GS_PhantomCam
Priority-based virtual camera management — composable stage pipeline, channel-aware instancing, blend profiles, and spatial influence fields.
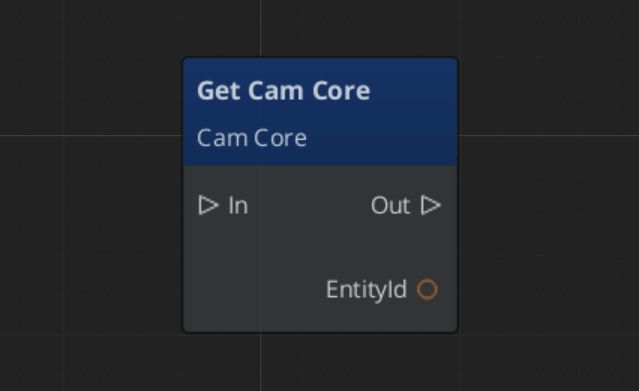
GS_PhantomCam is the camera management system for GS_Play. Instead of driving a single camera directly, you place lightweight virtual cameras — Phantom Cameras — in your level. Each Phantom Camera carries a priority value and runs a per-tick stage pipeline that produces its candidate pose. The Cam Core drives the real engine camera to match whichever Phantom Camera currently has the highest priority. Transitions between cameras are animated by Blend Profile assets, and Influence Fields let spatial zones or gameplay states adjust priority dynamically.
For multi-player and split-screen, GS_PhantomCam can also run in a channel-aware mode where each player gets its own arbitration slot — Tier 1 single-cam, Tier 2 single-player rig, Tier 3 multi-channel co-op — without changing the per-cam authoring surface.
For architecture details, component properties, and extending the system in C++, see the GS_PhantomCam API.
Quick Navigation
| I want to… | Feature | API |
|---|
| Manage the camera system lifecycle, channel registries, and dispatch overrides | Cam Manager | API |
| Place virtual cameras with priority, target routing, and snap / focus state | Phantom Cameras | API |
| Compose camera behavior from Body, Aim, and Additive stages | Stage Pipeline | API |
| Drive the real camera, run blends, handle mid-blend interrupts | Cam Core | API |
| Define smooth transitions with custom easing, blend shape, and state inheritance | Blend Profiles | API |
| Create spatial zones that modify camera priority | Influence Fields | API |
Architecture
Breakdown
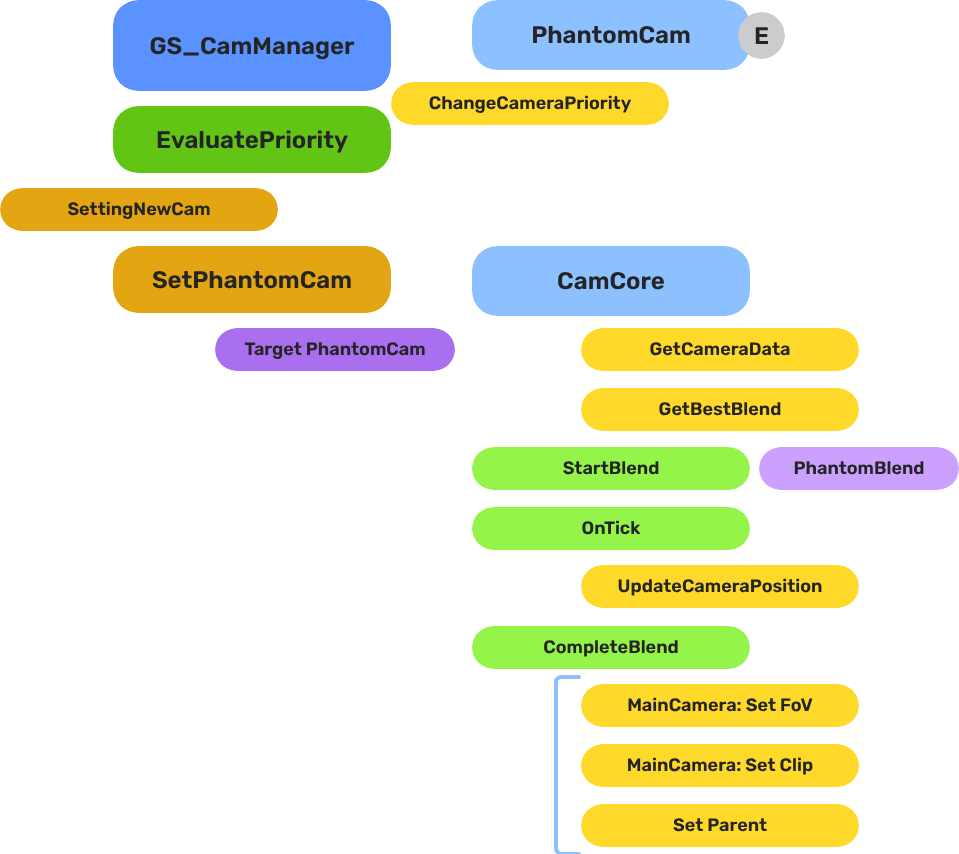
Each Phantom Camera publishes a candidate pose every tick by running its Body → Aim → Reposition → Noise pipeline. The Cam Manager arbitrates priority across all registered Phantom Cameras inside a channel (channel 0 covers all single-player projects). When the channel’s winner changes, the Cam Core looks up the best blend for the pair and animates the real camera from the outgoing pose to the new one — optionally inheriting pose state across the transition and applying mid-blend interrupt correction when a new winner appears before the current blend completes.
| Scenario | Which Blend Is Used |
|---|
| Camera A becomes inactive, Camera B was waiting | The Cam Core queries the assigned Blend Profile for an A → B entry. |
| No entry matches the pair | The Cam Core falls back to its own default blend time, easing, and shape. |
| A new transition starts before the current one finishes | The Cam Core applies a mid-blend correction window so the cam does not snap. |
| Blend entry’s Inherit State is set | The outgoing cam’s body publishes a pose snapshot; the incoming cam’s body adopts it before the blend executes. |
Because Blend Profiles are assets, the same profile can be shared across many Phantom Cameras. A single edit to the asset changes the feel of every camera that references it.
E Indicates extensible classes and methods.
Patterns - Complete list of system patterns used in GS_Play.
Installation
GS_PhantomCam requires GS_Core only. Add both gems to your project before placing PhantomCam components in a level.
For a full guided walkthrough, follow the Simple Project Setup guide.
Quick Installation Summary
- Enable the GS_PhantomCam gem in your project configuration.
- Create a Cam Manager prefab and add it to the Game Manager’s Managers list.
- Choose your authoring tier:
- Tier 1 / 2 (single-player) — Assign a rig prefab to the Cam Manager’s Primary Rig Prefab, or hand-place a Cam Core entity in the level.
- Tier 3 (split-screen / co-op) — Toggle Enable Instanced Channels on the Cam Manager and populate the Channel Configs list. Detailed walkthrough ships with the Channels & Instancing docs.
- Place Phantom Camera entities with desired Body, Aim, and Additive stages.
- Create Blend Profile assets for camera transitions.
Cam Manager
The Cam Manager is the singleton camera-system controller, integrated with GS_Core’s manager lifecycle. It handles startup and shutdown, owns per-channel registries (cameras, targets, influences, group targets), runs priority arbitration, dispatches cross-channel cinematic overrides, and orchestrates the engine’s active main view. In multi-channel projects, the Cam Manager also spawns rig prefabs at startup and re-spawns them on stage transitions.
Cam Manager
API
Phantom Cameras
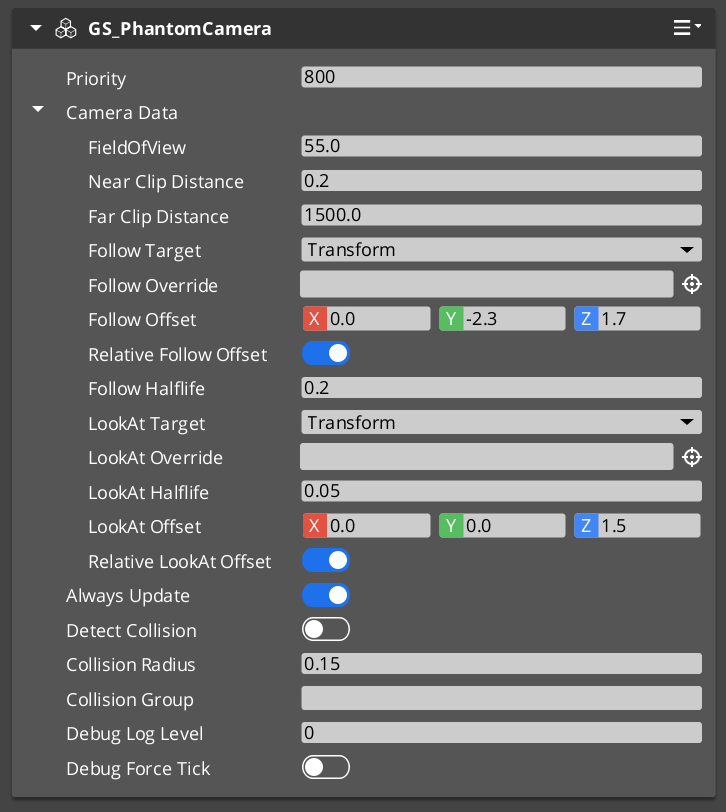
A Phantom Camera is a single entity component — GS_PhantomCameraComponent — that carries priority, lens, target routing, snap / focus / blendingOut state, and the stage pipeline slot that gives the cam its behavior. Where previous versions of GS_PhantomCam shipped separate components for each behavior (clamped-look, static-orbit, spline track), all those behaviors are now stage variants on the single base component.
Phantom Cameras
API
Stage Pipeline
Every Phantom Camera runs the same per-tick pipeline:
Body → Aim → Reposition additives → Noise additives → Finalize
Authors compose a cam by picking a Body stage (follow, orbit, dynamic orbit, leading-follow, track), an Aim stage (default look, clamped look), and zero-or-more Additive stages (collision, tug listeners, Perlin noise, impulse). The same component becomes a follow cam, an orbital cam, a tracking dolly, or a third-person shoulder cam depending on what is slotted.
For step-by-step composition recipes — third-person shoulder cam, orbital boss cam, tracking dolly — see the recipes page.
Stage Composition Recipes
API
Cam Core
Cam Core is the runtime bridge between the Phantom Camera system and the actual O3DE camera entity. It receives the channel’s arbitrated winner from the Cam Manager, looks up the matching Blend Profile entry, optionally runs a state-inheritance handoff between the outgoing and incoming cams, and animates the real camera over the blend duration. When a new transition starts before the current one completes, Cam Core applies a mid-blend correction window so the cam does not snap.
Cam Core
API
Blend Profiles
Blend Profiles are .camblendprofile data assets that define how the Cam Core transitions between Phantom Cameras. Each entry specifies a From / To pair, a duration, an easing curve, a blend shape (Linear / Cylindrical / Spherical around a pivot), an inherit-state flag, and a pivot source. Authors share one profile across many cameras for visual consistency, then add per-pair overrides where the feel needs to differ.
Blend Profiles
API
Influence Fields
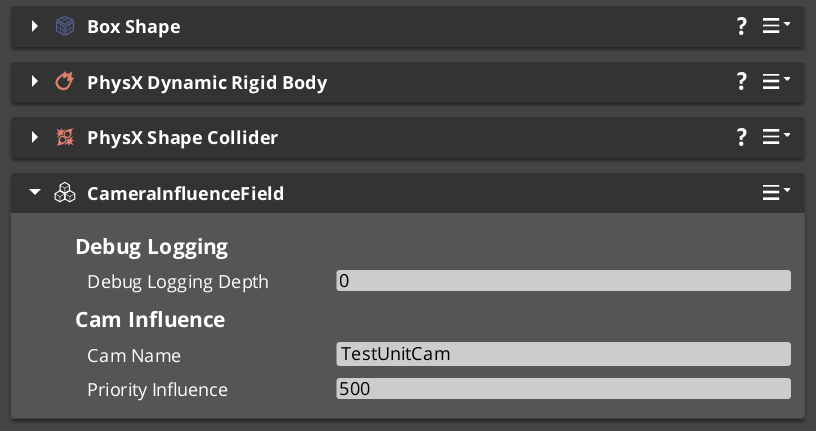
Influence Fields are spatial or global modifiers that dynamically shift camera priority. GlobalCameraInfluence applies a constant priority modifier for its entire active lifetime (typically scoped to a level via the StageData entity); CameraInfluenceField applies a priority modifier when an entity enters a PhysX trigger volume. In multi-channel projects, influences are routed to the channel that owns the entity that triggered them — clean isolation between players in co-op.
Influence Fields
API
See Also
For the full API, component properties, and C++ extension guide:
For step-by-step project setup:
Get GS_PhantomCam
GS_PhantomCam — Explore this gem on the product page and add it to your project.
1 - Cam Manager
How to work with the GS_PhantomCam manager — enabling and disabling the camera system, and responding to active camera changes.
The Cam Manager is the camera system’s singleton manager. It integrates with GS_Core’s standard manager lifecycle, handles the camera system’s startup and shutdown through the two-stage initialization sequence, and maintains awareness of which Phantom Camera is currently dominant. Any time the active camera changes, the Cam Manager broadcasts a notification so dependent systems can react without polling.
For architecture details, component properties, and extending the system in C++, see the Framework API reference.
Contents
Manager Lifecycle
The Cam Manager is a GS_ManagerComponent and participates in the standard GS_Core startup sequence. It activates alongside all other managers during the two-stage initialization, making it safe to call camera system methods any time after OnStartupComplete.
| Stage | What Happens |
|---|
| Initialize | Cam Manager activates and registers with the camera pipeline. |
Startup (OnSetupManagers) | Manager is initialized. Safe to query camera state. |
Complete (OnStartupComplete) | All managers ready. Safe to enable or disable the camera system. |
Enabling and Disabling the Camera System
The camera system can be suspended and resumed independently of other gameplay systems. This is used during UI-only states, loading screens, or when a cinematic takes direct control of the camera.
| Notification | What It Does |
|---|
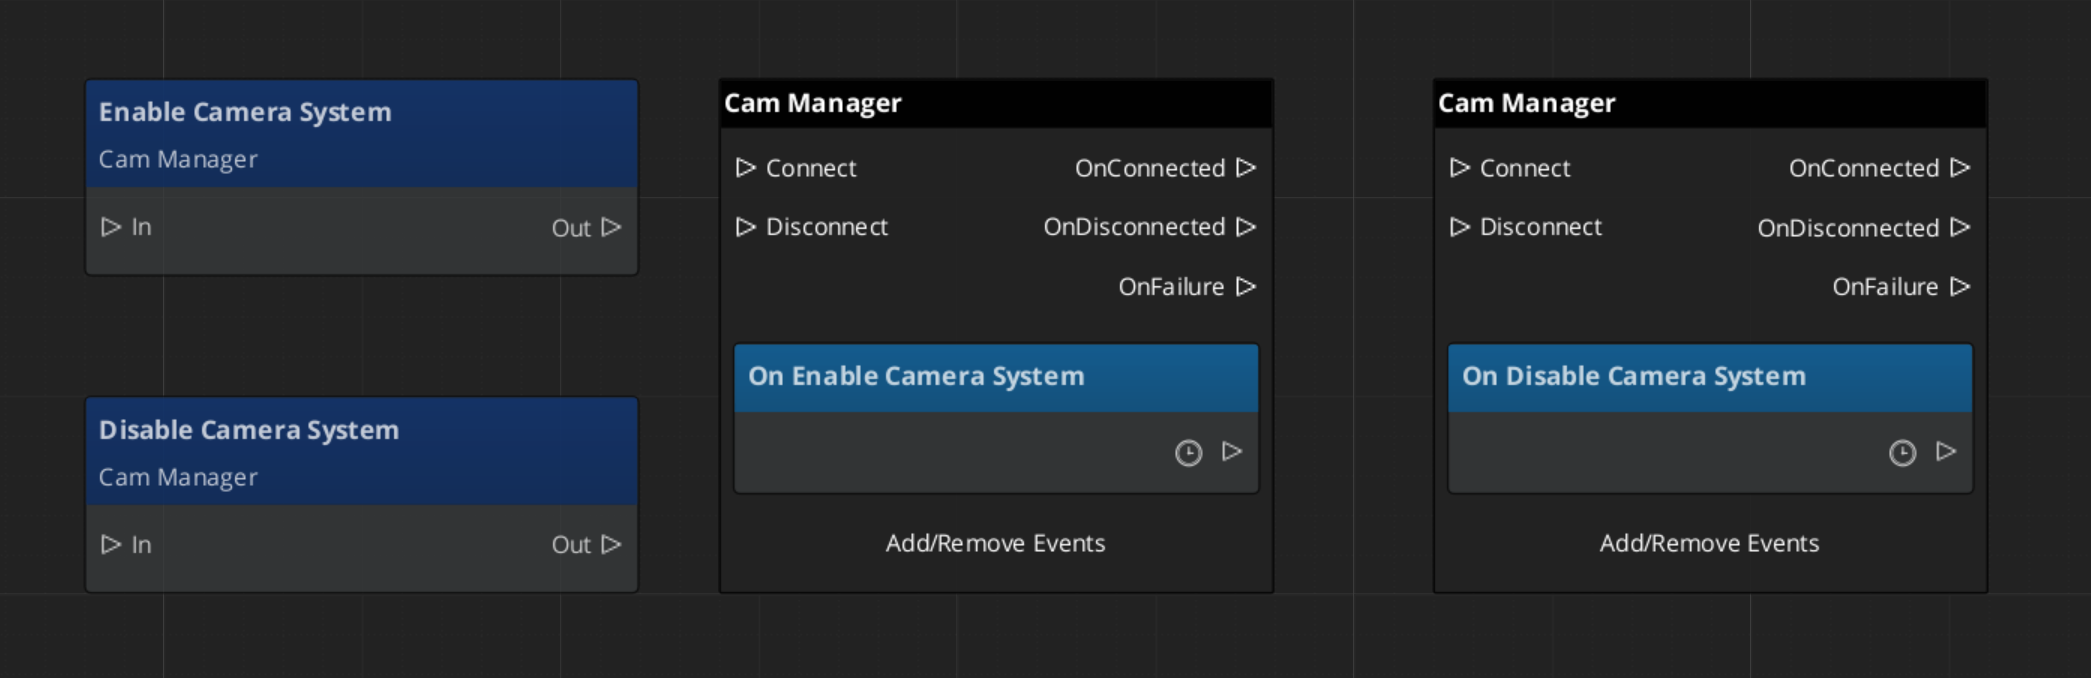
EnableCameraSystem | Activates the camera system. Phantom Cameras resume competing for priority. |
DisableCameraSystem | Suspends the camera system. The real camera stops receiving updates from Phantom Cameras. |
Both events are on CamManagerNotificationBus. Broadcast them to switch the camera system state from any script or component.
Tracking the Active Camera
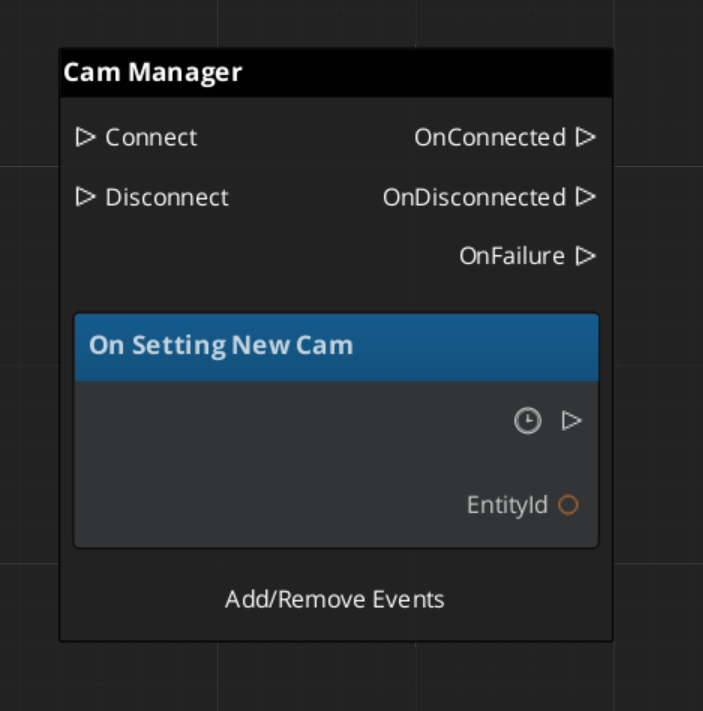
The Cam Manager broadcasts SettingNewCam on CamManagerNotificationBus whenever a different Phantom Camera becomes dominant. This fires any time a camera with higher priority activates, a dominant camera deactivates, or a blend resolves to a new target.
Use this event in any system that needs to know which camera is currently active — aiming reticles, world-space UI elements, minimaps, or audio listener positioning.
ScriptCanvas
Suspending the Camera System
ScriptCanvas
Broadcast DisableCameraSystem to suspend camera updates, for example when a cutscene takes direct camera control:
Because DisableCameraSystem and EnableCameraSystem are notifications rather than requests, they are fire-and-forget. Any script can broadcast them.
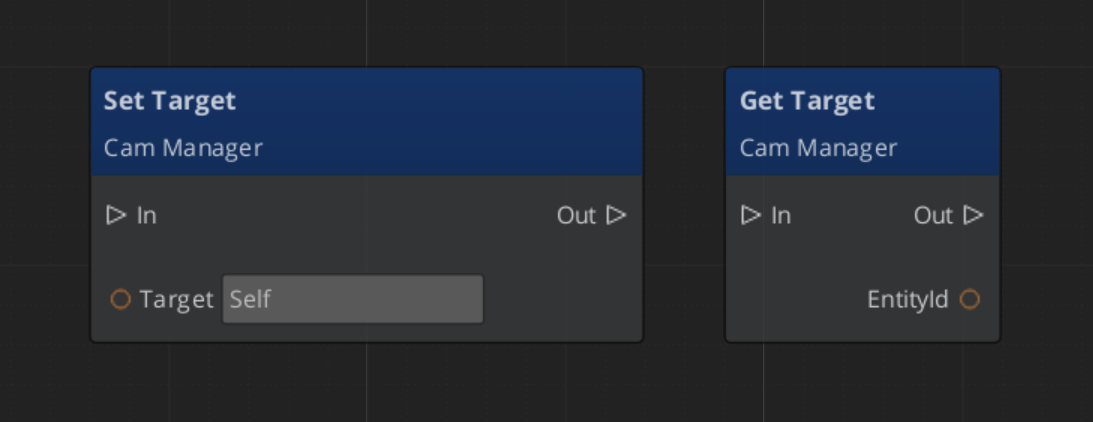
Changing the Camera Target
ScriptCanvas
The follow target, designated by the CamManager, can be set with Get/Set Target:
Three Authoring Tiers
The Cam Manager exposes three top-level fields that control how the camera system is configured for your project. Most single-player projects use Tier 1; multi-player or split-screen projects use Tier 3.
| Tier | Cam Manager configuration | When to choose it |
|---|
| Tier 1 — Single Cam | m_primaryRigPrefab set, m_enableInstancedChannels = false | Single-player projects with a normal camera rig. The default for most games. |
| Tier 2 — Level-placed CamCore | No primary rig prefab, m_enableInstancedChannels = false | Legacy single-player flow where the Cam Core is hand-placed in each level. |
| Tier 3 — Multi-Channel | m_enableInstancedChannels = true, m_channelConfigs populated | Split-screen, local co-op, or cinematic projects that need per-player rigs and arbitration. |
For the full step-by-step walkthrough of each tier — including common Tier 3 patterns (shared cinematic cams, hero-perspective cams, cross-channel dispatch) and the lobby flow for variable player counts — see the dedicated Channels page:
Channels & Instancing
API
Cam Manager Entity Configuration
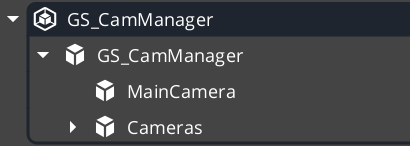
In Tier 1, assign your rig prefab (containing a Cam Core and any cams that should persist with the manager) to the Cam Manager’s Primary Rig Prefab field. The Cam Manager spawns the rig at startup.
In Tier 2, hand-place the Cam Core entity as a child of the Cam Manager. Any phantom cameras that should persist between stage changes can sit alongside the Cam Core.
In Tier 3, populate m_channelConfigs with one entry per supported player slot — see Channels & Instancing.
Across all tiers, the PossessedUnit event on a player controller is a convenient way to push the camera target the moment the player unit spawns.
Quick Reference
| Need | Bus | Method / Event |
|---|
| Enable the camera system | CamManagerNotificationBus | EnableCameraSystem |
| Disable the camera system | CamManagerNotificationBus | DisableCameraSystem |
| Set the camera target (single-player) | CamManagerRequestBus | SetTarget(playerEntityId) |
| Set a channel’s target (multi-channel) | CamManagerRequestBus | SetChannelTarget(channelId, entity) |
| Know when the active camera changes (single-player) | CamManagerNotificationBus | SettingNewCam(newCamEntityId) |
| Know when a channel’s active cam changes (multi-channel) | CamManagerNotificationBus | SettingNewCamOnChannel(channelId, cam) |
| Spawn / despawn a channel mid-session | CamManagerRequestBus | EnableChannel(id) / DisableChannel(id) |
| Set the engine’s active main view | CamManagerRequestBus | SetActiveChannel(id) or SetActiveCamCore(camCore) |
Glossary
| Term | Meaning |
|---|
| Cam Manager | The singleton manager for the PhantomCam system that tracks active cameras and broadcasts changes |
| Dominant Camera | The Phantom Camera with the highest priority that currently drives the real camera |
For full definitions, see the Glossary.
See Also
For the full API, component properties, and C++ extension guide:
For related systems:
Get GS_PhantomCam
GS_PhantomCam — Explore this gem on the product page and add it to your project.
1.1 - Channels & Instancing
Concept primer for the PhantomCam channel system — what a channel is, which authoring tier to choose, and the pitfalls to know before authoring.
GS_PhantomCam can be configured at three different tiers depending on what your project needs. Most projects use Tier 1 (single-cam) or Tier 2 (single-player rig). Co-op, split-screen, and per-player-cinematic projects use Tier 3 (multi-channel). The per-cam authoring surface is identical across tiers — what changes is the Cam Manager configuration and how many rigs the system spawns.
This page is a concept primer. For step-by-step Tier 1 / Tier 2 / Tier 3 walkthroughs, common Tier 3 patterns, and the lobby-flow recipe for variable player counts, see the recipes collection.
Channel Tier Configurations (Recipes)
API
For architecture details and the full bus surface, see the Framework API reference.
Contents
What Is a Channel?
A channel is one player viewpoint slot. Each channel owns:
- An instantiated rig subtree (one Cam Core + zero or more Phantom Cameras).
- Its own target binding (typically the player unit for that channel).
- Its own priority table — arbitration is independent per channel.
- Its own active influence-field records.
Channel 0 is the implicit default for all single-player flows. You only deal with non-zero channels in Tier 3.
Multi-view rendering is pending. Until the AttachmentImage work lands, the engine renders one channel’s view at a time even when multiple channels are arbitrating internally. The Cam Manager’s active main-view API selects which channel reaches the framebuffer. The arbitration / dispatch / target binding all work today — only the simultaneous-rendering piece is gated.
Choosing a Tier
| Tier | Cam Manager configuration | When to choose it | Recipe |
|---|
| Tier 1 — Single Cam | m_primaryRigPrefab set, m_enableInstancedChannels = false | Single-player projects with a normal camera rig. The default for most games. | Tier 1 walkthrough |
| Tier 2 — Level-placed CamCore | No primary rig prefab, m_enableInstancedChannels = false | Legacy single-player flow where the Cam Core is hand-placed in each level rather than spawned from a prefab. Supported but not preferred. | Tier 2 walkthrough |
| Tier 3 — Multi-Channel | m_enableInstancedChannels = true, m_channelConfigs populated | Split-screen, local co-op, or cinematic projects that need per-player rigs and arbitration. | Tier 3 walkthrough |
You can build a project at Tier 1, then add Tier 3 later by toggling the master gate and authoring channel configs — the per-cam configuration and stage compositions you authored at Tier 1 still work.
The Tier 3 walkthrough recipe also covers common Tier 3 patterns (in-rig per-player cams, shared cinematic collapse cams, hero-perspective cams, cross-channel dispatch) and the lobby flow for variable player counts.
Pitfalls
Tug-field channels are not instancing channels
Tug-field m_channels are arbitrary string tags (“Cinematic”, “Combat”) that match tug volumes to listeners. They are unrelated to the integer ChannelIds on this page despite the shared word. See Tug Fields for the unrelated tagging system.
A cam outside any rig prefab in Tier 3
If you place a Local-scope Phantom Camera in the level (not inside a rig prefab) with multi-channel ON, the stamp-walk misses and the cam falls through to legacy channel 0. This may surprise you. To make a level-placed cam channel-aware in Tier 3, set its scope to TrueUnique with explicit binding.
AllChannels outside a rig prefab
AllChannels-scoped cams outside a rig prefab currently warn and fall back to channel 0. The “out-of-rig runtime cloning” path is deferred. For per-player broadcast cams, place the cam inside the rig prefab.
Cam Manager spawns BEFORE HandleStartup
The Cam Manager spawns configured rigs from OnStartupComplete and only then broadcasts HandleStartup. This means cams inside spawned rigs receive the startup wave alongside everything else — your gameplay code can rely on Cam Cores being registered by the time HandleStartup fires. Stage transitions follow the same pattern: respawn before re-broadcasting HandleStartup.
See Also
Recipes:
Framework API:
Related basics pages:
Get GS_PhantomCam
GS_PhantomCam — Explore this gem on the product page and add it to your project.
2 - Cam Core
How to work with GS_CamCoreComponent — the rendering bridge that reads the dominant Phantom Camera each frame and drives the real camera entity.
Cam Core is the rendering bridge between the Phantom Camera system and the actual O3DE camera entity. GS_CamCoreComponent runs on tick, reads the dominant Phantom Camera’s configuration each frame, and writes position, rotation, and field of view directly to the camera entity that the renderer uses. Phantom Cameras define intent — Cam Core executes it.
For architecture details, component properties, and extending the system in C++, see the Framework API reference.
Contents
What Cam Core Does Each Frame
On every tick, Cam Core follows this sequence:
| Step | What Happens |
|---|
| 1 — Query active camera | Reads the current dominant Phantom Camera from the Cam Manager. |
| 2 — Read PhantomCamData | Fetches the active camera’s position, rotation, FOV, and clip planes. |
| 3 — Apply blend | If a blend is in progress, interpolates between the outgoing and incoming camera values. |
| 4 — Write to real camera | Pushes the resolved transform and FOV to the real O3DE camera entity. |
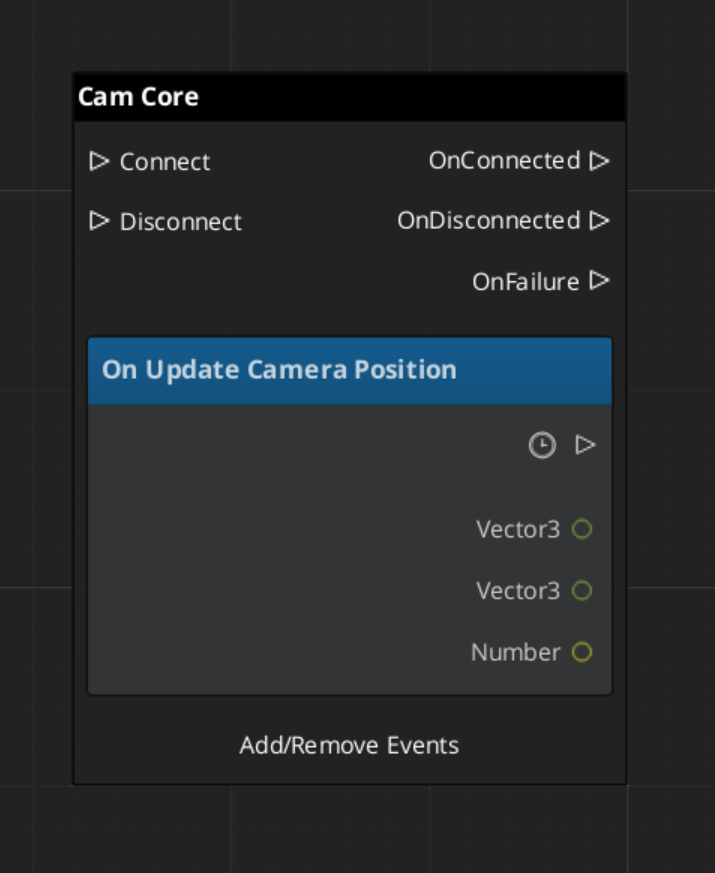
| 5 — Broadcast position | Fires UpdateCameraPosition on CamCoreNotificationBus so dependent systems receive the final camera location. |
Because Cam Core owns the final write to the camera entity, it is also the correct insertion point for last-mile adjustments such as screen shake offsets, post-processing overrides, or recoil displacement — applied after blend resolution but before the frame renders.
Responding to Camera Position Updates
CamCoreNotificationBus broadcasts UpdateCameraPosition every frame with the resolved camera transform. Connect to this bus in any system that needs per-frame camera location data.
| Use Case | Why UpdateCameraPosition |
|---|
| Audio listener positioning | Follow the camera without polling the camera entity. |
| LOD or culling controllers | Receive camera position reliably after blend is applied. |
| Shadow caster updates | React to camera movement each frame. |
| World-space UI anchoring | Know exactly where the camera landed after Cam Core processed its frame. |
ScriptCanvas
Cam Core Setup
Cam Core requires exactly one GS_CamCoreComponent in the level, and a separate entity with an O3DE Camera component that Cam Core is configured to drive. The Camera entity is what the renderer uses — Cam Core holds a reference to it and writes to it each frame.
| Entity | Required Components |
|---|
| Cam Core entity | GS_CamCoreComponent |
| Camera entity | O3DE CameraComponent (standard) |
Assign the Camera entity reference in the Cam Core component’s properties in the editor. Both entities should be present in every level that uses the PhantomCam system.
Querying Cam Core State
Use CamCoreRequestBus to read the current camera state or set the camera entity reference at runtime:
ScriptCanvas
Quick Reference
| Need | Bus | Method / Event |
|---|
| Know the camera position each frame | CamCoreNotificationBus | UpdateCameraPosition(transform) |
| Get the real camera entity ID | CamCoreRequestBus | GetCameraEntity |
| Get the current resolved FOV | CamCoreRequestBus | GetCurrentFOV |
| Know when the active camera changes | CamManagerNotificationBus | SettingNewCam(newCamEntityId) |
Glossary
| Term | Meaning |
|---|
| Cam Core | The rendering bridge that reads the dominant Phantom Camera each frame and writes to the real O3DE camera |
| Blend Resolution | The process of interpolating position, rotation, and FOV between outgoing and incoming cameras |
For full definitions, see the Glossary.
See Also
For the full API, component properties, and C++ extension guide:
For related systems:
Get GS_PhantomCam
GS_PhantomCam — Explore this gem on the product page and add it to your project.
2.1 - State Inheritance
One-checkbox author surface for cam-to-cam pose handoff during blends. When to enable it, what each body type does with it, and the common authoring gotcha.
State inheritance is an opt-in checkbox on each entry in a Blend Profile asset. When the box is ticked, the outgoing camera publishes a snapshot of its pose at the moment of transition, and the incoming camera’s Body stage adopts the snapshot through its own kinematic model. The blend then reads as a smooth drift instead of a swing.
When the box is unticked (the default), the incoming camera starts from its authored ideal — useful for cinematic shots where you want the camera to land at a specific framing regardless of where the outgoing camera was.
For the protocol mechanics, per-stage Get / Adopt implementations, and the matching m_inheritState field, see the Framework API reference.
Contents
When to Tick the Box
| Tick it when… | Don’t tick it when… |
|---|
| The two cams have similar framing intent (both follow the same target) and you want a seamless continuation. | The destination cam is a cinematic shot authored at a specific pose. |
| The destination cam would otherwise “snap to its starting yaw / pitch” in a jarring way. | The two cams have unrelated targets and the snap is the desired beat. |
| You’re blending between two orbital cams and want angular continuity. | The destination cam is the first cam in a stage and there’s no source to inherit from. |
The default is off so cinematic shots land at their authored poses unless you opt in.
What Each Body Does With It
Inheritance is body-only. The destination’s Aim stage runs fresh on the inherited body pose.
| Destination Body | Behavior with InheritState = true |
|---|
DefaultFollowBody | No special handling — falls through to the standard visual blend. |
OrbitBody (static orbit) | Does not adopt — the authored yaw / pitch define the static shot’s identity. (It can be the source for inheritance into another orbit cam, providing clean angular state.) |
DynamicOrbitBody | Adopts the source’s yaw / pitch directly when the source publishes angular state (e.g. another orbit body). Falls back to back-deriving yaw / pitch from world position when the source doesn’t. Preserves angular continuity across different orbit shape assets. |
LeadingFollowBody | Inherits the source’s facing at the body’s preferred standoff distance. The destination cam doesn’t lock to the source’s literal position (which could land off-band); instead it stands at band-natural distance in the direction the source was facing. |
TrackBody | Projects the source’s position onto the dolly spline. If the source sits farther than the body’s threshold (default 5 m) from the spline, the adoption is rejected and the cam falls back to a standard blend (no teleport-snap). |
The Common Gotcha
If the destination cam looks like it’s snapping to its initial-yaw seed instead of inheriting from the source, check the inherit flag on the matched blend entry. The symptom varies by body type:
| Body | Symptom of inherit-off |
|---|
LeadingFollowBody | “Cam orients behind player’s travel direction regardless of source facing.” |
DynamicOrbitBody / OrbitBody | Cam swings to authored yaw / pitch then blends from there. |
TrackBody | Dolly starts at its untouched starting spline parameter. |
All three indicate the same root cause: the blend entry exists in the asset, but InheritState is unticked on it. Fix it in the asset.
Author Steps
- Open the relevant
.camblendprofile asset in the Asset Editor. - Find or add the blend entry for the From / To pair.
- Tick the Inherit State checkbox on that entry.
- Save the asset.
That’s the entire author surface. Everything else — pose snapshotting, body-stage Get / Adopt selection, ANGULAR vs POSITION derivation, the path-rejection threshold — happens automatically per body type.
For per-pair authoring at scale, share one blend profile across cams that should behave the same way, and use multiple profiles for cams that need different inheritance defaults.
See Also
Framework API:
Related basics pages:
Get GS_PhantomCam
GS_PhantomCam — Explore this gem on the product page and add it to your project.
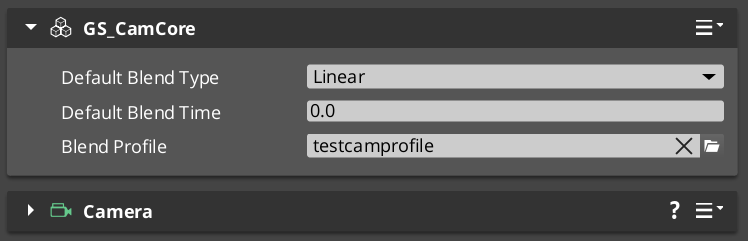
2.2 - Blend Profiles
How to author .camblendprofile assets to control camera transitions — duration, easing, blend shape, pivot source, and the inherit-state toggle.
Blend Profiles are .camblendprofile data assets that define how the Cam Core transitions from one Phantom Camera to another. Without a Blend Profile, transitions are instantaneous. A well-authored Blend Profile is often the single largest contributor to a camera system feeling polished rather than mechanical.
Each entry in a profile defines a single transition rule — a From / To pair plus the parameters that shape the blend: duration, easing curve, blend shape, pivot source, and whether the destination cam should inherit pose state from the source.
For asset structure details and version semantics, see the Framework API reference.
Contents
What a Blend Entry Contains
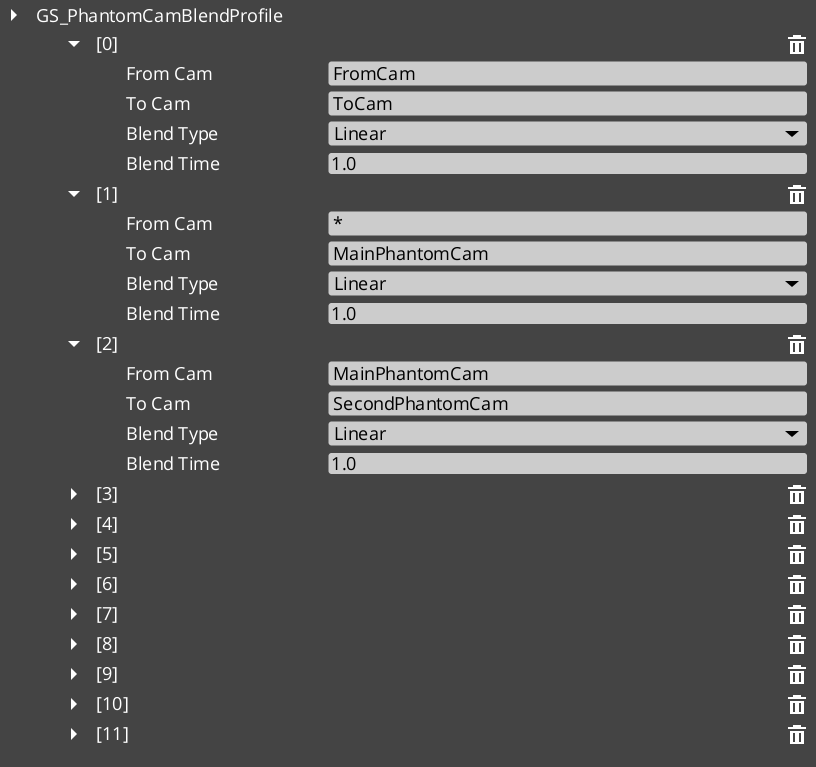
Each entry in a .camblendprofile defines a single transition rule:
| Field | Purpose |
|---|
| From Camera | Entity name of the outgoing cam. Blank / "any" matches all. |
| To Camera | Entity name of the incoming cam. Blank / "any" matches all. |
| Blend Time | Duration of the transition in seconds. |
| Blend Type | The easing curve. Same CurveType enum used elsewhere in the framework. |
| Blend Shape | Linear, Cylindrical, or Spherical. See Blend Shape. |
| Pivot Source | Source, Destination, or Shared. See Pivot Source. Ignored when Blend Shape is Linear. |
| Inherit State | Opt-in cam-to-cam pose handoff. See Inherit State. |
Camera names correspond to the entity names of your Phantom Camera entities in the scene.
Resolution Order
When a transition occurs, the Cam Core asks the profile for the best entry matching the outgoing → incoming pair. Resolution is by specificity:
| Tier | Match |
|---|
| 1 — Exact | Both From and To camera names match. |
| 2 — Any-to-specific | From is "any" or blank, To matches. |
| 3 — Specific-to-any | From matches, To is "any" or blank. |
| 4 — Default fallback | No entry matched; the Cam Core uses its own default Blend Time, Blend Type, and Blend Shape configured on the component. |
This layered resolution lets you author broad defaults (“any” to “any” at 1.0 seconds with Linear shape and Inherit unchecked) while overriding specific transitions (“MenuCam” → “GameplayCam” at 2.5 seconds with Spherical shape, Pivot Source = Destination, and Inherit on).
Blend Shape
How the cam’s position interpolates between source and destination. Rotation always slerps; the shape only affects position.
| Shape | When to use it |
|---|
Linear | Default. Straight-line lerp. The cheapest and most predictable. Right for most transitions. |
Cylindrical | The two cams sit at similar heights around a shared target, and you want the transition to feel like sweeping around the target. Pitch and radius interpolate independently; the yaw arcs around a pivot. |
Spherical | The two cams sit at different heights around a shared target, and you want a full 3D orbital arc. The cam traces a great-circle path around the pivot. |
Auto-fallback to Linear. When neither cam reports a pivot (e.g. environmental cams without follow / look-at targets), the blend lerps straight regardless of the authored shape. The pivot resolution gracefully drops back to Linear so you don’t accidentally break a transition by picking a shape that can’t be computed.
Pivot Source
When Blend Shape is Cylindrical or Spherical, the cam arcs around a pivot in world space. The Pivot Source selects which cam’s pivot to use:
| Pivot Source | Meaning |
|---|
Source | The outgoing cam’s pivot. “Leave A elegantly” — the source cam’s framing reference defines the arc. |
Destination | The incoming cam’s pivot. “Arrive at B elegantly” — the destination’s framing defines the arc. |
Shared (default) | Midpoint of both pivots. Collapses identically when both cams target the same point. |
This field is ignored when Blend Shape is Linear.
A cam that doesn’t publish a pivot (typically a body type that has no target — DefaultFollowBody without a follow target) disqualifies itself from being the pivot source. The Cam Core falls back to whichever cam does publish one, or to Linear if neither.
Inherit State
Setting Inherit State opts the matched pair into the cam-to-cam pose handoff protocol. When enabled, the destination cam’s Body stage seeds itself from the outgoing cam’s pose before the blend runs. The blend then reads as a smooth drift instead of a swing.
For when to use it, per-body behavior, and the common authoring gotcha, see the dedicated guide:
State Inheritance
API
Default is unchecked so cinematic shots authored at specific poses land at those poses unless you opt in.
Creating a Blend Profile Asset
- Open the Asset Editor in O3DE.
- Select New → GS_PhantomCamBlendProfile.
- Name the asset descriptively — e.g.
CombatBlend, CinematicSoftBlend, CharacterSelectBlend. - Add blend entries via the + button on the Blend List array.
- For each entry:
- Set From Camera name (or leave blank for “any”).
- Set To Camera name (or leave blank for “any”).
- Set Blend Time in seconds.
- Choose Blend Type (easing curve).
- Choose Blend Shape.
- Choose Pivot Source (only matters if Shape is not Linear).
- Tick Inherit State if you want a continuation-feel handoff.
- Save the asset.
- Assign it to a Cam Core component’s Blend Profile slot.
A starter SampleRigBlend.camblendprofile ships in gs_phantomcam/Assets/ for reference.
Quick Reference
| Need | How |
|---|
| Create a blend profile | Asset Editor → New → GS_PhantomCamBlendProfile |
| Assign a profile to the cam system | Set the Blend Profile slot on the Cam Core component |
| Make a transition instant | Leave the entry’s Blend Time at 0, or don’t add an entry at all (falls back to Cam Core defaults — set those to 0 too if you want all transitions instant). |
| Share one profile across many cams | Use the same asset reference across multiple Cam Core components (Tier 3 / multi-rig) |
| Edit blend timing project-wide | Edit the Blend Profile asset — all consumers update automatically. |
| Continuation-feel handoff between similar cams | Tick Inherit State on the matching entry |
| Orbital arc between two cams sharing a target | Set Blend Shape to Spherical and Pivot Source to Shared |
Glossary
| Term | Meaning |
|---|
| Blend Profile | A .camblendprofile data asset defining per-pair transition parameters. |
| Blend Entry | One row in a Blend Profile — a From / To pair and the parameters for that specific transition. |
| Blend Shape | The geometric shape of the cam’s position interpolation — Linear / Cylindrical / Spherical. |
| Pivot Source | Which cam’s pivot is used as the orbital center for non-Linear shapes. |
| Inherit State | The opt-in toggle that drives the cam-to-cam pose handoff protocol. |
For full definitions, see the Glossary.
See Also
Framework API:
Related basics pages:
Get GS_PhantomCam
GS_PhantomCam — Explore this gem on the product page and add it to your project.
3 - Phantom Cameras
How to configure a Phantom Camera — priority, target, lens, stage composition, and snap / focus state.
A Phantom Camera is a virtual camera definition placed in your level as a component on an ordinary entity. It does not render anything. Instead, the GS_PhantomCameraComponent holds priority, lens, target routing, and a stage pipeline slot that authors fill in to give the cam its behavior. The Cam Manager arbitrates priority across all registered Phantom Cameras in a channel — whichever active cam holds the highest priority drives the real camera at any given moment via the Cam Core.
Where previous versions of GS_PhantomCam shipped separate components for each behavior, all of those behaviors are now stage variants layered on top of the single base component. To make a cam follow, orbit, sweep along a spline, or track a group of subjects, you slot a Body stage and an Aim stage — and optionally one or more Additive stages — from the editor’s type-picker.
For architecture details, component properties, and extending the system in C++, see the Framework API reference.
Contents
How Priority Works
Every GS_PhantomCameraComponent has a base priority. The Cam Manager continuously evaluates priority across all active Phantom Cameras in a channel and routes camera control to the highest. Influences (Influence Fields, gameplay code) can add temporary priority modifiers without touching the base value. When the dominant camera changes, the Cam Manager notifies the Cam Core to begin blending toward the new winner.
| Condition | Result |
|---|
| Camera A priority 10, Camera B priority 5 — both active | Camera A is dominant. |
| Camera A is disabled or deactivated | Camera B becomes dominant immediately (or blends if a Blend Profile entry matches the A → B pair). |
| Camera A and Camera B both priority 10 | The most recently activated one is dominant. |
| No Phantom Cameras are active in a channel | The real camera holds its last known position. |
In multi-channel projects, each channel arbitrates independently — player 1 dominance changes do not affect player 2’s view.
PhantomCamData Fields
Each Phantom Camera stores a PhantomCamData record with its lens, priority, and follow target. Follow / look-at offsets, damping halflives, and target-mode resolution live on the stages, not on PhantomCamData.
| Field | Type | Purpose |
|---|
Priority | s32 | Base priority used in arbitration. Higher wins. |
FOV | float | Field of view in degrees. Applied to the real camera when dominant. |
NearClip | float | Near clip plane distance. |
FarClip | float | Far clip plane distance. |
CamTarget | EntityId | The follow target. May be left empty to inherit the channel target from the Cam Manager. |
A Phantom Camera with no CamTarget and no inherited channel target sits at its entity’s authored position until a target is bound.
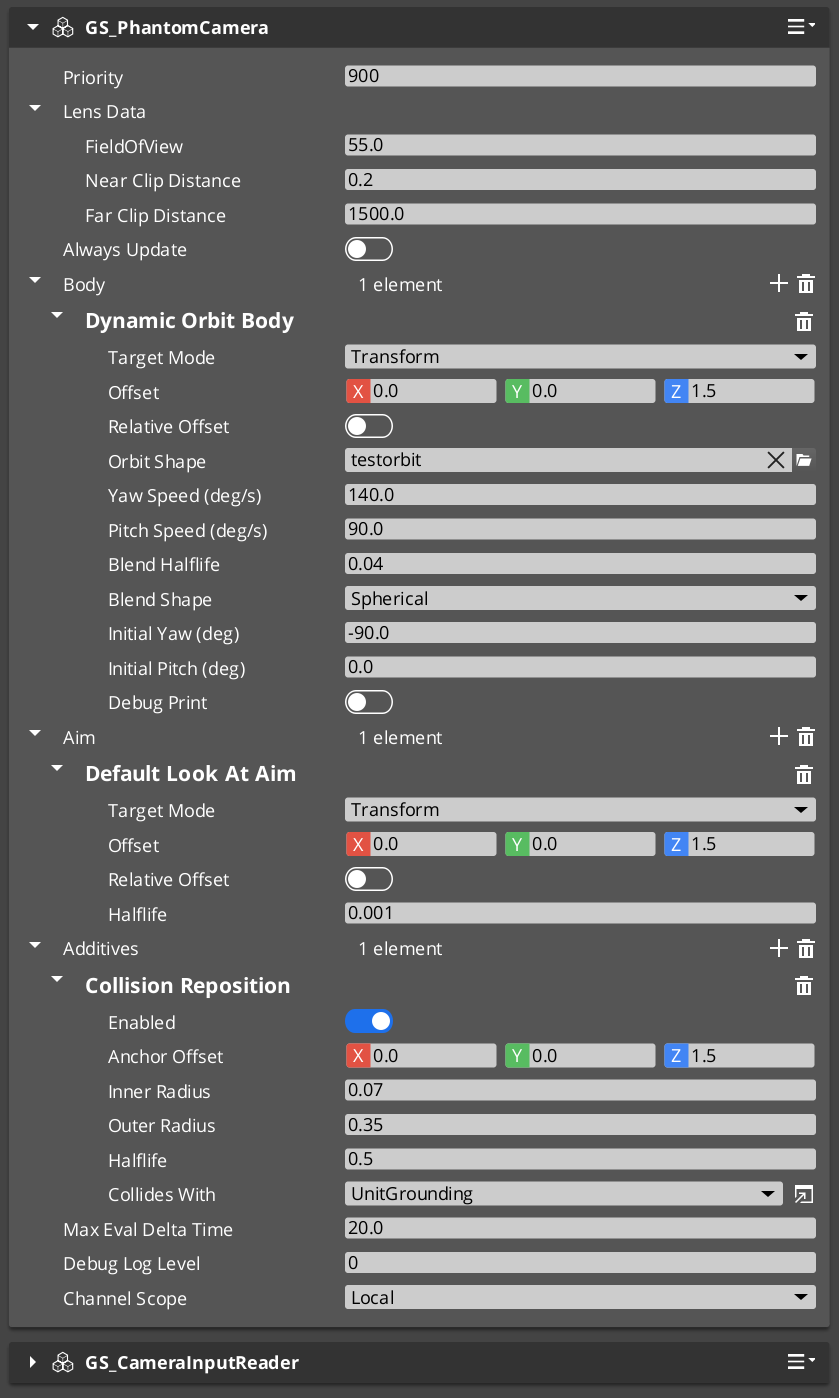
Stage Composition
The cam’s behavior is the composition of one Body stage, one Aim stage, and zero-or-more Additive stages. Each is picked from the editor’s type-picker on the corresponding slot.
| Slot | Common picks | What it controls |
|---|
| Body | DefaultFollowBody, OrbitBody, DynamicOrbitBody, LeadingFollowBody, TrackBody | How the cam follows the target. |
| Aim | DefaultLookAtAim, ClampedLookAim | How the cam orients toward the target. |
| Additives (Reposition) | CollisionReposition, TugAimListener, TugBodyListener | Pose corrections — collision pushback, magnetic spatial pulls. |
| Additives (Noise) | PerlinNoise, ImpulseNoise | Pose perturbations — handheld sway, event-triggered shake. |
A third-person shoulder cam, for example, slots LeadingFollowBody + DefaultLookAtAim + a CollisionReposition additive. An orbital boss cam slots DynamicOrbitBody + DefaultLookAtAim + a PerlinNoise additive for handheld feel.
For full step-by-step composition recipes, see the recipes page.
Stage Composition Recipes
API
Retired components
ClampedLook_PhantomCamComponent, StaticOrbit_PhantomCamComponent, and Track_PhantomCamComponent no longer exist as separate components. Their behavior is now provided by stage variants:
| Retired component | Replacement |
|---|
StaticOrbit_PhantomCamComponent | OrbitBody Body stage. |
ClampedLook_PhantomCamComponent | ClampedLookAim Aim stage. |
Track_PhantomCamComponent | TrackBody Body stage. |
AlwaysFaceCameraComponent is unchanged — it is still a billboard helper, not a camera type itself.
Channel Scope
Each Phantom Camera authors a Channel Scope that decides how it participates in the channel system. In single-player projects, leave this at the default (Local) and everything routes through channel 0. In multi-channel projects:
| Scope | Use for |
|---|
Local (default) | The cam lives in its rig’s channel. Each spawned rig instance has its own copy. |
AllChannels | In-rig per-player broadcast cam — every spawned rig carries a duplicate. |
TrueUnique | A single instance bound to a specific channel, or shared across every channel (e.g. cinematic collapse cams paired with Group Targets). |
For the full walkthrough, see Channels & Instancing.
Snap and Focus
A Phantom Camera ticks each frame when any of these is true:
m_hasFocus — this cam is the channel’s currently-driven cam.m_alwaysUpdate — authored opt-in to always tick (background-tracking cams).m_blendingOut — this cam is the outgoing source of an in-flight blend.
Outside that condition the cam is fully dormant — it does not tick, its stages do not run, and its body does not integrate input.
The cam automatically snaps to its evaluated ideal pose (bypassing damping for one tick) on:
- Focus gain.
- A new target binding (
SetCameraTarget). - A new group-target binding (
SetTargetFocusGroup). - An explicit
QueueSnapCamera() call.
For synchronous snap (typically only needed by framework code at mid-spawn binding), call SnapCameraNow() instead.
Activating and Deactivating Cameras
Phantom Cameras participate in priority arbitration only while their entity is active. Enable or disable the entity to add or remove a camera from the channel. The transition between dominant cameras is animated by whichever Blend Profile entry matches the outgoing → incoming pair (see Blend Profiles).
ScriptCanvas
To raise a camera’s priority and make it dominant:
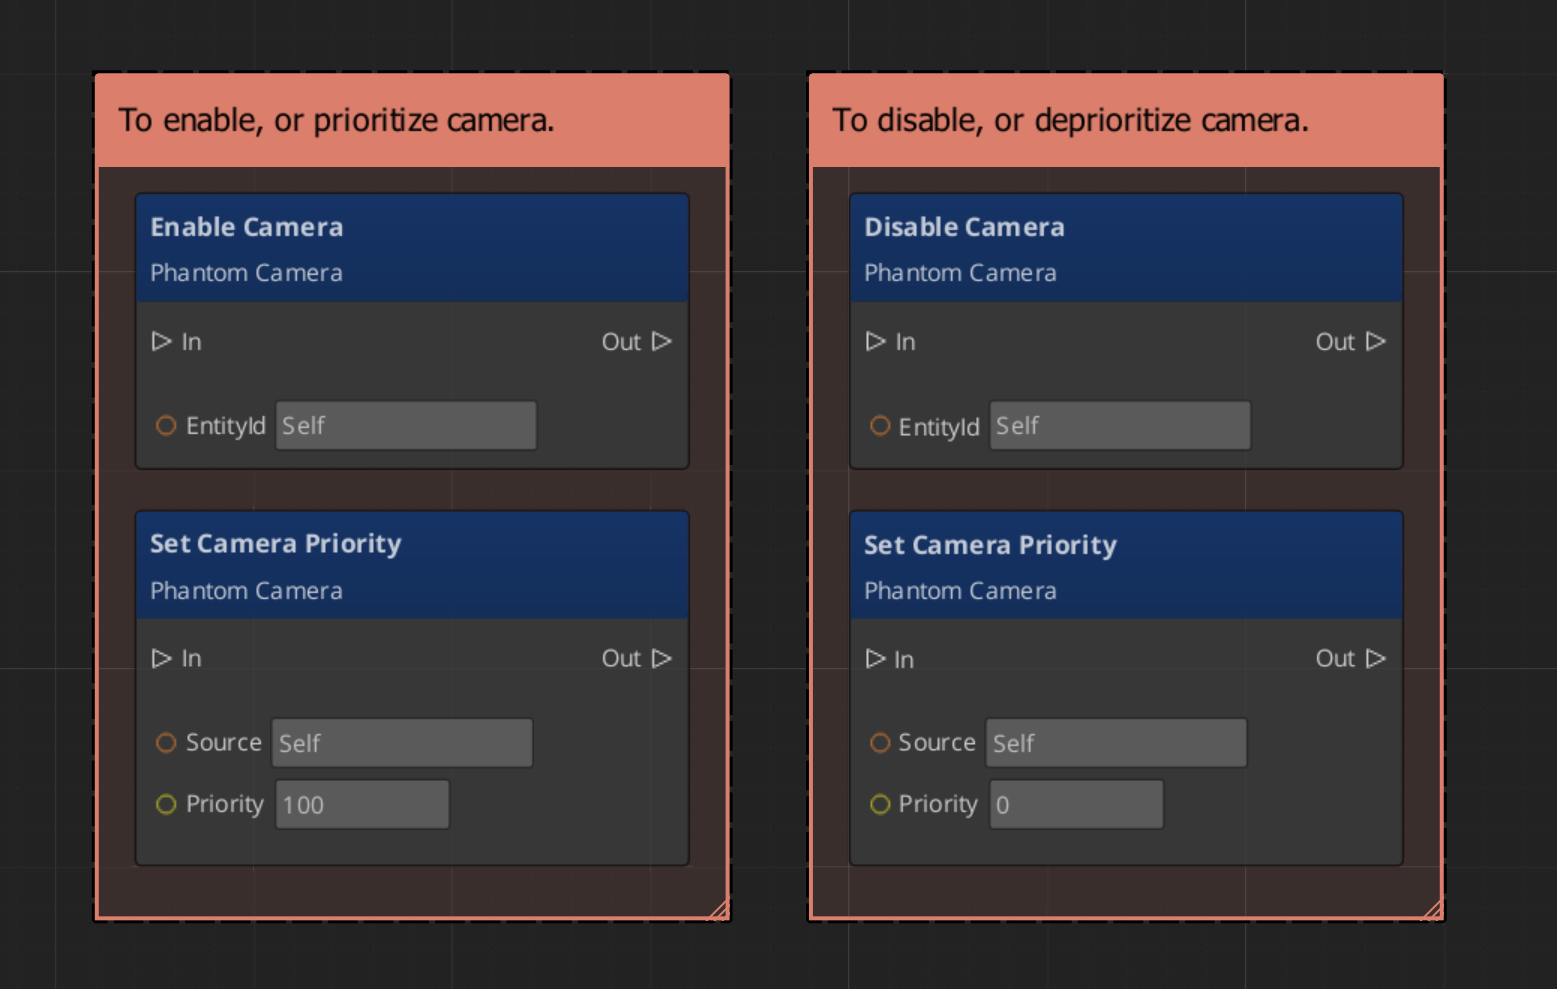
Because priority is numeric, you can activate multiple cameras simultaneously and let priority values determine dominance without manually disabling others.
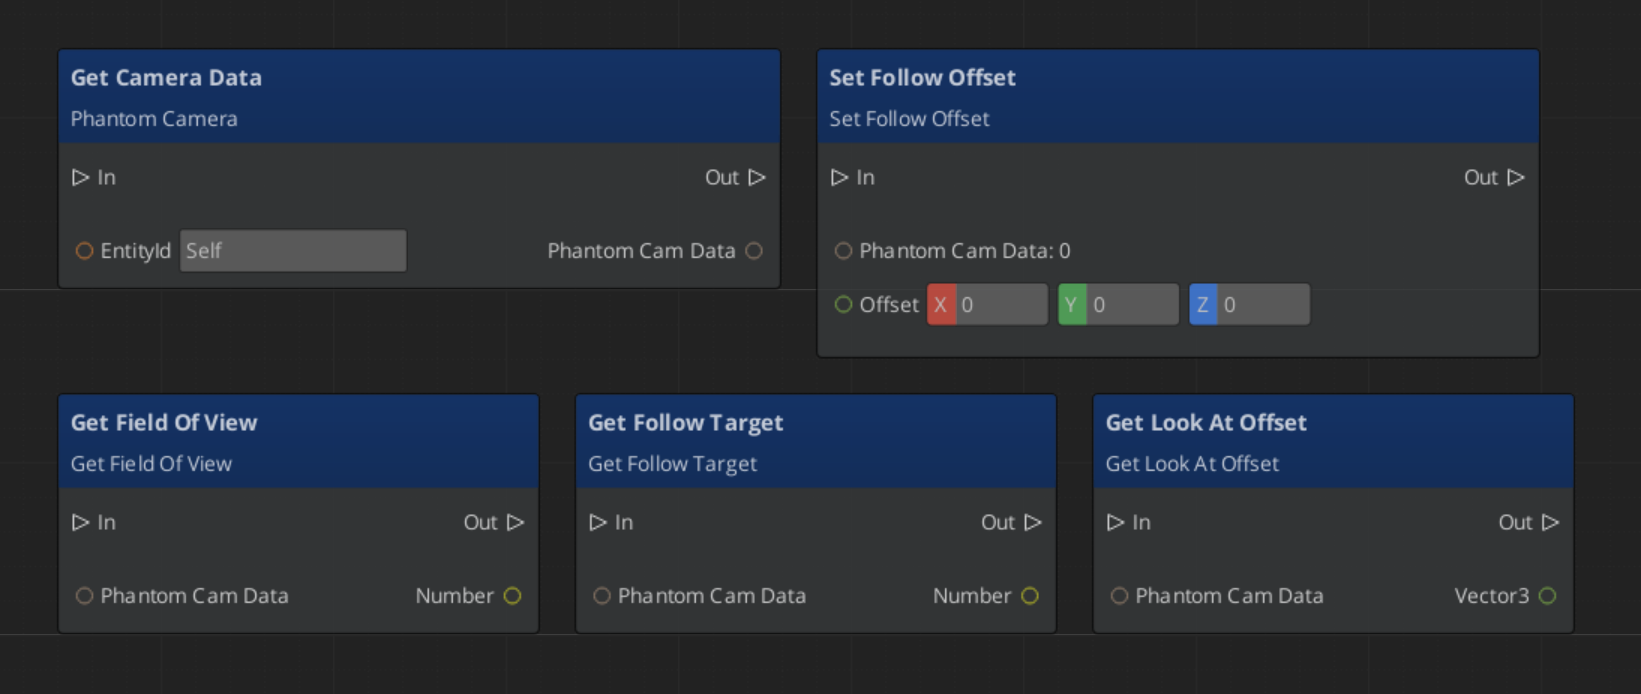
Requesting Camera Data
Use PhantomCameraRequestBus (addressed by the Phantom Camera entity’s ID) to read or write its configuration at runtime, query staged poses, or trigger an impulse on all ImpulseNoise additives.
ScriptCanvas
Quick Reference
| Need | Bus | Method / Event |
|---|
| Read a camera’s lens / priority data | PhantomCameraRequestBus(id) | GetCameraData |
| Change a camera’s follow target | PhantomCameraRequestBus(id) | SetCameraTarget(entityId) |
| Change a camera’s priority | PhantomCameraRequestBus(id) | SetCameraPriority(value) |
| Snap the camera to its ideal next tick | PhantomCameraRequestBus(id) | QueueSnapCamera |
Fire an impulse on all ImpulseNoise additives | PhantomCameraRequestBus(id) | TriggerCameraImpulse(strength) |
| Make a camera dominant | (entity activation) | Enable the Phantom Camera entity |
| Remove a camera from arbitration | (entity activation) | Disable the Phantom Camera entity |
| Know when the dominant camera changes | CamManagerNotificationBus | SettingNewCam (channel 0) or SettingNewCamOnChannel (multi-channel) |
| Read a stable pose for gameplay code | PhantomCameraRequestBus(id) | GetStablePose — preferred over GetFinalPose for movement input |
Glossary
| Term | Meaning |
|---|
| Phantom Camera | A virtual camera definition that publishes a candidate pose every tick. |
| Stage pipeline | The fixed Body → Aim → Reposition → Noise order that each cam runs each tick. |
| Body stage | The component that writes state.position. One slot per cam. |
| Aim stage | The component that writes state.rotation. One slot per cam. |
| Additive stage | A stackable correction or perturbation that runs after Body / Aim. |
| Priority | A numeric value that determines which Phantom Camera drives the real camera within its channel. |
| Channel | One player viewpoint slot. Channel 0 is the implicit default for single-player. |
For full definitions, see the Glossary.
See Also
For the full API, component properties, and C++ extension guide:
For related systems:
Get GS_PhantomCam
GS_PhantomCam — Explore this gem on the product page and add it to your project.
3.1 - Stage Composition
Concept primer for composing camera behavior from Body, Aim, and Additive stages on a single Phantom Camera component.
A Phantom Camera’s behavior is the composition of one Body stage, one Aim stage, and zero-or-more Additive stages. The same GS_PhantomCameraComponent becomes a follow cam, an orbital cam, a tracking dolly, or a third-person shoulder cam depending on what is slotted from the editor’s type-picker.
This page is a concept primer for the composition model. For step-by-step recipes (third-person shoulder cam, orbital player cam, static showcase, first-person clamped look, tracking dolly, group-framing cam) see the recipes collection.
PhantomCam Configurations (Recipes)
API
For the per-variant fields and kinematic models, see the Stage Pipeline API reference.
Contents
The Pipeline at a Glance
Each tick, the cam runs:
Body → Aim → Reposition additives → Noise additives → Finalize
| Slot | What it does | When you change it |
|---|
| Body | Writes the cam’s position. | Different follow behavior — orbit vs. spring-damped follow vs. spline-bound. |
| Aim | Writes the cam’s rotation. | Different look behavior — free look vs. clamped envelope. |
| Reposition additives | Correct the smoothed pose (collision pushback, magnetic tug). Run BEFORE noise. | When the cam needs to avoid geometry or be pulled by spatial cues. |
| Noise additives | Perturb the final pose (handheld sway, event-triggered shake). Run AFTER reposition. | Game feel — adding life or punch. |
Each stage owns its own damping. There is no separate “smoothing” stage.
Where to Go Next
See Also
Recipes for stage composition:
For the full per-variant API and kinematic models:
Related basics pages:
Get GS_PhantomCam
GS_PhantomCam — Explore this gem on the product page and add it to your project.
3.2 - Noise & Impulse
Author guide for camera shake — the two noise additive stages, preset library, gameplay-code impulse triggering, and the Stable-vs-Final pose readback rule.
Camera shake comes in two flavors, both as Noise additives on a Phantom Camera’s stage list:
PerlinNoise — continuous Perlin-noise displacement. Use for handheld feel, idle sway, low-frequency wobble. Always sampling.ImpulseNoise — event-triggered burst, gated by an ADSR envelope. Use for explosions, foot-stomps, gun kicks. Stays silent until you fire it.
Both consume the same .camnoiseprofile asset and the same six-axis Perlin layer model. Stack freely on the same cam — a baseline handheld profile plus an event-triggered impact profile is the canonical combination.
For step-by-step composition recipes (handheld baseline, event-triggered impact, stacked handheld + impact), see the recipes collection.
Camera Noise Configurations (Recipes)
API
For the asset reference and per-axis layer details, see Noise Profiles (Framework API). For the stage variants’ authored fields and kinematic models, see Additive Stage Variants (Framework API).
Contents
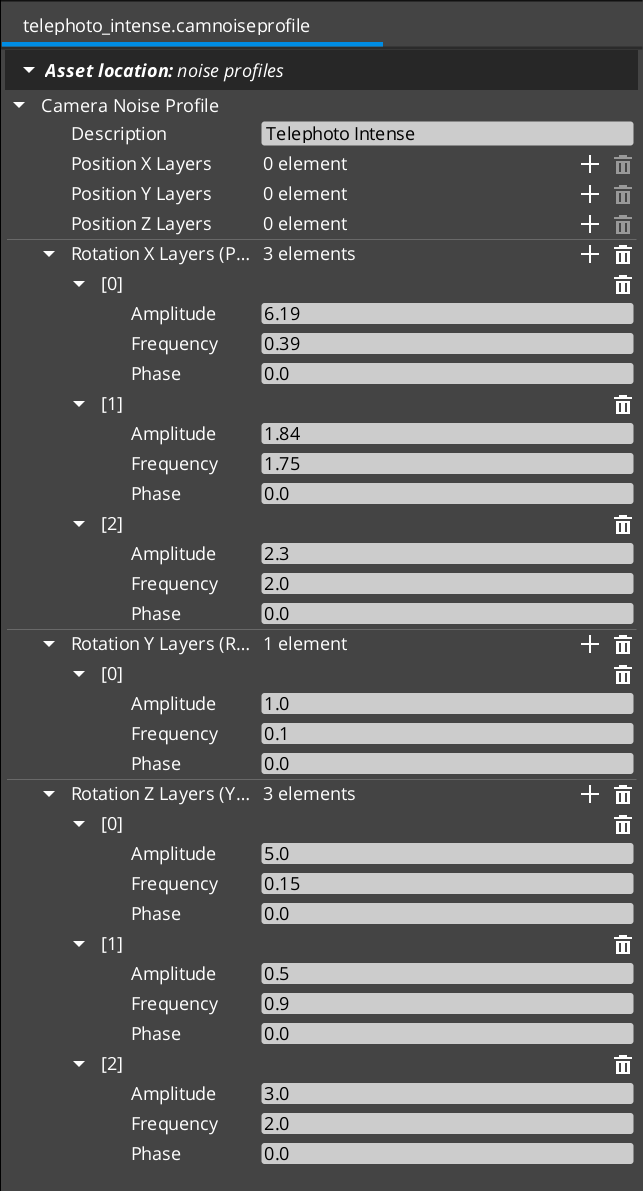
Preset Library
A starter library of .camnoiseprofile assets ships in gs_phantomcam/Assets/Noise Profiles/. Drop one onto a PerlinNoise or ImpulseNoise stage’s Profile slot to get an immediate baseline. Match the preset’s lens family to the cam’s lens for natural feel.
Handheld lens family — pair with PerlinNoise
| Asset | Lens character |
|---|
Normal_Mild.camnoiseprofile | Normal-lens baseline. Balanced position and rotation. |
Normal_Intense.camnoiseprofile | Normal-lens active handheld. Larger amplitudes. |
Telephoto_Mild.camnoiseprofile | Telephoto baseline. Tighter angular response, low position. |
Telephoto_Intense.camnoiseprofile | Aggressive telephoto handheld. |
Wide_Mild.camnoiseprofile | Wide-lens baseline. Translation dominates; rotation low. |
Wide_Intense.camnoiseprofile | Aggressive wide-lens handheld. |
All-axes shake family — pair with ImpulseNoise or aggressive PerlinNoise
| Asset | Character |
|---|
6D_Shake.camnoiseprofile | Earthquake / impact aftermath — all six axes, high-frequency micro-jitter on top of mid-frequency sway. |
6D_Wobble.camnoiseprofile | Floaty / dreamlike — all six axes, low-frequency long sway. |
Tuning intensity without re-authoring
Per-cam intensity is dialed on the additive stage’s AmplitudeGain (and FrequencyGain for speed). A single Normal_Mild profile can drive a subtle cutscene cam (AmplitudeGain = 0.3) and a frantic chase cam (AmplitudeGain = 1.8) without authoring new assets.
For project-specific characters — gunfire-tuned impulse profiles, ultra-mild cinematic sway, etc. — see Authoring a Custom Profile.
Triggering an Impulse from Gameplay Code
Fire TriggerCameraImpulse(strength) on the cam to play one burst of every ImpulseNoise additive on it.
C++
#include <GS_PhantomCam/Cameras/GS_PhantomCameraBus.h>

// Compute distance-based falloff.
const float strength = AZ::GetClamp(1.0f - distance / radius, 0.0f, 1.0f);

GS_PhantomCam::PhantomCameraRequestBus::Event(
    activeCameraEntityId,
    &GS_PhantomCam::PhantomCameraRequests::TriggerCameraImpulse,
    strength);
strength multiplies each stage’s AmplitudeGain for that specific burst. Pass 1.0 for full profile intensity, smaller for distance falloff, larger to boost.
Author pattern: distance-attenuated impact source
A typical “explosion at world position X” pattern:
const float distance     = (explosionPos - cameraPos).GetLength();
const float falloff      = AZ::GetClamp(1.0f - distance / kEffectRadius, 0.0f, 1.0f);
const float baseStrength = 1.5f;       // for the explosion's overall punch

const float impulseStrength = baseStrength * falloff;

GS_PhantomCam::PhantomCameraRequestBus::Event(
    activeCamId,
    &GS_PhantomCam::PhantomCameraRequests::TriggerCameraImpulse,
    impulseStrength);
Cams outside kEffectRadius receive strength = 0 and ignore. Cams at the explosion’s exact position receive full baseStrength.
Querying the active cam
TriggerCameraImpulse is per-cam, so you need a target cam id. The common pattern is to track the channel’s currently-active cam via SettingNewCam / SettingNewCamOnChannel and store it, or query CamManagerRequestBus::GetActiveCamCore() for the engine’s active view.
Stable vs Final Pose for Gameplay Readback
Cam pose snapshots come in three flavors:
| Snapshot | Where it lands | Use it for… |
|---|
| Desired pose | Post Body + Aim, pre-Reposition. Clean ideal. | Debug visualization. |
| Stable pose | Post Reposition, pre-Noise. Collision-corrected but shake-free. | Gameplay code that reads camera facing (e.g. movement-input direction). |
| Final pose | Post Noise. What gets rendered. | Audio listener, screen-space UI. |
The pitfall. If your character moves “where the camera is facing,” and you read GetFinalPose (or the entity’s TransformBus), every shake event will momentarily drag the character around. Use GetStablePose instead — the cam’s pose without noise displacement.
AZ::Transform stable;
GS_PhantomCam::PhantomCameraRequestBus::EventResult(
    stable,
    activeCamId,
    &GS_PhantomCam::PhantomCameraRequests::GetStablePose);

const AZ::Vector3 cameraForward = stable.GetBasisY();   // O3DE forward axis
Authoring a Custom Profile
When the shipped presets don’t fit, author your own:
- Open the Asset Editor in O3DE.
- Select New and choose CameraNoiseProfile.
- For each axis where you want noise (typically translation X / Y and rotation pitch / yaw / roll), add 1–3 layers. Three layers per axis is the typical rhythm: one slow / large layer for sway, one mid layer for flutter, one fast / small layer for micro-jitter.
- For each layer set:
- Amplitude — in meters (position) or degrees (rotation).
- Frequency — in Hz. Handheld typically 0.1 – 2 Hz; shake / impact 3 – 60 Hz.
- Phase (optional) — decorrelates layers that share frequency.
- Set the Description to record intent and tuning history.
- Save the asset.
- Assign it to a
PerlinNoise or ImpulseNoise additive stage’s Profile slot.
See Noise Profiles (Framework API) for the full per-field reference.
See Also
Recipes:
Framework API:
Related basics pages:
Get GS_PhantomCam
GS_PhantomCam — Explore this gem on the product page and add it to your project.
4 - Group Targets
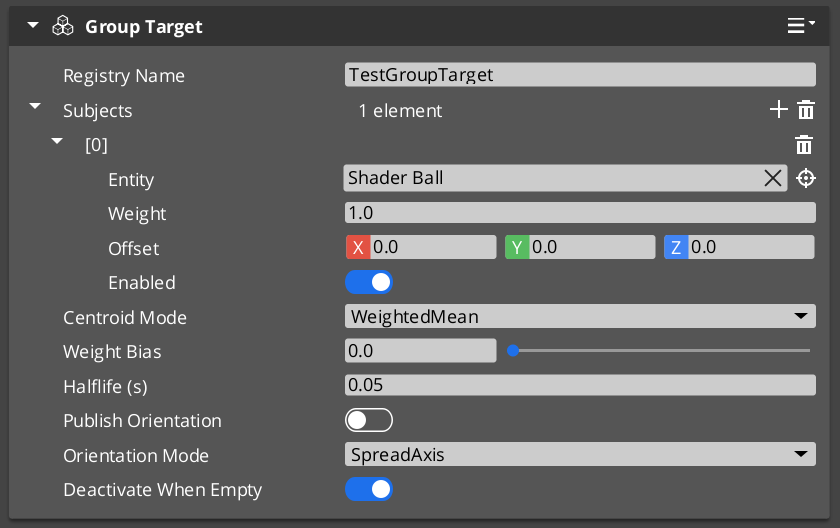
Author guide for GroupTargetComponent — weighted-centroid focal entity. Common use cases, centroid modes, runtime subject management, and pitfalls.
A Group Target is an entity whose world transform is the weighted centroid of a runtime-editable subject list. You point a camera at it like any other target, and the cam frames “where the group is” rather than chasing any single subject. The Cam Manager hosts a name-based registry so cameras can reference a group by string name without holding a direct entity reference.
For step-by-step composition recipes (two-player party cam, combat encounter frame, collapse to single view), see the recipes collection.
Group Target Configurations (Recipes)
API
For the full per-field reference and the registry bus, see the Framework API reference.
Contents
Common Use Cases
| Use case | What you author | Recipe |
|---|
| Party / co-op cam frames all players | Group Target with one subject per player; cam uses GroupTarget mode. | Two-Player Party Cam |
| Combat encounter cam frames the fight | Group Target whose subjects are dynamically added / removed as combatants enter / leave. | Combat Encounter Frame |
| Cinematic “collapse to single view” trigger in split-screen | Group Target + a shared TrueUnique cam. When all channels’ rigs converge on the shared cam, UI receives a collapse signal. | Collapse to Single View |
| Aim ahead of a moving formation | Group Target on a moving leader’s “look-ahead” point with subjects weighted by formation position. | — |
Centroid Modes — Which One to Pick
| Mode | When to use it |
|---|
| WeightedMean (default) | Most cases. Each subject contributes by weight. Simple, predictable. |
| BoundingBoxCenter | When you want the framing point to track the extent of the group, not just the average position. With WeightBias = 0, the cam centers on the bounding-box midpoint; raising the bias blends toward the weighted mean. |
| BoundingSphereCenter | Same intent as bounding-box but spherical — useful when subjects are evenly distributed in all axes. |
The WeightBias slider (0..1) on the bbox / sphere modes lets you tune the geometric / weighted mix to taste:
| WeightBias | Effect |
|---|
| 0 | Pure geometric center (ignore weights). |
| 0.5 | Half geometric, half weighted. |
| 1 | Pure weighted mean (the bbox / sphere effectively ignored). |
Subject Management at Runtime
The full subject-management API is exposed on GroupTargetRequestBus (per-entity addressed by the group’s id). Common operations:
| Operation | Use |
|---|
AddSubject(entity, weight) | Add a subject. |
RemoveSubject(entity) | Remove a subject. |
SetSubjectWeight(entity, weight) | Adjust priority without removing. |
SetSubjectEnabled(entity, enabled) | Temporary include / exclude without removing — cheaper than Remove + Add since cadence rebind is skipped. |
ClearSubjects() | Remove all. |
SetCentroidMode(mode) | Swap mode at runtime — e.g. tighten framing when an encounter starts. |
SetSmoothingHalflife(halflife) | Tighten or loosen centroid response at runtime. |
Cadence (PhysX post-sim vs TickBus) is re-evaluated automatically whenever the subject list changes.
Pitfalls
Empty subject list with DeactivateWhenEmpty = false
If you author m_deactivateWhenEmpty = false and the subject list goes empty (all enemies dead, all players despawned), the group target’s centroid sits at world origin — cams pointed at it will swing to (0, 0, 0). Set the flag to its default true to fall back gracefully to hold-last-pose instead.
Group cam targeting the group’s own entity
If you accidentally add the group target entity itself to its own subject list, you create a feedback loop: the centroid moves toward where it already is, which moves it again, etc. Don’t.
Centroid lag on physics subjects
By default the component uses TickBus cadence. If your subjects are physics-driven and you see the cam lagging by a frame, the component should auto-detect this and switch to PhysX post-simulate cadence — but you can verify with IsEvaluatingPostSim() (returns true when post-sim is bound). If it’s stuck on TickBus, file a bug — the auto-detection should have triggered.
See Also
Recipes:
Framework API:
Related basics pages:
Get GS_PhantomCam
GS_PhantomCam — Explore this gem on the product page and add it to your project.
5 - Influence Fields
How GlobalCameraInfluenceComponent and CameraInfluenceFieldComponent shift camera priority globally or within spatial trigger volumes — types, priority stacking, channel-aware routing.
Influence Fields modify the effective priority of Phantom Cameras without changing their base priority values. Two types are available: global components that apply for their entire active lifetime, and spatial components that apply only while an entity is inside a PhysX trigger volume.
In multi-player / multi-channel projects, the spatial form is channel-aware — the influence is routed to the channel that owns the entity that triggered it, so player 1 walking into a field does not affect player 2’s cameras.
For step-by-step composition recipes (boost a cam inside a room, always-on cinematic boost), see the recipes collection.
Influence Field Configurations (Recipes)
API
For component properties, the bus signature, and C++ extension guide, see the Framework API reference.
Contents
Types of Influence Fields
| Component | Scope | When it applies |
|---|
GlobalCameraInfluenceComponent | Global | Active for the component’s entire lifetime. Typically placed on the StageData entity so the influence is scoped to a level. |
CameraInfluenceFieldComponent | Spatial | Active while an entity (typically a player) is inside the field’s PhysX trigger volume. Channel-aware. |
Both use a CamInfluenceData record to describe what they modify (camera name + influence magnitude). Multiple fields can be active simultaneously — their effects stack additively.
Priority Stacking
When multiple influences are active on the same camera within a channel, their values sum with the cam’s base priority. This lets you build layered authoring:
- A general fallback priority on the cam itself.
- A stage-wide global influence that boosts a cinematic cam for the level.
- A spatial field that boosts further when the player enters a specific room.
The same cam gets base + global + spatial = effective priority during arbitration. Exiting the spatial field drops the spatial term; ending the stage drops the global term.
Channel Routing
The influence bus signature carries two entity arguments:
| Argument | Meaning |
|---|
sourceEntity | The field volume itself (the entity emitting the influence). Used as the per-channel storage key — multiple overlapping fields applied to the same channel don’t collide. |
targetEntity | The entity that triggered the influence (typically the player unit that walked into the trigger). Used as the routing key — the Cam Manager looks up which channel owns this entity. |
| Resolution result | Behavior |
|---|
| Target is bound to a channel | Influence is stored in that channel’s priority table. Only that channel’s arbitration sees the boost. |
| Target is not bound to any channel | Influence is silently dropped. |
This gives clean isolation between players in co-op. A CameraInfluenceFieldComponent triggered by player 1 only affects player 1’s cameras; player 2’s view is unaffected. It also gives natural behavior for non-player triggers — an enemy walking into a player-cam field doesn’t influence anything.
Global influence in multi-channel projects
GlobalCameraInfluenceComponent has no specific target. In multi-channel projects, the global form currently routes through channel 0 as a fallback. For per-channel global influences, author one Global component per channel that you want to affect.
Quick Reference
| Need | Component | How |
|---|
| Always-on priority boost for a level | GlobalCameraInfluenceComponent | Add to the StageData entity. Scopes the influence to the stage lifecycle. |
| Priority boost inside a spatial zone | CameraInfluenceFieldComponent | Add with a PhysX trigger collider. Entity entering the volume triggers the boost. |
| Per-player isolation in co-op | (automatic) | CameraInfluenceFieldComponent routes by the entity that crossed the trigger — only that entity’s channel sees the boost. |
| Multiple overlapping fields on the same cam | (automatic) | Each field is keyed by its source entity, so overlaps stack additively without colliding. |
Glossary
| Term | Meaning |
|---|
| Influence Field | A component that adjusts camera priority dynamically without modifying the cam’s base priority. |
| Priority Stacking | Influences sum with the base priority during arbitration — multiple active influences on the same cam add their values. |
| Global Influence | An unconditional priority modifier active for the component’s lifetime. |
| Spatial Influence | A volume-based modifier active while an entity is inside the PhysX trigger volume. |
| Source Entity | The field volume entity, used as the per-channel storage key. |
| Target Entity | The entity that triggered the influence, used as the routing key (channel lookup). |
For full definitions, see the Glossary.
See Also
Recipes:
Framework API:
Related basics pages:
Related utilities:
Get GS_PhantomCam
GS_PhantomCam — Explore this gem on the product page and add it to your project.
6 - Tug Fields
Author guide for tug-field cinematic pulls — three-component model, PhysX layer setup, channel filtering, tuning, and pitfalls.
Tug Fields pull the camera’s pose toward a designated point while the player (or any “proxy” entity) is inside a defined PhysX trigger volume. Use them for environmental cinematography — a railing that pulls the cam’s gaze toward a vista, a doorway that draws the cam toward what’s beyond, a hazard that draws attention as the player passes.
The system is built from three decoupled components — a volume, a source, and a proxy — plus one or two listener stages on the cam. Each piece is small; the combination is flexible.
For step-by-step composition recipes (vista pull, doorway glance, decoupled source / destination), see the recipes collection.
Camera Tug Configurations (Recipes)
API
For the per-field reference and the per-tick algorithm, see the Framework API reference.
The single biggest authoring trap: Tug Fields require a specific PhysX collision-layer configuration. If you set up volumes and listeners but nothing happens, check the PhysX layer setup first (PhysX Layer Setup).
Contents
The Three Components
| Component | Where it lives | What it does |
|---|
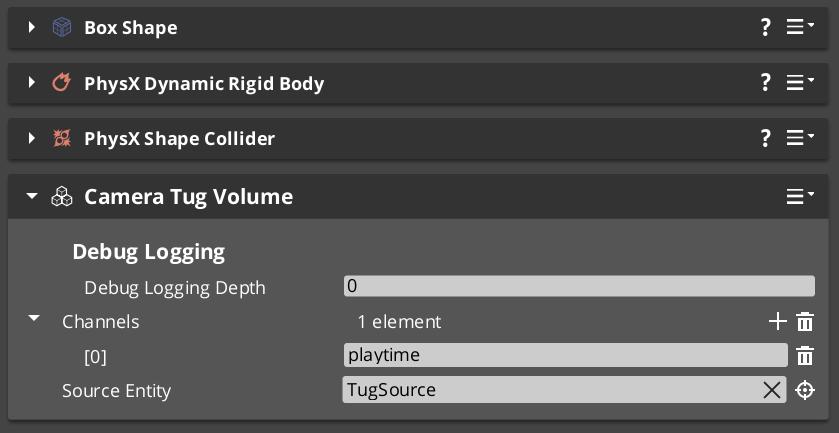
| CameraTugVolumeComponent | Level entity with a PhysX trigger collider on the TugField layer | Spatial gate. Fires per-proxy enter / exit broadcasts when something on the TugProxy layer overlaps. |
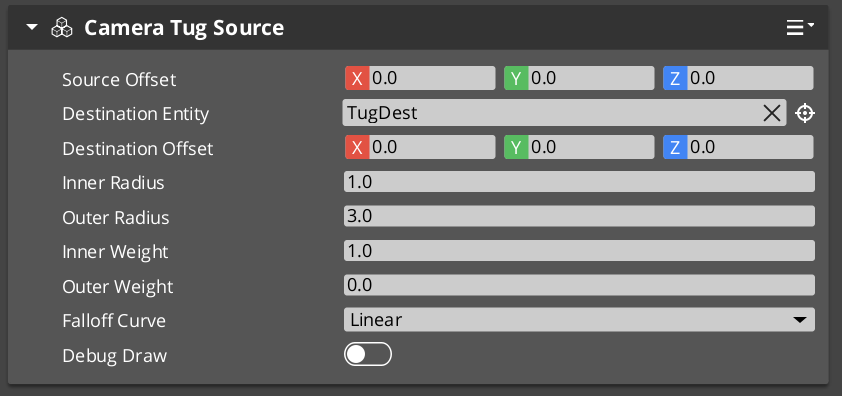
| CameraTugSourceComponent | Either the volume entity itself, OR a separate entity (for decoupled source / destination) | Configures the geometry — proximity center, falloff radii, falloff curve, destination point. |
| TugFieldProxyComponent | On the player entity (or a child entity, or the cam entity) | Lightweight marker. The PhysX trigger collider on this entity is what overlaps tug volumes. |

Plus on the Phantom Camera
| Listener stage | What it does |
|---|
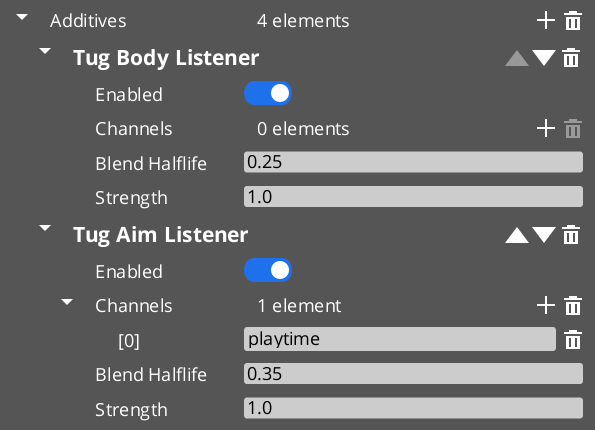
TugAimListener | Slerps the cam’s rotation toward the source’s destination point. |
TugBodyListener | Lerps the cam’s position toward the source’s destination point. |
A cam can run either listener, both, or neither.
PhysX Layer Setup
The system filters tug-volume contacts at the PhysX layer level — there is no central registry, and no runtime entity-tag check. If the layer setup is wrong, nothing fires.
One-time project setup
- Open PhysX Configuration → Collision Layers.
- Create two new layers:
- Open Collision Groups. Create or edit a collision-group preset such that:
TugProxy overlaps only TugField (and not Default, Player, Static, etc.).TugField overlaps only TugProxy.
This pair-only configuration ensures tug volumes fire triggers only for registered proxies, with no accidental cross-talk from normal-world physics.
Verify the pairing. It’s easy to leave TugProxy overlapping Default or Player by accident. If your cam jitters whenever the player walks through doorframes, that’s almost certainly the symptom — tug volumes are firing on the player’s main collider instead of the proxy collider.
Channel Filtering
The volume’s Channels field is a list of arbitrary string tags (“Cinematic”, “Combat”, “Environment”). The listener’s Channels field is the same. The listener responds only to volumes whose channels intersect with its own.
Empty channels on the listener = match all volumes.
Use channels when you have multiple kinds of tug fields in the same world — environmental pulls vs scripted-cinematic pulls — and you want some cams to respond only to certain kinds.
Tug-field channels are NOT instancing channels. Tug-field channels are these string tags. Instancing channels (in Channels & Instancing) are integer per-player viewpoint slots. Despite the shared word, the two systems are unrelated.
Tuning the Pull Strength
A few knobs interact:
| Knob | On | Effect |
|---|
Strength | Listener | Overall multiplier. 0.5 = half the full influence. Default 1.0. |
Inner Weight / Outer Weight | Source | The proximity-to-influence falloff curve’s endpoints. Inner weight at the deadzone (full), outer weight at the boundary (typically 0). |
Falloff Curve | Source | Shapes the ramp between outer and inner. Linear is even; EaseInOutQuadratic engages gently and disengages gently. |
Blend Halflife | Listener | Smoothing on the influence’s engagement and disengagement. Higher = slower ramps. |
If the cam feels “jerky” entering or exiting the volume, raise Blend Halflife on the listener (try 0.5 or higher). If the cam pulls too aggressively at the deadzone, lower the listener’s Strength.
Pitfalls
Nothing fires
Almost always the PhysX layer setup. Verify:
TugProxy and TugField layers both exist.- The collision-group preset has them paired (and only paired).
- The player’s proxy collider is on
TugProxy. - The volume’s trigger collider is on
TugField.
The cam yanks the moment the player enters the volume
Blend Halflife is too low (or zero). The listener’s dormant-to-engaged transition seeds at a zero-displacement point, but if the halflife is near zero the ramp is instant. Raise to 0.2–0.4.
The volume is “inert” — warning at startup
The source resolution failed. Either:
m_sourceEntity points at an entity that has no CameraTugSourceComponent. Fix the reference.m_sourceEntity is empty AND the volume’s own entity has no CameraTugSourceComponent. Add one or set m_sourceEntity.
Tug volume and instancing channel confusion
If you’re in a multi-channel project and a tug volume’s m_channels says "P1", this does NOT bind the volume to channel 1. The string is just a tag — name it "Player1ExclusivePull" or use proper Channel Scope on the cam if you want per-player exclusivity.
See Also
Recipes:
Framework API:
Related basics pages:
Get GS_PhantomCam
GS_PhantomCam — Explore this gem on the product page and add it to your project.