The Basics
High-level usage and scripting references for GS_Play feature sets. Drop-in functionality for intermediate developers and designers.
GS_Play is a full production set of modular features that can all be individually toggled on to enable only the features you need for your project. The “Basics” section covers what each feature set does, how to work with it from the editor and scripts, and what events and nodes are available — without requiring deep architectural knowledge.
If you are new to GS_Play, start with Get Started first. If you need architecture-level detail, component internals, or extension guides, use the Framework API section instead.
How This Section Is Organized
Each gem section follows this structure:
Gem overview page — What the gem does, the problems it solves, and a summary of its feature sets with links to feature sub-pages.
Feature sub-pages — One page per feature set. Each covers:
- What it does and what components are involved.
- Editor setup for drop-in use.
- Relevant ScriptCanvas nodes and EBus events.
- A quick reference table.
- Links to the Framework API for deeper reference.
Pages in this section deliberately omit architecture internals, extension code, and low-level component details. If you need those, follow the Framework API links at the bottom of each page.
Sections
1 - GS_Core
The foundation gem for the GS_Play framework — game lifecycle, save system, stage management, input, actions, and utility libraries.
GS_Core is the required foundation for every GS_Play enabled project. All other GS gems depend on it to drive their complex behaviour, and utilize its systemic features. It provides the game startup sequence, persistence, level loading, input handling, a triggerable action system, and a shared utility library.
If you have not set up GS_Core yet, start with the Simple Project Setup guide before reading further.
For architecture details, component properties, and extending the system in C++, see the GS_Core API.
Quick Navigation
| I want to… | Feature | API |
|---|
| Start a new game, continue from a save, load a specific file, or return to the title screen | GS_Managers | API |
| Save and load game data, or track persistent flags and counters across sessions | GS_Save | API |
| Move between levels, or configure per-level spawn points and navigation settings | GS_StageManager | API |
| Read player input, disable input during menus, or swap control schemes at runtime | GS_Options | API |
| Use easing curves, detect physics zones, smooth values, pick randomly, or work with splines | Utilities | API |
| Trigger a reusable behavior on an entity from a script, physics zone, or another action | Systems: GS_Actions | API |
| Animate a transform, color, or value smoothly over time | Systems: GS_Motion | API |
Installation
GS_Core is a required gem. It will be added to your project when you enable any other GS_Play gem.
For a complete guided setup, follow the Simple Project Setup guide or video tutorial.
Follow these steps in particular:
- Configure Project
- Prepare Managers
- Prepare Startup
Quick Installation Summary
Once the gem is registered to your project:
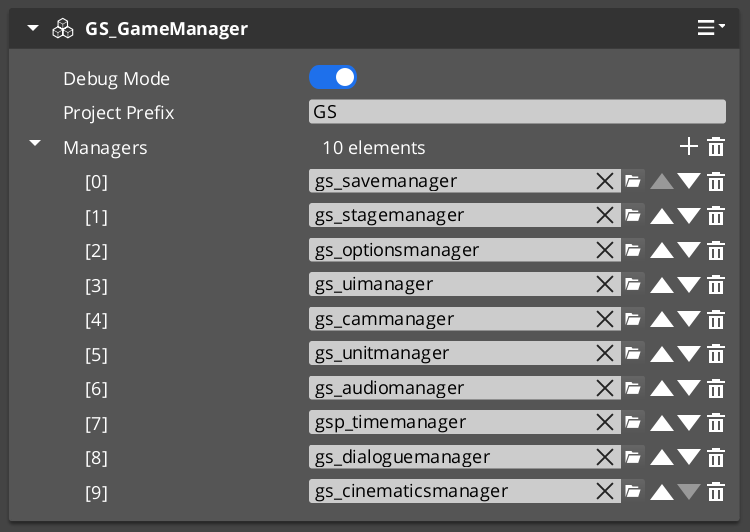
- Create a Game Manager prefab and place it in every level.
- Create prefabs of any managers you wish to utilize in your project
- Add all the manager prefabs to your GameManager Managers list.
- Implement a way to activate “Begin Game”
- Create a UI to fire New Game, or Load Game.
- Create a Script to fire New Game, or Load Game OnStartupComplete.
- Toggle “Debug Mode” on. This skips through the begin game process.
GS_Managers
Controls the game startup lifecycle — spawning and initializing all manager systems in a guaranteed order, then providing top-level game navigation: New Game, Continue, Load Game, Return to Title, and Quit. The starting point for any game-wide behavior.
GS_Managers
API
GS_Save
Handles all save and load operations, including entity state persistence across level loads and simple key-value record tracking for global flags and counters.
GS_Save
API
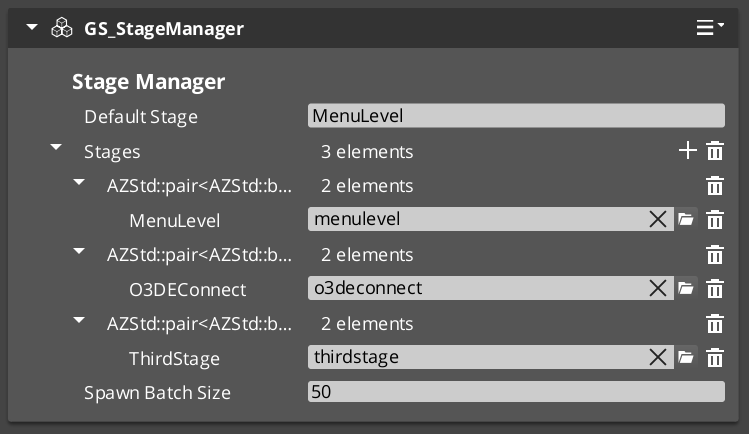
GS_StageManager
Manages level loading and navigation. Place named Exit Points in your levels to control where the player arrives, and use Stage Data components to configure per-level settings like NavMesh references and spawn configuration.
GS_StageManager
API
GS_Options
Manages player input through swappable Input Profile assets and Input Reader components, with group-level enable/disable for suppressing input during menus, cutscenes, or transitions.
GS_Options
API
Systems
Core framework systems used across multiple gems: the GS_Actions triggerable behavior system and the GS_Motion track-based animation engine.
Systems
API
Utilities
A collection of shared tools: easing curves (40+ types), spring dampers for smooth value following, weighted random selection, color and float gradients, spline helpers, and Physics Trigger Volume components.
Utilities
API
See Also
For the full API, component properties, and C++ extension guide:
For step-by-step project setup:
Get GS_Core
GS_Core — Explore this gem on the product page and add it to your project.
1.1 - Managers System
How to work with the GS_Play manager system — startup events, game navigation, and standby mode from scripts.
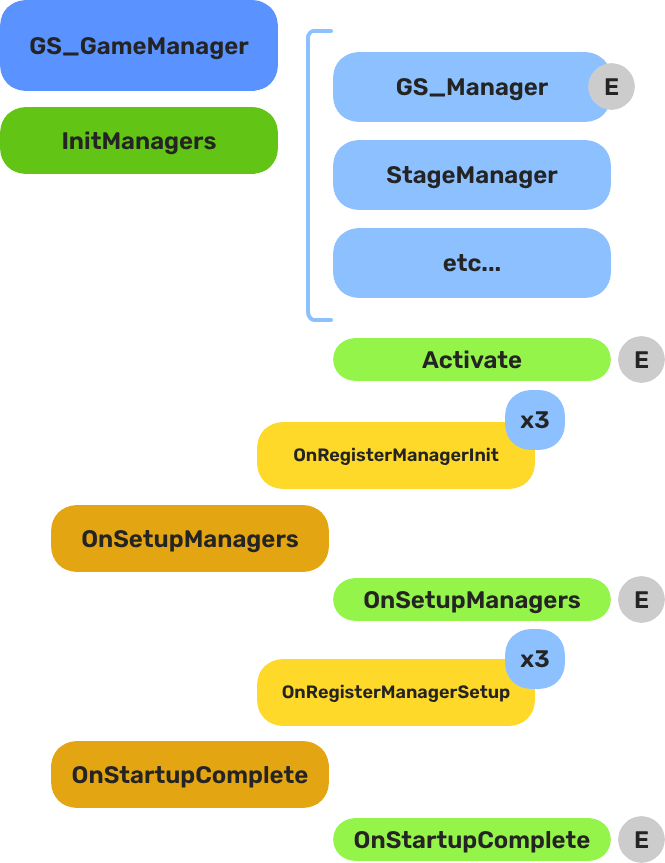
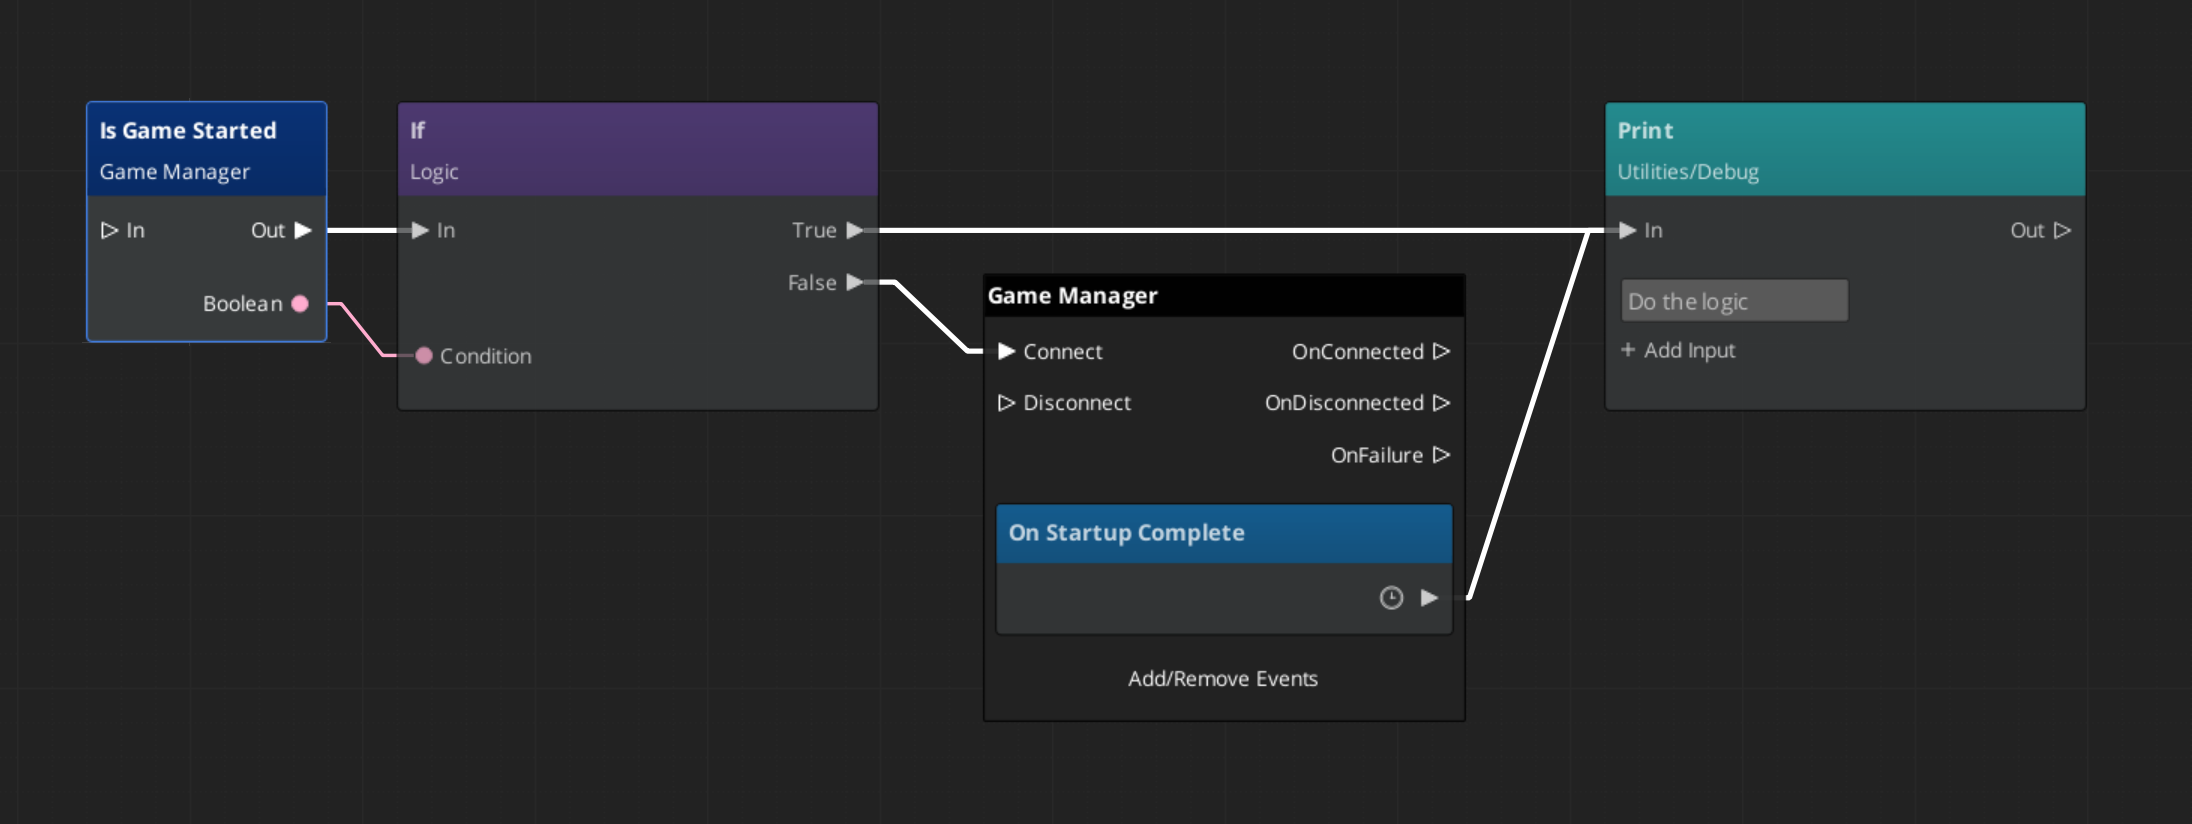
The Managers system is how GS_Play starts your game. The Game Manager spawns all other managers in a guaranteed order, coordinates their initialization stages, and then broadcasts events that signal when each stage is complete and when the game is fully ready to run.
This gives you the ability to ensure startup happens as expected, can create your own managers of any type, and can toggle full-game standby.
For architecture details, component properties, and extending the system in C++, see the GS_Managers API.
Contents
Startup Sequence
Breakdown
When the project starts, the Game Manager runs three stages before the game is considered ready:
| Stage | Broadcast Event | What It Means |
|---|
| 1 — Initialize | (internal) | Each manager is spawned. They activate, then report ready. |
| 2 — Setup | OnSetupManagers | Setup stage. Now safe to query other managers. |
| 3 — Complete | OnStartupComplete | Last stage. Everything is ready.
Do any last minute things. Now safe to begin gameplay. |
For most scripts, you only need OnStartupComplete. Wait for this event before doing anything that depends on managers to be completely setup.
E Indicates extensible classes and methods.
Patterns - Complete list of system patterns used in GS_Play.
Responding to Startup
ScriptCanvas
Connect to GameManagerNotificationBus and handle OnStartupComplete to know when the game is fully ready:
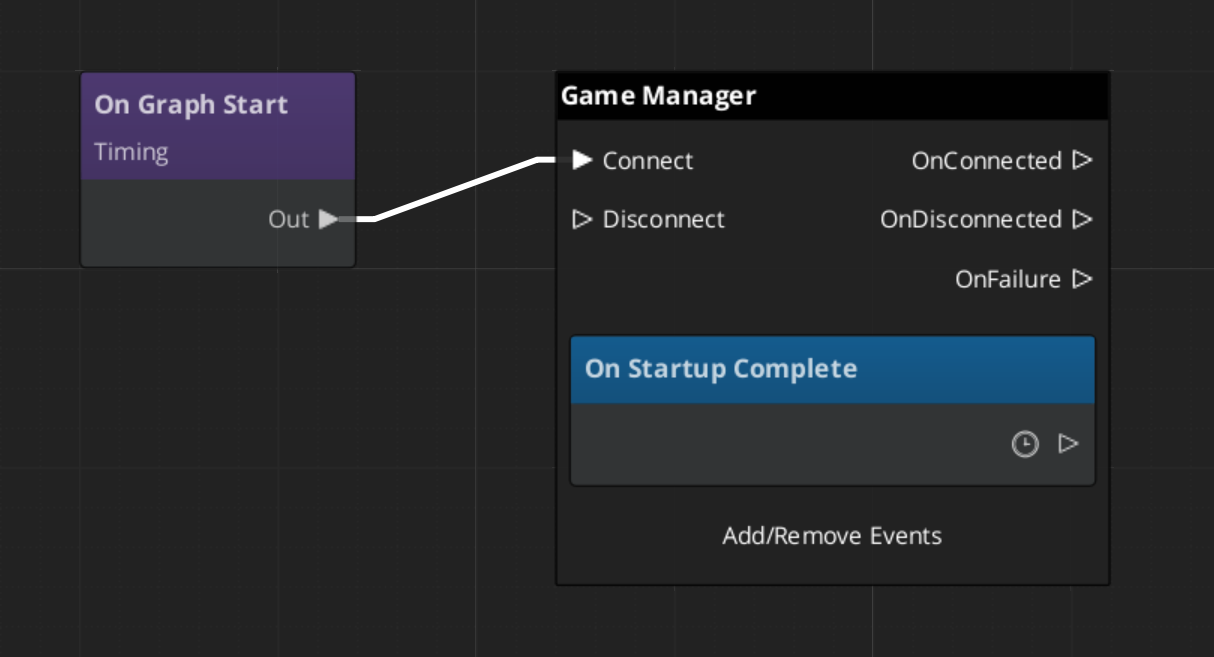
To check at any point whether the game has already finished starting, use the IsStarted request:
Game Navigation
The Game Manager owns the top-level game flow. Call these from title screens, pause menus, and end-game sequences. They coordinate the Save Manager and Stage Manager automatically.
| ScriptCanvas Node | What It Does |
|---|
TriggerNewGame | Starts a new game with the default save name. |
TriggerNewGameWithName(saveName) | Starts a new game and writes to a named save file. |
TriggerContinueGame | Loads the most recent save and continues from it. |
TriggerLoadGame(saveName) | Loads a specific save file by name. |
TriggerReturnToTitle | Returns to the title stage, tearing down the current session. |
TriggerSaveAndExitGame | Saves the current state and exits the application. |
TriggerExitGame | Exits the application without saving. |
Standby Mode
Standby is a global pause. The Game Manager enters standby automatically during level transitions and other blocking operations. It broadcasts OnEnterStandby to halt all gameplay systems, and OnExitStandby when the operation completes.
Listen to these in any script that drives continuous logic — timers, ticks, or animation sequences:
| Event | What to Do |
|---|
OnEnterStandby | Pause timers, halt ticks, stop animations. |
OnExitStandby | Resume timers, re-enable ticks. |
Both events are on GameManagerNotificationBus.
Debug Mode
When Debug Mode is enabled on the Game Manager component in the editor, the game starts in the current level instead of navigating to your title stage. This allows rapid iteration on any level without going through the full boot flow.
Debug Mode only changes startup navigation. All manager initialization and event broadcasting proceed normally.
Quick Reference
| Need | Bus | Method / Event |
|---|
| Know when startup is complete | GameManagerNotificationBus | OnStartupComplete |
| Check if game has started | GameManagerRequestBus | IsStarted |
| Start a new game | GameManagerRequestBus | NewGame / TriggerNewGame (SC) |
| Continue from last save | GameManagerRequestBus | ContinueGame / TriggerContinueGame (SC) |
| Load a specific save | GameManagerRequestBus | LoadGame / TriggerLoadGame (SC) |
| Return to title | GameManagerRequestBus | ReturnToTitle / TriggerReturnToTitle (SC) |
| Pause all systems | GameManagerRequestBus | EnterStandby |
| Resume all systems | GameManagerRequestBus | ExitStandby |
| Know when standby changes | GameManagerNotificationBus | OnEnterStandby / OnExitStandby |
Glossary
| Term | Meaning |
|---|
| Standby | Global pause broadcast to all managers and their subsystems |
| Startup Sequence | The three-stage lifecycle (Initialize → SetupManagers → StartupComplete) before gameplay is ready |
| Manager | A component that extends GS_ManagerComponent and registers with the Game Manager |
| Debug Mode | Starts the game in the current editor level instead of navigating to the title stage |
For full definitions, see the Glossary.
See Also
For the full API, component properties, and C++ extension guide:
For step-by-step project setup:
Get GS_Core
GS_Core — Explore this gem on the product page and add it to your project.
1.2 - Save System
How to work with the GS_Play save system — saving game state, loading saves, and tracking progression with the Record Keeper.
The Save system handles all persistence in a GS_Play project. The Save Manager coordinates file operations, Savers serialize per-entity state, and the Record Keeper tracks flat progression data. Together they give you a complete save/load pipeline that works out of the box and extends cleanly for custom data.
For architecture details, component properties, and extending the system in C++, see the Framework API reference.
Contents
How Saving Works
Breakdown
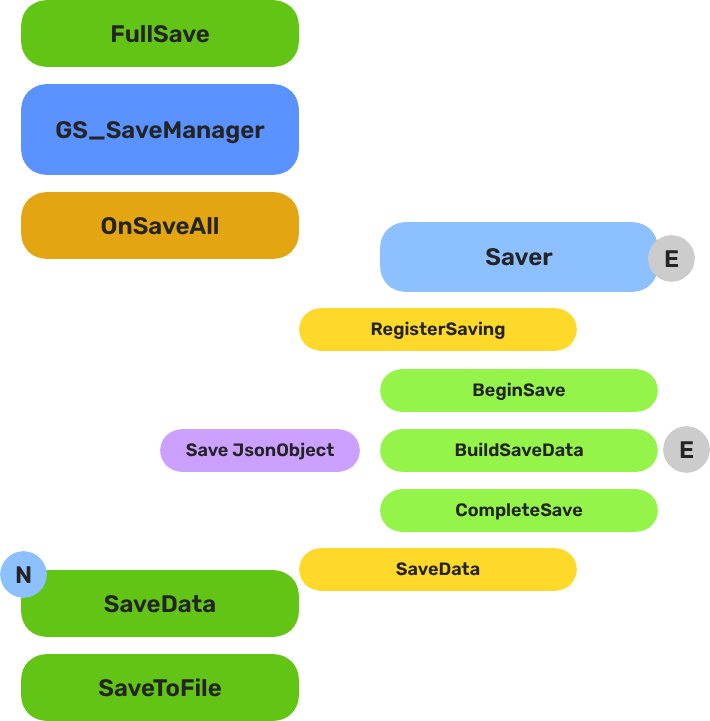
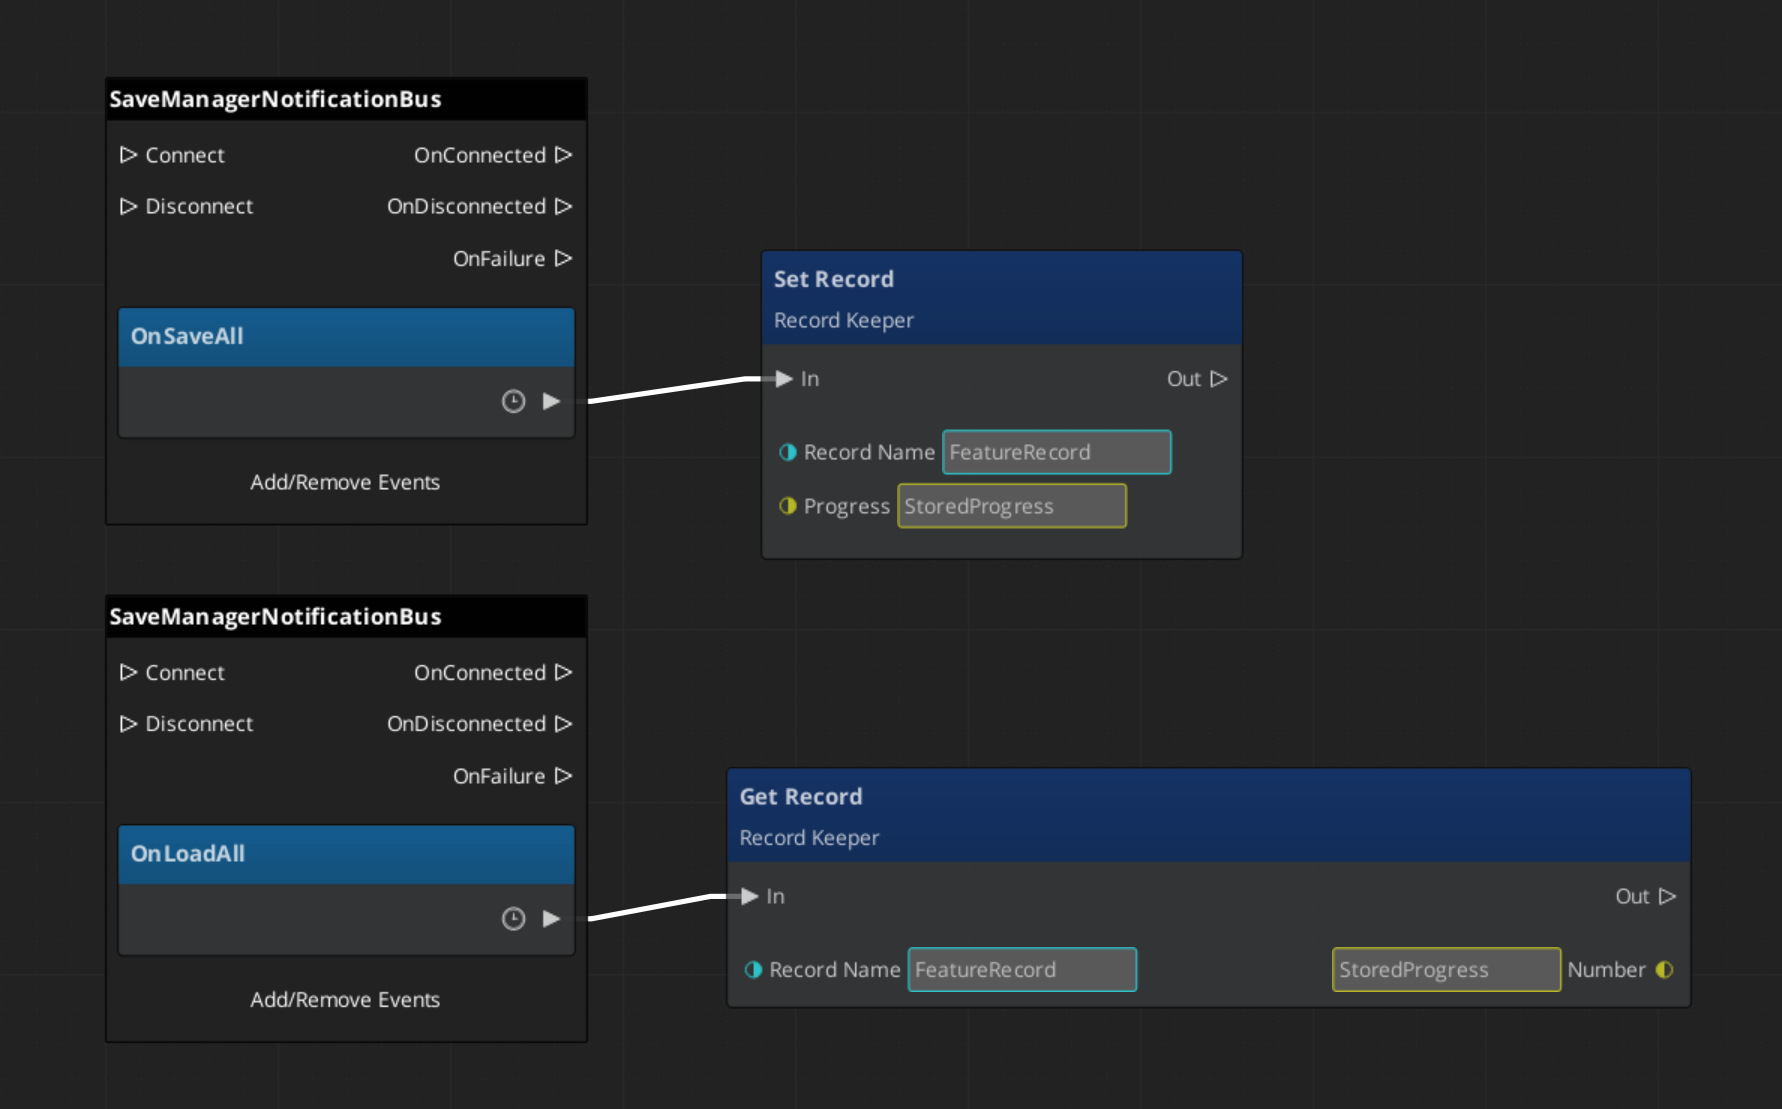
When a save is triggered, the Save Manager broadcasts OnSaveAll to every Saver component in the scene. Each Saver serializes its entity’s relevant state into the save file. When loading, the Save Manager broadcasts OnLoadAll, and each Saver restores its entity from the save data.
The Save Manager also maintains a list of all save files with metadata (timestamps, names), so you can present a save/load UI to the player.
| Operation | What Happens |
|---|
| New save | Creates a new save file, broadcasts OnSaveAll to all Savers. |
| Load save | Reads save file, broadcasts OnLoadAll to all Savers. |
| Save data | Writes current game state to the active save file. |
| Load data | Reads data from the active save file into memory. |
E Indicates extensible classes and methods.
Patterns - Complete list of system patterns used in GS_Play.
Responding to Save Events
ScriptCanvas
Connect to SaveManagerNotificationBus to know when save or load operations occur:
Triggering Saves and Loads
These methods are available on SaveManagerRequestBus:
| ScriptCanvas Node | What It Does |
|---|
NewGameSave | Creates a fresh save file for a new game. |
LoadGame(saveName) | Loads a specific save file by name. |
SaveData | Writes current state to the active save file. |
LoadData | Reads the active save file into memory. |
GetOrderedSaveList | Returns all save files sorted by most recent. |
ConvertEpochToReadable(epoch) | Converts a save file timestamp to a human-readable string. |
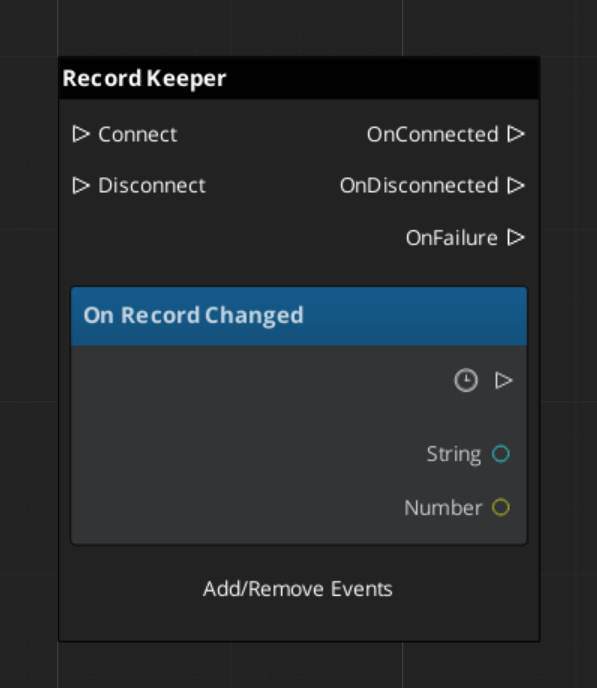
Record Keeper
The Record Keeper is a lightweight key-value store for tracking game-wide progression — quest flags, counters, unlock states, completion markers. It lives on the Save Manager prefab and is automatically persisted with the save system.
Unlike Savers (which are per-entity), the Record Keeper is a global singleton. Any script or component can read and write records by name.
| ScriptCanvas Node | What It Does |
|---|
HasRecord(name) | Returns whether a record with the given name exists. |
SetRecord(name, value) | Creates or updates a record. Value is a float. |
GetRecord(name) | Returns the current value of a record. |
DeleteRecord(name) | Removes a record. |
Responding to Record Changes
Listen on RecordKeeperNotificationBus for the RecordChanged event. This fires whenever any record is created, updated, or deleted — useful for UI that displays progression state.
Built-In Savers
Two Savers ship with GS_Core for the most common use cases:
| Saver | What It Saves |
|---|
| BasicEntitySaver | Entity transform (position, rotation, scale). |
| BasicPhysicsEntitySaver | Entity transform plus rigidbody velocity and angular velocity. |
Add these components to any entity that needs to persist its position across save/load cycles. They handle serialization and restoration automatically.
Quick Reference
| Need | Bus | Method / Event |
|---|
| Trigger a save | SaveManagerRequestBus | SaveData |
| Trigger a load | SaveManagerRequestBus | LoadGame(saveName) |
| Create a new save | SaveManagerRequestBus | NewGameSave |
| List all saves | SaveManagerRequestBus | GetOrderedSaveList |
| Know when saving | SaveManagerNotificationBus | OnSaveAll |
| Know when loading | SaveManagerNotificationBus | OnLoadAll |
| Check a progress flag | RecordKeeperRequestBus | HasRecord(name) / GetRecord(name) |
| Set a progress flag | RecordKeeperRequestBus | SetRecord(name, value) |
| Know when a record changes | RecordKeeperNotificationBus | RecordChanged |
Glossary
| Term | Meaning |
|---|
| Saver | A component that serializes one entity’s state into the save file |
| Record Keeper | A global key-value store for tracking progression flags and counters |
| Save File | A serialized snapshot of all Saver data plus Record Keeper state |
For full definitions, see the Glossary.
See Also
For the full API, component properties, and C++ extension guide:
For step-by-step project setup:
Get GS_Core
GS_Core — Explore this gem on the product page and add it to your project.
1.3 - Stage Management
How to work with the GS_Play stage management system — level loading, stage transitions, exit points, and stage data.
The Stage Manager handles all level-to-level navigation in a GS_Play project. It owns the master list of stages, processes transition requests, and coordinates with the Game Manager’s standby mode to ensure clean load/unload cycles. Stage Data components in each level control how that level initializes.
For architecture details, component properties, and extension patterns, see the Framework API reference.
Contents
How Stage Transitions Work
Breakdown
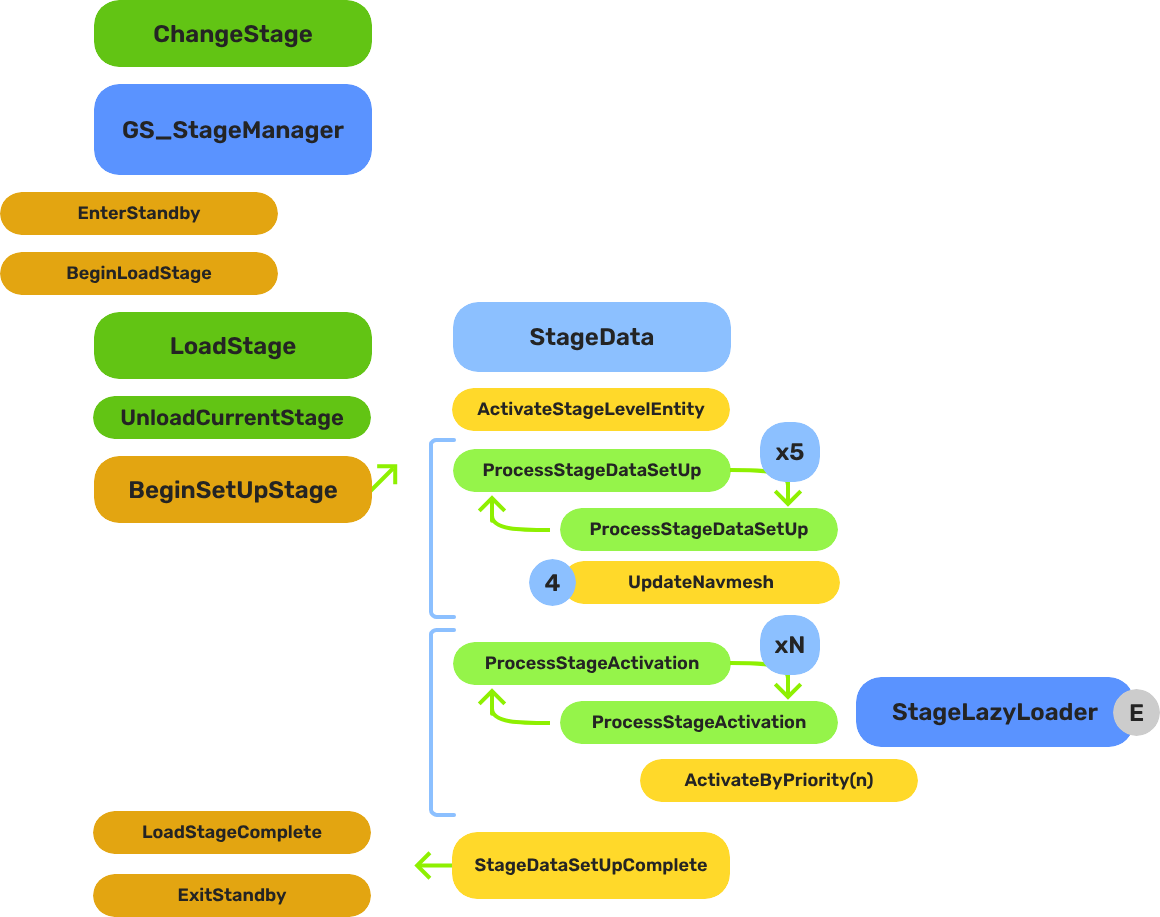
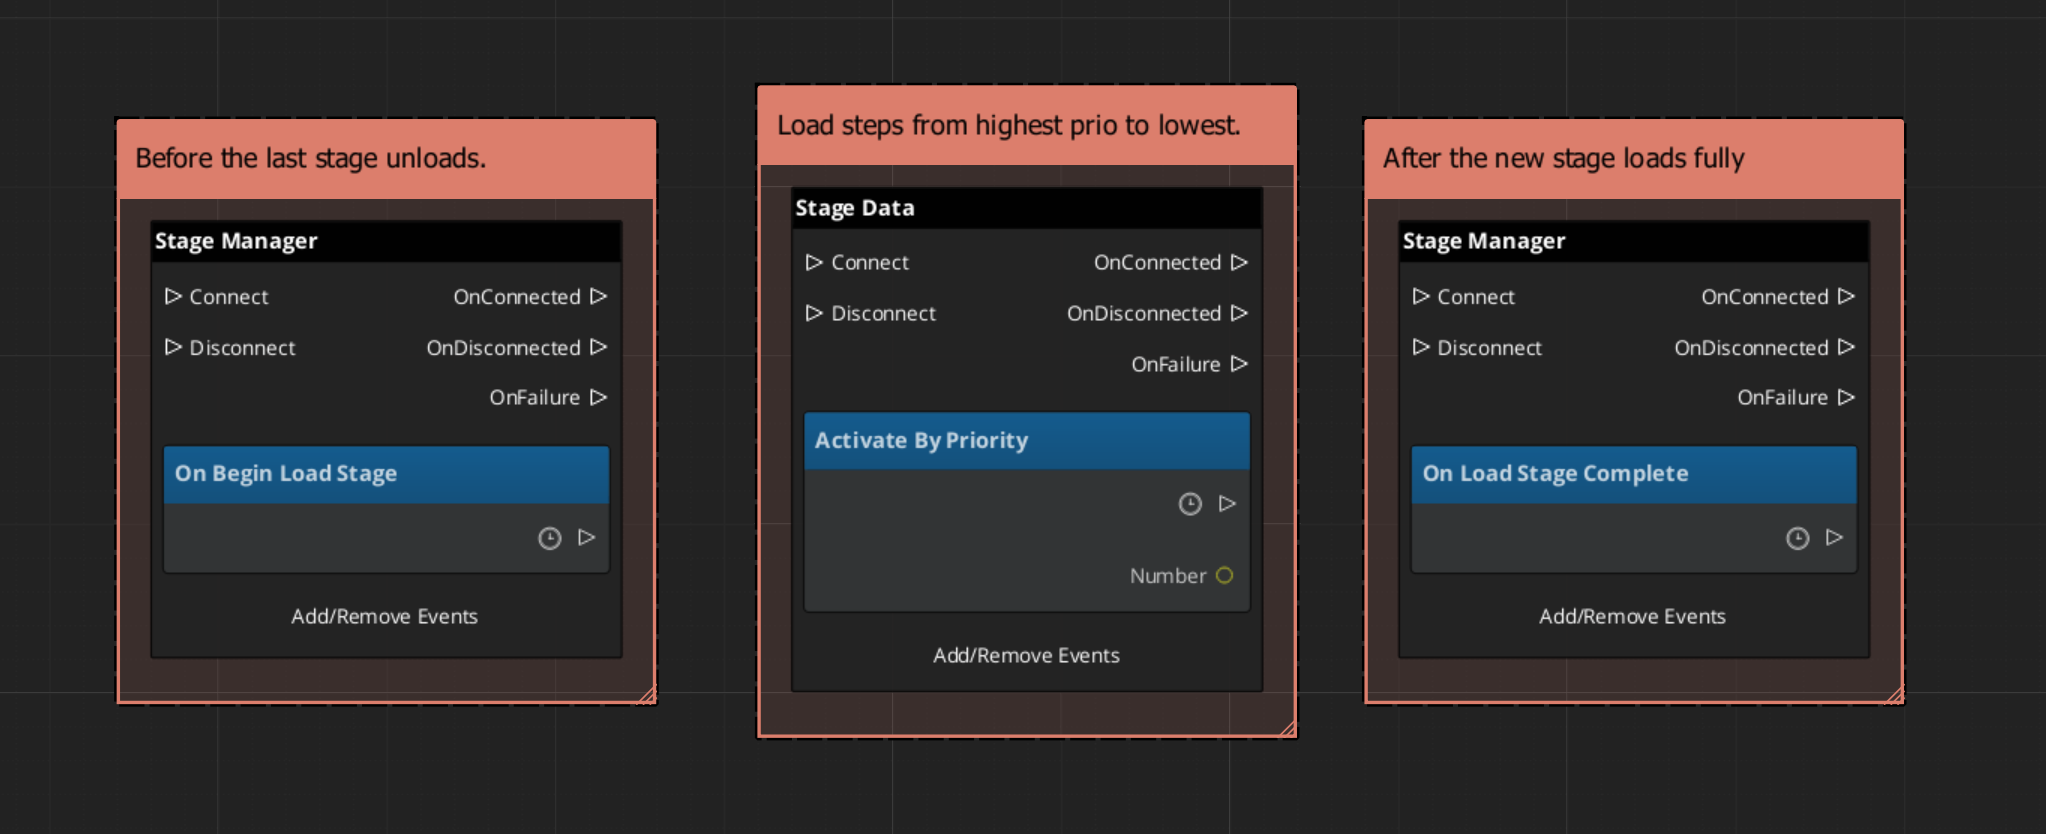
When you request a stage change, the system follows this sequence:
| Step | What Happens |
|---|
| 1 — Standby | The Game Manager enters standby, pausing all gameplay systems. |
| 2 — Unload | The current stage’s entities are torn down. |
| 3 — Spawn | The target stage’s prefab is instantiated. |
| 4 — Set Up | The Stage Data component in the new level runs its layered startup sequence. |
| 5 — Complete | The Stage Manager broadcasts LoadStageComplete. Standby exits. |
The Stage Data startup is layered — SetUpStage, ActivateByPriority, then Complete — so heavy levels can initialize incrementally without causing frame-time spikes.
E Indicates extensible classes and methods.
Patterns - Complete list of system patterns used in GS_Play.
Stage Data
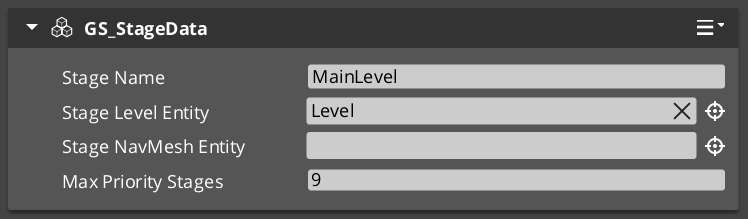
Each level should have a Stage Data component as its root entity. Using a start inactive child “Level” entity, the Stage Data system controls the initialization sequence for that new level. Stage Data holds level-specific configuration, and scripts.
| Event | What It Means |
|---|
OnBeginSetUpStage | The level is starting its setup. Initialize per-level systems. |
ActivateByPriority | Activate heavy entities in priority order (lazy loading). |
OnLoadStageComplete | The level is fully loaded and ready. |
OnTearDownStage | The level is being unloaded. Clean up per-level state. |
Listen to these on StageDataNotificationBus in any script that needs to react to level lifecycle.
Triggering Stage Changes
ScriptCanvas
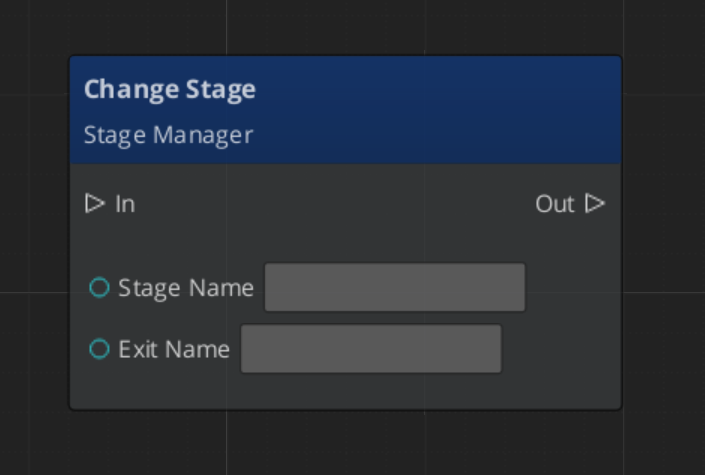
The exitPointName parameter is optional. If provided, the system will position the player at the named exit point in the target level.
Exit Points
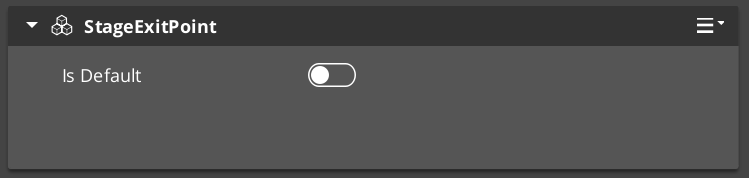
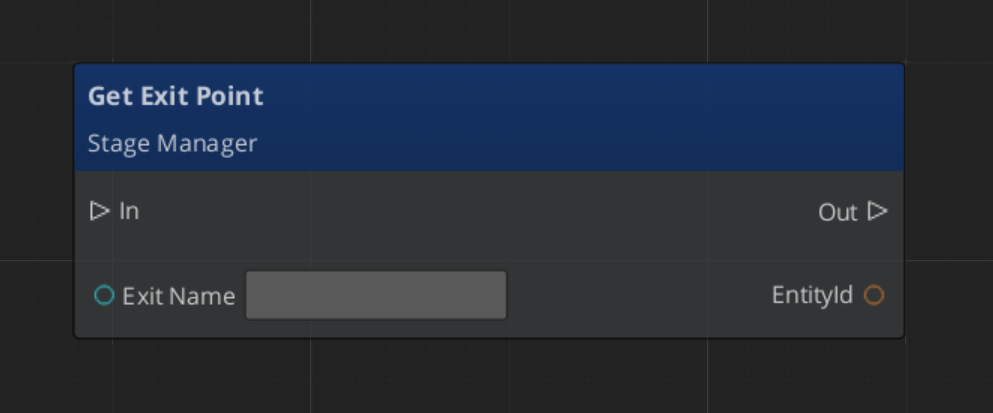
Exit Points are named position markers placed in a level. They define where entities spawn when arriving from another stage. A door in Level A can specify that when transitioning to Level B, the player should appear at Exit Point “DoorB_Entry”.
Exit Points are registered and unregistered with the Stage Manager automatically when they activate and deactivate.
| ScriptCanvas Node | What It Does |
|---|
ChangeStageRequest(stageName, exitPoint) | Transitions to a stage and positions at the named exit point. |
RegisterExitPoint(name, entity) | Manually registers an exit point (usually automatic). |
UnregisterExitPoint(name) | Manually unregisters an exit point. |
GetExitPoint(name) | Returns the entity ID of a registered exit point. |
Responding to Stage Events
ScriptCanvas
Entity Level Configuration
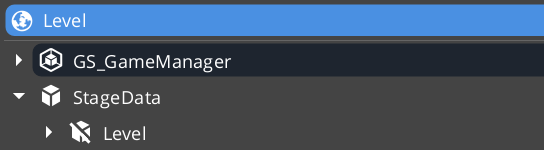
The Stage Data entity must live outside of the levels Game Manager prefab. It is left active.
Inside, it has a secondary level “wrapper” entity that you set to “Start Inactive” by default. This enables the Stage Data to control exactly when the level begins loading.
Quick Reference
| Need | Bus | Method / Event |
|---|
| Change to a different level | StageManagerRequestBus | ChangeStageRequest(stageName, exitPoint) |
| Load the default stage | StageManagerRequestBus | LoadDefaultStage |
| Know when a load starts | StageManagerNotificationBus | BeginLoadStage |
| Track loading progress | StageManagerNotificationBus | StageLoadProgress |
| Know when a load finishes | StageManagerNotificationBus | LoadStageComplete |
| React to level setup | StageDataNotificationBus | OnBeginSetUpStage |
| React to level teardown | StageDataNotificationBus | OnTearDownStage |
| Find an exit point | StageManagerRequestBus | GetExitPoint(name) |
Glossary
| Term | Meaning |
|---|
| Stage | A spawnable prefab representing a game level or screen |
| Exit Point | A named position marker in a level that defines where entities arrive from another stage |
| Stage Data | A per-level component that controls level initialization and holds level-specific settings |
| Default Stage | The first stage loaded on application start (typically the title screen) |
For full definitions, see the Glossary.
See Also
For the full API, component properties, and C++ extension guide:
For related systems:
Get GS_Core
GS_Core — Explore this gem on the product page and add it to your project.
1.4 - Options & Input
How to work with the GS_Play options system — input profiles, input groups, and runtime binding management.
The Options system manages player-facing configuration and input handling. Its primary feature is the Input Profile system, which provides group-based input binding management that can be toggled at runtime without code changes.
For architecture details, component properties, and extension patterns, see the Framework API reference.
Contents
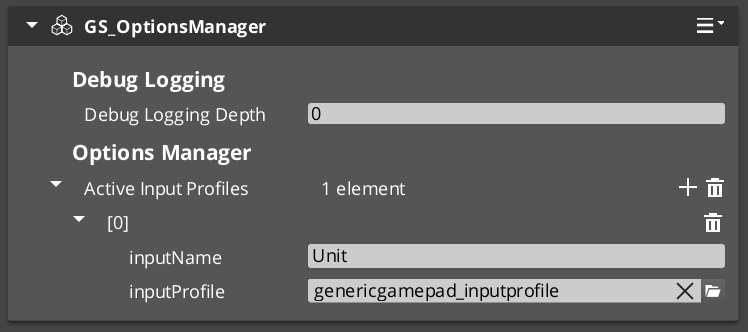
Options Manager
The Options Manager is a singleton that holds the active Input Profile and makes it available to all Input Reader components. It responds to the Game Manager lifecycle automatically.
| ScriptCanvas Node | What It Does |
|---|
GetActiveInputProfile | Returns the currently active Input Profile asset. |
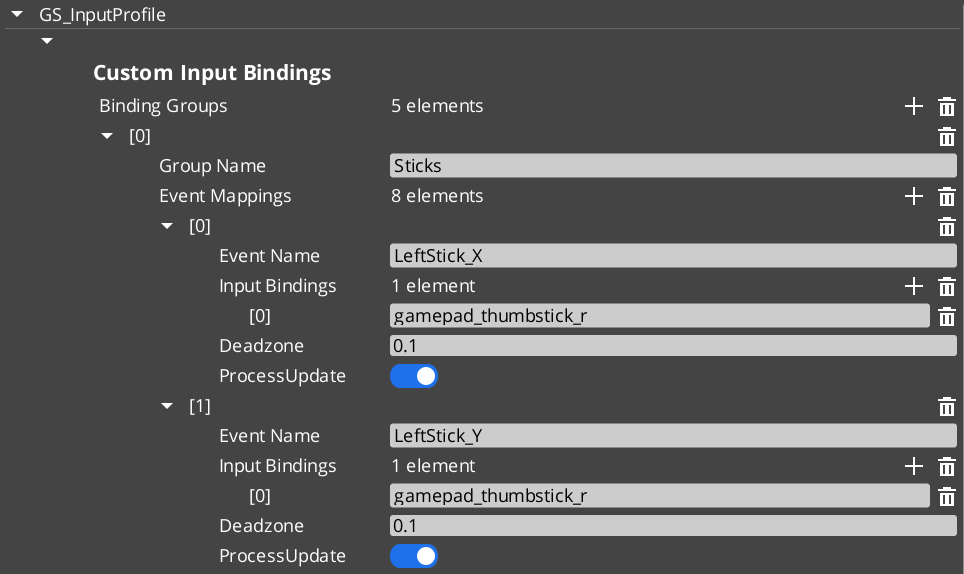
An Input Profile is a data asset created in the O3DE Asset Editor. It contains named input groups, each holding a set of event mappings. Each event mapping binds a gameplay event name to one or more raw input bindings (key presses, axis movements, button presses) with configurable deadzones.
The key advantage over raw O3DE input bindings is the group system. Groups can be enabled and disabled independently at runtime — a pause menu can suppress gameplay input by disabling the “Gameplay” group, without tearing down and rebuilding bindings.
| Stage | What Happens |
|---|
| 1 — Raw Input | O3DE’s input system captures key/axis/button events. |
| 2 — Input Reader | The GS_InputReaderComponent on the entity matches raw input against the active Input Profile’s event mappings. |
| 3 — Event Mapping | Matched input fires a named gameplay event (e.g., “Jump”, “MoveForward”). |
| 4 — Consumer | Other components on the entity (controllers, reactors) handle the gameplay event. |
Input Readers filter by group — if a group is disabled, none of its event mappings fire.
Quick Reference
| Need | Bus | Method / Event |
|---|
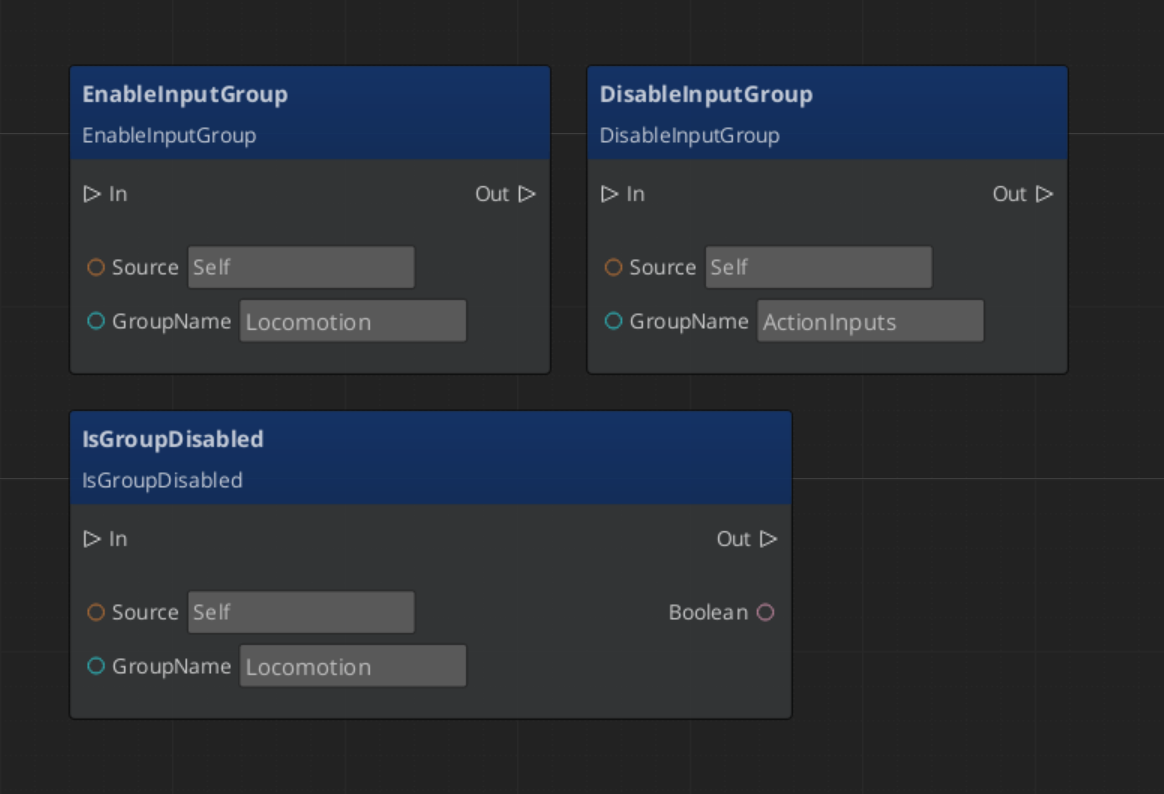
| Disable an input group | InputReaderRequestBus | DisableInputGroup(groupName) |
| Enable an input group | InputReaderRequestBus | EnableInputGroup(groupName) |
| Check if group is disabled | InputReaderRequestBus | IsGroupDisabled(groupName) |
| Get the active profile | OptionsManagerRequestBus | GetActiveInputProfile |
Glossary
| Term | Meaning |
|---|
| Input Profile | A data asset containing named input groups with event mappings |
| Input Group | A named collection of event mappings that can be enabled or disabled at runtime |
| Event Mapping | A binding from a gameplay event name to one or more raw input sources |
| Input Reader | A component that matches raw input against the active Input Profile |
For full definitions, see the Glossary.
See Also
For the full API, component properties, and C++ extension guide:
Get GS_Core
GS_Core — Explore this gem on the product page and add it to your project.
1.5 - Systems
Core framework systems — the GS_Actions triggerable behavior system and the GS_Motion track-based animation engine.
GS_Core provides a growing number of standalone systems that are used across multiple gems. Currently, the GS_Motion track-based animation engine powers UIAnimation and Juice Feedback playback.
For architecture details, component properties, and C++ extension guides, see the Framework API: Systems.
Contents
GS_Motion
Provides tween-style Motion Track components for animating transforms, colors, and values over time. Multiple tracks on the same entity run in parallel; chains are configured by setting an On Complete motion name.
GS_Motion
API
See Also
For the full API, component properties, and C++ extension guides:
For related systems:
Get GS_Core
GS_Core — Explore this gem on the product page and add it to your project.
1.5.1 - Actions System
How to work with the GS_Play action system — triggerable, composable behaviors that fire from scripts, triggers, or code.
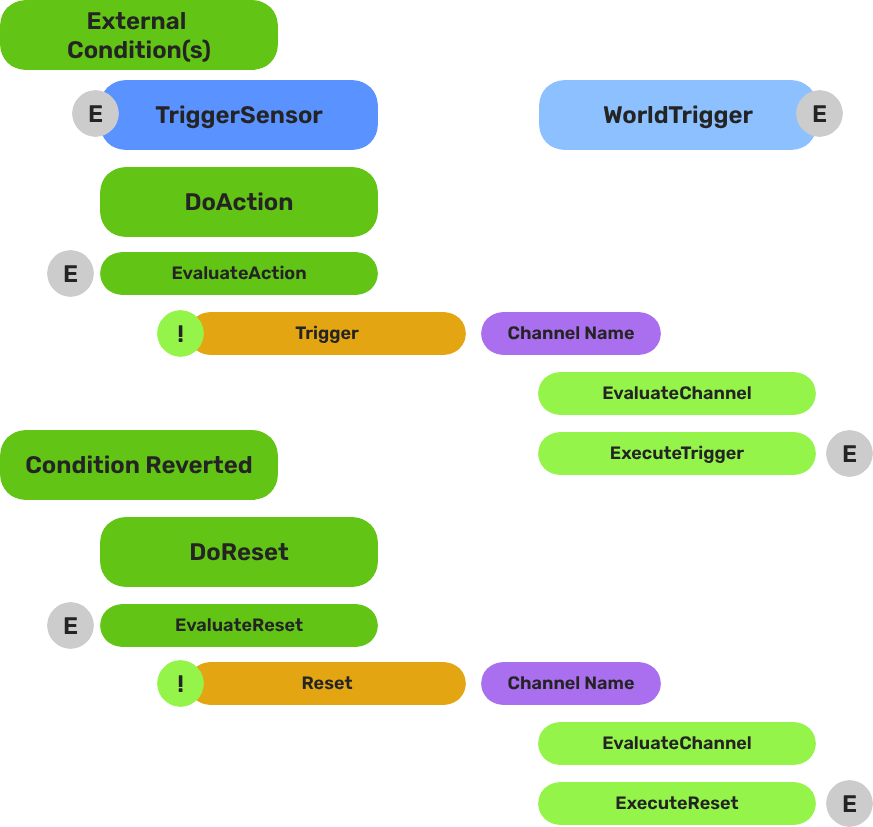
The Actions system provides a universal pattern for attaching discrete, reusable behaviors to entities and triggering them from any source — ScriptCanvas, World Triggers, UI buttons, or C++ code. Actions are data-driven components that fire on named channels, enabling composition without custom scripting.
For architecture details, component properties, and creating custom actions in C++, see the Framework API reference.
Contents
How Actions Work
An Action is a component you attach to an entity. Each Action has a channel name. When something calls DoAction(channelName) on that entity’s bus, every Action component whose channel matches the name will execute.
This decoupling is the core value — the system that fires DoAction does not need to know what kind of action is attached. You can change, add, or remove action components on an entity without modifying any calling code.
| Concept | What It Means |
|---|
| Channel | A named string. Actions on the same channel fire together. |
| Composition | Multiple actions on the same channel execute in parallel — stack components to compose behaviors. |
| Chaining | An action can fire a different channel on completion, enabling lightweight sequences. |
Triggering Actions
ScriptCanvas
[ActionRequestBus → DoAction(channelName)]
    └─► All Action components on this entity with matching channel execute
To know when an action completes:
[ActionNotificationBus → OnActionComplete]
    └─► Action has finished executing
Built-In Actions
GS_Core ships with these ready-to-use actions:
| Action | What It Does |
|---|
| PrintLog | Logs a configurable message to the console. Useful for debugging trigger chains. |
| ToggleMouseCursor | Shows or hides the system mouse cursor. |
Additional actions are available in other gems (e.g., World Trigger actions in GS_Interaction, dialogue effects in GS_Cinematics).
Common Patterns
World Trigger → Action
A World Trigger detects a collision or interaction event and fires DoAction on its entity. Action components on the same entity respond — one might play a sound, another might set a record, another might toggle an entity.
A UI button press fires DoAction with a channel name. Actions handle the response — navigate to a different UI page, start a new game, or toggle the pause menu.
Chaining Actions
Set an action’s “Chain Channel” property to fire a different channel when it completes:
Channel "OpenDoor" → [ToggleEntity action] → chains to "PlayDoorSound" → [AudioEvent action]
Quick Reference
| Need | Bus | Method / Event |
|---|
| Fire an action | ActionRequestBus | DoAction(channelName) |
| Know when an action completes | ActionNotificationBus | OnActionComplete |
Glossary
| Term | Meaning |
|---|
| Action | A component that executes a discrete behavior when triggered on a named channel |
| Channel | A named string identifier that groups actions — all actions on the same channel fire together |
| Chaining | Configuring an action to fire a different channel on completion, creating lightweight sequences |
For full definitions, see the Glossary.
See Also
For the full API, component properties, and C++ extension guide:
For related systems:
Get GS_Core
GS_Core — Explore this gem on the product page and add it to your project.
1.5.2 - Motion System
How to work with GS_Motion — the track-based animation and tween system that powers UI transitions, feedback effects, and custom animations.
GS_Motion is a track-based animation engine built into GS_Core. It drives timed property changes — position, rotation, scale, color, opacity — through authored data assets rather than hand-coded interpolation scripts. Domain gems extend GS_Motion with their own track types: GS_UI adds 8 LyShine-specific tracks for UI animation, and GS_Juice adds transform and material tracks for game feel feedback.
For architecture details, the domain extension pattern, and all track types, see the Framework API reference.
Contents
Key Concepts
| Concept | What It Is |
|---|
| Track | A single animated property — what changes, how long, and which easing curve. |
| Motion | A collection of tracks that play together. Tracks can start at different times within the motion. |
| Motion Asset | A data asset authored in the O3DE Asset Editor containing the tracks and their configuration. |
| Proxy | An optional entity redirect — lets a track target a child entity instead of the motion’s owner. |
| Composite | The runtime instance created from an asset. Each entity gets its own deep copy. |
How It Works
- Author a motion asset in the Asset Editor. Each domain has its own asset type (
.uiam for UI, .feedbackmotion for Juice). - Assign the asset to a component or embed it in a serialized field (e.g., a page’s show/hide transitions).
- Play the motion from ScriptCanvas or C++. The system initializes a runtime composite, resolves proxies, and ticks all tracks.
- Each track receives an eased progress value (0 → 1) every frame and applies its property change to the target entity.
- When all tracks complete, the motion fires its OnComplete callback.
Easing Curves
Every track can use any of the 40+ easing curves from the GS_Core curves library. Curves are configured per-track in the asset editor.
Available families: Linear, Quad, Cubic, Sine, Expo, Circ, Back, Elastic, Bounce — each with In, Out, and InOut variants.
Proxy Targeting
When a motion asset has tracks with identifiers (named labels), those tracks appear in the proxy list on the component. Proxies let you redirect a track to a different entity in the hierarchy — for example, a page show animation might animate the background separately from the content panel.
Each proxy entry maps a track label to a target entity. If no proxy is set, the track targets the motion’s owner entity.
Domain Extensions
GS_Motion is not used directly — it provides the base system that domain gems extend with concrete track types.
UI Animation (GS_UI)
Eight tracks for LyShine UI elements (position, scale, rotation, alpha, color, text). Asset extension: .uiam. Used for page transitions, button hover/select effects, and standalone UI animation.
UI Animation API
Feedback Motions (GS_Juice)
Two tracks for game feel effects — transform (position, scale, rotation) and material (opacity, emissive, color tint). Asset extension: .feedbackmotion. Used for screen shake, hit flash, and visual feedback.
Feedback Motions API
Quick Reference
| Need | Where |
|---|
| Animate UI elements | Use .uiam assets with UiAnimationMotionComponent or page transitions |
| Create feedback effects | Use .feedbackmotion assets with FeedbackEmitter component |
| Change easing curve | Edit the curve type on individual tracks in the asset editor |
| Redirect a track to another entity | Configure proxy entries on the component |
| Loop an animation | Enable loop on the motion asset |
Glossary
| Term | Meaning |
|---|
| Track | A single animated property within a motion — defines what changes, duration, and easing |
| Motion | A collection of tracks that play together as a single animation |
| Motion Asset | A data asset authored in the Asset Editor containing track configurations |
| Proxy | An entity redirect that lets a track target a child entity instead of the motion’s owner |
| Composite | The runtime instance created from a motion asset — each entity gets its own deep copy |
| Domain Extension | A gem-specific set of track types that extends GS_Motion for a particular use case |
For full definitions, see the Glossary.
See Also
For the full API, component properties, and C++ extension guide:
For related systems:
Get GS_Core
GS_Core — Explore this gem on the product page and add it to your project.
1.6 - Utilities
General-purpose components and math helpers — physics triggers, easing curves, spring dampers, gradients, splines, and more.
GS_Core includes a library of general-purpose components and math helpers available to every system in the framework. These utilities handle common game development tasks — physics overlap detection, value interpolation, animation curves, gradient sampling, and spatial math — so you can focus on gameplay logic rather than reimplementing fundamental patterns.
For full API details and code examples, see the Framework API reference.
Contents
Physics Trigger Volume
A reusable physics overlap detector. Handles trigger enter, stay, and exit events with filtering and callback support. Used internally by Pulsors, Targeting Fields, and World Triggers — and available for your own components.
Physics Trigger Volume API
Easing Curves
40+ easing functions organized into families. Every GS_Motion track, spring, and interpolation system in the framework can reference these curves by enum.
| Family | Variants |
|---|
| Linear | Linear |
| Quad | In, Out, InOut |
| Cubic | In, Out, InOut |
| Sine | In, Out, InOut |
| Expo | In, Out, InOut |
| Circ | In, Out, InOut |
| Back | In, Out, InOut |
| Elastic | In, Out, InOut |
| Bounce | In, Out, InOut |
Select a curve type via the CurveType enum in component properties, asset fields, or C++ code.
Curves API
Spring Dampers
15+ spring functions for physically-grounded value interpolation. Springs produce natural-feeling motion that reacts to velocity and acceleration, making them ideal for camera smoothing, UI follow, and any value that should “settle” rather than snap.
| Function | Use Case |
|---|
| Simple Spring | Basic spring with damping |
| Acceleration Spring | Spring with acceleration bias |
| Double Spring | Two-stage spring for overshoot effects |
| Timed Spring | Spring that reaches target in a fixed time |
| Velocity Spring | Spring driven by velocity |
| Quaternion Spring | Spring for rotation values |
Springs API
Gradients
Multi-stop gradient types for sampling values over a range. Used extensively by GS_Motion tracks and GS_Juice feedback tracks to define animation curves.
| Type | What It Samples |
|---|
| ColorGradient | RGBA color with positioned markers |
| FloatGradient | Single float value |
| Vector2Gradient | 2D vector |
Gradients are editable in the Inspector with visual marker placement.
Gradients API
Entity Helpers
Utility functions for finding entities in the scene by name.
| Function | What It Does |
|---|
GetEntityByName(name) | Returns the entity with the given name. |
GetEntityIdByName(name) | Returns the EntityId of the named entity. |
Entity Helper API
Weighted Random
Template-based weighted random selection. Given a collection of items with weights, returns a randomly selected item biased by weight. Useful for loot tables, dialogue variation, and procedural placement.
GS_Random API
Angle Helpers
Functions for angle and orientation math, plus 22 preset section configurations for direction classification.
| Function | What It Does |
|---|
YawFromDir(direction) | Extracts yaw angle from a direction vector. |
QuatFromYaw(yaw) | Creates a quaternion from a yaw angle. |
PickByAngle(angle, sections) | Maps an angle to a section index using a preset configuration. |
Section presets range from 2-section (left/right) to 16-section (compass-style), plus diagonal and cardinal configurations. Useful for animation direction selection and 2D-style facing.
Angle Helper API
Spline Helpers
Utility functions for working with O3DE spline components.
| Function | What It Does |
|---|
FindClosestWorldPoint(spline, point) | Returns the closest point on the spline in world space. |
FindClosestLocalPoint(spline, point) | Returns the closest point in local space. |
FindClosestFraction(spline, point) | Returns the 0–1 fraction along the spline. |
Spline Helper API
Serialization Helpers
Utility functions for common O3DE serialization patterns. Simplifies working with SerializeContext and EditContext in component reflection.
Serialization Helper API
Common Enums
Shared enumeration types used across the framework.
Common Enums API
Glossary
| Term | Meaning |
|---|
| Easing Curve | A function that maps linear progress (0→1) to a shaped output for smooth animation |
| Spring Damper | A physically-modeled interpolation function that settles naturally toward a target |
| Gradient | A multi-stop sampler that returns interpolated values (color, float, vector) over a 0→1 range |
| Physics Trigger Volume | A reusable overlap detector that fires enter, stay, and exit callbacks |
For full definitions, see the Glossary.
See Also
For the full API, component properties, and code examples:
For related systems:
Get GS_Core
GS_Core — Explore this gem on the product page and add it to your project.
2 - GS_AI
Foundation scaffold for AI-driven entity behavior in the GS_Play framework.
GS_AI provides the structural foundation for AI-driven entity behavior. It defines the base architecture that AI controller implementations build upon, integrating with the Unit system’s controller pattern to drive NPC entities through behavior logic rather than player input.
For architecture details and extension patterns, see the GS_AI API.
GS_AI is a foundation scaffold. It provides the base infrastructure and extension points that your project’s AI implementation builds on top of. Concrete AI behavior (behavior trees, utility AI, state machines) is implemented in your project or via third-party integration.
How It Works
GS_AI establishes the conventions and base classes for AI in the GS_Play framework. AI controllers extend the Unit Controller pattern — the same mechanism that player controllers use to drive units. Switching an entity between player control and AI control is a standard possession swap with no special handling required.
AI implementations listen to the same game lifecycle events as every other GS_Play system. AI controllers respond to standby mode, stage transitions, and manager lifecycle broadcasts automatically through the manager pattern.
Integration Points
| System | How AI Connects |
|---|
| Unit Controllers | AI controllers extend the unit controller pattern to drive NPC movement and actions. |
| GS_Managers | AI systems respond to startup, standby, and shutdown lifecycle events. |
| Interaction | AI entities can be targeting targets, trigger world triggers, and emit/receive pulsors. |
| Cinematics | The Cinematic Controller (in GS_Complete) demonstrates AI-to-cinematic handoff. |
See Also
For the full API and extension patterns:
For related systems:
Get GS_AI
GS_AI — Explore this gem on the product page and add it to your project.
3 - GS_Audio
Audio management, event-based sound, music scoring, mixing, and Klatt voice synthesis for the GS_Play framework.
GS_Audio is the audio management gem for GS_Play. It provides a visual node-based audio event authoring system, a multi-layer music scoring system, mixing buses with effects chains, and a built-in Klatt formant voice synthesizer with 3D spatial audio. All audio features integrate with the GS_Play manager lifecycle and respond to standby mode automatically.
For architecture details, component properties, and extension patterns, see the GS_Audio API.
Quick Navigation
| I want to… | Feature | API |
|---|
| Manage the audio engine or control master volume | Audio Manager | API |
| Author sound events visually with filters, effects, routing, and phase lifecycle | Audio Event Graph | API |
| Configure mixing buses with filters, EQ, and environmental influence effects | Mixing & Effects | API |
| Layer music tracks dynamically based on gameplay state | Score Arrangement | API |
| Generate text-to-speech with configurable voice parameters and 3D spatial audio | Klatt Voice | API |
Installation
GS_Audio requires GS_Core and the MiniAudio gem. Add both to your project’s gem dependencies.
For a complete guided setup, follow the Simple Project Setup guide.
Quick Installation Summary
- Enable the GS_Audio gem in your project configuration.
- Create an Audio Manager prefab and add it to the Game Manager’s Managers list.
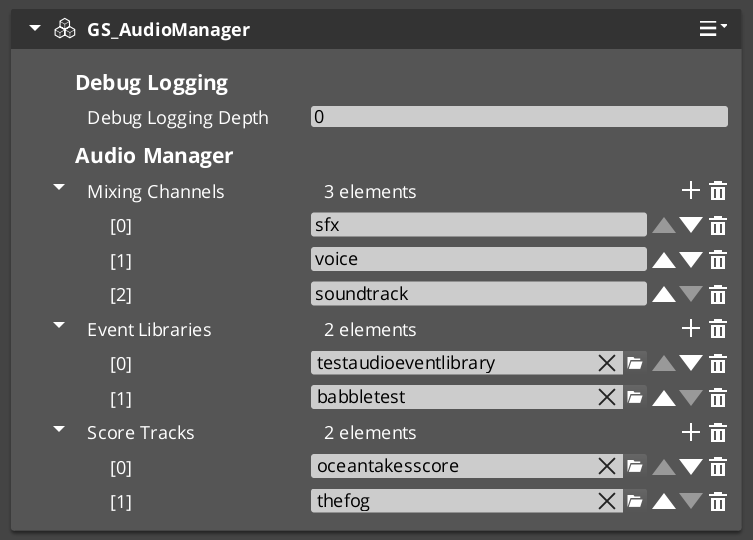
Audio Manager
The Audio Manager is the singleton controller for the entire audio system. It initializes the audio engine, manages mixing buses, loads audio event libraries, and coordinates score playback. Like all GS_Play managers, it extends the Manager base class and plugs into the Game Manager’s startup sequence automatically.
Audio Manager
API
Audio Event Graph
The Audio Event Graph is a visual node editor for authoring complex sound events. Build audio processing chains with source nodes, filter nodes, effects, and conditional routing — all connected in a graph that evaluates as a live data-flow pipeline. Supports phase lifecycle (Start / Loop / Finish) and runtime variable control for dynamic sound behavior.
Audio Event Graph
API
Mixing & Effects
The mixing system provides named audio buses with configurable effects chains. Each bus can have filters applied — low pass, high pass, band pass, notch, peaking EQ, shelving, delay, and reverb. Audio Bus Influence Effects allow environmental zones to dynamically modify bus effects based on the listener’s position.
Mixing & Effects
API
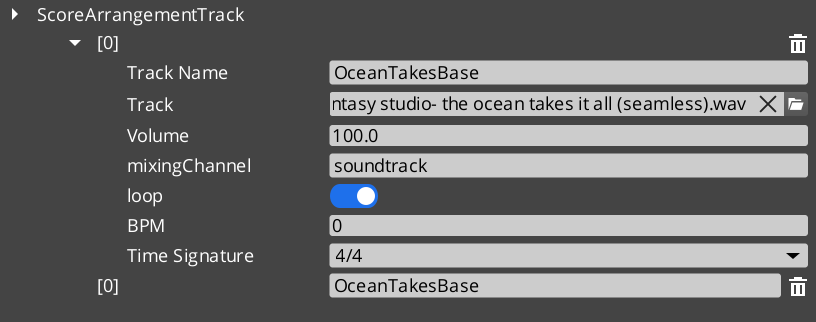
Score Arrangement
Score Arrangement Tracks are multi-layer music assets. Each arrangement defines a time signature, BPM, fade behavior, and a set of Score Layers — individual audio tracks that can be enabled or disabled independently. This allows dynamic music that adds or removes instrument layers based on gameplay state.
Score Arrangement
API
Klatt Voice Synthesis
GS_Play includes a built-in text-to-speech system based on Klatt formant synthesis. The Klatt Voice component converts text to speech in real time with configurable voice parameters — frequency, speed, waveform, formants, and pitch variance. The system supports 3D spatial audio and inline KTT tags for expressive delivery.
Klatt Voice
API
See Also
For the full API, component properties, and C++ extension guide:
For step-by-step project setup:
Get GS_Audio
GS_Audio — Explore this gem on the product page and add it to your project.
3.1 - Audio Manager
How to work with the GS_Play Audio Manager — engine initialization, bus routing, event library loading, and Audio Event Graph instance control.
The Audio Manager is the singleton controller for the entire audio system. It initializes the MiniAudio engine, manages mixing buses, loads audio event libraries, and coordinates score track playback. It also manages the instance lifecycle for Audio Event Graphs — pooling, firing, and releasing graph instances.
Like all GS_Play managers, it extends the Manager base class and responds to the Game Manager lifecycle automatically.
For component properties and API details, see the Framework API reference.
Contents
What It Manages
| Responsibility | What It Does |
|---|
| Engine lifecycle | Initializes and shuts down the MiniAudio audio engine. |
| Mixing buses | Creates and routes named audio buses with effects chains. |
| Audio Event Graphs | Pools and manages graph instances — fire-and-forget or manual lifecycle control. |
| Score playback | Manages Score Arrangement Track assets for dynamic music. |
| Master volume | Controls global and per-bus volume. |
Audio Event Graph Instances
The Audio Manager is the runtime entry point for the Audio Event Graph system. Two patterns are available:
Fire-and-Forget
The simplest pattern — the Manager handles everything automatically:
PlayAudioGraph(assetPath) → plays the graph → auto-cleans up when finished
Manual Instance Control
For sounds that need to be modified after starting — looping ambience, sounds driven by game state variables:
AcquireAudioGraph(assetPath) → instanceId
FireAudioGraph(instanceId)
SetAudioGraphVariable(instanceId, "paramName", value)   ← update at any time
SetAudioGraphEntity(instanceId, entityId)               ← 3D tracking
StopAudioGraph(instanceId) or FinishAudioGraph(instanceId)
ReleaseAudioGraph(instanceId)
The manager pools idle instances internally — acquiring and releasing is cheap.
Quick Reference
Audio Event Graph
| Need | Method |
|---|
| Fire-and-forget graph | PlayAudioGraph(assetPath) |
| Get a controllable instance | AcquireAudioGraph(assetPath) → instanceId |
| Start / restart an instance | FireAudioGraph(instanceId) |
| Stop an instance | StopAudioGraph(instanceId) |
| Fade out and stop | StopAudioGraphFade(instanceId, fadeTime) |
| Transition to Finish phase | FinishAudioGraph(instanceId) |
| Set a float variable | SetAudioGraphVariable(instanceId, name, value) |
| Set a bool variable | SetAudioGraphVariableBool(instanceId, name, value) |
| Enable looping | SetAudioGraphLooping(instanceId, true) |
| Track entity position (3D) | SetAudioGraphEntity(instanceId, entityId) |
| Release instance to pool | ReleaseAudioGraph(instanceId) |
Mixing & Score
| Need | Method |
|---|
| Set bus volume | SetMixerVolume(busName, volume) |
| Set master volume | SetMasterVolume(volume) |
| Play a score track | PlayScoreTrack(asset) |
| Stop the score track | StopScoreTrack() |
Glossary
| Term | Meaning |
|---|
| Audio Event Graph | A .audiograph node graph asset defining a sound event |
| Graph Instance | An independent runtime copy of an Audio Event Graph, pooled and reused by the Manager |
| Mixing Bus | A named audio channel with an effects chain for routing and processing sounds |
| Score Arrangement | A multi-layer music asset managed by the Audio Manager for dynamic playback |
For full definitions, see the Glossary.
See Also
Get GS_Audio
GS_Audio — Explore this gem on the product page and add it to your project.
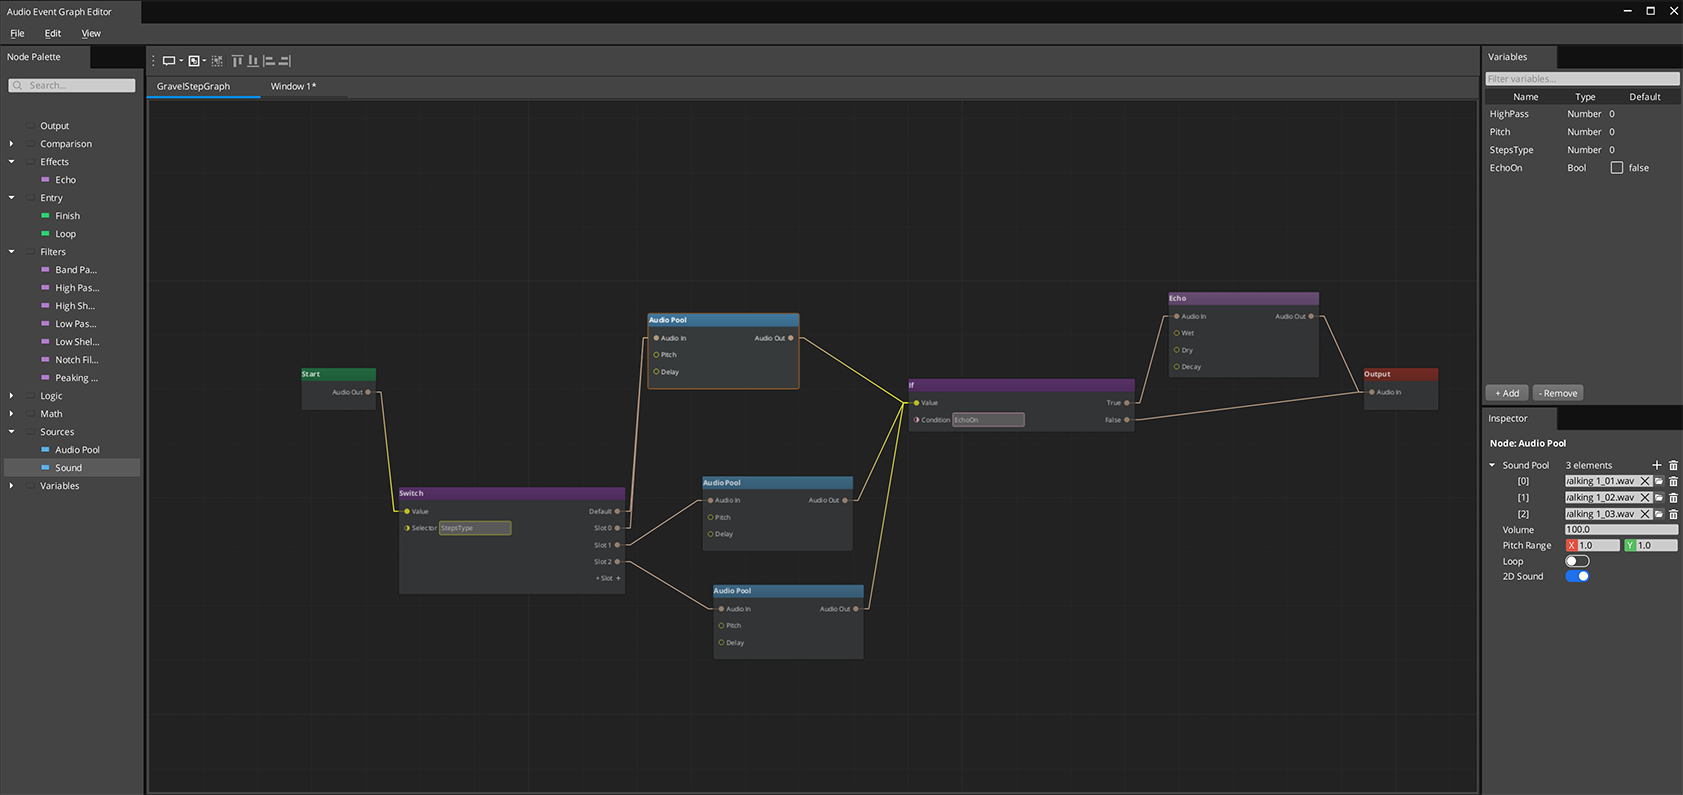
3.2 - Audio Event Graph
How to author complex sound events visually using the Audio Event Graph editor — nodes, phase lifecycle, variables, and runtime control.
The Audio Event Graph is a visual node-based editor for authoring complex sound events. Instead of a single clip pool, you connect sources, filters, effects, and routing nodes into a graph that evaluates as a data-flow pipeline. Each .audiograph file is one sound event. At runtime, the graph maps directly to a live audio processing chain.
For component properties and C++ extension, see the Framework API reference.
Contents
How It Works
Nodes in an Audio Event Graph evaluate left to right in topological order. Connections carry AudioRoute values — handles to a point in the audio processing chain. The signal flows through:
- An Entry node gates which phase is active
- Source nodes create and output audio
- Filter and effect nodes process the signal
- Routing nodes (If/Switch) direct the signal based on variables
- The Output node wires everything to a mixing bus
Only nodes affected by a change re-evaluate — the rest are skipped. This makes variable-driven sound modification cheap even for complex graphs.
Phase Lifecycle

Every Audio Event Graph supports up to three phases:
| Phase | Entry Node | Use For |
|---|
| Start | Aud_StartNode | One-shot intro sounds, attack transient |
| Loop | Aud_LoopNode | Sustained loops, ambient audio |
| Finish | Aud_FinishNode | Fade-outs, release tails |
Phases transition automatically: Start fires once, Loop repeats while looping is enabled, Finish plays when FinishAudioGraph() is called. Not all phases are required — a simple one-shot only needs Start.
Entry nodes share routing freely. A source wired to both Start and Loop phases produces sound in both.
Nodes
Source Nodes
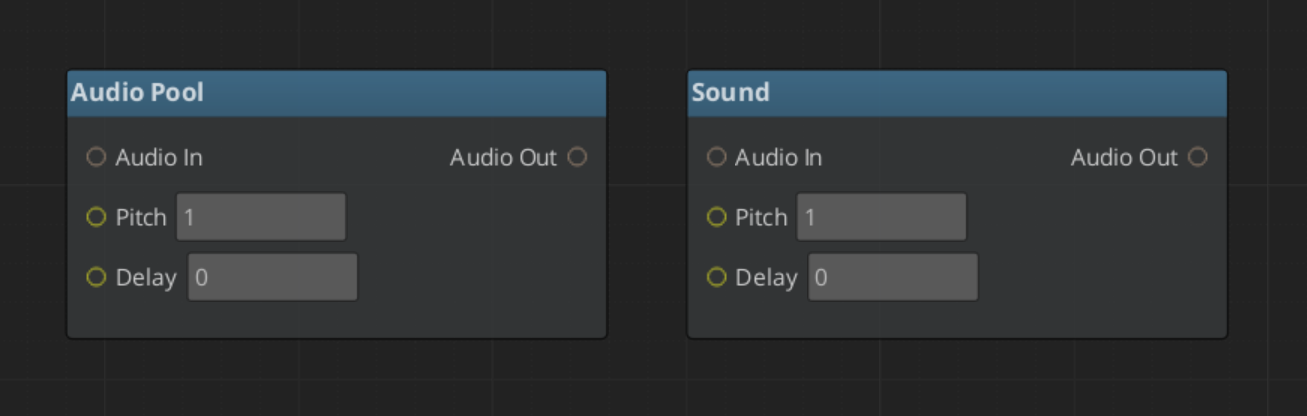
| Node | What It Does |
|---|
| Aud_SoundNode | Single audio asset playback |
| Aud_AudioPoolNode | Random clip selection from a pool |
Both support volume, pitch, delay, looping, and 3D spatialization.
Filter Nodes
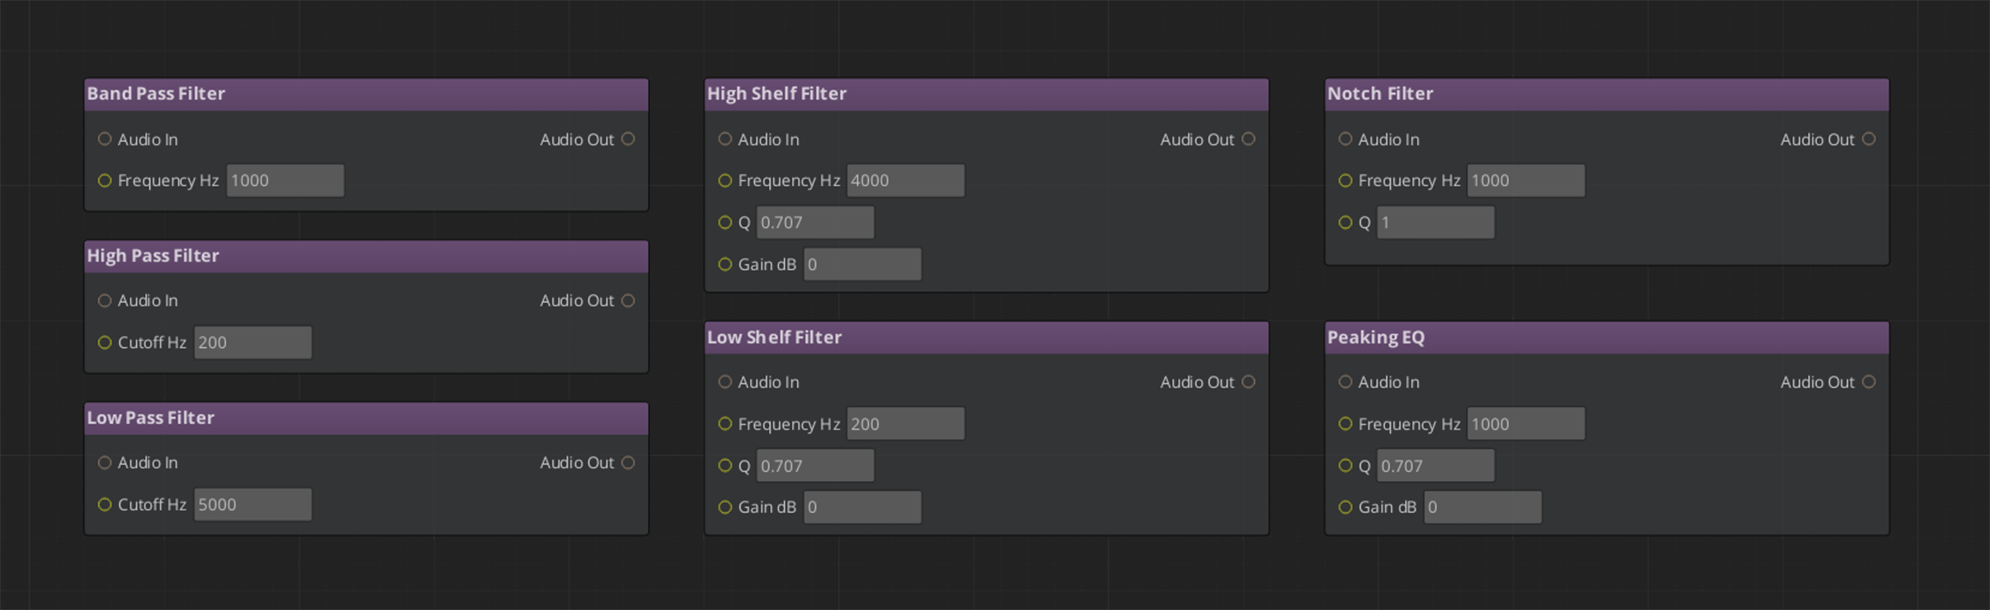
LowPass, HighPass, BandPass, Notch, PeakingEQ, LowShelf, HighShelf — all take audio_in and output audio_out. Parameters (cutoff, Q, gain) can be set per-node or bound to graph variables.
Effect Nodes
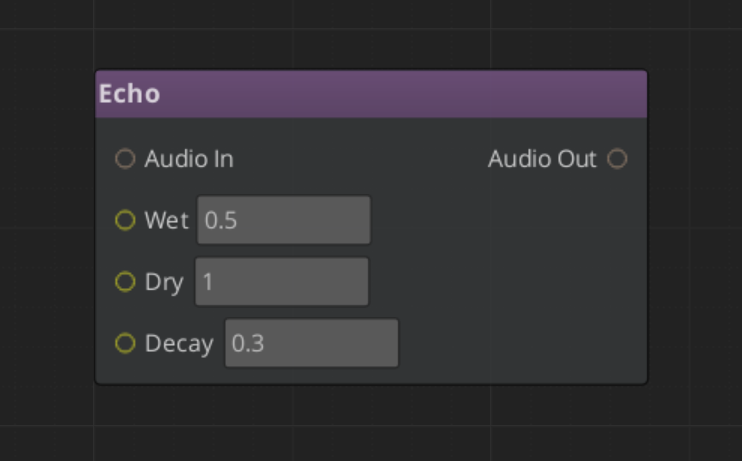
| Node | What It Does |
|---|
| Aud_EchoNode | Echo / reverb tail |
| Aud_DelayNode | Delay effect |
Routing Nodes
IfNode and SwitchNode route AudioRoute values based on conditions or a selector variable. Use these for conditional audio paths — different sounds based on surface type, weather, or character state.
Output Node
Aud_OutputNode wires the final signal to a named mixing bus. Every graph needs exactly one Output node.
Using Variables
Declare variables in the Variable Panel. Bind them to filter parameter slots (right-click > Convert to Reference) or use If/Switch nodes to route based on them.
At runtime, setting a variable re-evaluates only the nodes that depend on it — the rest of the graph is untouched.
Common patterns:
| Variable | Type | Use |
|---|
underwater | Float | Bind to LowPass cutoff — muffles audio when > 0 |
surfaceType | Int | Drive a SwitchNode to select different footstep sources |
intensity | Float | Blend between effect parameters for emotional scoring |
Variables are set from gameplay code via the Audio Manager:
SetAudioGraphVariable(instanceId, "underwater", 0.8)
SetAudioGraphVariableBool(instanceId, "isSprinting", true)
Playing at Runtime
All Audio Event Graph playback goes through the Audio Manager.
Fire-and-Forget
For one-shot sounds with no runtime modification needed:
PlayAudioGraph("Assets/Audio/Explosion.audiograph")
Manual Control
For sounds that loop, need variable updates, or need explicit stopping:
AcquireAudioGraph(assetPath) — get an instance IDSetAudioGraphLooping(id, true) — if it loopsSetAudioGraphEntity(id, entityId) — for 3D trackingFireAudioGraph(id) — start playbackSetAudioGraphVariable(id, name, value) — update variables any timeStopAudioGraph(id) or FinishAudioGraph(id) — stop cleanlyReleaseAudioGraph(id) — return the instance to the pool
Quick Reference
| Task | How |
|---|
| Create a new graph | File > New in the Audio Event Graph Editor |
| Add a phase entry node | Drag Start / Loop / Finish node from the palette |
| Add a source | Drag Aud_SoundNode or Aud_AudioPoolNode |
| Chain a filter | Connect source audio_out → filter audio_in |
| Wire to output | Connect final node’s audio_out → Aud_OutputNode audio_in |
| Bind a variable to a slot | Right-click the slot > Convert to Reference |
| Play fire-and-forget | AudioManagerRequestBus::PlayAudioGraph(path) |
| Play with control | AcquireAudioGraph → FireAudioGraph → ReleaseAudioGraph |
| Update a variable | SetAudioGraphVariable(id, name, value) |
Glossary
| Term | Meaning |
|---|
| Audio Event Graph | A .audiograph file defining a sound event as a data-flow node graph |
| AudioRoute | The value type flowing between nodes — a handle to a point in the miniaudio processing chain |
| Phase | One of three lifecycle stages (Start / Loop / Finish) gated by entry nodes |
| Graph Instance | An independent runtime copy of a graph, pooled and managed by the Audio Manager |
| Dirty Propagation | The evaluation model — only nodes downstream of a changed variable re-run |
For full definitions, see the Glossary.
See Also
Get GS_Audio
GS_Audio — Explore this gem on the product page and add it to your project.
3.3 - Mixing & Effects
How to work with GS_Play audio mixing — named buses, effects chains, and environmental audio influence.
The mixing system provides named audio buses with configurable effects chains. Each bus can have multiple audio filters applied for real-time audio processing. Audio Bus Influence Effects allow environmental zones to dynamically modify bus parameters based on the listener’s position.
For component properties and filter types, see the Framework API reference.
GS_Audio is in Early Development. Full support planned soon: 2026.
Contents
Available Filters
| Filter | What It Does |
|---|
| Low Pass | Removes high frequencies. Simulates muffling (underwater, behind walls). |
| High Pass | Removes low frequencies. Simulates thin/tinny audio (radio, phone). |
| Band Pass | Passes a frequency band. Isolates specific ranges. |
| Notch | Removes a narrow frequency band. |
| Peaking EQ | Boosts or cuts a frequency band. |
| Low Shelf | Boosts or cuts frequencies below a threshold. |
| High Shelf | Boosts or cuts frequencies above a threshold. |
| Delay | Adds echo/delay effect. |
| Reverb | Adds room/space reverb. |
Environmental Audio Influence
Audio Bus Influence Effects allow spatial zones to modify bus effects dynamically. When the listener enters an influence zone (like a cave or tunnel), the zone’s effects are applied to the specified bus with priority-based stacking. Multiple overlapping zones resolve by priority.
Quick Reference
| Need | Bus | Method |
|---|
| Control mixer settings | GS_MixingRequestBus | Mixer control methods |
| Set master volume | AudioManagerRequestBus | SetMixerVolume |
Glossary
| Term | Meaning |
|---|
| Mixing Bus | A named audio channel that routes sound through an effects chain |
| Audio Filter | A real-time audio processing effect applied to a mixing bus |
| Audio Bus Influence Effect | A spatial zone that modifies bus effects based on listener position |
For full definitions, see the Glossary.
See Also
For the full API, component properties, and C++ extension guide:
For related systems:
Get GS_Audio
GS_Audio — Explore this gem on the product page and add it to your project.
3.4 - Score Arrangement
How to work with GS_Play score arrangements — multi-layer dynamic music with configurable time signatures and layer control.
Score Arrangement Tracks are multi-layer music assets for dynamic, adaptive game music. Each arrangement defines a time signature, tempo, fade behavior, and a set of independently controllable Score Layers. This enables music that responds to gameplay — adding percussion during combat, muting melody during dialogue, or transitioning between intensity levels.
For asset structure and playback API, see the Framework API reference.
GS_Audio is in Early Development. Full support planned soon: 2026.
Contents
How It Works
A Score Arrangement Track is a data asset containing:
| Field | What It Controls |
|---|
| Time Signature | Musical timing (4/4, 3/4, 6/8, etc.). |
| BPM | Tempo in beats per minute. |
| Fade Control | How layers fade in and out. |
| Score Layers | Individual audio tracks that play simultaneously. |
Each Score Layer is an independent audio stream within the arrangement. Layers can be enabled or disabled at runtime, creating dynamic music that evolves based on game state.
Supported Time Signatures
4/4, 4/2, 12/8, 2/2, 2/4, 6/8, 3/4, 3/2, 9/8
Glossary
| Term | Meaning |
|---|
| Score Arrangement Track | A multi-layer music data asset with time signature, tempo, and controllable layers |
| Score Layer | An individual audio stream within an arrangement that can be enabled or disabled at runtime |
| BPM | Beats per minute — the tempo of the arrangement |
For full definitions, see the Glossary.
See Also
For the full API, component properties, and C++ extension guide:
For related systems:
Get GS_Audio
GS_Audio — Explore this gem on the product page and add it to your project.
3.5 - Klatt Voice Synthesis
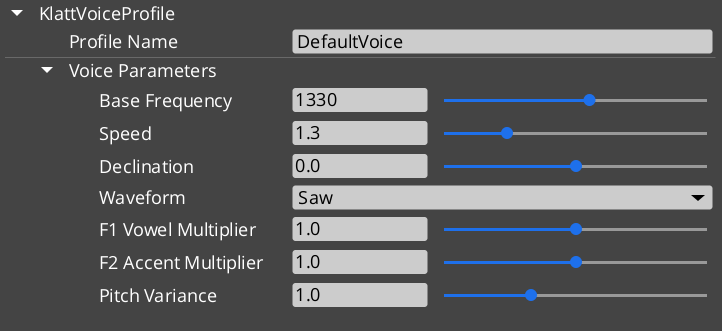
How to work with GS_Play Klatt voice synthesis — text-to-speech with 3D spatial audio, voice profiles, and inline parameter control.
GS_Play includes a built-in text-to-speech system based on Klatt formant synthesis. The KlattVoiceComponent converts text to speech in real time with configurable voice parameters. Voices are positioned in 3D space and attenuate with distance, making synthesized speech feel like it comes from the character speaking.
For component properties, voice parameter details, and the phoneme mapping system, see the Framework API reference.
Contents
How It Works
- Configure a voice using a KlattVoiceProfile — set frequency, speed, waveform, formants, and pitch variance.
- Assign a KlattPhonemeMap — maps text characters to ARPABET phonemes for pronunciation.
- Speak text from ScriptCanvas or C++ — the system converts text to phonemes and synthesizes audio in real time.
- Position in 3D — the voice component uses KlattSpatialConfig for 3D audio positioning relative to the entity.
Voice Configuration
| Parameter | What It Controls |
|---|
| Frequency | Base voice pitch. |
| Speed | Speech rate. |
| Waveform | Voice quality — Saw, Triangle, Sin, Square, Pulse, Noise, Warble. |
| Formants | Vocal tract resonance characteristics. |
| Pitch Variance | Random pitch variation for natural-sounding speech. |
| Declination | Pitch drop over the course of a sentence. |
KTT (Klatt Text Tags) allow inline parameter changes within speech text for expressive delivery:
"Hello <speed=0.5>world</speed>, how are <pitch=1.2>you</pitch>?"
The KlattCommandParser processes these tags during speech synthesis, enabling mid-sentence changes to speed, pitch, and other voice parameters.
For the complete tag reference — all attributes, value ranges, and reset behavior — see the Framework API: KTT Voice Tags.
Phoneme Maps
Two base phoneme maps are available:
| Map | Description |
|---|
| SoLoud_Default | Simple default mapping. |
| CMU_Full | Full CMU pronunciation dictionary mapping. |
Custom phoneme overrides allow project-specific word pronunciations (character names, fantasy terms) without modifying the base map.
3D Spatial Audio
The KlattSpatialConfig controls how synthesized speech is positioned in 3D:
- Voices attenuate with distance from the listener.
- The KlattVoiceSystemComponent tracks the listener position and updates all active voices.
- Multiple characters can speak simultaneously with correct spatial positioning.
Quick Reference
| Need | Bus | Method |
|---|
| Control a voice | KlattVoiceRequestBus | Voice synthesis methods (entity-addressed) |
| System-level voice control | KlattVoiceSystemRequestBus | Listener tracking, engine management |
Glossary
| Term | Meaning |
|---|
| Klatt Synthesis | A formant-based speech synthesis method that generates voice from frequency parameters |
| KTT Tags | Inline text tags that modify voice parameters mid-sentence during synthesis |
| Phoneme Map | A mapping from text characters to ARPABET phonemes for pronunciation |
| KlattSpatialConfig | Configuration for 3D audio positioning and distance attenuation of synthesized speech |
For full definitions, see the Glossary.
See Also
For the full API, component properties, and C++ extension guide:
For related systems:
Get GS_Audio
GS_Audio — Explore this gem on the product page and add it to your project.
4 - GS_Cinematics
Node-graph dialogue sequences, cinematic stage management, polymorphic performances, and world-space UI with typewriter and audio babble.
GS_Cinematics is the complete dialogue and cinematic control system for GS_Play. It provides a node-graph authoring tool for branching dialogue sequences, a runtime sequencer with conditions and side effects, a UI layer for text display and player choice, and a Cinematics Manager for scene staging. Custom conditions, effects, and performance types are discovered automatically through O3DE serialization, so project-specific dialogue behaviors can be added without modifying the gem.
For architecture details, component properties, and extending the system in C++, see the GS_Cinematics API.
Quick Navigation
| I want to… | Feature | API |
|---|
| Coordinate cinematic sequences and manage stage markers for actor positioning | Cinematics Manager | API |
| Author branching dialogue sequences in the visual Dialogue Editor | Dialogue System | API |
| Display dialogue text, player choices, and speech babble on screen or in world space | Dialogue UI | API |
| Move actors to stage markers during dialogue with navigation or teleport | Performances | API |
Installation
GS_Cinematics requires GS_Core, LyShine, and RecastNavigation. The node editor tools additionally require GraphCanvas and GraphModel as editor-only dependencies.
For a full guided walkthrough, follow the Simple Project Setup guide.
Quick Installation Summary
- Enable the GS_Cinematics gem in your project configuration.
- Create Cinematics Manager and Dialogue Manager prefabs, add to the Game Manager’s Managers list.
- Create
.dialoguedatabase assets with the Dialogue Editor (GS Tools > Dialogue Editor). - Place DialogueSequencer and DialogueUI components in your level.
- Bake NavMesh in levels where PathTo performances will be used.
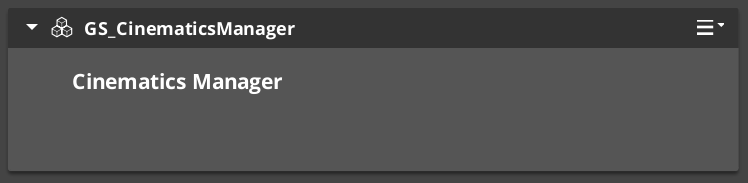
Cinematics Manager
The Cinematics Manager coordinates the begin and end of cinematic sequences, broadcasting enter/exit events so other systems know when to yield control. It maintains a registry of stage marker entities placed in each level — named anchor points that performers and cameras look up at runtime to determine positioning during a sequence.
Cinematics Manager
API
Dialogue System
The Dialogue System is the authoring and runtime core. Dialogue is authored in the Dialogue Editor — a visual node graph tool — and stored in .dialoguedatabase container files holding actors and sequences. Each sequence is a graph of polymorphic nodes: text, selection, random branch, effects, and performances. At runtime, the sequencer walks the graph, evaluates conditions, executes effects, and emits events for the UI layer.
Dialogue System
API
Dialogue UI
The Dialogue UI feature set puts dialogue text and player choices on screen. DialogueUI handles screen-space text display with a Typewriter for character-by-character reveal. DialogueUISelection renders player choices as selectable buttons. World-space variants place speech bubbles above actors. Babble plays audio tied to the active speaker. The DialogueUIBridge routes sequencer events to the correct UI implementation and routes player selection back.
Dialogue UI
API
Performances are polymorphic actions that move or reposition actors during dialogue. MoveTo translates actors to named stage markers, PathTo navigates via NavMesh, and Reposition teleports instantly. All run asynchronously — the sequencer waits for completion before advancing. Custom performance types can be created through extending the class.
Performances
API
See Also
For the full API, component properties, and C++ extension guide:
For step-by-step project setup:
Get GS_Cinematics
GS_Cinematics — Explore this gem on the product page and add it to your project.
4.1 - Cinematics Manager
How to coordinate cinematic sequences in GS_Play — beginning and ending cutscenes, registering stage markers, and reacting to cinematic events from scripts.
The Cinematics Manager is the GS_Core-integrated manager component for the GS_Cinematics system. It signals when a cinematic sequence begins and ends, broadcasts events so other systems — UI, movement, input — know when to yield control to a cutscene, and maintains a registry of named CinematicStageMarkerComponent entities placed in each level.
For architecture details, component properties, and extending the system in C++, see the Framework API reference.
Contents
Stage Markers
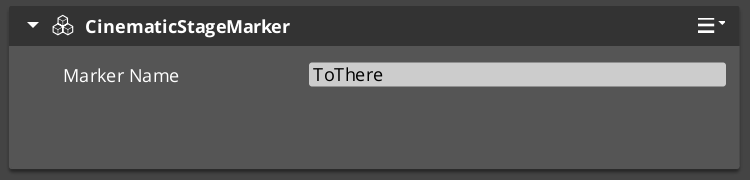
Stage markers are named anchor entities placed in each level that serve as spatial reference points for cinematic sequences. Performers and camera systems look up markers by name at runtime to determine where actors should stand, face, or move to during a cutscene.
This design decouples authored dialogue data from level-specific layout. The same sequence asset plays in any level as long as that level provides CinematicStageMarkerComponent entities with the expected names.
| Component | Purpose |
|---|
CinematicStageMarkerComponent | Marks a named position in the level for cinematic staging. |
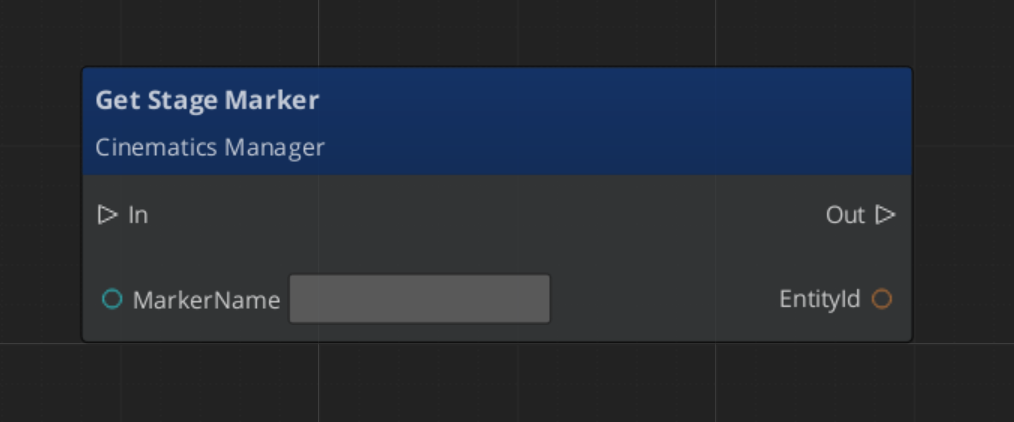
To register a marker, add CinematicStageMarkerComponent to an entity in the level and give it a name. The Cinematics Manager automatically discovers and registers all markers in the level on startup via RegisterStageMarker. At runtime, any system can retrieve a marker entity by name with GetStageMarker.
Cinematic Events
When a cinematic begins and ends, the Cinematics Manager broadcasts events on CinematicsManagerNotificationBus. Listen to these in any system that needs to yield or reclaim control during a cutscene — player input, HUD, AI, camera.
| Event | When It Fires | What to Do |
|---|
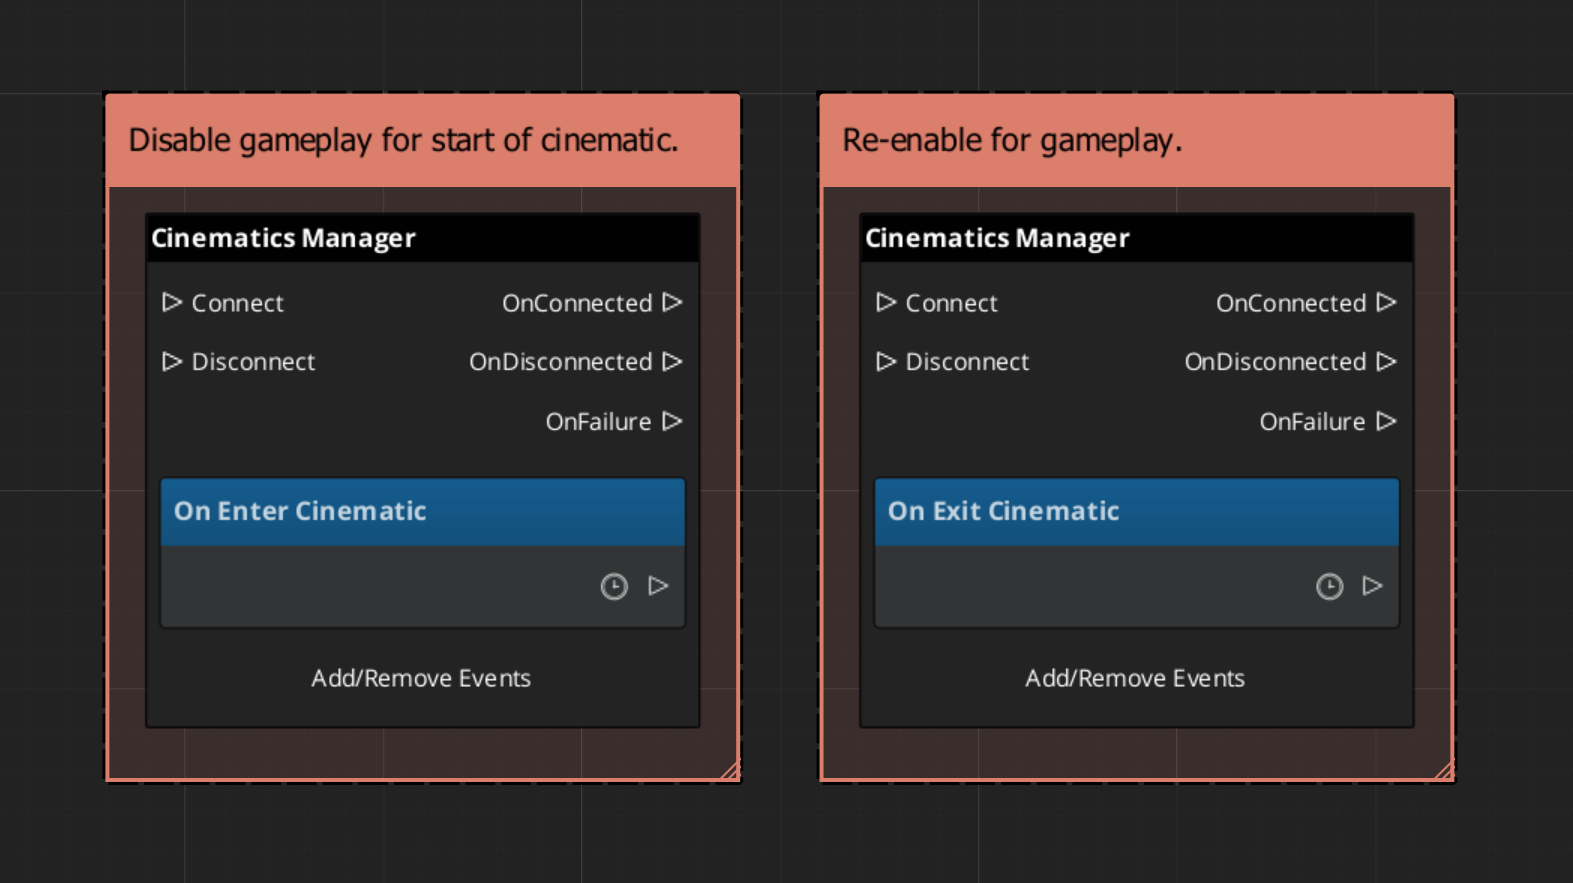
EnterCinematic | A cinematic sequence has started. | Disable player input, hide the HUD, suspend AI. |
ExitCinematic | The cinematic sequence has ended. | Re-enable input, restore HUD, resume AI. |
Starting and Ending Cinematics
Call BeginCinematic to signal that a cinematic is starting and EndCinematic when it completes. These calls broadcast EnterCinematic and ExitCinematic respectively. They do not drive animation or sequence playback directly — that is the role of DialogueSequencerComponent. The Cinematics Manager handles the global state change so all listening systems respond in one coordinated broadcast.
| Bus | Method | What It Does |
|---|
CinematicsManagerRequestBus | BeginCinematic | Broadcasts EnterCinematic to all listeners. |
CinematicsManagerRequestBus | EndCinematic | Broadcasts ExitCinematic to all listeners. |
CinematicsManagerRequestBus | RegisterStageMarker | Adds a marker to the registry by name. |
CinematicsManagerRequestBus | GetStageMarker | Returns the entity for a marker by name. |
ScriptCanvas Usage
Reacting to Cinematic State
To pause gameplay systems when a cinematic starts and resume them when it ends, connect to CinematicsManagerNotificationBus:
Triggering a Cinematic
To start a cinematic from a trigger or cutscene entity, call BeginCinematic, drive the sequence through the Dialogue Sequencer, then call EndCinematic on completion:
Looking Up a Stage Marker
Quick Reference
| Need | Bus | Method / Event |
|---|
| Start a cinematic | CinematicsManagerRequestBus | BeginCinematic |
| End a cinematic | CinematicsManagerRequestBus | EndCinematic |
| Register a stage marker | CinematicsManagerRequestBus | RegisterStageMarker |
| Retrieve a stage marker entity | CinematicsManagerRequestBus | GetStageMarker |
| Know when a cinematic starts | CinematicsManagerNotificationBus | EnterCinematic |
| Know when a cinematic ends | CinematicsManagerNotificationBus | ExitCinematic |
Glossary
| Term | Meaning |
|---|
| Stage Marker | A named anchor entity in a level used as a spatial reference for cinematic positioning |
| Cinematic | A global state where the Cinematics Manager has signaled that a cutscene is in progress |
For full definitions, see the Glossary.
See Also
For the full API, component properties, and C++ extension guide:
For related systems:
Get GS_Cinematics
GS_Cinematics — Explore this gem on the product page and add it to your project.
4.2 - Dialogue System
How to author and play back branching dialogue in GS_Play — the Dialogue Editor, node types, conditions, effects, performances, and the runtime sequencer.
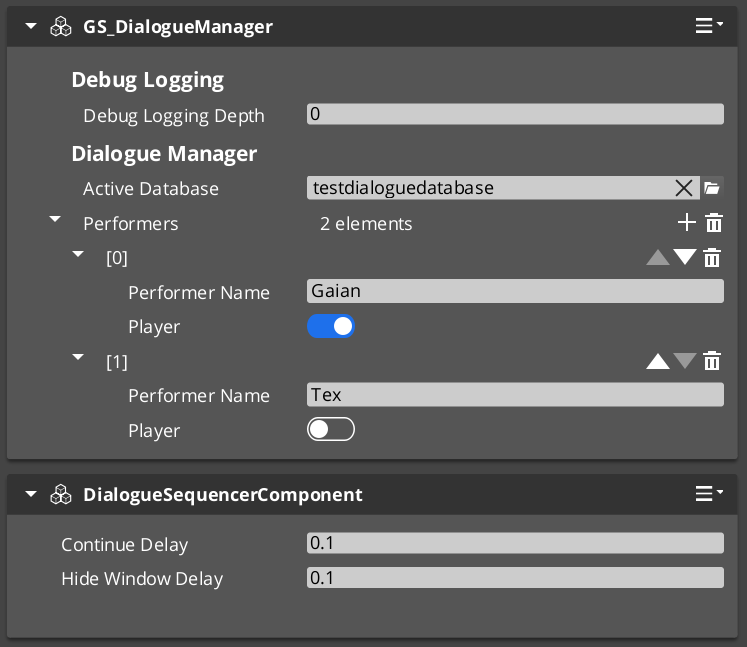
The Dialogue System is the authoring and runtime core of GS_Cinematics. Dialogue is authored visually in the Dialogue Editor — a node graph tool where sequences are built from Text, Selection, Effects, and Performance nodes inside a .dialoguedatabase container file. At runtime, GS_DialogueManagerComponent manages the active database and maps performer names to entities in the level, while DialogueSequencerComponent drives playback — walking the graph, evaluating conditions, executing effects, and emitting events that UI components consume.
For architecture details, component properties, and extending the system in C++, see the Framework API reference.
Contents
Dialogue Editor
Dialogue is authored in the Dialogue Editor — a visual node graph tool opened from GS Tools > Dialogue Editor. Each .dialoguedatabase file is a container holding all actors and sequences for a dialogue database. Sequences are built as directed node graphs: connect Text, Selection, Random, Effects, and Performance nodes to define the conversation flow. The editor saves the entire container as one file — individual sequences are not separate assets.
Conditions, effects, and performance types from any gem are discovered automatically at startup and appear in the editor without modifying GS_Cinematics.

Database Model
A .dialoguedatabase file is a container managed entirely through the Dialogue Editor:
| Container Contents | Purpose |
|---|
| Actors / Performers | Character definitions with portrait and metadata. Defined on the Performers page. |
| Sequences | Each sequence is an independent graph, opened as a tab via the Sequence Sidebar. |
| System settings | Database-level defaults, on the System page. |
The editor saves and loads the entire container as one file. Individual sequences are not separate assets. Switch the active database at runtime via DialogueManagerRequestBus::ChangeDialogueDatabase.
Authoring a Sequence
- Open GS Tools > Dialogue Editor
- File > New → save as
.dialoguedatabase - Define performers on the Performers page
- On the Sequences page, click Add in the sidebar, name the sequence
- Build the graph: drag nodes from the palette, connect FlowOut → FlowIn
- Ctrl+S to save the database
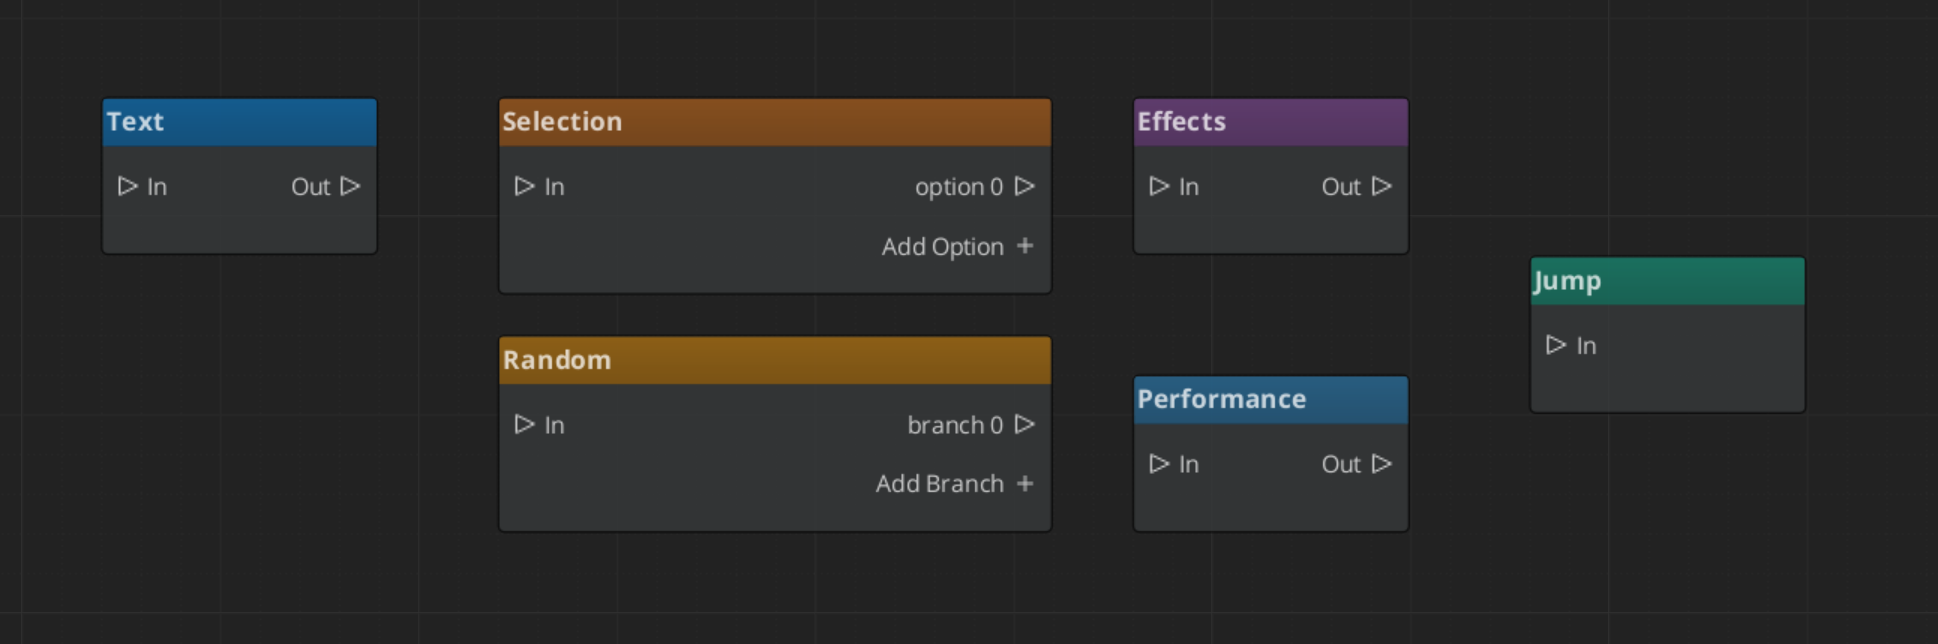
Node Types
Each sequence is a directed graph of nodes connected by FlowOut → FlowIn slots.
| Node | What It Does |
|---|
| Start | Entry point. Auto-spawned, one per sequence. |
| Text | Displays a line of dialogue from a speaker. Supports localization. |
| Selection | Presents the player with choices. One FlowOut slot per option. |
| Random | Selects a random outgoing branch. Supports weighted randomization. |
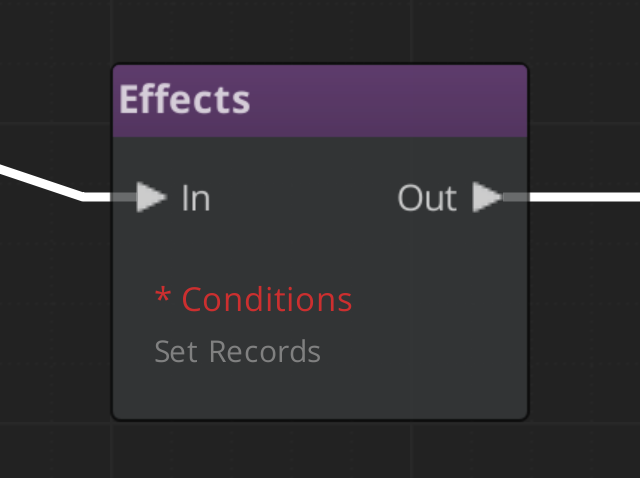
| Effects | Executes one or more DialogueEffect objects. |
| Performance | Triggers a DialoguePerformance action, optionally waits for it to complete. |
| End | Terminates the sequence. |
Conditions
Conditions are polymorphic objects added to any node. The sequencer evaluates all conditions before entering a node — failed conditions cause the evaluator to skip it and try the next valid path.
| Condition Type | What It Evaluates |
|---|
Boolean_DialogueCondition | A base boolean comparison. |
Record_DialogueCondition | Checks a game record via the RecordKeeper system. |
Custom conditions from any gem are discovered automatically — subclass DialogueCondition, reflect it, and it appears in the inspector type picker.
Effects
Effects are polymorphic objects executed when the sequencer reaches an Effects node.
| Effect Type | What It Does |
|---|
SetRecords_DialogueEffect | Sets one or more game records via the RecordKeeper system. |
ToggleEntitiesActive_DialogueEffect | Activates or deactivates entities in the level. |
Custom effects follow the same discovery pattern as conditions.
Performances are polymorphic actions executed at Performance nodes. The sequencer can optionally wait for completion before advancing.
| Performance Type | What It Does |
|---|
MoveTo_DialoguePerformance | Smoothly moves a performer to a named stage marker. |
PathTo_DialoguePerformance | Navigates a performer to a marker via NavMesh. |
RepositionPerformer_DialoguePerformance | Instantly teleports a performer to a marker (non-blocking). |
Custom performance types are discovered automatically.
Runtime Playback
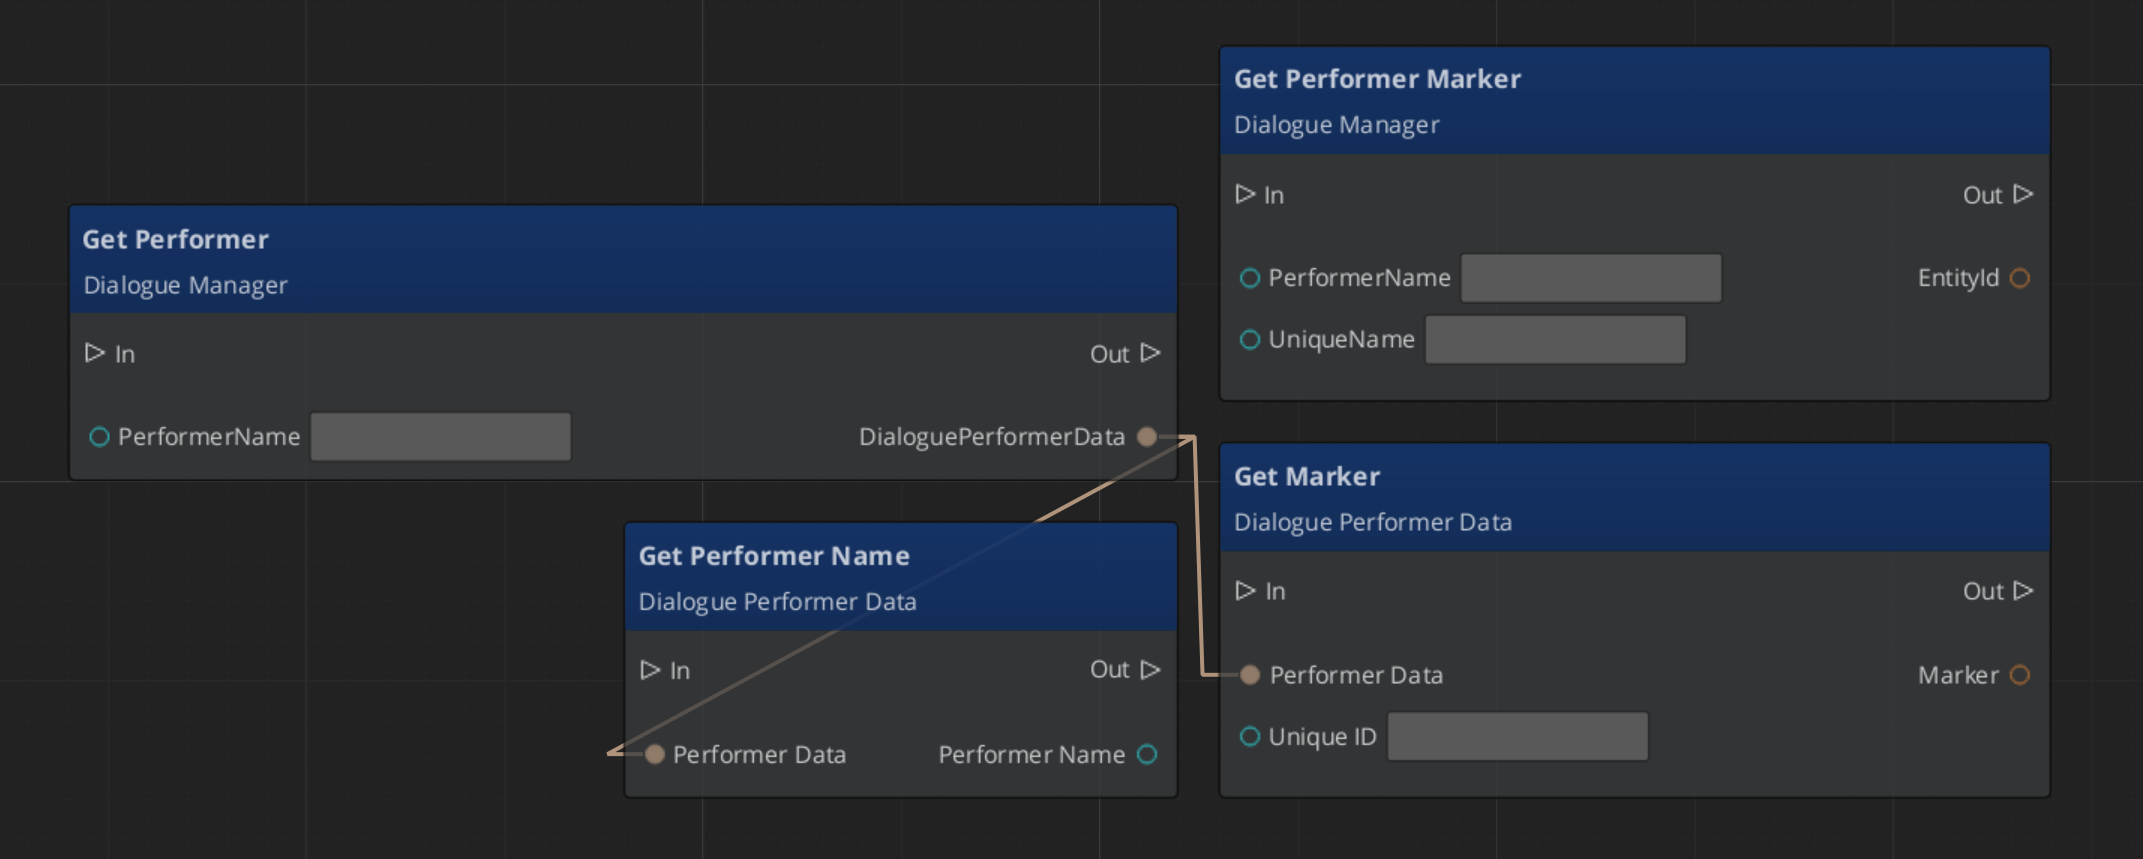
GS_DialogueManagerComponent
The top-level manager for all dialogue. Holds the active database, maps performer names to level entities, and is the entry point for starting sequences.
| Bus | Method | What It Does |
|---|
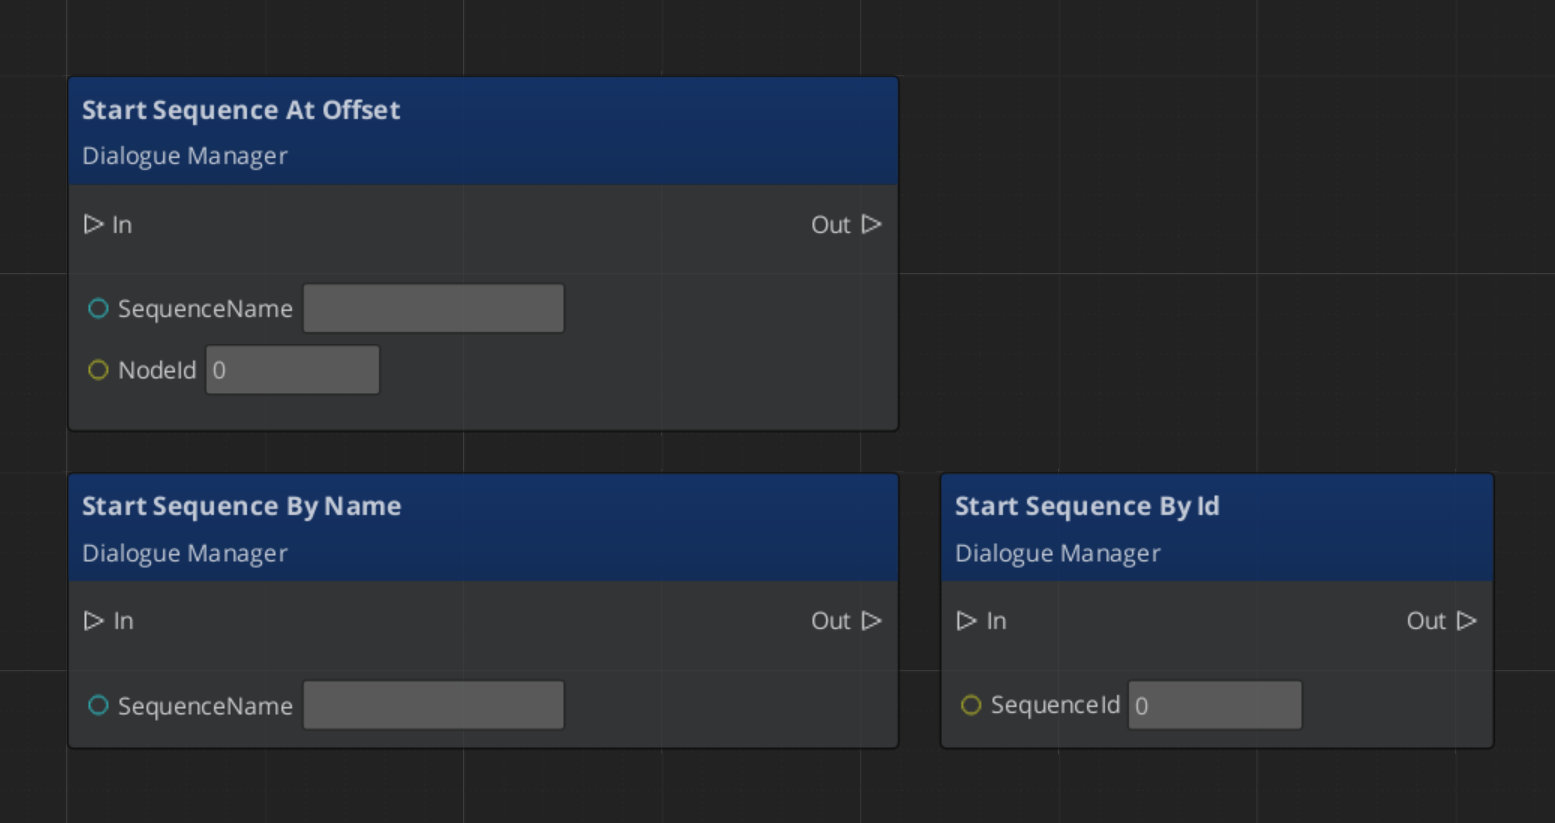
DialogueManagerRequestBus | StartDialogueSequenceByName | Starts a named sequence from the active database. |
DialogueManagerRequestBus | ChangeDialogueDatabase | Loads a different .dialoguedatabase asset. |
DialogueManagerRequestBus | RegisterPerformerMarker | Registers a performer entity by name for the current level. |
DialogueManagerRequestBus | GetPerformer | Returns the entity for a named performer. |
DialogueSequencerComponent
Drives sequence playback. Walks the graph, evaluates conditions, executes effects, triggers performances, and emits notifications for the UI layer.
| Bus | Method / Event | Purpose |
|---|
DialogueSequencerRequestBus | StartDialogueBySequence | Begins playback of a sequence object directly. |
DialogueSequencerNotificationBus | OnDialogueTextBegin | Fires when a Text node executes — carries speaker and text data. |
DialogueSequencerNotificationBus | OnDialogueSequenceComplete | Fires when the sequence reaches its End node. |
Localization
Text nodes store lines as LocalizedStringId references — a key plus default fallback text. At runtime Resolve() looks up the key in the active LocalizedStringTable and returns the localized string. If no table is loaded or the key is absent, the fallback text is used.
ScriptCanvas Usage
Starting a Dialogue Sequence
Quick Reference
| Need | Bus | Method / Event |
|---|
| Start a sequence by name | DialogueManagerRequestBus | StartDialogueSequenceByName |
| Load a different database | DialogueManagerRequestBus | ChangeDialogueDatabase |
| Register a performer | DialogueManagerRequestBus | RegisterPerformerMarker |
| Get a performer entity | DialogueManagerRequestBus | GetPerformer |
| Start a sequence directly | DialogueSequencerRequestBus | StartDialogueBySequence |
| React to a text line | DialogueSequencerNotificationBus | OnDialogueTextBegin |
| React to sequence end | DialogueSequencerNotificationBus | OnDialogueSequenceComplete |
Glossary
| Term | Meaning |
|---|
| Dialogue Editor | The visual gs_graphcanvas-based tool for authoring dialogue sequences |
| DialogueDatabase | A .dialoguedatabase container asset holding actors and sequences |
| DialogueSequence | A graph of nodes defining a single dialogue conversation |
| DialogueCondition | A polymorphic evaluator gating node entry |
| DialogueEffect | A polymorphic action executed at Effects nodes |
| DialoguePerformance | A polymorphic action that moves or repositions performers; optionally blocking |
| Performer | A named actor entity in the level mapped from the database via DialoguePerformerMarkerComponent |
For full definitions, see the Glossary.
See Also
Get GS_Cinematics
GS_Cinematics — Explore this gem on the product page and add it to your project.
4.2.1 - Dialogue UI
How to display dialogue text, player choices, and typewriter effects in GS_Play — screen-space and world-space UI components and the bridge that connects them to the sequencer.
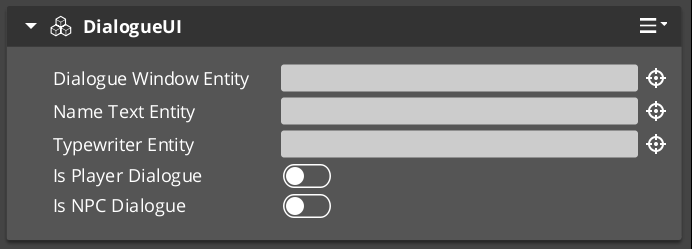
The Dialogue UI layer is the display side of the GS_Cinematics system. It receives events from DialogueSequencerComponent through DialogueUIBridgeComponent and routes them to the correct UI implementation — screen-space for HUD-style dialogue or world-space for speech bubbles above actors. Player choices are handled by selection components, and the TypewriterComponent reveals text character-by-character. BabbleComponent optionally plays per-character audio babble to give speakers a voice.
For architecture details, component properties, and extending the system in C++, see the Framework API reference.
Contents
Component Overview
| Component | Space | Purpose |
|---|
DialogueUIComponent | Screen | Displays the current speaker line on the HUD. |
WorldDialogueUIComponent | World | Displays speech bubbles positioned above actors in 3D space. |
DialogueUISelectionComponent | Screen | Renders player choice options on the HUD. |
WorldDialogueUISelectionComponent | World | Renders player choice options in 3D world space. |
DialogueUIBridgeComponent | — | Routes sequencer events to UI and player input back to sequencer. |
TypewriterComponent | — | Reveals text one character at a time with configurable timing. |
BabbleComponent | — | Plays per-character audio babble for the active speaker. |
DialogueUIBridgeComponent
The Bridge component is the central connector between the sequencer and the UI. Place it on the same entity as DialogueSequencerComponent. It listens for OnDialogueTextBegin and OnDialogueSequenceComplete from the sequencer and forwards those events to whatever UI components are registered with it. It also receives player selection events from the selection UI and forwards them back to the sequencer.
This design keeps the sequencer and the display fully decoupled — swapping in a new UI implementation only requires registering it with the Bridge.
| Bus | Method | What It Does |
|---|
DialogueUIBridgeRequestBus | RunDialogue | Sends a text line to the registered dialogue UI. |
DialogueUIBridgeRequestBus | RunSelection | Sends selection options to the registered selection UI. |
DialogueUIBridgeRequestBus | RegisterDialogueUI | Registers a UI entity as the active dialogue display target. |
DialogueUIBridgeRequestBus | CloseDialogue | Tells the registered UI to close. |
DialogueUIBridgeNotificationBus | OnDialogueComplete | Fires when the dialogue UI reports it has finished displaying. |
DialogueUIBridgeNotificationBus | OnSelectionComplete | Fires when the player makes a selection. |
Dialogue Display Components
Screen-Space Text
DialogueUIComponent handles HUD-style dialogue display. Add it to a UI canvas entity. It exposes the active TypewriterComponent so other systems can check typewriter state or force completion.
World-Space Speech Bubbles
WorldDialogueUIComponent extends DialogueUIComponent for world-space placement. It positions the dialogue panel above the speaking actor’s entity in 3D space. Use this for over-the-shoulder dialogue or conversations where the camera stays in the world rather than cutting to a UI overlay.
Selection Components
Screen-Space Choices
DialogueUISelectionComponent renders the player’s available choices as a list on the HUD. Each choice is backed by a DialogueSelectButtonComponent entity that is configured with option text and a selection index. When the player activates a button, it fires back through the Bridge to the sequencer.
World-Space Choices
WorldDialogueUISelectionComponent extends DialogueUISelectionComponent for world-space display. Choices appear positioned in 3D space rather than as a HUD overlay, useful for games with diegetic UI.
TypewriterComponent

The TypewriterComponent reveals a string one character at a time. It fires OnTypeFired for each character revealed and OnTypewriterComplete when the full string is displayed. Use ForceComplete to instantly reveal the remaining text — typically wired to a player skip input — and ClearTypewriter to reset the display to empty.
| Bus | Method / Event | What It Does |
|---|
TypewriterRequestBus | StartTypewriter(text) | Begins revealing the given string character by character. |
TypewriterRequestBus | ForceComplete | Instantly reveals all remaining characters. |
TypewriterRequestBus | ClearTypewriter | Clears the display and resets state. |
TypewriterNotificationBus | OnTypeFired | Fires each time a character is revealed. |
TypewriterNotificationBus | OnTypewriterComplete | Fires when the full string has been revealed. |
BabbleComponent
BabbleComponent pairs with TypewriterComponent to play short audio sounds for each character revealed, giving the impression of a speaker’s voice. Each actor has a SpeakerBabbleEvents record that maps them to a specific babble sound profile. The component returns the correct BabbleToneEvent for the current speaker via GetBabbleEvent, which is called by the typewriter on each OnTypeFired.
| Bus | Method | What It Does |
|---|
BabbleRequestBus | GetBabbleEvent | Returns the babble audio event for the active speaker. |
ScriptCanvas Usage
Forcing Typewriter Completion on Skip Input
Wire a player input action to ForceComplete so pressing a button instantly reveals the current line:
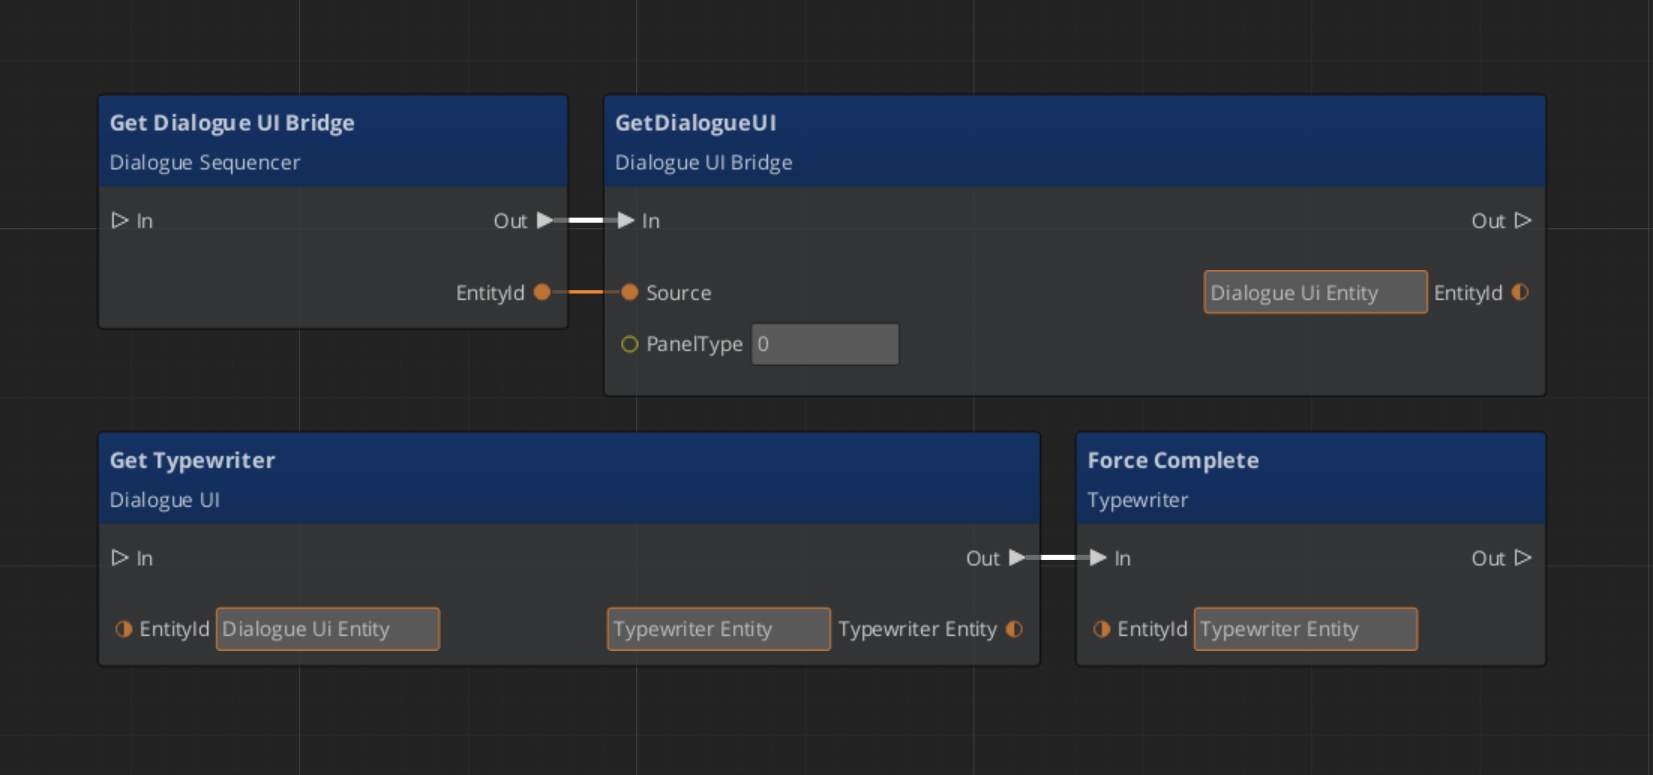
Reacting to Typewriter Events
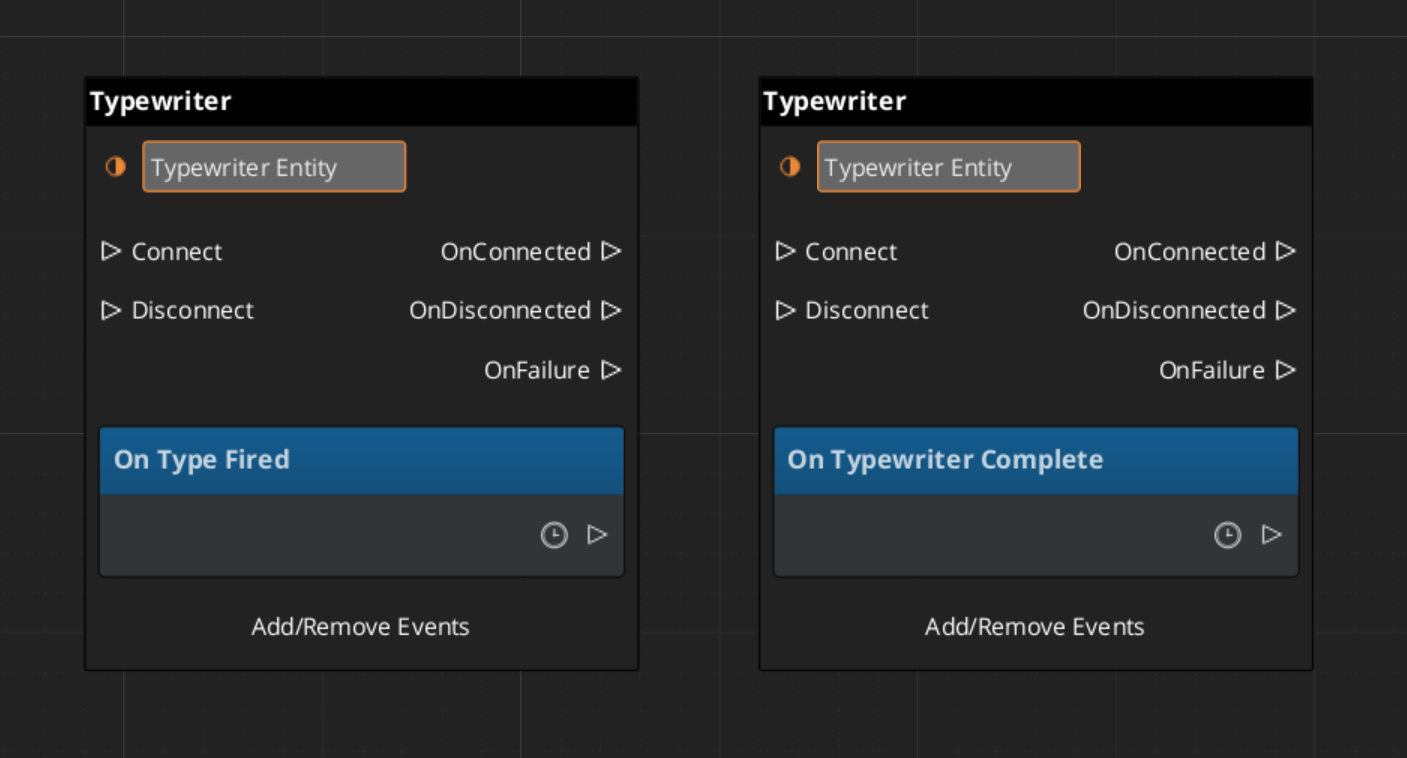
Quick Reference
| Need | Bus | Method / Event |
|---|
| Route sequencer events to UI | DialogueUIBridgeRequestBus | RunDialogue / RunSelection |
| Register a UI entity with the bridge | DialogueUIBridgeRequestBus | RegisterDialogueUI |
| Close the dialogue UI | DialogueUIBridgeRequestBus | CloseDialogue |
| React when dialogue UI finishes | DialogueUIBridgeNotificationBus | OnDialogueComplete |
| React when player makes a choice | DialogueUIBridgeNotificationBus | OnSelectionComplete |
| Start typewriter reveal | TypewriterRequestBus | StartTypewriter |
| Skip / instantly reveal text | TypewriterRequestBus | ForceComplete |
| Clear the typewriter display | TypewriterRequestBus | ClearTypewriter |
| React to each character reveal | TypewriterNotificationBus | OnTypeFired |
| React to full text revealed | TypewriterNotificationBus | OnTypewriterComplete |
| Get babble event for speaker | BabbleRequestBus | GetBabbleEvent |
Glossary
| Term | Meaning |
|---|
| DialogueUIBridge | The connector component that routes sequencer events to UI and player input back to the sequencer |
| Typewriter | A text reveal component that displays characters one at a time with configurable timing |
| Babble | Per-character audio playback that simulates a speaker’s voice during typewriter text reveal |
For full definitions, see the Glossary.
See Also
For the full API, component properties, and C++ extension guide:
For related systems:
Get GS_Cinematics
GS_Cinematics — Explore this gem on the product page and add it to your project.
4.2.2 - Performances
How to move and reposition actors during dialogue in GS_Play — the polymorphic performance system, built-in movement types, and async completion.
Performances are polymorphic actions that move or reposition actors during dialogue sequences. The sequencer triggers a performance when it reaches a PerformanceNodeData node and waits for OnPerformanceComplete before advancing. This async model lets multi-step actor choreography complete fully before dialogue continues. Three built-in performance types cover direct movement, navmesh navigation, and instant teleportation. Custom types can be created by extending the base class.
For architecture details, component properties, and extending the system in C++, see the Framework API reference.
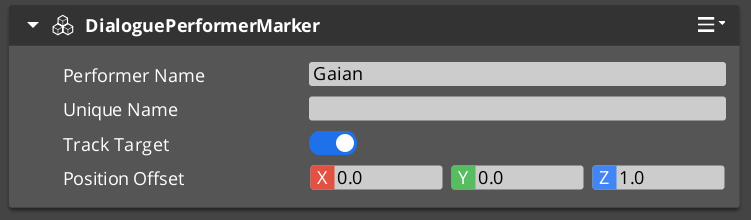
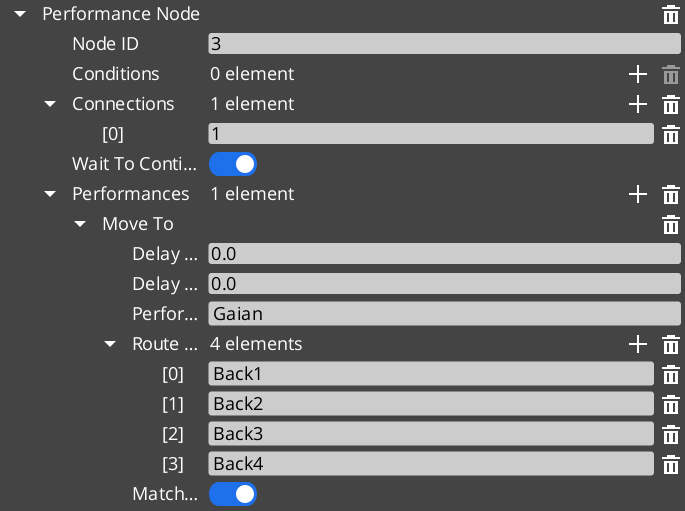
Contents
When the sequencer encounters a PerformanceNodeData node, it:
- Resolves the named performer entity via
DialogueManagerRequestBus → GetPerformer. - Instantiates the performance object specified on the node.
- Calls
DoPerformance() — the public entry point. - Waits. The sequencer does not advance until the performance broadcasts
OnPerformanceComplete. - Resumes from the next node once completion is received.
The performance itself handles the movement logic, monitors completion, and signals back through its notification bus. This means a single PerformanceNodeData can represent any action that takes time — walking to a spot, running a path, playing an animation, triggering a VFX sequence — as long as it broadcasts completion when done.
| Performance Type | Movement Method | When to Use |
|---|
MoveTo_DialoguePerformance | Direct translation to marker(s) | Open areas, stylized movement, non-physical traversal. |
PathTo_DialoguePerformance | RecastNavigation pathfinding | Realistic navigation around obstacles and geometry. |
RepositionPerformer_DialoguePerformance | Instant teleport to marker | Off-screen repositioning between scenes, no visible movement needed. |
All three extend DialoguePerformance, the abstract base class. The base class provides DoPerformance(), ExecutePerformance(), and FinishPerformance() hooks, plus TickBus integration for per-frame movement updates.
MoveTo_DialoguePerformance
MoveTo_DialoguePerformance translates an actor toward one or more named stage markers using direct movement — no obstacle avoidance, no navmesh. It broadcasts movement requests over MoveTo_PerformanceNotificationBus. Listening systems (typically the performer’s movement component) receive those requests and execute the actual translation. When the actor reaches the final marker, the performance calls FinishPerformance() and broadcasts completion.
Use this for stylized games where physical path correctness is less important than snappy, predictable actor placement, or for any case where the path between actor and marker is guaranteed to be clear.
| Bus | Purpose |
|---|
MoveTo_PerformanceRequestBus | Query state of the performance. |
MoveTo_PerformanceNotificationBus | Receives move-to-marker requests from the performance. |
PathTo_DialoguePerformance
PathTo_DialoguePerformance navigates an actor to one or more named stage markers using the RecastNavigation navmesh. It requests a path from the navmesh, walks the actor along that path, and completes when the actor arrives at the final marker. Use this in games with detailed geometry where actors must walk around walls, furniture, and obstacles rather than moving in a straight line.
RecastNavigation must be enabled in the project and a navmesh must be baked in any level where PathTo performances are used.
| Bus | Purpose |
|---|
PathTo_PerformanceRequestBus | Query state of the performance. |
PathTo_PerformanceNotificationBus | Receives path-to-marker requests from the performance. |
RepositionPerformer_DialoguePerformance
RepositionPerformer_DialoguePerformance teleports an actor instantly to a named stage marker. It does not animate, translate, or navigate — it sets position directly. Useful for placing actors at the start of a new scene, recovering from a previous sequence that ended far from the required starting point, or repositioning actors that are off-camera and do not need visible movement.
| Bus | Purpose |
|---|
RepositionPerformer_PerformanceNotificationBus | Receives teleport requests from the performance. |
Async Completion
All performances signal completion asynchronously. The sequencer does not poll or time out — it simply waits for the performance to call FinishPerformance(), which broadcasts OnPerformanceComplete over the appropriate notification bus. This means:
- A performance can take any amount of time.
- A performance can be driven by external events — animation callbacks, physics arrival, etc.
- Multiple performances can run in parallel if the node graph is structured to fork, because each notifies independently.
When writing custom performance types, always call FinishPerformance() when the action is done. Forgetting to do so will stall the sequencer indefinitely.
Extending with Custom Performances
Custom performance types are discovered automatically through O3DE serialization at startup. Extend DialoguePerformance, reflect it, and your custom type appears in the node editor’s performance picker and can be placed on any PerformanceNodeData node.
See the Framework API reference for the full base class interface and extension guide.
ScriptCanvas Usage
Performances are authored in the dialogue node graph and executed automatically by the sequencer. Most projects do not need to drive performances from ScriptCanvas directly. The common scripting patterns involve the movement side — receiving move or path requests from a performance and executing them on the performer entity.
Receiving a MoveTo Request
[MoveTo_PerformanceNotificationBus → StartMoveToMarker(markerEntity)]
    └─► [Move performer toward markerEntity position]
    └─► [When arrived → MoveTo_PerformanceRequestBus → ReportArrival]
Receiving a Reposition Request
[RepositionPerformer_PerformanceNotificationBus → RepositionToMarker(markerEntity)]
    └─► [Set performer transform to markerEntity transform]
Quick Reference
| Need | Bus | Method / Event |
|---|
| Receive a MoveTo move request | MoveTo_PerformanceNotificationBus | StartMoveToMarker |
| Receive a PathTo navigation request | PathTo_PerformanceNotificationBus | StartPathToMarker |
| Receive a reposition teleport request | RepositionPerformer_PerformanceNotificationBus | RepositionToMarker |
| Query active MoveTo state | MoveTo_PerformanceRequestBus | (see Framework API) |
| Query active PathTo state | PathTo_PerformanceRequestBus | (see Framework API) |
Glossary
| Term | Meaning |
|---|
| Performance | A polymorphic action that moves or repositions an actor during a dialogue sequence |
| PerformanceNodeData | A dialogue graph node that triggers a performance and waits for completion |
| Async Completion | The pattern where the sequencer waits for OnPerformanceComplete before advancing |
For full definitions, see the Glossary.
See Also
For the full API, component properties, and C++ extension guide:
For related systems:
Get GS_Cinematics
GS_Cinematics — Explore this gem on the product page and add it to your project.
5 - GS_Environment
World time and environmental systems for GS_Play — time-of-day progression, day/night cycle management, and data-driven sky configuration.
GS_Environment manages the living world — the passage of time, the shift between day and night, and the visual appearance of the sky. It provides a singleton time authority that other systems subscribe to for world tick events and phase-change notifications, decoupling every time-dependent system from managing its own clock. Sky presentation is data-driven through configuration assets.
For architecture details, component properties, and extending the system in C++, see the GS_Environment API.
GS_Environment is in Early Development. Full support planned soon: 2026.
Quick Navigation
| I want to… | Feature | API |
|---|
| Control world time, time passage speed, or respond to day/night changes | Time Manager | API |
| Define how the sky looks at different times of day with data assets | Sky Configuration | API |
Installation
GS_Environment requires GS_Core and the Atom renderer. Add both to your project.
For a full guided walkthrough, follow the Simple Project Setup guide.
Quick Installation Summary
- Enable the GS_Environment gem in your project configuration.
- Create a Time Manager prefab and add it to the Game Manager’s Managers list.
- Create SkyColourConfiguration assets for your sky appearance.
Time Manager
The Time Manager is the singleton authority for world time. It advances time each tick according to a configurable speed, exposes query and control methods, and broadcasts WorldTick and DayNightChanged events so any system can react to time progression without polling.
Time Manager
API
Sky Configuration
The Sky Configuration system defines how the sky looks at different times of day through data assets. SkyColourConfiguration assets hold colour values for dawn, midday, dusk, and night — swappable per-region, per-weather, or per-level without modifying entity hierarchies.
Sky Configuration
API
See Also
For the full API, component properties, and C++ extension guide:
For step-by-step project setup:
Get GS_Environment
GS_Environment — Explore this gem on the product page and add it to your project.
5.1 - Time Manager
How to work with the GS_Play Time Manager — world time, day/night cycles, and time passage control.
The Time Manager is the singleton controller for world time in your project. It drives the time-of-day value, controls how fast time passes, determines day/night state, and broadcasts timing events that other systems (lighting, AI schedules, environmental effects) can react to.
For component properties and API details, see the Framework API reference.

GS_Environment is in Early Development. Full support planned soon: 2026.
Contents
How It Works
The Time Manager maintains a continuous time-of-day value. Each frame, it advances the time based on the configured passage speed and broadcasts a WorldTick event. When the time crosses the day/night threshold, it broadcasts DayNightChanged.
You set the main camera reference so the Time Manager can position sky effects relative to the player’s view.
Controlling Time
| ScriptCanvas Node | What It Does |
|---|
SetTimeOfDay(time) | Sets the current time of day directly. |
GetTimeOfDay | Returns the current time of day. |
SetTimePassageSpeed(speed) | Controls how fast time advances (multiplier). |
GetWorldTime | Returns the total elapsed world time. |
IsDay | Returns whether it is currently daytime. |
SetMainCam(entity) | Sets the camera entity for sky positioning. |
ScriptCanvas
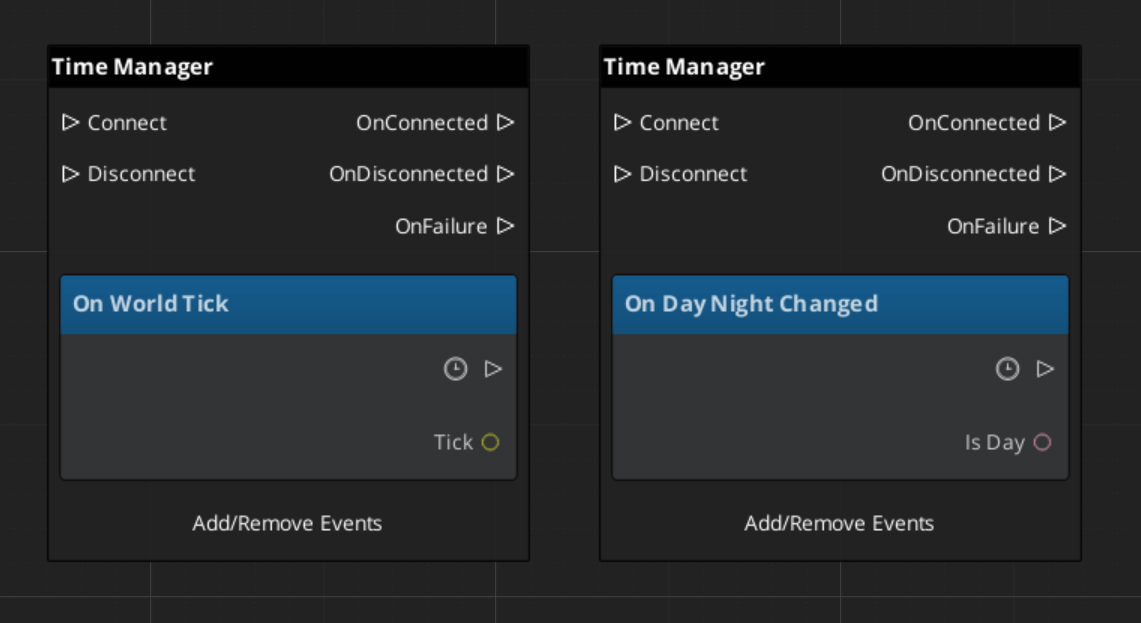
Responding to Time Events
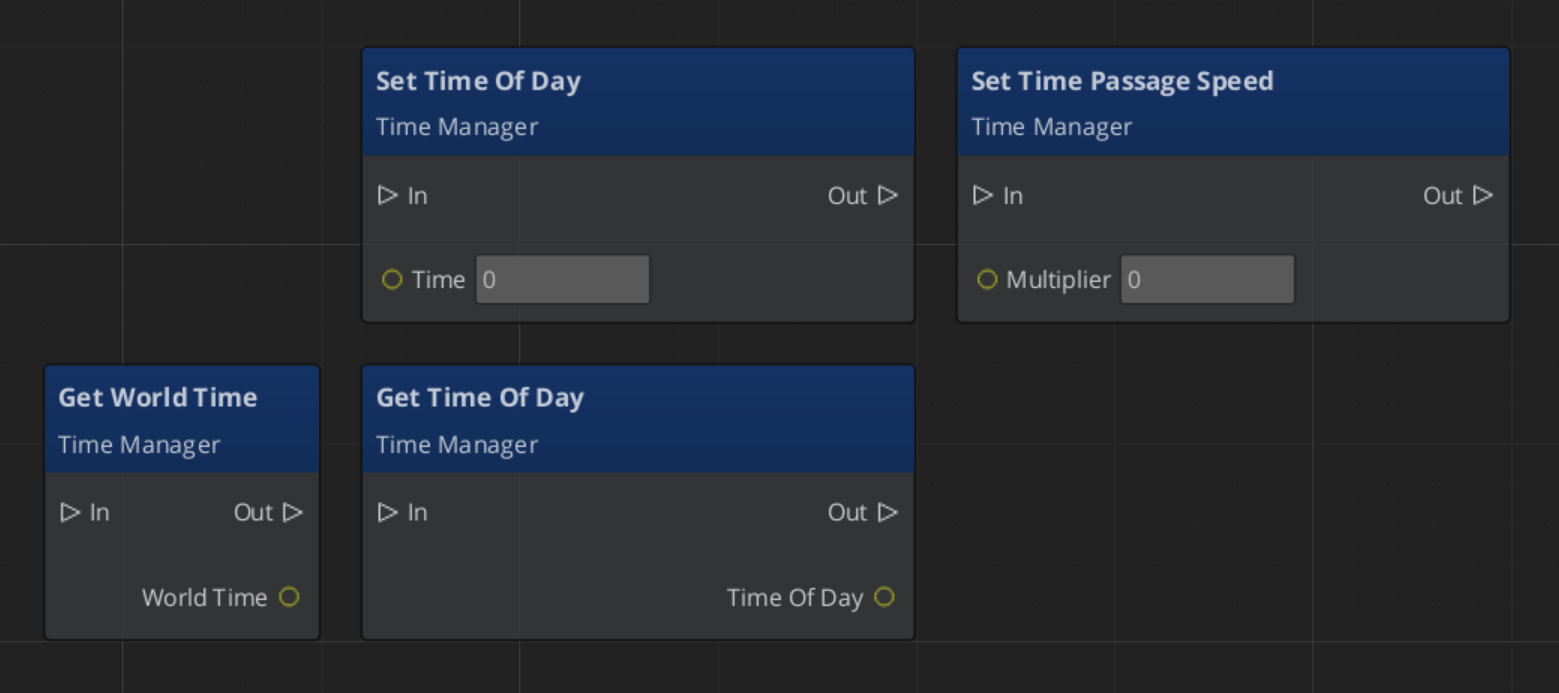
Time Manager Entity Configuration
In order to drive many of the environment effects and weather systems, the Time Manager needs many entities and components available to it.
| Entity | What It Does |
|---|
| SkyPivot | This entity holds all the rest of the celestial entities. It’s pivot is the pivot of the planet. |
| Sun / Moon | Two directional lights, pointed in opposite directions. One is disabled at a time and has it’s colours and intensities handled by the Time Manager sky configuration profile. |
| Moon Body | A graphic, placed in the sky relative to the moon directional light. Purely Cosmetic. |
| Planet Axis | An entity that carries celestial bodies at an offset. They spin with the rest of the sky. Purely Cosmetic. |
| Stars | The stars component. If it’s inside the pivot, the stars follow the rotation of the sky. |
Stars component needs to be disabled in editor, if TimeManager is being used outside of runtime. Causes graphics crash.
Quick Reference
| Need | Bus | Method / Event |
|---|
| Set time of day | TimeManagerRequestBus | SetTimeOfDay(time) |
| Get current time | TimeManagerRequestBus | GetTimeOfDay |
| Check if daytime | TimeManagerRequestBus | IsDay |
| Change time speed | TimeManagerRequestBus | SetTimePassageSpeed(speed) |
| React to time ticks | TimeManagerNotificationBus | WorldTick |
| React to day/night change | TimeManagerNotificationBus | DayNightChanged |
Glossary
| Term | Meaning |
|---|
| World Time | The continuously advancing time-of-day value maintained by the Time Manager |
| Time Passage Speed | A multiplier controlling how fast world time advances each frame |
| Day/Night Phase | The current phase (day or night) determined by the time-of-day threshold |
For full definitions, see the Glossary.
See Also
For the full API, component properties, and C++ extension guide:
For related systems:
Get GS_Environment
GS_Environment — Explore this gem on the product page and add it to your project.
5.2 - Sky Configuration
How to work with GS_Play sky configuration — data-driven sky color settings for time-of-day transitions.
Sky Colour Configuration assets define the visual appearance of the sky at different times of day. These are data assets created in the O3DE Asset Editor that the Time Manager references to drive sky color transitions as time progresses.
For asset structure and property details, see the Framework API reference.
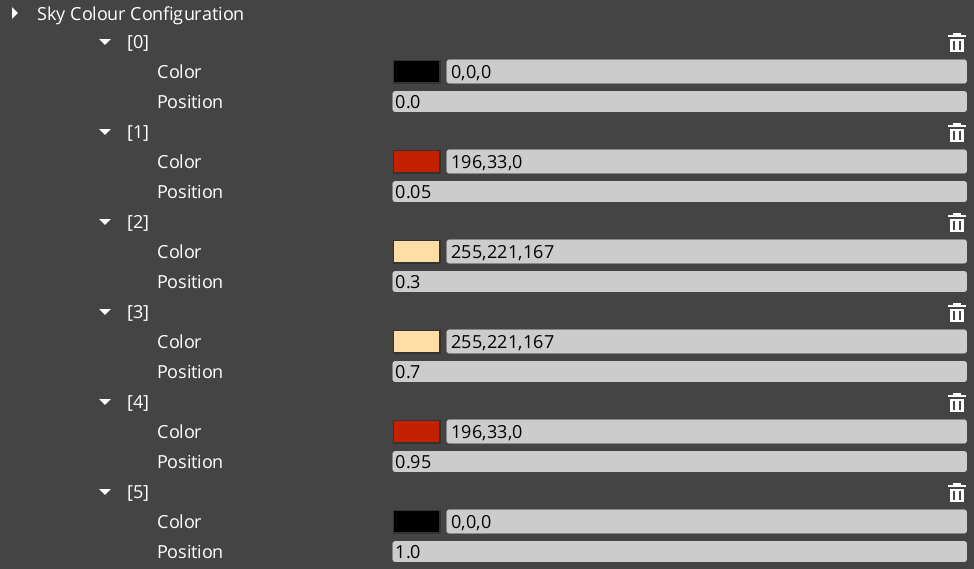
GS_Environment is in Early Development. Full support planned soon: 2026.
Contents
How It Works
A Sky Colour Configuration asset defines color values for key times of day (dawn, midday, dusk, night). The Time Manager samples the configuration based on the current time of day and interpolates between the defined colors to produce smooth transitions.
Different environments (desert, forest, underwater) can use different configuration assets. Swapping the active configuration changes the sky appearance without modifying entity hierarchies.
Glossary
| Term | Meaning |
|---|
| SkyColourConfiguration | A data asset defining sky color values for dawn, midday, dusk, and night |
For full definitions, see the Glossary.
See Also
For the full API, component properties, and C++ extension guide:
For related systems:
Get GS_Environment
GS_Environment — Explore this gem on the product page and add it to your project.
6 - GS_Interaction
Physics-based pulse events, proximity targeting with cursors, and data-driven world trigger zones.
GS_Interaction provides three independent but composable systems for making the world respond to entities. Pulsors broadcast typed events via physics volumes, the Targeting system finds and locks onto the best interactable in proximity with a cursor overlay, and World Triggers fire configurable responses from zones and conditions without requiring script code.
For architecture details, component properties, and extending the system in C++, see the GS_Interaction API.
Quick Navigation
| I want to… | Feature | API |
|---|
| Broadcast typed physics events from trigger volumes to receiving entities | Pulsors | API |
| Find and lock onto the best interactable entity in proximity with a cursor overlay | Targeting | API |
| Fire configurable responses from zones and conditions without scripting | World Triggers | API |
Installation
GS_Interaction requires GS_Core, LmbrCentral, LyShine, and CommonFeaturesAtom. Add all required gems to your project before placing Interaction components in a level.
For a full guided walkthrough, follow the Simple Project Setup guide.
Quick Installation Summary
- Enable the GS_Interaction gem in your project configuration.
- Configure physics collision layers for trigger volumes.
- Place Pulsor, Targeting, or World Trigger components on entities as needed.
Pulsors
The Pulsor system is a physics-driven event broadcast layer. A PulsorComponent on any entity with a trigger collider emits a typed pulse event when another entity enters or exits that volume. PulseReactorComponents on the receiving entity listen for those events and respond. Pulse types are polymorphic and registered at runtime, so project-specific types can be added without modifying GS_Interaction.
Pulsors
API
Targeting
The Targeting system handles “which interactable entity is the player looking at or closest to right now?” A TargetingHandler on the player maintains a live registry of nearby targets, evaluates candidates on demand, and exposes the current target via bus events. Cursor components render a tracking reticle on screen that updates based on the selected target’s properties.
Targeting
API
World Triggers
World Triggers are a data-driven system for firing game responses when conditions are met, with no script boilerplate required. TriggerSensor components define the condition side (interact, collider overlap, record check), and WorldTrigger components define the response (set record, toggle entity, change stage, print log). The combination lets most interactive world objects be authored entirely in the editor.
World Triggers
API
See Also
For the full API, component properties, and C++ extension guide:
For step-by-step project setup:
Get GS_Interaction
GS_Interaction — Explore this gem on the product page and add it to your project.
6.1 - Pulsors
How to work with the GS_Interaction Pulsor system — emitting typed physics-based pulse events and reacting to them from scripts.
The Pulsor system is a physics-driven event broadcast layer. A PulsorComponent lives on any entity with a trigger collider and emits a typed pulse event when another entity enters or exits that volume. PulseReactorComponent instances on the receiving entity listen for those events and respond. Because pulse types are polymorphic and registered at runtime, you can define project-specific pulse types without modifying the Pulsor or Reactor components themselves.
For architecture details, component properties, and extending the system in C++, see the Framework API reference.
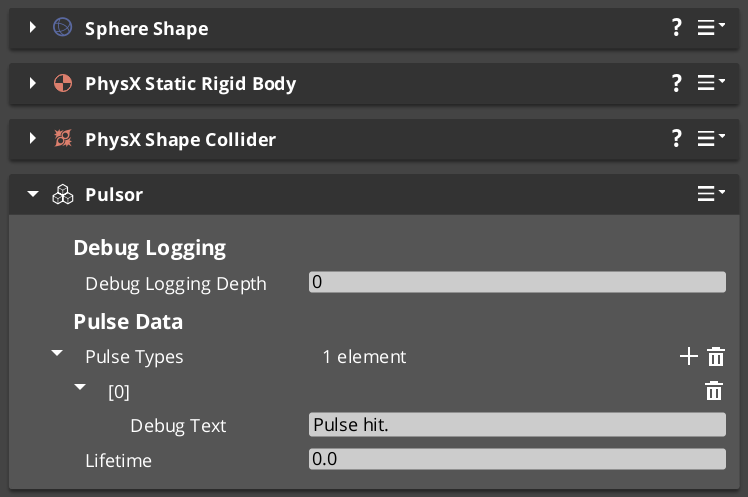
Contents
How Pulses Work
Breakdown
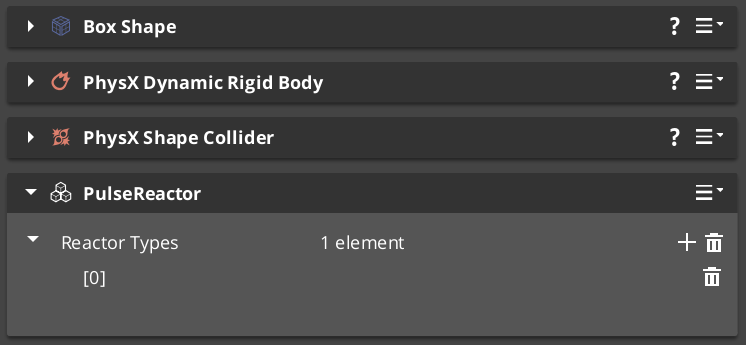
When a physics trigger fires, the PulsorComponent iterates all PulseReactorComponent instances on the entering entity and calls ReceivePulses() on each one that returns true from IsReactor() for the emitted pulse type. Each reactor independently decides whether it handles a given pulse, so multiple reactors on one entity can each respond to a different subset of pulse types without interfering with each other.
| Step | What Happens |
|---|
| 1 — Collider overlap | Physics system detects entity entering the Pulsor’s trigger volume. |
| 2 — Pulse emit | PulsorComponent reads its configured PulseType and prepares the event. |
| 3 — Reactor query | Each PulseReactorComponent on the entering entity is called with IsReactor() for that type. |
| 4 — Reaction | Reactors that return true have ReceivePulses() called and execute their response. |
E Indicates extensible classes and methods.
Patterns - Complete list of system patterns used in GS_Play.
Pulse Types
A pulse type is a class derived from the abstract PulseType base. It carries no payload — the type itself is the signal. Reactors match on type identity, so adding a new type automatically makes it distinct from all existing ones.
Built-In Pulse Types
| Type | Purpose |
|---|
Debug_Pulse | Test and development use. Logs or prints when received. |
Destruct_Pulse | Signals that the receiving entity should be destroyed or deactivated. |
Reactor Types
A reactor type is a class derived from the abstract ReactorType base. It defines what the receiving entity does when a matching pulse arrives. One entity can carry multiple reactors — one for each pulse type it needs to handle.
Built-In Reactor Types
| Type | Paired With | Behavior |
|---|
Debug_Reactor | Debug_Pulse | Outputs a debug message when it receives a matching pulse. |
Destructable_Reactor | Destruct_Pulse | Handles entity destruction or deactivation on pulse receipt. |
Extending with Custom Pulse Types
Custom pulse and reactor types are discovered automatically through O3DE serialization at startup. Any team or plugin can add new interaction semantics — damage types, pickup types, status effects — by extending the base class and reflecting it, without modifying GS_Interaction itself. Custom types appear automatically as options in the editor’s component property dropdowns and are available to all Pulsors and Reactors in the project.
For the full extension guide and C++ interface, see Framework API: Pulsors and Framework API: Pulses.
Components
| Component | Role | Key Bus |
|---|
PulsorComponent | Emits a typed pulse when its trigger volume fires. | — |
PulseReactorComponent | Receives pulses and executes a reaction if the type matches. | PulseReactorRequestBus (ById) |
ScriptCanvas Usage
The GS_Core PulseReactorEmissionBus exposes the reactor’s state for script-driven queries (the ScriptCanvas node name is preserved from the pre-interfaces bus). A common pattern is to wait for a Reactor to receive a pulse via OnPulseReceived, then process its incoming data for your own pulse processing.
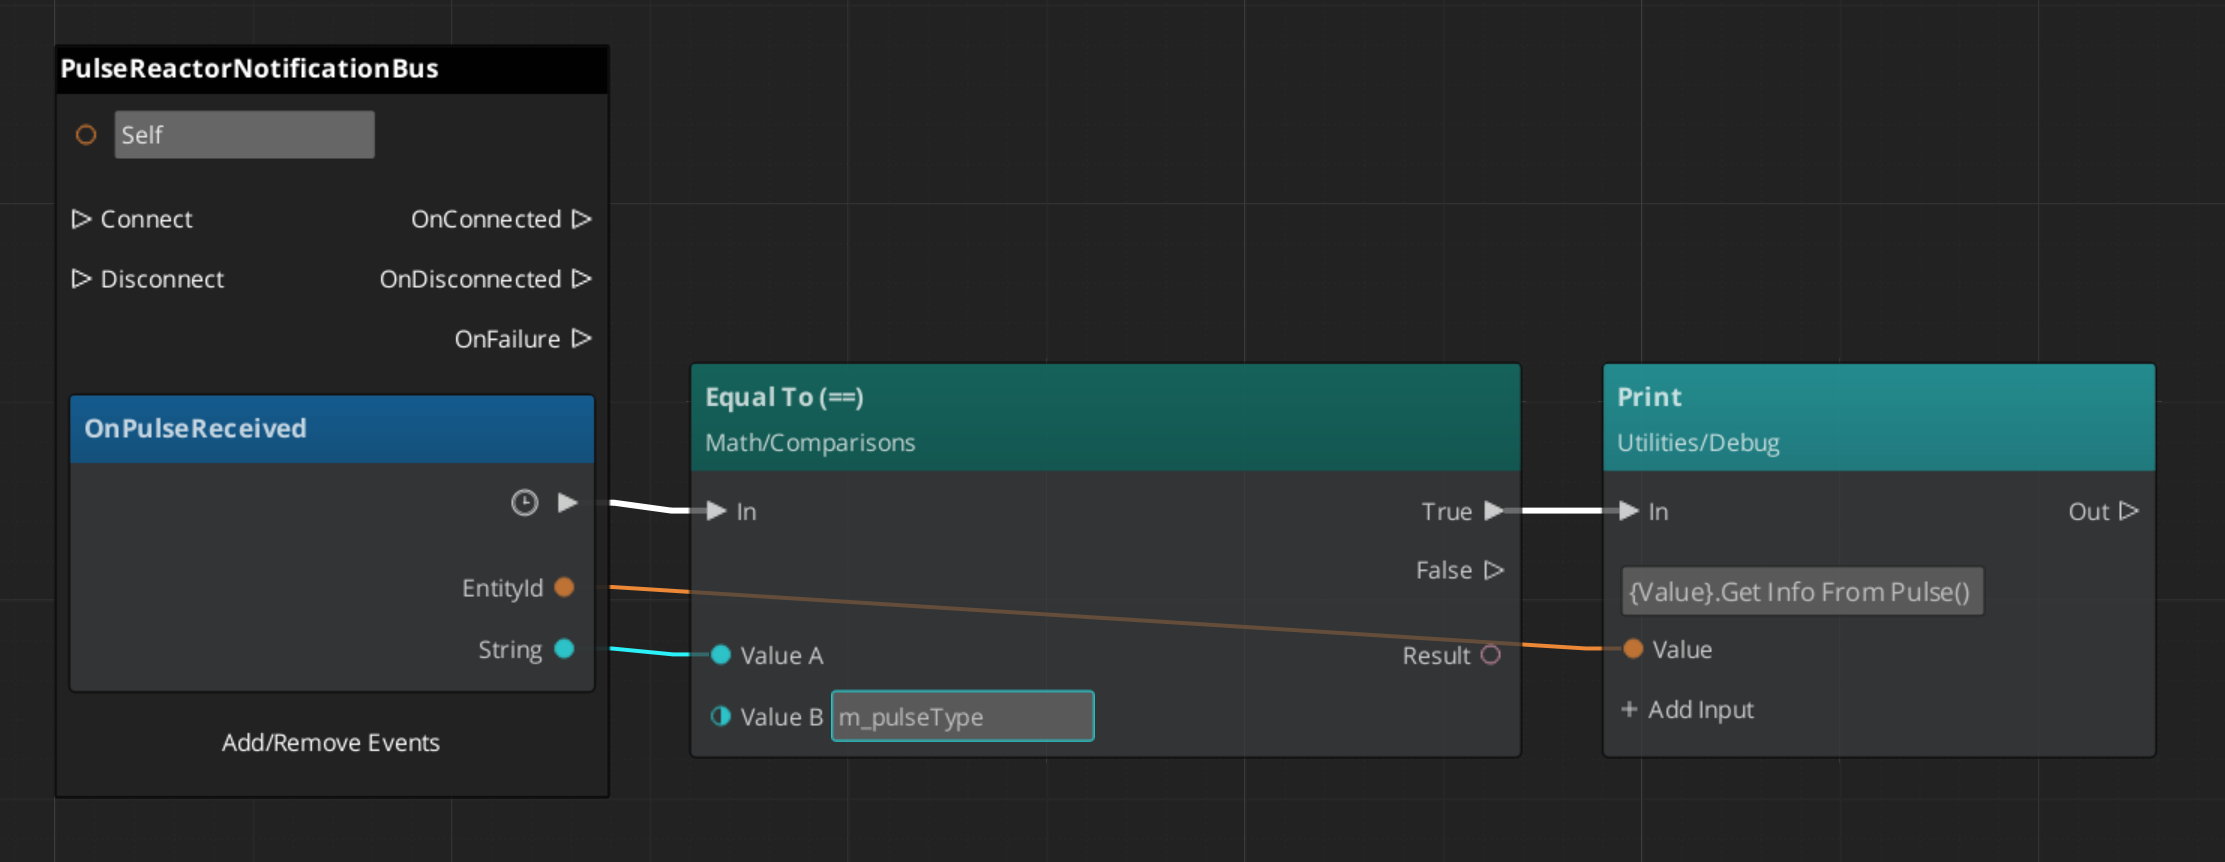
Quick Reference
| Need | Bus | Method |
|---|
| Check if entity handles a pulse type | PulseReactorRequestBus (ById) | IsReactor() |
| Manually trigger pulse processing | PulseReactorRequestBus (ById) | ReceivePulses() |
Glossary
| Term | Meaning |
|---|
| Pulsor | A component that emits a typed pulse event when its trigger volume fires |
| Pulse Reactor | A component that receives pulses and executes a response if the type matches |
| Pulse Type | A polymorphic class that identifies the kind of pulse being emitted |
For full definitions, see the Glossary.
See Also
For the full API, component properties, and C++ extension guide:
For related systems:
Get GS_Interaction
GS_Interaction — Explore this gem on the product page and add it to your project.
6.2 - Targeting
How to work with the GS_Interaction Targeting system — selecting interactable entities, managing cursor display, and handling interaction input from scripts.
The Targeting system answers the question “which interactable entity should the player act on right now?” A GS_TargetingHandlerComponent on the player maintains a live registry of nearby targets. Proximity detection volumes populate that registry automatically as the player moves. When the handler evaluates candidates, it selects the best target and broadcasts the result so the cursor layer and any downstream logic stay in sync.
For architecture details, component properties, and extending the system in C++, see the Framework API reference.
Contents
How Targeting Works
The targeting pipeline runs across four layers — proximity detection, target registration, target selection, and cursor display. Each layer is a separate component so they can be mixed and matched for different entity configurations.
| Layer | Component | What It Does |
|---|
| Proximity detection | GS_TargetingInteractionFieldComponent | Physics trigger volume on targetable entities. Registers and unregisters with the handler as the player enters and exits range. |
| Target data | GS_TargetComponent / GS_InteractTargetComponent | Defines the target’s visual properties — size, spatial offset, colour, and sprite. |
| Target selection | GS_TargetingHandlerComponent | Maintains the candidate list, evaluates it, and exposes the selected target via GetInteractTarget. |
| Cursor display | GS_CursorComponent + GS_CursorCanvasComponent | Reads the selected target’s visual properties and renders a cursor on screen or in world space. |
Target Components
GS_TargetComponent is the base marker that makes an entity targetable. It carries four properties the cursor layer reads to display correctly:
| Property | Purpose |
|---|
| Size | How large the targeting cursor appears over this entity. |
| Offset | Spatial offset from the entity’s origin, used to position the cursor at a sensible point (e.g. centre of a character’s torso). |
| Colour | Tint applied to the cursor sprite when this target is selected. |
| Sprite | The cursor image to display for this target. |
GS_InteractTargetComponent extends GS_TargetComponent with specialised interaction semantics. Use it for any entity that can be interacted with via the InteractInputReaderComponent.
Targeting Handler
The GS_TargetingHandlerComponent is the central coordinator. It tracks all currently-registered candidates and determines which one is the best target at any given moment.
Notifications
Subscribe to GS_TargetingHandlerNotificationBus to react to targeting state changes:
| Notification | When It Fires |
|---|
OnUpdateInteractTarget | The selected target has changed. Payload is the new target entity id (or invalid if none). |
OnEnterStandby | The targeting handler has suspended evaluation (e.g. during a cutscene or level transition). |
OnExitStandby | The targeting handler has resumed evaluation. |
ScriptCanvas — Listening for Target Changes
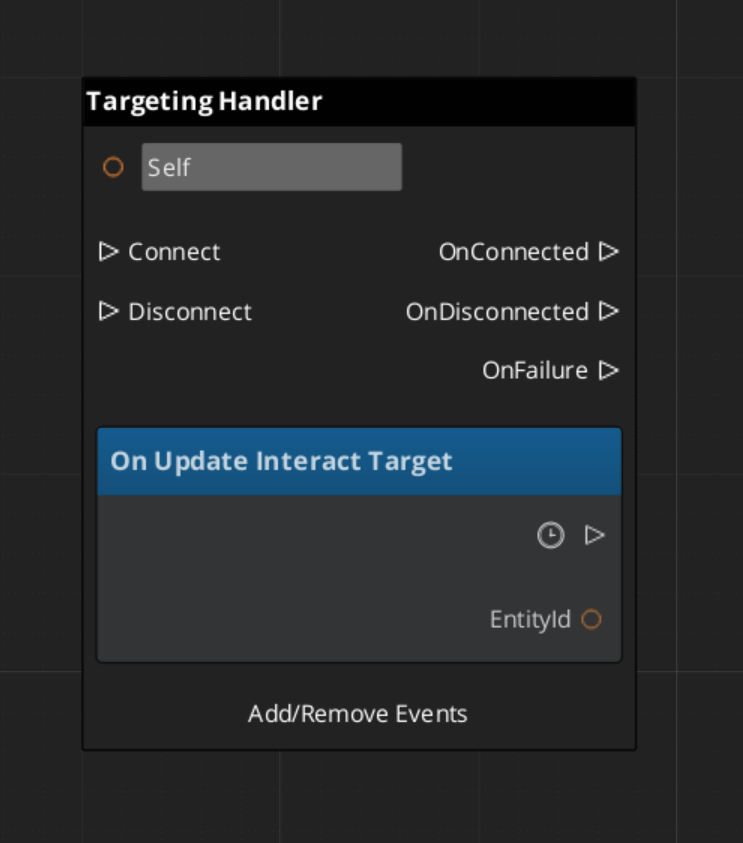
ScriptCanvas — Querying the Current Target
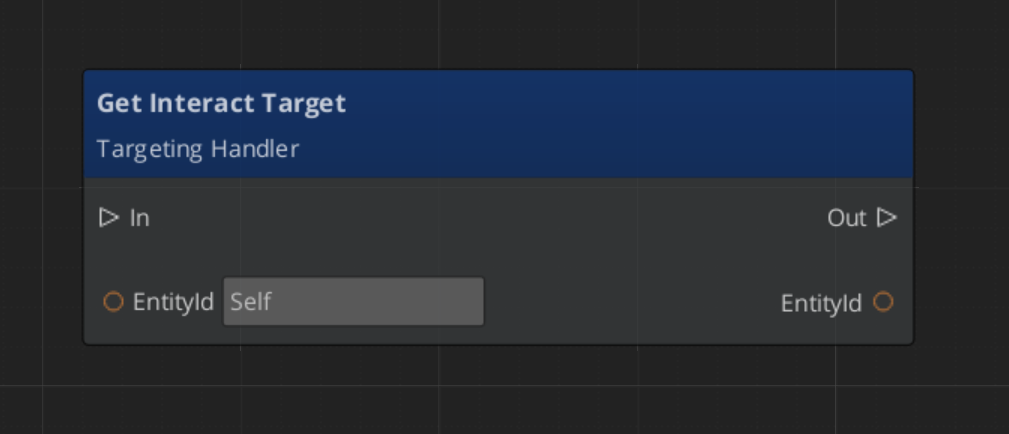
Interaction Fields
GS_TargetingInteractionFieldComponent is a physics trigger volume placed on targetable entities. When the player’s collider overlaps the field, it calls RegisterTarget on the handler. When the player leaves, it calls UnregisterTarget. The handler never has to poll — the field layer pushes updates automatically.
The field’s volume shape (sphere, box, capsule) determines the interaction range independently of the entity’s visual or physics collision bounds, so you can have a large detection range with a small visible object.
Cursor System
The cursor layer visualizes the current target selection on screen. It is composed of two components that work together:
| Component | Bus | Role |
|---|
GS_CursorComponent | GS_CursorRequestBus (Single) | Global cursor coordinator. Manages canvas registration, visibility, offset, and position. |
GS_CursorCanvasComponent | GS_CursorCanvasRequestBus (ById) | Per-canvas cursor. Renders the sprite and responds to hide/show instructions. |
ScriptCanvas — Cursor Control
[GS_CursorRequestBus → SetCursorVisuals]
    └─► Updates the sprite and colour from the selected target's properties.

[GS_CursorRequestBus → SetCursorPosition]
    └─► Moves the cursor to track the target's world position.

[GS_CursorRequestBus → HideCursor]
    └─► Hides the cursor when no target is selected or targeting is suspended.
UI Cursor Canvas

A LyShine ui canvas that pairs with the in-world CursorComponent.
The cursor canvas applies visuals to the UI image in behalf of the targeting system.
InteractInputReaderComponent extends GS_Core::GS_InputReaderComponent to map raw button input to interaction events.
Place it on the same entity as the GS_TargetingHandlerComponent. When the player presses the configured interact button, the reader fires an event the handler can act on to confirm the current selection or trigger the target’s interact action.
This keeps input handling decoupled from targeting logic — you can swap input mappings or replace the reader component without touching the handler.
Quick Reference
| Need | Bus | Method / Event |
|---|
| Get the current target | GS_TargetingHandlerRequestBus (ById) | GetInteractTarget |
| Manually register a target | GS_TargetingHandlerRequestBus (ById) | RegisterTarget |
| Manually unregister a target | GS_TargetingHandlerRequestBus (ById) | UnregisterTarget |
| Know when the target changes | GS_TargetingHandlerNotificationBus (ById) | OnUpdateInteractTarget |
| Know when targeting suspends | GS_TargetingHandlerNotificationBus (ById) | OnEnterStandby |
| Know when targeting resumes | GS_TargetingHandlerNotificationBus (ById) | OnExitStandby |
| Hide the cursor | GS_CursorRequestBus | HideCursor |
| Update cursor position | GS_CursorRequestBus | SetCursorPosition |
| Update cursor appearance | GS_CursorRequestBus | SetCursorVisuals |
Glossary
| Term | Meaning |
|---|
| Targeting Handler | The coordinator component on the player that maintains the candidate list and selects the best target |
| Interaction Field | A physics trigger volume on a targetable entity that registers/unregisters with the handler automatically |
| Target Component | A marker component that makes an entity targetable with visual properties for the cursor |
| Cursor | The visual overlay that tracks the selected target on screen or in world space |
For full definitions, see the Glossary.
See Also
For the full API, component properties, and C++ extension guide:
For related systems:
Get GS_Interaction
GS_Interaction — Explore this gem on the product page and add it to your project.
6.3 - World Triggers
How to work with the GS_Interaction World Trigger system — configuring sensor types and trigger types to create event-driven world responses without scripting.
World Triggers are a data-driven system for firing game responses when conditions are met. A TriggerSensorComponent defines the condition side — physics overlap, player interact, record check. A WorldTriggerComponent defines the response side — changing stage, toggling an entity, writing a record, logging a message. Each component holds an array of polymorphic type objects, so any combination of conditions and responses can be composed on a single entity without scripting.
For architecture details, component properties, and extending the system in C++, see the Framework API reference.
Contents
How World Triggers Work
Breakdown
Each trigger is split into two container components. Logic lives in type objects held by each component:
| Part | Role |
|---|
| TriggerSensorComponent | Holds andConditions and orConditions arrays of TriggerSensorType objects. When conditions pass, fires WorldTriggerRequestBus::Trigger on the same entity. |
| WorldTriggerComponent | Holds a triggerTypes array of WorldTriggerType objects. On Trigger(), calls Execute() on every type. On Reset(), calls OnReset(). |
You can add any mix of sensor types and trigger types — for example, a door that requires both a physics overlap AND a record flag (andConditions) before it opens (TriggerType_ToggleEntities), then sets a quest record (TriggerType_SetRecord).
E Indicates extensible classes and methods.
Patterns - Complete list of system patterns used in GS_Play.
Sensor Types
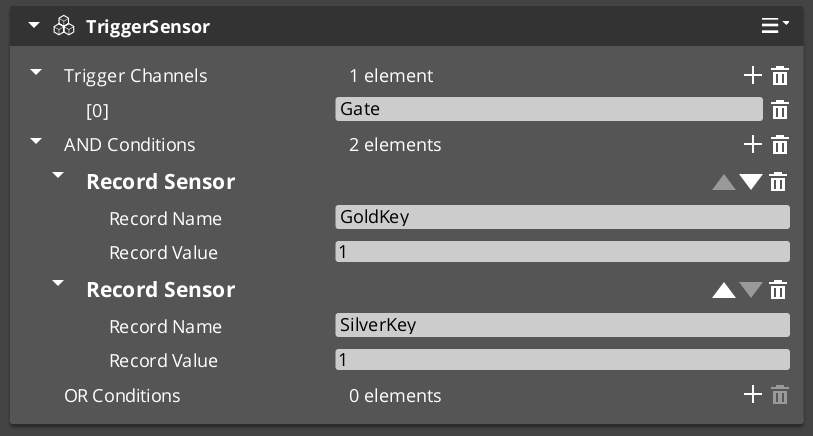
Add sensor types to the andConditions or orConditions arrays on a TriggerSensorComponent. The four built-in types cover the most common condition patterns:
| Sensor Type | Condition | Notes |
|---|
SensorType_Interact | Any unit with targeting interacts with this entity. | Requires GS_TargetComponent or GS_InteractTargetComponent on the entity. |
SensorType_PlayerInteract | The player-controlled unit specifically interacts with this entity. | Extends SensorType_Interact; filters to entities with the "Player" tag. |
SensorType_Collider | A physics collider enters the entity’s trigger volume. | Automatically activates a PhysicsTriggerComponent — no manual setup needed. |
SensorType_Record | A game record reaches a configured value. | Connects to RecordKeeper automatically; fires without polling. |
Trigger Types
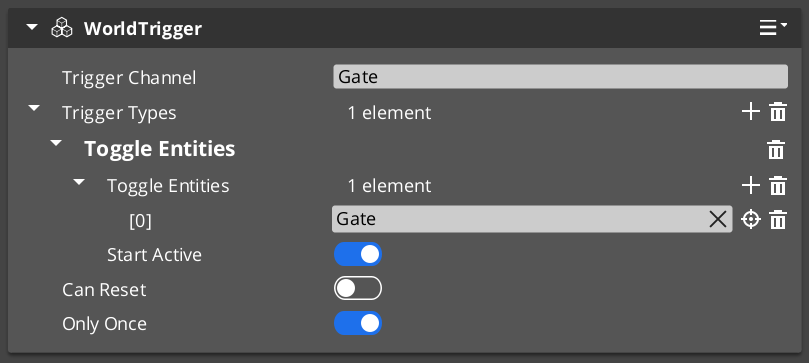
Add trigger types to the triggerTypes array on a WorldTriggerComponent. The four built-in types handle the most common response patterns:
| Trigger Type | Response | Notes |
|---|
TriggerType_PrintLog | Prints a message to the development log. | Development and debugging use. |
TriggerType_SetRecord | Writes a value to the Record Keeper by name. | Useful for setting quest flags, unlock states, or counters. |
TriggerType_ToggleEntities | Enables or disables referenced entities. Seeds initial state at startup via startActive. | Works with any entity in the level — doors, pickups, blockers. |
TriggerType_ChangeStage | Transitions the game to a different stage (level). | Queued on next tick; coordinates with Stage Manager automatically. |
Reset and Re-Arming
Calling Reset() on WorldTriggerRequestBus calls OnReset() on every trigger type in the component. Each type can reverse its effect or prepare for re-activation:
TriggerType_ToggleEntities inverts entity states on both Execute and OnReset, enabling toggle behavior.- Switches that cycle on repeat interaction.
- Area triggers that fire each time a player re-enters.
- Multi-step sequences where earlier steps re-arm later ones.
ScriptCanvas Usage
WorldTriggerRequestBus exposes both core methods directly to scripts:
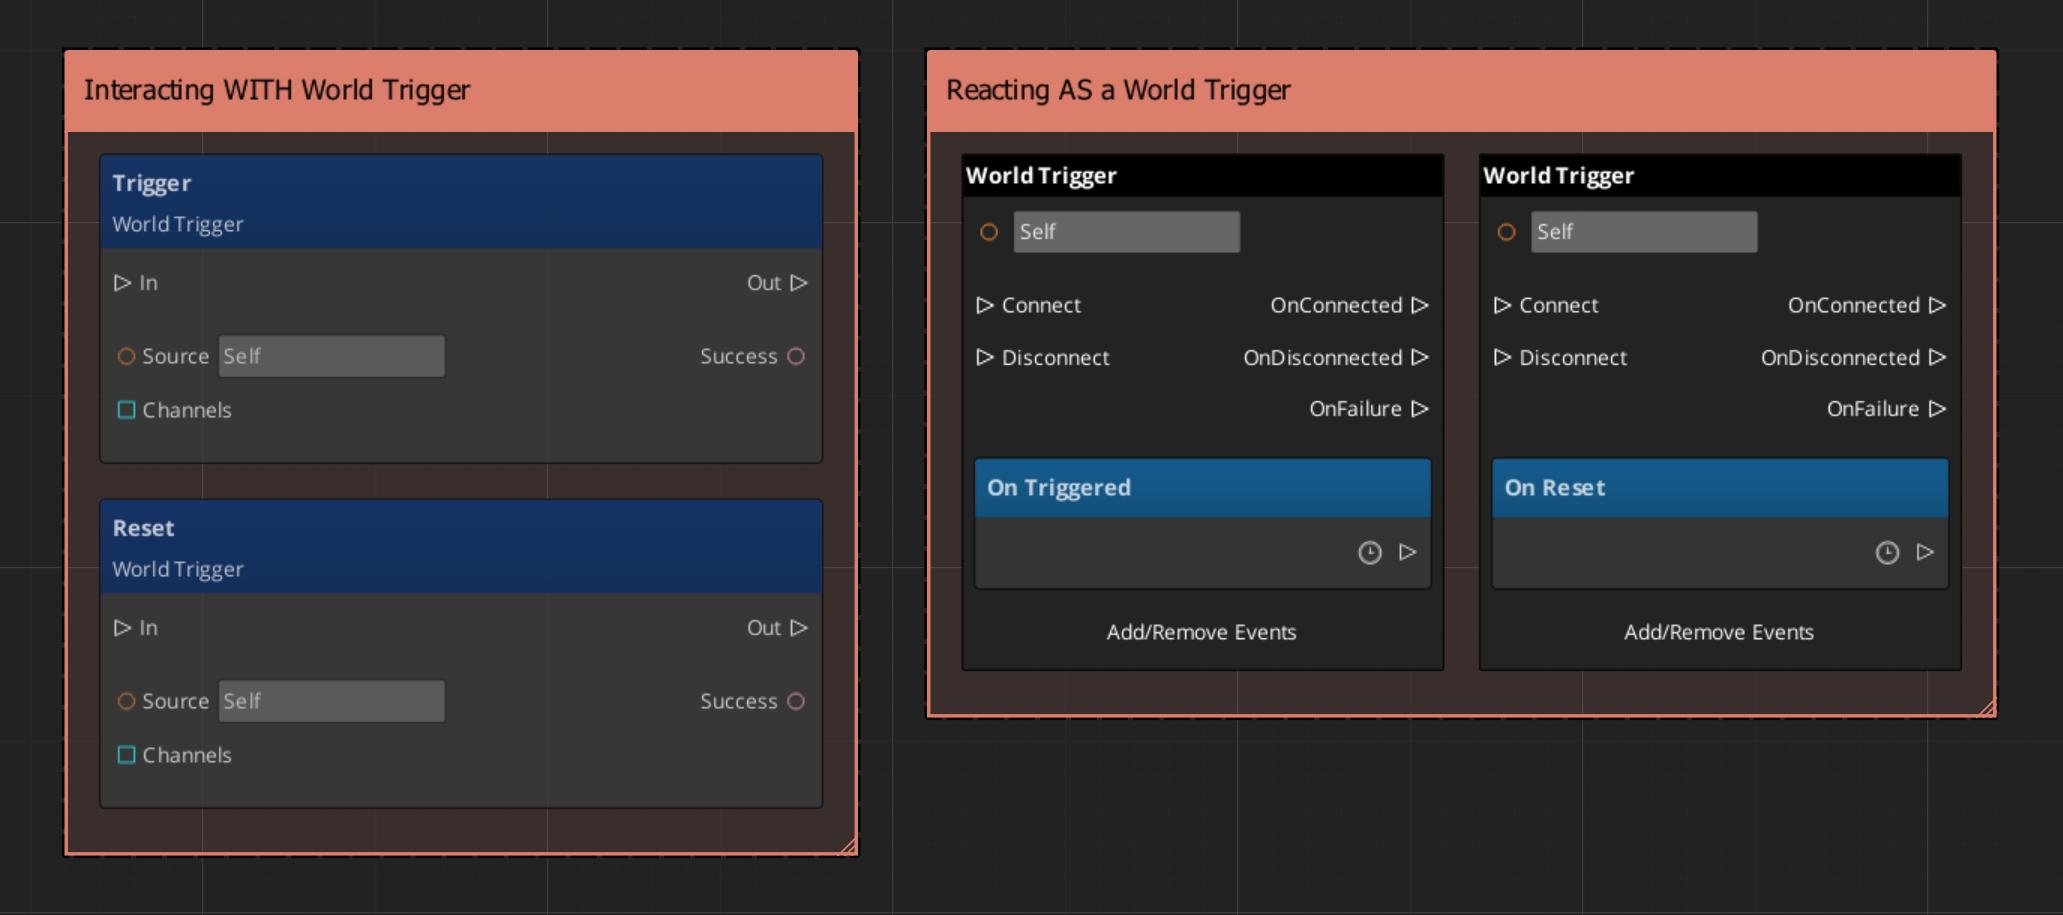
A common script pattern is to use a SensorType_Record condition to gate a sequence, then script the reset from a separate event so the trigger only re-arms after additional conditions are met:
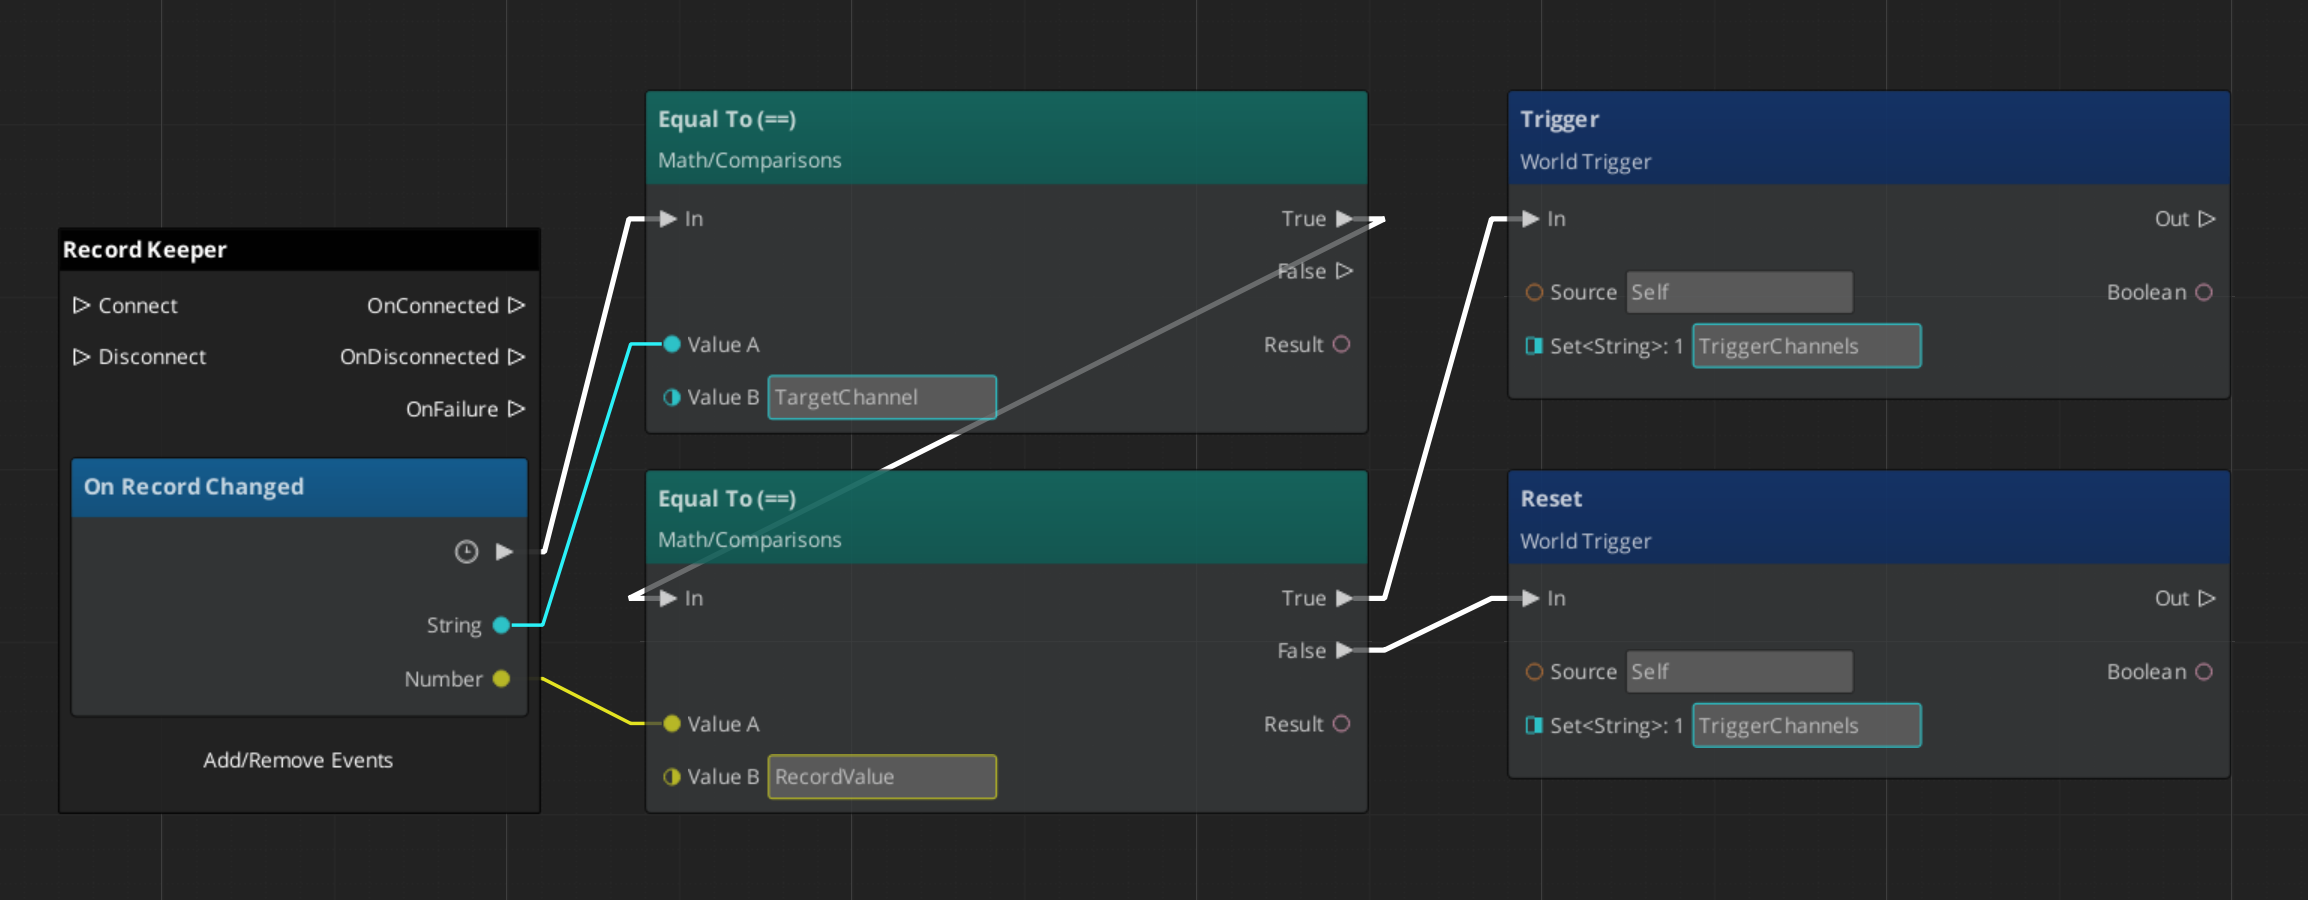
You can also bypass the sensor component entirely and call Trigger() directly from any script when you need to fire a world trigger response programmatically — for example, from a dialogue completion callback or an animation event.
Editor Setup Pattern
Most interactive world objects follow this assembly in the editor:
- Create an entity for the interactive object (door, switch, collectible, zone border).
- Add a
TriggerSensorComponent to the entity. - Add the appropriate sensor type(s) to
andConditions or orConditions (e.g. SensorType_PlayerInteract for interact, SensorType_Collider for proximity). - Add a
WorldTriggerComponent to the same entity. - Add the appropriate trigger type(s) to
triggerTypes (e.g. TriggerType_ToggleEntities to open a door, TriggerType_SetRecord to record the event). - Configure each type’s properties in the editor — no scripting needed for these patterns.
For interact-based sensors, also add GS_TargetComponent or GS_InteractTargetComponent so the Targeting system can select this entity.
Quick Reference
| Need | Bus | Method |
|---|
| Fire a trigger response from script | WorldTriggerRequestBus (ById) | Trigger() |
| Re-arm a trigger after it has fired | WorldTriggerRequestBus (ById) | Reset() |
| Fire sensor evaluation from event-driven type | TriggerSensorRequestBus (ById) | DoAction() / DoResetAction() |
| Condition Type | Sensor Type |
|---|
| Any unit interacts | SensorType_Interact |
| Player only interacts | SensorType_PlayerInteract |
| Physics overlap | SensorType_Collider |
| Record/flag state | SensorType_Record |
| Response Type | Trigger Type |
|---|
| Log a debug message | TriggerType_PrintLog |
| Write a game record | TriggerType_SetRecord |
| Toggle an entity on/off | TriggerType_ToggleEntities |
| Change stage/level | TriggerType_ChangeStage |
Glossary
| Term | Meaning |
|---|
| TriggerSensorComponent | Container component that owns sensor type objects and evaluates them on each event |
| WorldTriggerComponent | Container component that owns trigger type objects and calls Execute on each Trigger() |
| TriggerSensorType | A type object that defines one condition — extend this to create custom sensor logic |
| WorldTriggerType | A type object that defines one response — extend this to create custom trigger logic |
| andConditions | Array on TriggerSensorComponent where all types must pass for the trigger to fire |
| orConditions | Array on TriggerSensorComponent where any one type passing is sufficient |
| Re-Arming | Calling Reset() on a WorldTriggerComponent so its types can fire again on the next Trigger() |
For full definitions, see the Glossary.
See Also
For the full API, component properties, and C++ extension guide:
For related systems:
Get GS_Interaction
GS_Interaction — Explore this gem on the product page and add it to your project.
7 - GS_Juice
Game feel and feedback motion system — screen shake, bounce, flash, and material effects driven by the GS_Motion engine.
GS_Juice is the game feel and feedback system. It provides motion-based visual feedback effects — screen shake, bounce, flash, pulse, material glow — authored as data assets and played on entities at runtime. GS_Juice extends the GS_Motion animation system with feedback-specific track types, so all timing, easing, and proxy targeting features are available for feedback effects.
For architecture details, track types, and the domain extension pattern, see the GS_Juice API.
GS_Juice is in Early Development. Full support planned soon: 2026.
Quick Navigation
| I want to… | Feature | API |
|---|
| Play screen shake, bounce, flash, or material glow effects on entities | Feedback System | API |
Installation
GS_Juice requires GS_Core. Add both gems to your project.
For a full guided walkthrough, follow the Simple Project Setup guide.
Quick Installation Summary
- Enable the GS_Juice gem in your project configuration.
- Create
.feedbackmotion assets in the O3DE Asset Editor. - Place FeedbackEmitter components on entities that need to play effects.
Feedback System
The feedback system is the core of GS_Juice. Feedback Motion assets (.feedbackmotion) define one or more animation tracks that play together as a feedback effect. The Feedback Emitter component plays a feedback motion on itself or on a target entity. Effects are additive — they modify properties relative to the entity’s current state, so multiple effects stack without conflict.
Two track types are included:
- Transform Track — Animates position offset, scale, and rotation using gradients. Ideal for screen shake, bounce, squash-and-stretch, and recoil.
- Material Track — Animates material properties (opacity, emissive intensity, color tint) using gradients. Ideal for hit flash, damage glow, and fade effects.
Feedback System
API
See Also
For the full API, component properties, and C++ extension guide:
For related systems:
Get GS_Juice
GS_Juice — Explore this gem on the product page and add it to your project.
7.1 - Feedback System
How to work with GS_Play feedback motions — transform and material animation effects for game feel.
The Feedback System is the core of GS_Juice. Feedback Motion assets define animation tracks that play together as a visual effect — screen shake, bounce, hit flash, glow pulse. The Feedback Emitter component plays these effects on entities, with support for proxy targeting and stacking.
For track type details, asset structure, and component properties, see the Framework API reference.
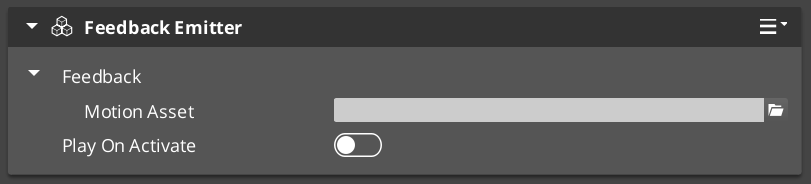
GS_Juice is in Early Development. Full support planned soon: 2026.
Contents
Track Types
| Track | What It Animates | Fields |
|---|
| FeedbackTransformTrack | Position offset, scale, rotation | Vector2Gradient (XY), FloatGradient (scale), FloatGradient (rotation) |
| FeedbackMaterialTrack | Opacity, emissive intensity, color tint | FloatGradient (opacity), FloatGradient (emissive), ColorGradient (tint) |
Both track types use Gradients from GS_Core, giving you full control over the animation shape at every point in the effect’s duration.
Feedback Emitter
The FeedbackEmitter component lives on any entity and plays a Feedback Motion.
| Property | What It Does |
|---|
| FeedbackMotion | The motion asset and proxy configuration. |
| playOnActivate | If true, plays the motion automatically when the entity activates. |
| Method | What It Does |
|---|
Play() | Plays the feedback motion on the owning entity. |
PlayOnTarget(entityId) | Plays on a different target entity. |
Stop() | Stops the currently playing motion. |
Authoring Feedback Motions
- Create a
.feedbackmotion asset in the O3DE Asset Editor. - Add transform and/or material tracks.
- Configure each track’s gradients — these define the animation curve shape.
- Set timing (start time, duration) and easing for each track.
- Optionally set track identifiers for proxy targeting.
- Assign the asset to a FeedbackEmitter component.
Stacking Effects
Feedback effects are additive — each track applies its property change relative to the entity’s current state. Multiple effects on the same entity stack naturally without conflict. A bounce effect and a flash effect can run simultaneously on the same entity.
Proxy Targeting
When a motion asset has tracks with identifiers (named labels), those tracks appear in the proxy list on the component. Proxies let you redirect a track to a different entity in the hierarchy — for example, a page show animation might animate the background separately from the content panel.
Each proxy entry maps a track label to a target entity. If no proxy is set, the track targets the motion’s owner entity.
Glossary
| Term | Meaning |
|---|
| Feedback Motion | A .feedbackmotion data asset containing animation tracks that play as a visual effect |
| Feedback Emitter | A component that plays a feedback motion on its entity or a target entity |
| FeedbackTransformTrack | A track that animates position offset, scale, and rotation via gradients |
| FeedbackMaterialTrack | A track that animates opacity, emissive intensity, and color tint via gradients |
For full definitions, see the Glossary.
See Also
For the full API, component properties, and C++ extension guide:
For related systems:
Get GS_Juice
GS_Juice — Explore this gem on the product page and add it to your project.
8 - GS_Item
Inventory and equipment systems for GS_Play — container-based item storage, slot management, stacking, and visual equipment integration with GS_Performer.
GS_Item provides the foundational inventory and equipment infrastructure for GS_Play games. It handles how items are stored, organized, and associated with characters — from simple containers that hold collectables to slot-based equipment systems that drive visual changes through GS_Performer.
GS_Item is under active development. Core inventory and equipment systems are functional, with additional features planned.
For architecture details, component properties, and extending the system in C++, see the GS_Item API.
Quick Navigation
| I want to… | Feature | API |
|---|
| Store, stack, and manage items in container-based inventories | Inventory | API |
| Equip items into typed character slots with visual integration | Equipment | API |
Installation
GS_Item requires GS_Core. GS_Performer is an optional dependency for visual equipment integration.
For a full guided walkthrough, follow the Simple Project Setup guide.
Quick Installation Summary
- Enable the GS_Item gem in your project configuration.
- Define item data assets for your game’s items.
- Place Inventory components on entities that need to store items.
- Place Equipment components on characters that need to equip items.
Inventory
The Inventory system is a container-based model for item storage. Each inventory is a collection of item slots where each slot holds an item reference and a stack count. The system handles adding, removing, querying, and capacity management. Any entity can host an inventory — a player backpack, a chest, a vendor, or a loot bag.
Inventory
API
Equipment
The Equipment system is the slot-based layer that governs which items a character has equipped. Each slot has a defined type and enforces compatibility rules. Equipment integrates with GS_Performer’s Skin Slot system — equipping an item automatically updates the matching visual asset, connecting inventory state to character presentation.
Equipment
API
See Also
For the full API, component properties, and C++ extension guide:
For related systems:
Get GS_Item
GS_Item — Explore this gem on the product page and add it to your project.
8.1 - Inventory
How to work with GS_Play inventory — container-based item storage with slots and stacking.
The Inventory system provides container-based item storage for entities. Inventory components define slot-based containers that hold item data, support stacking, and enable item transfer between entities (player to chest, vendor to player).
For component properties and the inventory data model, see the Framework API reference.
GS_Item is under active development. Core inventory functionality is operational, with additional features planned.
Contents
How Inventory Works
| Concept | What It Means |
|---|
| Container | A component on an entity that holds item slots. Players, chests, vendors, and loot drops are all containers. |
| Slot | An individual position within a container. Each slot holds one item type. |
| Stacking | Multiple units of the same item can occupy a single slot up to a maximum stack size. |
| Transfer | Items move between containers via slot references — no intermediate state required. |
Glossary
| Term | Meaning |
|---|
| Container | A component on an entity that holds item slots |
| Slot | An individual position within a container that holds one item type |
| Stacking | Multiple units of the same item occupying a single slot up to a maximum count |
For full definitions, see the Glossary.
See Also
For the full API, component properties, and C++ extension guide:
For related systems:
Get GS_Item
GS_Item — Explore this gem on the product page and add it to your project.
8.2 - Equipment
How to work with GS_Play equipment — typed equipment slots with visual integration via GS_Performer skin slots.
The Equipment system provides typed equipment slots for characters. Equipment slots enforce type constraints (helmet slot accepts helmets, weapon slot accepts weapons) and integrate directly with the Skin Slot system in GS_Performer to update visual appearance when items are equipped or unequipped.
For component properties and the equipment data model, see the Framework API reference.
GS_Item is under active development. Core equipment functionality is operational, with additional features planned.
Contents
How Equipment Works
| Phase | What Happens |
|---|
| Equip | An item is placed into a typed slot. Equip notifications fire. |
| Visual Update | If linked to a GS_Performer skin slot, the character mesh updates automatically. |
| Stat Application | Equipment stats are applied to the entity (via RPStats integration, when available). |
| Unequip | The item is removed from the slot. Visual and stat changes revert. |
Integration with Skin Slots
Equipment slots can be linked to Performer Skin Slots. When an item is equipped, the corresponding skin slot’s actor mesh and materials are automatically swapped to match the item. No manual wiring is required — the connection is data-driven through slot name matching.
Glossary
| Term | Meaning |
|---|
| Equipment Slot | A typed slot on a character that accepts items matching its type constraint |
| Skin Slot Integration | Automatic visual update when equipping or unequipping items via GS_Performer |
For full definitions, see the Glossary.
See Also
For the full API, component properties, and C++ extension guide:
For related systems:
Get GS_Item
GS_Item — Explore this gem on the product page and add it to your project.
9 - GS_Performer
Character rendering and animation for GS_Play — modular skin slots, billboard 2.5D rendering, and velocity-driven locomotion parameters.
GS_Performer is the character presentation layer for GS_Play. It handles the visual side of any entity that needs to look like a character — whether that is a fully-rigged 3D mesh swapping equipment, a sprite-based billboard character, or an animated unit whose blend parameters track real movement velocity. GS_Performer sits above GS_Unit and GS_Core, consuming movement and game state events to keep visual output in sync with gameplay.
For architecture details, component properties, and extending the system in C++, see the GS_Performer API.
GS_Performer is in Early Development. Full support planned soon: 2026.
Quick Navigation
| I want to… | Feature | API |
|---|
| Manage registered performers or query them by name | Performer Manager | API |
| Swap equipment visuals at runtime with modular slot-based assets | Skin Slots | API |
| Render billboard-style 2.5D characters that face the camera correctly | Paper Performer | API |
| Drive animation blend parameters from entity velocity automatically | Locomotion | API |
Installation
GS_Performer requires GS_Core. EMotionFX and GS_Unit are optional dependencies for animation and velocity-driven locomotion.
For a full guided walkthrough, follow the Simple Project Setup guide.
Quick Installation Summary
- Enable the GS_Performer gem in your project configuration.
- Create a Performer Manager prefab and add it to the Game Manager’s Managers list.
- Place PerformerSkinSlotComponent and SkinSlotHandlerComponent on character entities.
- For 2.5D characters, add a PaperFacingHandlerComponent.
The Performer Manager is the singleton coordinator for all registered performers in the active scene. It follows the GS_Core manager pattern — spawned by the Game Manager, participates in standby, and is accessible globally via its request bus. Systems that need to enumerate or query active performers route through this component.
Performer Manager
API
Skin Slots
The Skin Slot system is the modular equipment and appearance layer for characters. Each PerformerSkinSlotComponent represents an equipment slot holding an actor asset and material overrides. The SkinSlotHandlerComponent manages the full collection for one character, providing batch operations and appearance-changed notifications. This makes character visual configuration composable rather than monolithic.
Skin Slots
API
The Paper Performer system provides billboard-style 2.5D character rendering. The PaperFacingHandlerComponent rotates the entity’s mesh to face the active camera each frame, accounting for movement direction to prevent visual artifacts from naive always-face-camera implementations. Custom facing logic can be substituted without modifying the core component.
Paper Performer
API
Locomotion
The Locomotion feature set connects an entity’s physical movement to its animation layer. The VelocityLocomotionHookComponent reads velocity from the physics system each tick and drives animation blend parameters — speed and direction — that EMotionFX or Simple Motion components consume. Animations stay tightly synchronized with gameplay movement without manual state machine scripts.
Locomotion
API
See Also
For the full API, component properties, and C++ extension guide:
For step-by-step project setup:
Get GS_Performer
GS_Performer — Explore this gem on the product page and add it to your project.
9.1 - Performer Manager
How to work with the GS_Play Performer Manager — performer registration and lifecycle.
The Performer Manager is the singleton controller for the performer system. It tracks all active performers in the scene, handles registration and lookup, and responds to the Game Manager’s lifecycle events automatically.
For component properties and API details, see the Framework API reference.
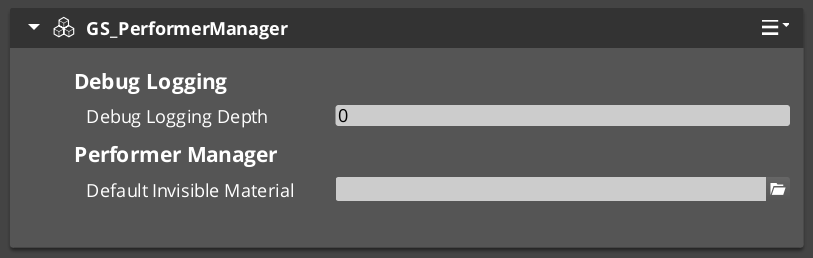
Contents
How It Works
Performers register with the Performer Manager when they activate. The manager provides lookup by name so that other systems — dialogue, cinematics, AI — can find performers without maintaining their own references.
The Performer Manager responds to standby and shutdown broadcasts from the Game Manager, coordinating performer state across level transitions.
Quick Reference
| Need | Bus | Method |
|---|
| Query performer management | PerformerManagerRequestBus | Manager-level queries |
Glossary
| Term | Meaning |
|---|
| Performer | An entity that represents a character in the world with visual, animation, and interaction capabilities |
| Performer Manager | The singleton that tracks all active performers and provides lookup by name |
For full definitions, see the Glossary.
See Also
For the full API, component properties, and C++ extension guide:
For related systems:
Get GS_Performer
GS_Performer — Explore this gem on the product page and add it to your project.
9.2 - Performers
The character rendering entity types in GS_Performer — billboard 2.5D paper performers and fully-rigged 3D avatar performers.
Performers are the character entity types in GS_Performer. Each type defines how a character’s visual layer is structured and rendered — whether a flat sprite quad that rotates to face the camera, or a fully-rigged 3D mesh driven by EMotionFX. Choose the performer type that fits your character pipeline, then add Performer Features to layer in additional capabilities.
For component details and C++ extension, see the Framework API: Performers.
GS_Performer is in Early Development. Full support planned soon: 2026.
The Paper Performer is a billboard-based character type for 2.5D and top-down games. The PaperFacingHandlerComponent orients the entity’s sprite quad toward the active camera each frame, accounting for movement direction to prevent visual artifacts. It is the simplest performer type — lightweight, with no animation graph required.
Paper Performer
API
The Avatar Performer is the full 3D character pipeline. It drives a rigged EMotionFX actor and integrates with Skin Slots and the Velocity Locomotion Hook for a complete character presentation layer. Use this for characters with full 3D rigs, animation blend trees, and runtime equipment swapping.
Avatar Performer
API
See Also
For the full API, component properties, and C++ extension guide:
For related systems:
Get GS_Performer
GS_Performer — Explore this gem on the product page and add it to your project.
9.2.1 - Avatar Performer
How to work with GS_Play avatar performers — 3D pipeline, animation, equipment.
Avatar Performer Under Construction
Get GS_Performer
GS_Performer — Explore this gem on the product page and add it to your project.
9.2.2 - Paper Performer
How to work with GS_Play paper performers — billboard-style 2.5D character rendering with camera-aware facing.
The Paper Performer system provides billboard-style character rendering for 2.5D games. The Paper Facing Handler rotates sprite-based characters to always face the active camera while maintaining proper orientation relative to movement direction. This prevents the visual artifacts that occur when a flat sprite is viewed from the side.
For component properties and the facing algorithm, see the Framework API reference.
GS_Performer is in Early Development. Full support planned soon: 2026.
Contents
How It Works
The PaperFacingHandlerComponent is placed on any entity that uses sprite-based or flat-mesh character rendering. Each frame, it calculates the optimal facing direction based on:
- The active camera’s position (via CamCore notifications).
- The entity’s movement direction.
- Configurable facing rules.
The result is a character that always presents its front face to the camera without snapping or popping during movement direction changes.
Camera-Aware Variant
The CamCorePaperFacingHandlerComponent (in GS_Performer) extends the base paper facing with direct camera core integration. It listens to the GS_Core CamCoreEmissionBus for camera position updates, ensuring the facing calculation uses the exact camera state rather than a cached position.
Entity Configuration
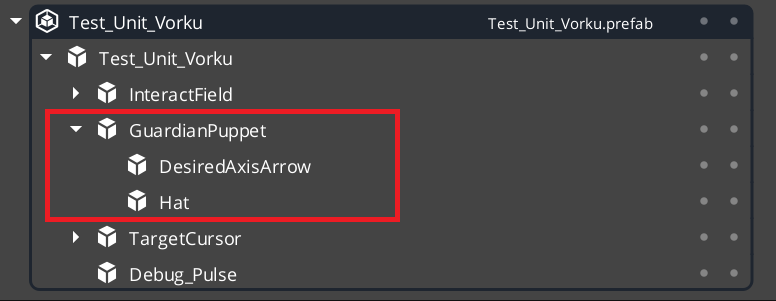
Note this has been put inside a GS_Unit prefab.
Glossary
| Term | Meaning |
|---|
| Paper Performer | A billboard-style character that always faces the camera for 2.5D rendering |
| Paper Facing Handler | The component that calculates optimal facing direction each frame |
For full definitions, see the Glossary.
See Also
For the full API, component properties, and C++ extension guide:
For related systems:
Get GS_Performer
GS_Performer — Explore this gem on the product page and add it to your project.
9.3 - Performer Features
Universal capabilities that extend any performer type — modular equipment via skin slots, and velocity-driven animation via locomotion.
Performer Features are components that layer onto any performer entity, regardless of type. They are not tied to how a character is rendered — they extend what any performer can do. Skin Slots give any character modular equipment slots. Locomotion connects physics movement to the animation graph automatically.
For component details and C++ extension, see the Framework API: Performer Features.
GS_Performer is in Early Development. Full support planned soon: 2026.
Skin Slots
The Skin Slot system provides modular equipment and appearance management. Each PerformerSkinSlotComponent represents one equipment position on the character — helm, chest, weapon — holding a swappable actor mesh and material set. The SkinSlotHandlerComponent coordinates all slots on a character and supports preset profiles for NPC archetypes or full equipment sets.
Skin Slots
API
Locomotion
The Velocity Locomotion Hook connects entity movement to animation automatically. It reads the entity’s physics velocity each frame and writes blend parameters — speed and direction — directly into the EMotionFX animation graph, driving walk, run, idle, and fall transitions without manual state machine scripting.
Locomotion
API
See Also
For the full API, component properties, and C++ extension guide:
For related systems:
Get GS_Performer
GS_Performer — Explore this gem on the product page and add it to your project.
9.3.1 - Skin Slots
How to work with GS_Play skin slots — modular character appearance with swappable actor meshes and materials.
The Skin Slot system provides modular character appearance. Each slot represents an equipment position on a character (head, body, arms, weapon) and holds an actor mesh with its materials. The Skin Slot Handler manages the full collection of slots for a character, enabling runtime equipment swapping through data changes rather than entity restructuring.
For component properties and data structures, see the Framework API reference.
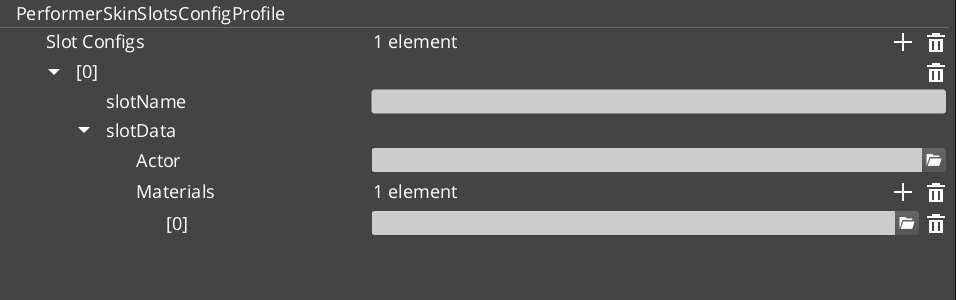
Contents
How It Works
Each character entity has one SkinSlotHandlerComponent and multiple PerformerSkinSlotComponent children — one per equipment position.
| Component | What It Does |
|---|
| SkinSlotHandler | Manages the full set of skin slots for a character. Provides batch operations. |
| PerformerSkinSlot | Individual slot. Holds a SkinSlotData (actor asset + material assets). |
When you equip a new item, you update the slot’s SkinSlotData — the system swaps the actor mesh and materials automatically.
Skin Slot Data
| Field | What It Is |
|---|
| Actor Asset | The 3D mesh for this equipment slot. |
| Material Assets | Materials applied to the mesh. |
| Slot Name | Named identifier for the slot (e.g., “Helmet”, “Chest”, “MainHand”). |
Skin Slot Configuration Profiles are preset assets that define complete character appearances — useful for NPC archetypes or equipment sets.
Quick Reference
| Need | Bus | Method |
|---|
| Access a skin slot | PerformerSkinSlotRequestBus | Per-slot queries and updates |
| Manage all slots | SkinSlotHandlerRequestBus | Batch operations on all slots |
Glossary
| Term | Meaning |
|---|
| Skin Slot | An equipment position on a character that holds an actor mesh and materials |
| SkinSlotHandler | The manager component that coordinates all skin slots on a single character |
| SkinSlotData | The data structure containing actor asset, materials, and slot name |
| Skin Slot Configuration Profile | A preset asset defining a complete character appearance for batch application |
For full definitions, see the Glossary.
See Also
For the full API, component properties, and C++ extension guide:
For related systems:
Get GS_Performer
GS_Performer — Explore this gem on the product page and add it to your project.
9.3.2 - Locomotion
How to work with GS_Play velocity locomotion — automatic animation parameter driving from entity velocity.
The Velocity Locomotion Hook automatically drives animation blend parameters from an entity’s velocity. Instead of manually scripting animation state transitions, you attach this component and it reads the entity’s physics velocity each frame, writing the appropriate blend values to the animation system.
For component properties, see the Framework API reference.
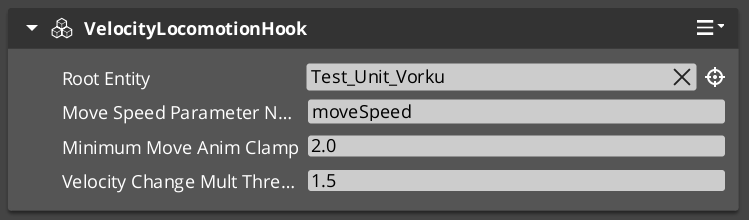
Contents
How It Works
The VelocityLocomotionHookComponent runs on the tick bus. Each frame it:
- Reads the entity’s current velocity from the physics system.
- Extracts speed, direction, and vertical velocity.
- Writes these as blend parameters to the entity’s EMotionFX animation graph.
This creates a seamless connection between movement and animation — walk, run, idle, and fall transitions happen automatically based on physics state.
When to Use
| Scenario | Result |
|---|
| Character walking | Speed parameter drives walk/run blend |
| Character idle | Zero velocity triggers idle state |
| Character falling | Vertical velocity drives fall animation |
| Character stopping | Deceleration naturally transitions to idle |
The component is stateless and lightweight — it reads velocity and writes parameters each frame with no internal state machine.
Glossary
| Term | Meaning |
|---|
| Velocity Locomotion Hook | A component that reads entity velocity and writes animation blend parameters each frame |
| Blend Parameter | A named value sent to the animation graph that controls state transitions and blending |
For full definitions, see the Glossary.
See Also
For the full API, component properties, and C++ extension guide:
For related systems:
Get GS_Performer
GS_Performer — Explore this gem on the product page and add it to your project.
10 - GS_PhantomCam
Priority-based virtual camera management — composable stage pipeline, channel-aware instancing, blend profiles, and spatial influence fields.
GS_PhantomCam is the camera management system for GS_Play. Instead of driving a single camera directly, you place lightweight virtual cameras — Phantom Cameras — in your level. Each Phantom Camera carries a priority value and runs a per-tick stage pipeline that produces its candidate pose. The Cam Core drives the real engine camera to match whichever Phantom Camera currently has the highest priority. Transitions between cameras are animated by Blend Profile assets, and Influence Fields let spatial zones or gameplay states adjust priority dynamically.
For multi-player and split-screen, GS_PhantomCam can also run in a channel-aware mode where each player gets its own arbitration slot — Tier 1 single-cam, Tier 2 single-player rig, Tier 3 multi-channel co-op — without changing the per-cam authoring surface.
For architecture details, component properties, and extending the system in C++, see the GS_PhantomCam API.
Quick Navigation
| I want to… | Feature | API |
|---|
| Manage the camera system lifecycle, channel registries, and dispatch overrides | Cam Manager | API |
| Place virtual cameras with priority, target routing, and snap / focus state | Phantom Cameras | API |
| Compose camera behavior from Body, Aim, and Additive stages | Stage Pipeline | API |
| Drive the real camera, run blends, handle mid-blend interrupts | Cam Core | API |
| Define smooth transitions with custom easing, blend shape, and state inheritance | Blend Profiles | API |
| Create spatial zones that modify camera priority | Influence Fields | API |
Architecture
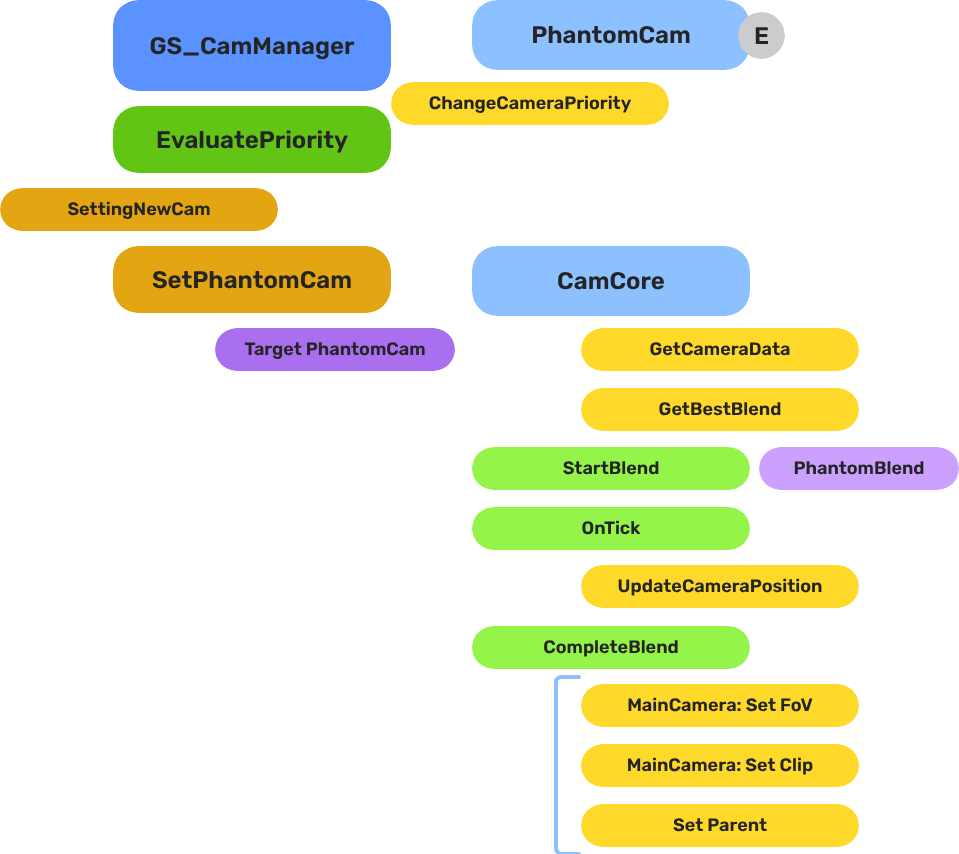
Breakdown
Each Phantom Camera publishes a candidate pose every tick by running its Body → Aim → Reposition → Noise pipeline. The Cam Manager arbitrates priority across all registered Phantom Cameras inside a channel (channel 0 covers all single-player projects). When the channel’s winner changes, the Cam Core looks up the best blend for the pair and animates the real camera from the outgoing pose to the new one — optionally inheriting pose state across the transition and applying mid-blend interrupt correction when a new winner appears before the current blend completes.
| Scenario | Which Blend Is Used |
|---|
| Camera A becomes inactive, Camera B was waiting | The Cam Core queries the assigned Blend Profile for an A → B entry. |
| No entry matches the pair | The Cam Core falls back to its own default blend time, easing, and shape. |
| A new transition starts before the current one finishes | The Cam Core applies a mid-blend correction window so the cam does not snap. |
| Blend entry’s Inherit State is set | The outgoing cam’s body publishes a pose snapshot; the incoming cam’s body adopts it before the blend executes. |
Because Blend Profiles are assets, the same profile can be shared across many Phantom Cameras. A single edit to the asset changes the feel of every camera that references it.
E Indicates extensible classes and methods.
Patterns - Complete list of system patterns used in GS_Play.
Installation
GS_PhantomCam requires GS_Core only. Add both gems to your project before placing PhantomCam components in a level.
For a full guided walkthrough, follow the Simple Project Setup guide.
Quick Installation Summary
- Enable the GS_PhantomCam gem in your project configuration.
- Create a Cam Manager prefab and add it to the Game Manager’s Managers list.
- Choose your authoring tier:
- Tier 1 / 2 (single-player) — Assign a rig prefab to the Cam Manager’s Primary Rig Prefab, or hand-place a Cam Core entity in the level.
- Tier 3 (split-screen / co-op) — Toggle Enable Instanced Channels on the Cam Manager and populate the Channel Configs list. Detailed walkthrough ships with the Channels & Instancing docs.
- Place Phantom Camera entities with desired Body, Aim, and Additive stages.
- Create Blend Profile assets for camera transitions.
Cam Manager
The Cam Manager is the singleton camera-system controller, integrated with GS_Core’s manager lifecycle. It handles startup and shutdown, owns per-channel registries (cameras, targets, influences, group targets), runs priority arbitration, dispatches cross-channel cinematic overrides, and orchestrates the engine’s active main view. In multi-channel projects, the Cam Manager also spawns rig prefabs at startup and re-spawns them on stage transitions.
Cam Manager
API
Phantom Cameras
A Phantom Camera is a single entity component — GS_PhantomCameraComponent — that carries priority, lens, target routing, snap / focus / blendingOut state, and the stage pipeline slot that gives the cam its behavior. Where previous versions of GS_PhantomCam shipped separate components for each behavior (clamped-look, static-orbit, spline track), all those behaviors are now stage variants on the single base component.
Phantom Cameras
API
Stage Pipeline
Every Phantom Camera runs the same per-tick pipeline:
Body → Aim → Reposition additives → Noise additives → Finalize
Authors compose a cam by picking a Body stage (follow, orbit, dynamic orbit, leading-follow, track), an Aim stage (default look, clamped look), and zero-or-more Additive stages (collision, tug listeners, Perlin noise, impulse). The same component becomes a follow cam, an orbital cam, a tracking dolly, or a third-person shoulder cam depending on what is slotted.
For step-by-step composition recipes — third-person shoulder cam, orbital boss cam, tracking dolly — see the recipes page.
Stage Composition Recipes
API
Cam Core
Cam Core is the runtime bridge between the Phantom Camera system and the actual O3DE camera entity. It receives the channel’s arbitrated winner from the Cam Manager, looks up the matching Blend Profile entry, optionally runs a state-inheritance handoff between the outgoing and incoming cams, and animates the real camera over the blend duration. When a new transition starts before the current one completes, Cam Core applies a mid-blend correction window so the cam does not snap.
Cam Core
API
Blend Profiles
Blend Profiles are .camblendprofile data assets that define how the Cam Core transitions between Phantom Cameras. Each entry specifies a From / To pair, a duration, an easing curve, a blend shape (Linear / Cylindrical / Spherical around a pivot), an inherit-state flag, and a pivot source. Authors share one profile across many cameras for visual consistency, then add per-pair overrides where the feel needs to differ.
Blend Profiles
API
Influence Fields
Influence Fields are spatial or global modifiers that dynamically shift camera priority. GlobalCameraInfluence applies a constant priority modifier for its entire active lifetime (typically scoped to a level via the StageData entity); CameraInfluenceField applies a priority modifier when an entity enters a PhysX trigger volume. In multi-channel projects, influences are routed to the channel that owns the entity that triggered them — clean isolation between players in co-op.
Influence Fields
API
See Also
For the full API, component properties, and C++ extension guide:
For step-by-step project setup:
Get GS_PhantomCam
GS_PhantomCam — Explore this gem on the product page and add it to your project.
10.1 - Cam Manager
How to work with the GS_PhantomCam manager — enabling and disabling the camera system, and responding to active camera changes.
The Cam Manager is the camera system’s singleton manager. It integrates with GS_Core’s standard manager lifecycle, handles the camera system’s startup and shutdown through the two-stage initialization sequence, and maintains awareness of which Phantom Camera is currently dominant. Any time the active camera changes, the Cam Manager broadcasts a notification so dependent systems can react without polling.
For architecture details, component properties, and extending the system in C++, see the Framework API reference.
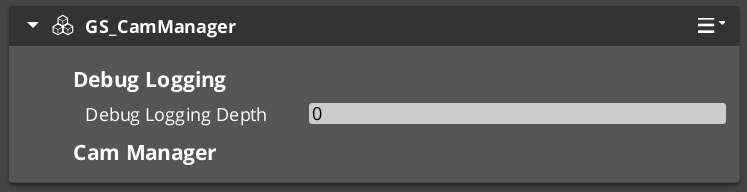
Contents
Manager Lifecycle
The Cam Manager is a GS_ManagerComponent and participates in the standard GS_Core startup sequence. It activates alongside all other managers during the two-stage initialization, making it safe to call camera system methods any time after OnStartupComplete.
| Stage | What Happens |
|---|
| Initialize | Cam Manager activates and registers with the camera pipeline. |
Startup (OnSetupManagers) | Manager is initialized. Safe to query camera state. |
Complete (OnStartupComplete) | All managers ready. Safe to enable or disable the camera system. |
Enabling and Disabling the Camera System
The camera system can be suspended and resumed independently of other gameplay systems. This is used during UI-only states, loading screens, or when a cinematic takes direct control of the camera.
| Notification | What It Does |
|---|
EnableCameraSystem | Activates the camera system. Phantom Cameras resume competing for priority. |
DisableCameraSystem | Suspends the camera system. The real camera stops receiving updates from Phantom Cameras. |
Both events are on CamManagerNotificationBus. Broadcast them to switch the camera system state from any script or component.
Tracking the Active Camera
The Cam Manager broadcasts SettingNewCam on CamManagerNotificationBus whenever a different Phantom Camera becomes dominant. This fires any time a camera with higher priority activates, a dominant camera deactivates, or a blend resolves to a new target.
Use this event in any system that needs to know which camera is currently active — aiming reticles, world-space UI elements, minimaps, or audio listener positioning.
ScriptCanvas
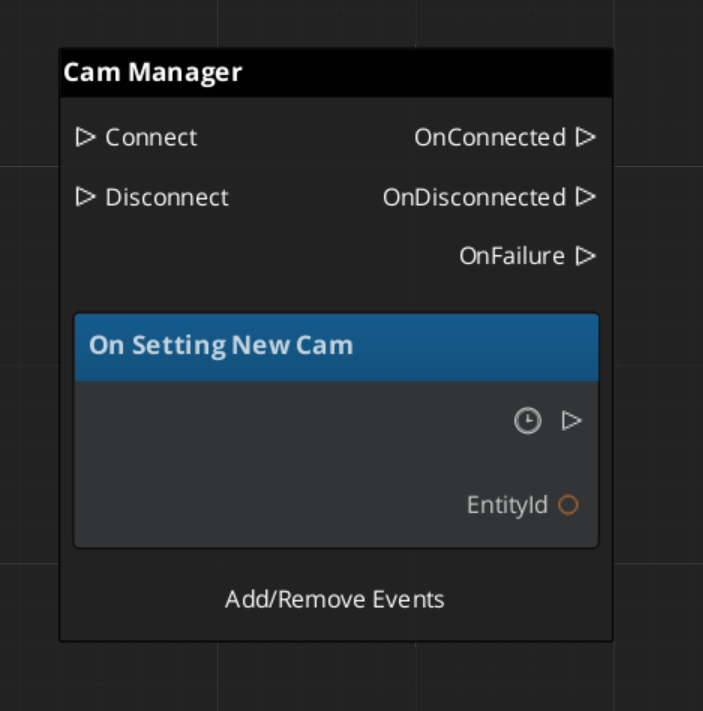
Suspending the Camera System
ScriptCanvas
Broadcast DisableCameraSystem to suspend camera updates, for example when a cutscene takes direct camera control:
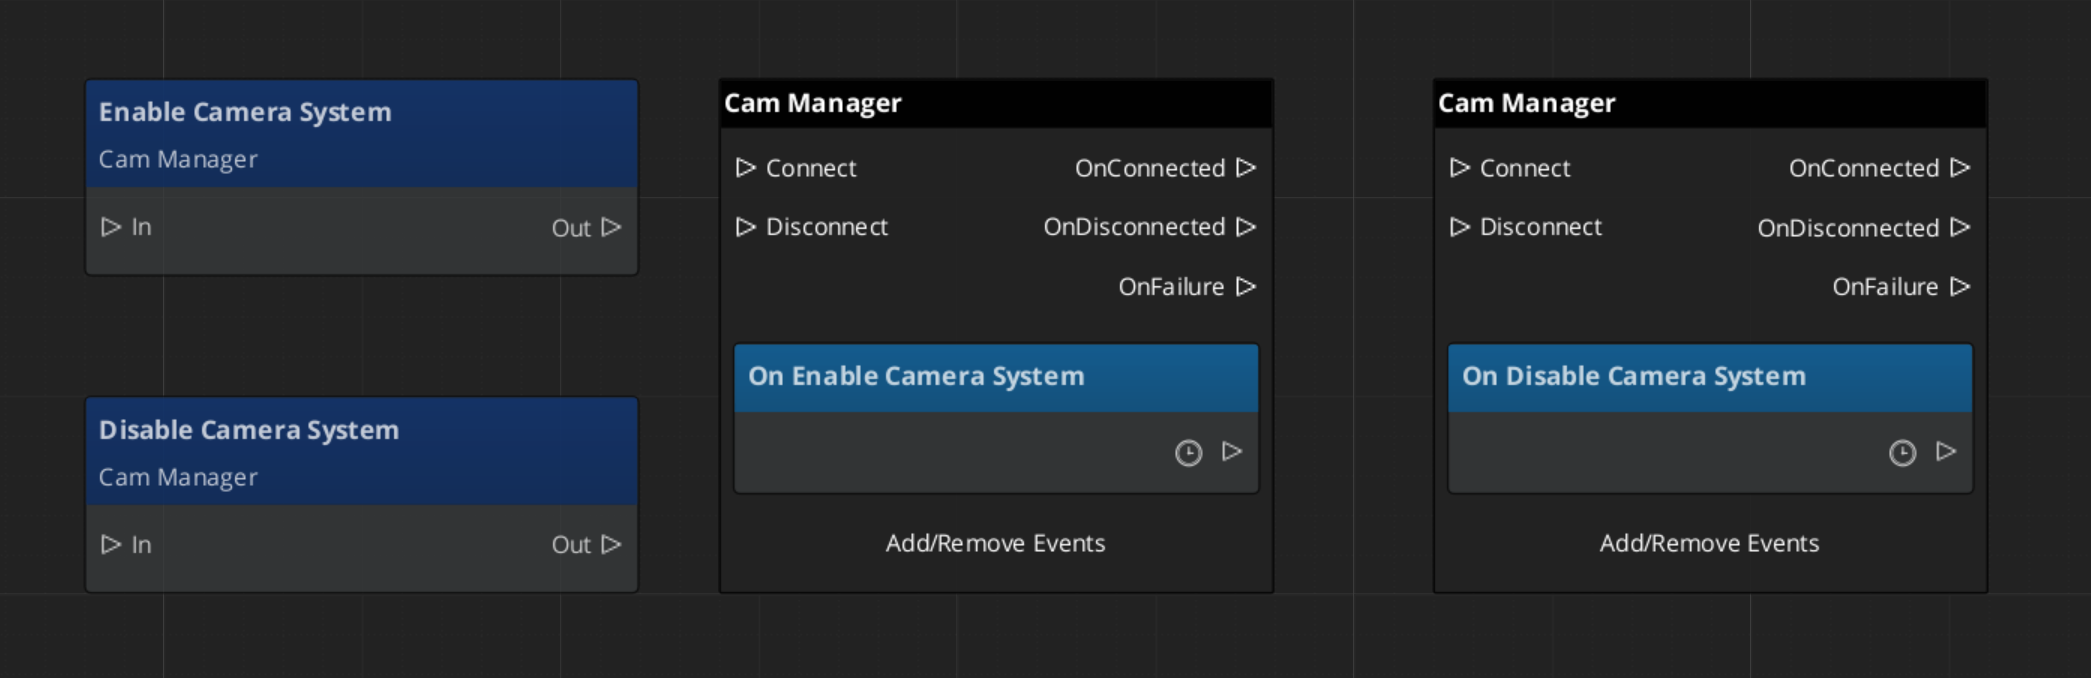
Because DisableCameraSystem and EnableCameraSystem are notifications rather than requests, they are fire-and-forget. Any script can broadcast them.
Changing the Camera Target
ScriptCanvas
The follow target, designated by the CamManager, can be set with Get/Set Target:
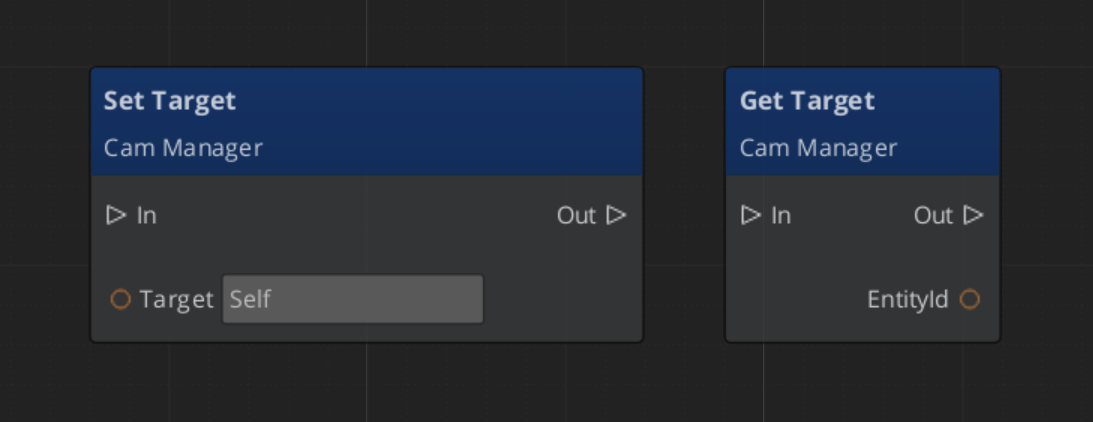
Three Authoring Tiers
The Cam Manager exposes three top-level fields that control how the camera system is configured for your project. Most single-player projects use Tier 1; multi-player or split-screen projects use Tier 3.
| Tier | Cam Manager configuration | When to choose it |
|---|
| Tier 1 — Single Cam | m_primaryRigPrefab set, m_enableInstancedChannels = false | Single-player projects with a normal camera rig. The default for most games. |
| Tier 2 — Level-placed CamCore | No primary rig prefab, m_enableInstancedChannels = false | Legacy single-player flow where the Cam Core is hand-placed in each level. |
| Tier 3 — Multi-Channel | m_enableInstancedChannels = true, m_channelConfigs populated | Split-screen, local co-op, or cinematic projects that need per-player rigs and arbitration. |
For the full step-by-step walkthrough of each tier — including common Tier 3 patterns (shared cinematic cams, hero-perspective cams, cross-channel dispatch) and the lobby flow for variable player counts — see the dedicated Channels page:
Channels & Instancing
API
Cam Manager Entity Configuration
In Tier 1, assign your rig prefab (containing a Cam Core and any cams that should persist with the manager) to the Cam Manager’s Primary Rig Prefab field. The Cam Manager spawns the rig at startup.
In Tier 2, hand-place the Cam Core entity as a child of the Cam Manager. Any phantom cameras that should persist between stage changes can sit alongside the Cam Core.
In Tier 3, populate m_channelConfigs with one entry per supported player slot — see Channels & Instancing.
Across all tiers, the PossessedUnit event on a player controller is a convenient way to push the camera target the moment the player unit spawns.
Quick Reference
| Need | Bus | Method / Event |
|---|
| Enable the camera system | CamManagerNotificationBus | EnableCameraSystem |
| Disable the camera system | CamManagerNotificationBus | DisableCameraSystem |
| Set the camera target (single-player) | CamManagerRequestBus | SetTarget(playerEntityId) |
| Set a channel’s target (multi-channel) | CamManagerRequestBus | SetChannelTarget(channelId, entity) |
| Know when the active camera changes (single-player) | CamManagerNotificationBus | SettingNewCam(newCamEntityId) |
| Know when a channel’s active cam changes (multi-channel) | CamManagerNotificationBus | SettingNewCamOnChannel(channelId, cam) |
| Spawn / despawn a channel mid-session | CamManagerRequestBus | EnableChannel(id) / DisableChannel(id) |
| Set the engine’s active main view | CamManagerRequestBus | SetActiveChannel(id) or SetActiveCamCore(camCore) |
Glossary
| Term | Meaning |
|---|
| Cam Manager | The singleton manager for the PhantomCam system that tracks active cameras and broadcasts changes |
| Dominant Camera | The Phantom Camera with the highest priority that currently drives the real camera |
For full definitions, see the Glossary.
See Also
For the full API, component properties, and C++ extension guide:
For related systems:
Get GS_PhantomCam
GS_PhantomCam — Explore this gem on the product page and add it to your project.
10.1.1 - Channels & Instancing
Concept primer for the PhantomCam channel system — what a channel is, which authoring tier to choose, and the pitfalls to know before authoring.
GS_PhantomCam can be configured at three different tiers depending on what your project needs. Most projects use Tier 1 (single-cam) or Tier 2 (single-player rig). Co-op, split-screen, and per-player-cinematic projects use Tier 3 (multi-channel). The per-cam authoring surface is identical across tiers — what changes is the Cam Manager configuration and how many rigs the system spawns.
This page is a concept primer. For step-by-step Tier 1 / Tier 2 / Tier 3 walkthroughs, common Tier 3 patterns, and the lobby-flow recipe for variable player counts, see the recipes collection.
Channel Tier Configurations (Recipes)
API
For architecture details and the full bus surface, see the Framework API reference.
Contents
What Is a Channel?
A channel is one player viewpoint slot. Each channel owns:
- An instantiated rig subtree (one Cam Core + zero or more Phantom Cameras).
- Its own target binding (typically the player unit for that channel).
- Its own priority table — arbitration is independent per channel.
- Its own active influence-field records.
Channel 0 is the implicit default for all single-player flows. You only deal with non-zero channels in Tier 3.
Multi-view rendering is pending. Until the AttachmentImage work lands, the engine renders one channel’s view at a time even when multiple channels are arbitrating internally. The Cam Manager’s active main-view API selects which channel reaches the framebuffer. The arbitration / dispatch / target binding all work today — only the simultaneous-rendering piece is gated.
Choosing a Tier
| Tier | Cam Manager configuration | When to choose it | Recipe |
|---|
| Tier 1 — Single Cam | m_primaryRigPrefab set, m_enableInstancedChannels = false | Single-player projects with a normal camera rig. The default for most games. | Tier 1 walkthrough |
| Tier 2 — Level-placed CamCore | No primary rig prefab, m_enableInstancedChannels = false | Legacy single-player flow where the Cam Core is hand-placed in each level rather than spawned from a prefab. Supported but not preferred. | Tier 2 walkthrough |
| Tier 3 — Multi-Channel | m_enableInstancedChannels = true, m_channelConfigs populated | Split-screen, local co-op, or cinematic projects that need per-player rigs and arbitration. | Tier 3 walkthrough |
You can build a project at Tier 1, then add Tier 3 later by toggling the master gate and authoring channel configs — the per-cam configuration and stage compositions you authored at Tier 1 still work.
The Tier 3 walkthrough recipe also covers common Tier 3 patterns (in-rig per-player cams, shared cinematic collapse cams, hero-perspective cams, cross-channel dispatch) and the lobby flow for variable player counts.
Pitfalls
Tug-field channels are not instancing channels
Tug-field m_channels are arbitrary string tags (“Cinematic”, “Combat”) that match tug volumes to listeners. They are unrelated to the integer ChannelIds on this page despite the shared word. See Tug Fields for the unrelated tagging system.
A cam outside any rig prefab in Tier 3
If you place a Local-scope Phantom Camera in the level (not inside a rig prefab) with multi-channel ON, the stamp-walk misses and the cam falls through to legacy channel 0. This may surprise you. To make a level-placed cam channel-aware in Tier 3, set its scope to TrueUnique with explicit binding.
AllChannels outside a rig prefab
AllChannels-scoped cams outside a rig prefab currently warn and fall back to channel 0. The “out-of-rig runtime cloning” path is deferred. For per-player broadcast cams, place the cam inside the rig prefab.
Cam Manager spawns BEFORE HandleStartup
The Cam Manager spawns configured rigs from OnStartupComplete and only then broadcasts HandleStartup. This means cams inside spawned rigs receive the startup wave alongside everything else — your gameplay code can rely on Cam Cores being registered by the time HandleStartup fires. Stage transitions follow the same pattern: respawn before re-broadcasting HandleStartup.
See Also
Recipes:
Framework API:
Related basics pages:
Get GS_PhantomCam
GS_PhantomCam — Explore this gem on the product page and add it to your project.
10.2 - Cam Core
How to work with GS_CamCoreComponent — the rendering bridge that reads the dominant Phantom Camera each frame and drives the real camera entity.
Cam Core is the rendering bridge between the Phantom Camera system and the actual O3DE camera entity. GS_CamCoreComponent runs on tick, reads the dominant Phantom Camera’s configuration each frame, and writes position, rotation, and field of view directly to the camera entity that the renderer uses. Phantom Cameras define intent — Cam Core executes it.
For architecture details, component properties, and extending the system in C++, see the Framework API reference.
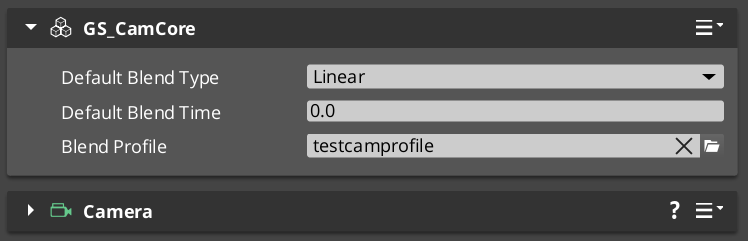
Contents
What Cam Core Does Each Frame
On every tick, Cam Core follows this sequence:
| Step | What Happens |
|---|
| 1 — Query active camera | Reads the current dominant Phantom Camera from the Cam Manager. |
| 2 — Read PhantomCamData | Fetches the active camera’s position, rotation, FOV, and clip planes. |
| 3 — Apply blend | If a blend is in progress, interpolates between the outgoing and incoming camera values. |
| 4 — Write to real camera | Pushes the resolved transform and FOV to the real O3DE camera entity. |
| 5 — Broadcast position | Fires UpdateCameraPosition on CamCoreNotificationBus so dependent systems receive the final camera location. |
Because Cam Core owns the final write to the camera entity, it is also the correct insertion point for last-mile adjustments such as screen shake offsets, post-processing overrides, or recoil displacement — applied after blend resolution but before the frame renders.
Responding to Camera Position Updates
CamCoreNotificationBus broadcasts UpdateCameraPosition every frame with the resolved camera transform. Connect to this bus in any system that needs per-frame camera location data.
| Use Case | Why UpdateCameraPosition |
|---|
| Audio listener positioning | Follow the camera without polling the camera entity. |
| LOD or culling controllers | Receive camera position reliably after blend is applied. |
| Shadow caster updates | React to camera movement each frame. |
| World-space UI anchoring | Know exactly where the camera landed after Cam Core processed its frame. |
ScriptCanvas
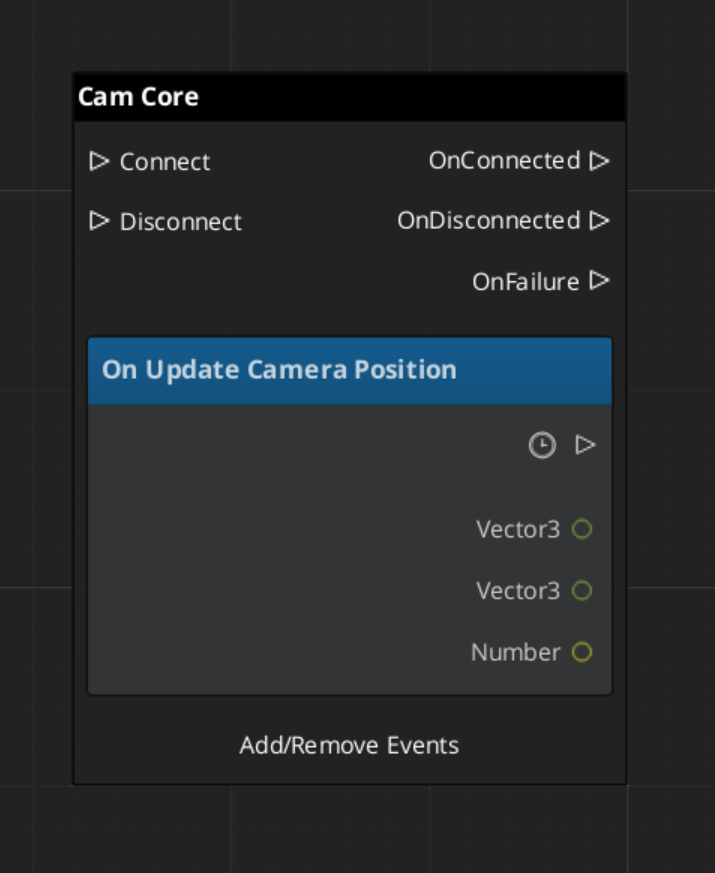
Cam Core Setup
Cam Core requires exactly one GS_CamCoreComponent in the level, and a separate entity with an O3DE Camera component that Cam Core is configured to drive. The Camera entity is what the renderer uses — Cam Core holds a reference to it and writes to it each frame.
| Entity | Required Components |
|---|
| Cam Core entity | GS_CamCoreComponent |
| Camera entity | O3DE CameraComponent (standard) |
Assign the Camera entity reference in the Cam Core component’s properties in the editor. Both entities should be present in every level that uses the PhantomCam system.
Querying Cam Core State
Use CamCoreRequestBus to read the current camera state or set the camera entity reference at runtime:
ScriptCanvas
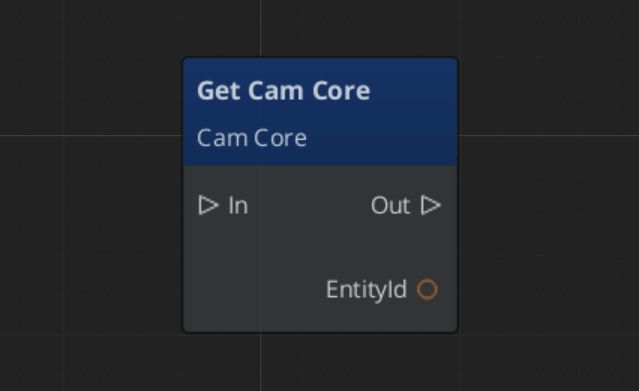
Quick Reference
| Need | Bus | Method / Event |
|---|
| Know the camera position each frame | CamCoreNotificationBus | UpdateCameraPosition(transform) |
| Get the real camera entity ID | CamCoreRequestBus | GetCameraEntity |
| Get the current resolved FOV | CamCoreRequestBus | GetCurrentFOV |
| Know when the active camera changes | CamManagerNotificationBus | SettingNewCam(newCamEntityId) |
Glossary
| Term | Meaning |
|---|
| Cam Core | The rendering bridge that reads the dominant Phantom Camera each frame and writes to the real O3DE camera |
| Blend Resolution | The process of interpolating position, rotation, and FOV between outgoing and incoming cameras |
For full definitions, see the Glossary.
See Also
For the full API, component properties, and C++ extension guide:
For related systems:
Get GS_PhantomCam
GS_PhantomCam — Explore this gem on the product page and add it to your project.
10.2.1 - State Inheritance
One-checkbox author surface for cam-to-cam pose handoff during blends. When to enable it, what each body type does with it, and the common authoring gotcha.
State inheritance is an opt-in checkbox on each entry in a Blend Profile asset. When the box is ticked, the outgoing camera publishes a snapshot of its pose at the moment of transition, and the incoming camera’s Body stage adopts the snapshot through its own kinematic model. The blend then reads as a smooth drift instead of a swing.
When the box is unticked (the default), the incoming camera starts from its authored ideal — useful for cinematic shots where you want the camera to land at a specific framing regardless of where the outgoing camera was.
For the protocol mechanics, per-stage Get / Adopt implementations, and the matching m_inheritState field, see the Framework API reference.
Contents
When to Tick the Box
| Tick it when… | Don’t tick it when… |
|---|
| The two cams have similar framing intent (both follow the same target) and you want a seamless continuation. | The destination cam is a cinematic shot authored at a specific pose. |
| The destination cam would otherwise “snap to its starting yaw / pitch” in a jarring way. | The two cams have unrelated targets and the snap is the desired beat. |
| You’re blending between two orbital cams and want angular continuity. | The destination cam is the first cam in a stage and there’s no source to inherit from. |
The default is off so cinematic shots land at their authored poses unless you opt in.
What Each Body Does With It
Inheritance is body-only. The destination’s Aim stage runs fresh on the inherited body pose.
| Destination Body | Behavior with InheritState = true |
|---|
DefaultFollowBody | No special handling — falls through to the standard visual blend. |
OrbitBody (static orbit) | Does not adopt — the authored yaw / pitch define the static shot’s identity. (It can be the source for inheritance into another orbit cam, providing clean angular state.) |
DynamicOrbitBody | Adopts the source’s yaw / pitch directly when the source publishes angular state (e.g. another orbit body). Falls back to back-deriving yaw / pitch from world position when the source doesn’t. Preserves angular continuity across different orbit shape assets. |
LeadingFollowBody | Inherits the source’s facing at the body’s preferred standoff distance. The destination cam doesn’t lock to the source’s literal position (which could land off-band); instead it stands at band-natural distance in the direction the source was facing. |
TrackBody | Projects the source’s position onto the dolly spline. If the source sits farther than the body’s threshold (default 5 m) from the spline, the adoption is rejected and the cam falls back to a standard blend (no teleport-snap). |
The Common Gotcha
If the destination cam looks like it’s snapping to its initial-yaw seed instead of inheriting from the source, check the inherit flag on the matched blend entry. The symptom varies by body type:
| Body | Symptom of inherit-off |
|---|
LeadingFollowBody | “Cam orients behind player’s travel direction regardless of source facing.” |
DynamicOrbitBody / OrbitBody | Cam swings to authored yaw / pitch then blends from there. |
TrackBody | Dolly starts at its untouched starting spline parameter. |
All three indicate the same root cause: the blend entry exists in the asset, but InheritState is unticked on it. Fix it in the asset.
Author Steps
- Open the relevant
.camblendprofile asset in the Asset Editor. - Find or add the blend entry for the From / To pair.
- Tick the Inherit State checkbox on that entry.
- Save the asset.
That’s the entire author surface. Everything else — pose snapshotting, body-stage Get / Adopt selection, ANGULAR vs POSITION derivation, the path-rejection threshold — happens automatically per body type.
For per-pair authoring at scale, share one blend profile across cams that should behave the same way, and use multiple profiles for cams that need different inheritance defaults.
See Also
Framework API:
Related basics pages:
Get GS_PhantomCam
GS_PhantomCam — Explore this gem on the product page and add it to your project.
10.2.2 - Blend Profiles
How to author .camblendprofile assets to control camera transitions — duration, easing, blend shape, pivot source, and the inherit-state toggle.
Blend Profiles are .camblendprofile data assets that define how the Cam Core transitions from one Phantom Camera to another. Without a Blend Profile, transitions are instantaneous. A well-authored Blend Profile is often the single largest contributor to a camera system feeling polished rather than mechanical.
Each entry in a profile defines a single transition rule — a From / To pair plus the parameters that shape the blend: duration, easing curve, blend shape, pivot source, and whether the destination cam should inherit pose state from the source.
For asset structure details and version semantics, see the Framework API reference.
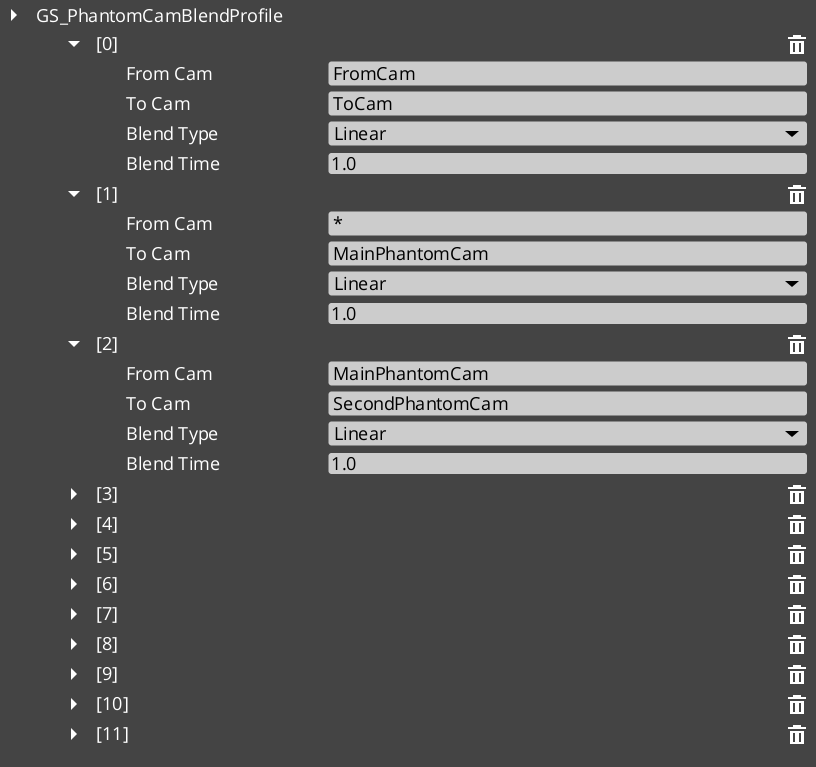
Contents
What a Blend Entry Contains
Each entry in a .camblendprofile defines a single transition rule:
| Field | Purpose |
|---|
| From Camera | Entity name of the outgoing cam. Blank / "any" matches all. |
| To Camera | Entity name of the incoming cam. Blank / "any" matches all. |
| Blend Time | Duration of the transition in seconds. |
| Blend Type | The easing curve. Same CurveType enum used elsewhere in the framework. |
| Blend Shape | Linear, Cylindrical, or Spherical. See Blend Shape. |
| Pivot Source | Source, Destination, or Shared. See Pivot Source. Ignored when Blend Shape is Linear. |
| Inherit State | Opt-in cam-to-cam pose handoff. See Inherit State. |
Camera names correspond to the entity names of your Phantom Camera entities in the scene.
Resolution Order
When a transition occurs, the Cam Core asks the profile for the best entry matching the outgoing → incoming pair. Resolution is by specificity:
| Tier | Match |
|---|
| 1 — Exact | Both From and To camera names match. |
| 2 — Any-to-specific | From is "any" or blank, To matches. |
| 3 — Specific-to-any | From matches, To is "any" or blank. |
| 4 — Default fallback | No entry matched; the Cam Core uses its own default Blend Time, Blend Type, and Blend Shape configured on the component. |
This layered resolution lets you author broad defaults (“any” to “any” at 1.0 seconds with Linear shape and Inherit unchecked) while overriding specific transitions (“MenuCam” → “GameplayCam” at 2.5 seconds with Spherical shape, Pivot Source = Destination, and Inherit on).
Blend Shape
How the cam’s position interpolates between source and destination. Rotation always slerps; the shape only affects position.
| Shape | When to use it |
|---|
Linear | Default. Straight-line lerp. The cheapest and most predictable. Right for most transitions. |
Cylindrical | The two cams sit at similar heights around a shared target, and you want the transition to feel like sweeping around the target. Pitch and radius interpolate independently; the yaw arcs around a pivot. |
Spherical | The two cams sit at different heights around a shared target, and you want a full 3D orbital arc. The cam traces a great-circle path around the pivot. |
Auto-fallback to Linear. When neither cam reports a pivot (e.g. environmental cams without follow / look-at targets), the blend lerps straight regardless of the authored shape. The pivot resolution gracefully drops back to Linear so you don’t accidentally break a transition by picking a shape that can’t be computed.
Pivot Source
When Blend Shape is Cylindrical or Spherical, the cam arcs around a pivot in world space. The Pivot Source selects which cam’s pivot to use:
| Pivot Source | Meaning |
|---|
Source | The outgoing cam’s pivot. “Leave A elegantly” — the source cam’s framing reference defines the arc. |
Destination | The incoming cam’s pivot. “Arrive at B elegantly” — the destination’s framing defines the arc. |
Shared (default) | Midpoint of both pivots. Collapses identically when both cams target the same point. |
This field is ignored when Blend Shape is Linear.
A cam that doesn’t publish a pivot (typically a body type that has no target — DefaultFollowBody without a follow target) disqualifies itself from being the pivot source. The Cam Core falls back to whichever cam does publish one, or to Linear if neither.
Inherit State
Setting Inherit State opts the matched pair into the cam-to-cam pose handoff protocol. When enabled, the destination cam’s Body stage seeds itself from the outgoing cam’s pose before the blend runs. The blend then reads as a smooth drift instead of a swing.
For when to use it, per-body behavior, and the common authoring gotcha, see the dedicated guide:
State Inheritance
API
Default is unchecked so cinematic shots authored at specific poses land at those poses unless you opt in.
Creating a Blend Profile Asset
- Open the Asset Editor in O3DE.
- Select New → GS_PhantomCamBlendProfile.
- Name the asset descriptively — e.g.
CombatBlend, CinematicSoftBlend, CharacterSelectBlend. - Add blend entries via the + button on the Blend List array.
- For each entry:
- Set From Camera name (or leave blank for “any”).
- Set To Camera name (or leave blank for “any”).
- Set Blend Time in seconds.
- Choose Blend Type (easing curve).
- Choose Blend Shape.
- Choose Pivot Source (only matters if Shape is not Linear).
- Tick Inherit State if you want a continuation-feel handoff.
- Save the asset.
- Assign it to a Cam Core component’s Blend Profile slot.
A starter SampleRigBlend.camblendprofile ships in gs_phantomcam/Assets/ for reference.
Quick Reference
| Need | How |
|---|
| Create a blend profile | Asset Editor → New → GS_PhantomCamBlendProfile |
| Assign a profile to the cam system | Set the Blend Profile slot on the Cam Core component |
| Make a transition instant | Leave the entry’s Blend Time at 0, or don’t add an entry at all (falls back to Cam Core defaults — set those to 0 too if you want all transitions instant). |
| Share one profile across many cams | Use the same asset reference across multiple Cam Core components (Tier 3 / multi-rig) |
| Edit blend timing project-wide | Edit the Blend Profile asset — all consumers update automatically. |
| Continuation-feel handoff between similar cams | Tick Inherit State on the matching entry |
| Orbital arc between two cams sharing a target | Set Blend Shape to Spherical and Pivot Source to Shared |
Glossary
| Term | Meaning |
|---|
| Blend Profile | A .camblendprofile data asset defining per-pair transition parameters. |
| Blend Entry | One row in a Blend Profile — a From / To pair and the parameters for that specific transition. |
| Blend Shape | The geometric shape of the cam’s position interpolation — Linear / Cylindrical / Spherical. |
| Pivot Source | Which cam’s pivot is used as the orbital center for non-Linear shapes. |
| Inherit State | The opt-in toggle that drives the cam-to-cam pose handoff protocol. |
For full definitions, see the Glossary.
See Also
Framework API:
Related basics pages:
Get GS_PhantomCam
GS_PhantomCam — Explore this gem on the product page and add it to your project.
10.3 - Phantom Cameras
How to configure a Phantom Camera — priority, target, lens, stage composition, and snap / focus state.
A Phantom Camera is a virtual camera definition placed in your level as a component on an ordinary entity. It does not render anything. Instead, the GS_PhantomCameraComponent holds priority, lens, target routing, and a stage pipeline slot that authors fill in to give the cam its behavior. The Cam Manager arbitrates priority across all registered Phantom Cameras in a channel — whichever active cam holds the highest priority drives the real camera at any given moment via the Cam Core.
Where previous versions of GS_PhantomCam shipped separate components for each behavior, all of those behaviors are now stage variants layered on top of the single base component. To make a cam follow, orbit, sweep along a spline, or track a group of subjects, you slot a Body stage and an Aim stage — and optionally one or more Additive stages — from the editor’s type-picker.
For architecture details, component properties, and extending the system in C++, see the Framework API reference.
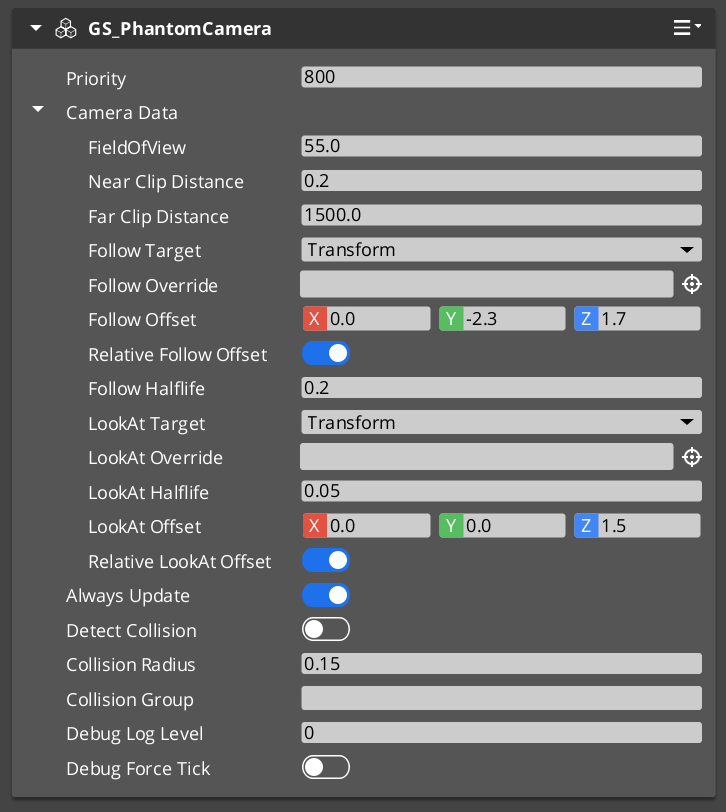
Contents
How Priority Works
Every GS_PhantomCameraComponent has a base priority. The Cam Manager continuously evaluates priority across all active Phantom Cameras in a channel and routes camera control to the highest. Influences (Influence Fields, gameplay code) can add temporary priority modifiers without touching the base value. When the dominant camera changes, the Cam Manager notifies the Cam Core to begin blending toward the new winner.
| Condition | Result |
|---|
| Camera A priority 10, Camera B priority 5 — both active | Camera A is dominant. |
| Camera A is disabled or deactivated | Camera B becomes dominant immediately (or blends if a Blend Profile entry matches the A → B pair). |
| Camera A and Camera B both priority 10 | The most recently activated one is dominant. |
| No Phantom Cameras are active in a channel | The real camera holds its last known position. |
In multi-channel projects, each channel arbitrates independently — player 1 dominance changes do not affect player 2’s view.
PhantomCamData Fields
Each Phantom Camera stores a PhantomCamData record with its lens, priority, and follow target. Follow / look-at offsets, damping halflives, and target-mode resolution live on the stages, not on PhantomCamData.
| Field | Type | Purpose |
|---|
Priority | s32 | Base priority used in arbitration. Higher wins. |
FOV | float | Field of view in degrees. Applied to the real camera when dominant. |
NearClip | float | Near clip plane distance. |
FarClip | float | Far clip plane distance. |
CamTarget | EntityId | The follow target. May be left empty to inherit the channel target from the Cam Manager. |
A Phantom Camera with no CamTarget and no inherited channel target sits at its entity’s authored position until a target is bound.
Stage Composition
The cam’s behavior is the composition of one Body stage, one Aim stage, and zero-or-more Additive stages. Each is picked from the editor’s type-picker on the corresponding slot.
| Slot | Common picks | What it controls |
|---|
| Body | DefaultFollowBody, OrbitBody, DynamicOrbitBody, LeadingFollowBody, TrackBody | How the cam follows the target. |
| Aim | DefaultLookAtAim, ClampedLookAim | How the cam orients toward the target. |
| Additives (Reposition) | CollisionReposition, TugAimListener, TugBodyListener | Pose corrections — collision pushback, magnetic spatial pulls. |
| Additives (Noise) | PerlinNoise, ImpulseNoise | Pose perturbations — handheld sway, event-triggered shake. |
A third-person shoulder cam, for example, slots LeadingFollowBody + DefaultLookAtAim + a CollisionReposition additive. An orbital boss cam slots DynamicOrbitBody + DefaultLookAtAim + a PerlinNoise additive for handheld feel.
For full step-by-step composition recipes, see the recipes page.
Stage Composition Recipes
API
Retired components
ClampedLook_PhantomCamComponent, StaticOrbit_PhantomCamComponent, and Track_PhantomCamComponent no longer exist as separate components. Their behavior is now provided by stage variants:
| Retired component | Replacement |
|---|
StaticOrbit_PhantomCamComponent | OrbitBody Body stage. |
ClampedLook_PhantomCamComponent | ClampedLookAim Aim stage. |
Track_PhantomCamComponent | TrackBody Body stage. |
AlwaysFaceCameraComponent is unchanged — it is still a billboard helper, not a camera type itself.
Channel Scope
Each Phantom Camera authors a Channel Scope that decides how it participates in the channel system. In single-player projects, leave this at the default (Local) and everything routes through channel 0. In multi-channel projects:
| Scope | Use for |
|---|
Local (default) | The cam lives in its rig’s channel. Each spawned rig instance has its own copy. |
AllChannels | In-rig per-player broadcast cam — every spawned rig carries a duplicate. |
TrueUnique | A single instance bound to a specific channel, or shared across every channel (e.g. cinematic collapse cams paired with Group Targets). |
For the full walkthrough, see Channels & Instancing.
Snap and Focus
A Phantom Camera ticks each frame when any of these is true:
m_hasFocus — this cam is the channel’s currently-driven cam.m_alwaysUpdate — authored opt-in to always tick (background-tracking cams).m_blendingOut — this cam is the outgoing source of an in-flight blend.
Outside that condition the cam is fully dormant — it does not tick, its stages do not run, and its body does not integrate input.
The cam automatically snaps to its evaluated ideal pose (bypassing damping for one tick) on:
- Focus gain.
- A new target binding (
SetCameraTarget). - A new group-target binding (
SetTargetFocusGroup). - An explicit
QueueSnapCamera() call.
For synchronous snap (typically only needed by framework code at mid-spawn binding), call SnapCameraNow() instead.
Activating and Deactivating Cameras
Phantom Cameras participate in priority arbitration only while their entity is active. Enable or disable the entity to add or remove a camera from the channel. The transition between dominant cameras is animated by whichever Blend Profile entry matches the outgoing → incoming pair (see Blend Profiles).
ScriptCanvas
To raise a camera’s priority and make it dominant:
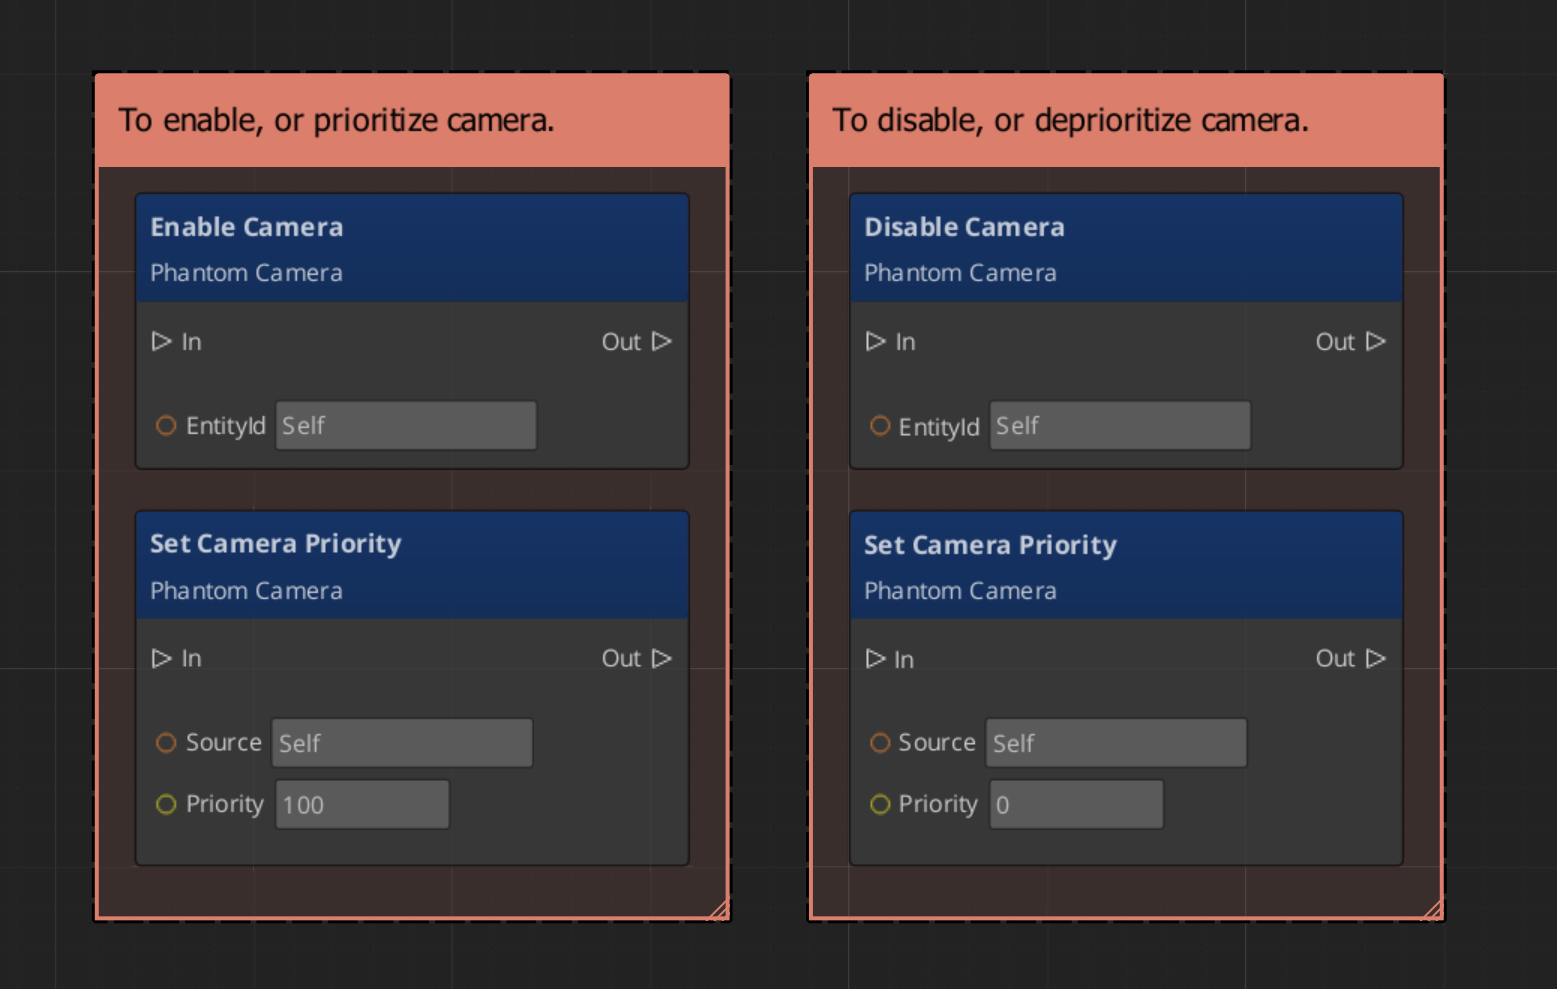
Because priority is numeric, you can activate multiple cameras simultaneously and let priority values determine dominance without manually disabling others.
Requesting Camera Data
Use PhantomCameraRequestBus (addressed by the Phantom Camera entity’s ID) to read or write its configuration at runtime, query staged poses, or trigger an impulse on all ImpulseNoise additives.
ScriptCanvas
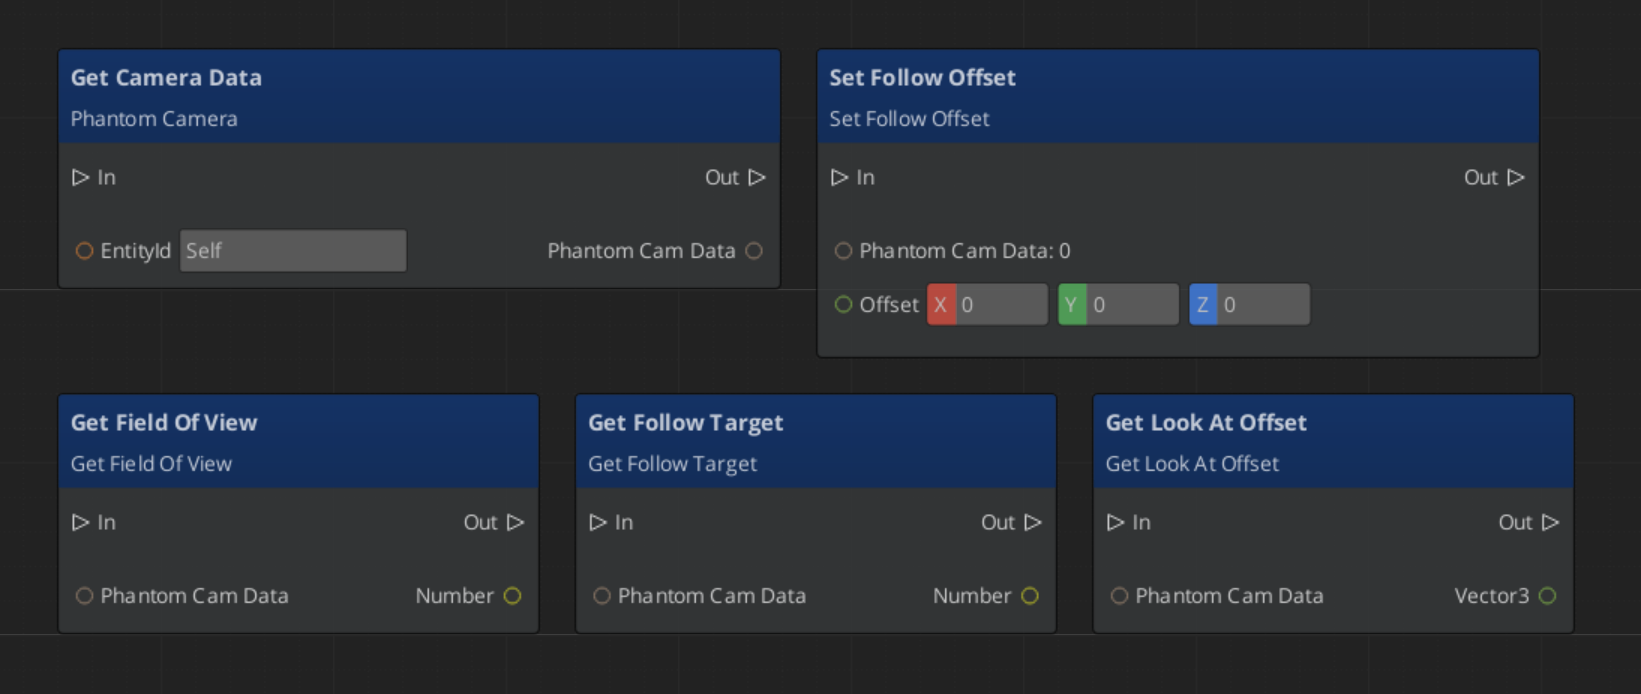
Quick Reference
| Need | Bus | Method / Event |
|---|
| Read a camera’s lens / priority data | PhantomCameraRequestBus(id) | GetCameraData |
| Change a camera’s follow target | PhantomCameraRequestBus(id) | SetCameraTarget(entityId) |
| Change a camera’s priority | PhantomCameraRequestBus(id) | SetCameraPriority(value) |
| Snap the camera to its ideal next tick | PhantomCameraRequestBus(id) | QueueSnapCamera |
Fire an impulse on all ImpulseNoise additives | PhantomCameraRequestBus(id) | TriggerCameraImpulse(strength) |
| Make a camera dominant | (entity activation) | Enable the Phantom Camera entity |
| Remove a camera from arbitration | (entity activation) | Disable the Phantom Camera entity |
| Know when the dominant camera changes | CamManagerNotificationBus | SettingNewCam (channel 0) or SettingNewCamOnChannel (multi-channel) |
| Read a stable pose for gameplay code | PhantomCameraRequestBus(id) | GetStablePose — preferred over GetFinalPose for movement input |
Glossary
| Term | Meaning |
|---|
| Phantom Camera | A virtual camera definition that publishes a candidate pose every tick. |
| Stage pipeline | The fixed Body → Aim → Reposition → Noise order that each cam runs each tick. |
| Body stage | The component that writes state.position. One slot per cam. |
| Aim stage | The component that writes state.rotation. One slot per cam. |
| Additive stage | A stackable correction or perturbation that runs after Body / Aim. |
| Priority | A numeric value that determines which Phantom Camera drives the real camera within its channel. |
| Channel | One player viewpoint slot. Channel 0 is the implicit default for single-player. |
For full definitions, see the Glossary.
See Also
For the full API, component properties, and C++ extension guide:
For related systems:
Get GS_PhantomCam
GS_PhantomCam — Explore this gem on the product page and add it to your project.
10.3.1 - Stage Composition
Concept primer for composing camera behavior from Body, Aim, and Additive stages on a single Phantom Camera component.
A Phantom Camera’s behavior is the composition of one Body stage, one Aim stage, and zero-or-more Additive stages. The same GS_PhantomCameraComponent becomes a follow cam, an orbital cam, a tracking dolly, or a third-person shoulder cam depending on what is slotted from the editor’s type-picker.
This page is a concept primer for the composition model. For step-by-step recipes (third-person shoulder cam, orbital player cam, static showcase, first-person clamped look, tracking dolly, group-framing cam) see the recipes collection.
PhantomCam Configurations (Recipes)
API
For the per-variant fields and kinematic models, see the Stage Pipeline API reference.
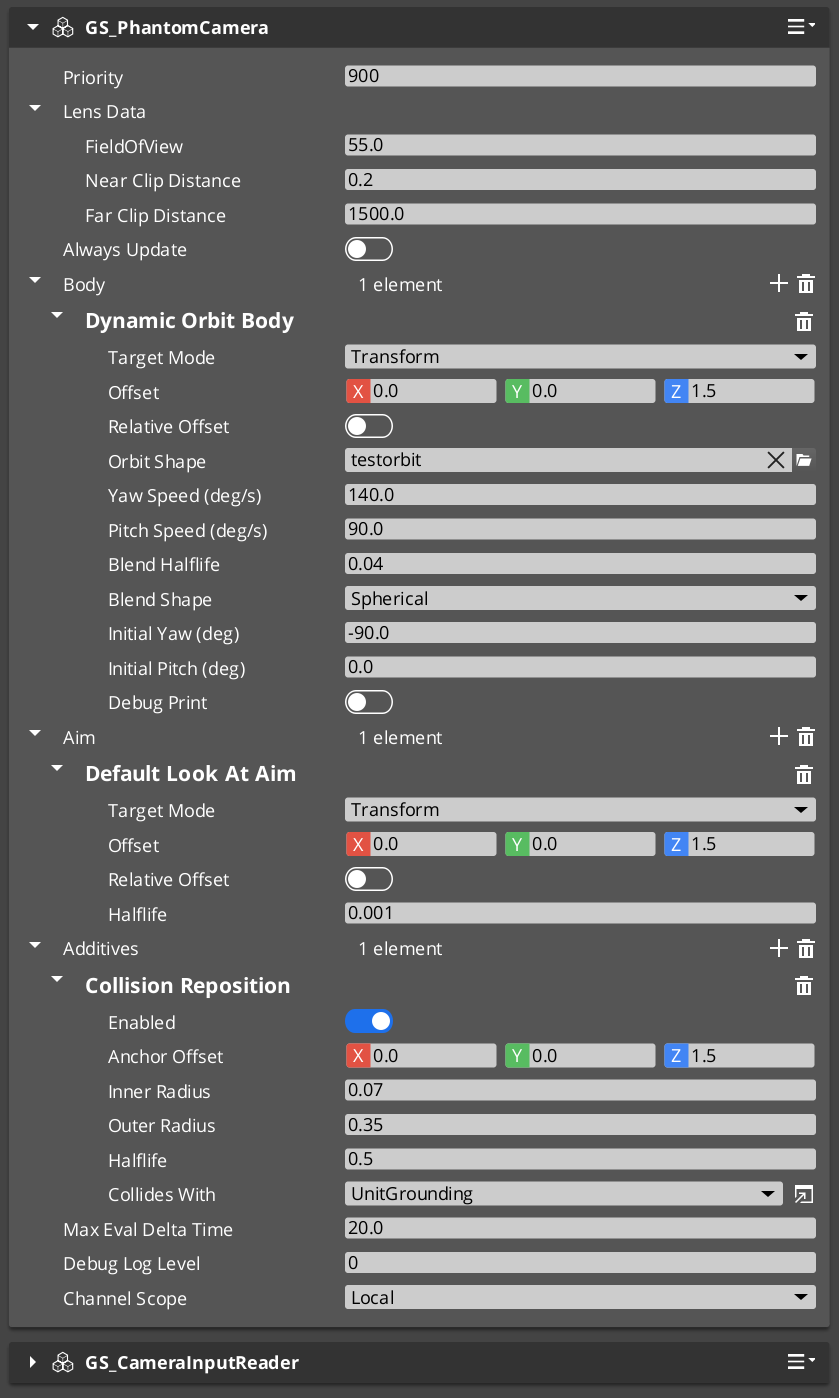
Contents
The Pipeline at a Glance
Each tick, the cam runs:
Body → Aim → Reposition additives → Noise additives → Finalize
| Slot | What it does | When you change it |
|---|
| Body | Writes the cam’s position. | Different follow behavior — orbit vs. spring-damped follow vs. spline-bound. |
| Aim | Writes the cam’s rotation. | Different look behavior — free look vs. clamped envelope. |
| Reposition additives | Correct the smoothed pose (collision pushback, magnetic tug). Run BEFORE noise. | When the cam needs to avoid geometry or be pulled by spatial cues. |
| Noise additives | Perturb the final pose (handheld sway, event-triggered shake). Run AFTER reposition. | Game feel — adding life or punch. |
Each stage owns its own damping. There is no separate “smoothing” stage.
Where to Go Next
See Also
Recipes for stage composition:
For the full per-variant API and kinematic models:
Related basics pages:
Get GS_PhantomCam
GS_PhantomCam — Explore this gem on the product page and add it to your project.
10.3.2 - Noise & Impulse
Author guide for camera shake — the two noise additive stages, preset library, gameplay-code impulse triggering, and the Stable-vs-Final pose readback rule.
Camera shake comes in two flavors, both as Noise additives on a Phantom Camera’s stage list:
PerlinNoise — continuous Perlin-noise displacement. Use for handheld feel, idle sway, low-frequency wobble. Always sampling.ImpulseNoise — event-triggered burst, gated by an ADSR envelope. Use for explosions, foot-stomps, gun kicks. Stays silent until you fire it.
Both consume the same .camnoiseprofile asset and the same six-axis Perlin layer model. Stack freely on the same cam — a baseline handheld profile plus an event-triggered impact profile is the canonical combination.
For step-by-step composition recipes (handheld baseline, event-triggered impact, stacked handheld + impact), see the recipes collection.
Camera Noise Configurations (Recipes)
API
For the asset reference and per-axis layer details, see Noise Profiles (Framework API). For the stage variants’ authored fields and kinematic models, see Additive Stage Variants (Framework API).
Contents
Preset Library
A starter library of .camnoiseprofile assets ships in gs_phantomcam/Assets/Noise Profiles/. Drop one onto a PerlinNoise or ImpulseNoise stage’s Profile slot to get an immediate baseline. Match the preset’s lens family to the cam’s lens for natural feel.
Handheld lens family — pair with PerlinNoise
| Asset | Lens character |
|---|
Normal_Mild.camnoiseprofile | Normal-lens baseline. Balanced position and rotation. |
Normal_Intense.camnoiseprofile | Normal-lens active handheld. Larger amplitudes. |
Telephoto_Mild.camnoiseprofile | Telephoto baseline. Tighter angular response, low position. |
Telephoto_Intense.camnoiseprofile | Aggressive telephoto handheld. |
Wide_Mild.camnoiseprofile | Wide-lens baseline. Translation dominates; rotation low. |
Wide_Intense.camnoiseprofile | Aggressive wide-lens handheld. |
All-axes shake family — pair with ImpulseNoise or aggressive PerlinNoise
| Asset | Character |
|---|
6D_Shake.camnoiseprofile | Earthquake / impact aftermath — all six axes, high-frequency micro-jitter on top of mid-frequency sway. |
6D_Wobble.camnoiseprofile | Floaty / dreamlike — all six axes, low-frequency long sway. |
Tuning intensity without re-authoring
Per-cam intensity is dialed on the additive stage’s AmplitudeGain (and FrequencyGain for speed). A single Normal_Mild profile can drive a subtle cutscene cam (AmplitudeGain = 0.3) and a frantic chase cam (AmplitudeGain = 1.8) without authoring new assets.
For project-specific characters — gunfire-tuned impulse profiles, ultra-mild cinematic sway, etc. — see Authoring a Custom Profile.
Triggering an Impulse from Gameplay Code
Fire TriggerCameraImpulse(strength) on the cam to play one burst of every ImpulseNoise additive on it.
C++
#include <GS_PhantomCam/Cameras/GS_PhantomCameraBus.h>

// Compute distance-based falloff.
const float strength = AZ::GetClamp(1.0f - distance / radius, 0.0f, 1.0f);

GS_PhantomCam::PhantomCameraRequestBus::Event(
    activeCameraEntityId,
    &GS_PhantomCam::PhantomCameraRequests::TriggerCameraImpulse,
    strength);
strength multiplies each stage’s AmplitudeGain for that specific burst. Pass 1.0 for full profile intensity, smaller for distance falloff, larger to boost.
Author pattern: distance-attenuated impact source
A typical “explosion at world position X” pattern:
const float distance     = (explosionPos - cameraPos).GetLength();
const float falloff      = AZ::GetClamp(1.0f - distance / kEffectRadius, 0.0f, 1.0f);
const float baseStrength = 1.5f;       // for the explosion's overall punch

const float impulseStrength = baseStrength * falloff;

GS_PhantomCam::PhantomCameraRequestBus::Event(
    activeCamId,
    &GS_PhantomCam::PhantomCameraRequests::TriggerCameraImpulse,
    impulseStrength);
Cams outside kEffectRadius receive strength = 0 and ignore. Cams at the explosion’s exact position receive full baseStrength.
Querying the active cam
TriggerCameraImpulse is per-cam, so you need a target cam id. The common pattern is to track the channel’s currently-active cam via SettingNewCam / SettingNewCamOnChannel and store it, or query CamManagerRequestBus::GetActiveCamCore() for the engine’s active view.
Stable vs Final Pose for Gameplay Readback
Cam pose snapshots come in three flavors:
| Snapshot | Where it lands | Use it for… |
|---|
| Desired pose | Post Body + Aim, pre-Reposition. Clean ideal. | Debug visualization. |
| Stable pose | Post Reposition, pre-Noise. Collision-corrected but shake-free. | Gameplay code that reads camera facing (e.g. movement-input direction). |
| Final pose | Post Noise. What gets rendered. | Audio listener, screen-space UI. |
The pitfall. If your character moves “where the camera is facing,” and you read GetFinalPose (or the entity’s TransformBus), every shake event will momentarily drag the character around. Use GetStablePose instead — the cam’s pose without noise displacement.
AZ::Transform stable;
GS_PhantomCam::PhantomCameraRequestBus::EventResult(
    stable,
    activeCamId,
    &GS_PhantomCam::PhantomCameraRequests::GetStablePose);

const AZ::Vector3 cameraForward = stable.GetBasisY();   // O3DE forward axis
Authoring a Custom Profile
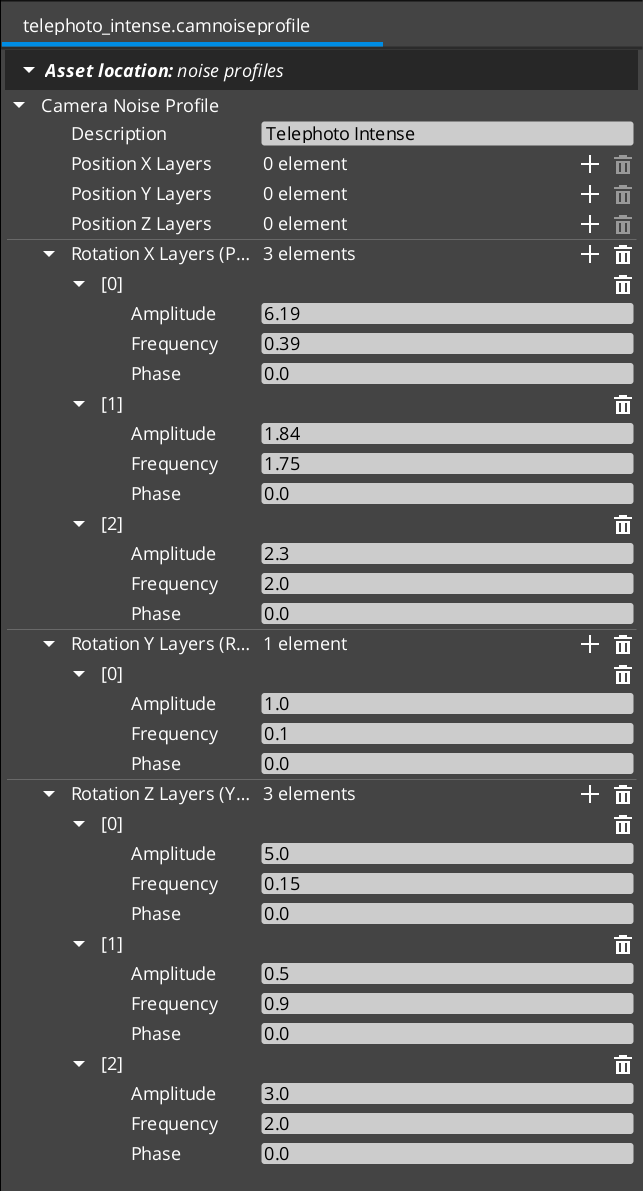
When the shipped presets don’t fit, author your own:
- Open the Asset Editor in O3DE.
- Select New and choose CameraNoiseProfile.
- For each axis where you want noise (typically translation X / Y and rotation pitch / yaw / roll), add 1–3 layers. Three layers per axis is the typical rhythm: one slow / large layer for sway, one mid layer for flutter, one fast / small layer for micro-jitter.
- For each layer set:
- Amplitude — in meters (position) or degrees (rotation).
- Frequency — in Hz. Handheld typically 0.1 – 2 Hz; shake / impact 3 – 60 Hz.
- Phase (optional) — decorrelates layers that share frequency.
- Set the Description to record intent and tuning history.
- Save the asset.
- Assign it to a
PerlinNoise or ImpulseNoise additive stage’s Profile slot.
See Noise Profiles (Framework API) for the full per-field reference.
See Also
Recipes:
Framework API:
Related basics pages:
Get GS_PhantomCam
GS_PhantomCam — Explore this gem on the product page and add it to your project.
10.4 - Group Targets
Author guide for GroupTargetComponent — weighted-centroid focal entity. Common use cases, centroid modes, runtime subject management, and pitfalls.
A Group Target is an entity whose world transform is the weighted centroid of a runtime-editable subject list. You point a camera at it like any other target, and the cam frames “where the group is” rather than chasing any single subject. The Cam Manager hosts a name-based registry so cameras can reference a group by string name without holding a direct entity reference.
For step-by-step composition recipes (two-player party cam, combat encounter frame, collapse to single view), see the recipes collection.
Group Target Configurations (Recipes)
API
For the full per-field reference and the registry bus, see the Framework API reference.
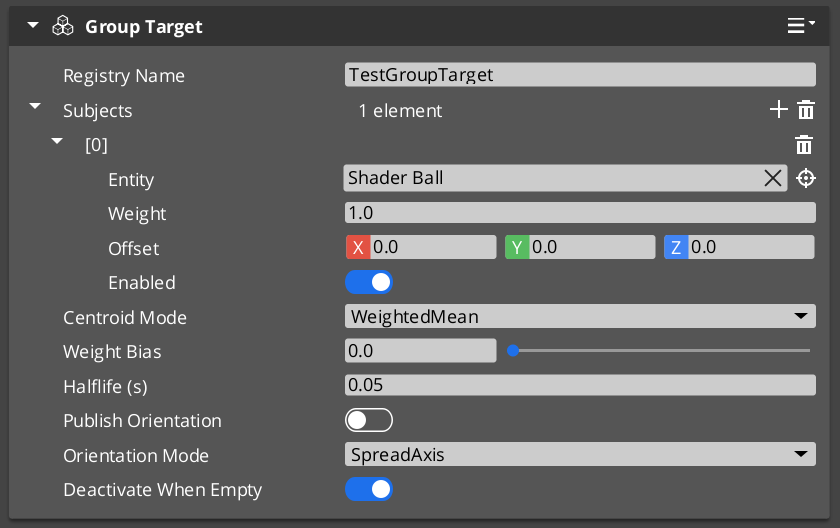
Contents
Common Use Cases
| Use case | What you author | Recipe |
|---|
| Party / co-op cam frames all players | Group Target with one subject per player; cam uses GroupTarget mode. | Two-Player Party Cam |
| Combat encounter cam frames the fight | Group Target whose subjects are dynamically added / removed as combatants enter / leave. | Combat Encounter Frame |
| Cinematic “collapse to single view” trigger in split-screen | Group Target + a shared TrueUnique cam. When all channels’ rigs converge on the shared cam, UI receives a collapse signal. | Collapse to Single View |
| Aim ahead of a moving formation | Group Target on a moving leader’s “look-ahead” point with subjects weighted by formation position. | — |
Centroid Modes — Which One to Pick
| Mode | When to use it |
|---|
| WeightedMean (default) | Most cases. Each subject contributes by weight. Simple, predictable. |
| BoundingBoxCenter | When you want the framing point to track the extent of the group, not just the average position. With WeightBias = 0, the cam centers on the bounding-box midpoint; raising the bias blends toward the weighted mean. |
| BoundingSphereCenter | Same intent as bounding-box but spherical — useful when subjects are evenly distributed in all axes. |
The WeightBias slider (0..1) on the bbox / sphere modes lets you tune the geometric / weighted mix to taste:
| WeightBias | Effect |
|---|
| 0 | Pure geometric center (ignore weights). |
| 0.5 | Half geometric, half weighted. |
| 1 | Pure weighted mean (the bbox / sphere effectively ignored). |
Subject Management at Runtime
The full subject-management API is exposed on GroupTargetRequestBus (per-entity addressed by the group’s id). Common operations:
| Operation | Use |
|---|
AddSubject(entity, weight) | Add a subject. |
RemoveSubject(entity) | Remove a subject. |
SetSubjectWeight(entity, weight) | Adjust priority without removing. |
SetSubjectEnabled(entity, enabled) | Temporary include / exclude without removing — cheaper than Remove + Add since cadence rebind is skipped. |
ClearSubjects() | Remove all. |
SetCentroidMode(mode) | Swap mode at runtime — e.g. tighten framing when an encounter starts. |
SetSmoothingHalflife(halflife) | Tighten or loosen centroid response at runtime. |
Cadence (PhysX post-sim vs TickBus) is re-evaluated automatically whenever the subject list changes.
Pitfalls
Empty subject list with DeactivateWhenEmpty = false
If you author m_deactivateWhenEmpty = false and the subject list goes empty (all enemies dead, all players despawned), the group target’s centroid sits at world origin — cams pointed at it will swing to (0, 0, 0). Set the flag to its default true to fall back gracefully to hold-last-pose instead.
Group cam targeting the group’s own entity
If you accidentally add the group target entity itself to its own subject list, you create a feedback loop: the centroid moves toward where it already is, which moves it again, etc. Don’t.
Centroid lag on physics subjects
By default the component uses TickBus cadence. If your subjects are physics-driven and you see the cam lagging by a frame, the component should auto-detect this and switch to PhysX post-simulate cadence — but you can verify with IsEvaluatingPostSim() (returns true when post-sim is bound). If it’s stuck on TickBus, file a bug — the auto-detection should have triggered.
See Also
Recipes:
Framework API:
Related basics pages:
Get GS_PhantomCam
GS_PhantomCam — Explore this gem on the product page and add it to your project.
10.5 - Influence Fields
How GlobalCameraInfluenceComponent and CameraInfluenceFieldComponent shift camera priority globally or within spatial trigger volumes — types, priority stacking, channel-aware routing.
Influence Fields modify the effective priority of Phantom Cameras without changing their base priority values. Two types are available: global components that apply for their entire active lifetime, and spatial components that apply only while an entity is inside a PhysX trigger volume.
In multi-player / multi-channel projects, the spatial form is channel-aware — the influence is routed to the channel that owns the entity that triggered it, so player 1 walking into a field does not affect player 2’s cameras.
For step-by-step composition recipes (boost a cam inside a room, always-on cinematic boost), see the recipes collection.
Influence Field Configurations (Recipes)
API
For component properties, the bus signature, and C++ extension guide, see the Framework API reference.
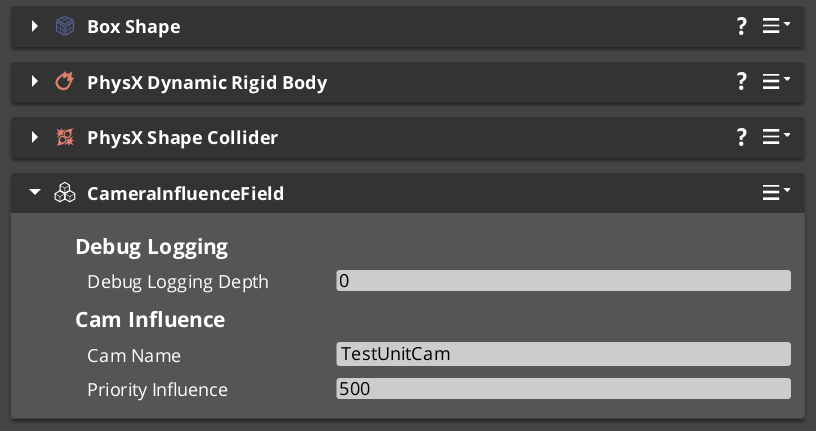
Contents
Types of Influence Fields
| Component | Scope | When it applies |
|---|
GlobalCameraInfluenceComponent | Global | Active for the component’s entire lifetime. Typically placed on the StageData entity so the influence is scoped to a level. |
CameraInfluenceFieldComponent | Spatial | Active while an entity (typically a player) is inside the field’s PhysX trigger volume. Channel-aware. |
Both use a CamInfluenceData record to describe what they modify (camera name + influence magnitude). Multiple fields can be active simultaneously — their effects stack additively.
Priority Stacking
When multiple influences are active on the same camera within a channel, their values sum with the cam’s base priority. This lets you build layered authoring:
- A general fallback priority on the cam itself.
- A stage-wide global influence that boosts a cinematic cam for the level.
- A spatial field that boosts further when the player enters a specific room.
The same cam gets base + global + spatial = effective priority during arbitration. Exiting the spatial field drops the spatial term; ending the stage drops the global term.
Channel Routing
The influence bus signature carries two entity arguments:
| Argument | Meaning |
|---|
sourceEntity | The field volume itself (the entity emitting the influence). Used as the per-channel storage key — multiple overlapping fields applied to the same channel don’t collide. |
targetEntity | The entity that triggered the influence (typically the player unit that walked into the trigger). Used as the routing key — the Cam Manager looks up which channel owns this entity. |
| Resolution result | Behavior |
|---|
| Target is bound to a channel | Influence is stored in that channel’s priority table. Only that channel’s arbitration sees the boost. |
| Target is not bound to any channel | Influence is silently dropped. |
This gives clean isolation between players in co-op. A CameraInfluenceFieldComponent triggered by player 1 only affects player 1’s cameras; player 2’s view is unaffected. It also gives natural behavior for non-player triggers — an enemy walking into a player-cam field doesn’t influence anything.
Global influence in multi-channel projects
GlobalCameraInfluenceComponent has no specific target. In multi-channel projects, the global form currently routes through channel 0 as a fallback. For per-channel global influences, author one Global component per channel that you want to affect.
Quick Reference
| Need | Component | How |
|---|
| Always-on priority boost for a level | GlobalCameraInfluenceComponent | Add to the StageData entity. Scopes the influence to the stage lifecycle. |
| Priority boost inside a spatial zone | CameraInfluenceFieldComponent | Add with a PhysX trigger collider. Entity entering the volume triggers the boost. |
| Per-player isolation in co-op | (automatic) | CameraInfluenceFieldComponent routes by the entity that crossed the trigger — only that entity’s channel sees the boost. |
| Multiple overlapping fields on the same cam | (automatic) | Each field is keyed by its source entity, so overlaps stack additively without colliding. |
Glossary
| Term | Meaning |
|---|
| Influence Field | A component that adjusts camera priority dynamically without modifying the cam’s base priority. |
| Priority Stacking | Influences sum with the base priority during arbitration — multiple active influences on the same cam add their values. |
| Global Influence | An unconditional priority modifier active for the component’s lifetime. |
| Spatial Influence | A volume-based modifier active while an entity is inside the PhysX trigger volume. |
| Source Entity | The field volume entity, used as the per-channel storage key. |
| Target Entity | The entity that triggered the influence, used as the routing key (channel lookup). |
For full definitions, see the Glossary.
See Also
Recipes:
Framework API:
Related basics pages:
Related utilities:
Get GS_PhantomCam
GS_PhantomCam — Explore this gem on the product page and add it to your project.
10.6 - Tug Fields
Author guide for tug-field cinematic pulls — three-component model, PhysX layer setup, channel filtering, tuning, and pitfalls.
Tug Fields pull the camera’s pose toward a designated point while the player (or any “proxy” entity) is inside a defined PhysX trigger volume. Use them for environmental cinematography — a railing that pulls the cam’s gaze toward a vista, a doorway that draws the cam toward what’s beyond, a hazard that draws attention as the player passes.
The system is built from three decoupled components — a volume, a source, and a proxy — plus one or two listener stages on the cam. Each piece is small; the combination is flexible.
For step-by-step composition recipes (vista pull, doorway glance, decoupled source / destination), see the recipes collection.
Camera Tug Configurations (Recipes)
API
For the per-field reference and the per-tick algorithm, see the Framework API reference.
The single biggest authoring trap: Tug Fields require a specific PhysX collision-layer configuration. If you set up volumes and listeners but nothing happens, check the PhysX layer setup first (PhysX Layer Setup).
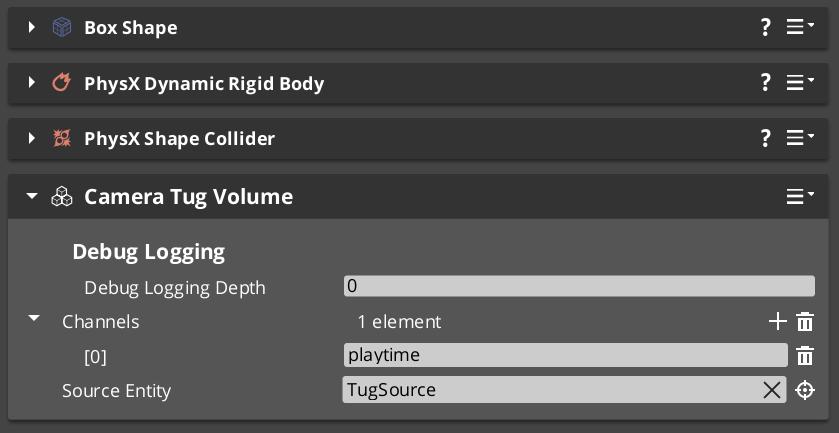
Contents
The Three Components
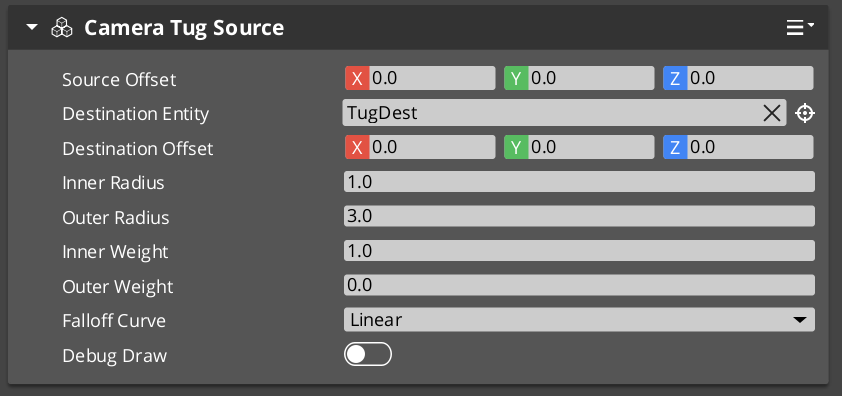
| Component | Where it lives | What it does |
|---|
| CameraTugVolumeComponent | Level entity with a PhysX trigger collider on the TugField layer | Spatial gate. Fires per-proxy enter / exit broadcasts when something on the TugProxy layer overlaps. |
| CameraTugSourceComponent | Either the volume entity itself, OR a separate entity (for decoupled source / destination) | Configures the geometry — proximity center, falloff radii, falloff curve, destination point. |
| TugFieldProxyComponent | On the player entity (or a child entity, or the cam entity) | Lightweight marker. The PhysX trigger collider on this entity is what overlaps tug volumes. |

Plus on the Phantom Camera
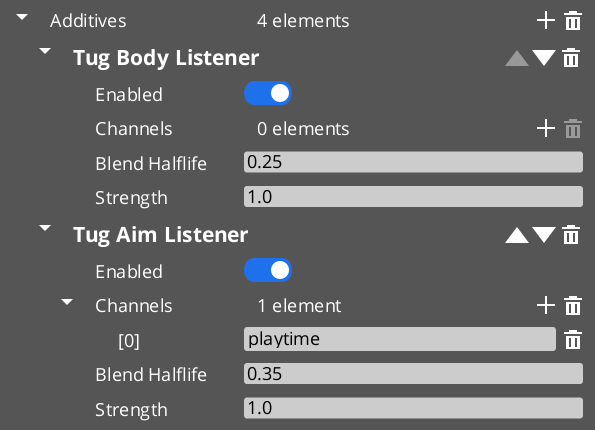
| Listener stage | What it does |
|---|
TugAimListener | Slerps the cam’s rotation toward the source’s destination point. |
TugBodyListener | Lerps the cam’s position toward the source’s destination point. |
A cam can run either listener, both, or neither.
PhysX Layer Setup
The system filters tug-volume contacts at the PhysX layer level — there is no central registry, and no runtime entity-tag check. If the layer setup is wrong, nothing fires.
One-time project setup
- Open PhysX Configuration → Collision Layers.
- Create two new layers:
- Open Collision Groups. Create or edit a collision-group preset such that:
TugProxy overlaps only TugField (and not Default, Player, Static, etc.).TugField overlaps only TugProxy.
This pair-only configuration ensures tug volumes fire triggers only for registered proxies, with no accidental cross-talk from normal-world physics.
Verify the pairing. It’s easy to leave TugProxy overlapping Default or Player by accident. If your cam jitters whenever the player walks through doorframes, that’s almost certainly the symptom — tug volumes are firing on the player’s main collider instead of the proxy collider.
Channel Filtering
The volume’s Channels field is a list of arbitrary string tags (“Cinematic”, “Combat”, “Environment”). The listener’s Channels field is the same. The listener responds only to volumes whose channels intersect with its own.
Empty channels on the listener = match all volumes.
Use channels when you have multiple kinds of tug fields in the same world — environmental pulls vs scripted-cinematic pulls — and you want some cams to respond only to certain kinds.
Tug-field channels are NOT instancing channels. Tug-field channels are these string tags. Instancing channels (in Channels & Instancing) are integer per-player viewpoint slots. Despite the shared word, the two systems are unrelated.
Tuning the Pull Strength
A few knobs interact:
| Knob | On | Effect |
|---|
Strength | Listener | Overall multiplier. 0.5 = half the full influence. Default 1.0. |
Inner Weight / Outer Weight | Source | The proximity-to-influence falloff curve’s endpoints. Inner weight at the deadzone (full), outer weight at the boundary (typically 0). |
Falloff Curve | Source | Shapes the ramp between outer and inner. Linear is even; EaseInOutQuadratic engages gently and disengages gently. |
Blend Halflife | Listener | Smoothing on the influence’s engagement and disengagement. Higher = slower ramps. |
If the cam feels “jerky” entering or exiting the volume, raise Blend Halflife on the listener (try 0.5 or higher). If the cam pulls too aggressively at the deadzone, lower the listener’s Strength.
Pitfalls
Nothing fires
Almost always the PhysX layer setup. Verify:
TugProxy and TugField layers both exist.- The collision-group preset has them paired (and only paired).
- The player’s proxy collider is on
TugProxy. - The volume’s trigger collider is on
TugField.
The cam yanks the moment the player enters the volume
Blend Halflife is too low (or zero). The listener’s dormant-to-engaged transition seeds at a zero-displacement point, but if the halflife is near zero the ramp is instant. Raise to 0.2–0.4.
The volume is “inert” — warning at startup
The source resolution failed. Either:
m_sourceEntity points at an entity that has no CameraTugSourceComponent. Fix the reference.m_sourceEntity is empty AND the volume’s own entity has no CameraTugSourceComponent. Add one or set m_sourceEntity.
Tug volume and instancing channel confusion
If you’re in a multi-channel project and a tug volume’s m_channels says "P1", this does NOT bind the volume to channel 1. The string is just a tag — name it "Player1ExclusivePull" or use proper Channel Scope on the cam if you want per-player exclusivity.
See Also
Recipes:
Framework API:
Related basics pages:
Get GS_PhantomCam
GS_PhantomCam — Explore this gem on the product page and add it to your project.
11 - GS_Stats
RPG statistics and status effect systems for GS_Play — timed and permanent modifiers that alter entity stats and drive reactive gameplay behavior.
GS_Stats provides the statistical and modifier infrastructure for RPG-style character systems. It handles the application, tracking, and expiry of status effects — the layer between raw gameplay events and the numerical state of a character.
GS_Stats is under active development. Core stat management and status effect infrastructure are functional, with additional features planned.
For architecture details, component properties, and extending the system in C++, see the GS_Stats API.
Quick Navigation
| I want to… | Feature | API |
|---|
| Apply timed or permanent modifiers to entity stats with stacking and expiry | Status Effects | API |
Installation
GS_Stats requires GS_Core. Add both gems to your project.
For a full guided walkthrough, follow the Simple Project Setup guide.
Quick Installation Summary
- Enable the GS_Stats gem in your project configuration.
- Define status effect data assets for your game’s modifiers.
- Place status effect components on entities that need to receive modifiers.
Status Effects
Status Effects are the primary mechanism for applying timed or permanent modifiers to entities. Each effect defines what it changes, how long it lasts, whether it stacks, and what happens on expiry. The system handles the full lifecycle: application, duration tracking, stack management, and cleanup. Effects are data-driven — designers author new types in the Asset Editor without touching code.
Status Effects
API
See Also
For the full API, component properties, and C++ extension guide:
Get GS_Stats
GS_Stats — Explore this gem on the product page and add it to your project.
11.1 - Status Effects
How to work with GS_Play status effects — timed modifiers that alter entity stats or behavior.
Status Effects are timed or permanent modifiers that alter entity stats or behavior. They support stacking, expiration, and side-effect triggering — enabling standard RPG mechanics like poison damage over time, temporary buffs, and debuff stacking.
For component properties and the status effect data model, see the Framework API reference.
GS_RPStats is under active development. The status effect infrastructure is functional, with additional stat management features planned.
Contents
How Status Effects Work
| Phase | What Happens |
|---|
| Application | A status effect is applied to an entity with a duration and configuration. |
| Active | The effect modifies the entity’s stats or triggers periodic side effects. |
| Stacking | If the same effect is applied again, stacking rules determine whether it refreshes, stacks count, or is rejected. |
| Expiration | When the duration expires, the effect is removed and any cleanup side effects fire. |
Glossary
| Term | Meaning |
|---|
| Status Effect | A timed or permanent modifier that alters entity stats or behavior |
| Stacking | Rules governing how repeated applications of the same effect interact |
| Side Effect | An action triggered when a status effect is applied, ticks, or expires |
For full definitions, see the Glossary.
See Also
For the full API, component properties, and C++ extension guide:
Get GS_Stats
GS_Stats — Explore this gem on the product page and add it to your project.
12 - GS_UI
The complete UI framework for GS_Play — canvas lifecycle management, single-tier page navigation, enhanced buttons, data-driven animation, and input interception.
GS_UI is the complete user interface framework for GS_Play, built on top of O3DE’s LyShine rendering layer. It provides a singleton manager for canvas lifecycle and focus, a single-tier page navigation architecture, motion-based button animations, a LyShine-specific track animation system authored as data assets, and input interception utilities for pause menus and stage transitions.
For architecture details, component properties, and extending the system in C++, see the GS_UI API.
Quick Navigation
| I want to… | Feature | API |
|---|
| Load and unload UI canvases, manage focus stack, or set startup focus | UI Manager | API |
| Navigate between pages, handle back navigation, or cross canvas boundaries | Page Navigation | API |
| Add button animations or intercept input for UI canvases | UI Interaction | API |
| Animate UI elements with position, scale, rotation, alpha, and color tracks | UI Animation | API |
| Add a load screen or pause menu | Widgets | API |
Installation
GS_UI requires GS_Core and LyShine. Add both gems to your project before placing UI components.
For a full guided walkthrough, follow the Simple Project Setup guide.
Quick Installation Summary
- Enable the GS_UI gem in your project configuration.
- Create a UI Manager prefab and add it to the Game Manager’s Managers list.
- Create LyShine UI canvases with GS_UIPageComponent on root elements.
- Create
.uiam animation assets for page transitions and button effects.
UI Manager
The UI Manager is the singleton that owns canvas lifecycle for the entire game session. It loads and unloads canvases by name, maintains a global focus stack, and handles startup focus deterministically. All canvas operations go through the Manager so that cross-canvas navigation and focus transitions remain coordinated.
UI Manager
API
Page Navigation
Page Navigation is the single-tier architecture that structures all navigable screens. Canvases contain root pages that can parent nested child pages recursively. Navigation is driven through the Page component: NavigateTo, NavigateBack, ChangePage, and ChangeUI handle all routing. Pages play UiAnimationMotion assets on show and hide for data-driven transitions.
Page Navigation
API
UI Interaction
Enhanced button animations and input interception. GS_ButtonComponent extends LyShine interactables with UiAnimationMotion-based hover and select animations. GS_UIInputInterceptorComponent captures input events while a canvas is focused, preventing them from reaching gameplay. Both systems work together on interactive canvases.
UI Interaction
API
UI Animation
UI Animation extends GS_Motion with eight LyShine-specific tracks: position, scale, rotation, element alpha, image alpha, image color, text color, and text size. Tracks are authored together in .uiam assets and played in parallel at runtime. Page components embed motion instances for show/hide transitions, and a standalone component makes animations available on any UI entity.
UI Animation
API
Standalone UI components for game-event-driven scenarios outside the page navigation model. Load screens display automatically during stage transitions. Pause menus overlay gameplay and suppress gameplay input while active.
Widgets
API
See Also
For the full API, component properties, and C++ extension guide:
For step-by-step project setup:
Get GS_UI
GS_UI — Explore this gem on the product page and add it to your project.
12.1 - UI Manager
How to work with the GS_Play UI Manager — canvas lifecycle, focus stack, and cross-canvas navigation.
The UI Manager is the singleton controller for all UI canvases in your project. It loads and unloads canvases, maintains a global focus stack that tracks which canvas the player is currently interacting with, and handles cross-canvas navigation so that opening a pause menu over gameplay UI and returning to it works automatically.
For architecture details, component properties, and extension patterns, see the Framework API reference.
Contents
How It Works
The UI Manager maintains a global focus stack — a history of which UI canvas has focus. When you open a new canvas (like a pause menu), it pushes onto the stack. When you close it, the previous canvas (gameplay HUD) regains focus automatically.
At startup, the UI Manager loads canvases and waits for root pages to register. One canvas is designated as the startup focus UI — it receives focus automatically when the startup sequence completes.
Loading and Unloading Canvases
| ScriptCanvas Node | What It Does |
|---|
LoadGSUI(name, path) | Loads a UI canvas from an asset path and registers it by name. |
UnloadGSUI(name) | Unloads a canvas and removes it from the active map. |
FocusUI(name) | Pushes a canvas onto the global focus stack and focuses its root page. |
NavLastUI | Pops the current canvas off the focus stack and returns focus to the previous one. |
ToggleUI(name, on) | Shows or hides a canvas without changing the focus stack. |
ScriptCanvas
If you wish to change between canvases, leaving the previous inactive, and enabling the next:
Toggle off your current canvas, then focus the next. Focus automatically handles enabling the canvas for use.
Using Page: NavigateBack will naturally hide the new canvas, and reactivate the past one.
Querying UI State
| ScriptCanvas Node | What It Does |
|---|
GetFocusedUI | Returns the name of the canvas currently on top of the focus stack. |
GetUICanvasEntity(name) | Returns the canvas entity for a named UI. |
GetUIRootPageEntity(name) | Returns the root page entity for a named UI. |
ScriptCanvas
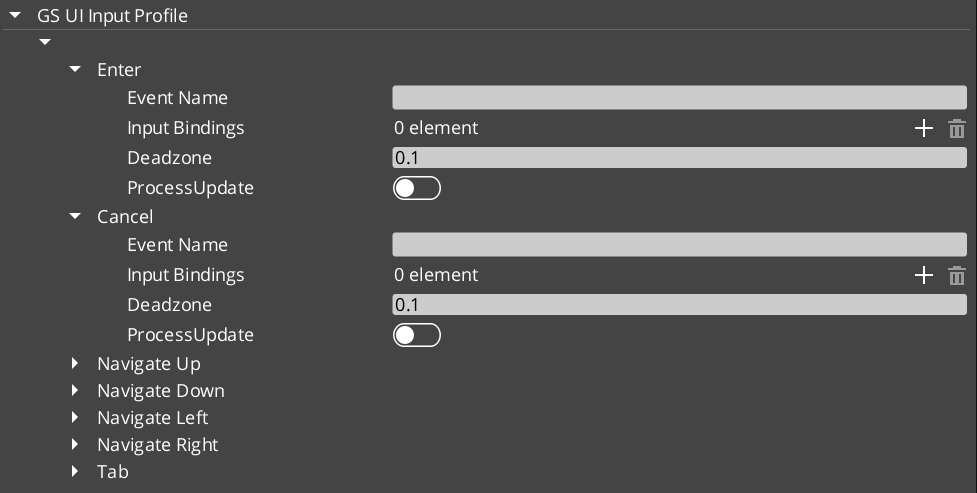
Quick Reference
| Need | Bus | Method |
|---|
| Load a canvas | UIManagerRequestBus | LoadGSUI(name, path) |
| Unload a canvas | UIManagerRequestBus | UnloadGSUI(name) |
| Focus a canvas | UIManagerRequestBus | FocusUI(name) |
| Return to previous canvas | UIManagerRequestBus | NavLastUI |
| Show/hide a canvas | UIManagerRequestBus | ToggleUI(name, on) |
| Get focused canvas name | UIManagerRequestBus | GetFocusedUI |
Glossary
| Term | Meaning |
|---|
| UI Canvas | A LyShine canvas loaded and managed by the UI Manager |
| Focus Stack | A global history of focused canvases — opening a new one pushes, closing pops |
| Root Page | A page registered with the UI Manager as a canvas entry point |
For full definitions, see the Glossary.
See Also
For the full API, component properties, and C++ extension guide:
For related systems:
Get GS_UI
GS_UI — Explore this gem on the product page and add it to your project.
12.2 - Page Navigation
How to work with GS_Play page navigation — single-tier page hierarchy, focus management, and transitions.
Page Navigation is the core of the GS_UI system. Pages are the fundamental unit of UI organization — each page represents a screen, panel, or section of your interface. Pages can be root pages (registered with the UI Manager as a canvas entry point) or nested child pages (managed by a parent page). Navigation uses a push/pop focus stack so the system always knows where to return when the player backs out.
For architecture details, the NavigateTo algorithm, and component internals, see the Framework API reference.
Contents
Page Types
| Type | How It’s Configured | What It Does |
|---|
| Root Page | m_isRoot = true | Registers with the UI Manager by name. Acts as the canvas entry point. |
| Child Page | m_isRoot = false | Registers with its parent page automatically. Managed by parent’s show/hide logic. |
A canvas typically has one root page at the top, with child pages nested beneath it for sub-screens (settings tabs, inventory categories, confirmation dialogs).
Example of pages within pages to determine UI display structure, and handling changing focus between pages. SettingsWindowPage represents the main options windows. The child pages are the actual different windows that display within the space, changing with side menu changes.
For guides on complex page navigation, see Lesson: Create UI.
Required Companion Components
Root page entities require two additional components alongside GS_UIPageComponent:
| Component | Why It’s Needed |
|---|
| FaderComponent | Drives alpha-based fade transitions for show/hide animations. |
| HierarchicalInteractionToggleComponent | Disables input on the entire page subtree when the page is hidden, preventing clicks from reaching invisible elements. |
Add both to every root page entity in the UI Editor.
Navigation Methods
These are the primary methods for controlling page flow:
| ScriptCanvas Node | What It Does |
|---|
NavigateTo(forced) | Focuses this page. Automatically pushes at the correct ancestor level in the hierarchy. |
NavigateBack | Walks up the page hierarchy to find the first ancestor with a non-empty focus stack and pops it. If no stack is found, calls NavLastUI on the UI Manager (closes the canvas). |
ChangePage(target, takeFocus, forced) | Swaps the displayed child page without pushing a new focus stack entry. |
ToggleShow(on) | Shows or hides this page. |
ChangeUI(targetUI, takeFocus, hideThis) | Cross-canvas navigation — switches to a different UI canvas. |
FocusChildPageByName(name, forced) | Focuses a child page by its m_pageName string. |
Handling Page Components
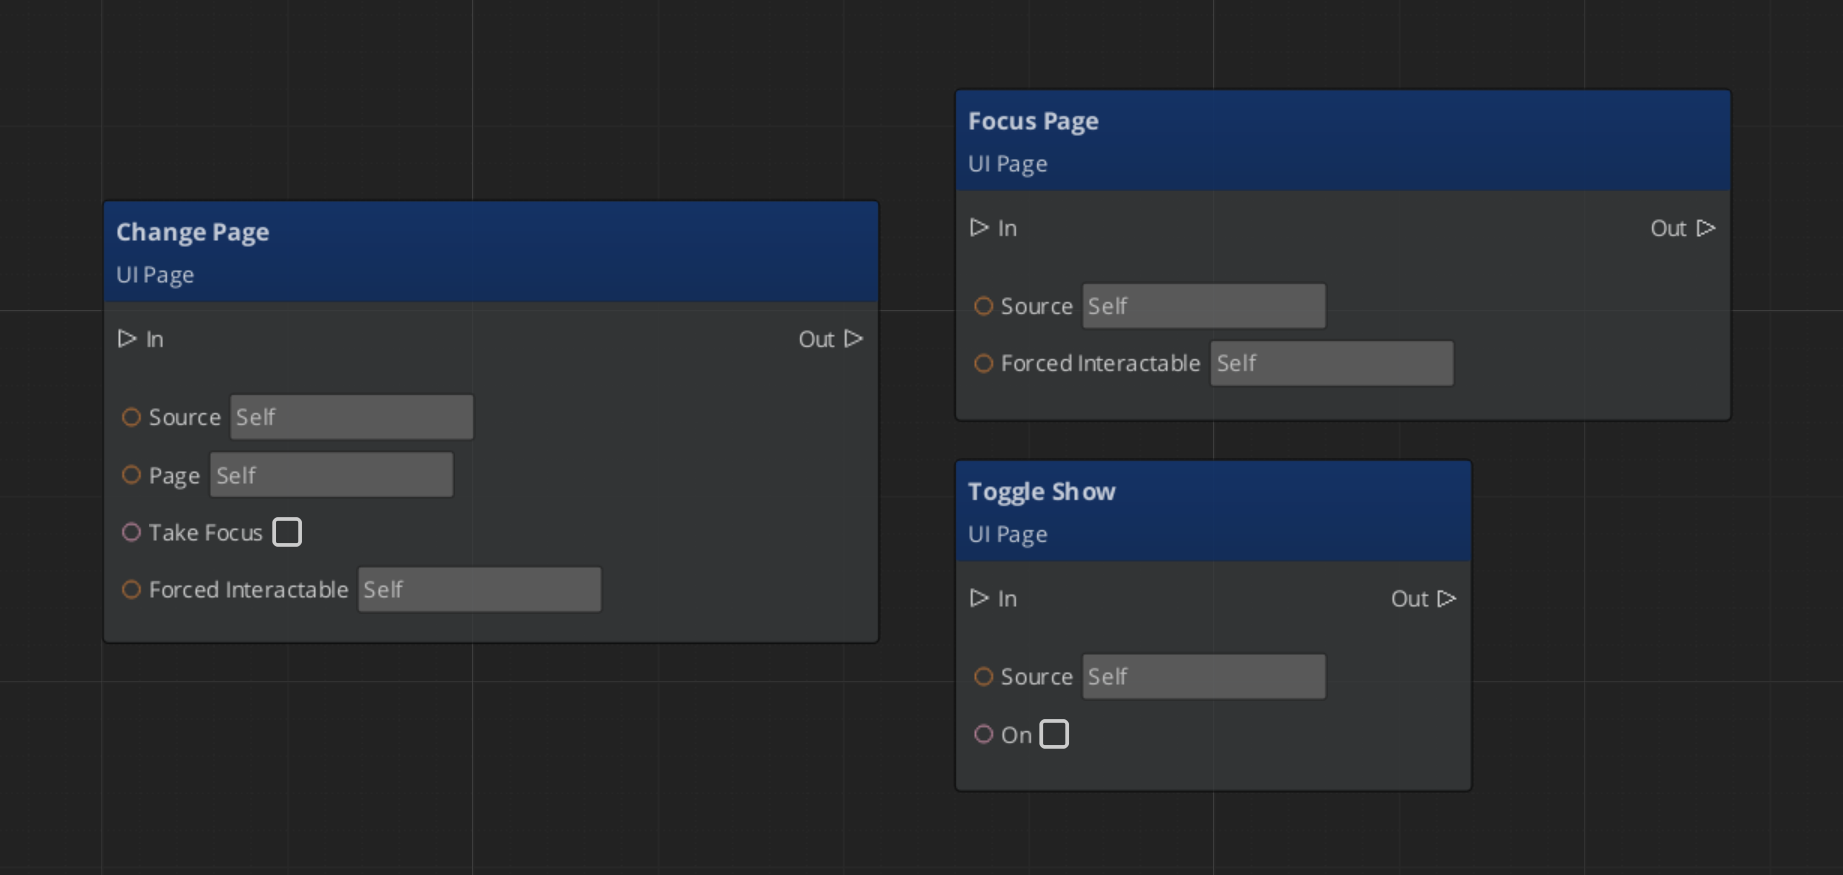
Navigating Pages
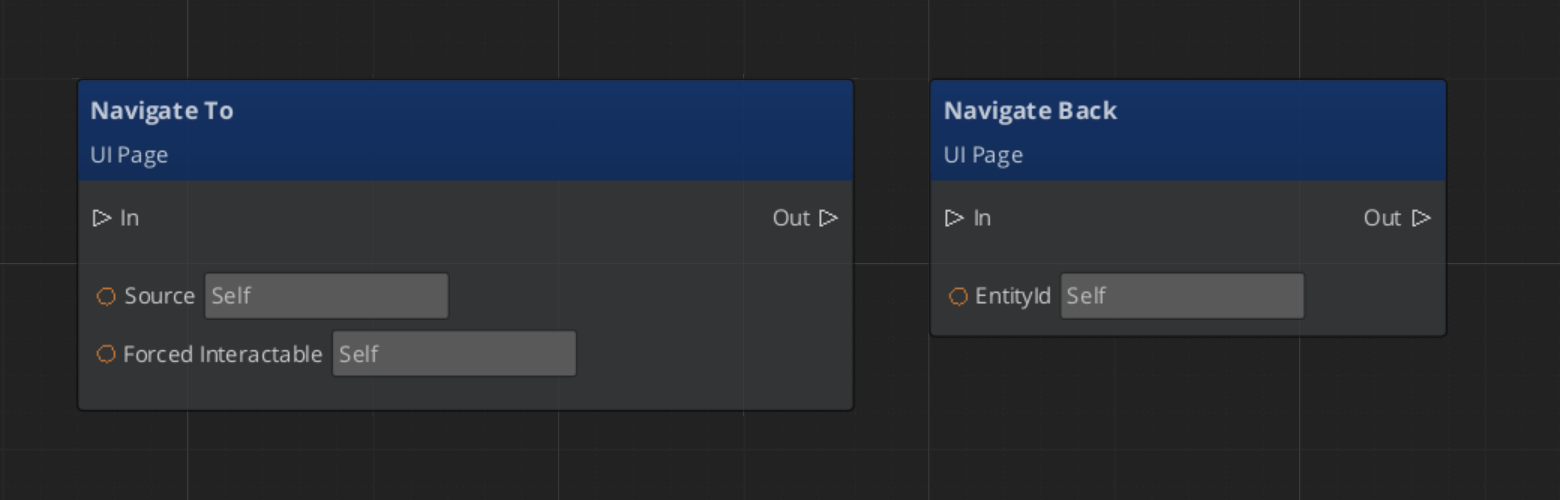
Changing UIs
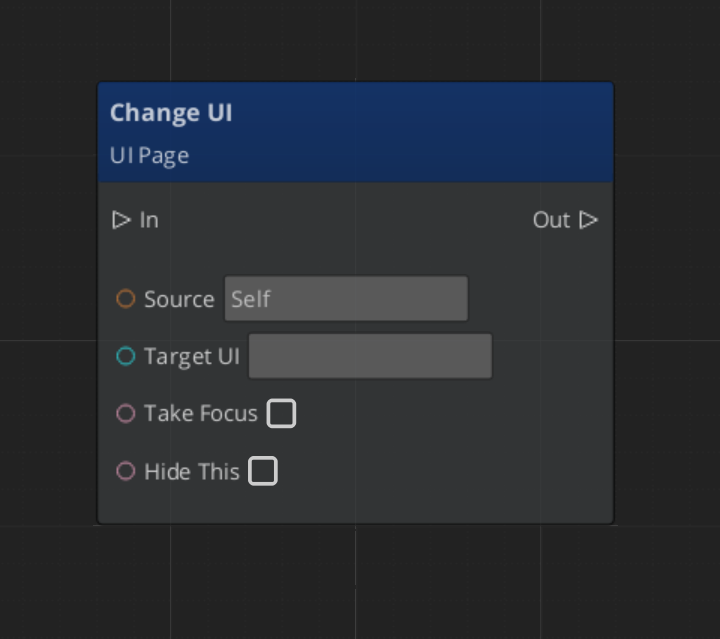
Return Policies
Each page has a NavigationReturnPolicy that controls which element gets focus when the page is returned to:
| Policy | Behavior |
|---|
| RestoreLast | Returns focus to the last interactable the player was on (e.g., resume where you left off). |
| AlwaysDefault | Always returns to the page’s default interactable (e.g., always land on “New Game” button). |
Page Transitions
Pages support three motion slots for animated transitions:
| Slot | When It Plays |
|---|
onShow | When the page becomes visible. |
onShowLoop | Loops continuously while the page is visible. |
onHide | When the page is hidden. |
Each slot takes a .uiam (UI Animation Motion) asset. See UI Animation for track types.
Quick Reference
| Need | Bus | Method |
|---|
| Navigate to a page | UIPageRequestBus | NavigateTo(forced) |
| Go back | UIPageRequestBus | NavigateBack |
| Switch child page | UIPageRequestBus | ChangePage(target, takeFocus, forced) |
| Show/hide a page | UIPageRequestBus | ToggleShow(on) |
| Switch canvases | UIPageRequestBus | ChangeUI(targetUI, takeFocus, hideThis) |
| Focus child by name | UIPageRequestBus | FocusChildPageByName(name, forced) |
Glossary
| Term | Meaning |
|---|
| Page | The fundamental UI unit — a screen, panel, or section of the interface |
| Root Page | A page registered with the UI Manager as a canvas entry point |
| Child Page | A page managed by a parent page, navigated to via ChangePage or FocusChildPageByName |
| NavigationReturnPolicy | Controls which element gets focus when returning to a page (RestoreLast or AlwaysDefault) |
For full definitions, see the Glossary.
See Also
For the full API, component properties, and C++ extension guide:
For related systems:
Get GS_UI
GS_UI — Explore this gem on the product page and add it to your project.
12.3 - UI Interaction
How to work with GS_Play UI interaction — motion-based button animations and input interception for focused canvases.
UI Interaction covers two systems that handle player input at the UI layer: enhanced buttons with motion-based hover and select animations, and the input interceptor that captures input events while a canvas is focused.
For component properties and the full API, see the Framework API reference.
Contents
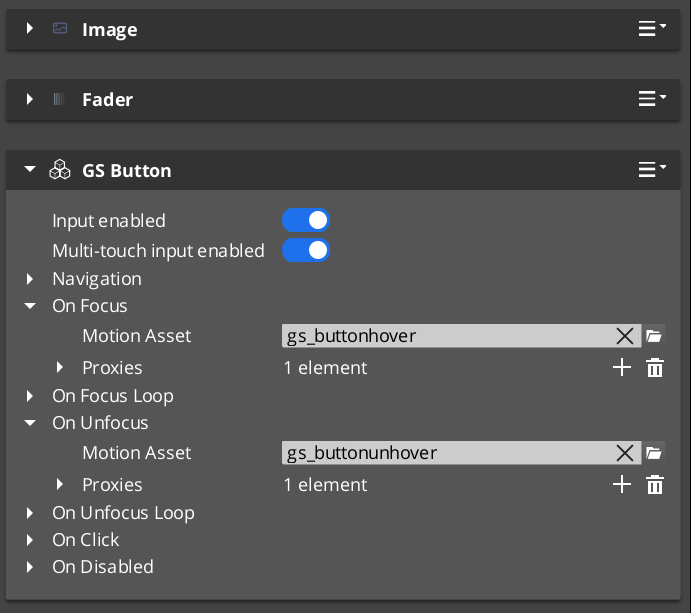
GS_ButtonComponent extends LyShine’s interactable system with UiAnimationMotion support. When the player hovers over a button (mouse or gamepad navigation), a configurable animation plays. When the button is selected, a separate animation fires. Both animations use .uiam assets, giving full control over position, scale, rotation, alpha, and color transitions.
Setup
- Add a LyShine
UiButtonComponent (or other interactable) to your entity. - Add
GS_ButtonComponent to the same entity. - Author
.uiam assets for hover, unhover, and select states. - Assign the assets to the corresponding fields in the Inspector.
Integration with Page Focus
When page navigation moves focus to a button (via keyboard or gamepad), the button treats focus as a hover event and plays its hover animation. This ensures consistent visual feedback regardless of input method.

GS_UIInputInterceptorComponent prevents input from leaking to gameplay systems while a UI canvas is active. It uses a GS_UIInputProfile asset to define which input channels to intercept. Intercepted events are re-broadcast on UIInputNotificationBus so UI-specific logic can respond to them.
When the canvas loses focus, the interceptor deactivates automatically and input flows normally back to gameplay.
Setup
- Add
GS_UIInputInterceptorComponent to the root page entity. - Configure a
GS_UIInputProfile asset with the channels to intercept. - Connect to
UIInputNotificationBus in any component that should respond to intercepted events.
Integration
Buttons and input interception work together on interactive canvases:
- The input interceptor blocks gameplay input while a menu is open.
- Buttons provide visual hover/select feedback driven by
UIInputNotificationBus events. - The page system routes gamepad focus to the correct button automatically.
Glossary
| Term | Meaning |
|---|
| GS_ButtonComponent | An enhanced button with GS_Motion-based hover and select animations |
| Hover Animation | A .uiam motion that plays when the button receives focus or mouse hover |
| Select Animation | A .uiam motion that plays when the button is activated |
| GS_UIInputInterceptorComponent | Component that captures input events while a canvas is focused |
| GS_UIInputProfile | Data asset defining which input channels to intercept |
For full definitions, see the Glossary.
See Also
For the full API, component properties, and C++ extension guide:
For related systems:
Get GS_UI
GS_UI — Explore this gem on the product page and add it to your project.
12.3.1 - Buttons
Redirected — button documentation is now part of UI Interaction.
GS_ButtonComponent is an enhanced button that adds GS_Motion-based animations for hover and select states. For the full guide, see The Basics: UI Interaction.
For component properties and API details, see the Framework API reference.
Contents
How It Works
The GS_ButtonComponent connects to LyShine’s interactable notification system. When the interactable reports a hover event, the button plays its hover animation. When it reports an unhover event, the animation reverses or stops. Select works the same way.
Animations are defined as .uiam assets and assigned in the Inspector. Each button can have independent hover and select motions.
Integration with Page Focus
When page navigation moves focus to a button (via keyboard or gamepad), the button treats focus as a hover event and plays its hover animation. This ensures consistent visual feedback regardless of input method.
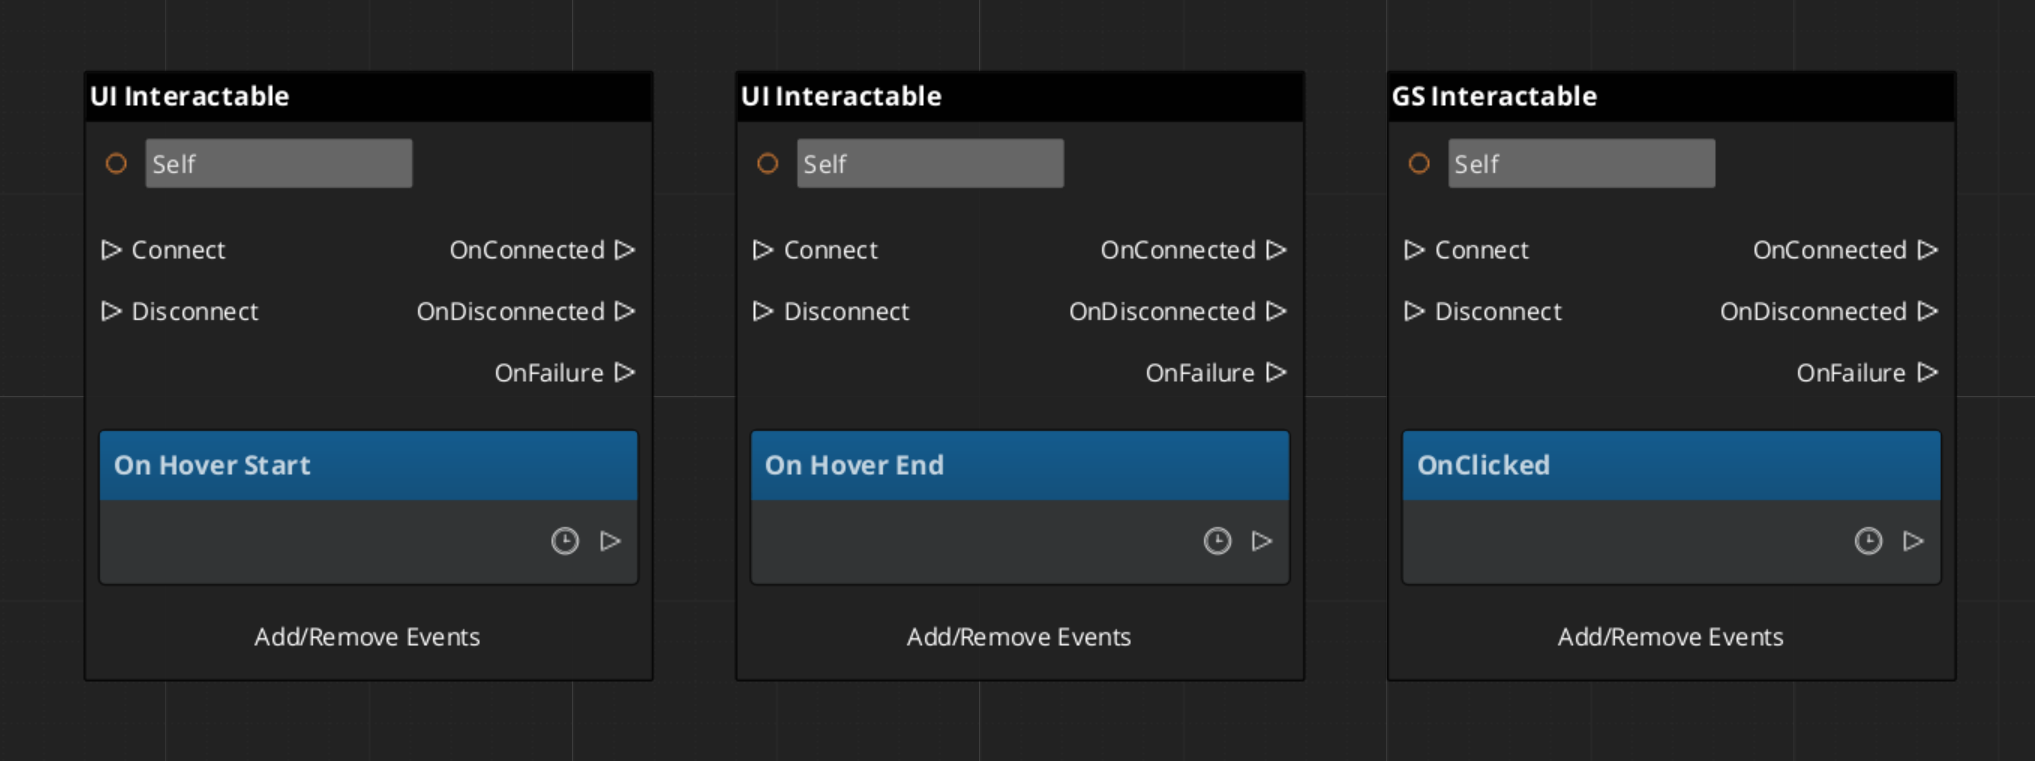
Glossary
| Term | Meaning |
|---|
| GS_ButtonComponent | An enhanced button with GS_Motion-based hover and select animations |
| Hover Animation | A .uiam motion that plays when the button receives focus or mouse hover |
| Select Animation | A .uiam motion that plays when the button is activated |
For full definitions, see the Glossary.
See Also
For the full API, component properties, and C++ extension guide:
For related systems:
Get GS_UI
GS_UI — Explore this gem on the product page and add it to your project.
12.4 - UI Animation
How to work with GS_Play UI animations — motion-based LyShine property animation for pages, buttons, and standalone components.
UI Animation extends the GS_Motion system with 8 LyShine-specific animation tracks. Animations are authored as .uiam (UI Animation Motion) assets in the O3DE Asset Editor and can be used for page transitions, button hover effects, and standalone component animation.
For track type details, the domain extension pattern, and component internals, see the Framework API reference.
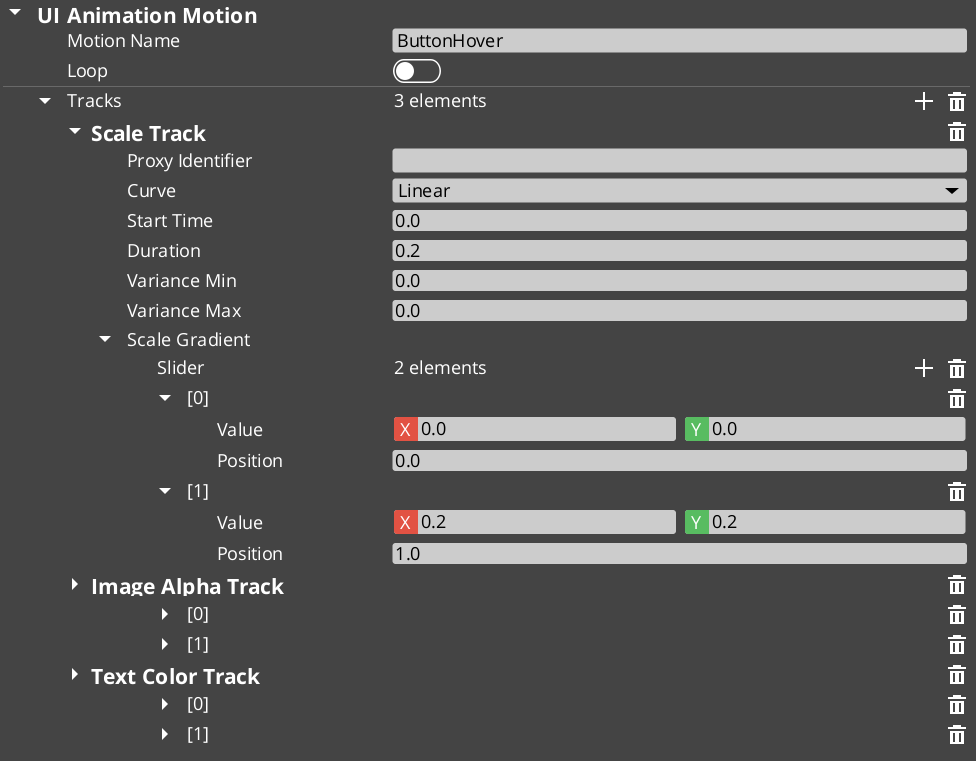
Contents
Available Tracks
Each track animates a single LyShine property over time:
| Track | Target Component | What It Animates |
|---|
| Position | Any LyShine element | Position offset from anchor |
| Scale | Any LyShine element | Element scale |
| Rotation | Any LyShine element | Element rotation |
| Element Alpha | Any LyShine element | Whole-element transparency |
| Image Alpha | UiImageComponent | Image-specific transparency |
| Image Color | UiImageComponent | Image color tint |
| Text Color | UiTextComponent | Text color |
| Text Size | UiTextComponent | Font size |
Multiple tracks can run simultaneously within a single motion — for example, a page show animation might fade in (Element Alpha) while sliding up (Position) and scaling from 90% to 100% (Scale).
Where Animations Are Used
| Context | How It’s Assigned |
|---|
| Page transitions | Assigned to onShow, onShowLoop, and onHide slots on GS_UIPageComponent. |
| Button states | Assigned to hover and select slots on GS_ButtonComponent. |
| Standalone playback | Assigned to UiAnimationMotionComponent on any entity. |
Authoring Animations
- Create a new
.uiam asset in the O3DE Asset Editor. - Add tracks for the properties you want to animate.
- Configure timing, easing curves, and property values for each track.
- Optionally set track identifiers for proxy targeting.
- Assign the asset to a component slot in the Inspector.
Proxy Targeting
When tracks have identifiers (named labels), they appear in the motion’s proxy list. Proxies let you redirect a track to a different entity in the UI hierarchy — for example, animating a background panel separately from a content area within the same page transition.
Quick Reference
| Need | How |
|---|
| Animate a page transition | Assign .uiam assets to onShow/onHide slots on the page |
| Animate a button hover | Assign .uiam asset to the button’s hover slot |
| Play an animation on any entity | Add UiAnimationMotionComponent and assign a .uiam asset |
| Target a child element | Use proxy entries to redirect tracks |
| Loop an animation | Enable loop on the motion asset |
Glossary
| Term | Meaning |
|---|
| UI Animation Motion (.uiam) | A data asset containing LyShine-specific animation tracks for UI elements |
| UiAnimationMotionComponent | A standalone component for playing UI animations on any entity |
| Proxy Targeting | Redirecting a track to a different entity in the UI hierarchy via named labels |
For full definitions, see the Glossary.
See Also
For the full API, component properties, and C++ extension guide:
For related systems:
Get GS_UI
GS_UI — Explore this gem on the product page and add it to your project.
12.5 - Widgets
How to work with GS_Play UI widgets — load screens, pause menus, and other standalone UI components.
Widgets are standalone UI components that handle specific game scenarios outside the page navigation model. They activate and deactivate in response to game events rather than player navigation — a load screen appears during a stage transition, a pause menu overlays gameplay when the player pauses.
For component properties and the full API, see the Framework API reference.
Contents
Load Screen
GS_LoadScreenComponent shows a loading canvas during stage transitions and hides it when loading is complete. Place it on the Game Manager entity and configure a LyShine canvas to use as the loading screen.
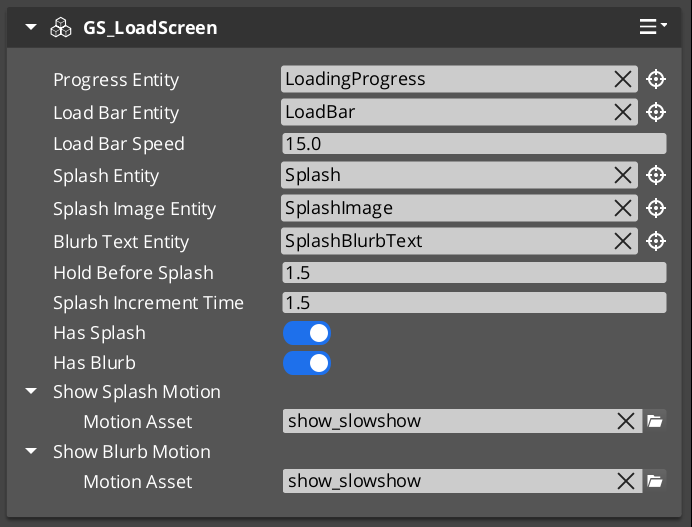
The component listens for StageManagerNotificationBus events and drives the canvas visibility automatically — no ScriptCanvas or manual triggers required.
PauseMenuComponent handles the pause overlay. It listens for the configured pause input action and toggles a designated pause canvas on and off, broadcasting events so other systems know to yield control.
Glossary
| Term | Meaning |
|---|
| Widget | A standalone UI component that activates in response to game events rather than player navigation |
| Load Screen | A canvas displayed during stage transitions, managed by GS_LoadScreenComponent |
| Pause Menu | An overlay canvas displayed when the game is paused, managed by PauseMenuComponent |
For full definitions, see the Glossary.
See Also
For the full API, component properties, and C++ extension guide:
For related systems:
Get GS_UI
GS_UI — Explore this gem on the product page and add it to your project.
13 - GS_Unit
The character and entity control system — unit registration, player and AI controllers, input processing, and modular movement.
GS_Unit is the complete character control system for GS_Play. It handles how entities are registered as controllable units, which controller possesses each unit, how raw player input is captured and converted into intent, and how that intent is translated into physical movement through a modular stack of movers, grounders, and influence fields.
For architecture details, component properties, and extending the system in C++, see the GS_Unit API.
Quick Navigation
| I want to… | Feature | API |
|---|
| Register units, track active controllers, or spawn units at runtime | Unit Manager | API |
| Possess and release units with player or AI controllers | Controllers | API |
| Capture raw input and convert it into structured movement intent | Input Data | API |
| Move characters with movers, grounders, and movement influence fields | Movement | API |
Installation
GS_Unit requires GS_Core. Add both gems to your project before using any Unit components.
For a full guided walkthrough, follow the Simple Project Setup guide.
Quick Installation Summary
- Enable the GS_Unit gem in your project configuration.
- Create a Unit Manager prefab and add it to the Game Manager’s Managers list.
- Configure physics collision layers for character movement.
- Place a Player Controller and Unit entity in your level.
Unit Manager
The Unit Manager is the singleton coordinator for everything unit-related. It handles registration of new units as they spawn, maintains an indexed list of all active units queryable by name or ID, and provides the spawn interface for runtime unit creation. It also participates in the standby system for clean level transitions.
Unit Manager
API
Controllers
Controllers are the possession layer — they determine which entity a given intelligence (player or AI) currently owns and drives. Player and AI controllers share the same possession interface, so swapping control mid-game or having both active simultaneously requires no special-casing.
Controllers
API
The Input Data feature set converts hardware signals into structured intent your movement code can consume. The PlayerControllerInputReader reads raw input events, InputData components store the current state, and Input Reactors compute movement vectors from keyboard or joystick input with deadzones and scaling.
Input Data
API
Units
Unit overview description, leads to movement.
Units
API
See Also
For the full API, component properties, and C++ extension guide:
For step-by-step project setup:
Get GS_Unit
GS_Unit — Explore this gem on the product page and add it to your project.
13.1 - Unit Manager
How to work with the GS_Unit manager — spawning units, registering player controllers, and coordinating standby across all controlled characters.
The Unit Manager is the global coordinator for all units in a GS_Play project. It maintains a registry of every active unit entity, provides the interface for spawning new units at runtime, tracks which player controllers are currently active, and participates in the GS_Core standby system so that all controlled characters pause cleanly during level transitions.
For architecture details, component properties, and extending the system in C++, see the Framework API reference.
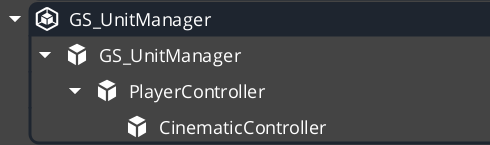
Contents
What the Unit Manager Does
The Unit Manager runs as a singleton that all other unit systems report to. When a unit entity activates, it registers itself so the manager can track it by name and ID. When gameplay code needs a new unit spawned, it asks the manager — not the spawning system directly — so the manager can assign a unique name and fire the appropriate notification.
| Responsibility | Description |
|---|
| Unit registry | Every active unit registers and deregisters automatically. |
| Spawning | Issues RequestSpawnNewUnit and fires ReturnNewUnit when the entity is ready. |
| Player controller tracking | Stores which controllers are registered as player-driven so multi-actor setups stay consistent. |
| Standby coordination | Broadcasts EnterStandby and ExitStandby to pause and resume all units during transitions. |
| Unit validation | CheckIsUnit lets any system confirm whether an entity is a registered unit. |
Spawning Units
How Spawning Works
Spawning a unit is a two-step async operation. Your script calls RequestSpawnNewUnit, the manager creates the entity using the prefab spawner, and when the unit is fully initialized the manager fires ReturnNewUnit on UnitManagerNotificationBus with the new entity ID and its assigned unique name.
You should always listen for ReturnNewUnit rather than attempting to use the entity immediately after the request, because spawning can take one or more frames.
| Step | What Happens |
|---|
| 1 — Request | Call RequestSpawnNewUnit with the prefab reference and desired spawn transform. |
| 2 — Wait | The manager spawns the entity and runs its initialization. |
| 3 — Receive | ReturnNewUnit fires on UnitManagerNotificationBus with the entity ID and name. |
ScriptCanvas — Spawning a Unit
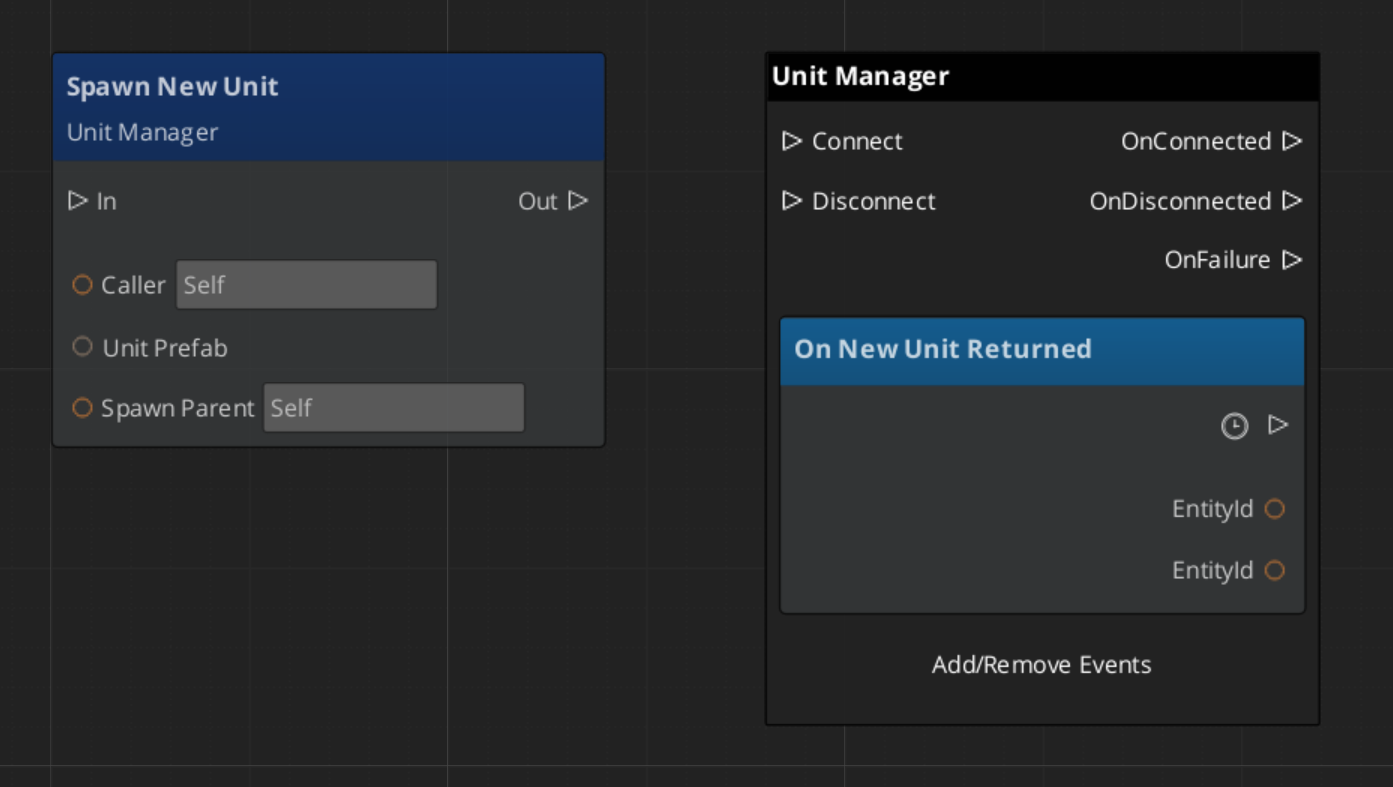
Registering Player Controllers
Player controllers must register themselves with the Unit Manager on activation so the game always knows which controllers are active. This is handled automatically by GS_PlayerControllerComponent, but if you are building a custom controller, call RegisterPlayerController in your activation logic.
[On Entity Activated (custom controller)]
    └─► [UnitManagerRequestBus → RegisterPlayerController(selfEntityId)]
This registration matters most for split-screen or multi-player setups where the manager needs to route input correctly across multiple simultaneous controllers.
Checking Unit Identity
Any system can confirm whether an arbitrary entity is a registered unit without holding a direct reference to the Unit Manager:
| ScriptCanvas Node | Returns | Notes |
|---|
CheckIsUnit(entityId) | bool | true if the entity is an active registered unit. |
ScriptCanvas
[UnitManagerRequestBus → CheckIsUnit(targetEntityId)]
    └─► bool
            ├─► true  — proceed with unit-specific logic
            └─► false — entity is not a unit, skip
Standby Mode
The Unit Manager participates in GS_Core’s global standby system. During level transitions or other blocking operations, the Game Manager signals standby and the Unit Manager relays that signal to all units. Units should pause movement, suspend input processing, and halt any tick-driven logic while in standby.
Listen on UnitManagerNotificationBus to coordinate your own logic with unit standby:
| Event | When It Fires | What to Do |
|---|
EnterStandby | Before a level transition or blocking operation begins. | Pause all movement, halt ticks, stop animations. |
ExitStandby | After the blocking operation completes. | Resume movement, re-enable ticks. |
ScriptCanvas
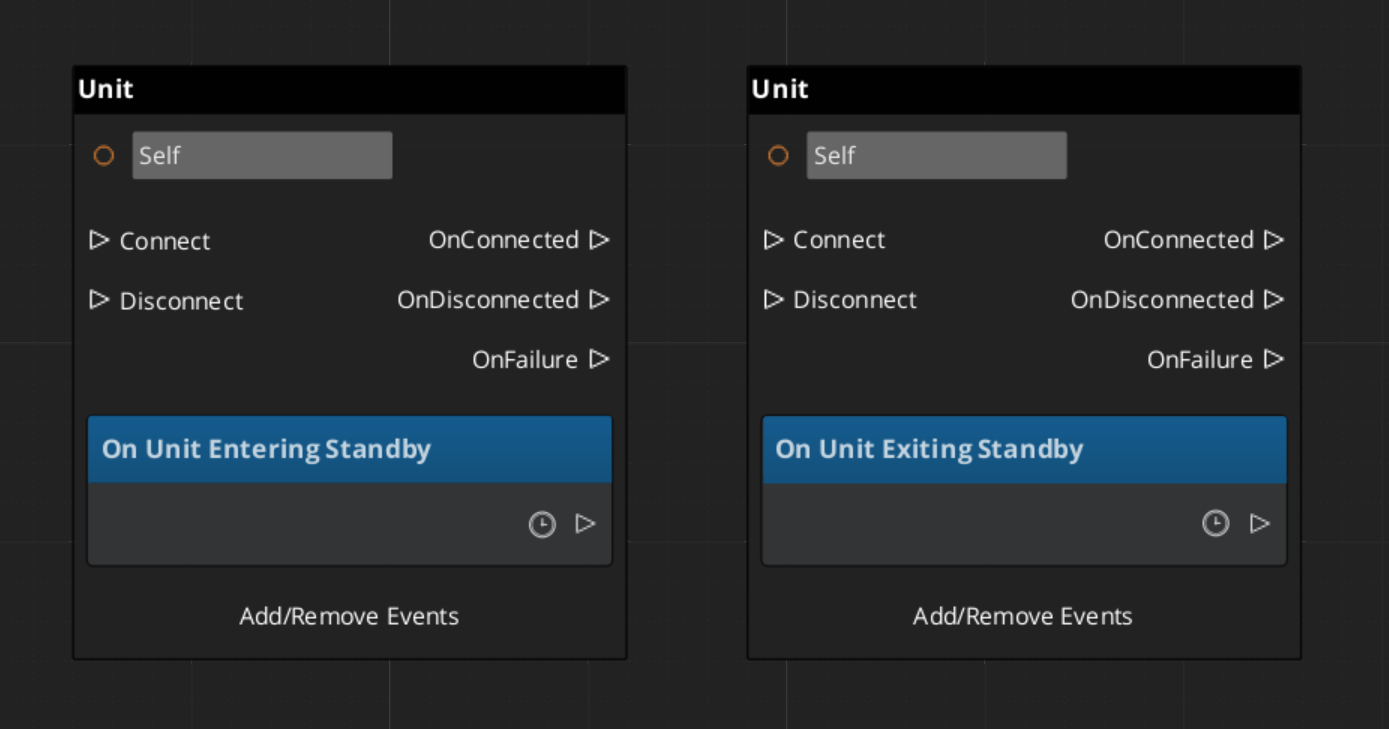
Quick Reference
| Need | Bus | Method / Event |
|---|
| Spawn a new unit | UnitManagerRequestBus | RequestSpawnNewUnit(prefab, transform) |
| Know when a unit is ready | UnitManagerNotificationBus | ReturnNewUnit(entityId, uniqueName) |
| Register a player controller | UnitManagerRequestBus | RegisterPlayerController(entityId) |
| Check if entity is a unit | UnitManagerRequestBus | CheckIsUnit(entityId) |
| Know when standby begins | UnitManagerNotificationBus | EnterStandby |
| Know when standby ends | UnitManagerNotificationBus | ExitStandby |
Glossary
| Term | Meaning |
|---|
| Unit Manager | The singleton manager that tracks all active units, handles spawning, and coordinates standby |
| Unit Registry | The internal list of every active unit entity, indexed by name and ID |
| Standby | A pause state broadcast to all units during level transitions or blocking operations |
For full definitions, see the Glossary.
See Also
For the full API, component properties, and C++ extension guide:
For related systems:
Get GS_Unit
GS_Unit — Explore this gem on the product page and add it to your project.
13.2 - Controllers
How to work with GS_Unit controllers — the possession model, player and AI controller setup, and switching control at runtime.
Controllers are the possession layer of GS_Unit. A controller is the intelligence — human input or AI logic — that owns and drives a unit at any given moment. Because both player and AI controllers share the same possession interface, your unit entities do not need to know what is controlling them, and swapping control at runtime requires no special-casing.
For architecture details, component properties, and extending the system in C++, see the Framework API reference.
Contents
The Possession Model
Breakdown
Every unit has exactly one controller at a time, or no controller at all. Possession is established by calling Possess on the unit and released by calling DePossess. Ownership changes are observed through the GS_Core cross-gem contract PossessionEmissionBus — the controller fires OnPossessedUnit / OnReleasedUnit on its own entity and the unit fires OnPossessedByController / OnReleasedByController on its entity — so other systems can react.
| Concept | Description |
|---|
| Possession | A controller attaches to a unit. The unit accepts input and movement commands from that controller only. |
| DePossession | The controller releases the unit. The unit halts input processing and enters a neutral state. |
| Possession events | Fire on the GS_Core PossessionEmissionBus (addressed by entity ID) whenever a unit’s controller changes. |
| GetController | Returns the entity ID of the current controller, or an invalid ID if none. |
| GetUniqueName | Returns the string name assigned by the Unit Manager when this unit was spawned. |
Controller Types
GS_Unit ships three controller components that cover the full range of typical game use:
| Component | Purpose |
|---|
GS_UnitControllerComponent | Base class establishing the possession contract. Extend this for custom controllers. |
GS_PlayerControllerComponent | Human-driven controller. Connects into the Input Data pipeline and routes player intent to the possessed unit. |
GS_AIControllerComponent | NPC controller. Provides the entry point for AI logic to issue movement commands through the same unit interface as player input. |
Both GS_PlayerControllerComponent and GS_AIControllerComponent extend the base controller, meaning any code that works with the base controller interface works transparently with either type.
Player Controller
GS_PlayerControllerComponent registers itself with the Unit Manager on activation, making it visible to the game’s controller tracking system. It connects to the Input Data pipeline on the possessed unit so that raw input events are routed correctly as soon as possession is established.
Setup
- Add
GS_PlayerControllerComponent to a controller entity (not the unit entity itself). - Ensure
GS_InputDataComponent and GS_PlayerControllerInputReaderComponent are on the unit entity. - Call
Possess to attach the controller to the target unit.
ScriptCanvas — Possessing a Unit
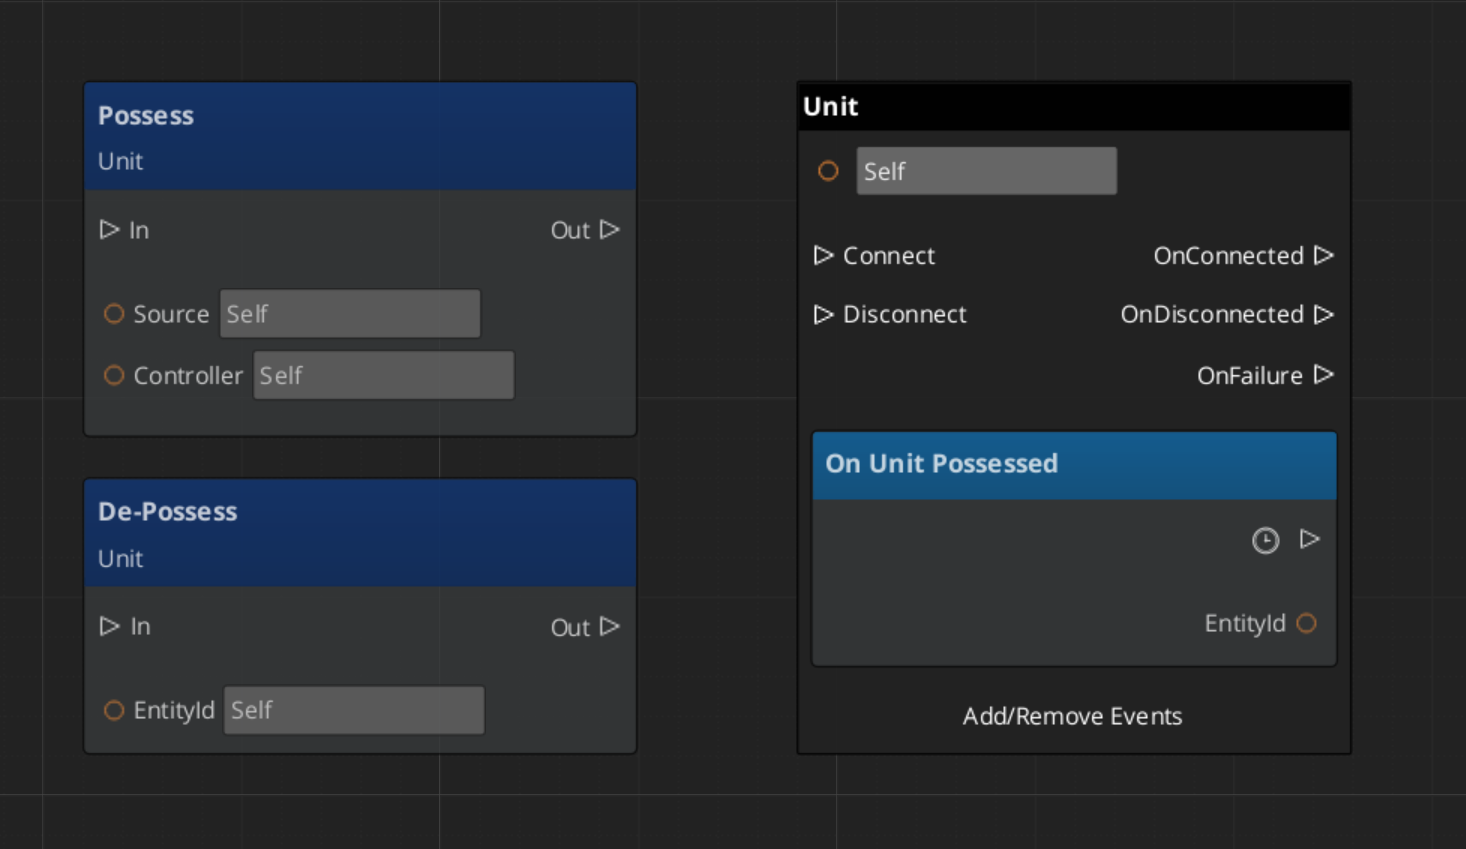
AI Controller
GS_AIControllerComponent gives AI logic the same possession interface as the player controller. An AI behavior system possesses a unit, then issues movement commands through UnitRequestBus or directly drives the unit’s Input Data component to simulate input. The unit processes those commands through the same mover stack it would use for player input.
ScriptCanvas — Handing a Unit to AI
// Called from your behavior tree or AI activation event when the NPC starts acting
[AI behavior activates]
    └─► [UnitRequestBus(unitEntityId) → Possess(aiControllerEntityId)]

[PossessionEmissionBus(unitEntityId) → OnPossessedByController(aiControllerEntityId)]
    └─► [AI logic begins issuing movement / action commands]
Switching Controllers at Runtime
Because possession is a simple attach/detach operation on the unit, switching from player to AI control (or back) is two calls:
[Trigger: cutscene starts, character incapacitated, etc.]
    └─► [UnitRequestBus(unitEntityId) → DePossess]
            └─► [UnitRequestBus(unitEntityId) → Possess(aiControllerEntityId)]

[Trigger: cutscene ends, character recovers, etc.]
    └─► [UnitRequestBus(unitEntityId) → DePossess]
            └─► [UnitRequestBus(unitEntityId) → Possess(playerControllerEntityId)]
The DePossess call ensures the previous controller’s input pipeline is disconnected before the new controller attaches, preventing stale input state from leaking between ownership changes.
Querying Controller State
| ScriptCanvas Node | Returns | Notes |
|---|
GetController (on unit) | EntityId | Current controller entity. Invalid ID means no controller. |
GetUniqueName (on unit) | string | The name assigned to this unit at spawn time. |
ScriptCanvas
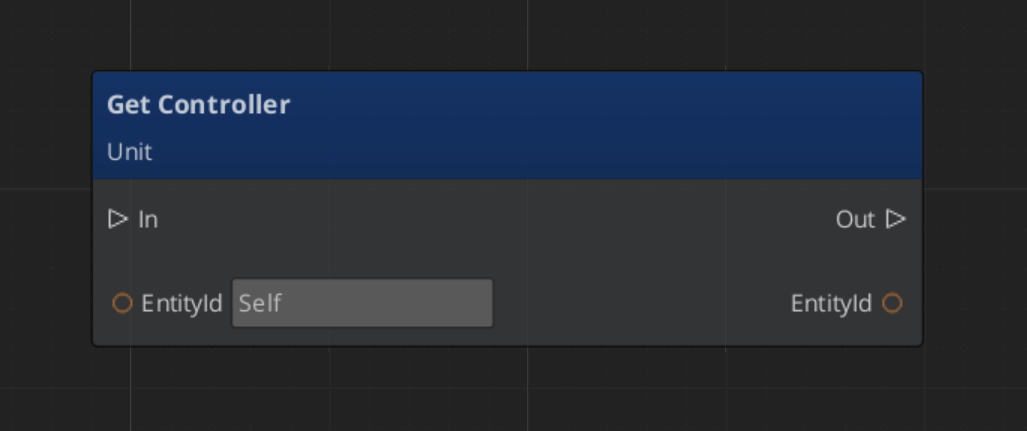
Standby and Controllers
When the Unit Manager broadcasts EnterStandby, both player and AI controllers should stop issuing commands. Player controllers automatically halt input reading. AI controllers must be suspended by whatever behavior system drives them. On ExitStandby, normal command flow resumes.
| Event | Controller Action |
|---|
UnitEnteringStandby | Halt input reads, suspend AI commands. |
UnitExitingStandby | Resume input reads, restart AI commands. |
Both events fire on UnitNotificationBus addressed by unit entity ID.
Quick Reference
| Need | Bus | Method / Event |
|---|
| Attach a controller to a unit | UnitRequestBus (by ID) | Possess(controllerEntityId) |
| Release a controller from a unit | UnitRequestBus (by ID) | DePossess |
| Know when possession changes | PossessionEmissionBus (GS_Core, by ID) | OnPossessedByController(controllerEntityId) on the unit; OnPossessedUnit on the controller |
| Get the current controller | UnitRequestBus (by ID) | GetController |
| Get a unit’s name | UnitRequestBus (by ID) | GetUniqueName |
| Know when unit enters standby | UnitNotificationBus (by ID) | UnitEnteringStandby |
| Know when unit exits standby | UnitNotificationBus (by ID) | UnitExitingStandby |
Glossary
| Term | Meaning |
|---|
| Possession | The act of a controller attaching to a unit and becoming its active intelligence |
| DePossession | Releasing a controller from a unit, halting its input processing |
| Player Controller | A human-driven controller that routes input from the Input Data pipeline to a unit |
| AI Controller | An NPC controller that issues movement commands through the same unit interface as player input |
For full definitions, see the Glossary.
See Also
For the full API, component properties, and C++ extension guide:
For related systems:
Get GS_Unit
GS_Unit — Explore this gem on the product page and add it to your project.
13.3 - Input Data
How to work with the GS_Unit input pipeline — reading player input, converting keyboard and joystick signals into movement vectors, and chaining input reactors.
The Input Data system is the pipeline that converts raw hardware signals into structured intent your movement code can consume. It sits between the active input profile and the mover stack, so controllers, movement components, and action systems all read from a single consistent source rather than polling hardware directly. Swapping input profiles at runtime — for remapping, controller switching, or accessibility options — requires no change to any downstream component.
For architecture details, component properties, and extending the system in C++, see the Framework API reference.
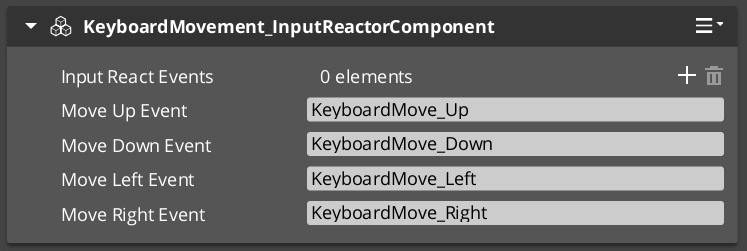
Contents
Pipeline Overview
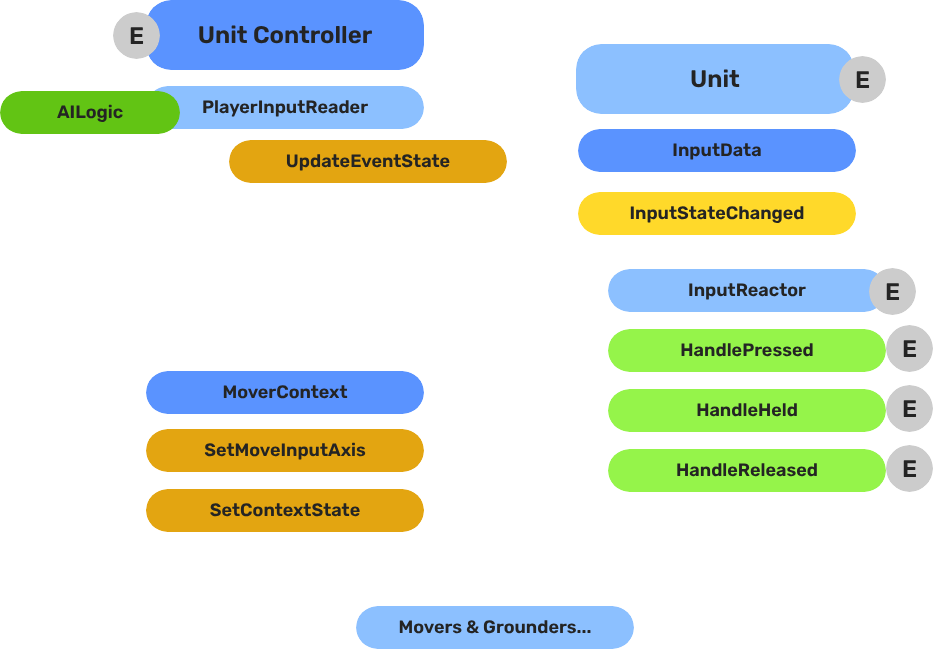
Breakdown
The input pipeline has three stages. Each stage is a separate component on the unit entity, and they run in order every frame:
| Stage | Component | What It Does |
|---|
| 1 — Read | GS_PlayerControllerInputReaderComponent | Reads raw input events from the active input profile and writes them into GS_InputDataComponent. |
| 2 — Store | GS_InputDataComponent | Holds the current frame’s input state — button presses, axis values — as structured data. |
| 3 — React | Reactor components | Read from GS_InputDataComponent and produce intent: movement vectors, action triggers, etc. |
All reactor components downstream of the store stage read from the same GS_InputDataComponent, so there is no duplicated hardware polling and no risk of two reactors seeing different input states for the same frame.
- The Basics: Controllers — Possession, input routing, and controller assignment.
- The Basics: Core Input — Input profiles, action mappings, and options setup.
- The Basics: Unit Input — Input readers, axis configuration, and ScriptCanvas usage.
- Framework API: Unit Controllers — Controller components, possession API, and C++ extension.
- Framework API: Input Reader — Profile binding, action event reading, and C++ extension.
- Framework API: Input Reactor — InputDataComponent schema, reactor base class, and C++ extension.
- Framework API: Mover Context — Context state, mode authority, and C++ extension.
GS_InputDataComponent is the shared state store. It does not read hardware — it only holds the values written by the Reader and consumed by Reactors.
Add it to any unit entity that needs to process input. A unit should have exactly one GS_InputDataComponent. All input reactors on the same entity read from it automatically.
GS_PlayerControllerInputReaderComponent connects the unit to the game’s active input profile. It receives input events from the profile and writes the resulting state into the unit’s GS_InputDataComponent each frame.
When the player controller possesses the unit, the reader activates. When the unit is depossessed or control is handed to an AI controller, the reader goes silent and the Input Data component retains its last-written state until overwritten.
Setup
Add GS_PlayerControllerInputReaderComponent to the unit entity alongside GS_InputDataComponent. No additional configuration is required — it picks up the active input profile automatically.
Reactors are the components that transform stored input state into useful intent values. Each reactor handles one concern:
| Component | Input Source | Output |
|---|
GS_InputReactorComponent | Base class — reads from GS_InputDataComponent. | Override to produce custom intent. |
GS_InputAxisReactorComponent | Axis values from GS_InputDataComponent. | Processed axis output (scaled, deadzoned). |
KeyboardMovement_InputReactorComponent | Keyboard directional buttons (WASD / arrow keys). | Normalized 3D movement vector. |
JoyAxisMovement_AxisReactorComponent | Joystick axis pair from GS_InputDataComponent. | Scaled, deadzoned 3D movement vector. |
Add as many reactors as your unit needs. A typical ground character has both KeyboardMovement_InputReactorComponent and JoyAxisMovement_AxisReactorComponent active so it responds to either keyboard or gamepad input without requiring separate prefabs.
Keyboard Movement Reactor
KeyboardMovement_InputReactorComponent reads the four directional button states from GS_InputDataComponent and produces a normalized movement vector. The vector direction is relative to the unit’s forward axis, so rotating the unit automatically adjusts the movement direction without any additional calculation.
The reactor writes the resulting vector into a movement data field that the active mover reads each frame.
ScriptCanvas — Reading the Movement Vector
You generally do not need to read the movement vector directly — the mover components consume it automatically. However, if you need to inspect or override it:
// Use only if you need to inspect or override the movement vector — movers consume it automatically
[On Tick]
    └─► [GS_InputDataComponent → GetMovementVector]
            └─► Vector3 — current frame's movement intent
Joystick Axis Reactor
JoyAxisMovement_AxisReactorComponent reads a pair of axis values (horizontal and vertical) from GS_InputDataComponent and applies deadzone filtering and magnitude scaling before writing the resulting vector. This prevents stick drift at rest and allows variable-speed movement when the stick is partially deflected.
| Setting | Effect |
|---|
| Deadzone | Axis values below this threshold are treated as zero. |
| Scale | Multiplier applied after deadzone removal. |
| Axis mapping | Which input profile axis pair to read (left stick, right stick, etc.). |
Adding Custom Reactors
To handle input not covered by the built-in reactors — jumping, sprinting, interaction, ability activation — extend GS_InputReactorComponent or GS_InputAxisReactorComponent in C++. Your reactor reads from GS_InputDataComponent the same way the built-in ones do, so it automatically benefits from any input profile that writes to those fields.
For the C++ extension guide, see the Framework API reference.
Quick Reference
| Need | Component | Notes |
|---|
| Store input state on a unit | GS_InputDataComponent | Required on every unit that processes input. |
| Read from active input profile | GS_PlayerControllerInputReaderComponent | Activates automatically when player controller possesses. |
| Keyboard → movement vector | KeyboardMovement_InputReactorComponent | Reads WASD / arrow keys from input data. |
| Joystick → movement vector | JoyAxisMovement_AxisReactorComponent | Reads axis pair, applies deadzone and scale. |
| Custom button or axis handler | Extend GS_InputReactorComponent (C++) | Reads from GS_InputDataComponent same as built-ins. |
| Inspect movement vector | GS_InputDataComponent → GetMovementVector | Vector3, current frame’s movement intent. |
Glossary
| Term | Meaning |
|---|
| Input Data Component | The shared state store that holds the current frame’s input values for a unit |
| Input Reader | The component that reads raw input events from the active input profile and writes them into the Input Data Component |
| Input Reactor | A component that reads from the Input Data Component and produces intent values (movement vectors, action triggers) |
| Movement Vector | A normalized 3D direction produced by input reactors and consumed by movers |
For full definitions, see the Glossary.
See Also
For the full API, component properties, and C++ extension guide:
For related systems:
Get GS_Unit
GS_Unit — Explore this gem on the product page and add it to your project.
13.4 - Units
What makes an entity a unit — the GS_UnitComponent, entity configuration, collision setup, possession, standby, and movement.
A “unit” in GS_Play is any entity that can be possessed by a controller and driven through gameplay. The GS_UnitComponent is the marker that transforms an ordinary entity into a unit — it provides the possession interface, unique naming, standby awareness, and automatic registration with the Unit Manager.
Units are the characters, vehicles, creatures, or any other controllable actors in your game. They do not contain decision-making logic themselves — that comes from the controller that possesses them. A unit provides the body: movement, collision, and visuals. The controller provides the brain: player input or AI logic.
For architecture details, component properties, and extending the system in C++, see the Framework API reference.

Contents
How Units Work
Registration
When a GS_UnitComponent activates, it registers itself with the Unit Manager. The manager tracks all active units and responds to CheckIsUnit queries. When the component deactivates, it unregisters automatically.
Possession
Units are possessed by controllers through the UnitRequestBus:
- A controller calls
Possess(controllerEntityId) on the unit. - The unit stores the controller reference and fires
OnPossessedByController on the GS_Core PossessionEmissionBus (unit entity). - The controller can now drive the unit’s subsystems (movement, actions, etc.).
- Calling
DePossess() clears the controller reference and releases the unit.
Standby
Units participate in the standby system for clean level transitions. When the Unit Manager signals standby, the unit broadcasts UnitEnteringStandby on its notification bus. Child components — movers, input reactors, and others — listen for this signal and pause their processing. UnitExitingStandby reverses the process.
Entity Configuration
A minimal unit entity requires:
- GS_UnitComponent — Registers the entity as a unit and provides the possession interface.
- Movement components — At least a mover and optionally a grounder for ground detection.
- PhysX collider — For physics interaction and ground detection raycasts.
A fully featured unit entity typically includes:
| Component | Role |
|---|
GS_UnitComponent | Marks the entity as a unit; handles possession and standby. |
GS_MoverContextComponent | Coordinates movers and grounders; holds the Movement Profile. |
A mover (e.g. GS_3DSlideMoverComponent) | Defines how the unit moves each frame. |
A grounder (e.g. GS_PhysicsRayGrounderComponent) | Detects surface contact and reports ground state. |
| PhysX Rigid Body + Collider | Physics presence in the world. |
| Mesh or Actor component | Visual representation. |
Entity Arrangement
Entity arrangement
Collision Setup
Units require properly configured PhysX collision layers to interact with the environment and other units. If you have not set up collision layers yet, refer to the Simple Project Setup guide.
Typical collision layer assignments:
| Layer | Purpose |
|---|
| Unit layer | The unit’s own collider. Collides with environment geometry and other units. |
| Ground detection layer | Used by grounder raycasts. Collides with terrain and walkable surfaces only. |
Movement
The Movement feature set is a composable stack where each component handles one concern of character locomotion. Movers define core behavior (free, strafe, grid, slide), the MoverContext manages movement state and selects the active mover, Grounders report ground state, and Influence components apply external forces like wind or currents.
Movement
API
Unit Action Graph
Under Construction
The Unit Action Graph editor is functional, but runtime integration with the movement system is not yet complete.The Unit Action Graph is a visual HFSM editor for authoring character behavioral logic — separate from and complementary to the Movement components. While Movers handle locomotion physics, the Unit Action Graph defines what the character is doing (Idle, Walk, Attack) and when it transitions between those states. Behavior is organized into parallel layers, each an independent state machine running simultaneously.
Unit Action Graph
API
Quick Reference
| Need | Bus | Method |
|---|
| Assign a controller to this unit | UnitRequestBus (ById) | Possess(controllerEntityId) |
| Release the current controller | UnitRequestBus (ById) | DePossess() |
| Get the possessing controller | UnitRequestBus (ById) | GetController() |
| Get the unit’s unique name | UnitRequestBus (ById) | GetUniqueName() |
| Event | Bus | Fired When |
|---|
OnPossessedByController | PossessionEmissionBus (GS_Core) | A controller takes possession of this unit. Fires on the unit entity. |
UnitEnteringStandby | UnitNotificationBus | The unit is entering standby (level transition). |
UnitExitingStandby | UnitNotificationBus | The unit is exiting standby and resuming. |
Glossary
| Term | Meaning |
|---|
| Unit | Any entity with a GS_UnitComponent — the controllable body in gameplay |
| Controller | The intelligence (player or AI) that possesses and drives a unit |
| Possession | The act of a controller claiming ownership of a unit via Possess() |
| Standby | A paused state units enter during level transitions, coordinated by the Unit Manager |
| Unique Name | An identifier generated at activation used to look up a unit by name |
For full definitions, see the Glossary.
See Also
For the full API, component properties, and C++ extension guide:
For related systems:
Get GS_Unit
GS_Unit — Explore this gem on the product page and add it to your project.
13.4.1 - Mover Context
Movement state coordinator for GS_Unit — manages movement modes, context states, input axis transformation, and movement profile priority.
GS_MoverContextComponent is the coordinator that sits above the movers and owns the movement state for a unit. It does not move the character itself — it decides which mover runs, transforms input into the correct movement vector, and exposes state to every other system that needs to know what the character is doing.
Add exactly one GS_MoverContextComponent to any unit that uses movers.
For architecture details, component properties, and extending the system in C++, see the Framework API: Mover Context.
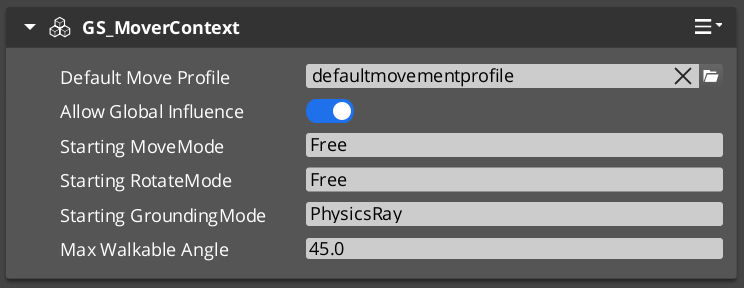
Contents
Movement Modes
The Mover Context uses three independent mode tracks — movement, rotation, and grounding — each holding a named string. Only the mover or grounder whose assigned mode name matches the active mode on that track will run. All others stay dormant.
| Track | Controls | Example modes |
|---|
| Movement | Which mover applies velocity each frame | "Free", "Slide" |
| Rotation | Which component rotates the character | "Free", "Locked" |
| Grounding | Which grounder runs surface detection | "Free", "Disabled" |
The three tracks are independent — changing the movement mode does not reset rotation or grounding.
Reverting Modes
Every mode change stores the previous value. Calling RevertToLastMovementMode, RevertToLastRotationMode, or RevertToLastGroundingMode restores it. This is how the Slide mover hands control back to Free movement after a slope is cleared — without needing to know what mode was active before.
Context States
Context states are named key/value pairs stored on the Mover Context. Any component can write or read them via MoverContextRequestBus. They provide a lightweight shared blackboard for movement systems to coordinate without direct dependencies.
| Built-in State | Values | Meaning |
|---|
"grounding" | 0 — Falling | No surface contact. |
| 1 — Grounded | Stable surface contact. |
| 2 — Sliding | Surface too steep to stand. Slide mover will activate. |
"StopMovement" | 1 — Active | Halts all mover velocity processing for this frame. |
The grounder writes "grounding" each frame. The Slide mover writes it back to 0 or 1 when the slope clears. Your own companion components can write custom states in the same way.
The Mover Context processes raw input through two transformations before handing it to the active mover.
| Step | Method | What It Does |
|---|
| Raw input | SetMoveInputAxis | Written by the input reactor. Screen-space direction. |
| 1 — Camera-relative | ModifyInputAxis() | Rotates the axis to align with the active camera’s facing. |
| 2 — Ground-projected | GroundInputAxis() | Projects onto the contact surface to prevent skating above or below terrain. |
Movers read the ground-projected axis. Both intermediate values are available via bus if a component needs an earlier stage.
Movement Profile Priority
The Mover Context resolves which GS_UnitMovementProfile governs the unit’s locomotion parameters at runtime using a priority stack:
- Influence fields — Any
MovementInfluenceFieldComponent or GlobalMovementInfluenceComponent that has added a profile to the unit. Highest priority. Multiple influences are stacked additively. - Global profile — The scene-level default from
GlobalMovementRequestBus. Applied when no influence overrides are active. - Default profile — The profile assigned directly to the
GS_MoverContextComponent. Used as the final fallback.
To change a unit’s movement feel in a specific area, place a MovementInfluenceFieldComponent with a volume shape and assign an alternate profile to it. The unit’s own component property does not need to change.
Script Canvas Examples
Changing movement mode:

Reverting to the previous movement mode:

Setting a context state flag:
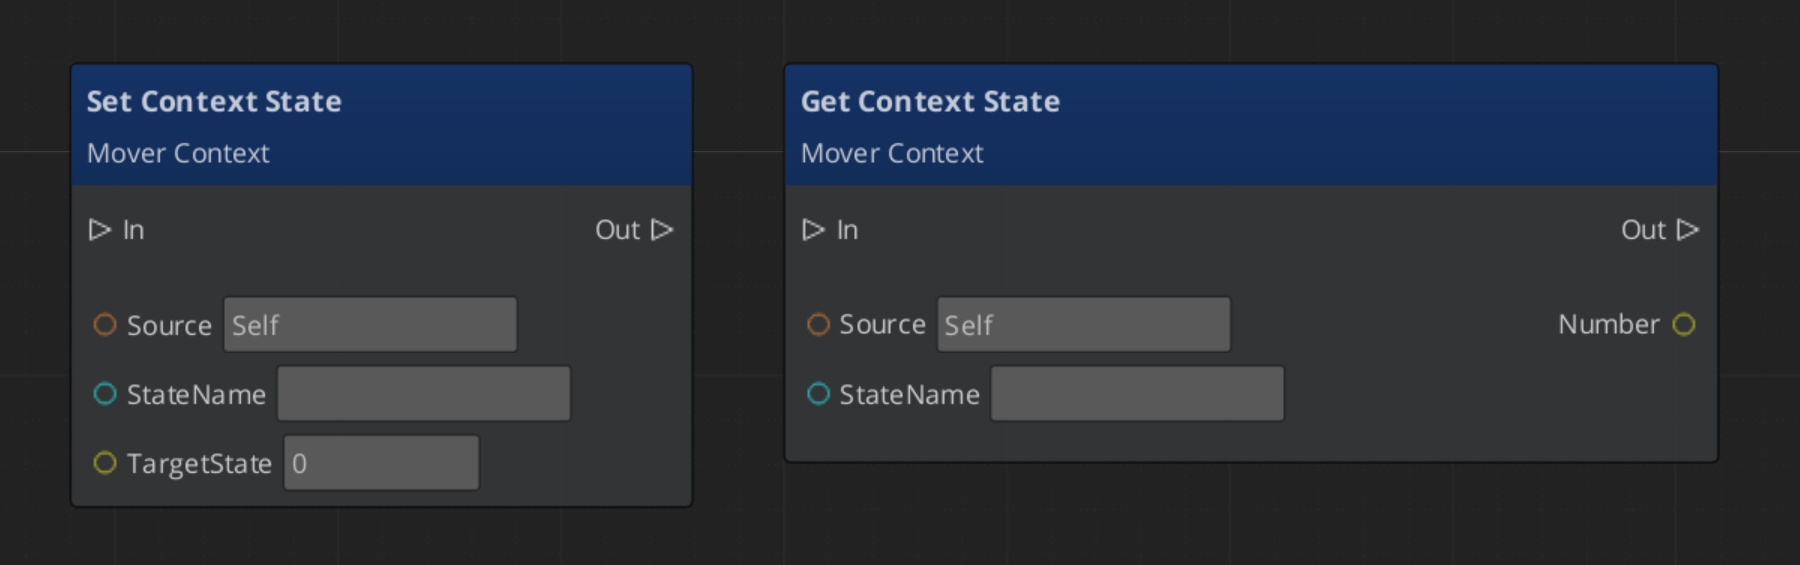
Quick Reference
| Need | Bus | Method |
|---|
| Change active movement mode | MoverContextRequestBus | ChangeMovementMode(modeName) |
| Restore previous movement mode | MoverContextRequestBus | RevertToLastMovementMode() |
| Read the ground-projected input | MoverContextRequestBus | GetGroundMoveInputAxis() |
| Write a context state | MoverContextRequestBus | SetMoverState(name, value) |
| Read a context state | MoverContextRequestBus | GetMoverState(name) |
| Push a movement profile override | MoverContextRequestBus | AddMovementProfile(influencer, profile) |
| Remove a profile override | MoverContextRequestBus | RemoveMovementProfile(influencer) |
| Listen for mode changes | MoverContextNotificationBus | MovementModeChanged, GroundingModeChanged |
| Listen for state changes | MoverContextNotificationBus | MoverStateChanged |
Glossary
| Term | Meaning |
|---|
| Mover Context | The coordinator component that owns movement state, selects the active mover, and transforms input each frame |
| Movement Mode | A named string on a mode track that determines which mover or grounder is active |
| Context State | A named key/value pair on the Mover Context used as a shared blackboard between movement components |
| Input Axis | The movement direction written by input reactors, transformed through camera-relative and ground-projected stages |
| Movement Profile | A data asset storing locomotion parameters (speed, acceleration, jump force) for a unit |
For full definitions, see the Glossary.
See Also
For the full API, component properties, and C++ extension guide:
For related systems:
Get GS_Unit
GS_Unit — Explore this gem on the product page and add it to your project.
13.4.2 - Movement
How to work with GS_Unit movement — mover types, mover context, grounders, movement profiles, and influence fields.
The Movement system is a composable stack of components that each handle one concern of character locomotion. Movers define the core behavior, grounders report surface contact, the Mover Context manages which mover is active and what movement state the character is in, influence fields apply external forces, and Movement Profiles store the parameters that govern all of it. You assemble what you need — most characters use two or three components — and replace individual pieces without touching anything else.
For architecture details, component properties, and extending the system in C++, see the Framework API reference.
Contents
How it Works
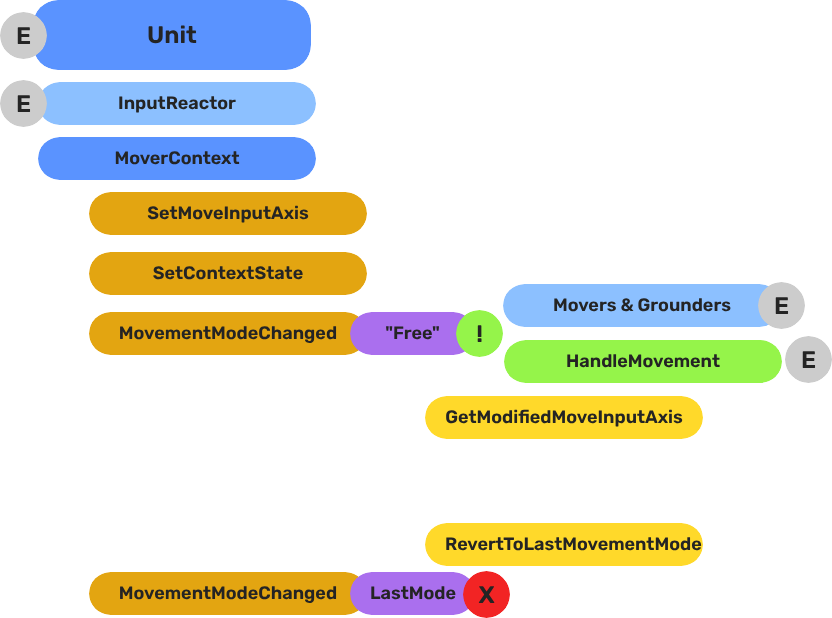
Breakdown
Movers and Grounders are multiple components on a Unit that are constantly changing activation based on the units state. When a mover is active, it freely processes the unit’s movement based on it’s functionality. At any moment, through internal or external forces, the Movement, Rotation, or Grounding state can change, which disables the old movers, and activates the new one to continue controlling the Unit.
Input
    ↓  InputDataNotificationBus::InputStateChanged
Input Reactor Components
    ↓  MoverContextRequestBus::SetMoveInputAxis
GS_MoverContextComponent
    ↓  ModifyInputAxis() → camera-relative
    ↓  GroundInputAxis() → ground-projected
    ↓  MoverContextNotificationBus::MovementModeChanged("Free")
GS_3DFreeMoverComponent  [active when mode == "Free"]
    ↓  AccelerationSpringDamper → rigidBody->SetLinearVelocity
GS_PhysicsRayGrounderComponent  [active when grounding mode == "Free"]
    ↓  MoverContextRequestBus::SetGroundNormal / SetContextState("grounding", ...)
    ↓  MoverContextRequestBus::ChangeMovementMode("Slide")  ← when slope too steep
GS_3DSlideMoverComponent  [active when mode == "Slide"]
The Slide mover activates when the Unit is walking on too steep an angle. It takes control over the unit, slides down the hill, then restores the previous movement behaviour.
- The Basics: Mover Context — Movement modes, grounding states, and configuration.
- The Basics: Movement — Mover types, grounder types, and ScriptCanvas usage.
- Framework API: Input Reactor — InputDataComponent schema, reactor base class, and C++ extension.
- Framework API: Mover Context — Context state, mode authority, and C++ extension.
- Framework API: Movers — Mover and grounder components, movement APIs, and C++ extension.
Mover Types
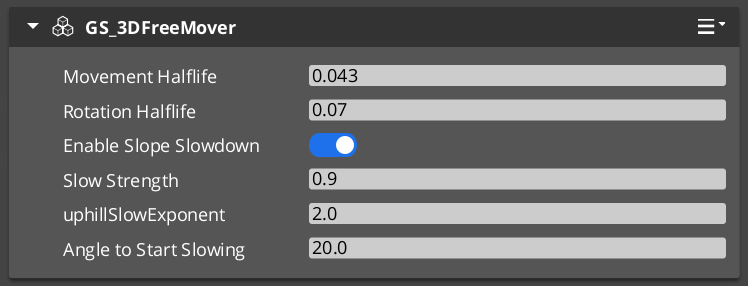
Each mover defines one locomotion behavior. A unit has one active mover at a time, selected by the Mover Context. All movers read from the unit’s movement vector (produced by the input pipeline) and translate it into entity movement each frame.
| Component | Best For | How It Moves |
|---|
GS_3DFreeMoverComponent | Flying, swimming, zero-gravity | Unconstrained motion in all three axes. No ground contact required. |
GS_3DSlideMoverComponent | Ground-bound characters on uneven terrain | Slides the character along the contact surface, maintaining ground contact smoothly. |
GS_PhysicsMoverComponent | Characters needing full collision response | Drives an O3DE physics rigid body. Forces and impulses apply normally. |
Choosing a Mover
- Use
GS_3DFreeMoverComponent for any character that needs to move through air or water without ground contact. - Use
GS_3DSlideMoverComponent for most ground-bound characters. It handles slopes and steps without requiring physics simulation. - Use
GS_PhysicsMoverComponent when the character must interact physically with the world — pushing objects, being knocked back by forces, or responding to physics joints.
Mover Context
GS_MoverContextComponent sits above the movers and coordinates everything: it selects which mover runs each frame, owns the movement mode tracks, transforms raw input into camera-relative and ground-projected vectors, and manages the movement profile priority stack.
Add exactly one to any unit that uses movers.
Mover Context →
Grounders
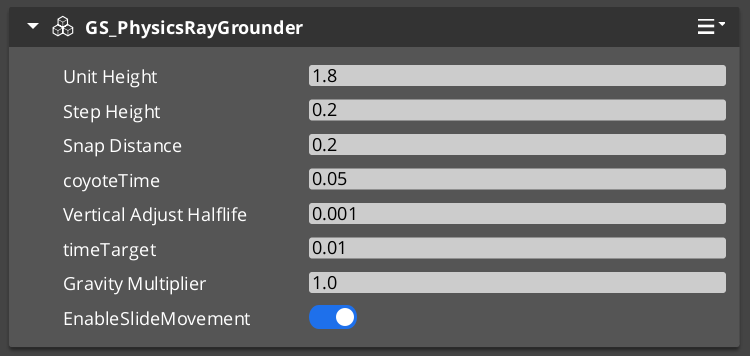
Grounders detect whether the character has contact with a surface and report that information to the Mover Context. Without a grounder, the Context cannot distinguish ground-bound from airborne states.
| Component | Method | Notes |
|---|
GS_GrounderComponent | Base class — extend for custom detection logic. | Not used directly. |
GS_PhysicsRayGrounderComponent | Fires a downward raycast each frame. | Suitable for most characters. Configurable ray length and collision layer. |
Add one grounder to a unit that uses GS_3DSlideMoverComponent or any mover that needs ground awareness. GS_3DFreeMoverComponent does not require a grounder because it never needs ground contact.
Movement Profiles
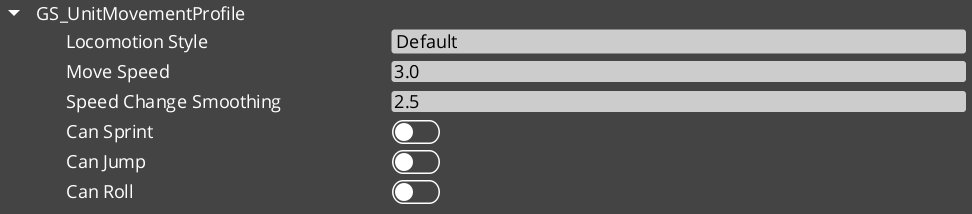
GS_UnitMovementProfile is a data asset that stores all locomotion parameters for a unit configuration: walk speed, run speed, acceleration, deceleration, air control, jump force, and any mover-specific values. The Mover Context component holds a reference to a profile asset, so multiple prefabs can share the same profile or each have their own without duplicating inline values.
Creating a Profile
- In the O3DE Asset Browser, right-click and select Create Asset → GS_UnitMovementProfile.
- Configure the parameters in the asset editor.
- Assign the asset to the Movement Profile slot on
GS_MoverContextComponent.
Changing a profile asset at runtime allows you to alter all locomotion parameters at once — for example, switching a character between normal and encumbered movement profiles without touching individual component properties.
Reading Movement Profile Data - ScriptCanvas
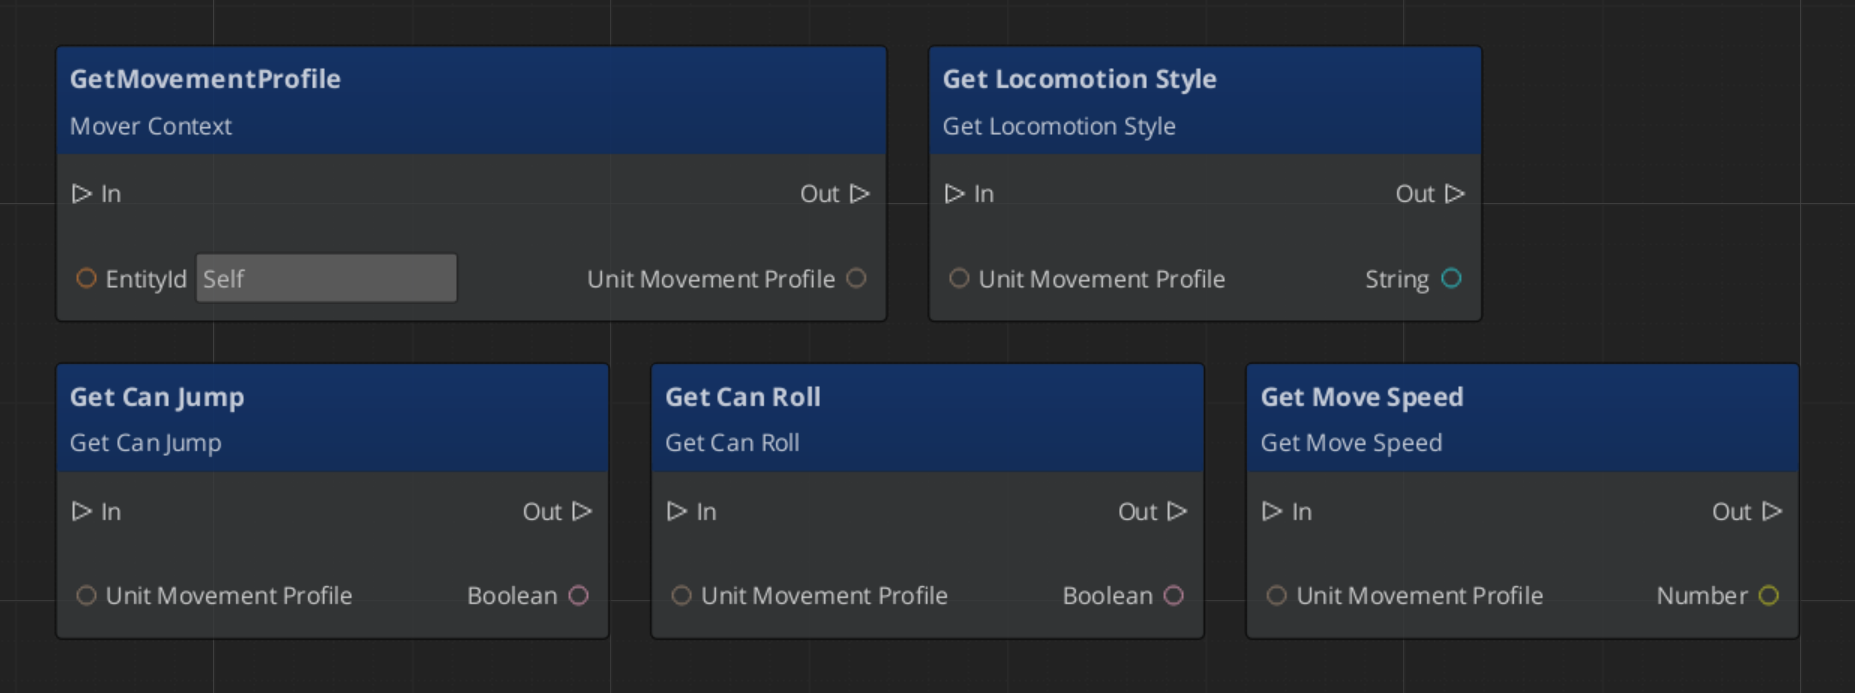
Influence Fields
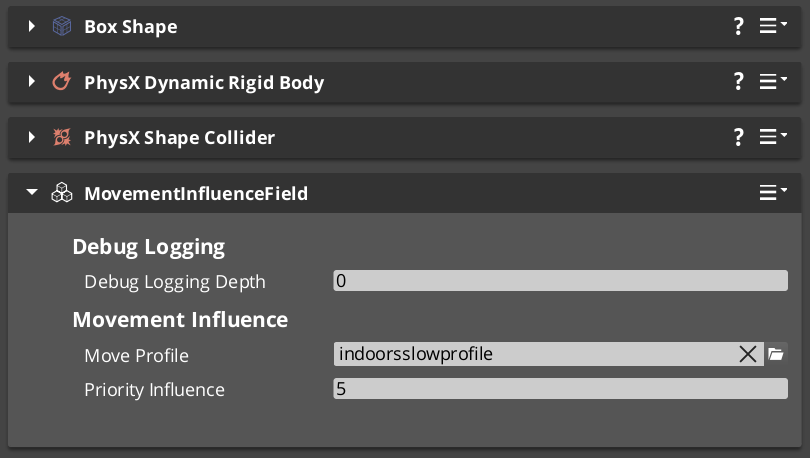
Influence components dynamically apply priority that change a units dominant movement profile. Priority values are additive — a unit accumulates priority values from all active sources and evaluate the final priority to determine the acting movement profile.
| Component | Scope | Typical Use |
|---|
GlobalMovementInfluenceComponent | All units globally | Standard movement for the region. |
MovementInfluenceFieldComponent | Units inside a spatial volume | Open fields, narrow channels, indoors and outdoors transitions. |
GlobalMovementInfluenceComponent is placed once in the level, usually on the Stage Data entity. MovementInfluenceFieldComponent uses a shape component to define its volume — place one wherever you need to change movement priority.
Assembly Guide
A typical ground-bound player character uses this component combination:
| Component | Role |
|---|
GS_InputDataComponent | Holds input state — movement vector written here each frame. |
GS_PlayerControllerInputReaderComponent | Reads input profile and fills GS_InputDataComponent. |
KeyboardMovement_InputReactorComponent | Converts keyboard input to movement vector. |
JoyAxisMovement_AxisReactorComponent | Converts joystick input to movement vector. |
GS_PhysicsRayGrounderComponent | Detects ground contact below the character. |
GS_MoverContextComponent | Coordinates grounders and movers, holds the Movement Profile. |
GS_3DSlideMoverComponent | Moves the character along the contact surface. |
A flying or swimming character replaces the grounder and slide mover with GS_3DFreeMoverComponent and removes the grounder entirely.
Quick Reference
| Need | Component | Notes |
|---|
| Free 3D movement (fly / swim) | GS_3DFreeMoverComponent | No ground contact required. |
| Surface-hugging ground movement | GS_3DSlideMoverComponent | Smooth contact on slopes and steps. |
| Physics-simulated movement | GS_PhysicsMoverComponent | Full rigid body collision response. |
| Coordinate movers and state | GS_MoverContextComponent | Required on any unit with movers. |
| Raycast ground detection | GS_PhysicsRayGrounderComponent | Used with slide and physics movers. |
| Shared locomotion parameters | GS_UnitMovementProfile (asset) | Referenced by GS_MoverContextComponent. |
| Global force on all units | GlobalMovementInfluenceComponent | Standard movement values. |
| Localized force in a volume | MovementInfluenceFieldComponent | Narrow paths, roughage, indoors to outdoors. |
Glossary
| Term | Meaning |
|---|
| Mover | A component that defines one locomotion behavior (free flight, surface sliding, physics-driven) |
| Mover Context | The coordinator that tracks movement state and selects the active mover each frame |
| Grounder | A component that detects surface contact and reports ground state to the Mover Context |
| Movement Profile | A data asset storing all locomotion parameters (speed, acceleration, jump force) for a unit |
| Influence Field | A component that applies additive priority to a units active movement profile |
For full definitions, see the Glossary.
See Also
For the full API, component properties, and C++ extension guide:
For related systems:
Get GS_Unit
GS_Unit — Explore this gem on the product page and add it to your project.
13.4.3 - Unit Action Graph
How to open the Unit Action Graph editor, author parallel behavior layers, set up states and transitions, and add conditions.
Under Construction
The Unit Action Graph editor is functional, but runtime integration with the Unit movement system is not yet complete. You can author graphs and work with the editor today; full in-game execution arrives in a future release.The Unit Action Graph is a visual editor for authoring character behavioral logic as a Hierarchical Finite State Machine (HFSM). Where the Movement system handles how a character moves — velocity, surface contact, physics — the Unit Action Graph defines what the character is doing: idle, walking, attacking, interacting, and when to switch between those states.
Behavior is authored in a .unitaction file as a set of parallel layers, each an independent state machine that evaluates simultaneously. A typical setup has a Movement layer, an Action layer, and a Rotation layer all running at once.
For component properties and C++ extension, see the Framework API reference.
Contents
Opening the Editor
From the O3DE Editor menu bar: GS Tools > Unit Action Graph Editor.
- File > New — Creates a new
.unitaction container file - File > Open — Opens an existing
.unitaction file
All layers for one character type live in a single file. Save with File > Save (Ctrl+S).
The Editor Layout
The editor has two main areas:
Layer Sidebar (left dock) — Lists all layers in the file. Use the toolbar buttons to add, remove, rename, or duplicate layers. Click a layer name to open it as a graph tab.
Graph Canvas (center) — The state machine for the selected layer. States are nodes; transitions are arrows drawn from the edge of one state to the edge of another.
Inspector (right dock) — Shows properties for the selected state or transition.
Variable Panel (dock) — Declare named variables shared across all layers.
Working with Layers
Adding a Layer
- Click Add in the Layer Sidebar
- Name the layer (e.g.,
"Movement", "Action", "Rotation") - Set its Priority in the Layer Details panel — higher values override lower ones when resolving conflicts
Each new layer starts with a single Entry node and a blank canvas.
Layer Priority
When layers share variables to communicate, priority determines which layer’s state outputs take precedence. A higher-priority Action layer can suppress a lower-priority Movement layer’s output when a blocking action is playing.
States and Transitions
Adding States
Drag a State node from the Node Palette onto the canvas. Name it to match the behavior it represents: Idle, Walk, Run, Attack.
The Entry Node
Every layer has exactly one Entry node — auto-spawned and non-deletable. Draw a transition from the Entry node to whichever state the machine should start in.
Drawing Transitions
Click and drag from the edge of one state to the edge of another. A transition arrow appears between them.
- Connections go from the perimeter of one state to the perimeter of the target
- Multiple transitions from the same source are allowed
- When several transitions are valid simultaneously, the one with the highest priority fires
Inspecting a Transition
Click a transition arrow to select it. The Inspector shows:
| Field | Description |
|---|
| Priority | Integer. Higher values fire first when multiple transitions are valid. |
| Conditions | List of conditions. All must pass for the transition to fire. Add via the type picker dropdown. |
Inspecting a State
Click a state node to select it. The Inspector shows the node’s properties and a Transition Summary below — a list of every outgoing transition with priority and condition count, and a Select button to jump to that connection’s inspector.
Compound States
A Compound State node contains its own nested state machine. Use them for behaviors with internal sub-states — for example, a Jump state that internally tracks Rising, Apex, and Falling. The nested graph starts from its own Entry node when the compound state is entered.
Transition Conditions
Conditions gate when a transition fires. Add them in the Inspector when a transition is selected — click the type picker dropdown and choose a condition type. All conditions in the list must pass for the transition to be valid.
Built-in Conditions
| Condition | When It Fires |
|---|
| VariableCompareCondition | A named variable satisfies a comparison (==, !=, <, >, <=, >=) against a set value |
| TimeElapsedCondition | The character has been in the current state for at least N seconds |
| VariableTrueCondition | A named boolean variable is true |
Condition-Free Transitions
A transition with no conditions fires as soon as the current state’s tick completes. Use a condition-free transition from an animation state to its follow-up state when you want an unconditional sequence.
Using Variables
Variables are named values declared in the Variable Panel dock. They are shared across all layers in the file — any layer can read or write them.
Common uses:
"speed" (Float) — set by the input system each frame, read by movement transitions"isGrounded" (Bool) — set by the grounder, read by jump/fall transitions"isAttacking" (Bool) — set by the Action layer, read by Movement to restrict options"stateTime" (Float) — the auto-variable __stateTime tracks how long the current state has been active
Declaring a Variable
- Open the Variable Panel
- Click Add
- Set the name and type (Bool, Int, Float, String, etc.)
- Optionally set a default value
Variables can also be set from gameplay code once runtime integration is available.
Parallel Layers in Practice
All layers evaluate simultaneously on every tick. Because they share variables, they can communicate cleanly:
Example: Attack while running
Movement layer (priority 0):
  Idle → Walk  (condition: speed > 0.1)
  Walk → Run   (condition: speed > 4.0)

Action layer (priority 1):
  None → Attack  (condition: attackInput == true)
  Attack → None  (condition: TimeElapsed >= 0.8)
Both layers run at the same time. The character walks or runs independently of whether an attack is playing. The Action layer sets isAttacking = true on enter and false on exit — the Movement layer can read this variable to restrict sprinting during attacks if needed.
Layer priority determines which layer’s output the movement system uses when both claim the same channel. Higher priority wins.
Quick Reference
| Task | How |
|---|
| Open editor | GS Tools > Unit Action Graph Editor |
| Create a new file | File > New |
| Add a layer | Layer Sidebar > Add |
| Add a state | Drag State node from the palette |
| Draw a transition | Drag from the edge of one state to the edge of another |
| Set transition priority | Select the transition arrow → Inspector → Priority field |
| Add a condition | Select the transition arrow → Inspector → Conditions → type picker |
| Declare a variable | Variable Panel → Add |
| Inspect a connection | Click the transition arrow |
| Jump to a transition from a state | Select state → Transition Summary → Select button |
Glossary
| Term | Meaning |
|---|
| Layer | One independent state machine within a .unitaction file, evaluated in parallel with all others |
| State | A node representing one behavior the character can be in |
| Entry Node | The auto-spawned marker that designates the initial state of a layer |
| Compound State | A state that contains its own nested state machine sub-graph |
| Transition | A directed connection between states, with priority and optional conditions |
| Condition | A rule that must be satisfied for a transition to fire |
| Priority | The tie-breaker when multiple transitions from the same state are simultaneously valid |
__stateTime | Auto-variable tracking how long the character has been in the current state (seconds) |
For full definitions, see the Glossary.
See Also
For the full API, node types, and C++ extension guide:
For related systems:
Get GS_Unit
GS_Unit — Explore this gem on the product page and add it to your project.