PhantomCam Recipes
Step-by-step recipes for the GS_PhantomCam virtual camera system — composing cams from stages, configuring noise, tug fields, group targets, influence fields, and the channel tier system.
Recipes for composing specific configurations of the GS_PhantomCam virtual camera system. Read the matching basics page first for the concept; then come here for the composition steps.
For the underlying gem reference, see GS_PhantomCam API and The Basics: PhantomCam.
Recipe Collections
- PhantomCam Configurations — composing cams from Body / Aim / Additive stages (shoulder, orbital player, static showcase, first-person clamped, tracking dolly, group framing).
- Camera Noise Configurations — handheld baseline, event-triggered impact, stacked handheld + impact.
- Camera Tug Configurations — vista pull, doorway glance, decoupled source / destination.
- Group Target Configurations — two-player party cam, combat encounter frame, collapse-to-single-view.
- Influence Field Configurations — boost a cam inside a room, always-on cinematic boost.
- Channel Tier Configurations — Tier 1 single cam, Tier 2 level-placed, Tier 3 multi-channel co-op, common Tier 3 patterns, lobby flow.
1 - PhantomCam Configurations
Step-by-step recipes for composing common camera behaviors from Body, Aim, and Additive stages on a single Phantom Camera component.
A Phantom Camera’s behavior is the composition of one Body stage, one Aim stage, and zero-or-more Additive stages. The same GS_PhantomCameraComponent becomes a follow cam, an orbital cam, a tracking dolly, or a third-person shoulder cam depending on what is slotted from the editor’s type-picker.
Each recipe below names a Body pick, an Aim pick, and any Additive picks, plus the key field values that produce the target behavior. For the concept, the per-tick pipeline, and per-stage field references, see The Basics: Phantom Cameras and the Stage Pipeline API.
Contents
Recipe: Third-Person Shoulder Cam
A camera that follows the player at standoff distance, holds position when the player is moving inside an authored band, and slides smoothly around to re-frame when the player travels in a new direction. The canonical leading-look feel.
| Slot | Pick | Key fields |
|---|
| Body | LeadingFollowBody | Offset = (0, 0, 1.6) (cam Z height), InnerRadius = 2.0, OuterRadius = 5.0, BlendShape = Cylindrical |
| Aim | DefaultLookAtAim | Offset = (0, 0, 1.5) (look point at chest height), Halflife = 0.1 |
| Additives (Reposition) | CollisionReposition | InnerRadius = 0.15, OuterRadius = 0.45, Halflife = 0.15, configure Collides With to match the player’s collision layer |
Why this combination:
LeadingFollowBody holds position inside its band — abrupt 180° turns by the player don’t swing the cam.DefaultLookAtAim smoothly tracks the player’s chest.CollisionReposition sphere-casts from the player to the cam and pushes the cam inside walls or geometry, gliding back out via the soft buffer when the player walks away.
Optional: Add PerlinNoise with a Normal_Mild.camnoiseprofile profile for a touch of handheld feel. See Camera Noise Configurations.
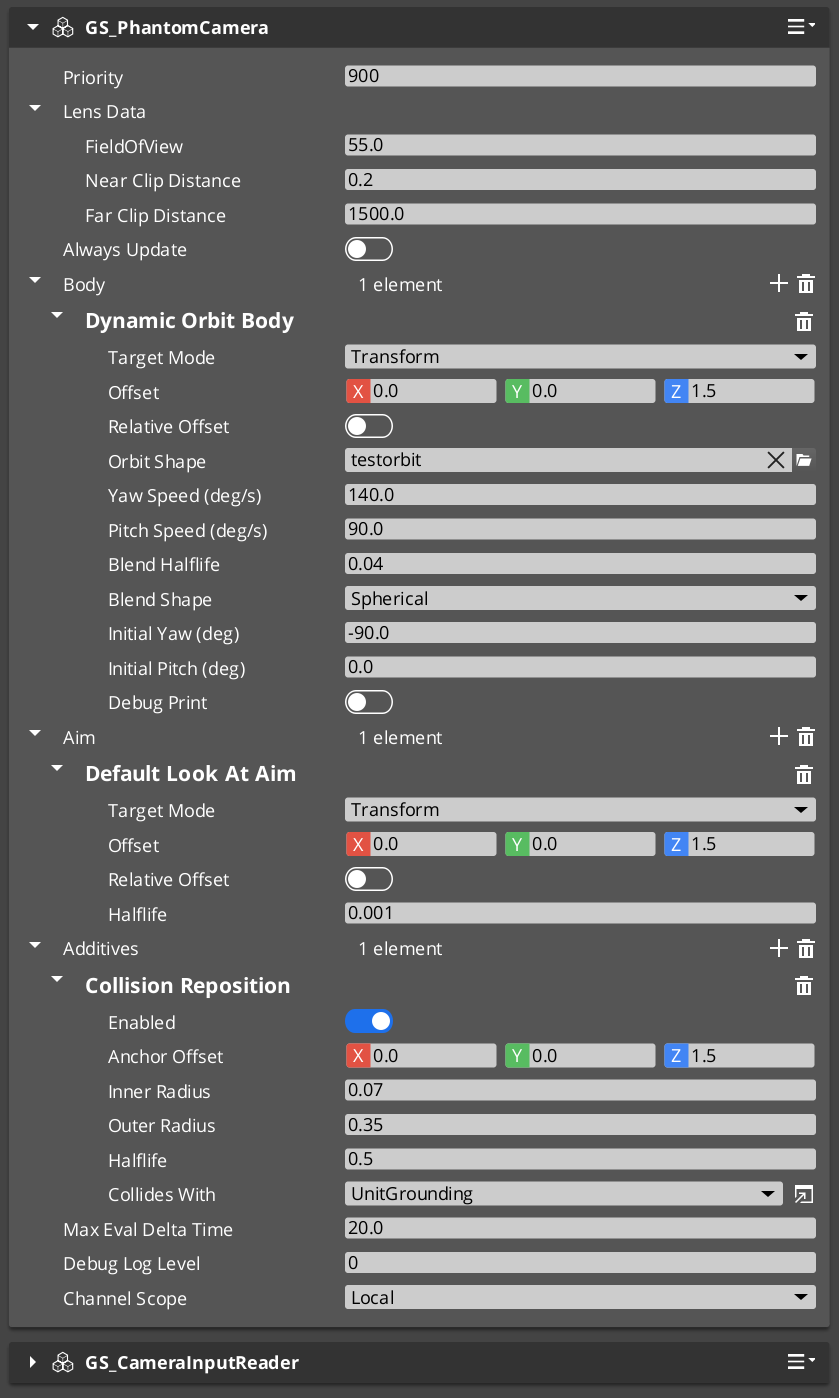
Recipe: Orbital Player Cam
A camera that orbits around the player driven by player input (right-stick or mouse). The current go-to for third-person action games.
| Slot | Pick | Key fields |
|---|
| Body | DynamicOrbitBody | Assign an .camorbit asset to OrbitShape, BlendHalflife = 0.10, InitialYawDeg = 180 (start behind player), InitialPitchDeg = 0 |
| Aim | DefaultLookAtAim | Halflife = 0.1 |
| Additives (Reposition) | CollisionReposition | As above |
Required companion: Add a GS_CameraInputReaderComponent to the same entity. It implements the OrbitInputProvider interface that DynamicOrbitBody polls each tick. Configure sensitivity (raw input scale) and halflife (input damping) on the reader.
Why this combination:
DynamicOrbitBody holds target yaw and pitch angles internally; input integration nudges them each tick, and the orbital solver damps the cam’s position toward whatever the angles imply on the orbit surface.- The
.camorbit shape asset defines the surface (sphere, oblate spheroid, rounded box) — different shapes give different “feel” for the orbit motion.
Recipe: Static Orbit Showcase Cam
A camera locked to a fixed orbital pose around its target — no input, no movement. Useful for menu / inventory / character-detail screens. Replacement for the retired StaticOrbit_PhantomCamComponent.
| Slot | Pick | Key fields |
|---|
| Body | OrbitBody | OrbitRadius = 5.0, OrbitYawDeg = 45, OrbitPitchDeg = 20 |
| Aim | DefaultLookAtAim | Halflife = 0.1 |
No additives needed for the basic case.
Static via DynamicOrbitBody. You can also get a static orbit using DynamicOrbitBody by simply not adding a GS_CameraInputReaderComponent — without an input provider, target angles never change and the solver damps once, then holds. Use the dedicated OrbitBody when you want the explicit “this is a fixed shot” identity (and the inheritance Get-only behavior that comes with it).
Recipe: First-Person Clamped Look
A first-person camera whose look-at rotation is clamped within authored pitch and yaw bounds. Replacement for the retired ClampedLook_PhantomCamComponent.
| Slot | Pick | Key fields |
|---|
| Body | DefaultFollowBody | Offset = (0, 0, 1.7) (eye height), OffsetIsRelative = true, Halflife = 0.05 |
| Aim | ClampedLookAim | MinRelClamp = (-45, 0, -90), MaxRelClamp = (45, 0, 90), LocalSpace = true, Halflife = 0.05 |
ClampedLookAim captures a starting forward on first evaluation, and the envelope clamps relative to that origin. Setting LocalSpace = true keeps the clamp axes aligned with the cam’s starting orientation rather than world axes.
Recipe: Tracking Dolly
A camera that slides along a spline path while tracking a target. The “dolly track” cinematic shot. Replacement for the retired Track_PhantomCamComponent.
Authoring steps:
- Add a
SplineComponent to a separate entity. Author the spline shape in the editor (linear, bezier, etc.). - On your Phantom Camera entity:
| Slot | Pick | Key fields |
|---|
| Body | TrackBody | Assign the spline entity to SplineTrack. Author StartData (offset, halflife, FoV) and EndData (offset, halflife, FoV). |
| Aim | DefaultLookAtAim | Halflife configured to match the dolly feel. |
TrackBody projects the target onto the spline at each tick and interpolates between StartData and EndData by spline parameter. If EndData.FieldOfView > 0, the cam’s FoV animates along the dolly too — useful for “zoom in as the cam reaches the climax point.”
Recipe: Group-Framing Cam
A camera that frames multiple subjects (e.g. all party members, all combatants in an encounter) using a Group Target.
Authoring steps:
- Create a Group Target entity. Add
GroupTargetComponent, give it a name (e.g. "PartyCentroid"), set its centroid mode (WeightedMean is the common choice), and add subjects with their weights. See Group Target Configurations for full subject-management patterns. - On your Phantom Camera entity:
| Slot | Pick | Key fields |
|---|
| Body | LeadingFollowBody or DynamicOrbitBody | Set TargetMode = GroupTarget, set GroupTargetName = "PartyCentroid". |
| Aim | DefaultLookAtAim | Same target-mode pattern — set TargetMode = GroupTarget, GroupTargetName = "PartyCentroid". |
The group target’s transform IS the weighted centroid of its subjects, so the cam tracks “where the group is” rather than any single member.
See Also
Related recipe collections:
Basics this builds on:
Framework API:
2 - Camera Noise Configurations
Step-by-step recipes for camera shake — continuous handheld feel via PerlinNoise, event-triggered bursts via ImpulseNoise, and stacking the two.
Camera shake comes in two flavors, both as Noise additives on a Phantom Camera’s stage list: PerlinNoise for continuous handheld sway and ImpulseNoise for event-triggered ADSR-gated bursts. Both consume the same .camnoiseprofile asset and the same six-axis Perlin layer model; they stack freely.
For the concept, the preset library, and how to trigger impulses from gameplay code, see The Basics: Noise & Impulse. For the underlying asset format, see Noise Profiles (Framework API).
Contents
Recipe: Handheld Baseline
Continuous low-amplitude sway that makes the camera feel “hand-held” rather than locked to a tripod.
| Slot | Pick | Key fields |
|---|
| Additive (Noise phase) | PerlinNoise | Assign Normal_Mild.camnoiseprofile (shipped in gs_phantomcam/Assets/Noise Profiles/). AmplitudeGain = 1.0, FrequencyGain = 1.0. |
That’s all — PerlinNoise is always sampling, so the moment the stage is added, the cam picks up handheld feel. Swap to Telephoto_Mild for tighter angular response on a zoomed lens, or Wide_Mild for translation-dominant feel on a wide lens.
To dial intensity per cam without re-authoring the profile, adjust AmplitudeGain:
| AmplitudeGain | Result |
|---|
0.3 | Very subtle — barely-noticed sway. |
1.0 | Profile’s authored intensity (the default). |
2.0 | Doubles the amplitude — aggressive handheld. |
FrequencyGain similarly speeds up or slows down the noise without changing the amplitude.
Recipe: Event-Triggered Impact
A burst of shake that fires when gameplay code calls TriggerCameraImpulse(strength) on the cam.
| Slot | Pick | Key fields |
|---|
| Additive (Noise phase) | ImpulseNoise | Assign 6D_Shake.camnoiseprofile (shipped) for high-frequency impact micro-jitter across all six axes. Configure the ADSR envelope: typically Attack = 0.02, Decay = 0.1, Sustain Level = 0.7, Sustain Duration = 0.1, Release = 0.3. |
The ImpulseNoise stage stays silent until triggered. See The Basics: Triggering an Impulse from Gameplay Code for the call patterns (distance-attenuated source, active-cam lookup, etc.).
Recipe: Stacked Handheld + Impact
The most common configuration for action games: handheld baseline plus event-triggered impact bursts.
| Slot | Pick | Profile |
|---|
| Additive (Noise phase) | PerlinNoise | Normal_Mild.camnoiseprofile (continuous handheld baseline). |
| Additive (Noise phase) | ImpulseNoise | 6D_Shake.camnoiseprofile (event-triggered impact). |
Both run in the Noise phase. The PhantomCam component dispatches TriggerCameraImpulse to every ImpulseNoise additive on the cam, so if you stack multiple impulse stages with different profiles (light kick + heavy explosion), one trigger fires all of them — pass the right strength to attenuate.
See Also
Related recipe collections:
Basics this builds on:
Framework API:
3 - Camera Tug Configurations
Step-by-step recipes for tug-field cinematic pulls — vista pull, doorway glance, and decoupled source / destination patterns.
Tug Fields pull the camera’s pose toward a designated point while a proxy entity is inside a defined PhysX trigger volume. Each recipe below assumes the PhysX layer setup (TugProxy ↔ TugField collision-group pair) is already configured for your project.
For the concept, the three-component model, and the PhysX layer setup walkthrough, see The Basics: Tug Fields. For the per-tick algorithm and per-field reference, see Tug Fields (Framework API).
Before starting any recipe: Confirm the PhysX layer setup. If TugProxy and TugField aren’t paired (and only paired) in your collision-group preset, nothing will fire — that is the single biggest authoring failure for this system.
Contents
Recipe: Vista Pull
Pull the cam’s gaze toward a vista point when the player approaches a railing.
Entities
| Entity | Components |
|---|
| Player root (or a child entity) | TugFieldProxyComponent + PhysX trigger collider (small sphere or capsule) on the TugProxy layer. |
| “Vista trigger” (level entity, placed at the railing) | CameraTugVolumeComponent + PhysX trigger collider (a box covering the railing approach) on the TugField layer. |
| (Source on the same entity as the volume — default) | CameraTugSourceComponent configured with the vista point as the destination. |
Configuration
On the volume’s CameraTugSourceComponent:
| Field | Set to |
|---|
Tug Point Offset | Local offset to the proximity-reference point (default (0,0,0) works if the volume is centered on the railing). |
Destination Entity | (leave empty — destination = source for the simple case) |
Inner Radius | 1.0 m — within this radius, full pull. |
Outer Radius | 4.0 m — beyond this, no pull. |
Inner Weight | 1.0 |
Outer Weight | 0.0 |
Falloff Curve | EaseInOutQuadratic |
On the cam:
- Add a
TugAimListener to the m_additives list. Channels → leave empty (matches any).Blend Halflife → 0.4 (slow engagement / disengagement).Strength → 1.0.
The cam’s gaze now drifts toward the vista as the player approaches the railing, full at deadzone, none outside the outer radius.
Recipe: Doorway Glance
The cam glances through a doorway as the player walks past, then returns. Body stays put; only aim engages.
Same shape as the vista pull, but:
- The volume’s trigger collider is a flat slab across the doorway approach.
- The cam uses only
TugAimListener (not body). The cam continues to follow the player normally; aim drifts toward what’s beyond the doorway. - Configure a short halflife (
0.2) on the listener so the glance is responsive — engage as the player enters, release as the player exits.
Recipe: Decoupled Source and Destination
You want the volume to fire at one location but the cam to be pulled toward a different location. Common case: the player crosses a threshold, but the cam should look 10 m past it.
Setup
- Place the volume entity with
CameraTugVolumeComponent at the threshold. - Place a separate “destination entity” with
TransformComponent only (no CameraTugSourceComponent!) at the vista point. - Place a separate source entity with
CameraTugSourceComponent somewhere convenient (often on the volume entity itself, or as a child of it). Configure:Destination Entity → point at the destination entity from step 2.Destination Offset → local offset from that entity (default (0,0,0) works).
- On the volume’s
m_sourceEntity field, point at the source from step 3.
Now proximity is measured around the threshold (where the volume is), but the cam is pulled toward the vista point (the destination entity).
If you leave Destination Entity unset on the source component, destination falls back to source. The decoupled setup is only needed when they should differ.
See Also
Related recipe collections:
Basics this builds on:
Framework API:
4 - Group Target Configurations
Step-by-step recipes for GroupTargetComponent — two-player party cam, combat encounter framing, and collapse-to-single-view triggers.
A Group Target is an entity whose world transform is the weighted centroid of a runtime-editable subject list. You point a camera at it like any other target, and the cam frames “where the group is” rather than chasing any single subject.
For the concept, centroid modes, subject-management API, and pitfalls, see The Basics: Group Targets. For the full per-field reference and the registry bus, see Group Targets (Framework API).
Contents
Recipe: Two-Player Party Cam
A single cam that frames both players, sliding smoothly as they spread apart and converge.
Steps
Create a Group Target entity in your level (a plain entity with TransformComponent is fine).
Add GroupTargetComponent to it. Configure:
- Name →
"Party" (or any string — this is your registry key). - Centroid Mode →
WeightedMean. - Smoothing Halflife →
0.2 (gentle smoothing so the centroid doesn’t jitter when players move).
Add Subjects at level start (or whenever players spawn):
GS_PhantomCam::GroupTargetRequestBus::Event(
    groupEntityId,
    &GS_PhantomCam::GroupTargetRequests::AddSubject,
    player1EntityId, 1.0f);    // equal weight

GS_PhantomCam::GroupTargetRequestBus::Event(
    groupEntityId,
    &GS_PhantomCam::GroupTargetRequests::AddSubject,
    player2EntityId, 1.0f);
On the Phantom Camera: Set the Body and Aim stages’ Target Mode to GroupTarget and Group Target Name to "Party". The stages will resolve the group entity through the Cam Manager registry at runtime.
The cam now points at the weighted midpoint of both players. As they move, the centroid follows.
Tip — pull the cam back as the spread grows. Pair this group cam with a DynamicOrbitBody and adjust the orbit shape’s radius at runtime based on subject spread. The group’s centroid is the pivot; the cam stays a healthy distance back so both subjects stay in frame. See the Group-Framing Cam recipe for the stage composition side.
Recipe: Combat Encounter Frame
The cam frames an evolving encounter. Subjects are added when combatants engage and removed when they disengage or die.
Steps
Create a Group Target named "CurrentCombat" (or similar).
On combat start, add the player and the engaged enemies:
AddSubject(player, weight: 2.0);          // weight player higher
for (each enemy in encounter):
    AddSubject(enemy, weight: 1.0);
On enemy death or disengage, remove the subject:
RemoveSubject(deadEnemy);
On combat end, clear:
Set the cam’s Body and Aim to GroupTarget mode with name "CurrentCombat".
Why weight the player higher? Pure equal-weighting means a single enemy at long range drags the cam half-way to them. Weighting the player higher keeps framing centered on the player while still acknowledging the enemy’s presence.
When m_deactivateWhenEmpty is true (default), the cam falls back to hold-last-pose if the encounter clears completely — handy for the moment between encounters.
Recipe: Collapse to Single View
For multi-channel projects: when all players converge, switch from split-screen to a single shared cam, then receive a UI signal at the moment of collapse.
Steps
Create a Group Target tracking all players (same as the party cam recipe).
Author a shared cam outside any rig prefab. Set:
- Channel Scope →
TrueUnique. - Show Advanced → on.
- All Channels Share → on.
- Body / Aim Target Mode →
GroupTarget, name → "Party".
Tune priority so the shared cam wins arbitration when players are close enough (e.g. use a CameraInfluenceField volume around the players’ convergence point).
Listen for the collapse signal in your UI controller:
void OnAllChannelsActivatedSharedCam(AZ::EntityId sharedCam)
{
    // All channels selected the same shared cam — switch to single-view layout.
}
When players converge such that the shared cam wins in every channel simultaneously, the Cam Manager fires OnAllChannelsActivatedSharedCam once on the edge. UI hides split-screen dividers and shows the single shared view.
See Channel Tier Configurations for the surrounding multi-channel setup.
See Also
Related recipe collections:
Basics this builds on:
Framework API:
5 - Influence Field Configurations
Step-by-step recipes for camera priority shifts — spatial room boosts and stage-scoped always-on cinematic boosts.
Influence Fields modify the effective priority of Phantom Cameras without changing their base priority values. The spatial form fires when an entity enters a PhysX trigger volume; the global form applies for the component’s entire active lifetime.
For the concept, the channel-aware bus signature, and the priority-stacking model, see The Basics: Influence Fields. For component properties and the bus surface, see Camera Influence Fields (Framework API).
Contents
Recipe: Boost a Cam Inside a Room
The player should see a different camera when they walk into a vista room — same player priority, but a “VistaCam” that frames the view jumps to dominance inside the room.
Steps
- Place the VistaCam as a normal Phantom Camera entity in the room (or in your rig prefab). Give it a low base priority, e.g.
10. Author its Body and Aim stages to frame the vista. - Author the trigger volume:
- Create a new entity at the room’s entrance.
- Add a PhysX Collider (set to trigger mode), shaped to cover the room.
- Configure the collider’s Collides With to match the player’s collision layer.
- Add
CameraInfluenceFieldComponent to the same entity.
- Configure the influence:
- Camera Name →
VistaCam (the target Phantom Camera’s entity name). - Influence →
100 (enough to overcome the player’s normal cam priority).
- Place the entity in the level.
When the player walks in, the trigger fires AddCameraInfluence(volumeEntity, playerEntity, "VistaCam", 100). The Cam Manager routes the influence to the player’s channel; VistaCam’s effective priority jumps to 110 and wins arbitration. On exit, the influence is removed and the player’s normal cam wins again.
Recipe: Always-On Cinematic Boost
A specific stage should always favor a cinematic cam — say, the title screen’s slow-orbit cam should always be dominant when the title-screen stage is loaded.
Steps
- Author the cinematic cam with a moderate base priority (e.g.
20). - On the StageData entity for the title-screen stage:
- Add
GlobalCameraInfluenceComponent. - Set Camera Name to the cinematic cam’s entity name.
- Set the influence value (e.g.
200) high enough to dominate any other cams in the stage.
- Save the stage.
When the stage activates, the global influence registers; the cinematic cam wins. When the stage unloads, the influence is removed.
This is cleaner than authoring the cinematic cam at priority 220 directly because the priority boost is scoped to the stage — the same cinematic cam at base 20 won’t accidentally win arbitration if it’s referenced elsewhere.
See Also
Related recipe collections:
Basics this builds on:
Framework API:
Related utilities:
6 - Channel Tier Configurations
Step-by-step walkthroughs for the PhantomCam channel system — Tier 1 single cam, Tier 2 level-placed, Tier 3 multi-channel co-op, common Tier 3 patterns, and the lobby flow for variable player counts.
GS_PhantomCam can be configured at three different tiers depending on what your project needs. Most projects use Tier 1 (single-cam) or Tier 2 (single-player rig). Co-op, split-screen, and per-player-cinematic projects use Tier 3 (multi-channel). The per-cam authoring surface is identical across tiers — what changes is the Cam Manager configuration and how many rigs the system spawns.
For the concept of channels, the choose-a-tier table, and pitfalls, see The Basics: Channels & Instancing. For the full bus surface and internal state, see Channels & Instancing (Framework API).
Multi-view rendering is pending. Until the AttachmentImage work lands, the engine renders one channel’s view at a time even when multiple channels are arbitrating internally. The Cam Manager’s active main-view API selects which channel reaches the framebuffer. Arbitration / dispatch / target binding all work today — only the simultaneous-rendering piece is gated.

Contents
Recipe: Tier 1 — Single Cam
The Cam Manager spawns one rig prefab on startup, and every Phantom Camera inside it registers to channel 0.
Steps
Author a rig prefab. Create a prefab containing:
- A root entity (anything — it can be empty, or a logical “Camera Rig” entity).
- A child entity carrying
GS_CamCoreComponent plus the engine’s standard CameraComponent. This is the main camera. - Zero or more child entities carrying
GS_PhantomCameraComponent with their authored Body / Aim stages.
On the Cam Manager component:
- Set Primary Rig Prefab to your rig prefab.
- Leave Enable Instanced Channels OFF (default).
Bind a target when the player spawns:
CamManagerRequestBus::Broadcast(SetTarget, playerEntity);
The Cam Manager spawns the rig at startup. The rig’s Cam Core and Phantom Cameras self-register to channel 0. The SettingNewCam legacy notification fires when the dominant cam changes.
That’s it. No further per-cam setup required.
Recipe: Tier 2 — Single-Player Rig (Legacy)
Same single-player behavior, but the Cam Core lives in the level rather than in a spawned prefab. Use this when you have an existing project that hand-places the Cam Core and you don’t want to refactor.
Steps
- Hand-place the Cam Core entity in your level (as a child of the Cam Manager prefab, or any persistent entity).
- On the Cam Manager:
- Leave Primary Rig Prefab empty.
- Leave Enable Instanced Channels OFF.
- Bind a target as in Tier 1.
The level-placed Cam Core and Phantom Cameras self-register to channel 0 via the legacy bus path (no ChannelStampComponent ancestor, so the stamp walk misses and the legacy registration falls through).
Recipe: Tier 3 — Multi-Channel Co-op
The Cam Manager spawns one rig per active channel. Each channel arbitrates independently. Per-player target binding routes through SetChannelTarget.
Steps
Author your rig prefab as in Tier 1. The same prefab can be reused across all channels (symmetric setup) or you can author multiple prefabs for asymmetric setups (e.g. P1 third-person, P2 top-down).
On the Cam Manager:
Toggle Enable Instanced Channels ON. The channel-aware fields appear in the inspector.
Set Primary Rig Prefab to your default rig (used as universal fallback — channels with no per-channel override inherit this).
Populate Channel Configs with one entry per supported player slot:
| Field | Set to |
|---|
| Channel Name | "P1", "P2", etc. (display label only — not a lookup key). |
| Channel Policy | PerChannelInstance (default — the rig spawns once per channel). |
| Rig Override Prefab | Leave empty for symmetric (every channel uses the primary). Set to a per-channel prefab for asymmetric. |
| Enabled By Default | true for slots that should spawn on startup. |
Optionally set Active Channel Count to cap how many channels actually spawn at startup (the lobby may override this — see Lobby Flow).
Per-player target binding — when each player spawns:
CamManagerRequestBus::Broadcast(SetChannelTarget, channelId, playerEntity);
The Cam Manager pushes the target to every cam in that channel and triggers a synchronous snap so the cam jumps to its evaluated pose before the Cam Core latches.
The Cam Manager spawns each enabled channel’s rig at startup. Each rig’s Cam Core registers to its channel; each Phantom Camera walks its ancestors to find the auto-attached ChannelStampComponent and registers to the same channel.
Common Tier 3 Patterns
Per-player cam (in-rig)
Drop a Phantom Camera inside the rig prefab with m_channelScope = Local (default). When the rig spawns for channel N, the cam’s auto-stamp-walk finds the rig’s ChannelStampComponent and registers to channel N. Each spawned rig instance carries its own copy — players don’t see each other’s cams.
Same logical cam name across channels
Keep entity names like "third_person_rig_cam" inside the rig prefab. The name is scoped within the channel — channel 0 and channel 1 each have their own "third_person_rig_cam" and they don’t collide. Authors never type _i1 / _i2 suffixes.
Shared cinematic cam — collapse-to-one-view
Author a Phantom Camera outside any rig prefab (in the level, or in a “shared cinematic” prefab that is not the channel rig). Set:
- Channel Scope →
TrueUnique. - Show Advanced → on.
- All Channels Share → on.
The cam appears in every active channel’s priority table. When players converge (e.g. a Group Target tracks all players and the shared cam targets the group), the shared cam may win arbitration in every channel simultaneously. At that edge, the Cam Manager broadcasts OnAllChannelsActivatedSharedCam(sharedCam) — UI can detect this and switch from split-screen layout to single-view. See the Collapse to Single View recipe for the group-target side.
Hero-perspective cam for a specific player
A cam that should only ever apply to one specific channel:
- Channel Scope →
TrueUnique. - Bound Channel Id → the channel number (e.g. 0 for P1).
- Leave All Channels Share off.
The cam is registered directly to that channel via RegisterPhantomCamDirect — bypasses the stamp-walk path entirely.
Cross-channel cinematic dispatch
Force a specific cam to render on a specific Cam Core, regardless of arbitration:
CamManagerRequestBus::Broadcast(DispatchCamToCamCore, cinematicCamEntity, p1CamCore);
// ... cinematic plays ...
CamManagerRequestBus::Broadcast(ReleaseCamCoreDispatch, p1CamCore);
Channel arbitration still runs internally during dispatch — SettingNewCamOnChannel continues firing with the arbitrated winner. Only the Cam Core route is overridden, so HUD or AI behavior that listens for arbitration changes still sees the “natural” winner.
Lobby Flow
The typical lobby pattern for variable player counts:
Author m_channelConfigs to hold N entries (the max supported player count for your project — e.g. 4).
Pre-startup (before the Cam Manager’s OnStartupComplete fires), the lobby calls:
CamManagerRequestBus::Broadcast(SetActiveChannelCount, actualPlayerCount);
On startup, only actualPlayerCount channels spawn. The remaining configured channels stay dormant.
Mid-session join / drop uses EnableChannel(channelId) / DisableChannel(channelId) to spawn or despawn channels as players come and go.
SetActiveChannelCount must run pre-startup. Mid-session calls warn and are ignored — use EnableChannel / DisableChannel instead.
See Also
Related recipe collections:
Basics this builds on:
Framework API: