Learn
Lessons for quick, or extended learning.
Lessons around the various features. Installation. And extended tutorials on deeper usage, or project creation.
How This Section Is Organized
Video Tutorials are one or a playlist of videos covering a targeted topic.
Lessons are guide documents that describe in step by step ways, with informational detail, on how to accomplish the targeted goal. Lessons tied to a video tutorial will have a link to the Video Page for use.
1 - Lessons
Index of Lesson Guides
Lesson Guides List
1.1 - Understanding GS_Play
What is GS_Play and what does it do?
GS_Play Methodology and Purpose
GS_Play is an intermediate to advanced game development and production framework. Because of this it can rapidly create prototypes and prove out gameplay, but is deeply extensible and customizable — allowing the project to grow, and the game to become exactly what you want to make. This does mean the tools are not as “out of the box” as more beginner-friendly options. You should already know how to make videogames, or be actively studying how to develop features, to get the most out of this framework. Check out the library of lessons and guides to get embedded in any GS_Play feature you’d like to explore.
Due to its modularity, your project should only need to target the features most relevant to your intended gameplay and genre, then build on and around the framework to satisfy any additional needs.
GS_Play is built on the idea of simple, intuitive patterns for every feature — patterns that let you think about how to deploy the functionality, not how it works under the hood. Because of this core tenet, you should be able to reason about what the premade functionality can do, and what custom features you want to contribute to that pool, to author your project rapidly and precisely.
What GS_Play Supports
The core functionality is oriented around character-centric, live-action gameplay. This can be slow and subtle — a point-and-click adventure or survival horror where the action revolves around exploration, investigation, and choosing your own path. It can also be extended to high-paced action: character-driven unit gameplay, supported by cinematic performer visuals, where you attack, roll, jump, dodge, and traverse a complex world. Enter and exit game-time cinematics, or transition into rich, fully authored sequences. The PhantomCam system can keep pace with anything you throw at it.
That is not to say other styles and genres are off the table. Many GS_Play feature sets are genre-agnostic and simply complete the needs of a full production. GS_UI can serve as straightforward menus and indicators, but with the dynamic animation system, wealth of widgets, and precise control of input focus, it can anchor heavily UI-reliant gameplay. With deeply extensible unit control, AI, and input handling, you can pursue the group formation and pathing an RTS requires. Any genre, supported by Audio, VFX, Cinematics, and gameplay systems working together.
The ultimate goal for GS_Play is to get you from a blank canvas to the end credits, and everything in between.
Best Practices
Focus on learning the patterns of each feature set. There are many base elements ready to use from the start, but as you work, keep asking: “What would I do if I needed X for my game?” That question is the right lens for every feature — it keeps you thinking about your game’s needs, not the framework’s internals.
Target only what your game requires. GS_Play’s modularity means you are not obligated to use every gem. Start with the features that directly serve your genre and core loop, then expand from there as the project demands it.
Lean on the EBus pattern. Most systems communicate through request and notification buses. Understanding how to listen for state changes and issue requests is the skill that unlocks the entire framework.
Review Best Practices for full coverage.
Specs
15+ gems, with 30+ feature sets across them.
Feature sets covering
- Operation — Settings, hardware compatibility, and startup sequencing.
- Character & Action — Unit controls and actions, with and against the world around them.
- Environment — Rich environmental development: time, day/night cycles, and sky configuration.
- Cinematics — Camera work, sequencing, dialogue, and character performance.
- Game Feel — Audio, UI and 3D effect bursts, post processing, and motion-based feedback.
1.2 - Simple Project Setup
Easy set up to get started.
A guide to get everything propped up rapidly
Video Tutorial
Embed youtube guide.
Link to video_tutorials.
1.2.1 - Configure Project
Configure Project to run GS_Play.
Install Gems
Add Project Dependencies
cmakelists: package build targets
<ProjectGemName>.Private.Object STATIC
BUILD_DEPENDENCIES
    PUBLIC
        Gem:GS_Play_Core.API
        Gem:GS_<your desired module>.API
Setup Project Environment
Environment Setup
Need Help?
Check out the Project Setup Video Tutorial (Links to video_tutorial tag for setup video)
1.2.1.1 - Setting Up the Physics Environment
Setting up your Physics Environment
These are the necessary details to create your project and have it run reliably with all GS_Play featuresets.
Physics

Image showing the standard PhysX Configuration necessary to support all GS_Play features.
Collision Layers
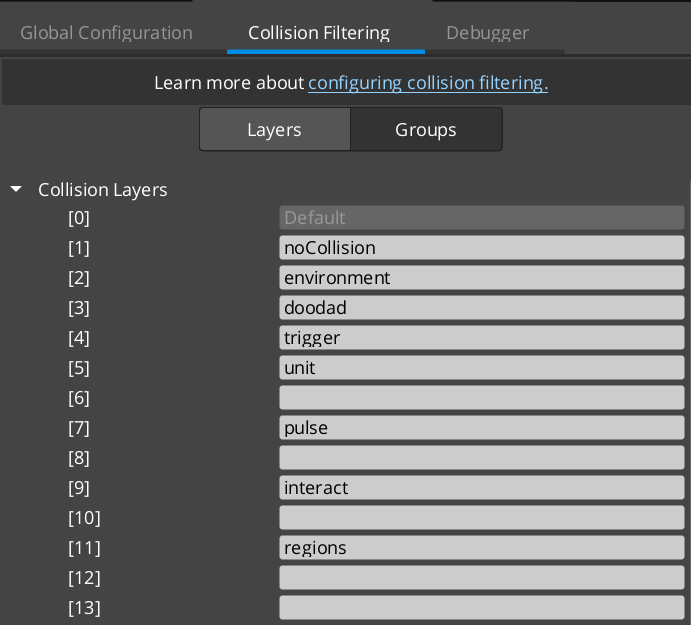
Image showing the standard PhysX Collision Layers necessary to support all GS_Play features.
NoCollision Layer
Environment Layer
Doodad Layer
Trigger Layer
Unit Layer
Pulse Layer
Interact Layer
Regions Layer
Collision Groups
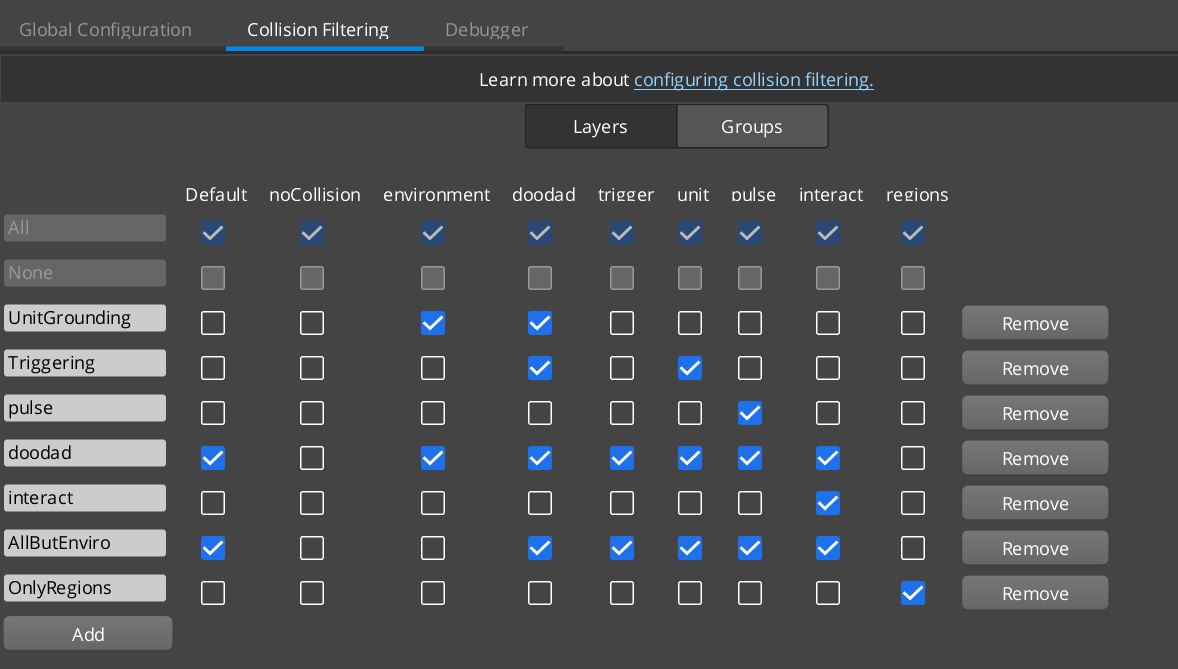
Image showing the standard PhysX Collision Groups necessary to support all GS_Play features.
UnitGrounding Group
Triggering Group
Pulse Group
Doodad Group
Interact Group
AllButEnviro Group
OnlyRegions Group
Set Ground Collision Layer
In order to properly introduce a GS_Unit to the default scene you need to create an object with the “Environment” collision layer to stand on.
The easist way to start is to change the collision layer of the default “Ground” entity in the level.
1.2.2 - Prepare Managers
Prepare Managers to run GS_Play.
Start Creating Manager Prefabs
- Blank Entity
- Create Prefab
- Add to Game Manager
Need Help?
Check out the Project Setup Video Tutorial (Links to video_tutorial tag for setup video)
1.2.3 - Prepare Startup
Prepare Startup to run GS_Play.
Start Creating Manager Prefabs
- Blank Entity
- Create Prefab
- Add to Game Manager
Need Help?
Check out the Project Setup Video Tutorial (Links to video_tutorial tag for setup video)
1.2.4 - Prepare Camera
Prepare Camera to run GS_Play.
Start Creating Manager Prefabs
- Blank Entity
- Create Prefab
- Add to Game Manager
Need Help?
Check out the Project Setup Video Tutorial (Links to video_tutorial tag for setup video)
1.2.5 - Get Ready to Start!
Prepare Gameplay to run GS_Play.
Resources to start using specific features.
Good things to know before starting.
You’re ready to start!
1.3 - Dialogue System Setup
A step-by-step lesson for setting up a working dialogue system with the Dialogue Editor, UI components, and runtime playback.
Dialogue System Setup — Tutorial
This lesson walks through setting up a complete dialogue system in a GS_Play project: creating a dialogue database, authoring a branching conversation, wiring up the runtime components, and displaying dialogue in-game with a typewriter effect.
What You Will Build
By the end of this lesson you will have:
- A dialogue database with multiple sequences
- Branching dialogue with player choices
- Performer definitions for your characters
- Runtime entities with the sequencer, manager, and UI bridge components
- A working in-game dialogue display with typewriter text reveal
Prerequisites
- A GS_Play project with GS_Core and GS_Cinematics gems enabled
- Familiarity with the O3DE Editor (placing entities, adding components)
- Basic understanding of prefabs and spawning
Pages
- Create the Database
- Author a Conversation
- Wire Up the Runtime
- Display Dialogue In-Game
- Add Player Choices
- Conditions and Effects
Overview
The GS_Cinematics dialogue system has three layers:
- Editor — The Dialogue Editor where you visually author conversations as node graphs
- Runtime — The DialogueSequencerComponent that executes the graph at runtime
- UI — DialogueUIComponent and SelectionUIComponent that display text and choices to the player
This tutorial connects all three layers into a working pipeline.
1.3.1 - Step 1: Create the Database
Create a dialogue database and define performers.
Step 1 — Create the Database
Open the Dialogue Editor
From the O3DE Editor menu bar, go to GS Tools > Dialogue Editor. The editor opens with three page tabs at the top: Sequences, Performers, and System.
Create a New Database
- Go to File > New
- Choose a save location in your project’s assets folder (e.g.,
Assets/Dialogue/) - Name the file (e.g.,
town_npcs.dialoguedatabase) - The editor opens with an empty database
Switch to the Performers page by clicking the tab at the top.
Performers represent the characters who speak in your dialogues. Add one performer for each character:
- Click Add Performer
- Set the Name — this is the identifier you will reference in Text nodes (e.g.,
"Merchant", "Guard") - Optionally configure:
- Portrait — Reference to a UI image asset shown during dialogue
- Voice — Audio configuration for this character’s voice
Add at least two performers for this tutorial (e.g., "Player" and "Merchant").
Create Your First Sequence
Switch back to the Sequences page.
- In the Sequence Sidebar (left dock), click Add
- Name the sequence (e.g.,
"MerchantGreeting") - The sequence opens as a graph tab with a single Start node
Your database now has one empty sequence ready for authoring. Save the database with File > Save (Ctrl+S).
What You Have So Far
town_npcs.dialoguedatabase
├── Performers: Player, Merchant
└── Sequences: MerchantGreeting (empty)
Next: Author a Conversation
1.3.2 - Step 2: Author a Conversation
Build a simple linear dialogue sequence using Text and End nodes.
Step 2 — Author a Conversation
Build a Linear Sequence
With the MerchantGreeting sequence open, you have a Start node on the canvas. Now add dialogue nodes:
- From the Node Palette (right dock), drag a Text node onto the canvas
- Connect the Start node’s FlowOut slot to the Text node’s FlowIn slot by clicking and dragging between the slots
- Select the Text node and set its properties in the Inspector:
- Speaker:
"Merchant" (matches your performer name) - Text:
"Welcome to my shop! Looking for something special?"
Add More Lines
Repeat the process to add a second Text node for the player’s response:
- Drag another Text node onto the canvas
- Connect the first Text node’s FlowOut to this new node’s FlowIn
- Set properties:
- Speaker:
"Player" - Text:
"Just browsing, thanks."
End the Sequence
- Drag an End node from the palette
- Connect the last Text node’s FlowOut to the End node’s FlowIn
Your sequence now reads:
Start → [Merchant: "Welcome to my shop!"] → [Player: "Just browsing."] → End
Test the Flow
The node footers preview each line of dialogue, making it easy to read through the conversation visually on the canvas. Verify the flow makes sense by following the connections from Start to End.
Save the database (Ctrl+S).
Tips
- Undo/Redo: Ctrl+Z / Ctrl+Y work on all graph operations
- Node selection: Click a node to see its full properties in the Inspector
- Moving nodes: Drag nodes to rearrange the layout for readability
- Copy/Paste: Select nodes and use Ctrl+C / Ctrl+V to duplicate sections
Next: Wire Up the Runtime
1.3.3 - Step 3: Wire Up the Runtime
Place the runtime components needed to play dialogue sequences in-game.
Step 3 — Wire Up the Runtime
The Dialogue Editor is for authoring. To play dialogue at runtime, you need three components on entities in your level.
The Dialogue Manager
The Dialogue Manager is a GS_Play manager that owns the active dialogue database and provides the top-level API.
- Your Game Manager prefab should already spawn a GS_DialogueManager (it is part of the GS_Cinematics manager set)
- If not, create a manager entity and add the
GS_DialogueManagerComponent - In the component properties, set the Dialogue Database field to your
.dialoguedatabase asset
The manager provides the entry point API: StartDialogueSequenceByName("MerchantGreeting").
The Dialogue Sequencer
The sequencer is the component that actually executes the graph — stepping through nodes, waiting for text display, and handling player choices.
- On your NPC entity (or a dedicated dialogue entity), add a
DialogueSequencerComponent - No configuration needed — the sequencer receives commands from the manager
The Dialogue UI Bridge
The UI Bridge connects the sequencer to your UI display components. It routes dialogue text to the correct UI panel and relays player choices back.
- On the same entity as the sequencer (or a shared UI entity), add a
DialogueUIBridgeComponent - It will automatically discover registered UI components in the scene
Triggering Dialogue
To start dialogue from gameplay code or ScriptCanvas:
// C++ via EBus
DialogueManagerRequestBus::Broadcast(
    &DialogueManagerRequests::StartDialogueSequenceByName,
    "MerchantGreeting"
);
Or connect it to an interaction trigger — when the player interacts with the merchant entity, fire StartDialogueSequenceByName.
Component Summary
| Component | Entity | Purpose |
|---|
GS_DialogueManagerComponent | Manager entity | Owns database, provides start/stop API |
DialogueSequencerComponent | NPC or dialogue entity | Executes the graph step by step |
DialogueUIBridgeComponent | Same or shared entity | Routes text/choices between sequencer and UI |
Next: Display Dialogue In-Game
1.3.4 - Step 4: Display Dialogue In-Game
Set up dialogue UI components for text display and typewriter effect.
Step 4 — Display Dialogue In-Game
Dialogue UI Component
The DialogueUIComponent handles displaying dialogue text on screen. It receives text from the UI Bridge and shows it in a UI element.
- Create a UI canvas with a text panel for dialogue display (speaker name label + dialogue text area)
- On the UI entity, add a
DialogueUIComponent - Register the UI entity with the bridge by calling
RegisterDialogueUI(panelType, entityId) or by placing it where the bridge can discover it
When a Text node executes, the sequencer sends the speaker name and dialogue text through the bridge to the UI component, which updates the display.
Typewriter Effect
The TypewriterComponent reveals text character by character for a classic RPG dialogue feel:
- On the same entity as the DialogueUIComponent, add a
TypewriterComponent - Set the Default Speed — letters per second (e.g., 30 for moderate speed)
- The typewriter automatically hooks into the dialogue display
When text arrives, the typewriter reveals it gradually. The player can press a button to call ForceComplete() for instant reveal.
World-Space Dialogue (Speech Bubbles)
For dialogue that appears above characters in the 3D world:
- Use
WorldDialogueUIComponent instead of DialogueUIComponent - Configure a spawnable prefab for the speech bubble UI
- The component tracks the speaking entity’s position and places the UI above them
Flow
Sequencer executes Text node
    → UIBridge.RunDialogue(text, speakerName)
        → DialogueUIComponent.DoDialogue(text, performerData)
            → TypewriterComponent.StartTypewriter(text)
                → Text reveals character by character
                    → Player presses button → ForceComplete()
                        → Sequencer advances to next node
Next: Add Player Choices
1.3.5 - Step 5: Add Player Choices
Add branching dialogue with Selection nodes and choice UI.
Step 5 — Add Player Choices
Add a Selection Node
Go back to the Dialogue Editor and open your MerchantGreeting sequence.
- Delete the connection between the merchant’s greeting and the player’s response
- Drag a Selection node from the palette and place it between them
- Connect the merchant’s Text node FlowOut to the Selection node’s FlowIn
Select the Selection node. In the Inspector:
- Set Question Text to
"What would you like to do?" (optional — displayed above the choices) - Add options in the Selection Options list:
- Option 1:
"Browse your wares" - Option 2:
"Tell me about the town" - Option 3:
"Goodbye"
Each option creates a dynamic FlowOut slot on the node.
Branch the Conversation
Now connect each output to different dialogue paths:
- “Browse your wares” FlowOut → New Text node (
Merchant: "Take a look around!") → End - “Tell me about the town” FlowOut → New Text node (
Merchant: "This town was founded...") → End - “Goodbye” FlowOut → New Text node (
Merchant: "Safe travels!") → End
Your graph now branches based on the player’s choice and each branch leads to a different response.
Selection UI Component
On the UI side, the DialogueUISelectionComponent displays the choices to the player:
- On a UI entity, add a
DialogueUISelectionComponent - Configure it with a button prefab for spawning choice options
- Register it with the UI Bridge
When the sequencer hits a Selection node:
Sequencer reaches Selection node
    → UIBridge.RunSelection(options)
        → DialogueUISelectionComponent.DoSelection(options, performerData)
            → Spawns choice buttons
                → Player clicks a choice
                    → OnSelection(index) fires
                        → Sequencer follows the chosen FlowOut
Random Branching
For variety without player choice, use a Random node instead. It picks a random output each time the sequence reaches it. Optionally configure weights to make some branches more likely.
Next: Conditions and Effects
1.3.6 - Step 6: Conditions and Effects
Gate dialogue branches with conditions and trigger game effects from dialogue.
Step 6 — Conditions and Effects
Using Variables
Declare variables in the Variable Panel to track dialogue state:
- Open the Variable Panel dock
- Click Add and create a boolean variable:
"hasVisitedMerchant" (default: false)
Conditions on Nodes
Any dialogue node can have conditions that gate whether it executes. If conditions fail, the evaluator skips that node and tries the next connection.
- Select a Text node in the inspector
- In the Conditions section, click the type picker dropdown
- Add a
Boolean_DialogueCondition - Set:
- Variable Name:
"hasVisitedMerchant" - Expected Value:
true
Now that Text node only executes if the player has visited before. You can create two branches from a single output — one with hasVisitedMerchant = true and one without conditions as a fallback.
Effects Nodes
Effects nodes trigger game actions during dialogue. They are the bridge between conversation and gameplay.
- Drag an Effects node from the palette
- Place it in the flow where you want the effect to happen
- Select it and use the type picker in the Inspector to add effect types
For example, after the merchant’s greeting, add an Effects node that sets hasVisitedMerchant = true so subsequent visits show different dialogue.
Performance nodes trigger character actions — animations, movement, posing:
- Drag a Performance node into the flow
- Add performance types via the Inspector type picker:
MoveTo_DialoguePerformance — Move a character to a positionPathTo_DialoguePerformance — Move along a path
- Enable Wait to Continue if the dialogue should pause until the performance finishes
Creating Custom Types
The polymorphic extension system makes it simple to add project-specific conditions, effects, and performances:
- Create a subclass of
DialogueCondition, DialogueEffect, or DialoguePerformance - Add
AZ_RTTI and implement Reflect() with SerializeContext and EditContext - Include and reflect it in
DialogueSequencerComponent::Reflect()
The inspector automatically discovers your new type — no registry code needed.
Complete Example
Here is a complete branching dialogue with conditions and effects:
Start
  → [Merchant greeting (no condition): "Welcome, stranger!"]
  → [Merchant greeting (hasVisitedMerchant=true): "Welcome back, friend!"]
      → Selection: "Buy" / "Sell" / "Leave"
          → "Buy" → Effects(OpenShopUI) → End
          → "Sell" → Effects(OpenSellUI) → End
          → "Leave" → [Merchant: "Come again!"] → Effects(Set hasVisitedMerchant=true) → End
Summary
You now have a complete dialogue pipeline:
- Database with performers and multiple sequences
- Visual authoring with Text, Selection, Random, Effects, and Performance nodes
- Runtime components (Manager, Sequencer, UI Bridge) executing the graphs
- UI display with typewriter text reveal and player choice buttons
- Conditions for dynamic branching based on game state
- Effects for triggering gameplay from within dialogue
For the full API reference, see the Dialogue Editor documentation.
1.4 - Building a Graph Tool
Step-by-step guide to creating a custom visual graph editor using the gs_graphcanvas framework.
This lesson walks through the full process of creating a new visual graph editor tool using the gs_graphcanvas framework. By the end, you will have a working editor with nodes, a palette, save/load, undo/redo, variables, and runtime execution.
The pipeline is proven across three implementations: the Dialogue Editor (FlowGraph), the Audio Event Graph (DataFlowGraph), and the Unit Action Graph (StateMachineGraph).
What You Provide vs What the Framework Gives You
You provide (per tool):
- A
GraphSystemDescriptor — identity and topology choice - A
GraphContext subclass — domain-specific data types (if any) - Node types — registered via macros
- An editor window — MainWindow subclass (or direct use)
- An editor system component — reflects nodes, registers the view pane
- A runtime component — (optional) bridges graphs to game systems
The framework gives you (free):
- Full editor window with menus, toolbar, palette, canvas
- Multi-document tabs with dirty tracking
- Save/load (XML wrapper + binary graph buffer)
- Undo/redo (snapshot-based, per-graph)
- Variable system (declarations, Get/Set nodes, references, drag-to-canvas)
- Inspector panel (auto-generated from node EditContext)
- Node palette with drag-drop
- Full-window page system
- Three execution engines (flow, data-flow, state machine)
- Copy/paste, selection, bookmarks
Pages
- Step 1: Choose Your Topology
- Step 2: Create the Descriptor
- Step 3: Create the GraphContext
- Step 4: Create Nodes
- Step 5: Create the Editor Window
- Step 6: Register the System Component
- Step 7: Build Runtime (Optional)
- Pitfalls Checklist
Step 1: Choose Your Topology
This is the fundamental design decision. It determines connections, execution model, and slot types.
| Topology | Use Case | Execution | Connections |
|---|
| FlowGraph | Sequential processes, dialogue trees, scripting | Step/wait/resume via FlowIn/FlowOut | Directional (left-to-right) |
| DataFlowGraph | Signal processing, audio, shaders, procedural generation | Topological dirty-propagation | Directional (left-to-right) |
| StateMachineGraph | State machines, behavior trees, HFSM | Tick-based state transitions | Multidirectional (perimeter arrows) |
Key constraints:
- DataFlowGraph requires a DAG (no cycles) for topological sorting
- StateMachineGraph inherently supports cycles
- FlowGraph optionally supports cycles via
allowConnectionLoopback
Step 2: Create the Descriptor
Create a header that returns a filled-out GraphSystemDescriptor:
#pragma once
#include <GS_GraphCanvas/GraphSystemDescriptor.h>

namespace GS_MyTool
{
    inline GS_GraphCanvas::GraphSystemDescriptor CreateMyToolDescriptor()
    {
        GS_GraphCanvas::GraphSystemDescriptor desc;

        // ===== Identity =====
        desc.systemId = "mytool";
        desc.systemName = "My Tool Editor";
        desc.fileExtension = ".mytool";
        desc.mimeType = "application/x-gs-mytool-node";
        desc.saveIdentifier = "MyToolEditor";
        desc.editorId = GraphCanvas::EditorId("MyToolEditor");

        // ===== Topology =====
        desc.topology = GS_GraphCanvas::GraphTopology::DataFlowGraph;

        // ===== Features =====
        desc.variablesEnabled = true;
        desc.allowConnectionLoopback = false;

        // ===== UI =====
        desc.windowTitle = "My Tool Editor";
        desc.menuCategory = "GS Tools";

        return desc;
    }
}
Every field in the descriptor is documented in the Descriptor & Topology reference.
Step 3: Create the GraphContext
Register any domain-specific data types beyond the built-in set (Bool, Int, Float, String, Vector2, Vector3, Color, EntityId).
#pragma once
#include <GS_GraphCanvas/Core/CommonDataTypes.h>
#include <GraphModel/Model/GraphContext.h>

namespace GS_MyTool
{
    class MyToolGraphContext : public GraphModel::GraphContext
    {
    public:
        MyToolGraphContext();

        static void RegisterDataTypes(GraphModel::GraphContextPtr context)
        {
            // Built-in CommonDataTypes are registered automatically.
            // Add domain-specific types here if needed:
            // context->RegisterDataType(MyCustomEnum, azrtti_typeid<MyStruct>(),
            //     MyStruct{}, "MyCustomType");
        }
    };
}
If your tool only uses the built-in types, the context subclass can be minimal.
Step 4: Create Nodes
Basic Node Template
#pragma once
#include <GS_GraphCanvas/Nodes/BaseNode.h>
#include <GS_GraphCanvas/Widgets/SimpleNodeMacros.h>
#include <GS_GraphCanvas/NodeRegistry.h>

namespace GS_MyTool
{
    class MyTool_ExampleNode : public GS_GraphCanvas::BaseNode
    {
    public:
        AZ_RTTI(MyTool_ExampleNode, "{GENERATE-UNIQUE-UUID}", GS_GraphCanvas::BaseNode);
        AZ_CLASS_ALLOCATOR(MyTool_ExampleNode, AZ::SystemAllocator);

        static constexpr const char* TITLE = "Example Node";
        static constexpr const char* CATEGORY = "Processing";

        static void Reflect(AZ::ReflectContext* context);
        const char* GetTitle() const override { return TITLE; }

    protected:
        void RegisterSlots() override
        {
            GS_INPUT_SLOT_TYPED("value_in", "Value", CommonDataTypes::Float, 0.0f);
            GS_OUTPUT_SLOT_TYPED("result_out", "Result", CommonDataTypes::Float);
        }

        float m_multiplier = 1.0f;
    };

    GS_AUTO_REGISTER_NODE_FOR(MyTool_ExampleNode, "mytool")
}
Reflect Implementation
void MyTool_ExampleNode::Reflect(AZ::ReflectContext* context)
{
    if (auto* sc = azrtti_cast<AZ::SerializeContext*>(context))
    {
        if (sc->FindClassData(azrtti_typeid<MyTool_ExampleNode>())) { return; }
        sc->Class<MyTool_ExampleNode, GS_GraphCanvas::BaseNode>()
            ->Version(1)
            ->Field("Multiplier", &MyTool_ExampleNode::m_multiplier)
            ;
    }
    if (auto* ec = azrtti_cast<AZ::EditContext*>(context))
    {
        ec->Class<MyTool_ExampleNode>("Example Node", "A processing node")
            ->ClassElement(AZ::Edit::ClassElements::EditorData, "")
                ->Attribute(AZ::Edit::Attributes::AutoExpand, true)
            ->DataElement(AZ::Edit::UIHandlers::Default, &MyTool_ExampleNode::m_multiplier,
                "Multiplier", "Scale factor")
            ;
    }
}
Implementing Execution
Choose the interface matching your topology:
FlowGraph — IExecutableNode:
FlowResult Execute(GraphExecutionContext& context) override
{
    float input = context.GetInputValue<float>(this, "value_in");
    context.SetOutputValue(this, "result_out", input * m_multiplier);
    return FlowResult::Continue;  // or Wait, Stop
}
DataFlowGraph — IDataFlowNode:
void Process(GraphExecutionContext& context) override
{
    auto inputAny = context.GetInputValueAny(this, "value_in");
    if (inputAny.empty())
    {
        context.SetOutputValueAny(this, "result_out", AZStd::any{});
        return;
    }
    float input = AZStd::any_cast<float>(inputAny);
    context.SetOutputValue(this, "result_out", input * m_multiplier);
}
StateMachineGraph — IStateMachineNode:
void OnEnter(GraphExecutionContext& context) override { /* ... */ }
void OnTick(GraphExecutionContext& context, float deltaTime) override { /* ... */ }
void OnExit(GraphExecutionContext& context) override { /* ... */ }
Step 5: Create the Editor Window
Simple: Standalone File Editor
If each graph is its own file (like the Audio Event Graph), use MainWindow directly:
class MyToolEditorWindow : public GS_GraphCanvas::MainWindow
{
public:
    MyToolEditorWindow(const GS_GraphCanvas::GraphSystemDescriptor& desc)
        : GS_GraphCanvas::MainWindow(desc)
    {}
};
This gives you a fully functional editor with no additional code.
Advanced: Container/Database Editor
If multiple graphs live in one file (like dialogue sequences or unit action layers), override file operations and add management UI:
class MyToolEditorWindow : public GS_GraphCanvas::MainWindow
{
protected:
    // Override file menu for container-level operations
    void AddFileNewAction() override;     // New container
    void AddFileOpenAction() override;    // Open container
    void AddFileSaveAction() override;    // Save entire container
    void AddFileSaveAsAction() override;

    // Add non-graph pages
    void SetupPages()
    {
        SetGraphPageTitle("Graphs");
        AddFullWindowPage("Settings", m_settingsPage);
    }

    // Container save pattern
    void SaveContainer()
    {
        for (auto& [graphId, entry] : m_openGraphs)
            CaptureGraphToAsset(graphId, entry.graphData, serializeContext);

        AZ::Utils::SaveObjectToFile(m_path, AZ::DataStream::ST_XML, &m_container);
        ClearAllDocumentDirty();
    }
};
Step 6: Register the System Component
The editor system component reflects all node types and registers the view pane:
class GS_MyToolEditorSystemComponent : public AZ::Component
{
public:
    AZ_COMPONENT(GS_MyToolEditorSystemComponent, "{UNIQUE-UUID}");

    static void Reflect(AZ::ReflectContext* context)
    {
        // Reflect all node types
        MyTool_ExampleNode::Reflect(context);
        // ... all your nodes ...

        // Reflect MIME events for palette drag-drop
        GS_GraphCanvas::NodeRegistry::Get().ReflectAllMimeEvents(context);

        // Reflect the component
        if (auto* sc = azrtti_cast<AZ::SerializeContext*>(context))
        {
            sc->Class<GS_MyToolEditorSystemComponent, AZ::Component>()
                ->Version(1);
        }
    }

    void Activate() override
    {
        AzToolsFramework::ViewPaneOptions options;
        options.paneRect = QRect(50, 50, 1200, 800);
        AzToolsFramework::RegisterViewPane<MyToolEditorWindow>(
            "My Tool Editor", "GS Tools", options);
    }

    void Deactivate() override
    {
        AzToolsFramework::UnregisterViewPane("My Tool Editor");
    }
};
Add the component descriptor to your gem’s editor module:
// In GS_MyToolEditorModule.cpp
m_descriptors.push_back(GS_MyToolEditorSystemComponent::CreateDescriptor());
Step 7: Build Runtime (Optional)
If your tool needs runtime execution (not just an editor-only design tool):
- Load the graph asset (directly or via a template cache for pooling)
- Create a
GraphInstance via GraphInstance::CreateFromAsset() - Create the appropriate evaluator (
FlowGraphEvaluator, DataFlowGraphEvaluator, or StateMachineEvaluator) - Expose an API via EBus for triggering and controlling execution
Pooling Pattern (High-Frequency Execution)
For graphs that are instantiated frequently (like audio events), follow the template cache pattern:
TemplateCache
  -> Caches GraphDocumentAsset per file path
  -> Pools idle GraphInstance objects
  -> CreateFromAsset() for new instances
  -> Return to idle pool on release
Pitfalls Checklist
Reflection
- Every
Reflect() must have a FindClassData guard (gs_graphcanvas is a static lib) - Every
sc->Enum<T>() must be guarded — enums crash on double-registration - All UUIDs must be globally unique (collision = crash in
ResolvePointer) - Polymorphic containers must use
AZStd::vector<Base*> (raw pointers, not smart pointers) EnableForAssetEditor goes on SerializeContext only, never EditContext- Field names must be unique, non-empty PascalCase strings
- Use
AZ_DISABLE_COPY on classes with polymorphic pointer vectors - Do not use
id as a member variable name (conflicts with AZ_RTTI macro)
Data Flow
- Inactive nodes must output
AZStd::any{}, not default-constructed structs - Multi-input slots must be declared explicitly per-slot
- Node auto-registration must use the correct systemId string
Editor
NodeRegistry.h must be included before StandardNodePaletteItem.h (MSVC requirement)- Editor system component must reflect all node types and call
ReflectAllMimeEvents() - View pane must be registered in
Activate() and unregistered in Deactivate()
Save/Load
- Graph document asset must be a plain struct (not
AZ::Data::AssetData) - Graphs must be serialized as byte buffers (not as
shared_ptr fields) - Transient display data (cached titles, etc.) must be rebuilt after deserialization
See Also
1.5 - Understanding Agentic Guidelines
Human-facing explanation of how the Agentic Guidelines page works — its structure, language rules, and how to keep it accurate. A how-to reference, not an open invitation to edit.
This page is written for humans. You are reading an explanation of how the parent document works and how to maintain it. If you are an AI agent that has landed here, the document you should be reading is
Agentic Guidelines.
What the Agentic Guidelines Page Is
The parent page — Agentic Guidelines — is not a documentation page in the normal sense. It contains no prose meant for a human to read comfortably. It is a structured seed document, intended to be pasted or loaded into an AI agent session before any GS_Play framework work begins.
Think of it as a mission briefing card. It is dense, compressed, and declarative. Every line exists to be parsed and acted on by a machine — not to be understood leisurely by a person.
Why it exists: Agents working without this document make predictable, repeatable errors. They guess EBus names incorrectly, place EnableForAssetEditor in the wrong reflection context, write polymorphic containers with the wrong pointer type, or generate C++ where a scripting answer was needed. The agentic guidelines page is the countermeasure for all of those failures.
What it is not: It is not a tutorial, an overview, or a feature summary. Those documents live elsewhere in the framework documentation. This page exists only to give an agent precise, actionable constraints and lookup data before it starts working.
Who Uses This Framework and Why It Matters
The framework has two distinct user groups. This distinction determines what kind of guidance an agent should give, and it is the single most important thing to keep in mind when editing this document.
Designer / Scripter
This user works entirely inside the O3DE editor. They configure components in the entity inspector, connect logic with Script Canvas or Lua, set up prefabs, and tweak exposed properties. They never write C++. For this user, an agent should provide guidance about:
- Which components to add to an entity
- How to configure component properties
- How to wire EBus events through Script Canvas nodes
- How to structure prefabs and entity hierarchies
Engineer / Developer
This user writes C++ to extend the framework. They inherit from GS_Play base classes, create new gems or project-level systems, write new components, and build on top of the existing architecture. For this user, an agent should provide guidance about:
- Which base class to inherit from
- How to implement EBus interfaces
- How to register new types (dialogue effects, pulse types, etc.)
- How to structure reflection, module registration, and CMake targets
Engineers have full freedom to combine gems. GS_Complete is the framework’s reference integration layer — it demonstrates cross-gem patterns but is not a restriction on what engineers can do in their own projects. An engineer may freely include headers from multiple gems in their project code.
How the Document Is Structured
The page uses three tiers of information. Understanding these tiers is the most important thing before contributing.
Tier 1 — Invariants
Hard rules with no exceptions. These live at the very top of the document in the INVARIANTS section. An agent that reads only the first 600 tokens of the document will encounter all of them.
Invariants are:
- Specific, not general (“polymorphic containers use
BaseT*”, not “use the right container type”) - Complete enough to act on without reading anything else
- Framed as prohibitions or exact requirements — never suggestions
Do not add to the Invariants section unless a rule is a hard technical constraint that has no contextual exceptions and causes a silent failure or editor malfunction when violated.
Tier 2 — Ontology and Reference
This is the structural description of what the system is: the SYSTEM ONTOLOGY paragraph, the GEM INDEX table, the EBUS DISPATCH REFERENCE, and the HOT PATHS section. This tier answers the question: what is this system and how do I operate it?
This tier is:
- Table-first. Prose is minimal.
- Accurate. A single wrong EBus method name here means an agent fails silently.
- Compressed. One row per concept, not one paragraph per concept.
Tier 3 — Conditional Depth
This tier does not provide information directly. It tells the agent when to stop and go deeper. The CONTEXT ANCHORS, CONFIDENCE THRESHOLDS, and CLARIFICATION TRIGGERS sections all belong here. They point the agent toward more information and define the exact conditions under which to seek it.
The Token Grammar
The document uses a small, fixed vocabulary of bracketed tokens. These act as machine-readable instruction labels. Agents across all backends pick them up reliably through pattern matching.
| Token | Meaning | Location |
|---|
[INVARIANT] | Hard constraint. Never violate. No exceptions. | INVARIANTS section |
[ANCHOR] | Stop and read the linked documentation before proceeding. | CONTEXT ANCHORS, inline in HOT PATHS |
[MEMORY] | Persist this content if a memory system is available. | MEMORY PROTOCOL section |
[ASK] | Do not infer. Pause and ask the user before proceeding. | CLARIFICATION TRIGGERS, inline in HOT PATHS |
[ANTIPATTERN] | What not to do and briefly why. | ANTIPATTERN CATALOG section |
Use only these tokens. Do not invent new ones. Tokens work because they are stable — an agent learns to treat [INVARIANT] as a certain category of instruction. A new, undiscussed token may be ignored or misinterpreted.
If you genuinely believe a new token category is needed, document the reasoning and discuss it before adding it. The bar is high: the existing five tokens cover almost every instruction type needed.
Editing the Agentic Guidelines: Step-by-Step Workflow
Step 1 — Identify what changed
Before opening the file, answer these questions:
- Was there a codebase change (new EBus, new component, renamed method)?
- Was there an error an agent actually made — something it got wrong that this document should have prevented?
- Is there a new common task that agents are regularly asked to do with no hot path covering it?
- Is there a new documentation page that an agent should be directed to?
If none of these are true, you probably do not need to edit the parent document. Editing it without a concrete reason adds noise.
Step 2 — Locate the right section
Use this map to find where your change belongs:
| Type of change | Target section |
|---|
| A rule that must never be broken | INVARIANTS |
| A new gem or renamed manager | GEM INDEX |
| A new or renamed EBus or method | EBUS DISPATCH REFERENCE |
| A new common code task | HOT PATHS |
| A mistake agents keep making | ANTIPATTERN CATALOG |
| A decision that needs user input | CLARIFICATION TRIGGERS |
| A documentation page that gives deep context | CONTEXT ANCHORS |
| Something agents can safely assume | CONFIDENCE THRESHOLDS |
| A memory entry agents should persist | MEMORY PROTOCOL |
If your change doesn’t fit any of these cleanly, it is probably better expressed in the framework’s technical documentation pages rather than here.
Step 3 — Apply the minimum change
Do not add surrounding context, explanations, or improvements to adjacent content. The agentic document is optimized for token density — adding prose that an agent does not need to act on degrades its quality.
Apply the minimum correct change:
- One new row in a table
- One new
[INVARIANT] entry - One revised method name
- One new numbered step in a hot path
Resist the impulse to expand.
Step 4 — Verify accuracy
Before saving, verify every name, method, and path in your change against the source:
- EBus method names — Open the source header for that bus. Copy the method name exactly. Do not paraphrase.
- Doc paths — Confirm the path actually exists. A broken anchor is worse than no anchor.
- Base class names — Confirm against the gem’s public Include/ headers.
- TypeIds — Do not add TypeId values unless you have copied them from
GS_{Name}TypeIds.h.
Step 5 — Apply the self-test
Read only the section you changed and ask: does an agent reading only this section know what to do, or does it still need to infer?
If it still needs to infer, the entry is incomplete. If it specifies exact names, exact locations, exact conditions, and exact patterns — it is ready.
Step 6 — Update this contributing page if structure changed
If you added a new section to the parent document, added a new token type, changed the tier structure, or changed any guidance about how to contribute — update this page to match. The two documents must stay in sync. See the section below: When to Update This Page.
Section-by-Section Editing Reference
BOOTSTRAP PROTOCOL
Edit when: The loading order or session re-entry behavior of the document should change.
Rules:
- Keep this section under 8 lines. It is the first thing an agent reads.
- Instructions must be ordered. Numbered list only.
- Do not add explanatory prose. Each line is an action, not a description.
INVARIANTS
Edit when: A new silent-failure rule has been discovered through a real agent error, or an existing invariant is no longer accurate.
Qualifying test for a new invariant — all must be true:
- It is a specific technical rule, not a general principle.
- Violating it causes a failure that is silent or extremely hard to diagnose.
- It applies in all contexts, with no exceptions.
- It cannot be reliably derived from general O3DE knowledge.
Format:
`[INVARIANT]` **Short title.** One or two sentences of exact, actionable constraint.
Optionally: a code block showing the correct pattern.
Do not add O3DE general best practices here. They do not belong in the invariants list — agents already know them.
MEMORY PROTOCOL
Edit when: A new section is added to the parent document that should be persisted to memory, or a memory key is renamed.
Rules:
- Memory keys are lowercase with underscores:
gs_play_invariants, not GS Play Invariants. - Only add memory entries for sections that are dense enough to be worth re-loading from memory rather than re-reading.
- The freshness rule (source code wins over stored memory) must never be removed.
SYSTEM ONTOLOGY
Edit when: The engine version changes, the build toolchain changes, or the platform target changes.
Rules:
- The attribute table is for hard facts only: version numbers, language, build system, platform.
- The “Core architectural rules” bullets must remain at three or fewer. If you need to add a fourth, one of the existing three should be absorbed into a more general statement.
- Do not add GS_Complete or internal gem restrictions as architectural rules. These are framework-internal development constraints, not user-facing rules.
GEM INDEX
Edit when: A new gem is added, a gem is renamed, a manager component is added or renamed, a primary bus is renamed, or a documentation path changes.
Rules:
- One row per gem. Do not split a gem across two rows.
- The dependency graph must be updated any time the gem dependency structure changes.
- Doc paths must be real paths. Verify before adding.
GS_Complete remains in the index as the integration layer reference — it documents a real gem. Its description should clarify it is Genome Studios’ reference layer, not a restriction on user code.
EBUS DISPATCH REFERENCE
Edit when: A new EBus is added to any gem, a method is renamed, or the dispatch policy of a bus changes.
Rules:
- Method names are copied from source headers. Not paraphrased, not summarized — exact.
- Include only the most commonly-called methods. This is a quick-lookup reference, not a full API.
- If a bus is entity-addressed, the Dispatch column must say
ById. If it is a singleton broadcast, the column says Broadcast. If it is a listener-only bus, say Listen. - Adding a new gem requires a new
### {GemName} buses subsection.
HOT PATHS
Edit when: A new common task emerges that agents are regularly asked to perform, or an existing hot path’s steps become inaccurate.
Qualifying test for a new hot path — all must be true:
- Agents are asked to do this task regularly.
- There is a correct pattern that is non-obvious or differs from standard O3DE conventions.
- There is a genuine way to get it wrong that the hot path would prevent.
Format:
### HOT PATH N — Short task description

1. First discrete action.
2. Second discrete action.
3. Third discrete action.

`[ANCHOR]` Condition requiring deeper reading → /docs/path/to/page/
Rules:
- Steps are single, discrete actions. Not compound sentences.
- No prose between steps.
- Add an
[ANCHOR] at the end if there is a documentation page that provides necessary deeper detail. - Hot paths are for engineer (C++ extension) tasks. Designer tasks belong in component or scripting documentation, not here.
ANTIPATTERN CATALOG
Edit when: A real agent error is identified that this document should prevent, or an existing antipattern is no longer relevant.
Qualifying test — all must be true:
- An agent actually made this mistake, or will predictably make it without the warning.
- The failure mode is silent or ambiguous — not a compile error that would surface immediately.
- The correct alternative is already documented (in INVARIANTS or HOT PATHS).
Format:
`[ANTIPATTERN]` **Short title.** One sentence describing the failure. One sentence pointing to the correct behavior or its location in this document.
Do not add antipatterns that are just general bad practices. Every entry here should represent a failure mode specific to GS_Play or to O3DE patterns that agents commonly get wrong.
CONFIDENCE THRESHOLDS
Edit when: A GS_Play-specific assumption has been confirmed safe (add to “proceed” list) or a pattern that agents incorrectly assume they know turns out to need verification (add to “stop” list).
Rules:
- The “proceed” list contains patterns where O3DE general knowledge is accurate and sufficient.
- The “stop” list contains patterns where GS_Play diverges from general O3DE knowledge, or where API details are too precise to guess.
- Do not add items to the “proceed” list unless they have been verified accurate across the framework.
CONTEXT ANCHORS
Edit when: A new documentation page is added that meaningfully fills a knowledge gap an agent would otherwise have to guess around, or an anchor’s target path changes.
Qualifying test for a new anchor:
- There is a specific documentation page at a specific path.
- An agent working without that page would make structural errors on this task.
- The condition is narrow enough to fire at the right moment (“before writing unit movement code”) — not so broad that it triggers on general O3DE work.
Format:
`[ANCHOR]` **Before doing [specific task]:**
→ Read /docs/path/to/page/ for [what the agent needs from it — be specific].
→ `[ASK]` Optional inline clarification prompt if a user decision is required here.
Note on GS_Complete anchors: GS_Complete is a valid reference target. An anchor pointing to it as a reference (“review GS_Complete for examples”) is appropriate. An anchor that frames it as a restriction (“you must implement this there”) is not — that is a framework-internal structural convention, not a rule that applies to user project code.
CLARIFICATION TRIGGERS
Edit when: A new category of user decision is identified where agents predictably infer the wrong answer, or an existing trigger is too broad to fire usefully.
Qualifying test:
- The agent cannot determine the correct answer from documentation alone — it requires user intent.
- Agents predictably get this wrong when left to infer.
- Getting it wrong has real consequences (wrong code generated, wrong scope, irreversible decisions).
The USER CONTEXT trigger at the top of this section must never be removed. It is the most important clarification in the document — it gates all subsequent behavior between designer/scripter guidance and engineer guidance.
The two documentation sections referenced in USER CONTEXT are:
- The Basics (
/docs/the_basics/) — Scripter and designer documentation. Covers component usage, property configuration, and scripting for all gems. - Framework API (
/docs/framework/) — Engineer documentation. Covers C++ interfaces, EBus signatures, base class architecture, and reflection patterns for all gems.
Both sections cover the same featureset across the same gem set: core, cinematics, environment, interaction, performer, phantomcam, ui, unit, ai, item, rpstats. Update the USER CONTEXT doc links if any gem is added, renamed, or its documentation path changes in either section.
What Makes Bad Agentic Content
Understanding what to avoid is as important as understanding what to write.
Prose explanations. The parent document must never read like a tutorial. “The EBus system in O3DE works by…” is wasted tokens. An agent already knows what EBus is. It needs the specific name and specific dispatch syntax.
Vague headings. “Common Patterns”, “Unique Details” — these tell neither a human nor a machine what type of instruction to expect. Every section heading in the parent document is also a category of instruction.
Soft language. “You should consider”, “it is generally recommended” — agents do not weight soft language correctly. If something must be done a specific way, say so directly. Preferences belong in other documentation pages, not here.
Information without a trigger condition. Raw information with no instruction about when to use it adds cognitive load without adding value. Every fact in the parent document is attached to a pattern, a constraint, a lookup trigger, or a warning.
Framework-internal conventions framed as user-facing rules. Conventions about how the framework’s own gem structure is organized (like where cross-gem components live within the framework itself) should not appear as [INVARIANT] or [ANTIPATTERN] entries. Engineers extending the framework in their own projects have full freedom to organize code as their project requires.
Outdated EBus names or method signatures. This is the most damaging type of error in the document. An agent trusting a wrong bus name fails silently, and the diagnosis will be non-obvious. Before adding or updating anything in the EBus section, verify against the current source header.
Maintaining Accuracy
When any of the following changes in the codebase, update the corresponding section:
| Codebase change | Section to update |
|---|
| New EBus added | EBUS DISPATCH REFERENCE — add table row |
| EBus method renamed | EBUS DISPATCH REFERENCE — update row; scan HOT PATHS for any direct references |
| New gem added | GEM INDEX — new row; update dependency graph |
| New Manager Component added or renamed | GEM INDEX — update Manager column and Primary Bus column |
| New documentation page published | CONTEXT ANCHORS — add anchor if it fills a knowledge gap |
| Documentation page moved or renamed | CONTEXT ANCHORS — update the path; if it is a gem root page in The Basics or Framework, also check CLARIFICATION TRIGGERS USER CONTEXT links |
| New gem added to the framework | GEM INDEX, EBUS DISPATCH REFERENCE, CLARIFICATION TRIGGERS USER CONTEXT gem list (both /docs/the_basics/ and /docs/framework/ paths) |
| O3DE API change affecting Reflect() patterns | INVARIANTS and HOT PATH 1, 5 — verify code blocks still compile |
| New common agent task identified | HOT PATHS — add new numbered path |
| New silent-failure pattern discovered | ANTIPATTERN CATALOG — add entry |
| GS_Play base class API changes | CONFIDENCE THRESHOLDS — verify the “stop” list is still accurate |
When to Update This Contributing Page
This contributing page should stay in sync with the parent document’s structure. Update it when:
- A new section is added to the parent document — add a corresponding entry to the Section-by-Section Editing Reference above.
- A token is added to the grammar — add it to the Token Grammar table.
- The tier structure changes — update the “How the Document Is Structured” section.
- The distinction between user contexts changes (new user type, renamed category) — update “Who Uses This Framework”.
- Any “rules” in the section-specific guidance become outdated.
This page is allowed to have prose. It is written for humans. Explanations, reasoning, and examples are all appropriate here. The parent document is the one that must remain dense and machine-optimized.
Testing Your Contribution
Before saving any change to the parent document, apply this test:
Read only the section you changed. Ask: does an agent reading only this section know exactly what to do, or does it still need to infer?
If it still needs to infer, the entry is incomplete. It is ready when it specifies:
- Exact names (method names, class names, bus names)
- Exact locations (file paths, doc paths, section names)
- Exact conditions (the trigger that fires this instruction)
- Exact patterns (the correct code form or step sequence)
A strong contribution eliminates a whole class of agent errors. A weak contribution adds words without eliminating uncertainty. When in doubt, add nothing and write the knowledge into the relevant framework documentation page instead. Let a [ANCHOR] point to it.
2 - Recipes
Step-by-step recipes for composing specific configurations of GS_Play systems, organized by gem.
Recipes are step-by-step setups for producing specific configured outcomes. Each gem has its own categorical section; within a section, recipe collections group related setups around a single subject.
Read the matching basics page first for the concept. Then come here for the composition steps.
Recipes by Gem
- PhantomCam — virtual camera composition, channels, noise, tug fields, group targets, influence fields.
Additional gem sections will land here as their recipe libraries are authored.
2.1 - PhantomCam Recipes
Step-by-step recipes for the GS_PhantomCam virtual camera system — composing cams from stages, configuring noise, tug fields, group targets, influence fields, and the channel tier system.
Recipes for composing specific configurations of the GS_PhantomCam virtual camera system. Read the matching basics page first for the concept; then come here for the composition steps.
For the underlying gem reference, see GS_PhantomCam API and The Basics: PhantomCam.
Recipe Collections
- PhantomCam Configurations — composing cams from Body / Aim / Additive stages (shoulder, orbital player, static showcase, first-person clamped, tracking dolly, group framing).
- Camera Noise Configurations — handheld baseline, event-triggered impact, stacked handheld + impact.
- Camera Tug Configurations — vista pull, doorway glance, decoupled source / destination.
- Group Target Configurations — two-player party cam, combat encounter frame, collapse-to-single-view.
- Influence Field Configurations — boost a cam inside a room, always-on cinematic boost.
- Channel Tier Configurations — Tier 1 single cam, Tier 2 level-placed, Tier 3 multi-channel co-op, common Tier 3 patterns, lobby flow.
2.1.1 - PhantomCam Configurations
Step-by-step recipes for composing common camera behaviors from Body, Aim, and Additive stages on a single Phantom Camera component.
A Phantom Camera’s behavior is the composition of one Body stage, one Aim stage, and zero-or-more Additive stages. The same GS_PhantomCameraComponent becomes a follow cam, an orbital cam, a tracking dolly, or a third-person shoulder cam depending on what is slotted from the editor’s type-picker.
Each recipe below names a Body pick, an Aim pick, and any Additive picks, plus the key field values that produce the target behavior. For the concept, the per-tick pipeline, and per-stage field references, see The Basics: Phantom Cameras and the Stage Pipeline API.
Contents
Recipe: Third-Person Shoulder Cam
A camera that follows the player at standoff distance, holds position when the player is moving inside an authored band, and slides smoothly around to re-frame when the player travels in a new direction. The canonical leading-look feel.
| Slot | Pick | Key fields |
|---|
| Body | LeadingFollowBody | Offset = (0, 0, 1.6) (cam Z height), InnerRadius = 2.0, OuterRadius = 5.0, BlendShape = Cylindrical |
| Aim | DefaultLookAtAim | Offset = (0, 0, 1.5) (look point at chest height), Halflife = 0.1 |
| Additives (Reposition) | CollisionReposition | InnerRadius = 0.15, OuterRadius = 0.45, Halflife = 0.15, configure Collides With to match the player’s collision layer |
Why this combination:
LeadingFollowBody holds position inside its band — abrupt 180° turns by the player don’t swing the cam.DefaultLookAtAim smoothly tracks the player’s chest.CollisionReposition sphere-casts from the player to the cam and pushes the cam inside walls or geometry, gliding back out via the soft buffer when the player walks away.
Optional: Add PerlinNoise with a Normal_Mild.camnoiseprofile profile for a touch of handheld feel. See Camera Noise Configurations.
Recipe: Orbital Player Cam
A camera that orbits around the player driven by player input (right-stick or mouse). The current go-to for third-person action games.
| Slot | Pick | Key fields |
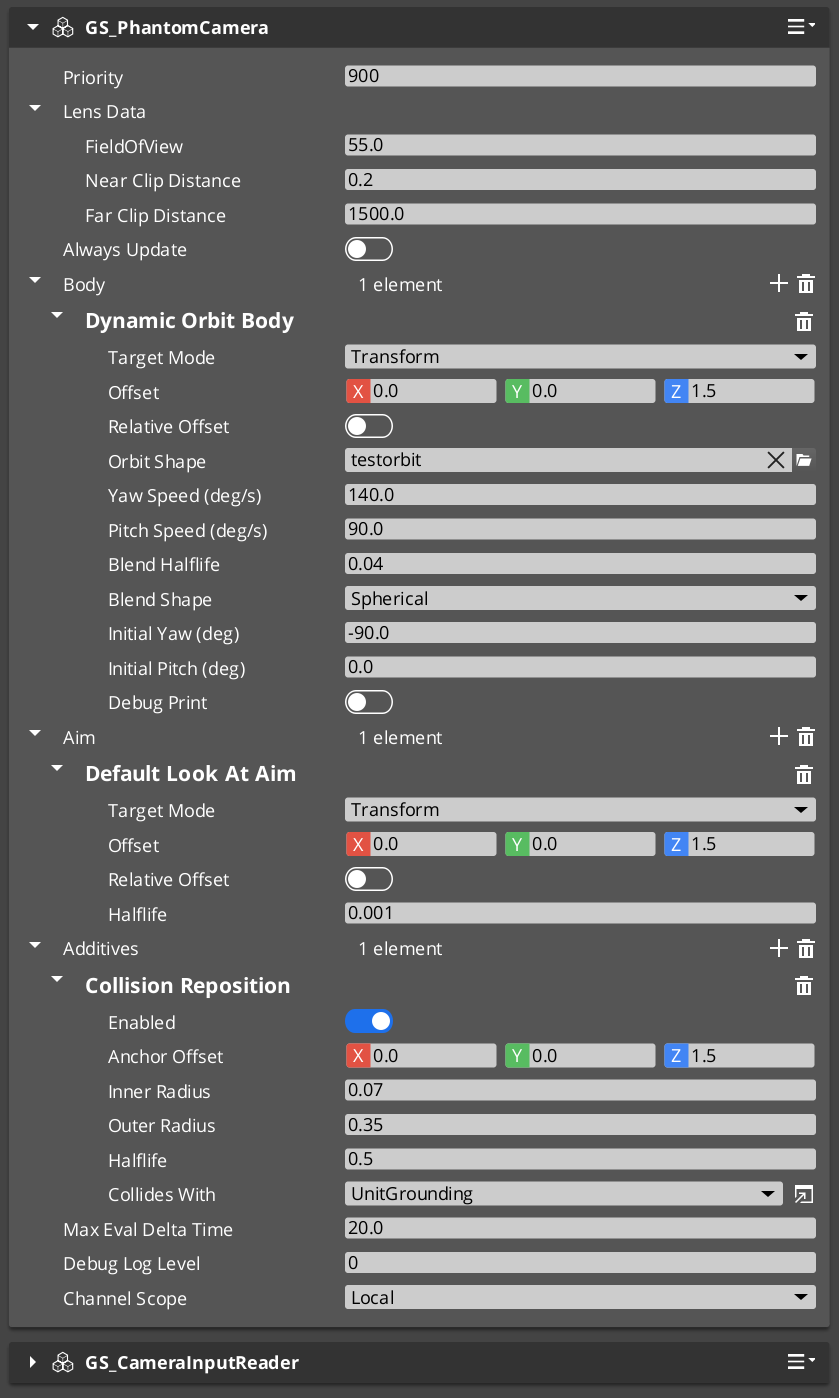
|---|
| Body | DynamicOrbitBody | Assign an .camorbit asset to OrbitShape, BlendHalflife = 0.10, InitialYawDeg = 180 (start behind player), InitialPitchDeg = 0 |
| Aim | DefaultLookAtAim | Halflife = 0.1 |
| Additives (Reposition) | CollisionReposition | As above |
Required companion: Add a GS_CameraInputReaderComponent to the same entity. It implements the OrbitInputProvider interface that DynamicOrbitBody polls each tick. Configure sensitivity (raw input scale) and halflife (input damping) on the reader.
Why this combination:
DynamicOrbitBody holds target yaw and pitch angles internally; input integration nudges them each tick, and the orbital solver damps the cam’s position toward whatever the angles imply on the orbit surface.- The
.camorbit shape asset defines the surface (sphere, oblate spheroid, rounded box) — different shapes give different “feel” for the orbit motion.
Recipe: Static Orbit Showcase Cam
A camera locked to a fixed orbital pose around its target — no input, no movement. Useful for menu / inventory / character-detail screens. Replacement for the retired StaticOrbit_PhantomCamComponent.
| Slot | Pick | Key fields |
|---|
| Body | OrbitBody | OrbitRadius = 5.0, OrbitYawDeg = 45, OrbitPitchDeg = 20 |
| Aim | DefaultLookAtAim | Halflife = 0.1 |
No additives needed for the basic case.
Static via DynamicOrbitBody. You can also get a static orbit using DynamicOrbitBody by simply not adding a GS_CameraInputReaderComponent — without an input provider, target angles never change and the solver damps once, then holds. Use the dedicated OrbitBody when you want the explicit “this is a fixed shot” identity (and the inheritance Get-only behavior that comes with it).
Recipe: First-Person Clamped Look
A first-person camera whose look-at rotation is clamped within authored pitch and yaw bounds. Replacement for the retired ClampedLook_PhantomCamComponent.
| Slot | Pick | Key fields |
|---|
| Body | DefaultFollowBody | Offset = (0, 0, 1.7) (eye height), OffsetIsRelative = true, Halflife = 0.05 |
| Aim | ClampedLookAim | MinRelClamp = (-45, 0, -90), MaxRelClamp = (45, 0, 90), LocalSpace = true, Halflife = 0.05 |
ClampedLookAim captures a starting forward on first evaluation, and the envelope clamps relative to that origin. Setting LocalSpace = true keeps the clamp axes aligned with the cam’s starting orientation rather than world axes.
Recipe: Tracking Dolly
A camera that slides along a spline path while tracking a target. The “dolly track” cinematic shot. Replacement for the retired Track_PhantomCamComponent.
Authoring steps:
- Add a
SplineComponent to a separate entity. Author the spline shape in the editor (linear, bezier, etc.). - On your Phantom Camera entity:
| Slot | Pick | Key fields |
|---|
| Body | TrackBody | Assign the spline entity to SplineTrack. Author StartData (offset, halflife, FoV) and EndData (offset, halflife, FoV). |
| Aim | DefaultLookAtAim | Halflife configured to match the dolly feel. |
TrackBody projects the target onto the spline at each tick and interpolates between StartData and EndData by spline parameter. If EndData.FieldOfView > 0, the cam’s FoV animates along the dolly too — useful for “zoom in as the cam reaches the climax point.”
Recipe: Group-Framing Cam
A camera that frames multiple subjects (e.g. all party members, all combatants in an encounter) using a Group Target.
Authoring steps:
- Create a Group Target entity. Add
GroupTargetComponent, give it a name (e.g. "PartyCentroid"), set its centroid mode (WeightedMean is the common choice), and add subjects with their weights. See Group Target Configurations for full subject-management patterns. - On your Phantom Camera entity:
| Slot | Pick | Key fields |
|---|
| Body | LeadingFollowBody or DynamicOrbitBody | Set TargetMode = GroupTarget, set GroupTargetName = "PartyCentroid". |
| Aim | DefaultLookAtAim | Same target-mode pattern — set TargetMode = GroupTarget, GroupTargetName = "PartyCentroid". |
The group target’s transform IS the weighted centroid of its subjects, so the cam tracks “where the group is” rather than any single member.
See Also
Related recipe collections:
Basics this builds on:
Framework API:
2.1.2 - Camera Noise Configurations
Step-by-step recipes for camera shake — continuous handheld feel via PerlinNoise, event-triggered bursts via ImpulseNoise, and stacking the two.
Camera shake comes in two flavors, both as Noise additives on a Phantom Camera’s stage list: PerlinNoise for continuous handheld sway and ImpulseNoise for event-triggered ADSR-gated bursts. Both consume the same .camnoiseprofile asset and the same six-axis Perlin layer model; they stack freely.
For the concept, the preset library, and how to trigger impulses from gameplay code, see The Basics: Noise & Impulse. For the underlying asset format, see Noise Profiles (Framework API).
Contents
Recipe: Handheld Baseline
Continuous low-amplitude sway that makes the camera feel “hand-held” rather than locked to a tripod.
| Slot | Pick | Key fields |
|---|
| Additive (Noise phase) | PerlinNoise | Assign Normal_Mild.camnoiseprofile (shipped in gs_phantomcam/Assets/Noise Profiles/). AmplitudeGain = 1.0, FrequencyGain = 1.0. |
That’s all — PerlinNoise is always sampling, so the moment the stage is added, the cam picks up handheld feel. Swap to Telephoto_Mild for tighter angular response on a zoomed lens, or Wide_Mild for translation-dominant feel on a wide lens.
To dial intensity per cam without re-authoring the profile, adjust AmplitudeGain:
| AmplitudeGain | Result |
|---|
0.3 | Very subtle — barely-noticed sway. |
1.0 | Profile’s authored intensity (the default). |
2.0 | Doubles the amplitude — aggressive handheld. |
FrequencyGain similarly speeds up or slows down the noise without changing the amplitude.
Recipe: Event-Triggered Impact
A burst of shake that fires when gameplay code calls TriggerCameraImpulse(strength) on the cam.
| Slot | Pick | Key fields |
|---|
| Additive (Noise phase) | ImpulseNoise | Assign 6D_Shake.camnoiseprofile (shipped) for high-frequency impact micro-jitter across all six axes. Configure the ADSR envelope: typically Attack = 0.02, Decay = 0.1, Sustain Level = 0.7, Sustain Duration = 0.1, Release = 0.3. |
The ImpulseNoise stage stays silent until triggered. See The Basics: Triggering an Impulse from Gameplay Code for the call patterns (distance-attenuated source, active-cam lookup, etc.).
Recipe: Stacked Handheld + Impact
The most common configuration for action games: handheld baseline plus event-triggered impact bursts.
| Slot | Pick | Profile |
|---|
| Additive (Noise phase) | PerlinNoise | Normal_Mild.camnoiseprofile (continuous handheld baseline). |
| Additive (Noise phase) | ImpulseNoise | 6D_Shake.camnoiseprofile (event-triggered impact). |
Both run in the Noise phase. The PhantomCam component dispatches TriggerCameraImpulse to every ImpulseNoise additive on the cam, so if you stack multiple impulse stages with different profiles (light kick + heavy explosion), one trigger fires all of them — pass the right strength to attenuate.
See Also
Related recipe collections:
Basics this builds on:
Framework API:
2.1.3 - Camera Tug Configurations
Step-by-step recipes for tug-field cinematic pulls — vista pull, doorway glance, and decoupled source / destination patterns.
Tug Fields pull the camera’s pose toward a designated point while a proxy entity is inside a defined PhysX trigger volume. Each recipe below assumes the PhysX layer setup (TugProxy ↔ TugField collision-group pair) is already configured for your project.
For the concept, the three-component model, and the PhysX layer setup walkthrough, see The Basics: Tug Fields. For the per-tick algorithm and per-field reference, see Tug Fields (Framework API).
Before starting any recipe: Confirm the PhysX layer setup. If TugProxy and TugField aren’t paired (and only paired) in your collision-group preset, nothing will fire — that is the single biggest authoring failure for this system.
Contents
Recipe: Vista Pull
Pull the cam’s gaze toward a vista point when the player approaches a railing.
Entities
| Entity | Components |
|---|
| Player root (or a child entity) | TugFieldProxyComponent + PhysX trigger collider (small sphere or capsule) on the TugProxy layer. |
| “Vista trigger” (level entity, placed at the railing) | CameraTugVolumeComponent + PhysX trigger collider (a box covering the railing approach) on the TugField layer. |
| (Source on the same entity as the volume — default) | CameraTugSourceComponent configured with the vista point as the destination. |
Configuration
On the volume’s CameraTugSourceComponent:
| Field | Set to |
|---|
Tug Point Offset | Local offset to the proximity-reference point (default (0,0,0) works if the volume is centered on the railing). |
Destination Entity | (leave empty — destination = source for the simple case) |
Inner Radius | 1.0 m — within this radius, full pull. |
Outer Radius | 4.0 m — beyond this, no pull. |
Inner Weight | 1.0 |
Outer Weight | 0.0 |
Falloff Curve | EaseInOutQuadratic |
On the cam:
- Add a
TugAimListener to the m_additives list. Channels → leave empty (matches any).Blend Halflife → 0.4 (slow engagement / disengagement).Strength → 1.0.
The cam’s gaze now drifts toward the vista as the player approaches the railing, full at deadzone, none outside the outer radius.
Recipe: Doorway Glance
The cam glances through a doorway as the player walks past, then returns. Body stays put; only aim engages.
Same shape as the vista pull, but:
- The volume’s trigger collider is a flat slab across the doorway approach.
- The cam uses only
TugAimListener (not body). The cam continues to follow the player normally; aim drifts toward what’s beyond the doorway. - Configure a short halflife (
0.2) on the listener so the glance is responsive — engage as the player enters, release as the player exits.
Recipe: Decoupled Source and Destination
You want the volume to fire at one location but the cam to be pulled toward a different location. Common case: the player crosses a threshold, but the cam should look 10 m past it.
Setup
- Place the volume entity with
CameraTugVolumeComponent at the threshold. - Place a separate “destination entity” with
TransformComponent only (no CameraTugSourceComponent!) at the vista point. - Place a separate source entity with
CameraTugSourceComponent somewhere convenient (often on the volume entity itself, or as a child of it). Configure:Destination Entity → point at the destination entity from step 2.Destination Offset → local offset from that entity (default (0,0,0) works).
- On the volume’s
m_sourceEntity field, point at the source from step 3.
Now proximity is measured around the threshold (where the volume is), but the cam is pulled toward the vista point (the destination entity).
If you leave Destination Entity unset on the source component, destination falls back to source. The decoupled setup is only needed when they should differ.
See Also
Related recipe collections:
Basics this builds on:
Framework API:
2.1.4 - Group Target Configurations
Step-by-step recipes for GroupTargetComponent — two-player party cam, combat encounter framing, and collapse-to-single-view triggers.
A Group Target is an entity whose world transform is the weighted centroid of a runtime-editable subject list. You point a camera at it like any other target, and the cam frames “where the group is” rather than chasing any single subject.
For the concept, centroid modes, subject-management API, and pitfalls, see The Basics: Group Targets. For the full per-field reference and the registry bus, see Group Targets (Framework API).
Contents
Recipe: Two-Player Party Cam
A single cam that frames both players, sliding smoothly as they spread apart and converge.
Steps
Create a Group Target entity in your level (a plain entity with TransformComponent is fine).
Add GroupTargetComponent to it. Configure:
- Name →
"Party" (or any string — this is your registry key). - Centroid Mode →
WeightedMean. - Smoothing Halflife →
0.2 (gentle smoothing so the centroid doesn’t jitter when players move).
Add Subjects at level start (or whenever players spawn):
GS_PhantomCam::GroupTargetRequestBus::Event(
    groupEntityId,
    &GS_PhantomCam::GroupTargetRequests::AddSubject,
    player1EntityId, 1.0f);    // equal weight

GS_PhantomCam::GroupTargetRequestBus::Event(
    groupEntityId,
    &GS_PhantomCam::GroupTargetRequests::AddSubject,
    player2EntityId, 1.0f);
On the Phantom Camera: Set the Body and Aim stages’ Target Mode to GroupTarget and Group Target Name to "Party". The stages will resolve the group entity through the Cam Manager registry at runtime.
The cam now points at the weighted midpoint of both players. As they move, the centroid follows.
Tip — pull the cam back as the spread grows. Pair this group cam with a DynamicOrbitBody and adjust the orbit shape’s radius at runtime based on subject spread. The group’s centroid is the pivot; the cam stays a healthy distance back so both subjects stay in frame. See the Group-Framing Cam recipe for the stage composition side.
Recipe: Combat Encounter Frame
The cam frames an evolving encounter. Subjects are added when combatants engage and removed when they disengage or die.
Steps
Create a Group Target named "CurrentCombat" (or similar).
On combat start, add the player and the engaged enemies:
AddSubject(player, weight: 2.0);          // weight player higher
for (each enemy in encounter):
    AddSubject(enemy, weight: 1.0);
On enemy death or disengage, remove the subject:
RemoveSubject(deadEnemy);
On combat end, clear:
Set the cam’s Body and Aim to GroupTarget mode with name "CurrentCombat".
Why weight the player higher? Pure equal-weighting means a single enemy at long range drags the cam half-way to them. Weighting the player higher keeps framing centered on the player while still acknowledging the enemy’s presence.
When m_deactivateWhenEmpty is true (default), the cam falls back to hold-last-pose if the encounter clears completely — handy for the moment between encounters.
Recipe: Collapse to Single View
For multi-channel projects: when all players converge, switch from split-screen to a single shared cam, then receive a UI signal at the moment of collapse.
Steps
Create a Group Target tracking all players (same as the party cam recipe).
Author a shared cam outside any rig prefab. Set:
- Channel Scope →
TrueUnique. - Show Advanced → on.
- All Channels Share → on.
- Body / Aim Target Mode →
GroupTarget, name → "Party".
Tune priority so the shared cam wins arbitration when players are close enough (e.g. use a CameraInfluenceField volume around the players’ convergence point).
Listen for the collapse signal in your UI controller:
void OnAllChannelsActivatedSharedCam(AZ::EntityId sharedCam)
{
    // All channels selected the same shared cam — switch to single-view layout.
}
When players converge such that the shared cam wins in every channel simultaneously, the Cam Manager fires OnAllChannelsActivatedSharedCam once on the edge. UI hides split-screen dividers and shows the single shared view.
See Channel Tier Configurations for the surrounding multi-channel setup.
See Also
Related recipe collections:
Basics this builds on:
Framework API:
2.1.5 - Influence Field Configurations
Step-by-step recipes for camera priority shifts — spatial room boosts and stage-scoped always-on cinematic boosts.
Influence Fields modify the effective priority of Phantom Cameras without changing their base priority values. The spatial form fires when an entity enters a PhysX trigger volume; the global form applies for the component’s entire active lifetime.
For the concept, the channel-aware bus signature, and the priority-stacking model, see The Basics: Influence Fields. For component properties and the bus surface, see Camera Influence Fields (Framework API).
Contents
Recipe: Boost a Cam Inside a Room
The player should see a different camera when they walk into a vista room — same player priority, but a “VistaCam” that frames the view jumps to dominance inside the room.
Steps
- Place the VistaCam as a normal Phantom Camera entity in the room (or in your rig prefab). Give it a low base priority, e.g.
10. Author its Body and Aim stages to frame the vista. - Author the trigger volume:
- Create a new entity at the room’s entrance.
- Add a PhysX Collider (set to trigger mode), shaped to cover the room.
- Configure the collider’s Collides With to match the player’s collision layer.
- Add
CameraInfluenceFieldComponent to the same entity.
- Configure the influence:
- Camera Name →
VistaCam (the target Phantom Camera’s entity name). - Influence →
100 (enough to overcome the player’s normal cam priority).
- Place the entity in the level.
When the player walks in, the trigger fires AddCameraInfluence(volumeEntity, playerEntity, "VistaCam", 100). The Cam Manager routes the influence to the player’s channel; VistaCam’s effective priority jumps to 110 and wins arbitration. On exit, the influence is removed and the player’s normal cam wins again.
Recipe: Always-On Cinematic Boost
A specific stage should always favor a cinematic cam — say, the title screen’s slow-orbit cam should always be dominant when the title-screen stage is loaded.
Steps
- Author the cinematic cam with a moderate base priority (e.g.
20). - On the StageData entity for the title-screen stage:
- Add
GlobalCameraInfluenceComponent. - Set Camera Name to the cinematic cam’s entity name.
- Set the influence value (e.g.
200) high enough to dominate any other cams in the stage.
- Save the stage.
When the stage activates, the global influence registers; the cinematic cam wins. When the stage unloads, the influence is removed.
This is cleaner than authoring the cinematic cam at priority 220 directly because the priority boost is scoped to the stage — the same cinematic cam at base 20 won’t accidentally win arbitration if it’s referenced elsewhere.
See Also
Related recipe collections:
Basics this builds on:
Framework API:
Related utilities:
2.1.6 - Channel Tier Configurations
Step-by-step walkthroughs for the PhantomCam channel system — Tier 1 single cam, Tier 2 level-placed, Tier 3 multi-channel co-op, common Tier 3 patterns, and the lobby flow for variable player counts.
GS_PhantomCam can be configured at three different tiers depending on what your project needs. Most projects use Tier 1 (single-cam) or Tier 2 (single-player rig). Co-op, split-screen, and per-player-cinematic projects use Tier 3 (multi-channel). The per-cam authoring surface is identical across tiers — what changes is the Cam Manager configuration and how many rigs the system spawns.
For the concept of channels, the choose-a-tier table, and pitfalls, see The Basics: Channels & Instancing. For the full bus surface and internal state, see Channels & Instancing (Framework API).
Multi-view rendering is pending. Until the AttachmentImage work lands, the engine renders one channel’s view at a time even when multiple channels are arbitrating internally. The Cam Manager’s active main-view API selects which channel reaches the framebuffer. Arbitration / dispatch / target binding all work today — only the simultaneous-rendering piece is gated.

Contents
Recipe: Tier 1 — Single Cam
The Cam Manager spawns one rig prefab on startup, and every Phantom Camera inside it registers to channel 0.
Steps
Author a rig prefab. Create a prefab containing:
- A root entity (anything — it can be empty, or a logical “Camera Rig” entity).
- A child entity carrying
GS_CamCoreComponent plus the engine’s standard CameraComponent. This is the main camera. - Zero or more child entities carrying
GS_PhantomCameraComponent with their authored Body / Aim stages.
On the Cam Manager component:
- Set Primary Rig Prefab to your rig prefab.
- Leave Enable Instanced Channels OFF (default).
Bind a target when the player spawns:
CamManagerRequestBus::Broadcast(SetTarget, playerEntity);
The Cam Manager spawns the rig at startup. The rig’s Cam Core and Phantom Cameras self-register to channel 0. The SettingNewCam legacy notification fires when the dominant cam changes.
That’s it. No further per-cam setup required.
Recipe: Tier 2 — Single-Player Rig (Legacy)
Same single-player behavior, but the Cam Core lives in the level rather than in a spawned prefab. Use this when you have an existing project that hand-places the Cam Core and you don’t want to refactor.
Steps
- Hand-place the Cam Core entity in your level (as a child of the Cam Manager prefab, or any persistent entity).
- On the Cam Manager:
- Leave Primary Rig Prefab empty.
- Leave Enable Instanced Channels OFF.
- Bind a target as in Tier 1.
The level-placed Cam Core and Phantom Cameras self-register to channel 0 via the legacy bus path (no ChannelStampComponent ancestor, so the stamp walk misses and the legacy registration falls through).
Recipe: Tier 3 — Multi-Channel Co-op
The Cam Manager spawns one rig per active channel. Each channel arbitrates independently. Per-player target binding routes through SetChannelTarget.
Steps
Author your rig prefab as in Tier 1. The same prefab can be reused across all channels (symmetric setup) or you can author multiple prefabs for asymmetric setups (e.g. P1 third-person, P2 top-down).
On the Cam Manager:
Toggle Enable Instanced Channels ON. The channel-aware fields appear in the inspector.
Set Primary Rig Prefab to your default rig (used as universal fallback — channels with no per-channel override inherit this).
Populate Channel Configs with one entry per supported player slot:
| Field | Set to |
|---|
| Channel Name | "P1", "P2", etc. (display label only — not a lookup key). |
| Channel Policy | PerChannelInstance (default — the rig spawns once per channel). |
| Rig Override Prefab | Leave empty for symmetric (every channel uses the primary). Set to a per-channel prefab for asymmetric. |
| Enabled By Default | true for slots that should spawn on startup. |
Optionally set Active Channel Count to cap how many channels actually spawn at startup (the lobby may override this — see Lobby Flow).
Per-player target binding — when each player spawns:
CamManagerRequestBus::Broadcast(SetChannelTarget, channelId, playerEntity);
The Cam Manager pushes the target to every cam in that channel and triggers a synchronous snap so the cam jumps to its evaluated pose before the Cam Core latches.
The Cam Manager spawns each enabled channel’s rig at startup. Each rig’s Cam Core registers to its channel; each Phantom Camera walks its ancestors to find the auto-attached ChannelStampComponent and registers to the same channel.
Common Tier 3 Patterns
Per-player cam (in-rig)
Drop a Phantom Camera inside the rig prefab with m_channelScope = Local (default). When the rig spawns for channel N, the cam’s auto-stamp-walk finds the rig’s ChannelStampComponent and registers to channel N. Each spawned rig instance carries its own copy — players don’t see each other’s cams.
Same logical cam name across channels
Keep entity names like "third_person_rig_cam" inside the rig prefab. The name is scoped within the channel — channel 0 and channel 1 each have their own "third_person_rig_cam" and they don’t collide. Authors never type _i1 / _i2 suffixes.
Shared cinematic cam — collapse-to-one-view
Author a Phantom Camera outside any rig prefab (in the level, or in a “shared cinematic” prefab that is not the channel rig). Set:
- Channel Scope →
TrueUnique. - Show Advanced → on.
- All Channels Share → on.
The cam appears in every active channel’s priority table. When players converge (e.g. a Group Target tracks all players and the shared cam targets the group), the shared cam may win arbitration in every channel simultaneously. At that edge, the Cam Manager broadcasts OnAllChannelsActivatedSharedCam(sharedCam) — UI can detect this and switch from split-screen layout to single-view. See the Collapse to Single View recipe for the group-target side.
Hero-perspective cam for a specific player
A cam that should only ever apply to one specific channel:
- Channel Scope →
TrueUnique. - Bound Channel Id → the channel number (e.g. 0 for P1).
- Leave All Channels Share off.
The cam is registered directly to that channel via RegisterPhantomCamDirect — bypasses the stamp-walk path entirely.
Cross-channel cinematic dispatch
Force a specific cam to render on a specific Cam Core, regardless of arbitration:
CamManagerRequestBus::Broadcast(DispatchCamToCamCore, cinematicCamEntity, p1CamCore);
// ... cinematic plays ...
CamManagerRequestBus::Broadcast(ReleaseCamCoreDispatch, p1CamCore);
Channel arbitration still runs internally during dispatch — SettingNewCamOnChannel continues firing with the arbitrated winner. Only the Cam Core route is overridden, so HUD or AI behavior that listens for arbitration changes still sees the “natural” winner.
Lobby Flow
The typical lobby pattern for variable player counts:
Author m_channelConfigs to hold N entries (the max supported player count for your project — e.g. 4).
Pre-startup (before the Cam Manager’s OnStartupComplete fires), the lobby calls:
CamManagerRequestBus::Broadcast(SetActiveChannelCount, actualPlayerCount);
On startup, only actualPlayerCount channels spawn. The remaining configured channels stay dormant.
Mid-session join / drop uses EnableChannel(channelId) / DisableChannel(channelId) to spawn or despawn channels as players come and go.
SetActiveChannelCount must run pre-startup. Mid-session calls warn and are ignored — use EnableChannel / DisableChannel instead.
See Also
Related recipe collections:
Basics this builds on:
Framework API:
3 - Video Tutorials
Index of Video based tutorials.
Tutorial Sets
3.1 - Simple Project Setup
Easy set up to get started.
A guide to get everything propped up rapidly
Video Tutorial
Embed youtube guide.
Link to video_tutorials.