GS_Core
The foundation gem for the GS_Play framework — game lifecycle, save system, stage management, input, actions, motion animation system, and utility libraries.
GS_Core is the required foundation for every GS_Play project. All other GS gems depend on it. It provides game lifecycle management (startup, shutdown, standby), persistence (save/load), level loading, input handling, triggerable actions, and a shared utility library.
For usage guides and setup examples, see The Basics: GS_Core.
Contents
GS_Managers
The lifecycle and startup management system. The Game Manager is a singleton placed in every level — it spawns all registered manager prefabs, coordinates their two-stage initialization, and provides global game navigation and standby mode.
All built-in GS_Play managers (Save, Stage, Options, UI, Unit, Camera, Audio) and any custom managers you create extend the Manager base class and plug into this system automatically.
| Component | Purpose |
|---|
| Game Manager | Top-level lifecycle controller. Spawns managers, handles navigation, standby, and debug mode. |
| Manager (Base) | Base class for all managers. Handles two-stage initialization automatically. |
GS_Managers API
GS_Save
The persistence system. The Save Manager orchestrates save and load operations across the project. Savers are per-entity components that serialize component state. The Record Keeper stores flat key-value progression records independently of the Saver system.
| Component | Purpose |
|---|
| Save Manager | Coordinates all save and load operations. |
| Savers | Per-entity components that serialize transform and physics state. |
| Record Keeper | Key-value progression store (flags, counters, unlock states). |
GS_Save API
GS_StageManager
The level loading and navigation system. The Stage Manager owns the ordered stage list for the project and handles all level transitions. Stage Data components are placed in each level as anchors and spin-up controllers for that level’s systems.
| Component | Purpose |
|---|
| Stage Manager | Manages stage list and handles transition requests. |
| Stage Data | Per-level anchor, spawn point, and activation controller. |
GS_StageManager API
GS_Options
Options and input profile management. The Options Manager persists player preferences. Input Profiles are data assets that hold input bindings, swappable at runtime.
GS_Options API
Systems
Core framework systems used across multiple gems: the GS_Motion track-based animation engine and the GS_Actions triggerable behavior system.
| System | Purpose |
|---|
| GS_Motion | Track-based animation and tween engine — abstract base classes extended by domain gems. |
| GS_Actions | Triggerable, composable, data-driven behaviors attachable to any entity. |
Systems API
Utilities
A general-purpose library of components and math helpers.
| Area | Contents |
|---|
| Physics | Physics Trigger Volume |
| Easing Curves | 40+ curve types (Linear, Quad, Cubic, Sine, Expo, Circ, Back, Elastic, Bounce) |
| Spring Dampers | 15+ spring functions including Simple, Acceleration, Double, Timed, Quaternion |
| Gradients | Color, float, and Vector2 gradients |
| Entity Helpers | Entity lookup by name |
| Random | Weighted random selection |
| Splines | Closest point, fraction, and local/world conversion |
| Angle Helpers | Yaw, quaternion from direction, section-by-angle mapping |
Utilities API
Installation
GS_Core is required by all GS_Play projects. Add it to your project before any other GS gem.
- Follow the Simple Project Setup guide for full walkthrough.
- Configure collision layers and physics per the Setup Environment guide.
- Create a Game Manager prefab and place it in every level.
- Add the managers you need to the Game Manager’s Startup Managers list.
See Also
For conceptual overviews and usage guides:
For related resources:
Get GS_Core
GS_Core — Explore this gem on the product page and add it to your project.
1 - GS_Managers
The game lifecycle management system — startup sequencing, systemic navigation, and the extensible manager pattern.
The Managers system is the backbone of every GS_Play project. It provides a controlled startup sequence that initializes game systems in the correct order, global access to those systems via EBus, and systemic navigation (New Game, Load Game, Quit) from a single point of control.
Every GS_Play gem that has a manager component (Save, Stage, UI, Unit, Camera, Audio, etc.) plugs into this system automatically.
For usage guides and setup examples, see The Basics: GS_Core.
Contents
Architecture
Breakdown
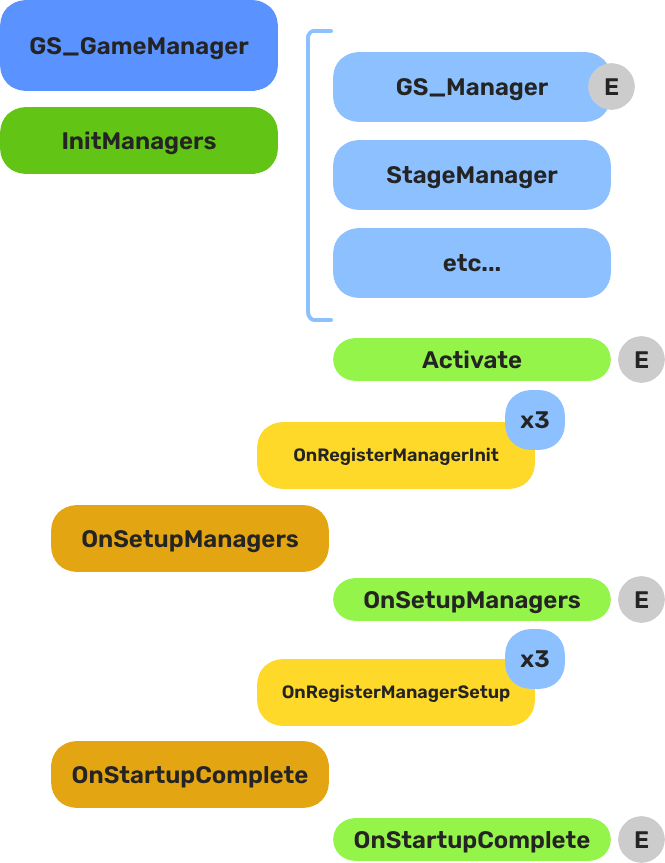
When the project starts, the Game Manager runs three stages before the game is considered ready:
| Stage | Broadcast Event | What It Means |
|---|
| 1 — Initialize | (internal) | Each manager is spawned. They activate, then report ready. |
| 2 — Setup | OnSetupManagers | Setup stage. Now safe to query other managers. |
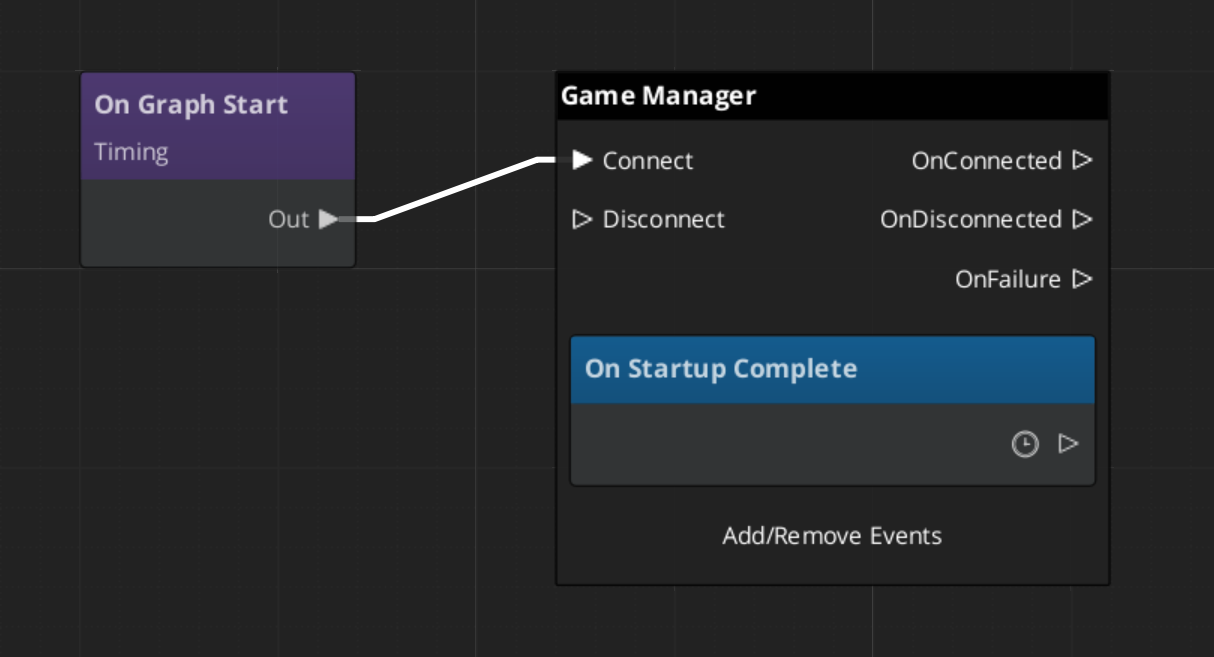
| 3 — Complete | OnStartupComplete | Last stage. Everything is ready.
Do any last minute things. Now safe to begin gameplay. |
For most scripts, you only need OnStartupComplete. Wait for this event before doing anything that depends on managers to be completely setup.
E Indicates extensible classes and methods.
Patterns - Complete list of system patterns used in GS_Play.
Components
| Component | Purpose | Reference |
|---|
| GS_GameManagerComponent | Top-level lifecycle controller. Spawns managers, handles New Game / Load / Quit / Standby. | Game Manager |
| GS_ManagerComponent | Base class for all game system managers. Handles the two-stage init pattern automatically. | Manager |
Quick Start
For step-by-step setup, see Game Manager — Setup and Manager — Setup.
For creating custom managers, see Manager — Extending the Manager Class.
See Also
For conceptual overviews and usage guides:
For component references:
For related resources:
Get GS_Core
GS_Core — Explore this gem on the product page and add it to your project.
1.1 - Game Manager
The top-level game lifecycle controller — startup sequencing, systemic navigation, standby mode, and debug support.
The Game Manager is the root component of every GS_Play project. It controls the game lifecycle from startup through shutdown: spawning and initializing all Manager components in the correct order, providing systemic navigation (New Game, Load Game, Return to Title, Quit), and coordinating standby mode for pausing gameplay during level transitions or other blocking operations.
Every level in your project should contain the same Game Manager prefab. In debug mode it stays in the current level on start; in release mode it navigates to your title stage.
For usage guides and setup examples, see The Basics: GS_Core.
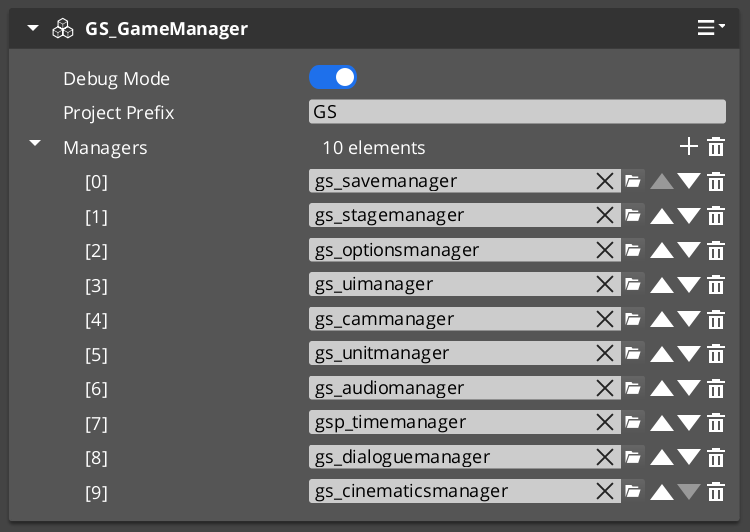
The Game Manager component in the Entity Inspector, with added manager prefabs in the Startup Managers list.
Contents
Design Intent
Extend the Game Manager when you need project-wide changes to startup ordering, custom post-startup logic (analytics sessions, online service initialization), or additional global lifecycle events. For most projects, the built-in component is sufficient as-is. Do not move gameplay logic here — the Game Manager orchestrates systems, it does not run game rules.
Dependencies & Interactions
| Coordinates with | Role |
|---|
| GS_SaveManager | Owns all save/load file operations triggered by NewGame, ContinueGame, LoadGame, SaveAndExitGame |
| GS_StageManager | Owns level navigation during NewGame, LoadGame, and ReturnToTitle |
| GS_ManagerComponent | Base class all spawned managers extend |
| All other GS gem managers | Any manager in the Startup Managers list registers automatically |
Setup
Game Manager Entity

The Game Manager wrapper entity set as Editor-Only inside Prefab Edit Mode.
- Create an entity and attach the GS_GameManagerComponent (or your extended version).
- Turn the entity into a prefab.
- Enter prefab edit mode. Set the wrapper entity (the parent of your Game Manager entity) to Editor Only. Save the prefab.
- Create Manager prefabs for the systems you need (Save, Stage, Options, or custom managers).
- Add each Manager
.spawnable to the Game Manager’s Startup Managers list in the Entity Inspector. - Push your overrides into the prefab to propagate across all levels.
Place your Game Manager prefab at the top of every level in the Entity Outliner.
The premade manager prefabs for each GS_Play gem are located in that gem’s Assets/Prefabs directory.
Core Concepts
Startup Sequence
When the project starts, the Game Manager executes a three-stage startup:
- Spawn Managers — The Game Manager instantiates every prefab in its Startup Managers list. Each manager component runs its
Activate() and reports back via OnRegisterManagerInit(). - Startup Managers — Once all managers report initialized, the Game Manager broadcasts
OnSetupManagers(). Managers now connect to each other and report back via OnRegisterManagerStartup(). - Startup Complete — Once all managers report started up, the Game Manager broadcasts
OnStartupComplete(). The game is fully initialized and ready to run.
At each stage, the Game Manager counts reports and only proceeds when every spawned manager has reported. This guarantees safe cross-referencing between managers in Stage 2.
Systemic Navigation
The Game Manager provides the high-level game flow methods that drive your project:
- NewGame / NewGame(saveName) — Starts a new game, optionally with a named save file.
- ContinueGame — Loads the most recent save and continues.
- LoadGame(saveName) — Loads a specific save file.
- ReturnToTitle — Returns to the title stage, tearing down the current game session.
- SaveAndExitGame / ExitGame — Saves and/or exits the application.
These methods coordinate with the Save Manager and Stage Manager automatically.
Standby Mode
Standby is a global pause mechanism. When the Game Manager enters standby, it broadcasts OnEnterStandby() to all managers, which propagate the signal to their subsystems. This halts timers, physics, gameplay ticks, and other simulation while a blocking operation (like a stage change) completes. Calling ExitStandby reverses the process.
Debug Mode
When Debug Mode is enabled in the Inspector, the Game Manager skips navigating to the title stage and remains in the current level. This allows rapid iteration — you can start the game from any level without going through the full title-to-gameplay flow. If save data and unit management are enabled, it loads default save data but overrides position data with the current level’s default spawn point.
Inspector Properties
| Property | Type | Description |
|---|
| Project Prefix | String | Sets the project prefix for generated files (e.g. save files). Example: "GS" produces GS_SaveGame.json. |
| Startup Managers | List of Manager Prefabs | The manager prefab spawnables to instantiate on game start. Order does not matter — the two-stage init handles dependencies. (C++: AZStd::vector<SpawnableAssetRef>) |
| Debug Mode | Bool | When enabled, the Game Manager stays in the current level instead of navigating to the title stage. |
API Reference
Request Bus: GameManagerRequestBus
Commands sent to the Game Manager. Singleton bus — single address, single handler.
| Method | Parameters | Returns | Description |
|---|
IsInDebug | — | bool | Returns whether debug mode is active. |
IsStarted | — | bool | Returns whether the startup sequence has completed. |
GetProjectPrefix | — | AZStd::string | Returns the configured project prefix string. |
EnterStandby | — | void | Broadcasts standby to all managers, pausing gameplay. |
ExitStandby | — | void | Broadcasts standby exit, resuming gameplay. |
NewGame | — | void | Starts a new game with the default save name. |
NewGame | const AZStd::string& saveName | void | Starts a new game with a specified save file name. |
ContinueGame | — | void | Loads the most recent save file and continues. |
LoadGame | const AZStd::string& saveName | void | Loads a specific save file by name. |
ReturnToTitle | — | void | Returns to the title stage, tearing down the current session. |
SaveAndExitGame | — | void | Saves the current game state and exits the application. |
ExitGame | — | void | Exits the application without saving. |
Notification Bus: GameManagerNotificationBus
Events broadcast by the Game Manager. Multiple handler bus — any number of components can subscribe.
| Event | Parameters | Returns | Description |
|---|
OnSetupManagers | — | — | Fired when all managers have reported initialized. Managers should now connect to each other. |
OnStartupComplete | — | — | Fired when the full startup sequence is complete. Safe to begin gameplay. |
OnShutdownManagers | — | — | Fired when the game is shutting down. Managers should clean up. |
OnBeginGame | — | — | Fired when a new game or loaded game begins. |
OnEnterStandby | — | — | Fired when entering standby mode. Pause your systems. |
OnExitStandby | — | — | Fired when exiting standby mode. Resume your systems. |
ScriptCanvas Nodes
These methods and events are available as ScriptCanvas nodes.
Request Nodes
| Node | Description |
|---|
TriggerNewGame | Starts a new game with the default save name. |
TriggerNewGameWithName(saveName) | Starts a new game with a named save file. |
TriggerContinueGame | Continues from the most recent save. |
TriggerLoadGame(saveName) | Loads a specific save file by name. |
TriggerReturnToTitle | Returns to the title stage. |
TriggerSaveAndExitGame | Saves and exits. |
TriggerExitGame | Exits without saving. |
Notification Nodes
Listen for these events on GameManagerNotificationBus.
| Node | When It Fires |
|---|
OnStartupComplete | The game is fully initialized and ready to run. |
OnBeginGame | A new or loaded game session begins. |
OnEnterStandby | The game has entered standby (paused). |
OnExitStandby | The game has exited standby (resumed). |
Virtual Methods
Override these when extending the Game Manager. Always call the base implementation.
| Method | Parameters | Returns | Description |
|---|
InitializeManagers() | — | void | Spawns the Startup Managers list. Override to add custom spawn logic. |
ProcessFallbackSpawn() | — | void | Handles fallback when a manager fails to spawn. |
StartupManagers() | — | void | Broadcasts OnSetupManagers. Override to inject logic between init and startup stages. |
CompleteStartup() | — | void | Broadcasts OnStartupComplete. Override to add post-startup logic. |
BeginGame() | — | void | Called when transitioning into active gameplay. |
SC ↔ C++ Quick Reference
| Action | ScriptCanvas Node | C++ Method | Notes |
|---|
| Start a new game | TriggerNewGame | NewGame() | Default save name |
| Start with named save | TriggerNewGameWithName(name) | NewGame(saveName) | Named save file |
| Continue from last save | TriggerContinueGame | ContinueGame() | Loads most recent save |
| Load specific save | TriggerLoadGame(name) | LoadGame(saveName) | Load by file name |
| Return to title | TriggerReturnToTitle | ReturnToTitle() | Tears down current session |
| Save and exit | TriggerSaveAndExitGame | SaveAndExitGame() | — |
| Exit without saving | TriggerExitGame | ExitGame() | — |
| Check if started | — | IsStarted() | Returns bool |
Usage Examples
ScriptCanvas: Title Screen Workflow
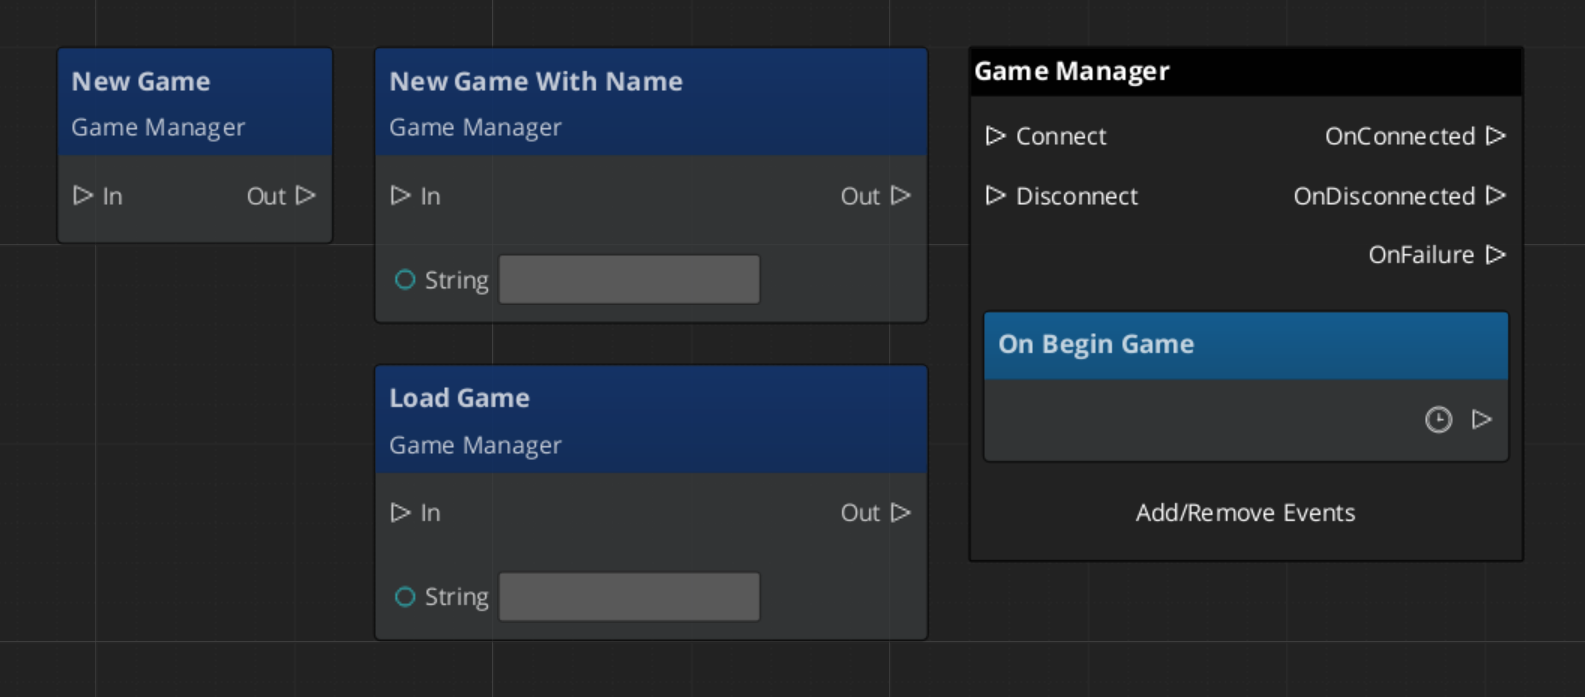
Calling new or load game proceedes to start the gameplay and systems. Begin Game event fires to start all systems across the game.
Debug Mode automatically begins the game.
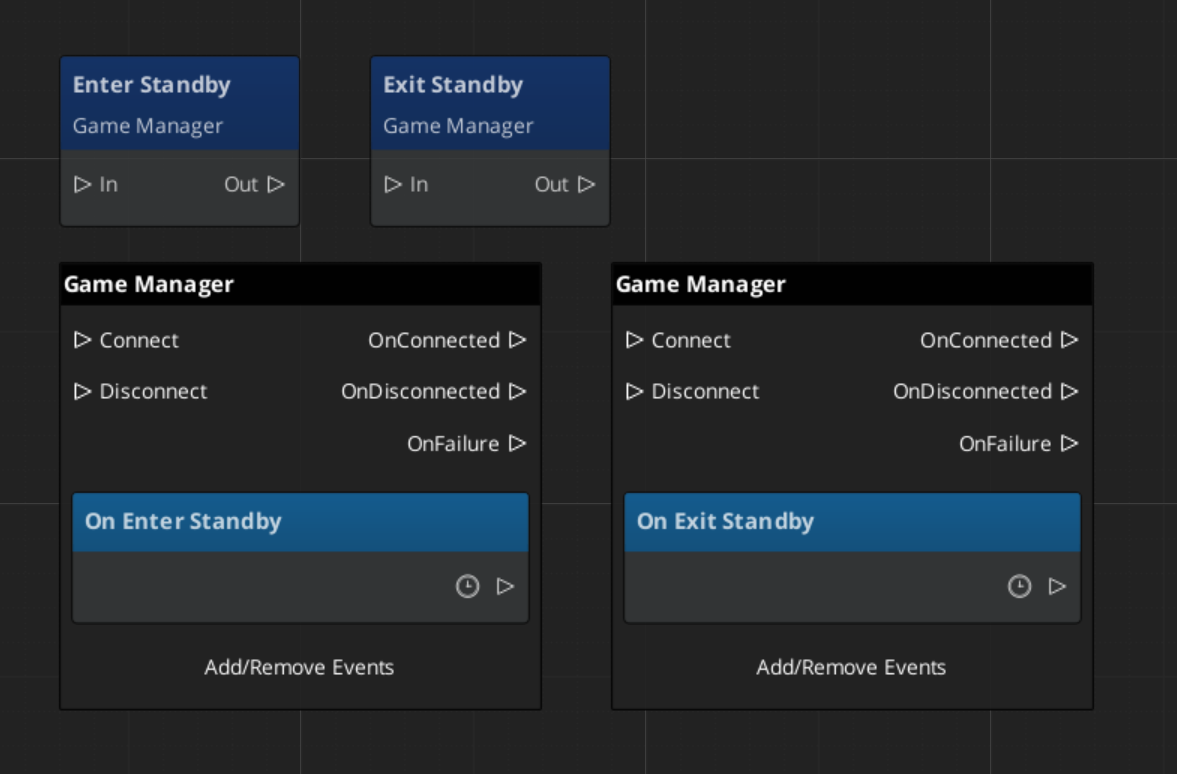
ScriptCanvas: Standby Logic
C++: Reacting to Events
A gameplay component that listens to the full startup and standby lifecycle:
#include <GS_Core/GS_CoreBus.h>

class MyGameplayComponent
    : public AZ::Component
    , protected GS_Core::GameManagerNotificationBus::Handler
{
protected:
    void Activate() override
    {
        GS_Core::GameManagerNotificationBus::Handler::BusConnect();
    }

    void Deactivate() override
    {
        GS_Core::GameManagerNotificationBus::Handler::BusDisconnect();
    }

    void OnStartupComplete() override
    {
        // Safe to access all managers and begin gameplay logic
    }

    void OnEnterStandby() override
    {
        // Pause your gameplay systems
    }

    void OnExitStandby() override
    {
        // Resume your gameplay systems
    }
};
C++: Custom Manager Integration
A manager that receives the startup handshake from the Game Manager. Add this class’s prefab to the Game Manager’s Startup Managers list:
#include <GS_Core/GS_CoreBus.h>
#include <Source/Managers/GS_ManagerComponent.h>

class MySystemManager
    : public GS_Core::GS_ManagerComponent
    , protected GS_Core::GameManagerNotificationBus::Handler
{
public:
    AZ_COMPONENT_DECL(MySystemManager);
    static void Reflect(AZ::ReflectContext* context);

protected:
    void Activate() override
    {
        GS_Core::GS_ManagerComponent::Activate();                        // Required: registers with Game Manager
        GS_Core::GameManagerNotificationBus::Handler::BusConnect();
    }

    void Deactivate() override
    {
        GS_Core::GameManagerNotificationBus::Handler::BusDisconnect();
        GS_Core::GS_ManagerComponent::Deactivate();                      // Required: deregisters from Game Manager
    }

    // Called during Stage 2 — safe to reference other managers here
    void OnSetupManagers() override
    {
        // Connect to other managers, set up cross-system references
    }

    // Called when the full startup sequence completes — safe to begin gameplay
    void OnStartupComplete() override
    {
        // Initialize systems that depend on all managers being ready
    }

    void OnEnterStandby() override { /* pause your systems */ }
    void OnExitStandby()  override { /* resume your systems */ }
};
Extending the Game Manager
Extend the Game Manager to add custom startup logic, additional lifecycle events, or project-specific behavior. Extension is done in C++.
#pragma once
#include <GS_Core/GS_CoreBus.h>
#include <Source/Managers/GS_GameManagerComponent.h>

namespace MyProject
{
    class MyGameManager : public GS_Core::GS_GameManagerComponent
    {
    public:
        AZ_COMPONENT_DECL(MyGameManager);

        static void Reflect(AZ::ReflectContext* context);

    protected:
        void InitializeManagers() override;
        void StartupManagers() override;
        void CompleteStartup() override;
        void BeginGame() override;
    };
}
Implementation (.cpp)
#include "MyGameManager.h"
#include <AzCore/Serialization/SerializeContext.h>

namespace MyProject
{
    AZ_COMPONENT_IMPL(MyGameManager, "MyGameManager", "{YOUR-UUID-HERE}");

    void MyGameManager::Reflect(AZ::ReflectContext* context)
    {
        if (auto serializeContext = azrtti_cast<AZ::SerializeContext*>(context))
        {
            serializeContext->Class<MyGameManager, GS_Core::GS_GameManagerComponent>()
                ->Version(0);

            if (AZ::EditContext* editContext = serializeContext->GetEditContext())
            {
                editContext->Class<MyGameManager>("My Game Manager", "Custom game manager for MyProject")
                    ->ClassElement(AZ::Edit::ClassElements::EditorData, "")
                        ->Attribute(AZ::Edit::Attributes::Category, "MyProject")
                        ->Attribute(AZ::Edit::Attributes::AppearsInAddComponentMenu, AZ_CRC_CE("Game"));
            }
        }
    }

    void MyGameManager::InitializeManagers()
    {
        // Call base to spawn the standard manager list
        GS_GameManagerComponent::InitializeManagers();
        // Custom initialization logic here
    }

    void MyGameManager::StartupManagers()
    {
        // Call base to handle standard startup
        GS_GameManagerComponent::StartupManagers();
    }

    void MyGameManager::CompleteStartup()
    {
        // Call base to broadcast OnStartupComplete
        GS_GameManagerComponent::CompleteStartup();
        // Post-startup logic here (e.g. connect to analytics, initialize online services)
    }

    void MyGameManager::BeginGame()
    {
        GS_GameManagerComponent::BeginGame();
        // Custom game start logic
    }
}
See Also
For scripting patterns and SC-first usage:
For related components:
Get GS_Core
GS_Core — Explore this gem on the product page and add it to your project.
1.2 - Manager
The base class for all game system managers — automatic two-stage initialization and lifecycle integration with the Game Manager.
For usage guides and setup examples, see The Basics: GS_Core.

A Manager prefab with the wrapper entity set as Editor-Only inside Prefab Edit Mode.
GS_GameManager
  └── (spawns) GS_ManagerComponent ◄ you are here — and all other managers extend this
The GS_ManagerComponent is the base class that all game system managers inherit from. It handles the two-stage initialization pattern with the Game Manager automatically, so you can focus on your system’s logic without worrying about startup ordering.
Every built-in GS_Play manager (Save, Stage, Options, UI, Unit, Camera, Audio, Performer) extends this class. When you need a custom game system manager, you extend it too.
Contents
How It Works
When the Game Manager spawns its list of manager prefabs, each Manager component goes through this lifecycle:
Activate — The component initializes itself (connects to buses, sets up internal state). When done, broadcasts OnRegisterManagerInit() to tell the Game Manager it is ready.
OnStartupManagers — Called by the Game Manager after all managers have reported initialized. Connect to other managers and set up cross-references here. When done, broadcasts OnRegisterManagerStartup().
OnStartupComplete — The Game Manager broadcasts this after all managers report started up. The game is fully ready.
OnEnterStandby / OnExitStandby — Called when the Game Manager enters or exits standby mode. Pause and resume your subsystem here.
OnShutdownManagers — Called when the game is shutting down. Clean up resources and disconnect buses.
The base class handles steps 1–2 automatically. Override them to add your logic, then call the base implementation to complete the handshake.
Setup
The Manager wrapper entity set as Editor-Only inside Prefab Edit Mode.
- Create an entity. Attach your Manager component (built-in or custom) to it.
- Configure any properties needed in the Entity Inspector.
- Turn the entity into a prefab.
- Enter prefab edit mode. Set the wrapper entity (parent of your Manager entity) to Editor Only. Save.
- Delete the Manager entity from the level (it will be spawned by the Game Manager at runtime).
- In the Game Manager prefab, add your Manager
.spawnable to the Startup Managers list.
The premade manager prefabs for each GS_Play gem are located in that gem’s Assets/Prefabs directory.
Inspector Properties
The base GS_ManagerComponent exposes no inspector properties of its own. Properties are defined by each inheriting manager component (e.g., the Save Manager exposes a Save System Version Number, the Stage Manager exposes a Stages list).
API Reference
Lifecycle Events: GameManagerNotificationBus
The Manager base class automatically subscribes to these events from the Game Manager:
| Event | When It Fires | What You Do |
|---|
OnStartupManagers | All managers are initialized | Connect to other managers, set up cross-references, then call base to report. |
OnStartupComplete | All managers are started up | Begin runtime operation. |
OnEnterStandby | Game is entering standby | Pause your subsystem (stop ticks, halt processing). |
OnExitStandby | Game is exiting standby | Resume your subsystem. |
OnShutdownManagers | Game is shutting down | Clean up resources, disconnect buses. |
Registration Methods
Called internally by the Manager base class to report back to the Game Manager. Do not call these manually — call the base class method instead.
| Method | Description |
|---|
OnRegisterManagerInit() | Called at the end of Activate(). Reports to the Game Manager that this manager has initialized. |
OnRegisterManagerStartup() | Called at the end of OnStartupManagers(). Reports to the Game Manager that this manager has started up. |
Usage Examples
C++ — Checking if the Game Manager Is Ready
#include <GS_Core/GS_CoreBus.h>

bool isStarted = false;
GS_Core::GameManagerRequestBus::BroadcastResult(
    isStarted,
    &GS_Core::GameManagerRequestBus::Events::IsStarted
);

if (isStarted)
{
    // Safe to access all managers
}
Extending the Manager Class
Create a custom manager whenever you need a singleton game system that initializes with the rest of the framework. Extension is done in C++.
#pragma once
#include <Source/Managers/GS_ManagerComponent.h>

// Define your EBus interface for other systems to call your manager
class MyManagerRequests
{
public:
    AZ_RTTI(MyManagerRequests, "{YOUR-UUID-HERE}");
    virtual ~MyManagerRequests() = default;

    virtual int GetSomeValue() = 0;
    virtual void DoSomething() = 0;
};

class MyManagerBusTraits : public AZ::EBusTraits
{
public:
    static constexpr AZ::EBusHandlerPolicy HandlerPolicy = AZ::EBusHandlerPolicy::Single;
    static constexpr AZ::EBusAddressPolicy AddressPolicy = AZ::EBusAddressPolicy::Single;
};

using MyManagerRequestBus = AZ::EBus<MyManagerRequests, MyManagerBusTraits>;

namespace MyProject
{
    class MyManagerComponent
        : public GS_Core::GS_ManagerComponent
        , protected MyManagerRequestBus::Handler
    {
    public:
        AZ_COMPONENT_DECL(MyManagerComponent);

        static void Reflect(AZ::ReflectContext* context);

    protected:
        // Manager lifecycle
        void Activate() override;
        void Deactivate() override;
        void OnStartupManagers() override;
        void OnEnterStandby() override;
        void OnExitStandby() override;

        // Your bus implementation
        int GetSomeValue() override;
        void DoSomething() override;

    private:
        int m_someValue = 0;
    };
}
Implementation (.cpp)
#include "MyManagerComponent.h"
#include <AzCore/Serialization/SerializeContext.h>

namespace MyProject
{
    AZ_COMPONENT_IMPL(MyManagerComponent, "MyManagerComponent", "{YOUR-UUID-HERE}");

    void MyManagerComponent::Reflect(AZ::ReflectContext* context)
    {
        if (auto serializeContext = azrtti_cast<AZ::SerializeContext*>(context))
        {
            serializeContext->Class<MyManagerComponent, GS_Core::GS_ManagerComponent>()
                ->Version(0)
                ->Field("SomeValue", &MyManagerComponent::m_someValue);

            if (AZ::EditContext* editContext = serializeContext->GetEditContext())
            {
                editContext->Class<MyManagerComponent>("My Manager", "A custom game system manager")
                    ->ClassElement(AZ::Edit::ClassElements::EditorData, "")
                        ->Attribute(AZ::Edit::Attributes::Category, "MyProject")
                        ->Attribute(AZ::Edit::Attributes::AppearsInAddComponentMenu, AZ_CRC_CE("Game"))
                    ->DataElement(AZ::Edit::UIHandlers::Default,
                        &MyManagerComponent::m_someValue, "Some Value", "Description of this property");
            }
        }
    }

    void MyManagerComponent::Activate()
    {
        MyManagerRequestBus::Handler::BusConnect();

        // IMPORTANT: Call base Activate last — it reports OnRegisterManagerInit()
        GS_ManagerComponent::Activate();
    }

    void MyManagerComponent::Deactivate()
    {
        MyManagerRequestBus::Handler::BusDisconnect();
        GS_ManagerComponent::Deactivate();
    }

    void MyManagerComponent::OnStartupManagers()
    {
        // Access other managers here — they are all initialized by now

        // IMPORTANT: Call base last — it reports OnRegisterManagerStartup()
        GS_ManagerComponent::OnStartupManagers();
    }

    void MyManagerComponent::OnEnterStandby()
    {
        // Pause your subsystem
    }

    void MyManagerComponent::OnExitStandby()
    {
        // Resume your subsystem
    }

    int MyManagerComponent::GetSomeValue()
    {
        return m_someValue;
    }

    void MyManagerComponent::DoSomething()
    {
        // Your game system logic
    }
}
Module Registration
m_descriptors.insert(m_descriptors.end(), {
    MyProject::MyManagerComponent::CreateDescriptor(),
});
Then create a prefab for your manager and add it to the Game Manager’s Startup Managers list.
See Also
For conceptual overviews and usage guides:
For component references:
For related resources:
Get GS_Core
GS_Core — Explore this gem on the product page and add it to your project.
2 - GS_Save
The persistence system — save files, load data, and track progression with managers, savers, and record keepers.
The Save system is the universal means of storing, loading, and handling game data. It provides a centralized Save Manager for file operations, entity-level Saver components for automatic data capture, and a Record Keeper for lightweight progression tracking — all backed by JSON-formatted save files that work across PC, console, and mobile platforms.
Every component that needs to persist data plugs into this system through one of two patterns: extend the Saver base class for complex per-entity data, or use the Record Keeper for simple key-value records.
For usage guides and setup examples, see The Basics: GS_Core.
Contents
Architecture
Breakdown
When a save or load is triggered, the Save Manager broadcasts to every Saver in the scene. Each Saver independently handles its own entity’s state. The Record Keeper persists flat progression data alongside the save file.
| Part | Broadcast Event | What It Means |
|---|
| Save Manager | OnSaveAll | Broadcasts to all Savers on save. Each serializes its entity state. |
| Save Manager | OnLoadAll | Broadcasts to all Savers on load. Each restores its entity state. |
| Record Keeper | RecordChanged | Fires when any progression flag is created, updated, or deleted. |
Savers are per-entity components — extend GS_SaverComponent to persist any custom data. The Record Keeper is a global singleton that lives on the Save Manager prefab.
E Indicates extensible classes and methods.
Patterns - Complete list of system patterns used in GS_Play.
Components
| Component | Purpose | Documentation |
|---|
| GS_SaveManagerComponent | Central save/load controller. Manages save files, triggers global save/load events, provides data access to all savers. | Save Manager |
| GS_SaverComponent | Base class for entity-level save handlers. Override BuildSaveData() and ProcessLoad() to persist any component data. | Savers |
| RecordKeeperComponent | Lightweight key-value store for progression tracking (string name → integer value). Extends GS_SaverComponent. | Record Keeper |
| BasicEntitySaverComponent | Pre-built saver that persists an entity’s Transform (position, rotation). | List of Savers |
| BasicPhysicsEntitySaverComponent | Pre-built saver that persists an entity’s Transform and Rigidbody state (velocity). | List of Savers |
Quick Start
- Create a Save Manager prefab with the GS_SaveManagerComponent.
- Optionally add a Record Keeper to the same prefab for progression tracking.
- Add the Save Manager
.spawnable to the Game Manager’s Startup Managers list. - Attach Saver components to any entities that need to persist data.
- Call
NewGame / LoadGame through the Game Manager — the Save Manager handles the rest.
See Also
For conceptual overviews and usage guides:
For component references:
For related resources:
Get GS_Core
GS_Core — Explore this gem on the product page and add it to your project.
2.1 - Save Manager
The central save/load controller — manages save files, triggers global persistence events, and provides data access for all savers.
The Save Manager is the central controller of the save system. It manages save file creation, triggers global save/load events that all Saver components respond to, and provides data access methods for storing and retrieving serialized game state.
Save files use JSON formatting for easy human interpretation, and the system uses the O3DE SaveData gem to write to the target platform’s default user data directory — PC, console, or mobile with no additional configuration.
For usage guides and setup examples, see The Basics: GS_Core.
Contents
How It Works
Save File Structure
The Save Manager maintains a CoreSaveData file that acts as an index of all save files for the project. This file is identified by the combination of the Game Manager’s Project Prefix and the Save Manager’s Save System Version Number. Changing either value starts a fresh save data pass.
Each individual save file stores the full game state as a JSON document, including timestamped metadata for ordering.
Initialization
On startup, the Save Manager checks for existing save data using the Project Prefix + Version combination. It sets its internal IsContinuing flag to indicate whether previous save data is available to load. Other systems can query this to determine whether to show “Continue” or “Load Game” options.
New Game Flow
When the Game Manager calls NewGame:
- The Save Manager creates a new save file — either
defaultSaveData (no name given) or a custom name via NewGame(saveName). - The CoreSaveData index is updated with the new file entry.
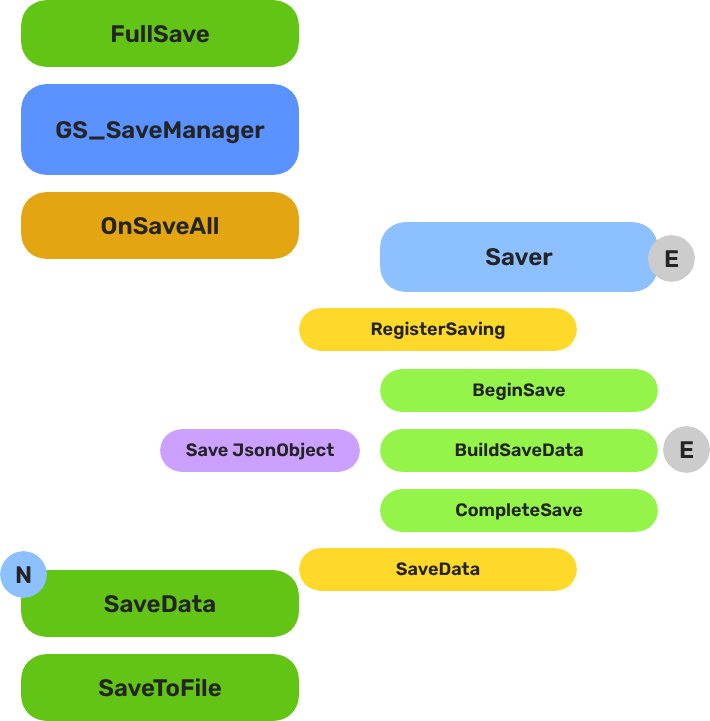
Save Flow
- Game systems call
SaveData(uniqueName, data) on the SaveManagerRequestBus to store their data into the live save document. - When a full save is triggered (via method call,
OnSaveAll broadcast, or save-on-exit logic), the Save Manager serializes the complete document to disk.
Load Flow
- The Save Manager reads the target save file from disk into memory.
- It broadcasts
OnLoadAll via the SaveManagerNotificationBus. - Each Saver component responds by calling
LoadData(uniqueName, outData) to retrieve its portion of the save data.
Setup

Image showing the Manager wrapper entity set as Editor-Only inside Prefab Edit Mode.
- Create an entity. Attach the GS_SaveManagerComponent to it.
- Set the Save System Version Number (increment this when your save format changes to avoid loading incompatible data).
- Optionally add a RecordKeeperComponent to the same entity for progression tracking.
- Turn the entity into a prefab.
- Enter prefab edit mode. Set the wrapper entity (parent) to Editor Only. Save.
- Delete the Save Manager entity from the level.
- In the Game Manager prefab, add the Save Manager
.spawnable to the Startup Managers list.
Inspector Properties
| Property | Type | Default | Description |
|---|
| Save System Version Number | int | 0 | Version stamp for save file compatibility. Increment when your save data format changes — the system will treat saves from a different version as a fresh start. |
| Full Save On Destroy | bool | true | When enabled, the Save Manager performs a full save when the component is destroyed (e.g., on level exit or game shutdown). |
API Reference
Request Bus: SaveManagerRequestBus
The primary interface for all save/load operations. Singleton bus — call via Broadcast.
| Method | Parameters | Returns | Description |
|---|
NewGameSave | const AZStd::string& uniqueName | void | Creates a new save file with the given name. Pass empty string for default name. |
LoadGame | const AZStd::string& uniqueName | void | Loads the specified save file into memory and triggers data restoration. |
SaveData | const AZStd::string& uniqueName, const rapidjson::Value& data | void | Stores a named data block into the live save document. Called by Saver components during save operations. |
LoadData | const AZStd::string& uniqueName, rapidjson::Value& outData | bool | Retrieves a named data block from the loaded save document. Returns true if the data was found. |
GetOrderedSaveList | — | AZStd::vector<AZStd::pair<AZStd::string, AZ::u64>> | Returns all save files ordered by timestamp (newest first). Each entry is a name + epoch timestamp pair. |
ConvertEpochToReadable | AZ::u64 epochSeconds | AZStd::string | Converts an epoch timestamp to a human-readable date string. |
GetEpochTimeNow | — | AZ::u64 | Returns the current time as an epoch timestamp. |
GetAllocator | — | rapidjson::Document::AllocatorType* | Returns the JSON allocator for constructing save data values. |
HasData | const AZStd::string& uniqueName | bool | Checks whether the specified data block exists in the current save. |
IsContinuing | — | bool | Returns true if previous save data was found on startup. |
RegisterSaving | — | void | Registers that a save operation is in progress (used internally by the save counting system). |
Notification Bus: SaveManagerNotificationBus
Broadcast to all Saver components. Connect to this bus to participate in global save/load events.
| Event | Parameters | Description |
|---|
OnSaveAll | — | Broadcast when a full save is triggered. All savers should gather and submit their data. |
OnLoadAll | — | Broadcast when a save file has been loaded into memory. All savers should retrieve and restore their data. |
Local / Virtual Methods
These methods are available when extending the Save Manager. Override them to customize save file handling.
| Method | Description |
|---|
SaveToFile(fileName, docFile) | Serializes a JSON document to disk using the O3DE SaveData gem. |
LoadFromFile(fileName, docFile) | Deserializes a save file from disk into a JSON document. |
FullSave() | Triggers a complete save of all game data to disk. |
UpdateCoreData(saveName) | Updates the CoreSaveData index with the current save file entry. |
FileExists(dataBufferName, localUserId) | Static utility — checks if a save file exists on disk. |
GetSaveFilePath(dataBufferName, localUserId) | Static utility — returns the platform-appropriate file path for a save file. |
Usage Examples
Saving Data from a Component
#include <GS_Core/GS_CoreBus.h>

// Store your component's data into the live save document
rapidjson::Document::AllocatorType* allocator = nullptr;
GS_Core::SaveManagerRequestBus::BroadcastResult(
    allocator,
    &GS_Core::SaveManagerRequestBus::Events::GetAllocator
);

if (allocator)
{
    rapidjson::Value myData(rapidjson::kObjectType);
    myData.AddMember("health", m_health, *allocator);
    myData.AddMember("level", m_level, *allocator);

    GS_Core::SaveManagerRequestBus::Broadcast(
        &GS_Core::SaveManagerRequestBus::Events::SaveData,
        "MyComponent_PlayerStats",
        myData
    );
}
Loading Data into a Component
#include <GS_Core/GS_CoreBus.h>

rapidjson::Value outData;
bool found = false;
GS_Core::SaveManagerRequestBus::BroadcastResult(
    found,
    &GS_Core::SaveManagerRequestBus::Events::LoadData,
    "MyComponent_PlayerStats",
    outData
);

if (found)
{
    if (outData.HasMember("health")) m_health = outData["health"].GetInt();
    if (outData.HasMember("level"))  m_level = outData["level"].GetInt();
}
Checking if a Save Exists
#include <GS_Core/GS_CoreBus.h>

bool hasSave = false;
GS_Core::SaveManagerRequestBus::BroadcastResult(
    hasSave,
    &GS_Core::SaveManagerRequestBus::Events::IsContinuing
);

if (hasSave)
{
    // Show "Continue" / "Load Game" in the main menu
}
Getting the Save File List
#include <GS_Core/GS_CoreBus.h>

AZStd::vector<AZStd::pair<AZStd::string, AZ::u64>> saves;
GS_Core::SaveManagerRequestBus::BroadcastResult(
    saves,
    &GS_Core::SaveManagerRequestBus::Events::GetOrderedSaveList
);

for (const auto& [name, epoch] : saves)
{
    AZStd::string readable;
    GS_Core::SaveManagerRequestBus::BroadcastResult(
        readable,
        &GS_Core::SaveManagerRequestBus::Events::ConvertEpochToReadable,
        epoch
    );
    AZ_TracePrintf("Save", "Save: %s — %s", name.c_str(), readable.c_str());
}
Extending the Save Manager
Extend the Save Manager when you need custom save file formats, encryption, cloud save integration, or platform-specific serialization.
#pragma once
#include <Source/SaveSystem/GS_SaveManagerComponent.h>

namespace MyProject
{
    class MySaveManagerComponent
        : public GS_Core::GS_SaveManagerComponent
    {
    public:
        AZ_COMPONENT_DECL(MySaveManagerComponent);

        static void Reflect(AZ::ReflectContext* context);

    protected:
        // Override save/load to add custom behavior (e.g., encryption, compression)
        void SaveToFile(AZStd::string fileName, rapidjson::Document& docFile) override;
        void LoadFromFile(AZStd::string fileName, rapidjson::Document& docFile) override;

        // Override to customize the full save sequence
        void FullSave() override;
    };
}
Implementation (.cpp)
#include "MySaveManagerComponent.h"
#include <AzCore/Serialization/SerializeContext.h>

namespace MyProject
{
    AZ_COMPONENT_IMPL(MySaveManagerComponent, "MySaveManagerComponent", "{YOUR-UUID-HERE}",
        GS_Core::GS_SaveManagerComponent);

    void MySaveManagerComponent::Reflect(AZ::ReflectContext* context)
    {
        if (auto serializeContext = azrtti_cast<AZ::SerializeContext*>(context))
        {
            serializeContext->Class<MySaveManagerComponent, GS_Core::GS_SaveManagerComponent>()
                ->Version(0);

            if (AZ::EditContext* editContext = serializeContext->GetEditContext())
            {
                editContext->Class<MySaveManagerComponent>(
                    "My Save Manager", "Custom save manager with encryption support")
                    ->ClassElement(AZ::Edit::ClassElements::EditorData, "")
                        ->Attribute(AZ::Edit::Attributes::Category, "MyProject")
                        ->Attribute(AZ::Edit::Attributes::AppearsInAddComponentMenu, AZ_CRC_CE("Game"));
            }
        }
    }

    void MySaveManagerComponent::SaveToFile(AZStd::string fileName, rapidjson::Document& docFile)
    {
        // Example: encrypt the JSON before writing
        // ... your encryption logic ...

        // Call base to perform the actual file write
        GS_SaveManagerComponent::SaveToFile(fileName, docFile);
    }

    void MySaveManagerComponent::LoadFromFile(AZStd::string fileName, rapidjson::Document& docFile)
    {
        // Call base to perform the actual file read
        GS_SaveManagerComponent::LoadFromFile(fileName, docFile);

        // Example: decrypt the JSON after reading
        // ... your decryption logic ...
    }

    void MySaveManagerComponent::FullSave()
    {
        // Example: add a timestamp or checksum before saving
        // ... your custom logic ...

        GS_SaveManagerComponent::FullSave();
    }
}
Module Registration
m_descriptors.insert(m_descriptors.end(), {
    MyProject::MySaveManagerComponent::CreateDescriptor(),
});
Then create a prefab for your custom Save Manager and add it to the Game Manager’s Startup Managers list (replacing the default Save Manager).
See Also
For component references:
For related resources:
Get GS_Core
GS_Core — Explore this gem on the product page and add it to your project.
2.2 - Savers
The base class for entity-level save handlers — override BuildSaveData() and ProcessLoad() to persist any component data automatically.
For usage guides and setup examples, see The Basics: GS_Core.

Image showing the Basic Physics Saver component, an example of a Saver-inherited class, as seen in the Entity Inspector.
The GS_SaverComponent is the base class for all entity-level save handlers. By extending it, you can create companion components that save and load data alongside your entities, or inherit directly into gameplay components for built-in persistence (as done by GS_Inventory).
Savers automatically participate in the global save/load cycle — when the Save Manager broadcasts OnSaveAll or OnLoadAll, every active Saver component responds by gathering or restoring its data.
Contents
How It Works
Save Cycle
When a save event fires (global OnSaveAll, local trigger, or saveOnDestroy):
- BeginSave() — Primes the save data container.
- BuildSaveData() — Your override. Gather your component’s data and write it into
localData using the Save Manager’s JSON allocator. - CompleteSave() — Submits the data to the Save Manager via
SaveData(uniqueName, localData).
Load Cycle
When a load event fires (global OnLoadAll or loadOnActivate):
- LoadLocalData() — Retrieves this Saver’s data block from the Save Manager via
LoadData(uniqueName, outData). - ProcessLoad() — Your override. Read the retrieved data and restore your component’s state.
Automatic Identity
Each Saver generates a unique save key from the entity name and GetSubComponentName(). This ensures multiple Savers on different entities (or multiple Saver types on the same entity) don’t collide.
Setup
- Attach a Saver component (built-in or custom) to any entity that needs to persist data.
- Configure the Saver properties:
- Load On Activate — restore data automatically when the entity spawns.
- Save On Destroy — save data automatically when the entity is destroyed.
- Ensure the Save Manager is set up and running (it handles the file I/O).
Inspector Properties
| Property | Type | Default | Description |
|---|
| Load On Activate | bool | true | Automatically loads and restores this Saver’s data when the component activates. Useful for entities that spawn mid-game and need to resume their saved state. |
| Save On Destroy | bool | true | Automatically saves this Saver’s data when the component is destroyed. Ensures data is captured even if a global save hasn’t been triggered. |
API Reference
Global Event Handlers
These are called automatically when the Save Manager broadcasts global save/load events. Override to customize behavior.
| Method | Description |
|---|
OnSaveAll() | Called when the Save Manager broadcasts a global save. Default implementation calls the full save cycle (BeginSave → BuildSaveData → CompleteSave). |
OnLoadAll() | Called when the Save Manager broadcasts a global load. Default implementation calls the full load cycle (LoadLocalData → ProcessLoad). |
Save Methods
Override these to control how your component’s data is saved.
| Method | Description |
|---|
BeginSave() | Prepares the save data container. Called before BuildSaveData(). |
BuildSaveData() | Your primary override. Write your component’s data into localData using the JSON allocator. |
CompleteSave() | Submits localData to the Save Manager. Called after BuildSaveData(). |
Load Methods
Override these to control how your component’s data is restored.
| Method | Description |
|---|
LoadLocalData() | Retrieves this Saver’s data block from the Save Manager into localData. |
ProcessLoad() | Your primary override. Read localData and restore your component’s state. |
Utility Methods
| Method | Returns | Description |
|---|
SetUniqueName() | void | Generates the unique save key from the entity name and sub-component name. Override for custom key generation. |
GetSubComponentName() | AZStd::string | Returns "Saver" by default. Override to distinguish multiple Saver types on the same entity. |
Components
Pre-built Saver components included in GS_Core:
| Component | Saves | Documentation |
|---|
| BasicEntitySaverComponent | Entity Transform (position, rotation) | List of Savers |
| BasicPhysicsEntitySaverComponent | Entity Transform + Rigidbody (position, rotation, linear velocity, angular velocity) | List of Savers |
| RecordKeeperComponent | Key-value records (string → integer) | Record Keeper |
Usage Examples
Responding to Global Save/Load Events
If your component doesn’t extend GS_SaverComponent but still needs to react to save/load events, connect to the SaveManagerNotificationBus:
#include <GS_Core/GS_CoreBus.h>

class MyComponent
    : public AZ::Component
    , protected GS_Core::SaveManagerNotificationBus::Handler
{
protected:
    void Activate() override
    {
        GS_Core::SaveManagerNotificationBus::Handler::BusConnect();
    }

    void Deactivate() override
    {
        GS_Core::SaveManagerNotificationBus::Handler::BusDisconnect();
    }

    void OnSaveAll() override
    {
        // Gather and submit data to the Save Manager
    }

    void OnLoadAll() override
    {
        // Retrieve and restore data from the Save Manager
    }
};
Extending the Saver Class
Use the SaverComponent ClassWizard template to generate a new saver with boilerplate already in place — see GS_Core Templates.
Create a custom Saver whenever you need to persist component-specific data that the built-in savers don’t cover.
#pragma once
#include <Source/SaveSystem/GS_SaverComponent.h>

namespace MyProject
{
    class MyEntitySaverComponent
        : public GS_Core::GS_SaverComponent
    {
    public:
        AZ_COMPONENT_DECL(MyEntitySaverComponent);

        static void Reflect(AZ::ReflectContext* context);

    protected:
        // Saver overrides
        void BuildSaveData() override;
        void ProcessLoad() override;
        AZStd::string GetSubComponentName() const override { return "MyEntitySaver"; }
    };
}
Implementation (.cpp)
#include "MyEntitySaverComponent.h"
#include <AzCore/Serialization/SerializeContext.h>
#include <GS_Core/GS_CoreBus.h>

namespace MyProject
{
    AZ_COMPONENT_IMPL(MyEntitySaverComponent, "MyEntitySaverComponent", "{YOUR-UUID-HERE}",
        GS_Core::GS_SaverComponent);

    void MyEntitySaverComponent::Reflect(AZ::ReflectContext* context)
    {
        if (auto serializeContext = azrtti_cast<AZ::SerializeContext*>(context))
        {
            serializeContext->Class<MyEntitySaverComponent, GS_Core::GS_SaverComponent>()
                ->Version(0);

            if (AZ::EditContext* editContext = serializeContext->GetEditContext())
            {
                editContext->Class<MyEntitySaverComponent>(
                    "My Entity Saver", "Saves custom entity data")
                    ->ClassElement(AZ::Edit::ClassElements::EditorData, "")
                        ->Attribute(AZ::Edit::Attributes::Category, "MyProject")
                        ->Attribute(AZ::Edit::Attributes::AppearsInAddComponentMenu, AZ_CRC_CE("Game"));
            }
        }
    }

    void MyEntitySaverComponent::BuildSaveData()
    {
        // Get the JSON allocator from the Save Manager
        rapidjson::Document::AllocatorType* allocator = nullptr;
        GS_Core::SaveManagerRequestBus::BroadcastResult(
            allocator,
            &GS_Core::SaveManagerRequestBus::Events::GetAllocator
        );

        if (!allocator) return;

        // Write your data into localData (inherited member)
        localData.SetObject();
        localData.AddMember("myValue", 42, *allocator);
        localData.AddMember("myFlag", true, *allocator);

        // Example: save a string
        rapidjson::Value nameVal;
        nameVal.SetString("hello", *allocator);
        localData.AddMember("myString", nameVal, *allocator);
    }

    void MyEntitySaverComponent::ProcessLoad()
    {
        // Read your data from localData (populated by LoadLocalData)
        if (localData.HasMember("myValue"))
        {
            int myValue = localData["myValue"].GetInt();
            // ... restore state ...
        }

        if (localData.HasMember("myFlag"))
        {
            bool myFlag = localData["myFlag"].GetBool();
            // ... restore state ...
        }
    }
}
Module Registration
m_descriptors.insert(m_descriptors.end(), {
    MyProject::MyEntitySaverComponent::CreateDescriptor(),
});
Attach your custom Saver to any entity that needs persistence. The save/load cycle handles the rest automatically.
See Also
For component references:
For related resources:
Get GS_Core
GS_Core — Explore this gem on the product page and add it to your project.
2.2.1 - List of Savers
Pre-built saver components included in GS_Core — ready-to-use entity persistence without writing code.
For usage guides and setup examples, see The Basics: GS_Core.
Contents
GS_Core includes pre-built Saver components that handle common persistence scenarios out of the box. Attach one to any entity that needs to remember its state between save/load cycles — no custom code required.
All built-in Savers inherit from GS_SaverComponent and participate in the global save/load cycle automatically.
Basic Entity Saver
A companion component that saves and loads an entity’s Transform data: position and rotation.
When to Use
Use the Basic Entity Saver for any entity that can be moved or rotated during gameplay and needs to retain its position across saves — collectibles, furniture, doors, NPCs with fixed patrol points, etc.
Inspector Properties
| Property | Type | Default | Description |
|---|
| Load On Activate | bool | true | Inherited from GS_SaverComponent. Automatically restores the saved Transform on activation. |
| Save On Destroy | bool | true | Inherited from GS_SaverComponent. Automatically saves the current Transform on destruction. |
What It Saves
| Data | Type | Description |
|---|
| Position | AZ::Vector3 | World-space position of the entity. |
| Rotation | AZ::Quaternion | World-space rotation of the entity. |
Setup
- Attach the BasicEntitySaverComponent to any entity that needs Transform persistence.
- Ensure the Save Manager is running.
- That’s it — the component saves and loads automatically.
Basic Physics Entity Saver
Image showing the Basic Physics Saver component, as seen in the Entity Inspector.
A companion component that saves and loads an entity’s Transform and Rigidbody physics state.
When to Use
Use the Basic Physics Entity Saver for physics-driven entities that need to retain both their position and their motion state across saves — throwable objects, rolling boulders, physics puzzles, ragdolls, etc.
Inspector Properties
| Property | Type | Default | Description |
|---|
| Load On Activate | bool | true | Inherited from GS_SaverComponent. Automatically restores saved state on activation. |
| Save On Destroy | bool | true | Inherited from GS_SaverComponent. Automatically saves current state on destruction. |
What It Saves
| Data | Type | Description |
|---|
| Position | AZ::Vector3 | World-space position of the entity. |
| Rotation | AZ::Quaternion | World-space rotation of the entity. |
| Linear Velocity | AZ::Vector3 | Current linear velocity of the rigidbody. |
| Angular Velocity | AZ::Vector3 | Current angular velocity of the rigidbody. |
Transform data (position, rotation) loads reliably. Rigidbody velocity restoration may not behave as expected in all physics scenarios.
Setup
- Attach the BasicPhysicsEntitySaverComponent to any entity with a Rigidbody component.
- Ensure the Save Manager is running.
- The component saves and loads automatically.
Creating Your Own Saver
Need to persist data that the built-in Savers don’t cover? See the Extending the Saver Class guide for a complete walkthrough with header, implementation, and module registration.
See Also
For component references:
Get GS_Core
GS_Core — Explore this gem on the product page and add it to your project.
2.3 - Record Keeper
Lightweight key-value progression tracking — store and retrieve named integer records without writing a custom saver.
For usage guides and setup examples, see The Basics: GS_Core.

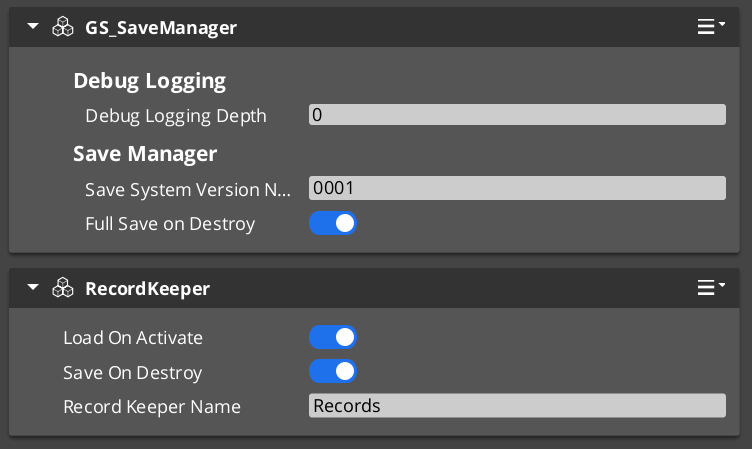
Image showing the Record Keeper component with its unique variables and inherited Saver properties, as seen in the Entity Inspector.
The Record Keeper is a companion component that provides a simple key-value store for tracking progression, switch states, quest stages, or any other data that doesn’t require a complex Saver implementation. Each record is a SaveRecord — a name/value pair of recordName (string) and recordProgress (integer).
Because it extends GS_SaverComponent, the Record Keeper saves and loads automatically with the rest of the save system. No custom serialization code needed.
Contents
How It Works
- The Record Keeper lives on your Save Manager prefab entity (recommended) or any entity with save system access.
- Game systems call
SetRecord, GetRecord, HasRecord, and DeleteRecord via the RecordKeeperRequestBus. - On each call to
SetRecord, the Record Keeper broadcasts RecordChanged on the RecordKeeperNotificationBus so listeners can react. - When a global save event fires (
OnSaveAll), the Record Keeper serializes all its records into the save file automatically. - On load, it deserializes its records and makes them available immediately.
SaveRecord Data Structure
struct SaveRecord
{
    AZStd::string recordName;    // Unique key (e.g., "quest_village_rescue", "switch_bridge_01")
    AZ::s32       recordProgress; // Integer value (progression stage, state, count, etc.)
};
TypeId: {F6F4F258-819A-468A-B015-CAF51D8289BF}
Setup
- Open your Save Manager prefab in prefab edit mode.
- Add the RecordKeeperComponent to the Save Manager entity.
- Set the Record Keeper Name — this drives unique save/load identification and allows multiple Record Keepers if needed.
- Enable the Saver booleans as needed:
- Load On Activate — automatically loads records when the component activates (recommended: on).
- Save On Destroy — automatically saves records when the component is destroyed (recommended: on).
Inspector Properties
| Property | Type | Default | Description |
|---|
| Record Keeper Name | AZStd::string | "" | Unique identifier for this Record Keeper. Drives the save/load key. Required if using multiple Record Keepers. |
| Load On Activate | bool | true | Inherited from GS_SaverComponent. Automatically loads records from save data on activation. |
| Save On Destroy | bool | true | Inherited from GS_SaverComponent. Automatically saves records to the save system on destruction. |
API Reference
Request Bus: RecordKeeperRequestBus
The primary interface for reading and writing records.
| Method | Parameters | Returns | Description |
|---|
HasRecord | const AZStd::string& recordName | bool | Returns true if a record with the given name exists. |
SetRecord | const AZStd::string& recordName, AZ::s32 recordProgress | void | Creates or updates a record. Broadcasts RecordChanged on success. |
GetRecord | const AZStd::string& recordName | AZ::s32 | Returns the value of the named record. Returns 0 if the record does not exist. |
DeleteRecord | const AZStd::string& recordName | void | Removes the named record from the store. |
Notification Bus: RecordKeeperNotificationBus
Connect to this bus to react when records change.
| Event | Parameters | Description |
|---|
RecordChanged | const AZStd::string& recordName, AZ::s32 recordValue | Broadcast whenever SetRecord is called. Use this to update UI, trigger gameplay events, or log progression. |
Usage Examples
Setting a Progression Record
#include <GS_Core/GS_CoreBus.h>

// Mark quest stage 2 as complete
GS_Core::RecordKeeperRequestBus::Broadcast(
    &GS_Core::RecordKeeperRequestBus::Events::SetRecord,
    "quest_village_rescue",
    2
);
Reading a Record
#include <GS_Core/GS_CoreBus.h>

AZ::s32 questStage = 0;
GS_Core::RecordKeeperRequestBus::BroadcastResult(
    questStage,
    &GS_Core::RecordKeeperRequestBus::Events::GetRecord,
    "quest_village_rescue"
);

if (questStage >= 2)
{
    // The player has completed stage 2 — unlock the bridge
}
Checking if a Record Exists
#include <GS_Core/GS_CoreBus.h>

bool exists = false;
GS_Core::RecordKeeperRequestBus::BroadcastResult(
    exists,
    &GS_Core::RecordKeeperRequestBus::Events::HasRecord,
    "switch_bridge_01"
);

if (!exists)
{
    // First time encountering this switch — initialize it
    GS_Core::RecordKeeperRequestBus::Broadcast(
        &GS_Core::RecordKeeperRequestBus::Events::SetRecord,
        "switch_bridge_01",
        0
    );
}
Listening for Record Changes
#include <GS_Core/GS_CoreBus.h>

// In your component header:
class MyQuestTrackerComponent
    : public AZ::Component
    , protected GS_Core::RecordKeeperNotificationBus::Handler
{
protected:
    void Activate() override
    {
        GS_Core::RecordKeeperNotificationBus::Handler::BusConnect();
    }

    void Deactivate() override
    {
        GS_Core::RecordKeeperNotificationBus::Handler::BusDisconnect();
    }

    // RecordKeeperNotificationBus
    void RecordChanged(const AZStd::string& recordName, AZ::s32 recordValue) override
    {
        if (recordName == "quest_village_rescue" && recordValue >= 3)
        {
            // Quest complete — trigger reward
        }
    }
};
Extending the Record Keeper
For complex data needs beyond simple key-value records, create custom Saver components.
See Also
For component references:
Get GS_Core
GS_Core — Explore this gem on the product page and add it to your project.
3 - GS_StageManager
The level navigation system — handles loading, unloading, and staged startup of game levels with exit point traversal.
The Stage Manager system handles the process of changing levels, loading and unloading their assets, and starting up levels in the correct sequence. It supports incremental loading so that complex levels with generative components can spin up reliably without massive frame-time spikes.
Each level contains a Stage Data component that acts as the level’s anchor — connecting the Stage Manager to level-specific references, startup sequences, and navigation data. Exit Points mark spawn positions for player placement when transitioning between stages.
For usage guides and setup examples, see The Basics: GS_Core.
Contents
Architecture
Breakdown
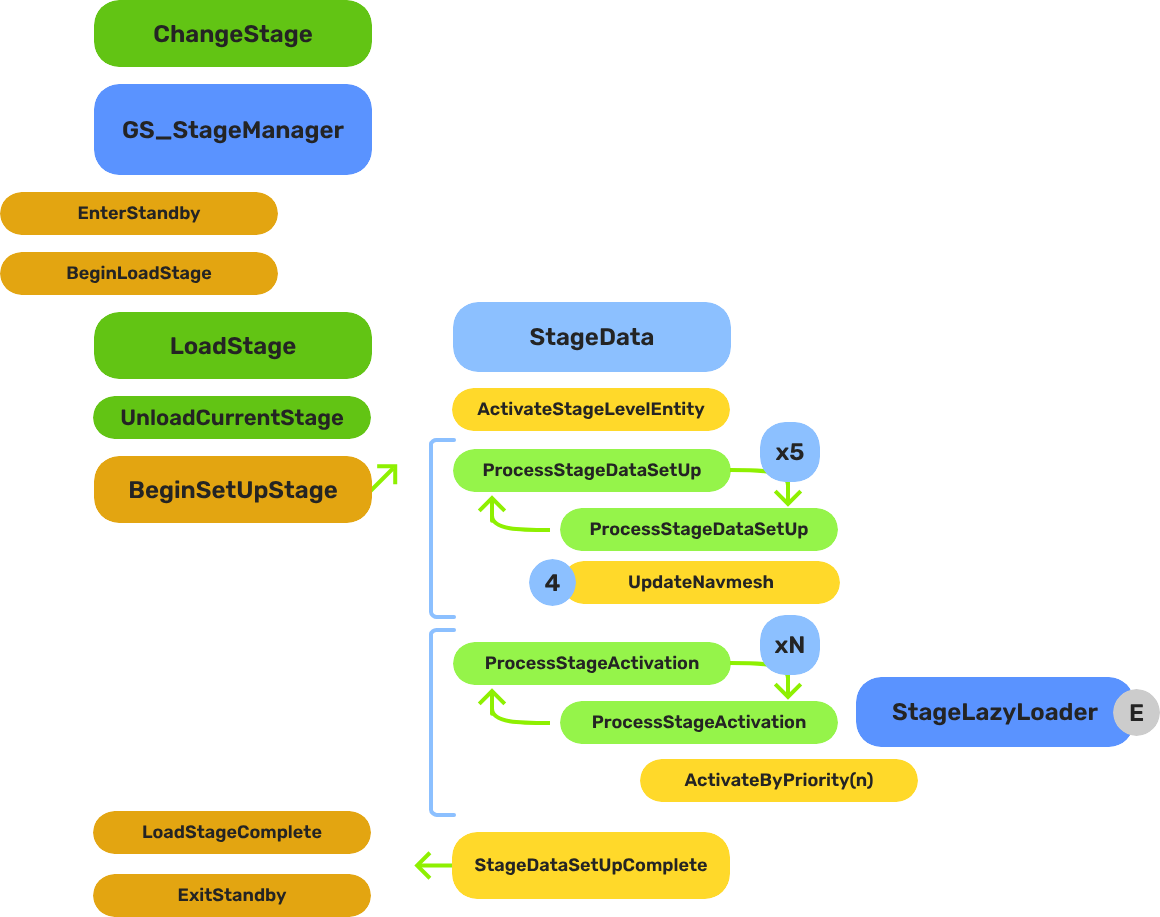
When a stage change is requested, the system follows a five-step sequence before gameplay resumes in the new level:
| Step | Broadcast Event | What It Means |
|---|
| 1 — Standby | OnEnterStandby | Game Manager enters standby, halting all gameplay systems. |
| 2 — Unload | (internal) | The current stage’s entities are torn down. |
| 3 — Spawn | (internal) | The target stage prefab is instantiated. |
| 4 — Set Up | OnBeginSetUpStage | Stage Data runs its layered startup: SetUpStage → ActivateByPriority → Complete. |
| 5 — Complete | LoadStageComplete | Stage Manager broadcasts completion. Standby exits. Gameplay resumes. |
The Stage Data startup is layered so heavy levels can initialize incrementally without causing frame-time spikes.
E Indicates extensible classes and methods.
Patterns - Complete list of system patterns used in GS_Play.
Components
| Component | Purpose | Documentation |
|---|
| GS_StageManagerComponent | Singleton level controller. Manages the Stages list, handles change requests, coordinates loading/unloading. | Stage Manager |
| GS_StageDataComponent | Per-level anchor. Holds stage name, NavMesh reference, and runs the level’s startup sequence. | Stage Data |
| StageExitPointComponent | Marks spawn/exit positions within a level. Registered by name for cross-stage entity placement. | Stage Manager: Exit Points |
| StageLazyLoaderComponent | Priority-based entity activation during level load. Spreads heavy initialization across frames. | Stage Data: Priority Loading |
Quick Start
- Create a Stage Manager prefab with the GS_StageManagerComponent.
- Add stage entries to the Stages list (name + spawnable prefab for each level).
- Set the Default Stage to your starting level.
- Add the Stage Manager
.spawnable to the Game Manager’s Startup Managers list. - In each level prefab, add a Stage Data component as the level’s anchor.
- Optionally place Exit Points in each level for spawn positioning.
See Also
For conceptual overviews and usage guides:
For component references:
For related resources:
Get GS_Core
GS_Core — Explore this gem on the product page and add it to your project.
3.1 - Stage Manager
The singleton level controller — manages a list of stages, handles level loading/unloading, and coordinates staged startup with the Stage Data component.
The Stage Manager is the singleton that handles all the logistics of loading and unloading game levels. It maintains a list of stages (name-to-spawnable mappings) and processes change requests by unloading the current stage and spawning the target. Once loaded, it connects to the level’s Stage Data component to run the staged startup sequence.
The system operates as a “one in, one out” format — loading one level automatically unloads the previous one.
For usage guides and setup examples, see The Basics: GS_Core.
Contents
How It Works
Startup
At game startup, the Stage Manager checks the Game Manager’s Debug Mode flag:
- Debug Mode OFF — The Stage Manager loads the Default Stage automatically. This is the normal game flow.
- Debug Mode ON — The Stage Manager stays connected to whatever level is already loaded in the editor. This lets developers iterate within a stage without waiting for a full level load cycle.
Change Stage Flow
When ChangeStageRequest(stageName, exitName) is called:
- Unload — The current stage is destroyed (if one is loaded).
- Spawn — The Stage Manager looks up
stageName in the Stages list and spawns the matching prefab. - Connect — The Stage Manager queries the newly spawned level for its Stage Data component.
- Startup — The Stage Data component runs the level’s staged activation sequence (priority layers, NavMesh generation, etc.).
- Notify — The Stage Manager broadcasts
LoadStageComplete when the level is fully ready.
Exit Points
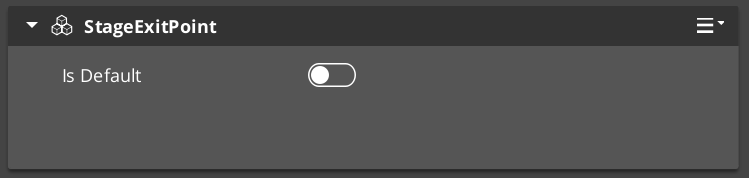
Exit Points are simple components placed within a level that mark positions for entity placement after a stage loads. They support cross-stage traversal — when changing stages, you specify an exit point name, and entities can be repositioned to that point.
- Exit Points register themselves with the Stage Manager by name via
RegisterExitPoint. - One Exit Point can be flagged as Default — it serves as the fallback if no specific exit point is requested.
- Call
GetExitPoint(exitName) to retrieve the entity at a named position.
Setup
Image showing the Manager wrapper entity set as Editor-Only inside Prefab Edit Mode.
- Create an entity. Attach the GS_StageManagerComponent to it.
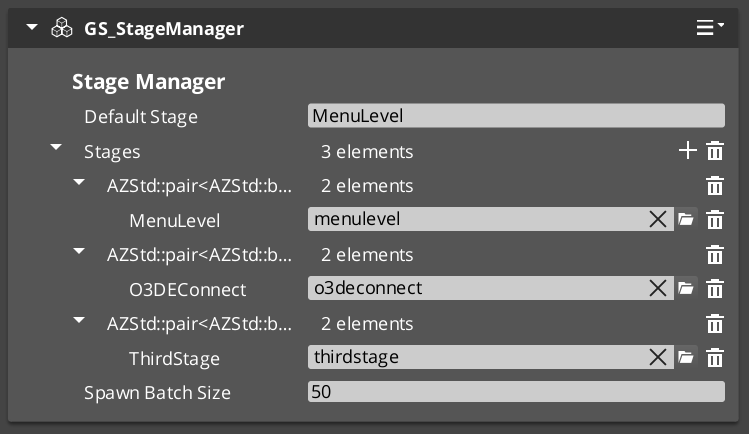
- Configure the Stages list — add an entry for each level (stage name + spawnable prefab reference).
- Set the Default Stage to your starting level. This name must also exist in the Stages list.
- Turn the entity into a prefab.
- Enter prefab edit mode. Set the wrapper entity (parent) to Editor Only. Save.
- Delete the Stage Manager entity from the level.
- In the Game Manager prefab, add the Stage Manager
.spawnable to the Startup Managers list.
Inspector Properties
| Property | Type | Default | Description |
|---|
| Stages | AZStd::vector<StageEntry> | [] | List of stage entries. Each entry maps a stage name to a spawnable prefab asset. |
| Default Stage | AZStd::string | "" | The stage to load automatically on game startup (when not in Debug Mode). Must match a name in the Stages list. |
API Reference
Request Bus: StageManagerRequestBus
The primary interface for level navigation. Singleton bus — call via Broadcast.
| Method | Parameters | Returns | Description |
|---|
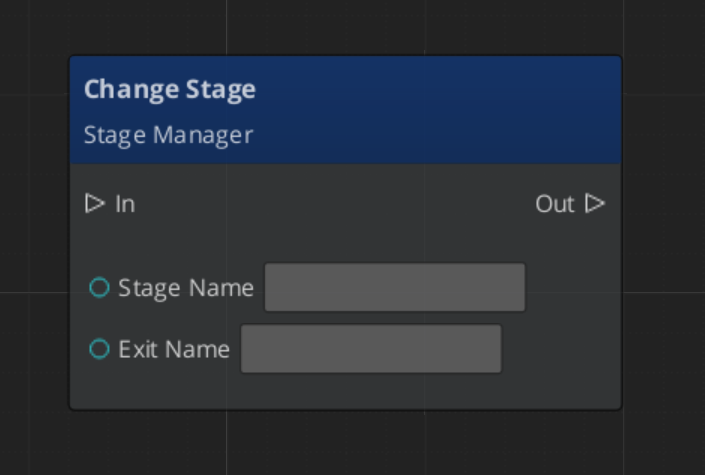
ChangeStageRequest | AZStd::string stageName, AZStd::string exitName | void | Unloads the current stage and loads the named stage. The exitName specifies which Exit Point to use for entity placement. Pass empty string for default. |
LoadDefaultStage | — | void | Loads the Default Stage. Typically called internally during game startup. |
RegisterExitPoint | AZStd::string exitName, AZ::EntityId exitEntity | void | Registers a named exit point entity. Called by StageExitPointComponents on activation. |
UnregisterExitPoint | AZStd::string exitName | void | Removes a named exit point. Called by StageExitPointComponents on deactivation. |
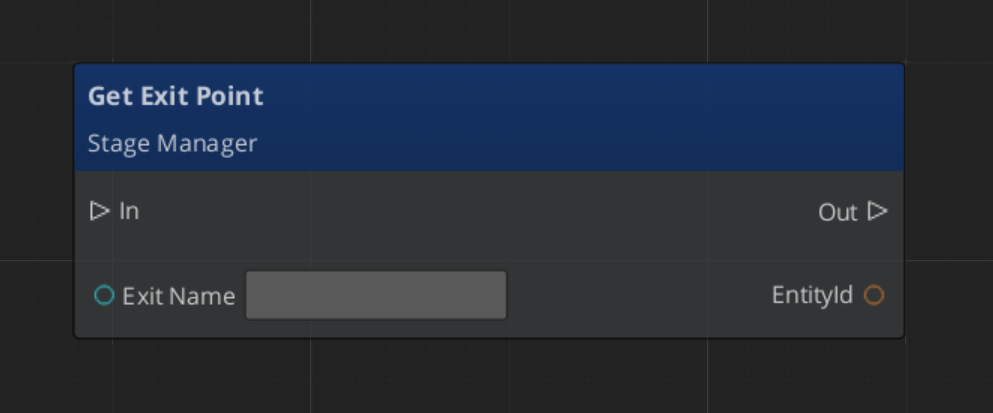
GetExitPoint | AZStd::string exitName = "" | AZ::EntityId | Returns the entity ID of the named exit point. Pass empty string to get the default exit point. |
Notification Bus: StageManagerNotificationBus
Connect to this bus to react to level loading events.
| Event | Parameters | Description |
|---|
BeginLoadStage | — | Broadcast when a stage change has started. Use this to show loading screens, disable input, etc. |
LoadStageComplete | — | Broadcast when the new stage is fully loaded and its startup sequence is complete. Safe to begin gameplay. |
StageLoadProgress | float progress | Broadcast during the loading process with a 0.0–1.0 progress value. Use for loading bar UI. |
Local / Virtual Methods
These methods are available when extending the Stage Manager.
| Method | Description |
|---|
ChangeStage(stageName, exitName) | Internal stage change logic. Override to add custom behavior around stage transitions. |
LoadStage() | Spawns the target stage prefab. Override for custom spawning logic. |
ContinueLoadStage() | Called after the stage prefab has spawned. Queries for Stage Data and starts the level’s activation sequence. |
UpdateStageData() | Connects to the Stage Data component in the loaded level. |
GetStageByName(stageName) | Returns the spawnable asset reference for a named stage from the Stages list. |
Usage Examples
Changing Stages
#include <GS_Core/GS_CoreBus.h>

// Load "ForestVillage" and place the player at the "main_entrance" exit point
GS_Core::StageManagerRequestBus::Broadcast(
    &GS_Core::StageManagerRequestBus::Events::ChangeStageRequest,
    AZStd::string("ForestVillage"),
    AZStd::string("main_entrance")
);
Getting an Exit Point Entity
#include <GS_Core/GS_CoreBus.h>

AZ::EntityId exitEntity;
GS_Core::StageManagerRequestBus::BroadcastResult(
    exitEntity,
    &GS_Core::StageManagerRequestBus::Events::GetExitPoint,
    AZStd::string("cave_exit")
);

if (exitEntity.IsValid())
{
    // Reposition the player entity to the exit point's transform
}
Listening for Stage Load Events
#include <GS_Core/GS_CoreBus.h>

class MyLoadScreenComponent
    : public AZ::Component
    , protected GS_Core::StageManagerNotificationBus::Handler
{
protected:
    void Activate() override
    {
        GS_Core::StageManagerNotificationBus::Handler::BusConnect();
    }

    void Deactivate() override
    {
        GS_Core::StageManagerNotificationBus::Handler::BusDisconnect();
    }

    void BeginLoadStage() override
    {
        // Show loading screen, disable player input
    }

    void LoadStageComplete() override
    {
        // Hide loading screen, enable player input
    }

    void StageLoadProgress(float progress) override
    {
        // Update loading bar: progress is 0.0 to 1.0
    }
};
Script Canvas
Changing stages:
Getting an exit point:
Extending the Stage Manager
Extend the Stage Manager when you need custom stage transition logic, procedural level generation, or multi-stage loading.
#pragma once
#include <Source/StageManager/GS_StageManagerComponent.h>

namespace MyProject
{
    class MyStageManagerComponent
        : public GS_Core::GS_StageManagerComponent
    {
    public:
        AZ_COMPONENT_DECL(MyStageManagerComponent);

        static void Reflect(AZ::ReflectContext* context);

    protected:
        // Override stage change behavior
        void ChangeStage(AZStd::string stageName, AZStd::string exitName) override;
        void ContinueLoadStage() override;
    };
}
Implementation (.cpp)
#include "MyStageManagerComponent.h"
#include <AzCore/Serialization/SerializeContext.h>

namespace MyProject
{
    AZ_COMPONENT_IMPL(MyStageManagerComponent, "MyStageManagerComponent", "{YOUR-UUID-HERE}",
        GS_Core::GS_StageManagerComponent);

    void MyStageManagerComponent::Reflect(AZ::ReflectContext* context)
    {
        if (auto serializeContext = azrtti_cast<AZ::SerializeContext*>(context))
        {
            serializeContext->Class<MyStageManagerComponent, GS_Core::GS_StageManagerComponent>()
                ->Version(0);

            if (AZ::EditContext* editContext = serializeContext->GetEditContext())
            {
                editContext->Class<MyStageManagerComponent>(
                    "My Stage Manager", "Custom stage manager with transition effects")
                    ->ClassElement(AZ::Edit::ClassElements::EditorData, "")
                        ->Attribute(AZ::Edit::Attributes::Category, "MyProject")
                        ->Attribute(AZ::Edit::Attributes::AppearsInAddComponentMenu, AZ_CRC_CE("Game"));
            }
        }
    }

    void MyStageManagerComponent::ChangeStage(AZStd::string stageName, AZStd::string exitName)
    {
        // Example: trigger a fade-out transition before changing stages
        // ... your transition logic ...

        // Call base to perform the actual stage change
        GS_StageManagerComponent::ChangeStage(stageName, exitName);
    }

    void MyStageManagerComponent::ContinueLoadStage()
    {
        // Call base to connect to Stage Data and start level activation
        GS_StageManagerComponent::ContinueLoadStage();

        // Example: trigger a fade-in transition after loading
        // ... your transition logic ...
    }
}
Module Registration
m_descriptors.insert(m_descriptors.end(), {
    MyProject::MyStageManagerComponent::CreateDescriptor(),
});
Then create a prefab for your custom Stage Manager and add it to the Game Manager’s Startup Managers list (replacing the default).
See Also
For component references:
For related resources:
Get GS_Core
GS_Core — Explore this gem on the product page and add it to your project.
3.2 - Stage Data
The per-level anchor component — holds stage configuration, NavMesh references, and runs the level’s staged activation sequence.
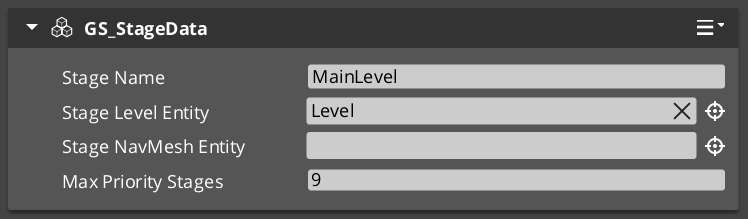
The Stage Data component is the anchor that connects the Stage Manager to a loaded level. It holds level-specific configuration — stage name, NavMesh reference, priority layers — and runs the staged activation sequence that brings the level online incrementally rather than all at once.
Every level that loads through the Stage Manager should have exactly one Stage Data component at the root of its prefab hierarchy.
For usage guides and setup examples, see The Basics: GS_Core.
Contents
How It Works
Connection
When the Stage Manager spawns a stage prefab, it queries the level for the Stage Data component via StageDataRequestBus. The Stage Data returns its reference, and the Stage Manager hands off the startup process.
Staged Activation
Rather than activating every entity in the level at once (which would cause a massive frame spike), the Stage Data component supports priority-based activation:
- SetUpStage() — Initial stage configuration. Sets up references, connects internal systems.
- ActivateByPriority — Entities tagged with priority layers activate in sequence, spreading heavy initialization across multiple frames. This allows NavMesh generation, procedural content, and complex entity hierarchies to spin up without blocking the main thread.
- LoadStageComplete — The Stage Manager broadcasts this once all priority layers have finished and the level is fully ready.
NavMesh Integration
The Stage Data component holds a reference to the level’s Recast NavMesh entity. This allows the Stage Manager to trigger NavMesh generation at the appropriate point during the startup sequence — after the level geometry is loaded but before AI systems begin pathfinding.
Setup
- In your level prefab, create an entity at the root level.
- Attach the GS_StageDataComponent to it.
- Set the Stage Name to match the name used in the Stage Manager’s Stages list.
- Assign the NavMesh entity reference if your level uses Recast Navigation.
- Configure priority layers for incremental entity activation if needed.
Inspector Properties
| Property | Type | Default | Description |
|---|
| Stage Name | AZStd::string | "" | The name of this stage. Must match the corresponding entry in the Stage Manager’s Stages list. |
| NavMesh | AZ::EntityId | Invalid | Reference to the entity with the Recast Navigation component. Used to trigger NavMesh generation during staged startup. |
API Reference
Request Bus: StageDataRequestBus
Used by the Stage Manager to connect to and control the level’s startup.
| Method | Parameters | Returns | Description |
|---|
GetStageData | — | StageData* | Returns a reference to this Stage Data component. Used by the Stage Manager during initial connection. |
BeginSetUpStage | — | void | Starts the stage’s setup sequence. Called by the Stage Manager after connecting. |
GetStageName | — | AZStd::string | Returns the configured stage name. |
GetStageNavMesh | — | AZ::EntityId | Returns the NavMesh entity reference for this stage. |
Notification Bus: StageDataNotificationBus
Connect to this bus for level-specific lifecycle events.
| Event | Parameters | Description |
|---|
OnLoadStageComplete | — | Broadcast when this stage’s activation sequence has finished. |
OnBeginSetUpStage | — | Broadcast when the stage setup begins. |
OnTearDownStage | — | Broadcast when the stage is being unloaded. Use for level-specific cleanup. |
ActivateByPriority | int priority | Broadcast for each priority layer during staged activation. Entities at this priority level should activate. |
Local / Virtual Methods
These methods are available when extending the Stage Data component.
| Method | Returns | Description |
|---|
SetUpStage() | bool | Runs the stage’s initial setup. Override to add custom startup logic. Returns true when setup is complete. |
BeginLoadStage() | void | Called when the stage begins loading. Override for custom load-start behavior. |
LoadStageComplete() | void | Called when loading is complete. Override for custom post-load behavior. |
Usage Examples
Listening for Stage Events in a Level Component
#include <GS_Core/GS_CoreBus.h>

class MyLevelController
    : public AZ::Component
    , protected GS_Core::StageDataNotificationBus::Handler
{
protected:
    void Activate() override
    {
        GS_Core::StageDataNotificationBus::Handler::BusConnect();
    }

    void Deactivate() override
    {
        GS_Core::StageDataNotificationBus::Handler::BusDisconnect();
    }

    void OnBeginSetUpStage() override
    {
        // Level setup is starting — initialize level-specific systems
    }

    void OnLoadStageComplete() override
    {
        // Level is fully ready — spawn enemies, start ambient audio, etc.
    }

    void OnTearDownStage() override
    {
        // Level is being unloaded — clean up level-specific resources
    }
};
Priority-Based Activation
#include <GS_Core/GS_CoreBus.h>

class MyPriorityActivator
    : public AZ::Component
    , protected GS_Core::StageDataNotificationBus::Handler
{
    int m_myPriority = 2; // Activate during priority layer 2

protected:
    void Activate() override
    {
        GS_Core::StageDataNotificationBus::Handler::BusConnect();
    }

    void Deactivate() override
    {
        GS_Core::StageDataNotificationBus::Handler::BusDisconnect();
    }

    void ActivateByPriority(int priority) override
    {
        if (priority == m_myPriority)
        {
            // This is our turn — initialize heavy resources
            // (procedural generation, AI setup, physics volumes, etc.)
        }
    }
};
Script Canvas
Getting stage name and NavMesh reference:
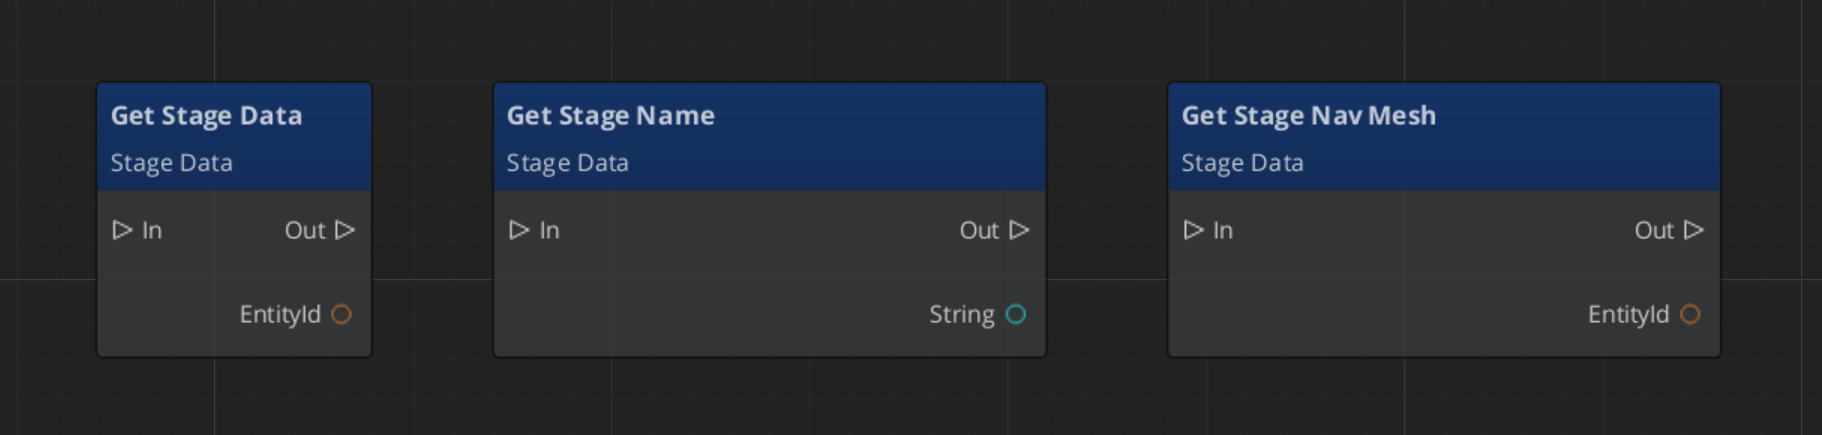
Extending the Stage Data Component
Extend Stage Data when you need custom level startup sequences, procedural generation hooks, or level-specific configuration.
#pragma once
#include <Source/StageManager/GS_StageDataComponent.h>

namespace MyProject
{
    class MyStageDataComponent
        : public GS_Core::GS_StageDataComponent
    {
    public:
        AZ_COMPONENT_DECL(MyStageDataComponent);

        static void Reflect(AZ::ReflectContext* context);

    protected:
        // Override to add custom stage setup
        bool SetUpStage() override;
        void LoadStageComplete() override;

    private:
        bool m_enableProceduralContent = false;
    };
}
Implementation (.cpp)
#include "MyStageDataComponent.h"
#include <AzCore/Serialization/SerializeContext.h>

namespace MyProject
{
    AZ_COMPONENT_IMPL(MyStageDataComponent, "MyStageDataComponent", "{YOUR-UUID-HERE}",
        GS_Core::GS_StageDataComponent);

    void MyStageDataComponent::Reflect(AZ::ReflectContext* context)
    {
        if (auto serializeContext = azrtti_cast<AZ::SerializeContext*>(context))
        {
            serializeContext->Class<MyStageDataComponent, GS_Core::GS_StageDataComponent>()
                ->Version(0)
                ->Field("EnableProceduralContent", &MyStageDataComponent::m_enableProceduralContent);

            if (AZ::EditContext* editContext = serializeContext->GetEditContext())
            {
                editContext->Class<MyStageDataComponent>(
                    "My Stage Data", "Custom stage data with procedural generation support")
                    ->ClassElement(AZ::Edit::ClassElements::EditorData, "")
                        ->Attribute(AZ::Edit::Attributes::Category, "MyProject")
                        ->Attribute(AZ::Edit::Attributes::AppearsInAddComponentMenu, AZ_CRC_CE("Game"))
                    ->DataElement(AZ::Edit::UIHandlers::Default,
                        &MyStageDataComponent::m_enableProceduralContent,
                        "Enable Procedural Content",
                        "Generate procedural content during stage setup");
            }
        }
    }

    bool MyStageDataComponent::SetUpStage()
    {
        if (m_enableProceduralContent)
        {
            // Run procedural generation for this level
            // ... your generation logic ...
        }

        // Call base to continue the standard setup sequence
        return GS_StageDataComponent::SetUpStage();
    }

    void MyStageDataComponent::LoadStageComplete()
    {
        // Custom post-load behavior
        // ... your logic ...

        GS_StageDataComponent::LoadStageComplete();
    }
}
Module Registration
m_descriptors.insert(m_descriptors.end(), {
    MyProject::MyStageDataComponent::CreateDescriptor(),
});
Use your custom Stage Data component in level prefabs instead of the default GS_StageDataComponent.
See Also
For component references:
For related resources:
Get GS_Core
GS_Core — Explore this gem on the product page and add it to your project.
4 - GS_Options
The configuration system — input profiles, input readers, and runtime settings management for gameplay and accessibility.
The Options system is the central pillar for handling background systemic configuration. At its simplest, it lets you set up user-facing options like volume, graphics settings, subtitles, and other standard configurable settings. Beyond that, it manages development-side functionality — language settings, current input device type, and other runtime-aware systems — providing that data to hook components throughout the game.
Currently, the Options system’s primary feature is the Input Profile system, which replaces O3DE’s raw input binding files with a more flexible, group-based approach that supports runtime rebinding and per-group enable/disable toggling.
For usage guides and setup examples, see The Basics: GS_Core.
Contents
Components
| Component | Purpose | Documentation |
|---|
| GS_OptionsManagerComponent | Singleton manager. Holds the active Input Profile and provides it to Input Readers. | Options Manager |
| GS_InputProfile | Data asset defining input groups, event mappings, and key bindings. Created in the Asset Editor. | Input Profiles |
| GS_InputReaderComponent | Reads input through the active profile and fires gameplay events. Can be extended for specialized input handling. | Input Options |
Quick Start
- Create an Options Manager prefab with the GS_OptionsManagerComponent.
- Create a GS_InputProfile data asset in the Asset Editor.
- Add input groups and event mappings to the profile.
- Assign the Input Profile to the Options Manager.
- Add the Options Manager
.spawnable to the Game Manager’s Startup Managers list. - Attach GS_InputReaderComponents to entities that need to process input.
See Also
For conceptual overviews and usage guides:
For component references:
For related resources:
Get GS_Core
GS_Core — Explore this gem on the product page and add it to your project.
4.1 - Options Manager
The singleton options controller — holds the active Input Profile and provides runtime configuration data to game systems.
For usage guides and setup examples, see The Basics: GS_Core.

Image showing the Options Manager component, as seen in the Entity Inspector.
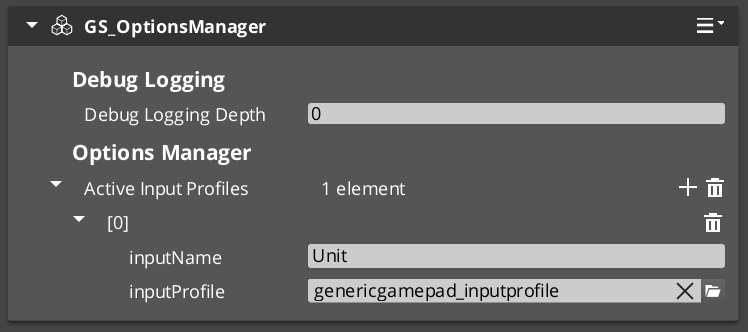
The Options Manager is the central anchor of the Options system. It holds the active Input Profile data asset and provides it to Input Readers and other game systems that need runtime configuration data.
As a Manager, it is spawned by the Game Manager and participates in the standard two-stage initialization lifecycle.
Contents
How It Works
- The Options Manager initializes during the Game Manager’s startup sequence.
- It loads the configured Input Profile data asset.
- Input Readers across the game query the Options Manager for the active profile via
OptionsManagerRequestBus. - The Options Manager responds to standby events — pausing and resuming input processing when the game enters or exits standby mode.
Setup
Image showing the Manager wrapper entity set as Editor-Only inside Prefab Edit Mode.
- Create an entity. Attach the GS_OptionsManagerComponent to it.
- Assign your Input Profile data asset.
- Turn the entity into a prefab.
- Enter prefab edit mode. Set the wrapper entity (parent) to Editor Only. Save.
- Delete the Options Manager entity from the level.
- In the Game Manager prefab, add the Options Manager
.spawnable to the Startup Managers list.
Inspector Properties
| Property | Type | Default | Description |
|---|
| Input Profile | AZ::Data::Asset<GS_InputProfile> | None | The active Input Profile data asset. Input Readers across the game will use this profile for event-to-binding mappings. |
API Reference
Request Bus: OptionsManagerRequestBus
Singleton bus — call via Broadcast.
| Method | Parameters | Returns | Description |
|---|
GetActiveInputProfile | — | AZ::Data::Asset<GS_InputProfile> | Returns the currently active Input Profile data asset. Called by Input Readers on activation. |
Lifecycle Events (from GameManagerNotificationBus)
| Event | Description |
|---|
OnStartupComplete | The Options Manager is fully ready. Input Readers can now query for the active profile. |
OnEnterStandby | Pause input processing. |
OnExitStandby | Resume input processing. |
Usage Examples
#include <GS_Core/GS_CoreBus.h>

AZ::Data::Asset<GS_Core::GS_InputProfile> profile;
GS_Core::OptionsManagerRequestBus::BroadcastResult(
    profile,
    &GS_Core::OptionsManagerRequestBus::Events::GetActiveInputProfile
);

if (profile.IsReady())
{
    // Use the profile to look up bindings, check group states, etc.
}
Extending the Options Manager
Extend the Options Manager when you need additional runtime settings (graphics quality, audio levels, accessibility), custom options persistence, or platform-specific configuration.
#pragma once
#include <Source/OptionsSystem/GS_OptionsManagerComponent.h>

namespace MyProject
{
    class MyOptionsManagerComponent
        : public GS_Core::GS_OptionsManagerComponent
    {
    public:
        AZ_COMPONENT_DECL(MyOptionsManagerComponent);

        static void Reflect(AZ::ReflectContext* context);

    protected:
        void OnStartupComplete() override;

    private:
        float m_masterVolume = 1.0f;
        int m_graphicsQuality = 2; // 0=Low, 1=Med, 2=High
    };
}
Implementation (.cpp)
#include "MyOptionsManagerComponent.h"
#include <AzCore/Serialization/SerializeContext.h>

namespace MyProject
{
    AZ_COMPONENT_IMPL(MyOptionsManagerComponent, "MyOptionsManagerComponent", "{YOUR-UUID-HERE}",
        GS_Core::GS_OptionsManagerComponent);

    void MyOptionsManagerComponent::Reflect(AZ::ReflectContext* context)
    {
        if (auto serializeContext = azrtti_cast<AZ::SerializeContext*>(context))
        {
            serializeContext->Class<MyOptionsManagerComponent, GS_Core::GS_OptionsManagerComponent>()
                ->Version(0)
                ->Field("MasterVolume", &MyOptionsManagerComponent::m_masterVolume)
                ->Field("GraphicsQuality", &MyOptionsManagerComponent::m_graphicsQuality);

            if (AZ::EditContext* editContext = serializeContext->GetEditContext())
            {
                editContext->Class<MyOptionsManagerComponent>(
                    "My Options Manager", "Extended options with audio and graphics settings")
                    ->ClassElement(AZ::Edit::ClassElements::EditorData, "")
                        ->Attribute(AZ::Edit::Attributes::Category, "MyProject")
                        ->Attribute(AZ::Edit::Attributes::AppearsInAddComponentMenu, AZ_CRC_CE("Game"))
                    ->DataElement(AZ::Edit::UIHandlers::Slider,
                        &MyOptionsManagerComponent::m_masterVolume, "Master Volume", "Global audio volume")
                        ->Attribute(AZ::Edit::Attributes::Min, 0.0f)
                        ->Attribute(AZ::Edit::Attributes::Max, 1.0f)
                    ->DataElement(AZ::Edit::UIHandlers::ComboBox,
                        &MyOptionsManagerComponent::m_graphicsQuality, "Graphics Quality", "Rendering quality preset");
            }
        }
    }

    void MyOptionsManagerComponent::OnStartupComplete()
    {
        // Apply saved options on startup
        // ... load from save system and apply settings ...

        GS_OptionsManagerComponent::OnStartupComplete();
    }
}
Module Registration
m_descriptors.insert(m_descriptors.end(), {
    MyProject::MyOptionsManagerComponent::CreateDescriptor(),
});
See Also
For component references:
Get GS_Core
GS_Core — Explore this gem on the product page and add it to your project.
4.2 - GS_InputOptions
The input subsystem — Input Profiles for grouped event-to-binding mappings and Input Readers for processing input in gameplay.
Input Options is the input subsystem within the Options system. It provides two core pieces:
- Input Profiles — Data assets that map input bindings to named events, organized into toggleable groups. These replace O3DE’s raw input binding files with a more flexible system that supports runtime rebinding and per-group enable/disable toggling.
- Input Readers — Components that read input through the active profile and fire gameplay events. They can be extended for specialized input handling (player controllers, UI navigation, etc.).
For usage guides and setup examples, see The Basics: GS_Core.
Contents
Architecture
GS_OptionsManagerComponent
  │
  └── Active GS_InputProfile (data asset)
        │
        ├── InputBindingGroup: "Movement"
        │     ├── EventInputMapping: "MoveForward" → [keyboard_key_alphanumeric_W]
        │     ├── EventInputMapping: "MoveBack"    → [keyboard_key_alphanumeric_S]
        │     └── EventInputMapping: "Sprint"      → [keyboard_key_modifier_shift_l]
        │
        ├── InputBindingGroup: "Combat"
        │     ├── EventInputMapping: "Attack"   → [mouse_button_left]
        │     └── EventInputMapping: "Block"    → [mouse_button_right]
        │
        └── InputBindingGroup: "UI"
              ├── EventInputMapping: "Confirm"  → [keyboard_key_alphanumeric_E]
              └── EventInputMapping: "Cancel"   → [keyboard_key_navigation_escape]

GS_InputReaderComponent (on player entity, UI entity, etc.)
  │
  ├── Queries OptionsManager for active profile
  ├── Listens for raw O3DE input events
  ├── Matches bindings → fires named events
  └── EnableInputGroup / DisableInputGroup for runtime control
Data assets that map key bindings to named events, organized into toggleable groups. They replace O3DE’s raw input binding files with a more flexible system that supports runtime rebinding and per-group enable/disable toggling.
| Asset / Type | Purpose |
|---|
| GS_InputProfile | Data asset defining input groups, event mappings, and key bindings. |
| InputBindingGroup | Named group of event mappings — can be toggled at runtime. |
| EventInputMapping | Maps a named event to one or more raw O3DE input bindings. |
Input Profiles API
Components that read input through the active profile and fire named gameplay events. Supports runtime group toggling to enable or disable input categories on the fly, and a claim flag to absorb matched events from other readers.
| Component | Purpose |
|---|
| GS_InputReaderComponent | Per-entity input processor. Queries the active profile, matches raw input, and fires named gameplay events. |
Input Reader API
Setup
- Create a GS_InputProfile data asset in the Asset Editor.
- Add input groups and event mappings to the profile.
- Assign the profile to the Options Manager.
- Attach a GS_InputReaderComponent to any entity that needs to process input.
- The Input Reader automatically queries the Options Manager for the active profile on activation.
See Also
For component references:
For related resources:
Get GS_Core
GS_Core — Explore this gem on the product page and add it to your project.
4.2.1 - Input Profiles
Data assets for input binding configuration — map key bindings to named events, organized into toggleable groups for advanced runtime input control.
Input Profiles are data assets that map key bindings to named events, organized into groups that can be enabled and disabled at runtime. They replace O3DE’s raw input binding files with a more flexible system that supports runtime rebinding, per-group toggling, and options menu customization.
For usage guides and setup examples, see The Basics: GS_Core.
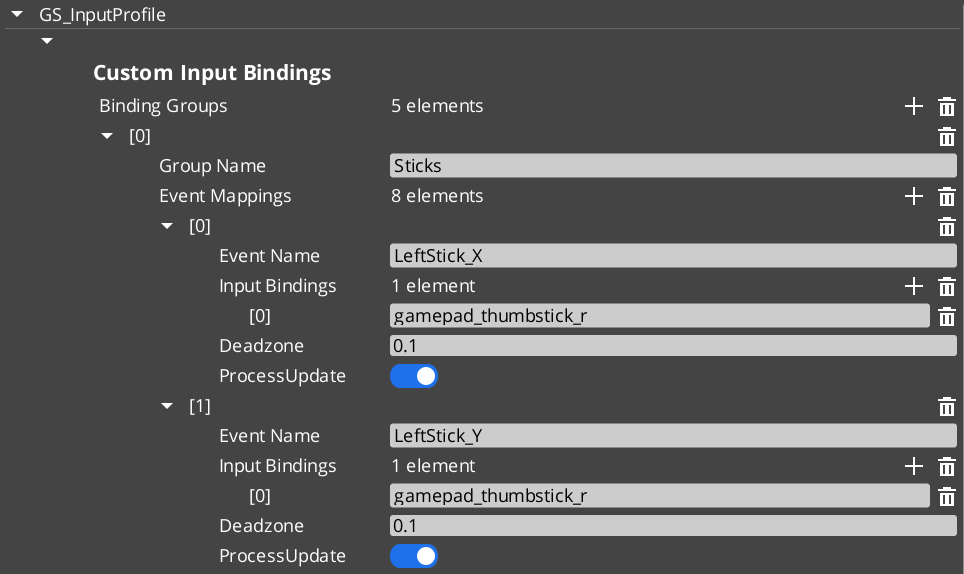
Contents
How It Works
An Input Profile contains a list of InputBindingGroups. Each group contains EventInputMappings that define the relationship between a named event, its key bindings, and processing options.
Data Structure
GS_InputProfile
  └── InputBindingGroups[]
        ├── groupName: "Movement"
        └── eventMappings[]
              ├── EventInputMapping
              │     ├── eventName: "MoveForward"
              │     ├── inputBindings: ["keyboard_key_alphanumeric_W"]
              │     ├── deadzone: 0.0
              │     └── processUpdate: true
              └── EventInputMapping
                    ├── eventName: "Jump"
                    ├── inputBindings: ["keyboard_key_alphanumeric_Space"]
                    ├── deadzone: 0.0
                    └── processUpdate: false
| Field | Type | Description |
|---|
eventName | AZStd::string | The name used to fire this event in gameplay through Input Readers. This is the identifier your gameplay code listens for. |
inputBindings | AZStd::vector<AZStd::string> | One or more raw O3DE input binding names (e.g., keyboard_key_alphanumeric_W, mouse_button_left, gamepad_button_a). Multiple bindings allow the same event to fire from different input sources. |
deadzone | float | Dead zone threshold for analog inputs (joysticks, triggers). Values below this threshold are treated as zero. Set to 0.0 for digital inputs (keys, buttons). |
processUpdate | bool | When true, the event fires continuously while the input is held. When false, the event fires only on initial press and release. Use true for movement and camera input; false for discrete actions like jumping or interacting. |
TypeId: {61421EC2-7B99-4EF2-9C56-2A7F41ED3474}
Reflection: GS_InputProfile extends AZ::Data::AssetData. Its Reflect() function requires GS_AssetReflectionIncludes.h — see Serialization Helpers.
| Field | Type | Description |
|---|
groupName | AZStd::string | Name of the group (e.g., “Movement”, “Combat”, “UI”). Used by Input Readers to enable/disable groups at runtime. |
eventMappings | AZStd::vector<EventInputMapping> | The event mappings belonging to this group. |
TypeId: {37E880D1-9AB4-4E10-9C3C-020B5C32F75B}
For initial startup instructions refer to the Core Set Up Guide.
- In the Asset Editor, open the New menu and select GS_InputProfile. This creates a blank Input Profile.
- Add Input Groups — Create groups that cluster related input events (e.g., “Movement”, “Combat”, “UI”). Groups can be toggled on/off at runtime by Input Readers.
- Add Event Mappings — Within each group, add EventInputMappings. Set the Event Name to the identifier your gameplay code will listen for.
- Set Bindings — Add the raw O3DE input bindings that should trigger each event. These are standard O3DE raw mapping names.
- Configure Deadzone — For gamepad joystick or trigger inputs, set an appropriate deadzone value (e.g.,
0.15). Leave at 0.0 for keyboard and mouse inputs. - Set Process Update — Enable for continuous input (movement, camera look). Disable for discrete actions (jump, interact, attack).
- Assign to Options Manager — Add the profile to the Options Manager’s Input Profile property.
API Reference
These methods are available on the GS_InputProfile data asset class for runtime binding queries and modifications.
| Method | Parameters | Returns | Description |
|---|
GetMappingFromBinding | const AZStd::string& binding, const AZStd::string& groupName = "" | const EventInputMapping* | Looks up the event mapping associated with a raw binding. Optionally restrict the search to a specific group. Returns nullptr if not found. |
GetGroupNameFromBinding | const AZStd::string& binding | const AZStd::string* | Returns the group name that contains the given binding. Returns nullptr if not found. |
HasBinding | const AZStd::string& binding | bool | Returns true if the binding exists anywhere in the profile. |
ReplaceEventInputBinding | const AZStd::string& eventName, const AZStd::string& newBinding | bool | Replaces the existing binding for the named event with a new one. For runtime rebinding in options menus. Returns true on success. |
AddEventInputBinding | const AZStd::string& eventName, const AZStd::string& newBinding | bool | Adds an additional binding to the named event. Returns true on success. |
RemoveEventBinding | const AZStd::string& eventName, const AZStd::string& bindingToRemove | bool | Removes a specific binding from the named event. Returns true on success. |
Usage Examples
Runtime Rebinding (Options Menu)
#include <GS_Core/GS_CoreBus.h>

// Get the active input profile
AZ::Data::Asset<GS_Core::GS_InputProfile> profile;
GS_Core::OptionsManagerRequestBus::BroadcastResult(
    profile,
    &GS_Core::OptionsManagerRequestBus::Events::GetActiveInputProfile
);

if (profile.IsReady())
{
    // Rebind the "Jump" event from Space to E
    profile.Get()->ReplaceEventInputBinding(
        "Jump",
        "keyboard_key_alphanumeric_E"
    );

    // Add an alternative binding (gamepad A button)
    profile.Get()->AddEventInputBinding(
        "Jump",
        "gamepad_button_a"
    );
}
Checking if a Binding Exists
if (profile.IsReady() && profile.Get()->HasBinding("keyboard_key_alphanumeric_W"))
{
    // This binding is mapped to an event in the profile
}
See Also
For component references:
For related resources:
Get GS_Core
GS_Core — Explore this gem on the product page and add it to your project.
4.2.2 - Input Reader
Component that reads input through the active profile and fires named gameplay events, with runtime group toggling and input claiming.
The Input Reader component sits on any entity that needs to process input. It queries the Options Manager for the active Input Profile, then listens for raw O3DE input events and matches them against the profile’s bindings to fire named gameplay events.
For usage guides and setup examples, see The Basics: GS_Core.
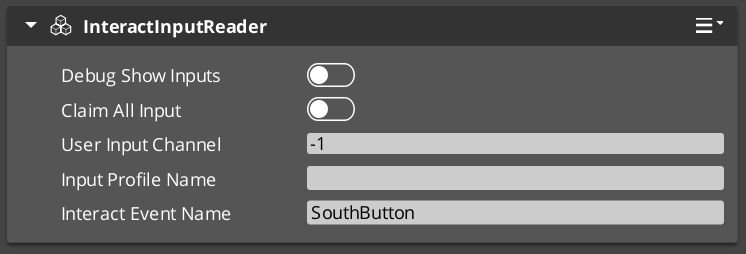
Contents
How It Works
On activation the Input Reader queries the Options Manager for the active Input Profile and subscribes to raw O3DE input events. Each frame it matches incoming raw input against the profile bindings. When a match is found it fires the associated named event into the gameplay event system. Input groups can be enabled or disabled at runtime to control which events are active at any moment.
Key Features
- Group toggling — Enable or disable entire input groups at runtime. For example, disable “Combat” inputs during a dialogue sequence, or disable “Movement” inputs during a cutscene.
- Claim input — The
ClaimAllInput flag causes the reader to absorb matched input events, preventing them from reaching other readers. Useful for layered input (e.g., UI absorbs input before gameplay). - Extensible — Extend the Input Reader for specialized input handling. GS_Play uses this internally for player controller input and UI navigation input.
API Reference
GS_InputReaderComponent
| Field | Value |
|---|
| Header | GS_Core/GS_CoreBus.h |
Request Bus: InputReaderRequestBus
Entity-addressed bus – call via Event(entityId, ...).
| Method | Parameters | Returns | Description |
|---|
EnableInputGroup | const AZStd::string& groupName | void | Enables a named input group for this reader. Events in this group will fire on matched input. |
DisableInputGroup | const AZStd::string& groupName | void | Disables a named input group. Events in this group will be ignored until re-enabled. |
IsGroupDisabled | const AZStd::string& groupName | bool | Returns true if the named group is currently disabled. |
Usage Examples
Toggling Input Groups
#include <GS_Core/GS_CoreBus.h>

// Disable combat inputs during dialogue
GS_Core::InputReaderRequestBus::Event(
    playerEntityId,
    &GS_Core::InputReaderRequestBus::Events::DisableInputGroup,
    AZStd::string("Combat")
);

// Re-enable when dialogue ends
GS_Core::InputReaderRequestBus::Event(
    playerEntityId,
    &GS_Core::InputReaderRequestBus::Events::EnableInputGroup,
    AZStd::string("Combat")
);
Script Canvas
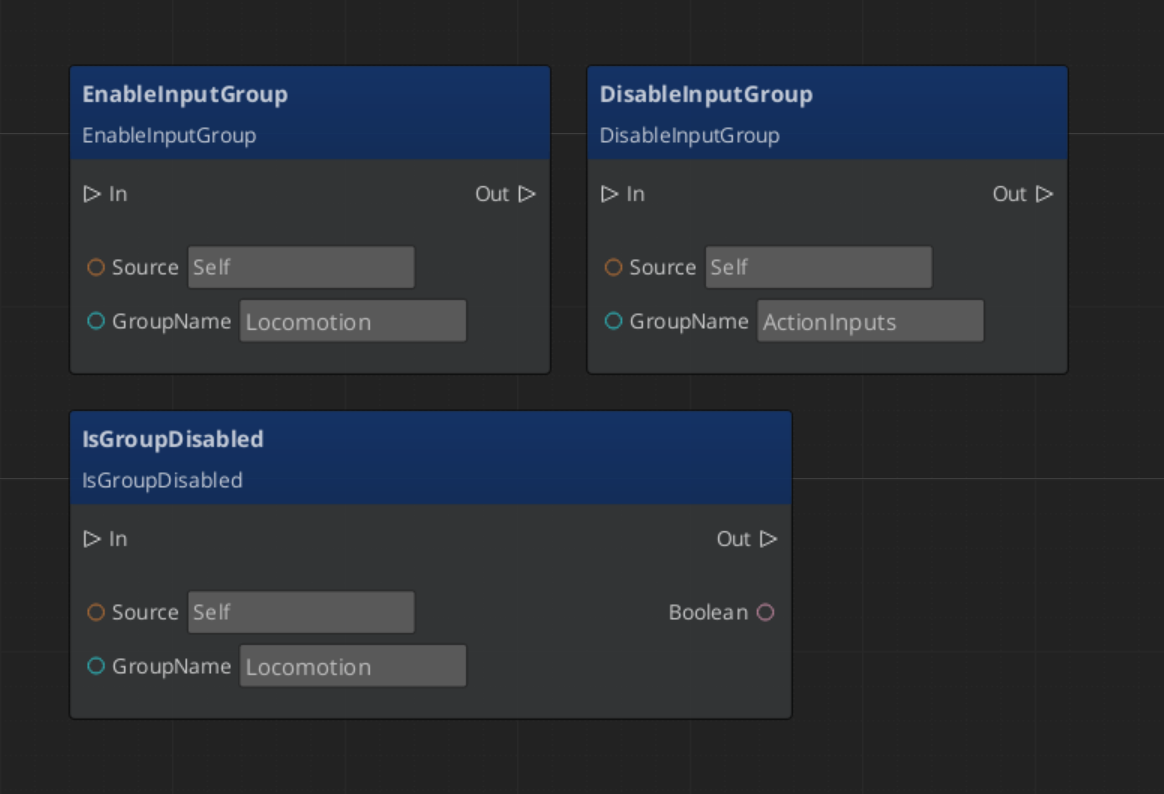
See Also
For component references:
For related resources:
Get GS_Core
GS_Core — Explore this gem on the product page and add it to your project.
5 - Systems
Core framework systems — the GS_Motion track-based animation engine and the GS_Actions triggerable behavior system.
For usage guides and setup examples, see The Basics: GS_Core.
Contents
GS_Motion
The track-based animation and tween engine. GS_Motion defines abstract base classes for tracks, assets, composites, and proxies. Domain gems (GS_UI, GS_Juice) extend it with concrete track types and custom asset formats. The system handles playback timing, per-track easing, proxy-based entity targeting, and deep-copy runtime instancing.
GS_Motion
API
See Also
For conceptual overviews and usage guides:
For related resources:
Get GS_Core
GS_Core — Explore this gem on the product page and add it to your project.
5.1 - GS_Motion
Track-based animation and tween system — abstract base classes for motions, tracks, composites, assets, and proxies with a domain extension pattern.
GS_Motion is the framework’s central track-based animation system. It defines abstract base classes that domain gems extend with concrete track types — GS_UI extends it with 8 UI animation tracks (.uiam assets), and GS_Juice extends it with 2 feedback tracks (.feedbackmotion assets). The system handles playback timing, per-track easing, proxy-based entity targeting, and deep-copy runtime instancing from data assets.
For usage guides and setup examples, see The Basics: GS_Core.
Contents
Architecture
GS_MotionTrack (abstract base)
    ├── UiMotionTrack (GS_UI domain base)
    │       ├── UiPositionTrack
    │       ├── UiScaleTrack
    │       ├── UiRotationTrack
    │       ├── UiElementAlphaTrack
    │       ├── UiImageAlphaTrack
    │       ├── UiImageColorTrack
    │       ├── UiTextColorTrack
    │       └── UiTextSizeTrack
    └── FeedbackMotionTrack (GS_Juice domain base)
            ├── FeedbackTransformTrack
            └── FeedbackMaterialTrack

GS_MotionAsset (abstract base)
    ├── UiAnimationMotionAsset (.uiam)
    └── FeedbackMotionAsset (.feedbackmotion)

GS_MotionComposite (runtime instance)
    └── Created by asset's CreateRuntimeComposite()
Core Classes
| Class | Description | Page |
|---|
| GS_MotionTrack | Abstract base for all animation tracks — fields, lifecycle, virtual methods, extension guide. | MotionTrack |
| GS_Motion | Playback engine — ticks tracks, computes per-track progress windows, applies easing, manages lifecycle. | Motion Engine |
| GS_MotionComposite | Runtime deep-copy instance with proxy entity overrides — created from GS_MotionAsset. | MotionComposite |
| GS_MotionAsset | Abstract base for motion data assets — holds track definitions and creates runtime composites. | MotionAsset |
| GS_MotionProxy | Serialized struct for track-to-entity redirection — allows designers to target named tracks at different entities. | MotionProxy |
Domain Extensions
GS_Motion is designed to be extended by domain gems. Each domain creates its own track hierarchy, asset type, and file extension.
| Domain | Gem | Base Track | Concrete Tracks | Asset Extension |
|---|
| UI Animation | GS_UI | UiMotionTrack | Position, Scale, Rotation, ElementAlpha, ImageAlpha, ImageColor, TextColor, TextSize (8) | .uiam |
| Feedback | GS_Juice | FeedbackMotionTrack | FeedbackTransformTrack, FeedbackMaterialTrack (2) | .feedbackmotion |
Extension Pattern
To create a new motion domain:
- Create a domain base track —
class MyTrack : public GS_Core::GS_MotionTrack - Create concrete tracks extending the domain base — each overrides
Update(float easedProgress) and GetTypeName() - Create a domain asset —
class MyAsset : public GS_Core::GS_MotionAsset with vector<MyTrack*> m_tracks - Create an instance wrapper struct (not a component) — holds
Asset<MyAsset> + vector<GS_MotionProxy>, manages Initialize / Unload / Play / Stop - Embed the wrapper — components embed the instance wrapper struct as a serialized field
Critical: All track vectors must use raw pointers: vector<MyTrack*>. Never use unique_ptr — O3DE SerializeContext requires raw pointers for polymorphic enumeration in the asset editor.
See Also
For conceptual overviews and usage guides:
For class references:
For domain extensions:
Get GS_Core
GS_Core — Explore this gem on the product page and add it to your project.
5.1.1 - GS_MotionTrack
Abstract base class for all animation tracks — fields, lifecycle, and virtual methods for domain extension.
GS_MotionTrack is the abstract base class for all animation tracks in the GS_Motion system. Each track animates one aspect of an entity over a time window within a motion. Domain gems extend this with concrete track types — GS_UI provides 8 LyShine tracks, GS_Juice provides 2 feedback tracks.
For usage guides and setup examples, see The Basics: GS_Core.
Fields
| Field | Type | Description |
|---|
| m_id | AZ::Uuid | Unique track identifier (auto-generated). |
| m_identifier | AZStd::string | Proxy label — if set, the track appears in the proxy list for entity override targeting. |
| curveType | CurveType | Easing curve applied to track progress (from the Curves utility library). |
| startTime | float | Time offset before the track begins playing (seconds). |
| duration | float | Track playback duration (seconds). |
| startVarianceMin | float | Minimum random variance added to start time. |
| startVarianceMax | float | Maximum random variance added to start time. |
Lifecycle
Each track goes through a fixed lifecycle managed by the parent GS_Motion:
| Phase | Method | Description |
|---|
| Initialize | Init(AZ::EntityId owner) | Stores the owner entity. Called once when the motion is initialized. |
| Start | Start() | Called when the track’s time window begins. |
| Update | Update(float easedProgress) | Called each frame with eased progress (0 → 1). Override this in concrete tracks. |
| End | End() | Called when the track’s time window completes. |
| Unload | Unload() | Cleanup. Called when the motion is unloaded. |
Virtual Methods
These methods must be overridden in concrete track implementations:
| Method | Returns | Description |
|---|
Update(float easedProgress) | void | Apply the animation at the given eased progress value (0 → 1). |
GetTypeName() | AZStd::string | Return the track’s display name for proxy labels in the editor. |
Extension Guide
To create a new domain of animation tracks:
- Create a domain base track:
class MyTrack : public GS_Core::GS_MotionTrack — this serves as the common base for all tracks in your domain. - Create concrete tracks extending the domain base — each overrides
Update(float easedProgress) to animate a specific property. - Reflect the track class using O3DE’s
SerializeContext and EditContext. The system discovers the new type automatically.
Critical: Track vectors must use raw pointers (vector<MyTrack*>). Never use unique_ptr — O3DE SerializeContext requires raw pointers for polymorphic enumeration in the asset editor.
See Also
Get GS_Core
GS_Core — Explore this gem on the product page and add it to your project.
5.1.2 - GS_Motion
The playback engine — ticks through tracks, computes per-track progress windows, and manages motion lifecycle.
GS_Motion is the playback engine that drives animation tracks. It ticks through all tracks each frame, computes per-track progress windows based on start time and duration, applies easing curves, and calls Update(easedProgress) on each active track. It handles motion lifecycle from initialization through completion.
For usage guides and setup examples, see The Basics: GS_Core.
API Reference
| Method | Parameters | Returns | Description |
|---|
Play | — | void | Begin playback from the start. |
PlayWithCallback | AZStd::function<void()> cb | void | Play and invoke callback on completion. |
Stop | — | void | Stop playback immediately. |
Initialize | AZ::EntityId owner | void | Initialize all tracks with the owner entity. |
Unload | — | void | Unload all tracks and clean up. |
Fields
| Field | Type | Description |
|---|
| motionName | AZStd::string | Display name for the motion. |
| tracks | vector<GS_MotionTrack*> | The tracks in this motion. |
| loop | bool | Whether playback loops. |
| onComplete | function<void()> | Completion callback (set via PlayWithCallback). |
How It Works
Each frame during playback:
- The motion calculates the global elapsed time.
- For each track, it computes the track-local progress based on
startTime and duration. - If the track is within its active window, the progress is eased using the track’s
curveType. Update(easedProgress) is called on the track with the eased value (0 → 1).- When all tracks complete,
OnMotionComplete() is called.
Virtual Methods
| Method | Description |
|---|
OnMotionComplete | Called when playback finishes. Override in subclasses for custom teardown. |
See Also
Get GS_Core
GS_Core — Explore this gem on the product page and add it to your project.
5.1.3 - GS_MotionComposite
Runtime deep-copy motion instance with proxy entity overrides — created from GS_MotionAsset for per-entity playback.
GS_MotionComposite is the runtime instance of a motion, created from a GS_MotionAsset. It deep-copies all tracks so each entity gets independent playback state, and applies proxy overrides to redirect specific tracks to different entities in the hierarchy.
For usage guides and setup examples, see The Basics: GS_Core.
GS_MotionComposite extends GS_Motion. When an asset’s CreateRuntimeComposite() is called, all tracks are SC-cloned (serialization-context cloned) into a new composite instance. This ensures each entity playing the same motion has its own independent track state — no shared mutation.
API Reference
| Method | Parameters | Returns | Description |
|---|
ApplyProxies | AZ::EntityId owner, vector<GS_MotionProxy> proxies | void | Matches proxy trackIds to tracks and overrides the target entity for each matched track. |
How It Works
- Creation:
GS_MotionAsset::CreateRuntimeComposite() deep-copies all asset tracks into a new composite. - Proxy Application:
ApplyProxies() walks the proxy list, matching each proxy’s m_trackId to a track’s m_id. Matched tracks redirect their owner entity to the proxy’s m_proxyEntity. - Playback: The composite plays exactly like a regular GS_Motion — it ticks tracks, applies easing, and calls
Update(). - Cleanup: On
Unload(), the composite cleans up all deep-copied tracks.
See Also
Get GS_Core
GS_Core — Explore this gem on the product page and add it to your project.
5.1.4 - GS_MotionAsset
Abstract base for motion data assets — holds track definitions and creates runtime composites.
GS_MotionAsset is the abstract base class for motion data assets. Domain gems extend this with their own asset type and file extension — GS_UI creates UiAnimationMotionAsset (.uiam), GS_Juice creates FeedbackMotionAsset (.feedbackmotion). Assets are created and edited in the O3DE Asset Editor.
Extends AZ::Data::AssetData. All subclasses require GS_AssetReflectionIncludes.h in their header — see Serialization Helpers.
For usage guides and setup examples, see The Basics: GS_Core.
API Reference
| Method | Returns | Description |
|---|
GetTrackInfos | vector<GS_TrackInfo> | Returns track UUID + label pairs for proxy list synchronization in the editor. |
CreateRuntimeComposite | GS_MotionComposite* | Factory — deep-copies all asset tracks into a new runtime GS_MotionComposite instance. |
GS_TrackInfo
Lightweight struct used for proxy synchronization between asset tracks and instance proxy lists.
| Field | Type | Description |
|---|
| id | AZ::Uuid | Track identifier (matches the track’s m_id). |
| label | AZStd::string | Track display name (from GetTypeName()). |
Domain Extensions
| Domain | Gem | Asset Class | Extension | Tracks |
|---|
| UI Animation | GS_UI | UiAnimationMotionAsset | .uiam | 8 LyShine-specific tracks |
| Feedback | GS_Juice | FeedbackMotionAsset | .feedbackmotion | 2 feedback tracks |
Extension Guide
To create a new domain asset type:
- Create
class MyAsset : public GS_Core::GS_MotionAsset with vector<MyDomainTrack*> m_tracks. Include GS_AssetReflectionIncludes.h in your asset’s header — see Serialization Helpers. - Implement
GetTrackInfos() — iterate tracks and return UUID + label pairs. - Implement
CreateRuntimeComposite() — deep-copy tracks into a new GS_MotionComposite. - Register the asset type in your gem’s
DataAssetsSystemComponent. - Add a
.setreg entry for the asset processor to recognize your file extension.
Critical: Track vectors must use raw pointers (vector<MyTrack*>). O3DE SerializeContext requires raw pointers for polymorphic enumeration.
See Also
Get GS_Core
GS_Core — Explore this gem on the product page and add it to your project.
5.1.5 - GS_MotionProxy
Serialized struct for track-to-entity redirection — allows designers to target named tracks at different entities.
GS_MotionProxy is a serialized struct that allows designers to redirect a named track to a different entity in the hierarchy. This enables a single motion asset to animate multiple entities — for example, a UI animation that moves one element while fading another.
For usage guides and setup examples, see The Basics: GS_Core.
Fields
| Field | Type | Description |
|---|
| m_trackId | AZ::Uuid | References the track’s m_id. Matched during ApplyProxies(). |
| m_label | AZStd::string | Read-only display label (synced from track info at edit time via GetTrackInfos()). |
| m_proxyEntity | AZ::EntityId | The entity this track should target instead of the motion’s owner entity. |
How It Works
- Edit time: The proxy list syncs from the asset’s track info. Each track with an
m_identifier (non-empty label) appears as a proxy slot in the inspector. - Designer assignment: The designer drags an entity reference into the proxy’s
m_proxyEntity field. - Runtime: When
GS_MotionComposite::ApplyProxies() runs, it matches each proxy’s m_trackId to a track’s m_id and overrides that track’s target entity. - Playback: The track now animates the proxy entity instead of the motion’s owner.
Usage
Proxies are embedded in instance wrapper structs (e.g., UiAnimationMotion, FeedbackMotion) alongside the asset reference. Components serialize the proxy list, and the wrapper handles synchronization with the asset.
Only tracks with a non-empty m_identifier appear in the proxy list. Tracks without an identifier always animate the owner entity.
See Also
Get GS_Core
GS_Core — Explore this gem on the product page and add it to your project.
5.2 - GS_Actions
A utility system for triggerable single-purpose actions — fire discrete behaviors from any system without recoding logic for each component.
The Actions system provides a simple, universal pattern for triggering discrete behaviors. Instead of recoding common functionality (toggle cursor, play sound, print log) into every component that needs it, you attach Action components to an entity and fire them by channel name.
Actions support chaining — when one action completes, it can fire another action on a different channel, enabling lightweight sequences without custom code.
For usage guides and setup examples, see The Basics: GS_Core.
Architecture
Entity with Actions
  │
  ├── ToggleMouseCursor_GSAction (channel: "enter_menu")
  ├── PlaySound_GSAction           (channel: "enter_menu")
  └── PrintLog_GSAction            (channel: "debug")

Any system calls:
  ActionRequestBus::Event(entityId, DoAction, "enter_menu")
    → Both ToggleMouseCursor and PlaySound fire (matching channel)
    → PrintLog does NOT fire (different channel)
Components
| Component | Purpose | Documentation |
|---|
| GS_ActionComponent | Base class for all actions. Handles channel matching, completion broadcasting, and action chaining. | Action |
| ToggleMouseCursor_GSActionComponent | Toggles the mouse cursor on or off. | Core Actions |
| PrintLog_GSActionComponent | Prints a message to the console log. | Core Actions |
Quick Start
- Attach one or more Action components to an entity.
- Set the Channel on each action to control when it fires.
- From any system, call
DoAction(channelName) on the entity’s ActionRequestBus to trigger matching actions. - Optionally enable Broadcast On Complete and set an On Complete Channel Chain for action sequencing.
See Also
Get GS_Core
GS_Core — Explore this gem on the product page and add it to your project.
5.2.1 - Action
The base class for triggerable actions — channel-based firing, completion broadcasting, and action chaining for lightweight behavior sequencing.
GS_ActionComponent is the base class for all triggerable actions. Actions are single-purpose behaviors that fire when their channel matches an incoming DoAction call. They support completion broadcasting and optional chaining to sequence multiple actions together.
Every GS_Play action (Toggle Mouse Cursor, Print Log, and actions from other gems) extends this class. When you need a custom action, you extend it too.
For usage guides and setup examples, see The Basics: GS_Core.
Contents
How It Works
Firing an Action
- A system calls
DoAction(targetChannel) on an entity’s ActionRequestBus. - Every Action component on that entity evaluates whether its channel matches the
targetChannel. - Matching actions call
ProcessAction() to execute their behavior. - When done,
CompleteAction() handles completion:- If Broadcast On Complete is enabled, it fires
OnActionComplete on the ActionNotificationBus. - If On Complete Channel Chain is set, it fires a new
DoAction with that channel name, triggering the next action in the chain.
Chaining Actions
By setting the On Complete Channel Chain to a different channel name, an action can trigger the next step in a sequence when it completes. This enables lightweight behavior chains without custom sequencing code.
Action A (channel: "step1", onCompleteChain: "step2")
  → fires → Action B (channel: "step2", onCompleteChain: "step3")
    → fires → Action C (channel: "step3")
Important: Every custom action must call CompleteAction() when its work is done. If you forget, the action will never complete and chains will break.
Inspector Properties
| Property | Type | Default | Description |
|---|
| Channel | AZStd::string | "" | The channel this action responds to. Only DoAction calls with a matching channel will trigger this action. |
| Broadcast On Complete | bool | false | When enabled, broadcasts OnActionComplete on the ActionNotificationBus when this action finishes. |
| On Complete Channel Chain | AZStd::string | "" | When non-empty, fires a new DoAction with this channel name after completing. Enables action chaining. |
API Reference
Request Bus: ActionRequestBus
Entity-addressed bus — call via Event(entityId, ...).
| Method | Parameters | Returns | Description |
|---|
DoAction | AZStd::string targetChannel | void | Triggers all actions on the target entity whose channel matches targetChannel. |
Notification Bus: ActionNotificationBus
Entity-addressed bus — connect via BusConnect(entityId).
| Event | Parameters | Description |
|---|
OnActionComplete | — | Broadcast when an action with Broadcast On Complete enabled finishes its work. |
Local / Virtual Methods
Override these when creating custom actions.
| Method | Description |
|---|
DoAction(targetChannel) | Evaluates whether this action should fire. Default compares channel to targetChannel. Override for custom evaluation logic. |
ProcessAction() | Your primary override. Executes the action’s behavior. Called when channel evaluation passes. |
CompleteAction() | Handles completion. Default checks broadcastOnComplete, fires OnActionComplete, then checks onCompleteChannelChain for chaining. Override to add custom completion logic, but always call base or handle chaining manually. |
Usage Examples
Firing Actions on an Entity
#include <GS_Core/GS_CoreBus.h>

// Fire all actions on this entity that match the "open_door" channel
GS_Core::ActionRequestBus::Event(
    targetEntityId,
    &GS_Core::ActionRequestBus::Events::DoAction,
    AZStd::string("open_door")
);
Listening for Action Completion
#include <GS_Core/GS_CoreBus.h>

class MyActionListener
    : public AZ::Component
    , protected GS_Core::ActionNotificationBus::Handler
{
protected:
    void Activate() override
    {
        // Listen for action completions on a specific entity
        GS_Core::ActionNotificationBus::Handler::BusConnect(m_targetEntityId);
    }

    void Deactivate() override
    {
        GS_Core::ActionNotificationBus::Handler::BusDisconnect();
    }

    void OnActionComplete() override
    {
        // An action on the target entity has completed
        // React accordingly (advance dialogue, open next door, etc.)
    }

private:
    AZ::EntityId m_targetEntityId;
};
Extending the Action Class
Create a custom action whenever you need a reusable, triggerable behavior that can be attached to any entity.
#pragma once
#include <Source/ActionSystem/GS_ActionComponent.h>

namespace MyProject
{
    class PlayEffect_GSActionComponent
        : public GS_Core::GS_ActionComponent
    {
    public:
        AZ_COMPONENT_DECL(PlayEffect_GSActionComponent);

        static void Reflect(AZ::ReflectContext* context);

    protected:
        // Action overrides
        void ProcessAction() override;
        void CompleteAction() override;

    private:
        AZStd::string m_effectName;
        float m_duration = 1.0f;
    };
}
Implementation (.cpp)
#include "PlayEffect_GSActionComponent.h"
#include <AzCore/Serialization/SerializeContext.h>

namespace MyProject
{
    AZ_COMPONENT_IMPL(PlayEffect_GSActionComponent, "PlayEffect_GSActionComponent", "{YOUR-UUID-HERE}",
        GS_Core::GS_ActionComponent);

    void PlayEffect_GSActionComponent::Reflect(AZ::ReflectContext* context)
    {
        if (auto serializeContext = azrtti_cast<AZ::SerializeContext*>(context))
        {
            serializeContext->Class<PlayEffect_GSActionComponent, GS_Core::GS_ActionComponent>()
                ->Version(0)
                ->Field("EffectName", &PlayEffect_GSActionComponent::m_effectName)
                ->Field("Duration", &PlayEffect_GSActionComponent::m_duration);

            if (AZ::EditContext* editContext = serializeContext->GetEditContext())
            {
                // Pattern: Incoming Channel → Feature Properties → Outgoing Channel
                editContext->Class<PlayEffect_GSActionComponent>(
                    "Play Effect Action", "Triggers a named particle effect")
                    ->ClassElement(AZ::Edit::ClassElements::EditorData, "")
                        ->Attribute(AZ::Edit::Attributes::Category, "MyProject/Actions")
                        ->Attribute(AZ::Edit::Attributes::AppearsInAddComponentMenu, AZ_CRC_CE("Game"))
                    ->DataElement(AZ::Edit::UIHandlers::Default,
                        &PlayEffect_GSActionComponent::m_effectName, "Effect Name",
                        "Name of the particle effect to trigger")
                    ->DataElement(AZ::Edit::UIHandlers::Default,
                        &PlayEffect_GSActionComponent::m_duration, "Duration",
                        "How long the effect plays (seconds)");
            }
        }
    }

    void PlayEffect_GSActionComponent::ProcessAction()
    {
        // Your action logic — trigger the particle effect
        AZ_TracePrintf("Action", "Playing effect: %s for %.1f seconds",
            m_effectName.c_str(), m_duration);

        // ... spawn particle effect, start timer, etc. ...

        // IMPORTANT: Call CompleteAction when done
        // If the action is instant, call it here.
        // If it takes time (animation, timer), call it when the effect finishes.
        CompleteAction();
    }

    void PlayEffect_GSActionComponent::CompleteAction()
    {
        // Custom completion logic (if any)
        // ...

        // IMPORTANT: Call base to handle broadcast and chaining
        GS_ActionComponent::CompleteAction();
    }
}
Module Registration
m_descriptors.insert(m_descriptors.end(), {
    MyProject::PlayEffect_GSActionComponent::CreateDescriptor(),
});
Reflection Pattern
When reflecting custom action properties in the Edit Context, follow this organization pattern so all actions have a consistent inspector layout:
- Incoming Channel — The
channel property (inherited, reflected by base class) - Feature Properties — Your action-specific properties (effect name, duration, etc.)
- Outgoing Channel — The
broadcastOnComplete and onCompleteChannelChain properties (inherited, reflected by base class)
See Also
For component references:
For related resources:
Get GS_Core
GS_Core — Explore this gem on the product page and add it to your project.
5.2.1.1 - Core Actions
Pre-built actions included in GS_Core — ready-to-use triggerable behaviors for common game functionality.
GS_Core includes pre-built Action components for common behaviors. Attach them to any entity, set a channel, and fire them from any system without writing code.
All built-in actions inherit from GS_ActionComponent and follow the same channel-matching, completion, and chaining patterns.
For usage guides and setup examples, see The Basics: GS_Core.
Toggle Mouse Cursor
Toggles the operating system mouse cursor on or off.
When to Use
Use this action when transitioning between gameplay (cursor hidden) and menus (cursor visible). Common triggers include opening an inventory, entering a pause menu, or starting a dialogue sequence.
Inspector Properties
| Property | Type | Default | Description |
|---|
| Channel | AZStd::string | "" | Inherited. The channel this action responds to. |
| Broadcast On Complete | bool | false | Inherited. Broadcasts OnActionComplete when the toggle finishes. |
| On Complete Channel Chain | AZStd::string | "" | Inherited. Fires a follow-up DoAction on completion for chaining. |
Usage Example
#include <GS_Core/GS_CoreBus.h>

// Toggle the cursor when opening the pause menu
GS_Core::ActionRequestBus::Event(
    uiEntityId,
    &GS_Core::ActionRequestBus::Events::DoAction,
    AZStd::string("toggle_cursor")
);
Print Log
Prints a configurable message to the console log. Useful for debugging action chains, verifying event flow, or logging gameplay milestones.
When to Use
Use this action during development to verify that action channels fire correctly, test chaining sequences, or log gameplay events without writing custom components.
Inspector Properties
| Property | Type | Default | Description |
|---|
| Channel | AZStd::string | "" | Inherited. The channel this action responds to. |
| Message | AZStd::string | "" | The message to print to the console log. |
| Broadcast On Complete | bool | false | Inherited. Broadcasts OnActionComplete when the print finishes. |
| On Complete Channel Chain | AZStd::string | "" | Inherited. Fires a follow-up DoAction on completion for chaining. |
Usage Example
#include <GS_Core/GS_CoreBus.h>

// Trigger a debug log message
GS_Core::ActionRequestBus::Event(
    debugEntityId,
    &GS_Core::ActionRequestBus::Events::DoAction,
    AZStd::string("debug")
);
// Console output: whatever message was configured on the PrintLog action
Creating Your Own Action
Need custom behavior? See the Extending the Action Class guide for a complete walkthrough with header, implementation, Reflect pattern, and module registration.
See Also
Get GS_Core
GS_Core — Explore this gem on the product page and add it to your project.
6 - Utilities
A collection of utility libraries — easing curves, spring dampers, physics trigger volumes, gradients, and entity helpers.
GS_Core includes a rich set of utility libraries for common game development patterns. These are header-only (or lightweight) utilities that any component or system can use without additional setup.
For usage guides and setup examples, see The Basics: GS_Core.
Contents
Physics Trigger Volume
PhysicsTriggeringVolume is a non-component base class that manages the full lifecycle of a physics trigger or collision volume — entity tracking, enter/exit/hold callbacks, and collision contact events. Inherit from it to create interactive volumes without boilerplate physics code. PhysicsTriggerComponent is the concrete O3DE component that wraps this base and adds game-lifecycle awareness (standby handling).
Physics Trigger Volume API
Easing Curves
The Curves namespace provides 40+ easing functions and a CurveType enum for data-driven curve selection. All functions take a normalized t (0 → 1) input. The dispatch function EvaluateCurve(CurveType, t) routes to the correct function at runtime. Curve families: Linear, Quadratic, Cubic, Quartic, Quintic, Sine, Exponential, Circular, Back, Elastic, and Bounce.
Easing Curves API
Spring Dampers
The Springs namespace provides 6 spring-damper types for physics-based animation and smoothing — each available in float, Vector2, and Vector3 overloads (plus a Quaternion variant). All springs use a halflife parameter (seconds to reach 50% of goal) rather than raw stiffness/damping constants.
Spring Dampers API
Gradients
Multi-stop gradient types (FloatGradient, Vector2Gradient, ColorGradient) for sampling values over a normalized [0,1] range. Used throughout the motion system and feedback effects for curve-based value animation. ColorGradient exposes independent EvaluateColor(t) and EvaluateAlpha(t) channels.
Gradients API
Entity Utilities
The EntityUtility namespace provides helper functions for entity lookup by name — returning either an AZ::Entity* or AZ::EntityId.
Entity Utilities API
Weighted Random
RandomUtils::GetRandomWeighted<T> selects a key from an AZStd::unordered_map<T, float> with probability proportional to each entry’s float weight. Requires a caller-provided AZ::SimpleLcgRandom instance.
Weighted Random API
Angle Helpers
The Orientation namespace maps angles to discrete sector indices for directional gameplay — facing directions, animation sectors, compass queries. Includes the SectionConfig enum (x4 through x24 presets), RotationDirection, hysteresis support, and yaw/quaternion helpers.
Angle Helpers API
Spline Utilities
The SplineUtility namespace provides helper functions for O3DE spline queries — closest world point, closest local point, and normalized fraction along a spline — taking an entity ID and world/local position.
Spline Utilities API
Serialization Helpers
Three helpers that reduce reflection boilerplate: GS_ReflectionIncludes.h (single-include for all reflection headers), and GS_AssetReflectionIncludes.h (extends with asset serialization).
Serialization Helpers API
Common Enums
Shared enum types used across the framework: CurveType (maps to all easing functions for serialized curve selection) and BooleanConditions (condition evaluation for dialogue and record-keeping systems).
Common Enums API
See Also
For conceptual overviews and usage guides:
For related resources:
Get GS_Core
GS_Core — Explore this gem on the product page and add it to your project.
6.1 - Common Enums
Shared enumeration types used across the GS_Play framework — CurveType for easing curve selection and BooleanConditions for condition evaluation.
Common Enums provides shared enumeration types registered with O3DE’s SerializeContext. They can be used in component properties, asset fields, and ScriptCanvas nodes across any gem in the framework. The two primary enums are CurveType (curve selection for motion and gradient systems) and BooleanConditions (condition evaluation for dialogue and record-keeping systems).
Reflect functions: GS_Core::ReflectCommonEnums(context), GS_Core::ReflectCurveType(context)
For usage guides and setup examples, see The Basics: GS_Core.
Contents
BooleanConditions
Used by condition-evaluation logic in the dialogue and record-keeping systems to compare numeric or string values.
Used by: DialogueCondition, Record_DialogueCondition, RecordKeeperComponent
| Value | Description |
|---|
Equals | Exact equality check |
NotEquals | Inequality check |
GreaterThan | Strict greater-than |
GreaterOrEquals | Greater-than or equal |
LessThan | Strict less-than |
LessOrEquals | Less-than or equal |
CurveType
Maps to all easing curve functions in the Curves utility. Used by GS_Motion tracks, blend profiles, gradient markers, and any system that needs designer-selectable easing.
Used by: GS_MotionTrack, UiMotionTrack, FeedbackMotionTrack, gradient markers, GS_PhantomCamBlendProfile
| Family | Values |
|---|
| Linear | Linear |
| Quadratic | EaseInQuadratic, EaseOutQuadratic, EaseInOutQuadratic |
| Cubic | EaseInCubic, EaseOutCubic, EaseInOutCubic |
| Quartic | EaseInQuartic, EaseOutQuartic, EaseInOutQuartic |
| Quintic | EaseInQuintic, EaseOutQuintic, EaseInOutQuintic |
| Sine | EaseInSine, EaseOutSine, EaseInOutSine |
| Exponential | EaseInExpo, EaseOutExpo, EaseInOutExpo |
| Circular | EaseInCirc, EaseOutCirc, EaseInOutCirc |
| Back | EaseInBack, EaseOutBack, EaseInOutBack |
| Elastic | EaseInElastic, EaseOutElastic, EaseInOutElastic |
| Bounce | EaseInBounce, EaseOutBounce, EaseInOutBounce |
Evaluating a CurveType in C++
#include <GS_Core/Utility/Math/CurvesUtility.h>

// Dispatch to the correct curve function via enum
float result = GS_Core::Curves::EvaluateCurve(GS_Core::CurveType::EaseInOutCubic, t);
Using Enums in Components
Use EnumAttribute on a DataElement with UIHandlers::ComboBox to expose enum selection as an Inspector dropdown.
#include <GS_Core/Utility/Math/CurvesUtility.h>
#include <GS_Core/Utility/CommonEnums.h>

// In your component's Reflect() method:
editContext->Class<MyComponent>("My Component", "Description")
    ->DataElement(AZ::Edit::UIHandlers::ComboBox,
        &MyComponent::m_curveType, "Curve Type",
        "The easing curve applied to this animation.")
        ->EnumAttribute(GS_Core::CurveType::Linear,             "Linear")
        ->EnumAttribute(GS_Core::CurveType::EaseInQuadratic,    "Ease In Quadratic")
        ->EnumAttribute(GS_Core::CurveType::EaseOutQuadratic,   "Ease Out Quadratic")
        ->EnumAttribute(GS_Core::CurveType::EaseInOutQuadratic, "Ease InOut Quadratic")
        ->EnumAttribute(GS_Core::CurveType::EaseInCubic,        "Ease In Cubic")
        ->EnumAttribute(GS_Core::CurveType::EaseOutCubic,       "Ease Out Cubic")
        ->EnumAttribute(GS_Core::CurveType::EaseInOutCubic,     "Ease InOut Cubic")
        // ... continue for all desired variants
    ;
This creates an Inspector dropdown where designers select a curve by name without touching code.
See Also
For related resources:
Get GS_Core
GS_Core — Explore this gem on the product page and add it to your project.
6.2 - Serialization Helpers
Three reflection helpers — single-include headers for common and asset serialization, and a generic asset handler template for custom asset types.
Three helpers that eliminate serialization boilerplate: a single-include header for common reflection, an extension for asset fields, and a ready-made O3DE asset handler template for any custom AssetData subclass.
For usage guides and setup examples, see The Basics: GS_Core.
Contents
GS_ReflectionIncludes.h
A single-include header that brings in all O3DE reflection headers needed for any class with an inline Reflect() method.
Includes:
AzCore/RTTI/RTTI.hAzCore/Memory/SystemAllocator.hAzCore/Serialization/SerializeContext.hAzCore/Serialization/EditContext.hAzCore/std/string/string.h
Use this in any header declaring a reflected struct, class, or enum. Does not handle AZ::Data::Asset<T> fields.
#include <GS_Core/Utility/Reflection/GS_ReflectionIncludes.h>

namespace MyProject
{
    struct MyData
    {
        AZ_TYPE_INFO(MyData, "{YOUR-UUID-HERE}");
        static void Reflect(AZ::ReflectContext* context);

        float m_value = 0.0f;
    };
}
GS_AssetReflectionIncludes.h
Extends GS_ReflectionIncludes.h with asset serialization headers.
Adds:
AzCore/Asset/AssetCommon.hAzCore/Asset/AssetSerializer.h
Use this in any header declaring a class with AZ::Data::Asset<T> fields. Ensures SerializeGenericTypeInfo<Asset<T>> is visible and prevents silent failures in Unity builds.
#include <GS_Core/Utility/Reflection/GS_AssetReflectionIncludes.h>

namespace MyProject
{
    struct MyComponent : public AZ::Component
    {
        AZ_COMPONENT_DECL(MyComponent);
        static void Reflect(AZ::ReflectContext* context);

        AZ::Data::Asset<MyAssetType> m_asset;
    };
}
See Also
For related resources:
Get GS_Core
GS_Core — Explore this gem on the product page and add it to your project.
6.3 - Curves
40+ easing curve functions for smooth animation and interpolation — organized by family with a CurveType enum for data-driven selection.
The Curves namespace (GS_Core::Curves) provides 40+ easing functions for smooth animation and interpolation. All functions take a normalized t value in [0,1] and return a remapped [0,1] value. The dispatch function EvaluateCurve routes to the correct function by CurveType enum value, making curve selection fully data-driven from the Inspector or asset editor.
Used by every GS_Motion track, all gradient evaluate calls, and the blend profile system.
For usage guides and setup examples, see The Basics: GS_Core.
Contents
Curve Families
| Family | Functions | Character |
|---|
| Linear | Linear | Constant speed |
| Quadratic | EaseInQuadratic, EaseOutQuadratic, EaseInOutQuadratic | Gentle acceleration |
| Cubic | EaseInCubic, EaseOutCubic, EaseInOutCubic | Moderate acceleration |
| Quartic | EaseInQuartic, EaseOutQuartic, EaseInOutQuartic | Strong acceleration |
| Quintic | EaseInQuintic, EaseOutQuintic, EaseInOutQuintic | Very strong acceleration |
| Sine | EaseInSine, EaseOutSine, EaseInOutSine | Gentle, natural feel |
| Exponential | EaseInExpo, EaseOutExpo, EaseInOutExpo | Dramatic speed change |
| Circular | EaseInCirc, EaseOutCirc, EaseInOutCirc | Quarter-circle shape |
| Back | EaseInBack, EaseOutBack, EaseInOutBack | Overshoot and return |
| Elastic | EaseInElastic, EaseOutElastic, EaseInOutElastic | Spring-like oscillation |
| Bounce | EaseInBounce, EaseOutBounce, EaseInOutBounce | Bouncing ball effect |
Variant naming: EaseIn = slow start, EaseOut = slow end, EaseInOut = slow start and end.
API Reference
Dispatch Function
float EvaluateCurve(CurveType curveType, float t);
Dispatches to the correct curve function based on the CurveType enum value. This is the primary call site for all motion and gradient systems. t must be in [0,1].
Individual Functions
One free function per CurveType value, all sharing the signature float <Name>(float t). Examples:
| Function | Description |
|---|
GS_Core::Curves::Linear(t) | Linear — no easing |
GS_Core::Curves::EaseInQuadratic(t) | Quadratic ease-in |
GS_Core::Curves::EaseOutBounce(t) | Bounce ease-out |
GS_Core::Curves::EaseInOutBack(t) | Back ease-in-out (overshoot both ends) |
All functions follow the same naming pattern as the CurveType enum values.
Usage Examples
Dispatch via enum (data-driven)
#include <GS_Core/Utility/Math/CurvesUtility.h>

// Evaluate at normalized progress t (0 → 1)
float eased = GS_Core::Curves::EvaluateCurve(GS_Core::CurveType::EaseInOutCubic, t);

// Interpolate between two values
float result = start + (end - start) * GS_Core::Curves::EvaluateCurve(curveType, t);
Direct function call
// Call the function directly for a known curve
float eased = GS_Core::Curves::EaseOutBack(t);
See Also
For related resources:
Get GS_Core
GS_Core — Explore this gem on the product page and add it to your project.
6.4 - Springs
Spring-damper functions for physically-grounded value interpolation — smooth following, overshoot, and settling for floats, vectors, and quaternions.
The Springs namespace (GS_Core::Springs) provides six spring-damper types for physics-based animation and smoothing. Springs produce natural-feeling motion that reacts to velocity — ideal for camera follow, UI motion, and any value that should settle rather than snap.
All springs use a halflife parameter: the number of seconds to cover 50% of the remaining distance to the goal. This is more intuitive than raw stiffness/damping constants. Each spring type is available in float, AZ::Vector2, and AZ::Vector3 overloads where applicable.
Used by: gs_phantomcam (camera smoothing), gs_unit (character movement), gs_juice (feedback motions)
For usage guides and setup examples, see The Basics: GS_Core.
Contents
Spring Types
| Type | Character | Best For |
|---|
SimpleSpringDamperExact | Fast start, ease-out arrival | Simple follow, snap behaviors |
AccelerationSpringDamper | Tracks target velocity, smoother on input changes | Character movement, camera motion |
DoubleSpringDamper | S-curve — slow start AND slow arrival | UI transitions, polished cuts |
TimedSpringDamper | Reaches target by a specified time | Choreographed, loosely timed movements |
VelocitySpringDamper | Predictive — leads the target’s direction | Camera following a moving target |
QuaternionSpringDamper | Rotational spring (angular velocity) | Smooth orientation changes |
SimpleSpringDamperExact
A critically-damped spring that moves toward a target position. Fast start, ease-out arrival. Computed exactly (no approximation). The most common spring for follow and snap behaviors.
| Parameter | Type | Description |
|---|
position | T (in/out) | Current position, updated in-place each frame |
velocity | T (in/out) | Current velocity — must be cached between frames |
targetPosition | T | Goal position to move toward |
halflife | float | Seconds to cover 50% of remaining distance |
deltaTime | float | Frame delta time |
AccelerationSpringDamper
Tracks a target velocity rather than a position. Adds an acceleration memory term for smoother response to sudden direction changes (e.g. thumbstick flicks). Suited for character movement and camera motion where input can change abruptly.
| Parameter | Type | Description |
|---|
position | T (in/out) | Accumulated position |
velocity | T (in/out) | Current velocity — must be cached between frames |
acceleration | T (in/out) | Acceleration memory — must be cached between frames |
targetVelocity | T | The desired velocity to spring toward |
halflife | float | Settling time |
deltaTime | float | Frame delta time |
DoubleSpringDamper
Two springs chained together, producing an S-curve (ease-in AND ease-out). Slower to start and slower to arrive than the simple spring. Gives a more polished feel for UI transitions or cinematic camera cuts.
| Parameter | Type | Description |
|---|
position | T (in/out) | Current position |
velocity | T (in/out) | Current velocity — must be cached between frames |
previousPosition | T (in/out) | Internal state — must be cached between frames |
previousVelocity | T (in/out) | Internal state — must be cached between frames |
targetPosition | T | Goal position |
halflife | float | Settling time |
deltaTime | float | Frame delta time |
TimedSpringDamper
Attempts to reach the target by a specific time. Adjusts halflife internally so the spring arrives near the target time rather than asymptotically. Useful for choreographed movements with loose time targets.
| Parameter | Type | Description |
|---|
position | T (in/out) | Current position |
velocity | T (in/out) | Current velocity — must be cached between frames |
previousTarget | T (in/out) | Last known target — must be cached between frames |
targetPosition | T | Destination |
targetTime | float | Time (in seconds) at which the spring should arrive |
halflife | float | Base settling time |
deltaTime | float | Frame delta time |
VelocitySpringDamper
Tracks a moving target by incorporating the target’s own velocity for predictive lead. The follower anticipates the direction of movement, reducing lag on fast-moving targets. Suited for camera following a character at speed.
| Parameter | Type | Description |
|---|
position | T (in/out) | Follower position |
velocity | T (in/out) | Follower velocity — must be cached between frames |
previousPosition | T (in/out) | Internal state — must be cached between frames |
targetPosition | T | Current target position |
targetVelocity | T | Target’s velocity (used for predictive lead) |
halflife | float | Settling time |
deltaTime | float | Frame delta time |
QuaternionSpringDamper
Rotation spring that operates on angular velocity. Includes a flip option to reverse the rotation direction.
Note: The rotation output jumps to the goal each frame. Extract angularVelocity and integrate externally if you need a continuously smooth rotation output.
| Parameter | Type | Description |
|---|
rotation | AZ::Quaternion (in/out) | Quaternion moved toward targetRotation |
angularVelocity | AZ::Vector3 (in/out) | Angular velocity — must be cached between frames |
targetRotation | AZ::Quaternion | Goal orientation |
halflife | float | Settling time |
deltaTime | float | Frame delta time |
flip | bool | Reverses rotation direction (default: false) |
Usage Example
#include <GS_Core/Utility/Math/SpringsUtility.h>

// Member fields — must persist between frames
AZ::Vector3 m_followVelocity = AZ::Vector3::CreateZero();

// In your tick function:
AZ::Vector3 currentPos = GetEntityTranslation();
AZ::Vector3 targetPos  = GetTargetTranslation();

GS_Core::Springs::SimpleSpringDamperExact(
    currentPos,       // in/out: current position (updated in place)
    m_followVelocity, // in/out: velocity (cached between frames)
    targetPos,        // target position
    0.1f,             // halflife: 0.1 seconds to cover half the distance
    deltaTime
);

SetEntityTranslation(currentPos);
See Also
For related resources:
Get GS_Core
GS_Core — Explore this gem on the product page and add it to your project.
6.5 - Gradients
Multi-stop gradient types for sampling color, float, and vector values over a normalized range — used by motion tracks and feedback effects.
The Gradients utility provides three parallel gradient types for interpolating values over a normalized [0,1] range using a sorted list of marker points. All types are fully reflected (SerializeContext + EditContext) and editable in the Inspector with visual marker placement. Gradients are lazily sorted before evaluation.
Used by: FeedbackMaterialTrack (color/float animation), UiImageColorTrack, procedural visual effects, any system needing editable color or value ramps.
For usage guides and setup examples, see The Basics: GS_Core.
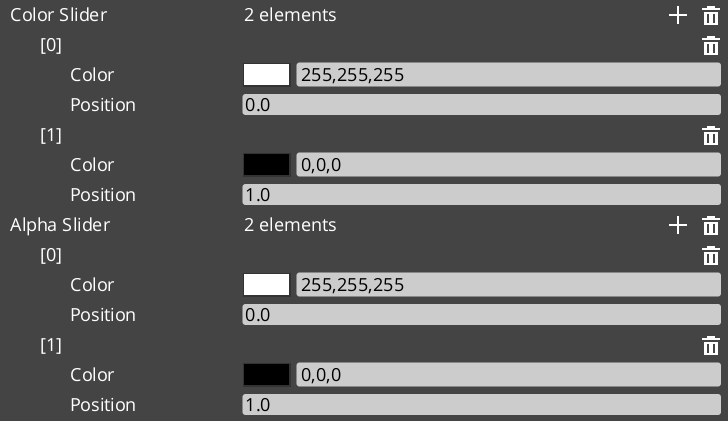
Contents
Gradient Types
| Type | Value Type | Description |
|---|
FloatGradient | float | Single float value ramp |
Vector2Gradient | AZ::Vector2 | 2D vector ramp |
ColorGradient | AZ::Color | RGBA color ramp with separate color and alpha channels |
Marker Structs
Each gradient type has a corresponding marker struct that defines a single stop on the gradient.
FloatGradientMarker
| Field | Type | Description |
|---|
markerValue | float | The float value at this stop |
markerPosition | float | Position in [0, 1] along the gradient |
Vector2GradientMarker
| Field | Type | Description |
|---|
markerValue | AZ::Vector2 | The 2D vector value at this stop |
markerPosition | float | Position in [0, 1] along the gradient |
ColorGradientMarker
| Field | Type | Description |
|---|
markerColor | AZ::Color | The color (RGB + A) at this stop |
markerPosition | float | Position in [0, 1] along the gradient |
Gradient Classes
All three gradient types share the same structure and interface:
| Field / Method | Description |
|---|
slider | AZStd::vector<Marker> — the sorted list of gradient stops (field name for Float/Vector2) |
sorted | Internal dirty flag; gradient is lazily sorted before Evaluate is called |
SortGradient() | Sorts markers by position. Called automatically before evaluation when markers change. |
Evaluate(float t) | Returns the interpolated value at normalized position t in [0, 1] |
ColorGradient
ColorGradient maintains two separate marker lists for independent RGB and alpha control:
| Field | Description |
|---|
colorSlider | AZStd::vector<ColorGradientMarker> — RGB stops |
alphaSlider | AZStd::vector<ColorGradientMarker> — alpha stops |
ColorGradient Channels
ColorGradient exposes three evaluate methods for flexible sampling:
| Method | Returns | Description |
|---|
Evaluate(float t) | AZ::Color | Full RGBA color — samples both colorSlider and alphaSlider |
EvaluateColor(float t) | AZ::Color | RGB only — alpha is always 1.0 |
EvaluateAlpha(float t) | float | Alpha channel only |
Usage Example
#include <GS_Core/Utility/Gradients/FloatGradientUtility.h>
#include <GS_Core/Utility/Gradients/ColorGradientUtility.h>

// Sample a float gradient at normalized progress (0 → 1)
float value = myFloatGradient.Evaluate(normalizedProgress);

// Sample full RGBA color
AZ::Color color = myColorGradient.Evaluate(normalizedProgress);

// Sample RGB and alpha independently
AZ::Color rgb   = myColorGradient.EvaluateColor(normalizedProgress);
float alpha     = myColorGradient.EvaluateAlpha(normalizedProgress);
See Also
For related resources:
Get GS_Core
GS_Core — Explore this gem on the product page and add it to your project.
6.6 - Entity Helpers
Utility functions for finding entities in the scene by name — runtime entity lookup without maintaining manual references.
The EntityUtility namespace provides helper functions for finding entities in the active scene by name. Useful for runtime entity lookup without maintaining manual entity references.
For usage guides and setup examples, see The Basics: GS_Core.
API Reference
| Function | Returns | Description |
|---|
GetEntityByName(name) | AZ::Entity* | Finds an active entity with the given name. Returns nullptr if not found. |
GetEntityIdByName(name) | AZ::EntityId | Finds an active entity’s ID by name. Returns an invalid EntityId if not found. |
Usage Example
#include <GS_Core/Utilities/EntityUtility.h>

// Find an entity by name
AZ::EntityId playerId = GS_Core::EntityUtility::GetEntityIdByName("Player");
if (playerId.IsValid())
{
    // Use the entity
}
See Also
For related resources:
Get GS_Core
GS_Core — Explore this gem on the product page and add it to your project.
6.7 - Angle Helpers
Angle and orientation math — sector mapping, yaw extraction, quaternion conversion, and hysteresis for directional classification.
The Orientation namespace (GS_Core::Orientation) provides angle-to-sector mapping for directional gameplay — animation direction selection, facing classification, and compass-style sector queries. It splits a full circle into N equal angular sectors and determines which sector a given angle falls into, with hysteresis to prevent rapid sector-switching at boundaries.
Used by: Paper-facing systems (gs_performer), directional input reactors (gs_unit), targeting systems (gs_interaction)
For usage guides and setup examples, see The Basics: GS_Core.
Contents
SectionConfig Enum
A reflected, editor-friendly enum selecting common sector counts and alignment modes. Two alignment modes exist per count:
- cardinal / sideAligned — sector boundaries fall on the cardinal directions; sectors straddle diagonals
- quarters / forwardAligned — sector boundaries fall on diagonals; sectors straddle cardinals
| Family | Values |
|---|
| x4 | x4_cardinal, x4_quarters |
| x6 | x6_sideAligned, x6_forwardAligned |
| x8 | x8_cardinal, x8_quarters |
| x10 | x10_sideAligned, x10_forwardAligned |
| x12 | x12_sideAligned, x12_forwardAligned |
| x14 | x14_sideAligned, x14_forwardAligned |
| x16 | x16_sideAligned, x16_forwardAligned |
| x18 | x18_sideAligned, x18_forwardAligned |
| x20 | x20_sideAligned, x20_forwardAligned |
| x22 | x22_sideAligned, x22_forwardAligned |
| x24 | x24_sideAligned, x24_forwardAligned |
Register with GS_Core::Orientation::ReflectOrientationEnums(context) to expose these in the Inspector.
RotationDirection Enum
Controls the winding convention used when computing sector angles.
| Value | Numeric | Description |
|---|
CCW | 1 | Counter-clockwise winding |
CW | -1 | Clockwise winding |
Pick Struct
Returned by all PickByAngle overloads. Contains full sector geometry for the selected sector.
| Field | Type | Description |
|---|
index | int | Which sector was selected [0, N) |
count | int | Total number of sectors |
angle | float | The input angle as provided |
width | float | Angular width of each sector (2π / N) |
center | float | Center angle of the selected sector |
start | float | Start angle of the selected sector |
end | float | End angle of the selected sector |
Use GS_Core::Orientation::Changed(pick, prevIndex) to detect when the sector index changes between frames.
API Reference
Sector Mapping
| Function | Description |
|---|
PickByAngle(angle, count, halfAligned, prevIndex, hysteresisDeg, startAngle, dir) | Primary overload — full parameter control |
PickByAngle(angle, SectionConfig, prevIndex, hysteresisDeg, startAngle, dir) | Convenience overload using SectionConfig enum |
PickByAngle(angle, count, offsetRad, prevIndex, hysteresisDeg, startAngle, dir) | Low-level overload with explicit alignment offset |
ConfigToParams(cfg) | Maps a SectionConfig value to its (count, halfAligned) pair |
Changed(pick, prevIndex) | Returns true if the sector index changed from prevIndex |
Angle Math
| Function | Description |
|---|
WrapToTwoPi(x) | Wraps any angle to [0, 2π) |
WrapToPi(x) | Wraps any angle to (-π, π] |
AlignmentOffsetRad(N, halfAligned) | Returns the alignment shift in radians for a given count and mode |
Yaw and Quaternion
| Function | Description |
|---|
YawFromDir(dir, rotDir) | Flat yaw from a direction vector (Z-up world) |
YawFromDir(dir, upAxis, forwardHint, rotDir) | General yaw with custom up and forward axes |
FlatSignedYaw_ToCam(camFwd, rootFwd, up, dir) | Signed yaw from camera-forward to entity-forward, projected flat |
QuatFromYaw(yawRad, upAxis) | Builds a rotation quaternion from a yaw angle and up axis |
Reflection
| Function | Description |
|---|
ReflectOrientationEnums(context) | Registers SectionConfig and RotationDirection with SerializeContext |
Usage Example
#include <GS_Core/Utility/Math/SectionByAngle.h>

// Member field — track previous sector to enable hysteresis
int m_prevSectorIndex = -1;

// In your tick / update function:
AZ::Vector3 moveDir = GetMovementDirection();

// Get the yaw from the movement direction (Z-up world)
float yaw = GS_Core::Orientation::YawFromDir(moveDir, GS_Core::Orientation::RotationDirection::CCW);

// Map to an 8-way sector with 5-degree hysteresis
GS_Core::Orientation::Pick pick = GS_Core::Orientation::PickByAngle(
    yaw,
    GS_Core::Orientation::SectionConfig::x8_cardinal,
    m_prevSectorIndex,  // previous index for hysteresis
    5.0f                // hysteresis in degrees
);

if (GS_Core::Orientation::Changed(pick, m_prevSectorIndex))
{
    m_prevSectorIndex = pick.index;
    // React to direction change: play animation, update facing, etc.
}
See Also
For related resources:
Get GS_Core
GS_Core — Explore this gem on the product page and add it to your project.
6.8 - Spline Helpers
Utility functions for O3DE spline queries — closest point, fraction, and local/world space conversion by entity ID.
The SplineUtility namespace (GS_Core::SplineUtility) provides free functions for querying the closest point on an O3DE spline component attached to an entity. All functions take an entity ID and a position in world or local space.
Used by: PathTo_DialoguePerformance (gs_cinematics), any system that guides an entity along a spline path.
For usage guides and setup examples, see The Basics: GS_Core.
Contents
API Reference
| Function | Parameters | Description |
|---|
FindClosestWorldPoint | AZ::EntityId entityId, AZ::Vector3 worldPos | Returns the closest world-space point on the spline attached to entityId |
FindClosestLocalPoint | AZ::EntityId entityId, AZ::Vector3 localPos | Returns the closest point in local spline space |
FindClosestFraction | AZ::EntityId entityId, AZ::Vector3 worldPos | Returns the normalized [0, 1] fraction along the spline of the closest point to worldPos |
Usage Example
#include <GS_Core/Utility/SplineUtility.h>

// Find how far along a path the player is (0 = start, 1 = end)
AZ::Vector3 playerPos = GetPlayerWorldPosition();
float fraction = GS_Core::SplineUtility::FindClosestFraction(splineEntityId, playerPos);

// Get the actual closest world position on the path
AZ::Vector3 closestPoint = GS_Core::SplineUtility::FindClosestWorldPoint(splineEntityId, playerPos);
See Also
For related resources:
Get GS_Core
GS_Core — Explore this gem on the product page and add it to your project.
6.9 - Physics Trigger Volume
Base class and component for physics trigger and collision handling — inherit to create interactive volumes with enter, exit, and hold callbacks.
The physics trigger system is two classes: PhysicsTriggeringVolume (the non-component base class with all trigger logic) and PhysicsTriggerComponent (the concrete O3DE component that wraps it with game-lifecycle awareness). Inherit from either to create interactive volumes — damage zones, pickup areas, dialogue triggers, environmental hazards — without writing boilerplate physics code.
The base class handles entity tracking (one enter/exit per entity), supports both trigger overlaps and collision contacts, and provides optional hold/persist callbacks for continuous processing.
For usage guides and setup examples, see The Basics: GS_Core.
Contents
PhysicsTriggeringVolume
File: Physics/PhysicsTriggeringVolume.h
Namespace: GS_Core
Base classes: Physics::RigidBodyNotificationBus::Handler, DebugLoggingHelper
A non-component base class that manages the full lifecycle of a physics trigger or collision volume. Add it alongside your own AZ::Component via multiple inheritance.
Configuration Fields
| Field | Type | Default | Description |
|---|
EnableCollisionAsTrigger | bool | false | Treat collision begin/persist/end events as trigger-style callbacks |
EnableTriggerHoldUpdate | bool | false | Enable per-physics-tick TriggerHold callback while entities are inside |
Lifecycle Methods
| Method | Description |
|---|
ConnectTriggering(AZ::EntityId entityId) | Subscribes to physics events on the given entity. Call from your component’s Activate(). |
DisconnectTriggering() | Unsubscribes and clears all handlers. Call from your component’s Deactivate(). |
OnPhysicsEnabled(AZ::EntityId entityId) | Called when the physics body becomes active. Internally calls InitPhysicsTriggerHandler. |
OnPhysicsDisabled(AZ::EntityId entityId) | Called when the physics body is destroyed. Internally calls DisconnectTriggering. |
Virtual Callbacks
Override these in your subclass to react to trigger and collision events.
| Method | Parameters | Returns | Description |
|---|
TriggerEnter | AZ::EntityId entity | bool | Called when an entity enters the volume. Return false to reject the entity. |
TriggerHold | float fixedDeltaTime | void | Called each physics tick while entities are inside. Requires EnableTriggerHoldUpdate = true. |
CollisionHold | AZ::EntityId entity | void | Called per-entity each physics tick for collision events. Requires EnableCollisionAsTrigger = true. |
TriggerExit | AZ::EntityId entity | bool | Called when an entity exits the volume. Return false to reject. |
Internal State
| Field | Description |
|---|
m_entities | AZStd::unordered_set<AZ::EntityId> — entities currently inside the volume |
m_triggerEntity | The entity whose physics body is being monitored |
PhysicsTriggerComponent
File: Physics/PhysicsTriggerComponent.h
Namespace: GS_Core
Base classes: PhysicsTriggeringVolume, GameManagerNotificationBus::Handler
A concrete O3DE component that wraps PhysicsTriggeringVolume and adds game-lifecycle awareness. Automatically disables the trigger during game standby and re-enables it on exit.
Used by: WorldTriggerComponent (gs_interaction), ColliderTriggerSensorComponent — these subclass PhysicsTriggerComponent to implement game-specific trigger behaviors.
Data Fields
| Field | Type | Default | Description |
|---|
isActive | bool | false | Whether the trigger is currently armed |
triggerEntity | AZ::EntityId | invalid | The entity providing the physics body to monitor |
Virtual Methods
Override these to implement game-specific trigger behavior.
| Method | Description |
|---|
ActivatePhysicsTrigger(AZ::EntityId entity) | Called when triggered. Subclasses perform the response here. |
DeactivatePhysicsTrigger() | Called on exit. Subclasses clean up here. |
Standby Handling
| Method | Description |
|---|
OnEnterStandby() | Disables the trigger when the game enters standby |
OnExitStandby() | Re-enables the trigger when the game exits standby |
Extending Physics Trigger Volume
Use the PhysicsTriggerComponent ClassWizard template to generate a new trigger component with boilerplate already in place — see GS_Core Templates.
Inherit directly from PhysicsTriggeringVolume alongside AZ::Component for a lightweight custom trigger. Use PhysicsTriggerComponent as your base if you need the built-in standby handling.
Use public virtual inheritance with PhysicsTriggeringVolume to avoid issues with multiple inheritance chains that include AZ::Component.
#pragma once
#include <AzCore/Component/Component.h>
#include <GS_Core/Utility/Physics/PhysicsTriggeringVolume.h>

namespace MyProject
{
    class DamageZoneComponent
        : public AZ::Component
        , public virtual GS_Core::PhysicsTriggeringVolume
    {
    public:
        AZ_COMPONENT_DECL(DamageZoneComponent);

        static void Reflect(AZ::ReflectContext* context);

    protected:
        void Activate() override;
        void Deactivate() override;

        // Trigger overrides
        bool TriggerEnter(AZ::EntityId entity) override;
        void TriggerHold(float fixedDeltaTime) override;
        bool TriggerExit(AZ::EntityId entity) override;

    private:
        float m_damagePerSecond = 10.0f;
    };
}
Implementation (.cpp)
#include "DamageZoneComponent.h"
#include <AzCore/Serialization/SerializeContext.h>

namespace MyProject
{
    AZ_COMPONENT_IMPL(DamageZoneComponent, "DamageZoneComponent", "{YOUR-UUID-HERE}");

    void DamageZoneComponent::Reflect(AZ::ReflectContext* context)
    {
        if (auto sc = azrtti_cast<AZ::SerializeContext*>(context))
        {
            sc->Class<DamageZoneComponent, AZ::Component, GS_Core::PhysicsTriggeringVolume>()
                ->Version(0)
                ->Field("DamagePerSecond", &DamageZoneComponent::m_damagePerSecond);

            if (AZ::EditContext* ec = sc->GetEditContext())
            {
                ec->Class<DamageZoneComponent>("Damage Zone", "Deals damage inside the trigger volume")
                    ->ClassElement(AZ::Edit::ClassElements::EditorData, "")
                        ->Attribute(AZ::Edit::Attributes::Category, "MyProject")
                        ->Attribute(AZ::Edit::Attributes::AppearsInAddComponentMenu, AZ_CRC_CE("Game"))
                    ->DataElement(AZ::Edit::UIHandlers::Default,
                        &DamageZoneComponent::m_damagePerSecond,
                        "Damage Per Second", "Damage dealt per second while inside");
            }
        }
    }

    void DamageZoneComponent::Activate()
    {
        EnableTriggerHoldUpdate = true;  // Enable hold callbacks for continuous damage
        GS_Core::PhysicsTriggeringVolume::ConnectTriggering(GetEntityId());
    }

    void DamageZoneComponent::Deactivate()
    {
        GS_Core::PhysicsTriggeringVolume::DisconnectTriggering();
    }

    bool DamageZoneComponent::TriggerEnter(AZ::EntityId entity)
    {
        AZ_TracePrintf("DamageZone", "Entity entered damage zone");
        return true; // Accept the entity
    }

    void DamageZoneComponent::TriggerHold(float fixedDeltaTime)
    {
        // Apply damage to all entities currently inside
        for (const AZ::EntityId& entity : m_entities)
        {
            // Apply m_damagePerSecond * fixedDeltaTime damage to entity...
        }
    }

    bool DamageZoneComponent::TriggerExit(AZ::EntityId entity)
    {
        AZ_TracePrintf("DamageZone", "Entity exited damage zone");
        return true;
    }
}
Setup
- Create an entity with a PhysX Collider component set as a trigger.
- Add your custom trigger component (e.g.,
DamageZoneComponent). - Configure the collider shape and component properties.
- Entities with PhysX rigid bodies that enter the collider will trigger your callbacks.
See Also
For conceptual overviews and usage guides:
For related resources:
Get GS_Core
GS_Core — Explore this gem on the product page and add it to your project.
6.10 - Weighted Random
Weighted random selection — pick a key from a weighted map with probability proportional to each entry’s float weight.
RandomUtils (GS_Core::RandomUtils) provides a single templated static method for weighted random selection from a map. The caller provides their own AZ::SimpleLcgRandom instance for deterministic control over the random sequence.
Used by: RandomNodeData (dialogue random node), KlattVoiceComponent (phoneme selection), any system needing weighted random draws.
For usage guides and setup examples, see The Basics: GS_Core.
Contents
API Reference
template<typename T>
static T GetRandomWeighted(
    AZ::SimpleLcgRandom* rand,
    const AZStd::unordered_map<T, float>& weightedTable
);
Selects one key from weightedTable with probability proportional to its float weight value. Higher weights mean higher probability of selection.
| Parameter | Description |
|---|
rand | Caller-owned AZ::SimpleLcgRandom instance. The caller controls seeding and lifetime. |
weightedTable | Map of candidates to weights. Keys are the items to select from; values are their relative weights. |
Returns: The selected key of type T.
Edge cases:
- Falls back to the last entry on floating-point precision edge cases.
- Asserts if
weightedTable is empty.
Usage Example
#include <GS_Core/Utility/Random/RandomUtils.h>
#include <AzCore/Math/Random.h>

// Member field — keep the random instance alive across calls
AZ::SimpleLcgRandom m_random;

// Build a weighted table: key = item, value = relative weight
AZStd::unordered_map<AZStd::string, float> lootTable;
lootTable["Common Sword"]    = 50.0f;
lootTable["Rare Shield"]     = 30.0f;
lootTable["Epic Helmet"]     = 15.0f;
lootTable["Legendary Ring"]  =  5.0f;

// Select an item — "Common Sword" is 10x more likely than "Legendary Ring"
AZStd::string selected = GS_Core::RandomUtils::GetRandomWeighted(&m_random, lootTable);
See Also
For related resources:
Get GS_Core
GS_Core — Explore this gem on the product page and add it to your project.
7 - Templates
ClassWizard templates for GS_Core — manager components, save system savers, input readers, and physics trigger volumes.
All GS_Core extension types are generated through the ClassWizard CLI. The wizard handles UUID generation, cmake file-list registration, and module descriptor injection automatically. Never create these files from scratch.
For usage guides and setup examples, see The Basics: GS_Core.
python ClassWizard.py \
    --template <TemplateName> \
    --gem <GemPath> \
    --name <SymbolName> \
    [--input-var key=value ...]
<GemPath> is the full path to your gem root. <SymbolName> becomes ${Name} — the prefix on all generated filenames and class names.
Contents
Manager Component
Template: GS_ManagerComponent
Creates a standard game component with an optional EBus interface header. This is the baseline component pattern for all GS_Play manager-style objects — systems that own state and expose it to other components via a request bus.
Generated files:
Source/${Name}ManagerComponent.h/.cppInclude/${GemName}/${Name}Bus.h (optional — the EBus interface)
CLI:
python ClassWizard.py --template GS_ManagerComponent --gem <GemPath> --name <Name>

# Skip the EBus header if no bus is needed:
python ClassWizard.py --template GS_ManagerComponent --gem <GemPath> --name <Name> \
    --input-var skip_interface=true
Input vars:
| Var | Type | Default | Description |
|---|
skip_interface | toggle | false | Omit the ${Name}Bus.h EBus interface header |
Post-generation: None — cmake registration and module descriptor are fully automatic.
See also: GS_Managers — the built-in manager system this component integrates with.
Saver Component
Template: SaverComponent
Creates a component that participates in the save system. Handles serializing and restoring a specific block of game state when the save system broadcasts its save/load events.
Generated files:
Source/${Name}SaverComponent.h/.cpp
CLI:
python ClassWizard.py --template SaverComponent --gem <GemPath> --name <Name>
Post-generation: Implement BuildSaveData() and ProcessLoad() bodies with save record reads/writes via GS_Core::SaveSystemRequestBus. Set GetSubComponentName() to a unique string so save keys do not collide with other savers.
See also: GS_Save / Savers — full extension guide with header and implementation examples.
Template: GS_InputReaderComponent
Sits on the Controller Entity. Reads raw hardware input events (keyboard, gamepad) and translates them into named input data events broadcast via InputDataNotificationBus. Downstream InputReactor components on the Unit Entity subscribe to those named events.
Generated files:
Source/${Name}InputReaderComponent.h/.cpp
CLI:
python ClassWizard.py --template GS_InputReaderComponent --gem <GemPath> --name <Name>
Post-generation: Bind specific hardware input channels in Activate() and implement event handlers that call InputDataNotificationBus::Broadcast(...). Pair with a corresponding InputReactor on the Unit side.
See also: GS_Unit / Input Data — the full input pipeline overview.
Physics Trigger Component
Template: PhysicsTriggerComponent
Creates a component that wraps a PhysX trigger volume. Responds to TriggerEnter / TriggerExit events to fire game logic when entities enter or leave a physics shape.
Generated files:
Source/${Name}PhysicsTriggerComponent.h/.cpp
CLI:
python ClassWizard.py --template PhysicsTriggerComponent --gem <GemPath> --name <Name>
Post-generation: Implement TriggerEnter / TriggerExit / TriggerHold bodies. Requires a PhysX Shape component on the same entity with Trigger mode enabled. Stack multiple trigger components on one entity for compound logic.
See also: Physics Trigger Volume — full extension guide with header and implementation examples.
See Also
For the full API, component properties, and C++ extension guide:
For all ClassWizard templates across GS_Play gems:
Get GS_Core
GS_Core — Explore this gem on the product page and add it to your project.
8 - 3rd Party Implementations
For usage guides and setup examples, see The Basics: GS_Core.
Get GS_Core
GS_Core — Explore this gem on the product page and add it to your project.