Framework API
Component references, EBus interfaces, and extension guides for the full GS_Play framework.
This section contains the full technical reference for every GS_Play gem — component properties, EBus request and notification interfaces, extension patterns, internal architecture, and code examples.
If you are looking for a scripting-level introduction or editor setup guides, see The Basics section first.
How This Section Is Organized
Each gem section follows a layered structure:
Gem overview page — Technical summary of the gem’s architecture, a table of feature sets with component listings, and installation notes.
Feature set pages — One page per sub-system (e.g., GS_Save, GS_StageManager). Each covers:
- Architectural overview and core design pattern.
- Component and class index with purpose descriptions.
- Extension and customization guidance.
- Links to The Basics for editor-level usage.
Class and component pages — One page per major class or component. Each covers:
- Inspector properties and configuration.
- EBus request and notification interfaces with method signatures.
- Virtual methods for subclassing.
- Code examples for common use cases.
Pages in this section assume familiarity with O3DE concepts (components, EBuses, SerializeContext). If you need a gentler introduction, start with the corresponding page in The Basics — every Framework API page links back to its Basics counterpart.
Sections
1 - GS_Core
The foundation gem for the GS_Play framework — game lifecycle, save system, stage management, input, actions, motion animation system, and utility libraries.
GS_Core is the required foundation for every GS_Play project. All other GS gems depend on it. It provides game lifecycle management (startup, shutdown, standby), persistence (save/load), level loading, input handling, triggerable actions, and a shared utility library.
For usage guides and setup examples, see The Basics: GS_Core.
Contents
GS_Managers
The lifecycle and startup management system. The Game Manager is a singleton placed in every level — it spawns all registered manager prefabs, coordinates their two-stage initialization, and provides global game navigation and standby mode.
All built-in GS_Play managers (Save, Stage, Options, UI, Unit, Camera, Audio) and any custom managers you create extend the Manager base class and plug into this system automatically.
| Component | Purpose |
|---|
| Game Manager | Top-level lifecycle controller. Spawns managers, handles navigation, standby, and debug mode. |
| Manager (Base) | Base class for all managers. Handles two-stage initialization automatically. |
GS_Managers API
GS_Save
The persistence system. The Save Manager orchestrates save and load operations across the project. Savers are per-entity components that serialize component state. The Record Keeper stores flat key-value progression records independently of the Saver system.
| Component | Purpose |
|---|
| Save Manager | Coordinates all save and load operations. |
| Savers | Per-entity components that serialize transform and physics state. |
| Record Keeper | Key-value progression store (flags, counters, unlock states). |
GS_Save API
GS_StageManager
The level loading and navigation system. The Stage Manager owns the ordered stage list for the project and handles all level transitions. Stage Data components are placed in each level as anchors and spin-up controllers for that level’s systems.
| Component | Purpose |
|---|
| Stage Manager | Manages stage list and handles transition requests. |
| Stage Data | Per-level anchor, spawn point, and activation controller. |
GS_StageManager API
GS_Options
Options and input profile management. The Options Manager persists player preferences. Input Profiles are data assets that hold input bindings, swappable at runtime.
GS_Options API
Systems
Core framework systems used across multiple gems: the GS_Motion track-based animation engine and the GS_Actions triggerable behavior system.
| System | Purpose |
|---|
| GS_Motion | Track-based animation and tween engine — abstract base classes extended by domain gems. |
| GS_Actions | Triggerable, composable, data-driven behaviors attachable to any entity. |
Systems API
Interfaces
The cross-gem contract layer. Feature gems depend on neutral contracts collected in GS_Core instead of on each other’s internals. Contracts come in three kinds, distinguished by their class/bus suffix.
| Kind | Pattern | Extend by |
|---|
| TypeBase | Strategy | Subclass a *Type base, reflect it → it appears in the editor’s type-picker. |
| Emit | Observance | Handle the *EmissionBus and override the event you care about. |
| Exchange | Mediator | Call the *Exchange query bus (mostly forward-looking). |
Interfaces
Utilities
A general-purpose library of components and math helpers.
| Area | Contents |
|---|
| Physics | Physics Trigger Volume |
| Easing Curves | 40+ curve types (Linear, Quad, Cubic, Sine, Expo, Circ, Back, Elastic, Bounce) |
| Spring Dampers | 15+ spring functions including Simple, Acceleration, Double, Timed, Quaternion |
| Gradients | Color, float, and Vector2 gradients |
| Entity Helpers | Entity lookup by name |
| Random | Weighted random selection |
| Splines | Closest point, fraction, and local/world conversion |
| Angle Helpers | Yaw, quaternion from direction, section-by-angle mapping |
Utilities API
Installation
GS_Core is required by all GS_Play projects. Add it to your project before any other GS gem.
- Follow the Simple Project Setup guide for full walkthrough.
- Configure collision layers and physics per the Setup Environment guide.
- Create a Game Manager prefab and place it in every level.
- Add the managers you need to the Game Manager’s Startup Managers list.
See Also
For conceptual overviews and usage guides:
For related resources:
Get GS_Core
GS_Core — Explore this gem on the product page and add it to your project.
1.1 - GS_Managers
The game lifecycle management system — startup sequencing, systemic navigation, and the extensible manager pattern.
The Managers system is the backbone of every GS_Play project. It provides a controlled startup sequence that initializes game systems in the correct order, global access to those systems via EBus, and systemic navigation (New Game, Load Game, Quit) from a single point of control.
Every GS_Play gem that has a manager component (Save, Stage, UI, Unit, Camera, Audio, etc.) plugs into this system automatically.
For usage guides and setup examples, see The Basics: GS_Core.
Contents
Architecture
Breakdown
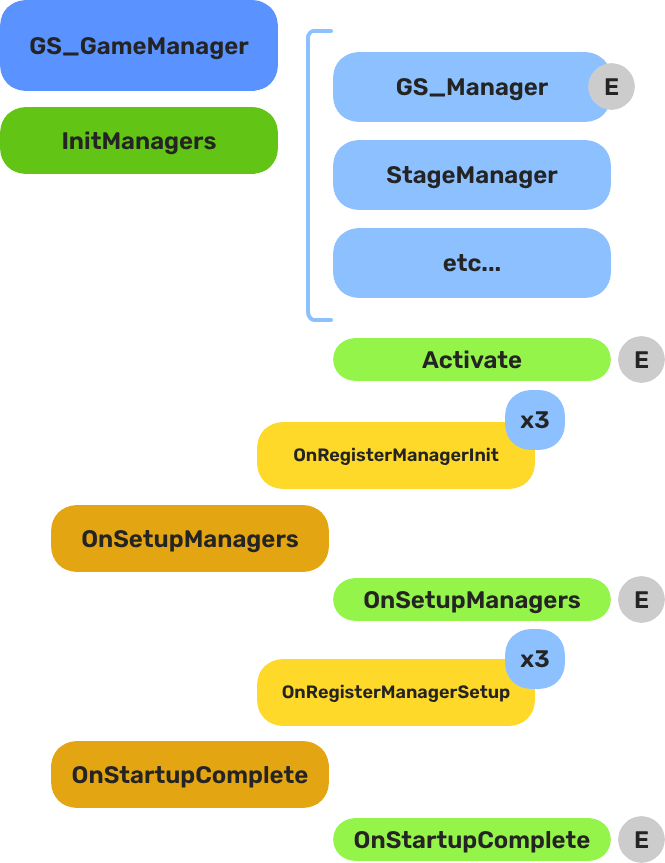
When the project starts, the Game Manager runs three stages before the game is considered ready:
| Stage | Broadcast Event | What It Means |
|---|
| 1 — Initialize | (internal) | Each manager is spawned. They activate, then report ready. |
| 2 — Setup | OnSetupManagers | Setup stage. Now safe to query other managers. |
| 3 — Complete | OnStartupComplete | Last stage. Everything is ready.
Do any last minute things. Now safe to begin gameplay. |
For most scripts, you only need OnStartupComplete. Wait for this event before doing anything that depends on managers to be completely setup.
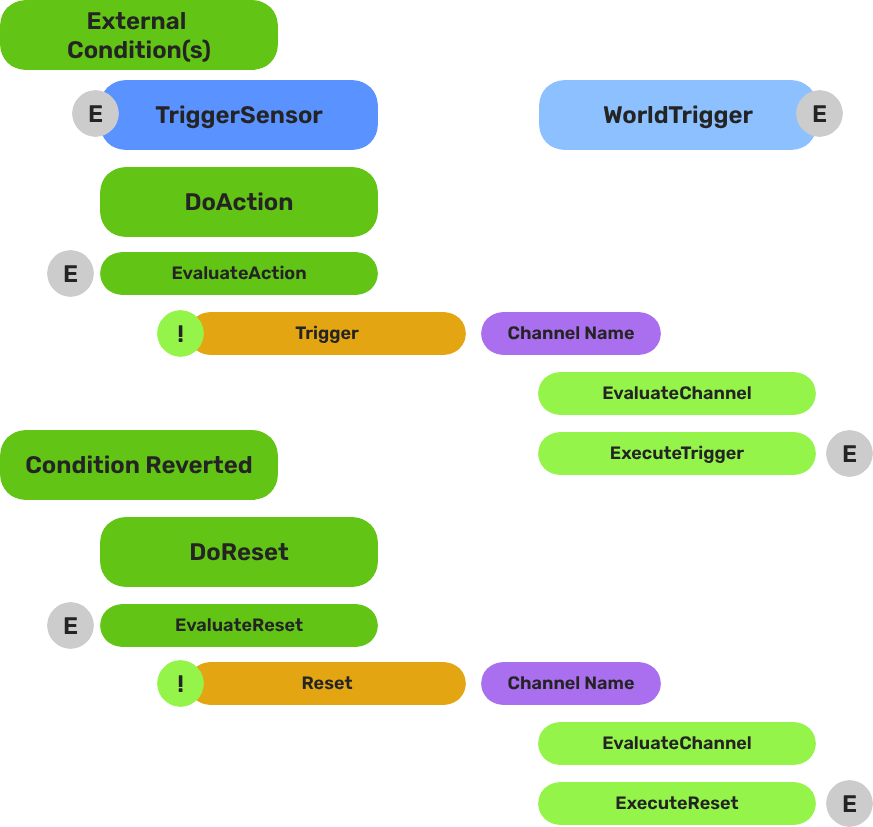
E Indicates extensible classes and methods.
Patterns - Complete list of system patterns used in GS_Play.
Components
| Component | Purpose | Reference |
|---|
| GS_GameManagerComponent | Top-level lifecycle controller. Spawns managers, handles New Game / Load / Quit / Standby. | Game Manager |
| GS_ManagerComponent | Base class for all game system managers. Handles the two-stage init pattern automatically. | Manager |
Quick Start
For step-by-step setup, see Game Manager — Setup and Manager — Setup.
For creating custom managers, see Manager — Extending the Manager Class.
See Also
For conceptual overviews and usage guides:
For component references:
For related resources:
Get GS_Core
GS_Core — Explore this gem on the product page and add it to your project.
1.1.1 - Game Manager
The top-level game lifecycle controller — startup sequencing, systemic navigation, standby mode, and debug support.
The Game Manager is the root component of every GS_Play project. It controls the game lifecycle from startup through shutdown: spawning and initializing all Manager components in the correct order, providing systemic navigation (New Game, Load Game, Return to Title, Quit), and coordinating standby mode for pausing gameplay during level transitions or other blocking operations.
Every level in your project should contain the same Game Manager prefab. In debug mode it stays in the current level on start; in release mode it navigates to your title stage.
For usage guides and setup examples, see The Basics: GS_Core.
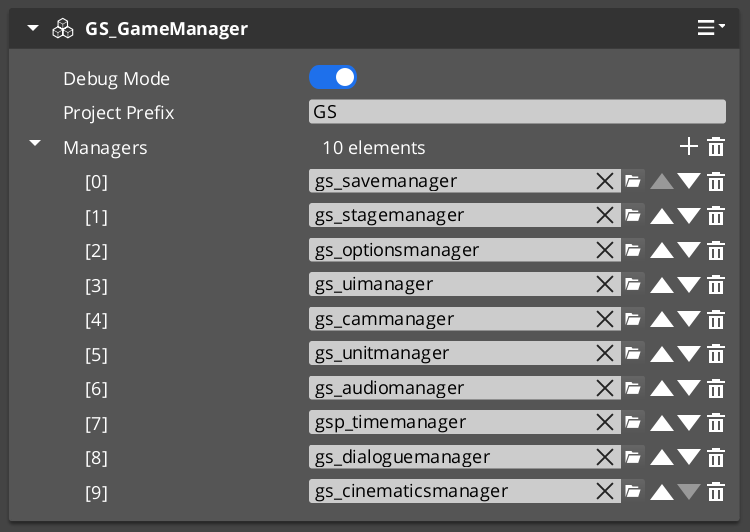
The Game Manager component in the Entity Inspector, with added manager prefabs in the Startup Managers list.
Contents
Design Intent
Extend the Game Manager when you need project-wide changes to startup ordering, custom post-startup logic (analytics sessions, online service initialization), or additional global lifecycle events. For most projects, the built-in component is sufficient as-is. Do not move gameplay logic here — the Game Manager orchestrates systems, it does not run game rules.
Dependencies & Interactions
| Coordinates with | Role |
|---|
| GS_SaveManager | Owns all save/load file operations triggered by NewGame, ContinueGame, LoadGame, SaveAndExitGame |
| GS_StageManager | Owns level navigation during NewGame, LoadGame, and ReturnToTitle |
| GS_ManagerComponent | Base class all spawned managers extend |
| All other GS gem managers | Any manager in the Startup Managers list registers automatically |
Setup
Game Manager Entity

The Game Manager wrapper entity set as Editor-Only inside Prefab Edit Mode.
- Create an entity and attach the GS_GameManagerComponent (or your extended version).
- Turn the entity into a prefab.
- Enter prefab edit mode. Set the wrapper entity (the parent of your Game Manager entity) to Editor Only. Save the prefab.
- Create Manager prefabs for the systems you need (Save, Stage, Options, or custom managers).
- Add each Manager
.spawnable to the Game Manager’s Startup Managers list in the Entity Inspector. - Push your overrides into the prefab to propagate across all levels.
Place your Game Manager prefab at the top of every level in the Entity Outliner.
The premade manager prefabs for each GS_Play gem are located in that gem’s Assets/Prefabs directory.
Core Concepts
Startup Sequence
When the project starts, the Game Manager executes a three-stage startup:
- Spawn Managers — The Game Manager instantiates every prefab in its Startup Managers list. Each manager component runs its
Activate() and reports back via OnRegisterManagerInit(). - Startup Managers — Once all managers report initialized, the Game Manager broadcasts
OnSetupManagers(). Managers now connect to each other and report back via OnRegisterManagerStartup(). - Startup Complete — Once all managers report started up, the Game Manager broadcasts
OnStartupComplete(). The game is fully initialized and ready to run.
At each stage, the Game Manager counts reports and only proceeds when every spawned manager has reported. This guarantees safe cross-referencing between managers in Stage 2.
Systemic Navigation
The Game Manager provides the high-level game flow methods that drive your project:
- NewGame / NewGame(saveName) — Starts a new game, optionally with a named save file.
- ContinueGame — Loads the most recent save and continues.
- LoadGame(saveName) — Loads a specific save file.
- ReturnToTitle — Returns to the title stage, tearing down the current game session.
- SaveAndExitGame / ExitGame — Saves and/or exits the application.
These methods coordinate with the Save Manager and Stage Manager automatically.
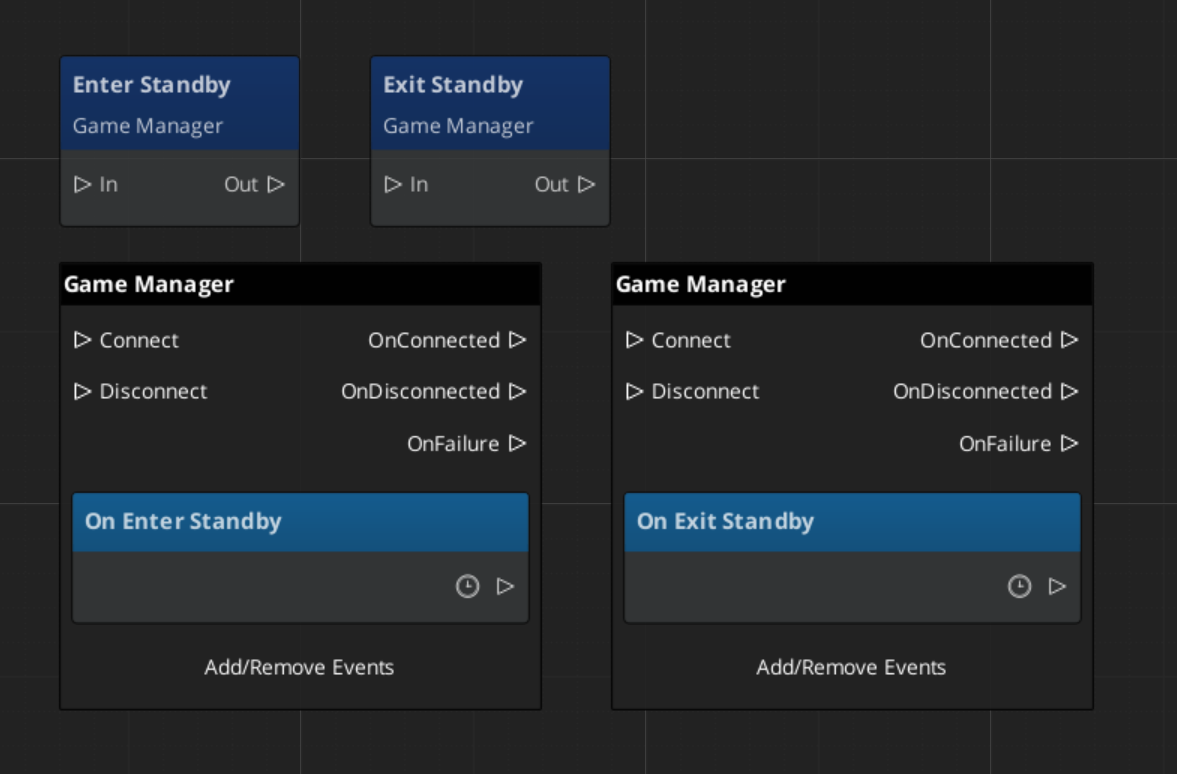
Standby Mode
Standby is a global pause mechanism. When the Game Manager enters standby, it broadcasts OnEnterStandby() to all managers, which propagate the signal to their subsystems. This halts timers, physics, gameplay ticks, and other simulation while a blocking operation (like a stage change) completes. Calling ExitStandby reverses the process.
Debug Mode
When Debug Mode is enabled in the Inspector, the Game Manager skips navigating to the title stage and remains in the current level. This allows rapid iteration — you can start the game from any level without going through the full title-to-gameplay flow. If save data and unit management are enabled, it loads default save data but overrides position data with the current level’s default spawn point.
Inspector Properties
| Property | Type | Description |
|---|
| Project Prefix | String | Sets the project prefix for generated files (e.g. save files). Example: "GS" produces GS_SaveGame.json. |
| Startup Managers | List of Manager Prefabs | The manager prefab spawnables to instantiate on game start. Order does not matter — the two-stage init handles dependencies. (C++: AZStd::vector<SpawnableAssetRef>) |
| Debug Mode | Bool | When enabled, the Game Manager stays in the current level instead of navigating to the title stage. |
API Reference
Request Bus: GameManagerRequestBus
Commands sent to the Game Manager. Singleton bus — single address, single handler.
| Method | Parameters | Returns | Description |
|---|
IsInDebug | — | bool | Returns whether debug mode is active. |
IsStarted | — | bool | Returns whether the startup sequence has completed. |
GetProjectPrefix | — | AZStd::string | Returns the configured project prefix string. |
EnterStandby | — | void | Broadcasts standby to all managers, pausing gameplay. |
ExitStandby | — | void | Broadcasts standby exit, resuming gameplay. |
NewGame | — | void | Starts a new game with the default save name. |
NewGame | const AZStd::string& saveName | void | Starts a new game with a specified save file name. |
ContinueGame | — | void | Loads the most recent save file and continues. |
LoadGame | const AZStd::string& saveName | void | Loads a specific save file by name. |
ReturnToTitle | — | void | Returns to the title stage, tearing down the current session. |
SaveAndExitGame | — | void | Saves the current game state and exits the application. |
ExitGame | — | void | Exits the application without saving. |
Notification Bus: GameManagerNotificationBus
Events broadcast by the Game Manager. Multiple handler bus — any number of components can subscribe.
| Event | Parameters | Returns | Description |
|---|
OnSetupManagers | — | — | Fired when all managers have reported initialized. Managers should now connect to each other. |
OnStartupComplete | — | — | Fired when the full startup sequence is complete. Safe to begin gameplay. |
OnShutdownManagers | — | — | Fired when the game is shutting down. Managers should clean up. |
OnBeginGame | — | — | Fired when a new game or loaded game begins. |
OnEnterStandby | — | — | Fired when entering standby mode. Pause your systems. |
OnExitStandby | — | — | Fired when exiting standby mode. Resume your systems. |
ScriptCanvas Nodes
These methods and events are available as ScriptCanvas nodes.
Request Nodes
| Node | Description |
|---|
TriggerNewGame | Starts a new game with the default save name. |
TriggerNewGameWithName(saveName) | Starts a new game with a named save file. |
TriggerContinueGame | Continues from the most recent save. |
TriggerLoadGame(saveName) | Loads a specific save file by name. |
TriggerReturnToTitle | Returns to the title stage. |
TriggerSaveAndExitGame | Saves and exits. |
TriggerExitGame | Exits without saving. |
Notification Nodes
Listen for these events on GameManagerNotificationBus.
| Node | When It Fires |
|---|
OnStartupComplete | The game is fully initialized and ready to run. |
OnBeginGame | A new or loaded game session begins. |
OnEnterStandby | The game has entered standby (paused). |
OnExitStandby | The game has exited standby (resumed). |
Virtual Methods
Override these when extending the Game Manager. Always call the base implementation.
| Method | Parameters | Returns | Description |
|---|
InitializeManagers() | — | void | Spawns the Startup Managers list. Override to add custom spawn logic. |
ProcessFallbackSpawn() | — | void | Handles fallback when a manager fails to spawn. |
StartupManagers() | — | void | Broadcasts OnSetupManagers. Override to inject logic between init and startup stages. |
CompleteStartup() | — | void | Broadcasts OnStartupComplete. Override to add post-startup logic. |
BeginGame() | — | void | Called when transitioning into active gameplay. |
SC ↔ C++ Quick Reference
| Action | ScriptCanvas Node | C++ Method | Notes |
|---|
| Start a new game | TriggerNewGame | NewGame() | Default save name |
| Start with named save | TriggerNewGameWithName(name) | NewGame(saveName) | Named save file |
| Continue from last save | TriggerContinueGame | ContinueGame() | Loads most recent save |
| Load specific save | TriggerLoadGame(name) | LoadGame(saveName) | Load by file name |
| Return to title | TriggerReturnToTitle | ReturnToTitle() | Tears down current session |
| Save and exit | TriggerSaveAndExitGame | SaveAndExitGame() | — |
| Exit without saving | TriggerExitGame | ExitGame() | — |
| Check if started | — | IsStarted() | Returns bool |
Usage Examples
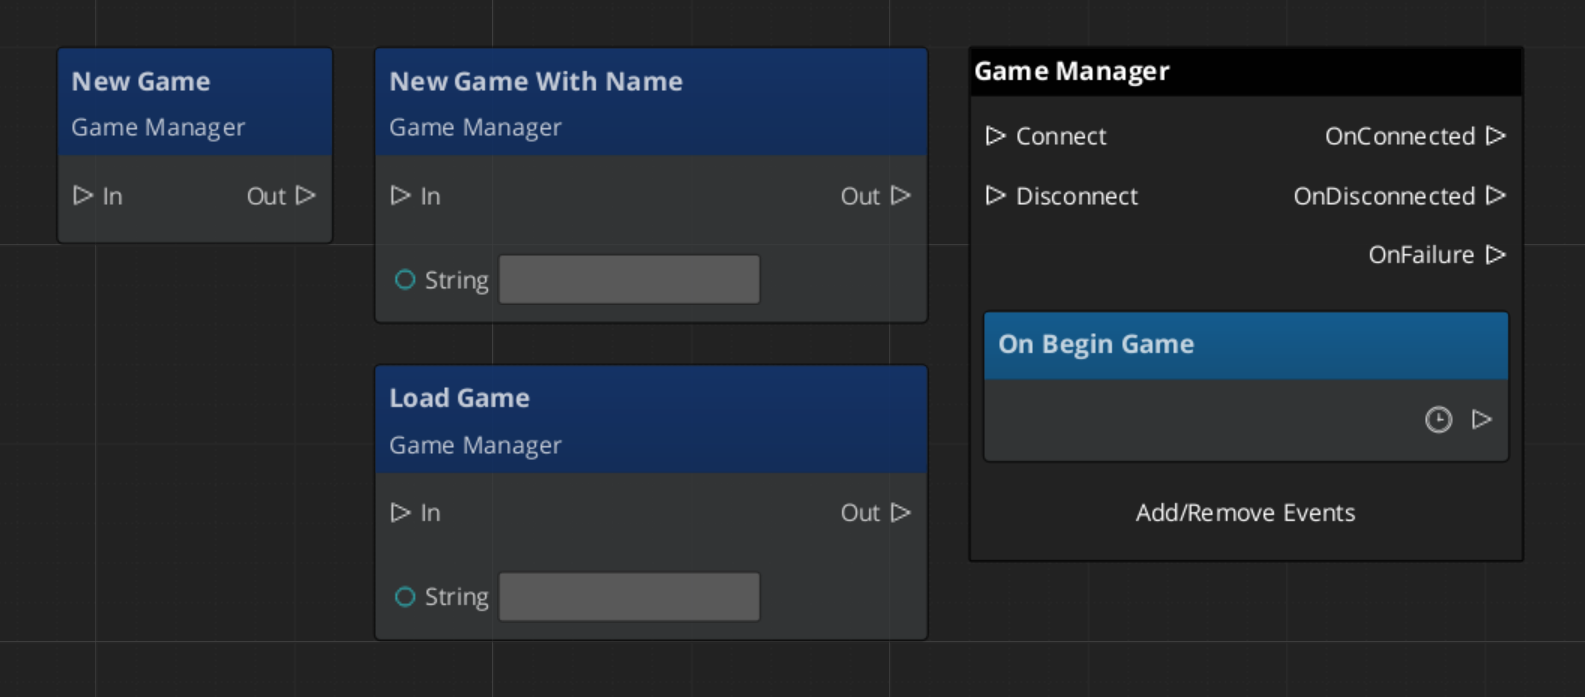
ScriptCanvas: Title Screen Workflow
Calling new or load game proceedes to start the gameplay and systems. Begin Game event fires to start all systems across the game.
Debug Mode automatically begins the game.
ScriptCanvas: Standby Logic
C++: Reacting to Events
A gameplay component that listens to the full startup and standby lifecycle:
#include <GS_Core/GS_CoreBus.h>

class MyGameplayComponent
    : public AZ::Component
    , protected GS_Core::GameManagerNotificationBus::Handler
{
protected:
    void Activate() override
    {
        GS_Core::GameManagerNotificationBus::Handler::BusConnect();
    }

    void Deactivate() override
    {
        GS_Core::GameManagerNotificationBus::Handler::BusDisconnect();
    }

    void OnStartupComplete() override
    {
        // Safe to access all managers and begin gameplay logic
    }

    void OnEnterStandby() override
    {
        // Pause your gameplay systems
    }

    void OnExitStandby() override
    {
        // Resume your gameplay systems
    }
};
C++: Custom Manager Integration
A manager that receives the startup handshake from the Game Manager. Add this class’s prefab to the Game Manager’s Startup Managers list:
#include <GS_Core/GS_CoreBus.h>
#include <Source/Managers/GS_ManagerComponent.h>

class MySystemManager
    : public GS_Core::GS_ManagerComponent
    , protected GS_Core::GameManagerNotificationBus::Handler
{
public:
    AZ_COMPONENT_DECL(MySystemManager);
    static void Reflect(AZ::ReflectContext* context);

protected:
    void Activate() override
    {
        GS_Core::GS_ManagerComponent::Activate();                        // Required: registers with Game Manager
        GS_Core::GameManagerNotificationBus::Handler::BusConnect();
    }

    void Deactivate() override
    {
        GS_Core::GameManagerNotificationBus::Handler::BusDisconnect();
        GS_Core::GS_ManagerComponent::Deactivate();                      // Required: deregisters from Game Manager
    }

    // Called during Stage 2 — safe to reference other managers here
    void OnSetupManagers() override
    {
        // Connect to other managers, set up cross-system references
    }

    // Called when the full startup sequence completes — safe to begin gameplay
    void OnStartupComplete() override
    {
        // Initialize systems that depend on all managers being ready
    }

    void OnEnterStandby() override { /* pause your systems */ }
    void OnExitStandby()  override { /* resume your systems */ }
};
Extending the Game Manager
Extend the Game Manager to add custom startup logic, additional lifecycle events, or project-specific behavior. Extension is done in C++.
#pragma once
#include <GS_Core/GS_CoreBus.h>
#include <Source/Managers/GS_GameManagerComponent.h>

namespace MyProject
{
    class MyGameManager : public GS_Core::GS_GameManagerComponent
    {
    public:
        AZ_COMPONENT_DECL(MyGameManager);

        static void Reflect(AZ::ReflectContext* context);

    protected:
        void InitializeManagers() override;
        void StartupManagers() override;
        void CompleteStartup() override;
        void BeginGame() override;
    };
}
Implementation (.cpp)
#include "MyGameManager.h"
#include <AzCore/Serialization/SerializeContext.h>

namespace MyProject
{
    AZ_COMPONENT_IMPL(MyGameManager, "MyGameManager", "{YOUR-UUID-HERE}");

    void MyGameManager::Reflect(AZ::ReflectContext* context)
    {
        if (auto serializeContext = azrtti_cast<AZ::SerializeContext*>(context))
        {
            serializeContext->Class<MyGameManager, GS_Core::GS_GameManagerComponent>()
                ->Version(0);

            if (AZ::EditContext* editContext = serializeContext->GetEditContext())
            {
                editContext->Class<MyGameManager>("My Game Manager", "Custom game manager for MyProject")
                    ->ClassElement(AZ::Edit::ClassElements::EditorData, "")
                        ->Attribute(AZ::Edit::Attributes::Category, "MyProject")
                        ->Attribute(AZ::Edit::Attributes::AppearsInAddComponentMenu, AZ_CRC_CE("Game"));
            }
        }
    }

    void MyGameManager::InitializeManagers()
    {
        // Call base to spawn the standard manager list
        GS_GameManagerComponent::InitializeManagers();
        // Custom initialization logic here
    }

    void MyGameManager::StartupManagers()
    {
        // Call base to handle standard startup
        GS_GameManagerComponent::StartupManagers();
    }

    void MyGameManager::CompleteStartup()
    {
        // Call base to broadcast OnStartupComplete
        GS_GameManagerComponent::CompleteStartup();
        // Post-startup logic here (e.g. connect to analytics, initialize online services)
    }

    void MyGameManager::BeginGame()
    {
        GS_GameManagerComponent::BeginGame();
        // Custom game start logic
    }
}
See Also
For scripting patterns and SC-first usage:
For related components:
Get GS_Core
GS_Core — Explore this gem on the product page and add it to your project.
1.1.2 - Manager
The base class for all game system managers — automatic two-stage initialization and lifecycle integration with the Game Manager.
For usage guides and setup examples, see The Basics: GS_Core.

A Manager prefab with the wrapper entity set as Editor-Only inside Prefab Edit Mode.
GS_GameManager
  └── (spawns) GS_ManagerComponent ◄ you are here — and all other managers extend this
The GS_ManagerComponent is the base class that all game system managers inherit from. It handles the two-stage initialization pattern with the Game Manager automatically, so you can focus on your system’s logic without worrying about startup ordering.
Every built-in GS_Play manager (Save, Stage, Options, UI, Unit, Camera, Audio, Performer) extends this class. When you need a custom game system manager, you extend it too.
Contents
How It Works
When the Game Manager spawns its list of manager prefabs, each Manager component goes through this lifecycle:
Activate — The component initializes itself (connects to buses, sets up internal state). When done, broadcasts OnRegisterManagerInit() to tell the Game Manager it is ready.
OnStartupManagers — Called by the Game Manager after all managers have reported initialized. Connect to other managers and set up cross-references here. When done, broadcasts OnRegisterManagerStartup().
OnStartupComplete — The Game Manager broadcasts this after all managers report started up. The game is fully ready.
OnEnterStandby / OnExitStandby — Called when the Game Manager enters or exits standby mode. Pause and resume your subsystem here.
OnShutdownManagers — Called when the game is shutting down. Clean up resources and disconnect buses.
The base class handles steps 1–2 automatically. Override them to add your logic, then call the base implementation to complete the handshake.
Setup
The Manager wrapper entity set as Editor-Only inside Prefab Edit Mode.
- Create an entity. Attach your Manager component (built-in or custom) to it.
- Configure any properties needed in the Entity Inspector.
- Turn the entity into a prefab.
- Enter prefab edit mode. Set the wrapper entity (parent of your Manager entity) to Editor Only. Save.
- Delete the Manager entity from the level (it will be spawned by the Game Manager at runtime).
- In the Game Manager prefab, add your Manager
.spawnable to the Startup Managers list.
The premade manager prefabs for each GS_Play gem are located in that gem’s Assets/Prefabs directory.
Inspector Properties
The base GS_ManagerComponent exposes no inspector properties of its own. Properties are defined by each inheriting manager component (e.g., the Save Manager exposes a Save System Version Number, the Stage Manager exposes a Stages list).
API Reference
Lifecycle Events: GameManagerNotificationBus
The Manager base class automatically subscribes to these events from the Game Manager:
| Event | When It Fires | What You Do |
|---|
OnStartupManagers | All managers are initialized | Connect to other managers, set up cross-references, then call base to report. |
OnStartupComplete | All managers are started up | Begin runtime operation. |
OnEnterStandby | Game is entering standby | Pause your subsystem (stop ticks, halt processing). |
OnExitStandby | Game is exiting standby | Resume your subsystem. |
OnShutdownManagers | Game is shutting down | Clean up resources, disconnect buses. |
Registration Methods
Called internally by the Manager base class to report back to the Game Manager. Do not call these manually — call the base class method instead.
| Method | Description |
|---|
OnRegisterManagerInit() | Called at the end of Activate(). Reports to the Game Manager that this manager has initialized. |
OnRegisterManagerStartup() | Called at the end of OnStartupManagers(). Reports to the Game Manager that this manager has started up. |
Usage Examples
C++ — Checking if the Game Manager Is Ready
#include <GS_Core/GS_CoreBus.h>

bool isStarted = false;
GS_Core::GameManagerRequestBus::BroadcastResult(
    isStarted,
    &GS_Core::GameManagerRequestBus::Events::IsStarted
);

if (isStarted)
{
    // Safe to access all managers
}
Extending the Manager Class
Create a custom manager whenever you need a singleton game system that initializes with the rest of the framework. Extension is done in C++.
#pragma once
#include <Source/Managers/GS_ManagerComponent.h>

// Define your EBus interface for other systems to call your manager
class MyManagerRequests
{
public:
    AZ_RTTI(MyManagerRequests, "{YOUR-UUID-HERE}");
    virtual ~MyManagerRequests() = default;

    virtual int GetSomeValue() = 0;
    virtual void DoSomething() = 0;
};

class MyManagerBusTraits : public AZ::EBusTraits
{
public:
    static constexpr AZ::EBusHandlerPolicy HandlerPolicy = AZ::EBusHandlerPolicy::Single;
    static constexpr AZ::EBusAddressPolicy AddressPolicy = AZ::EBusAddressPolicy::Single;
};

using MyManagerRequestBus = AZ::EBus<MyManagerRequests, MyManagerBusTraits>;

namespace MyProject
{
    class MyManagerComponent
        : public GS_Core::GS_ManagerComponent
        , protected MyManagerRequestBus::Handler
    {
    public:
        AZ_COMPONENT_DECL(MyManagerComponent);

        static void Reflect(AZ::ReflectContext* context);

    protected:
        // Manager lifecycle
        void Activate() override;
        void Deactivate() override;
        void OnStartupManagers() override;
        void OnEnterStandby() override;
        void OnExitStandby() override;

        // Your bus implementation
        int GetSomeValue() override;
        void DoSomething() override;

    private:
        int m_someValue = 0;
    };
}
Implementation (.cpp)
#include "MyManagerComponent.h"
#include <AzCore/Serialization/SerializeContext.h>

namespace MyProject
{
    AZ_COMPONENT_IMPL(MyManagerComponent, "MyManagerComponent", "{YOUR-UUID-HERE}");

    void MyManagerComponent::Reflect(AZ::ReflectContext* context)
    {
        if (auto serializeContext = azrtti_cast<AZ::SerializeContext*>(context))
        {
            serializeContext->Class<MyManagerComponent, GS_Core::GS_ManagerComponent>()
                ->Version(0)
                ->Field("SomeValue", &MyManagerComponent::m_someValue);

            if (AZ::EditContext* editContext = serializeContext->GetEditContext())
            {
                editContext->Class<MyManagerComponent>("My Manager", "A custom game system manager")
                    ->ClassElement(AZ::Edit::ClassElements::EditorData, "")
                        ->Attribute(AZ::Edit::Attributes::Category, "MyProject")
                        ->Attribute(AZ::Edit::Attributes::AppearsInAddComponentMenu, AZ_CRC_CE("Game"))
                    ->DataElement(AZ::Edit::UIHandlers::Default,
                        &MyManagerComponent::m_someValue, "Some Value", "Description of this property");
            }
        }
    }

    void MyManagerComponent::Activate()
    {
        MyManagerRequestBus::Handler::BusConnect();

        // IMPORTANT: Call base Activate last — it reports OnRegisterManagerInit()
        GS_ManagerComponent::Activate();
    }

    void MyManagerComponent::Deactivate()
    {
        MyManagerRequestBus::Handler::BusDisconnect();
        GS_ManagerComponent::Deactivate();
    }

    void MyManagerComponent::OnStartupManagers()
    {
        // Access other managers here — they are all initialized by now

        // IMPORTANT: Call base last — it reports OnRegisterManagerStartup()
        GS_ManagerComponent::OnStartupManagers();
    }

    void MyManagerComponent::OnEnterStandby()
    {
        // Pause your subsystem
    }

    void MyManagerComponent::OnExitStandby()
    {
        // Resume your subsystem
    }

    int MyManagerComponent::GetSomeValue()
    {
        return m_someValue;
    }

    void MyManagerComponent::DoSomething()
    {
        // Your game system logic
    }
}
Module Registration
m_descriptors.insert(m_descriptors.end(), {
    MyProject::MyManagerComponent::CreateDescriptor(),
});
Then create a prefab for your manager and add it to the Game Manager’s Startup Managers list.
See Also
For conceptual overviews and usage guides:
For component references:
For related resources:
Get GS_Core
GS_Core — Explore this gem on the product page and add it to your project.
1.2 - GS_Save
The persistence system — save files, load data, and track progression with managers, savers, and record keepers.
The Save system is the universal means of storing, loading, and handling game data. It provides a centralized Save Manager for file operations, entity-level Saver components for automatic data capture, and a Record Keeper for lightweight progression tracking — all backed by JSON-formatted save files that work across PC, console, and mobile platforms.
Every component that needs to persist data plugs into this system through one of two patterns: extend the Saver base class for complex per-entity data, or use the Record Keeper for simple key-value records.
For usage guides and setup examples, see The Basics: GS_Core.
Contents
Architecture
Breakdown
When a save or load is triggered, the Save Manager broadcasts to every Saver in the scene. Each Saver independently handles its own entity’s state. The Record Keeper persists flat progression data alongside the save file.
| Part | Broadcast Event | What It Means |
|---|
| Save Manager | OnSaveAll | Broadcasts to all Savers on save. Each serializes its entity state. |
| Save Manager | OnLoadAll | Broadcasts to all Savers on load. Each restores its entity state. |
| Record Keeper | RecordChanged | Fires when any progression flag is created, updated, or deleted. |
Savers are per-entity components — extend GS_SaverComponent to persist any custom data. The Record Keeper is a global singleton that lives on the Save Manager prefab.
E Indicates extensible classes and methods.
Patterns - Complete list of system patterns used in GS_Play.
Components
| Component | Purpose | Documentation |
|---|
| GS_SaveManagerComponent | Central save/load controller. Manages save files, triggers global save/load events, provides data access to all savers. | Save Manager |
| GS_SaverComponent | Base class for entity-level save handlers. Override BuildSaveData() and ProcessLoad() to persist any component data. | Savers |
| RecordKeeperComponent | Lightweight key-value store for progression tracking (string name → integer value). Extends GS_SaverComponent. | Record Keeper |
| BasicEntitySaverComponent | Pre-built saver that persists an entity’s Transform (position, rotation). | List of Savers |
| BasicPhysicsEntitySaverComponent | Pre-built saver that persists an entity’s Transform and Rigidbody state (velocity). | List of Savers |
Quick Start
- Create a Save Manager prefab with the GS_SaveManagerComponent.
- Optionally add a Record Keeper to the same prefab for progression tracking.
- Add the Save Manager
.spawnable to the Game Manager’s Startup Managers list. - Attach Saver components to any entities that need to persist data.
- Call
NewGame / LoadGame through the Game Manager — the Save Manager handles the rest.
See Also
For conceptual overviews and usage guides:
For component references:
For related resources:
Get GS_Core
GS_Core — Explore this gem on the product page and add it to your project.
1.2.1 - Save Manager
The central save/load controller — manages save files, triggers global persistence events, and provides data access for all savers.
The Save Manager is the central controller of the save system. It manages save file creation, triggers global save/load events that all Saver components respond to, and provides data access methods for storing and retrieving serialized game state.
Save files use JSON formatting for easy human interpretation, and the system uses the O3DE SaveData gem to write to the target platform’s default user data directory — PC, console, or mobile with no additional configuration.
For usage guides and setup examples, see The Basics: GS_Core.
Contents
How It Works
Save File Structure
The Save Manager maintains a CoreSaveData file that acts as an index of all save files for the project. This file is identified by the combination of the Game Manager’s Project Prefix and the Save Manager’s Save System Version Number. Changing either value starts a fresh save data pass.
Each individual save file stores the full game state as a JSON document, including timestamped metadata for ordering.
Initialization
On startup, the Save Manager checks for existing save data using the Project Prefix + Version combination. It sets its internal IsContinuing flag to indicate whether previous save data is available to load. Other systems can query this to determine whether to show “Continue” or “Load Game” options.
New Game Flow
When the Game Manager calls NewGame:
- The Save Manager creates a new save file — either
defaultSaveData (no name given) or a custom name via NewGame(saveName). - The CoreSaveData index is updated with the new file entry.
Save Flow
- Game systems call
SaveData(uniqueName, data) on the SaveManagerRequestBus to store their data into the live save document. - When a full save is triggered (via method call,
OnSaveAll broadcast, or save-on-exit logic), the Save Manager serializes the complete document to disk.
Load Flow
- The Save Manager reads the target save file from disk into memory.
- It broadcasts
OnLoadAll via the SaveManagerNotificationBus. - Each Saver component responds by calling
LoadData(uniqueName, outData) to retrieve its portion of the save data.
Setup

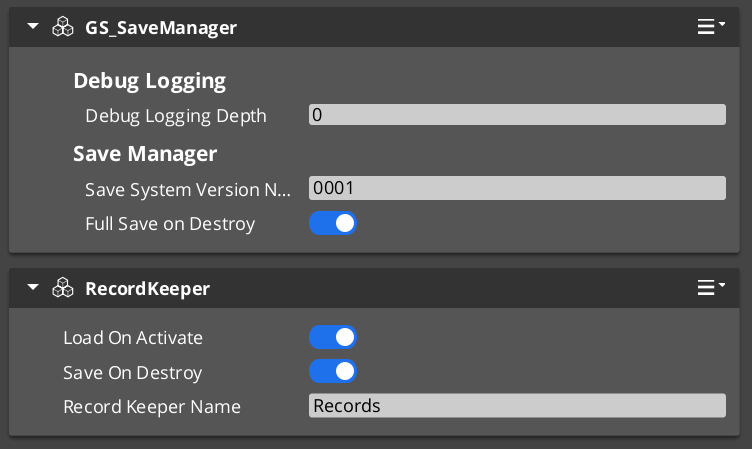
Image showing the Manager wrapper entity set as Editor-Only inside Prefab Edit Mode.
- Create an entity. Attach the GS_SaveManagerComponent to it.
- Set the Save System Version Number (increment this when your save format changes to avoid loading incompatible data).
- Optionally add a RecordKeeperComponent to the same entity for progression tracking.
- Turn the entity into a prefab.
- Enter prefab edit mode. Set the wrapper entity (parent) to Editor Only. Save.
- Delete the Save Manager entity from the level.
- In the Game Manager prefab, add the Save Manager
.spawnable to the Startup Managers list.
Inspector Properties
| Property | Type | Default | Description |
|---|
| Save System Version Number | int | 0 | Version stamp for save file compatibility. Increment when your save data format changes — the system will treat saves from a different version as a fresh start. |
| Full Save On Destroy | bool | true | When enabled, the Save Manager performs a full save when the component is destroyed (e.g., on level exit or game shutdown). |
API Reference
Request Bus: SaveManagerRequestBus
The primary interface for all save/load operations. Singleton bus — call via Broadcast.
| Method | Parameters | Returns | Description |
|---|
NewGameSave | const AZStd::string& uniqueName | void | Creates a new save file with the given name. Pass empty string for default name. |
LoadGame | const AZStd::string& uniqueName | void | Loads the specified save file into memory and triggers data restoration. |
SaveData | const AZStd::string& uniqueName, const rapidjson::Value& data | void | Stores a named data block into the live save document. Called by Saver components during save operations. |
LoadData | const AZStd::string& uniqueName, rapidjson::Value& outData | bool | Retrieves a named data block from the loaded save document. Returns true if the data was found. |
GetOrderedSaveList | — | AZStd::vector<AZStd::pair<AZStd::string, AZ::u64>> | Returns all save files ordered by timestamp (newest first). Each entry is a name + epoch timestamp pair. |
ConvertEpochToReadable | AZ::u64 epochSeconds | AZStd::string | Converts an epoch timestamp to a human-readable date string. |
GetEpochTimeNow | — | AZ::u64 | Returns the current time as an epoch timestamp. |
GetAllocator | — | rapidjson::Document::AllocatorType* | Returns the JSON allocator for constructing save data values. |
HasData | const AZStd::string& uniqueName | bool | Checks whether the specified data block exists in the current save. |
IsContinuing | — | bool | Returns true if previous save data was found on startup. |
RegisterSaving | — | void | Registers that a save operation is in progress (used internally by the save counting system). |
Notification Bus: SaveManagerNotificationBus
Broadcast to all Saver components. Connect to this bus to participate in global save/load events.
| Event | Parameters | Description |
|---|
OnSaveAll | — | Broadcast when a full save is triggered. All savers should gather and submit their data. |
OnLoadAll | — | Broadcast when a save file has been loaded into memory. All savers should retrieve and restore their data. |
Local / Virtual Methods
These methods are available when extending the Save Manager. Override them to customize save file handling.
| Method | Description |
|---|
SaveToFile(fileName, docFile) | Serializes a JSON document to disk using the O3DE SaveData gem. |
LoadFromFile(fileName, docFile) | Deserializes a save file from disk into a JSON document. |
FullSave() | Triggers a complete save of all game data to disk. |
UpdateCoreData(saveName) | Updates the CoreSaveData index with the current save file entry. |
FileExists(dataBufferName, localUserId) | Static utility — checks if a save file exists on disk. |
GetSaveFilePath(dataBufferName, localUserId) | Static utility — returns the platform-appropriate file path for a save file. |
Usage Examples
Saving Data from a Component
#include <GS_Core/GS_CoreBus.h>

// Store your component's data into the live save document
rapidjson::Document::AllocatorType* allocator = nullptr;
GS_Core::SaveManagerRequestBus::BroadcastResult(
    allocator,
    &GS_Core::SaveManagerRequestBus::Events::GetAllocator
);

if (allocator)
{
    rapidjson::Value myData(rapidjson::kObjectType);
    myData.AddMember("health", m_health, *allocator);
    myData.AddMember("level", m_level, *allocator);

    GS_Core::SaveManagerRequestBus::Broadcast(
        &GS_Core::SaveManagerRequestBus::Events::SaveData,
        "MyComponent_PlayerStats",
        myData
    );
}
Loading Data into a Component
#include <GS_Core/GS_CoreBus.h>

rapidjson::Value outData;
bool found = false;
GS_Core::SaveManagerRequestBus::BroadcastResult(
    found,
    &GS_Core::SaveManagerRequestBus::Events::LoadData,
    "MyComponent_PlayerStats",
    outData
);

if (found)
{
    if (outData.HasMember("health")) m_health = outData["health"].GetInt();
    if (outData.HasMember("level"))  m_level = outData["level"].GetInt();
}
Checking if a Save Exists
#include <GS_Core/GS_CoreBus.h>

bool hasSave = false;
GS_Core::SaveManagerRequestBus::BroadcastResult(
    hasSave,
    &GS_Core::SaveManagerRequestBus::Events::IsContinuing
);

if (hasSave)
{
    // Show "Continue" / "Load Game" in the main menu
}
Getting the Save File List
#include <GS_Core/GS_CoreBus.h>

AZStd::vector<AZStd::pair<AZStd::string, AZ::u64>> saves;
GS_Core::SaveManagerRequestBus::BroadcastResult(
    saves,
    &GS_Core::SaveManagerRequestBus::Events::GetOrderedSaveList
);

for (const auto& [name, epoch] : saves)
{
    AZStd::string readable;
    GS_Core::SaveManagerRequestBus::BroadcastResult(
        readable,
        &GS_Core::SaveManagerRequestBus::Events::ConvertEpochToReadable,
        epoch
    );
    AZ_TracePrintf("Save", "Save: %s — %s", name.c_str(), readable.c_str());
}
Extending the Save Manager
Extend the Save Manager when you need custom save file formats, encryption, cloud save integration, or platform-specific serialization.
#pragma once
#include <Source/SaveSystem/GS_SaveManagerComponent.h>

namespace MyProject
{
    class MySaveManagerComponent
        : public GS_Core::GS_SaveManagerComponent
    {
    public:
        AZ_COMPONENT_DECL(MySaveManagerComponent);

        static void Reflect(AZ::ReflectContext* context);

    protected:
        // Override save/load to add custom behavior (e.g., encryption, compression)
        void SaveToFile(AZStd::string fileName, rapidjson::Document& docFile) override;
        void LoadFromFile(AZStd::string fileName, rapidjson::Document& docFile) override;

        // Override to customize the full save sequence
        void FullSave() override;
    };
}
Implementation (.cpp)
#include "MySaveManagerComponent.h"
#include <AzCore/Serialization/SerializeContext.h>

namespace MyProject
{
    AZ_COMPONENT_IMPL(MySaveManagerComponent, "MySaveManagerComponent", "{YOUR-UUID-HERE}",
        GS_Core::GS_SaveManagerComponent);

    void MySaveManagerComponent::Reflect(AZ::ReflectContext* context)
    {
        if (auto serializeContext = azrtti_cast<AZ::SerializeContext*>(context))
        {
            serializeContext->Class<MySaveManagerComponent, GS_Core::GS_SaveManagerComponent>()
                ->Version(0);

            if (AZ::EditContext* editContext = serializeContext->GetEditContext())
            {
                editContext->Class<MySaveManagerComponent>(
                    "My Save Manager", "Custom save manager with encryption support")
                    ->ClassElement(AZ::Edit::ClassElements::EditorData, "")
                        ->Attribute(AZ::Edit::Attributes::Category, "MyProject")
                        ->Attribute(AZ::Edit::Attributes::AppearsInAddComponentMenu, AZ_CRC_CE("Game"));
            }
        }
    }

    void MySaveManagerComponent::SaveToFile(AZStd::string fileName, rapidjson::Document& docFile)
    {
        // Example: encrypt the JSON before writing
        // ... your encryption logic ...

        // Call base to perform the actual file write
        GS_SaveManagerComponent::SaveToFile(fileName, docFile);
    }

    void MySaveManagerComponent::LoadFromFile(AZStd::string fileName, rapidjson::Document& docFile)
    {
        // Call base to perform the actual file read
        GS_SaveManagerComponent::LoadFromFile(fileName, docFile);

        // Example: decrypt the JSON after reading
        // ... your decryption logic ...
    }

    void MySaveManagerComponent::FullSave()
    {
        // Example: add a timestamp or checksum before saving
        // ... your custom logic ...

        GS_SaveManagerComponent::FullSave();
    }
}
Module Registration
m_descriptors.insert(m_descriptors.end(), {
    MyProject::MySaveManagerComponent::CreateDescriptor(),
});
Then create a prefab for your custom Save Manager and add it to the Game Manager’s Startup Managers list (replacing the default Save Manager).
See Also
For component references:
For related resources:
Get GS_Core
GS_Core — Explore this gem on the product page and add it to your project.
1.2.2 - Savers
The base class for entity-level save handlers — override BuildSaveData() and ProcessLoad() to persist any component data automatically.
For usage guides and setup examples, see The Basics: GS_Core.

Image showing the Basic Physics Saver component, an example of a Saver-inherited class, as seen in the Entity Inspector.
The GS_SaverComponent is the base class for all entity-level save handlers. By extending it, you can create companion components that save and load data alongside your entities, or inherit directly into gameplay components for built-in persistence (as done by GS_Inventory).
Savers automatically participate in the global save/load cycle — when the Save Manager broadcasts OnSaveAll or OnLoadAll, every active Saver component responds by gathering or restoring its data.
Contents
How It Works
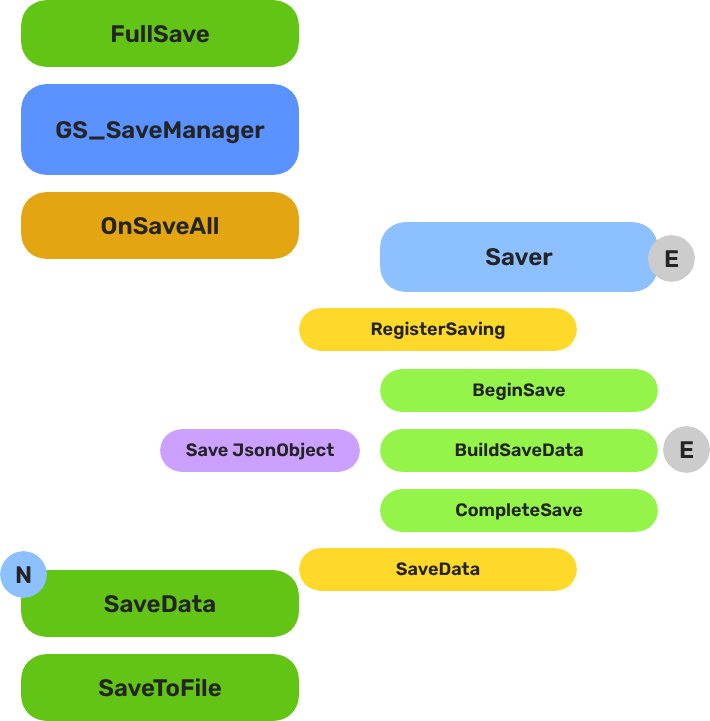
Save Cycle
When a save event fires (global OnSaveAll, local trigger, or saveOnDestroy):
- BeginSave() — Primes the save data container.
- BuildSaveData() — Your override. Gather your component’s data and write it into
localData using the Save Manager’s JSON allocator. - CompleteSave() — Submits the data to the Save Manager via
SaveData(uniqueName, localData).
Load Cycle
When a load event fires (global OnLoadAll or loadOnActivate):
- LoadLocalData() — Retrieves this Saver’s data block from the Save Manager via
LoadData(uniqueName, outData). - ProcessLoad() — Your override. Read the retrieved data and restore your component’s state.
Automatic Identity
Each Saver generates a unique save key from the entity name and GetSubComponentName(). This ensures multiple Savers on different entities (or multiple Saver types on the same entity) don’t collide.
Setup
- Attach a Saver component (built-in or custom) to any entity that needs to persist data.
- Configure the Saver properties:
- Load On Activate — restore data automatically when the entity spawns.
- Save On Destroy — save data automatically when the entity is destroyed.
- Ensure the Save Manager is set up and running (it handles the file I/O).
Inspector Properties
| Property | Type | Default | Description |
|---|
| Load On Activate | bool | true | Automatically loads and restores this Saver’s data when the component activates. Useful for entities that spawn mid-game and need to resume their saved state. |
| Save On Destroy | bool | true | Automatically saves this Saver’s data when the component is destroyed. Ensures data is captured even if a global save hasn’t been triggered. |
API Reference
Global Event Handlers
These are called automatically when the Save Manager broadcasts global save/load events. Override to customize behavior.
| Method | Description |
|---|
OnSaveAll() | Called when the Save Manager broadcasts a global save. Default implementation calls the full save cycle (BeginSave → BuildSaveData → CompleteSave). |
OnLoadAll() | Called when the Save Manager broadcasts a global load. Default implementation calls the full load cycle (LoadLocalData → ProcessLoad). |
Save Methods
Override these to control how your component’s data is saved.
| Method | Description |
|---|
BeginSave() | Prepares the save data container. Called before BuildSaveData(). |
BuildSaveData() | Your primary override. Write your component’s data into localData using the JSON allocator. |
CompleteSave() | Submits localData to the Save Manager. Called after BuildSaveData(). |
Load Methods
Override these to control how your component’s data is restored.
| Method | Description |
|---|
LoadLocalData() | Retrieves this Saver’s data block from the Save Manager into localData. |
ProcessLoad() | Your primary override. Read localData and restore your component’s state. |
Utility Methods
| Method | Returns | Description |
|---|
SetUniqueName() | void | Generates the unique save key from the entity name and sub-component name. Override for custom key generation. |
GetSubComponentName() | AZStd::string | Returns "Saver" by default. Override to distinguish multiple Saver types on the same entity. |
Components
Pre-built Saver components included in GS_Core:
| Component | Saves | Documentation |
|---|
| BasicEntitySaverComponent | Entity Transform (position, rotation) | List of Savers |
| BasicPhysicsEntitySaverComponent | Entity Transform + Rigidbody (position, rotation, linear velocity, angular velocity) | List of Savers |
| RecordKeeperComponent | Key-value records (string → integer) | Record Keeper |
Usage Examples
Responding to Global Save/Load Events
If your component doesn’t extend GS_SaverComponent but still needs to react to save/load events, connect to the SaveManagerNotificationBus:
#include <GS_Core/GS_CoreBus.h>

class MyComponent
    : public AZ::Component
    , protected GS_Core::SaveManagerNotificationBus::Handler
{
protected:
    void Activate() override
    {
        GS_Core::SaveManagerNotificationBus::Handler::BusConnect();
    }

    void Deactivate() override
    {
        GS_Core::SaveManagerNotificationBus::Handler::BusDisconnect();
    }

    void OnSaveAll() override
    {
        // Gather and submit data to the Save Manager
    }

    void OnLoadAll() override
    {
        // Retrieve and restore data from the Save Manager
    }
};
Extending the Saver Class
Use the SaverComponent ClassWizard template to generate a new saver with boilerplate already in place — see GS_Core Templates.
Create a custom Saver whenever you need to persist component-specific data that the built-in savers don’t cover.
#pragma once
#include <Source/SaveSystem/GS_SaverComponent.h>

namespace MyProject
{
    class MyEntitySaverComponent
        : public GS_Core::GS_SaverComponent
    {
    public:
        AZ_COMPONENT_DECL(MyEntitySaverComponent);

        static void Reflect(AZ::ReflectContext* context);

    protected:
        // Saver overrides
        void BuildSaveData() override;
        void ProcessLoad() override;
        AZStd::string GetSubComponentName() const override { return "MyEntitySaver"; }
    };
}
Implementation (.cpp)
#include "MyEntitySaverComponent.h"
#include <AzCore/Serialization/SerializeContext.h>
#include <GS_Core/GS_CoreBus.h>

namespace MyProject
{
    AZ_COMPONENT_IMPL(MyEntitySaverComponent, "MyEntitySaverComponent", "{YOUR-UUID-HERE}",
        GS_Core::GS_SaverComponent);

    void MyEntitySaverComponent::Reflect(AZ::ReflectContext* context)
    {
        if (auto serializeContext = azrtti_cast<AZ::SerializeContext*>(context))
        {
            serializeContext->Class<MyEntitySaverComponent, GS_Core::GS_SaverComponent>()
                ->Version(0);

            if (AZ::EditContext* editContext = serializeContext->GetEditContext())
            {
                editContext->Class<MyEntitySaverComponent>(
                    "My Entity Saver", "Saves custom entity data")
                    ->ClassElement(AZ::Edit::ClassElements::EditorData, "")
                        ->Attribute(AZ::Edit::Attributes::Category, "MyProject")
                        ->Attribute(AZ::Edit::Attributes::AppearsInAddComponentMenu, AZ_CRC_CE("Game"));
            }
        }
    }

    void MyEntitySaverComponent::BuildSaveData()
    {
        // Get the JSON allocator from the Save Manager
        rapidjson::Document::AllocatorType* allocator = nullptr;
        GS_Core::SaveManagerRequestBus::BroadcastResult(
            allocator,
            &GS_Core::SaveManagerRequestBus::Events::GetAllocator
        );

        if (!allocator) return;

        // Write your data into localData (inherited member)
        localData.SetObject();
        localData.AddMember("myValue", 42, *allocator);
        localData.AddMember("myFlag", true, *allocator);

        // Example: save a string
        rapidjson::Value nameVal;
        nameVal.SetString("hello", *allocator);
        localData.AddMember("myString", nameVal, *allocator);
    }

    void MyEntitySaverComponent::ProcessLoad()
    {
        // Read your data from localData (populated by LoadLocalData)
        if (localData.HasMember("myValue"))
        {
            int myValue = localData["myValue"].GetInt();
            // ... restore state ...
        }

        if (localData.HasMember("myFlag"))
        {
            bool myFlag = localData["myFlag"].GetBool();
            // ... restore state ...
        }
    }
}
Module Registration
m_descriptors.insert(m_descriptors.end(), {
    MyProject::MyEntitySaverComponent::CreateDescriptor(),
});
Attach your custom Saver to any entity that needs persistence. The save/load cycle handles the rest automatically.
See Also
For component references:
For related resources:
Get GS_Core
GS_Core — Explore this gem on the product page and add it to your project.
1.2.2.1 - List of Savers
Pre-built saver components included in GS_Core — ready-to-use entity persistence without writing code.
For usage guides and setup examples, see The Basics: GS_Core.
Contents
GS_Core includes pre-built Saver components that handle common persistence scenarios out of the box. Attach one to any entity that needs to remember its state between save/load cycles — no custom code required.
All built-in Savers inherit from GS_SaverComponent and participate in the global save/load cycle automatically.
Basic Entity Saver
A companion component that saves and loads an entity’s Transform data: position and rotation.
When to Use
Use the Basic Entity Saver for any entity that can be moved or rotated during gameplay and needs to retain its position across saves — collectibles, furniture, doors, NPCs with fixed patrol points, etc.
Inspector Properties
| Property | Type | Default | Description |
|---|
| Load On Activate | bool | true | Inherited from GS_SaverComponent. Automatically restores the saved Transform on activation. |
| Save On Destroy | bool | true | Inherited from GS_SaverComponent. Automatically saves the current Transform on destruction. |
What It Saves
| Data | Type | Description |
|---|
| Position | AZ::Vector3 | World-space position of the entity. |
| Rotation | AZ::Quaternion | World-space rotation of the entity. |
Setup
- Attach the BasicEntitySaverComponent to any entity that needs Transform persistence.
- Ensure the Save Manager is running.
- That’s it — the component saves and loads automatically.
Basic Physics Entity Saver
Image showing the Basic Physics Saver component, as seen in the Entity Inspector.
A companion component that saves and loads an entity’s Transform and Rigidbody physics state.
When to Use
Use the Basic Physics Entity Saver for physics-driven entities that need to retain both their position and their motion state across saves — throwable objects, rolling boulders, physics puzzles, ragdolls, etc.
Inspector Properties
| Property | Type | Default | Description |
|---|
| Load On Activate | bool | true | Inherited from GS_SaverComponent. Automatically restores saved state on activation. |
| Save On Destroy | bool | true | Inherited from GS_SaverComponent. Automatically saves current state on destruction. |
What It Saves
| Data | Type | Description |
|---|
| Position | AZ::Vector3 | World-space position of the entity. |
| Rotation | AZ::Quaternion | World-space rotation of the entity. |
| Linear Velocity | AZ::Vector3 | Current linear velocity of the rigidbody. |
| Angular Velocity | AZ::Vector3 | Current angular velocity of the rigidbody. |
Transform data (position, rotation) loads reliably. Rigidbody velocity restoration may not behave as expected in all physics scenarios.
Setup
- Attach the BasicPhysicsEntitySaverComponent to any entity with a Rigidbody component.
- Ensure the Save Manager is running.
- The component saves and loads automatically.
Creating Your Own Saver
Need to persist data that the built-in Savers don’t cover? See the Extending the Saver Class guide for a complete walkthrough with header, implementation, and module registration.
See Also
For component references:
Get GS_Core
GS_Core — Explore this gem on the product page and add it to your project.
1.2.3 - Record Keeper
Lightweight key-value progression tracking — store and retrieve named integer records without writing a custom saver.
For usage guides and setup examples, see The Basics: GS_Core.

Image showing the Record Keeper component with its unique variables and inherited Saver properties, as seen in the Entity Inspector.
The Record Keeper is a companion component that provides a simple key-value store for tracking progression, switch states, quest stages, or any other data that doesn’t require a complex Saver implementation. Each record is a SaveRecord — a name/value pair of recordName (string) and recordProgress (integer).
Because it extends GS_SaverComponent, the Record Keeper saves and loads automatically with the rest of the save system. No custom serialization code needed.
Contents
How It Works
- The Record Keeper lives on your Save Manager prefab entity (recommended) or any entity with save system access.
- Game systems call
SetRecord, GetRecord, HasRecord, and DeleteRecord via the RecordKeeperRequestBus. - On each call to
SetRecord, the Record Keeper broadcasts RecordChanged on the RecordKeeperNotificationBus so listeners can react. - When a global save event fires (
OnSaveAll), the Record Keeper serializes all its records into the save file automatically. - On load, it deserializes its records and makes them available immediately.
SaveRecord Data Structure
struct SaveRecord
{
    AZStd::string recordName;    // Unique key (e.g., "quest_village_rescue", "switch_bridge_01")
    AZ::s32       recordProgress; // Integer value (progression stage, state, count, etc.)
};
TypeId: {F6F4F258-819A-468A-B015-CAF51D8289BF}
Setup
- Open your Save Manager prefab in prefab edit mode.
- Add the RecordKeeperComponent to the Save Manager entity.
- Set the Record Keeper Name — this drives unique save/load identification and allows multiple Record Keepers if needed.
- Enable the Saver booleans as needed:
- Load On Activate — automatically loads records when the component activates (recommended: on).
- Save On Destroy — automatically saves records when the component is destroyed (recommended: on).
Inspector Properties
| Property | Type | Default | Description |
|---|
| Record Keeper Name | AZStd::string | "" | Unique identifier for this Record Keeper. Drives the save/load key. Required if using multiple Record Keepers. |
| Load On Activate | bool | true | Inherited from GS_SaverComponent. Automatically loads records from save data on activation. |
| Save On Destroy | bool | true | Inherited from GS_SaverComponent. Automatically saves records to the save system on destruction. |
API Reference
Request Bus: RecordKeeperRequestBus
The primary interface for reading and writing records.
| Method | Parameters | Returns | Description |
|---|
HasRecord | const AZStd::string& recordName | bool | Returns true if a record with the given name exists. |
SetRecord | const AZStd::string& recordName, AZ::s32 recordProgress | void | Creates or updates a record. Broadcasts RecordChanged on success. |
GetRecord | const AZStd::string& recordName | AZ::s32 | Returns the value of the named record. Returns 0 if the record does not exist. |
DeleteRecord | const AZStd::string& recordName | void | Removes the named record from the store. |
Notification Bus: RecordKeeperNotificationBus
Connect to this bus to react when records change.
| Event | Parameters | Description |
|---|
RecordChanged | const AZStd::string& recordName, AZ::s32 recordValue | Broadcast whenever SetRecord is called. Use this to update UI, trigger gameplay events, or log progression. |
Usage Examples
Setting a Progression Record
#include <GS_Core/GS_CoreBus.h>

// Mark quest stage 2 as complete
GS_Core::RecordKeeperRequestBus::Broadcast(
    &GS_Core::RecordKeeperRequestBus::Events::SetRecord,
    "quest_village_rescue",
    2
);
Reading a Record
#include <GS_Core/GS_CoreBus.h>

AZ::s32 questStage = 0;
GS_Core::RecordKeeperRequestBus::BroadcastResult(
    questStage,
    &GS_Core::RecordKeeperRequestBus::Events::GetRecord,
    "quest_village_rescue"
);

if (questStage >= 2)
{
    // The player has completed stage 2 — unlock the bridge
}
Checking if a Record Exists
#include <GS_Core/GS_CoreBus.h>

bool exists = false;
GS_Core::RecordKeeperRequestBus::BroadcastResult(
    exists,
    &GS_Core::RecordKeeperRequestBus::Events::HasRecord,
    "switch_bridge_01"
);

if (!exists)
{
    // First time encountering this switch — initialize it
    GS_Core::RecordKeeperRequestBus::Broadcast(
        &GS_Core::RecordKeeperRequestBus::Events::SetRecord,
        "switch_bridge_01",
        0
    );
}
Listening for Record Changes
#include <GS_Core/GS_CoreBus.h>

// In your component header:
class MyQuestTrackerComponent
    : public AZ::Component
    , protected GS_Core::RecordKeeperNotificationBus::Handler
{
protected:
    void Activate() override
    {
        GS_Core::RecordKeeperNotificationBus::Handler::BusConnect();
    }

    void Deactivate() override
    {
        GS_Core::RecordKeeperNotificationBus::Handler::BusDisconnect();
    }

    // RecordKeeperNotificationBus
    void RecordChanged(const AZStd::string& recordName, AZ::s32 recordValue) override
    {
        if (recordName == "quest_village_rescue" && recordValue >= 3)
        {
            // Quest complete — trigger reward
        }
    }
};
Extending the Record Keeper
For complex data needs beyond simple key-value records, create custom Saver components.
See Also
For component references:
Get GS_Core
GS_Core — Explore this gem on the product page and add it to your project.
1.3 - GS_StageManager
The level navigation system — handles loading, unloading, and staged startup of game levels with exit point traversal.
The Stage Manager system handles the process of changing levels, loading and unloading their assets, and starting up levels in the correct sequence. It supports incremental loading so that complex levels with generative components can spin up reliably without massive frame-time spikes.
Each level contains a Stage Data component that acts as the level’s anchor — connecting the Stage Manager to level-specific references, startup sequences, and navigation data. Exit Points mark spawn positions for player placement when transitioning between stages.
For usage guides and setup examples, see The Basics: GS_Core.
Contents
Architecture
Breakdown
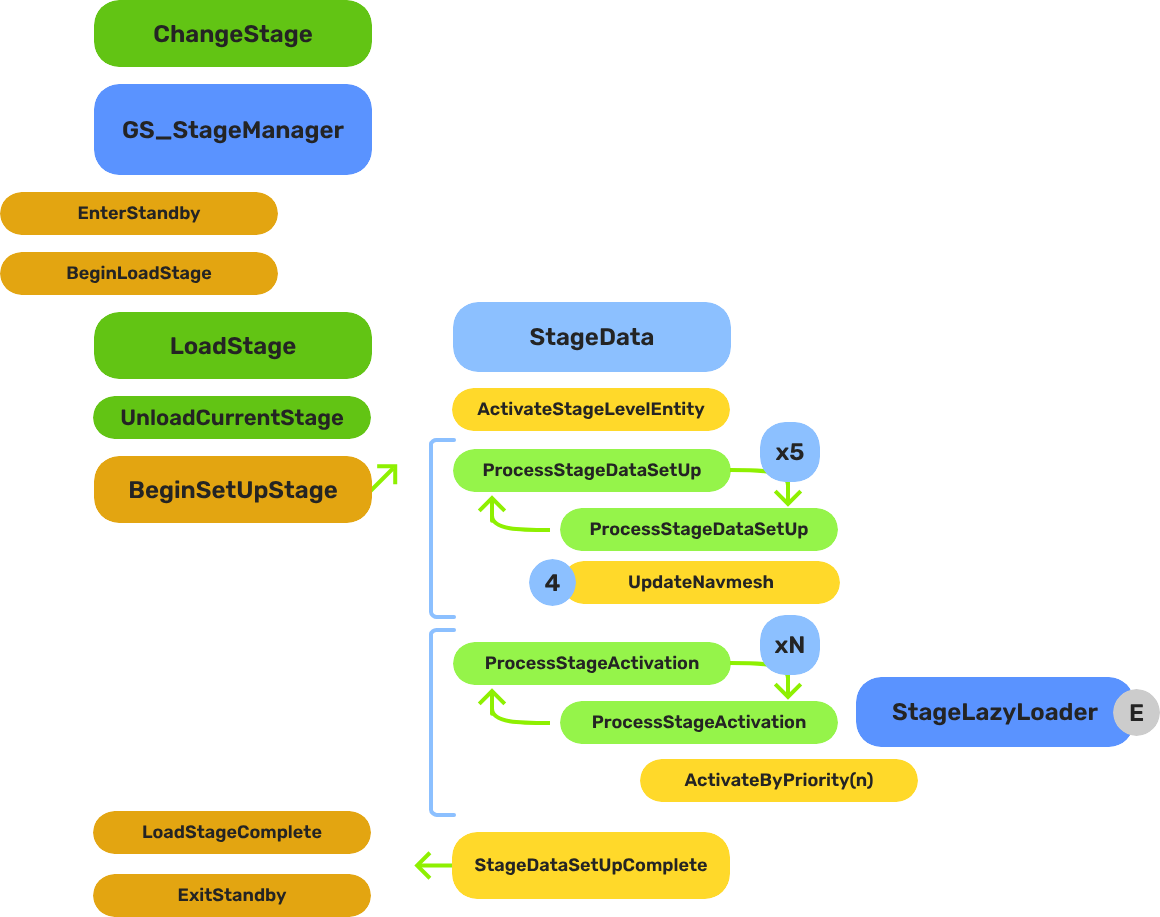
When a stage change is requested, the system follows a five-step sequence before gameplay resumes in the new level:
| Step | Broadcast Event | What It Means |
|---|
| 1 — Standby | OnEnterStandby | Game Manager enters standby, halting all gameplay systems. |
| 2 — Unload | (internal) | The current stage’s entities are torn down. |
| 3 — Spawn | (internal) | The target stage prefab is instantiated. |
| 4 — Set Up | OnBeginSetUpStage | Stage Data runs its layered startup: SetUpStage → ActivateByPriority → Complete. |
| 5 — Complete | LoadStageComplete | Stage Manager broadcasts completion. Standby exits. Gameplay resumes. |
The Stage Data startup is layered so heavy levels can initialize incrementally without causing frame-time spikes.
E Indicates extensible classes and methods.
Patterns - Complete list of system patterns used in GS_Play.
Components
| Component | Purpose | Documentation |
|---|
| GS_StageManagerComponent | Singleton level controller. Manages the Stages list, handles change requests, coordinates loading/unloading. | Stage Manager |
| GS_StageDataComponent | Per-level anchor. Holds stage name, NavMesh reference, and runs the level’s startup sequence. | Stage Data |
| StageExitPointComponent | Marks spawn/exit positions within a level. Registered by name for cross-stage entity placement. | Stage Manager: Exit Points |
| StageLazyLoaderComponent | Priority-based entity activation during level load. Spreads heavy initialization across frames. | Stage Data: Priority Loading |
Quick Start
- Create a Stage Manager prefab with the GS_StageManagerComponent.
- Add stage entries to the Stages list (name + spawnable prefab for each level).
- Set the Default Stage to your starting level.
- Add the Stage Manager
.spawnable to the Game Manager’s Startup Managers list. - In each level prefab, add a Stage Data component as the level’s anchor.
- Optionally place Exit Points in each level for spawn positioning.
See Also
For conceptual overviews and usage guides:
For component references:
For related resources:
Get GS_Core
GS_Core — Explore this gem on the product page and add it to your project.
1.3.1 - Stage Manager
The singleton level controller — manages a list of stages, handles level loading/unloading, and coordinates staged startup with the Stage Data component.
The Stage Manager is the singleton that handles all the logistics of loading and unloading game levels. It maintains a list of stages (name-to-spawnable mappings) and processes change requests by unloading the current stage and spawning the target. Once loaded, it connects to the level’s Stage Data component to run the staged startup sequence.
The system operates as a “one in, one out” format — loading one level automatically unloads the previous one.
For usage guides and setup examples, see The Basics: GS_Core.
Contents
How It Works
Startup
At game startup, the Stage Manager checks the Game Manager’s Debug Mode flag:
- Debug Mode OFF — The Stage Manager loads the Default Stage automatically. This is the normal game flow.
- Debug Mode ON — The Stage Manager stays connected to whatever level is already loaded in the editor. This lets developers iterate within a stage without waiting for a full level load cycle.
Change Stage Flow
When ChangeStageRequest(stageName, exitName) is called:
- Unload — The current stage is destroyed (if one is loaded).
- Spawn — The Stage Manager looks up
stageName in the Stages list and spawns the matching prefab. - Connect — The Stage Manager queries the newly spawned level for its Stage Data component.
- Startup — The Stage Data component runs the level’s staged activation sequence (priority layers, NavMesh generation, etc.).
- Notify — The Stage Manager broadcasts
LoadStageComplete when the level is fully ready.
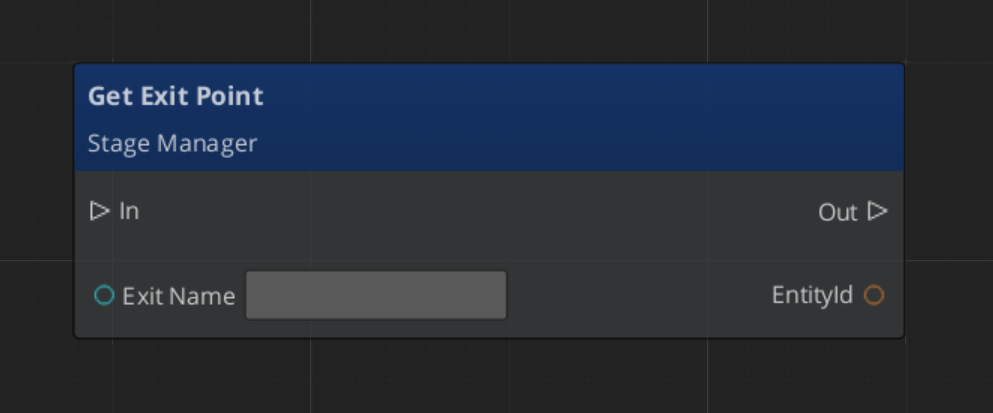
Exit Points
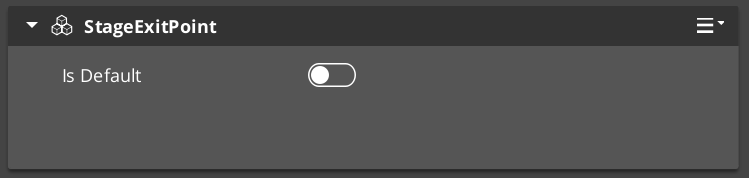
Exit Points are simple components placed within a level that mark positions for entity placement after a stage loads. They support cross-stage traversal — when changing stages, you specify an exit point name, and entities can be repositioned to that point.
- Exit Points register themselves with the Stage Manager by name via
RegisterExitPoint. - One Exit Point can be flagged as Default — it serves as the fallback if no specific exit point is requested.
- Call
GetExitPoint(exitName) to retrieve the entity at a named position.
Setup
Image showing the Manager wrapper entity set as Editor-Only inside Prefab Edit Mode.
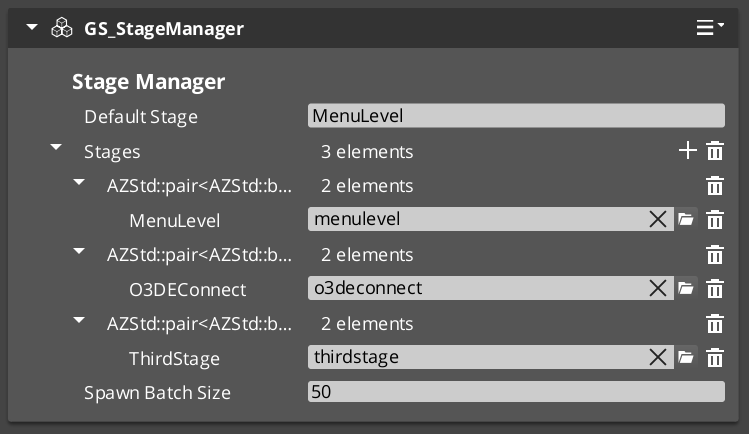
- Create an entity. Attach the GS_StageManagerComponent to it.
- Configure the Stages list — add an entry for each level (stage name + spawnable prefab reference).
- Set the Default Stage to your starting level. This name must also exist in the Stages list.
- Turn the entity into a prefab.
- Enter prefab edit mode. Set the wrapper entity (parent) to Editor Only. Save.
- Delete the Stage Manager entity from the level.
- In the Game Manager prefab, add the Stage Manager
.spawnable to the Startup Managers list.
Inspector Properties
| Property | Type | Default | Description |
|---|
| Stages | AZStd::vector<StageEntry> | [] | List of stage entries. Each entry maps a stage name to a spawnable prefab asset. |
| Default Stage | AZStd::string | "" | The stage to load automatically on game startup (when not in Debug Mode). Must match a name in the Stages list. |
API Reference
Request Bus: StageManagerRequestBus
The primary interface for level navigation. Singleton bus — call via Broadcast.
| Method | Parameters | Returns | Description |
|---|
ChangeStageRequest | AZStd::string stageName, AZStd::string exitName | void | Unloads the current stage and loads the named stage. The exitName specifies which Exit Point to use for entity placement. Pass empty string for default. |
LoadDefaultStage | — | void | Loads the Default Stage. Typically called internally during game startup. |
RegisterExitPoint | AZStd::string exitName, AZ::EntityId exitEntity | void | Registers a named exit point entity. Called by StageExitPointComponents on activation. |
UnregisterExitPoint | AZStd::string exitName | void | Removes a named exit point. Called by StageExitPointComponents on deactivation. |
GetExitPoint | AZStd::string exitName = "" | AZ::EntityId | Returns the entity ID of the named exit point. Pass empty string to get the default exit point. |
Notification Bus: StageManagerNotificationBus
Connect to this bus to react to level loading events.
| Event | Parameters | Description |
|---|
BeginLoadStage | — | Broadcast when a stage change has started. Use this to show loading screens, disable input, etc. |
LoadStageComplete | — | Broadcast when the new stage is fully loaded and its startup sequence is complete. Safe to begin gameplay. |
StageLoadProgress | float progress | Broadcast during the loading process with a 0.0–1.0 progress value. Use for loading bar UI. |
Local / Virtual Methods
These methods are available when extending the Stage Manager.
| Method | Description |
|---|
ChangeStage(stageName, exitName) | Internal stage change logic. Override to add custom behavior around stage transitions. |
LoadStage() | Spawns the target stage prefab. Override for custom spawning logic. |
ContinueLoadStage() | Called after the stage prefab has spawned. Queries for Stage Data and starts the level’s activation sequence. |
UpdateStageData() | Connects to the Stage Data component in the loaded level. |
GetStageByName(stageName) | Returns the spawnable asset reference for a named stage from the Stages list. |
Usage Examples
Changing Stages
#include <GS_Core/GS_CoreBus.h>

// Load "ForestVillage" and place the player at the "main_entrance" exit point
GS_Core::StageManagerRequestBus::Broadcast(
    &GS_Core::StageManagerRequestBus::Events::ChangeStageRequest,
    AZStd::string("ForestVillage"),
    AZStd::string("main_entrance")
);
Getting an Exit Point Entity
#include <GS_Core/GS_CoreBus.h>

AZ::EntityId exitEntity;
GS_Core::StageManagerRequestBus::BroadcastResult(
    exitEntity,
    &GS_Core::StageManagerRequestBus::Events::GetExitPoint,
    AZStd::string("cave_exit")
);

if (exitEntity.IsValid())
{
    // Reposition the player entity to the exit point's transform
}
Listening for Stage Load Events
#include <GS_Core/GS_CoreBus.h>

class MyLoadScreenComponent
    : public AZ::Component
    , protected GS_Core::StageManagerNotificationBus::Handler
{
protected:
    void Activate() override
    {
        GS_Core::StageManagerNotificationBus::Handler::BusConnect();
    }

    void Deactivate() override
    {
        GS_Core::StageManagerNotificationBus::Handler::BusDisconnect();
    }

    void BeginLoadStage() override
    {
        // Show loading screen, disable player input
    }

    void LoadStageComplete() override
    {
        // Hide loading screen, enable player input
    }

    void StageLoadProgress(float progress) override
    {
        // Update loading bar: progress is 0.0 to 1.0
    }
};
Script Canvas
Changing stages:
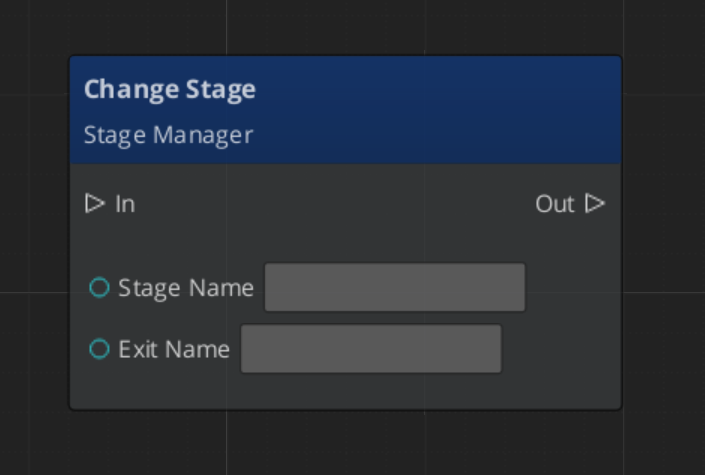
Getting an exit point:
Extending the Stage Manager
Extend the Stage Manager when you need custom stage transition logic, procedural level generation, or multi-stage loading.
#pragma once
#include <Source/StageManager/GS_StageManagerComponent.h>

namespace MyProject
{
    class MyStageManagerComponent
        : public GS_Core::GS_StageManagerComponent
    {
    public:
        AZ_COMPONENT_DECL(MyStageManagerComponent);

        static void Reflect(AZ::ReflectContext* context);

    protected:
        // Override stage change behavior
        void ChangeStage(AZStd::string stageName, AZStd::string exitName) override;
        void ContinueLoadStage() override;
    };
}
Implementation (.cpp)
#include "MyStageManagerComponent.h"
#include <AzCore/Serialization/SerializeContext.h>

namespace MyProject
{
    AZ_COMPONENT_IMPL(MyStageManagerComponent, "MyStageManagerComponent", "{YOUR-UUID-HERE}",
        GS_Core::GS_StageManagerComponent);

    void MyStageManagerComponent::Reflect(AZ::ReflectContext* context)
    {
        if (auto serializeContext = azrtti_cast<AZ::SerializeContext*>(context))
        {
            serializeContext->Class<MyStageManagerComponent, GS_Core::GS_StageManagerComponent>()
                ->Version(0);

            if (AZ::EditContext* editContext = serializeContext->GetEditContext())
            {
                editContext->Class<MyStageManagerComponent>(
                    "My Stage Manager", "Custom stage manager with transition effects")
                    ->ClassElement(AZ::Edit::ClassElements::EditorData, "")
                        ->Attribute(AZ::Edit::Attributes::Category, "MyProject")
                        ->Attribute(AZ::Edit::Attributes::AppearsInAddComponentMenu, AZ_CRC_CE("Game"));
            }
        }
    }

    void MyStageManagerComponent::ChangeStage(AZStd::string stageName, AZStd::string exitName)
    {
        // Example: trigger a fade-out transition before changing stages
        // ... your transition logic ...

        // Call base to perform the actual stage change
        GS_StageManagerComponent::ChangeStage(stageName, exitName);
    }

    void MyStageManagerComponent::ContinueLoadStage()
    {
        // Call base to connect to Stage Data and start level activation
        GS_StageManagerComponent::ContinueLoadStage();

        // Example: trigger a fade-in transition after loading
        // ... your transition logic ...
    }
}
Module Registration
m_descriptors.insert(m_descriptors.end(), {
    MyProject::MyStageManagerComponent::CreateDescriptor(),
});
Then create a prefab for your custom Stage Manager and add it to the Game Manager’s Startup Managers list (replacing the default).
See Also
For component references:
For related resources:
Get GS_Core
GS_Core — Explore this gem on the product page and add it to your project.
1.3.2 - Stage Data
The per-level anchor component — holds stage configuration, NavMesh references, and runs the level’s staged activation sequence.
The Stage Data component is the anchor that connects the Stage Manager to a loaded level. It holds level-specific configuration — stage name, NavMesh reference, priority layers — and runs the staged activation sequence that brings the level online incrementally rather than all at once.
Every level that loads through the Stage Manager should have exactly one Stage Data component at the root of its prefab hierarchy.
For usage guides and setup examples, see The Basics: GS_Core.
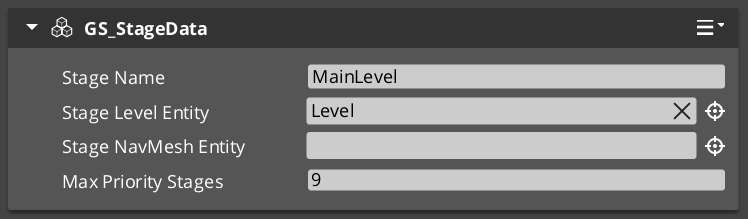
Contents
How It Works
Connection
When the Stage Manager spawns a stage prefab, it queries the level for the Stage Data component via StageDataRequestBus. The Stage Data returns its reference, and the Stage Manager hands off the startup process.
Staged Activation
Rather than activating every entity in the level at once (which would cause a massive frame spike), the Stage Data component supports priority-based activation:
- SetUpStage() — Initial stage configuration. Sets up references, connects internal systems.
- ActivateByPriority — Entities tagged with priority layers activate in sequence, spreading heavy initialization across multiple frames. This allows NavMesh generation, procedural content, and complex entity hierarchies to spin up without blocking the main thread.
- LoadStageComplete — The Stage Manager broadcasts this once all priority layers have finished and the level is fully ready.
NavMesh Integration
The Stage Data component holds a reference to the level’s Recast NavMesh entity. This allows the Stage Manager to trigger NavMesh generation at the appropriate point during the startup sequence — after the level geometry is loaded but before AI systems begin pathfinding.
Setup
- In your level prefab, create an entity at the root level.
- Attach the GS_StageDataComponent to it.
- Set the Stage Name to match the name used in the Stage Manager’s Stages list.
- Assign the NavMesh entity reference if your level uses Recast Navigation.
- Configure priority layers for incremental entity activation if needed.
Inspector Properties
| Property | Type | Default | Description |
|---|
| Stage Name | AZStd::string | "" | The name of this stage. Must match the corresponding entry in the Stage Manager’s Stages list. |
| NavMesh | AZ::EntityId | Invalid | Reference to the entity with the Recast Navigation component. Used to trigger NavMesh generation during staged startup. |
API Reference
Request Bus: StageDataRequestBus
Used by the Stage Manager to connect to and control the level’s startup.
| Method | Parameters | Returns | Description |
|---|
GetStageData | — | StageData* | Returns a reference to this Stage Data component. Used by the Stage Manager during initial connection. |
BeginSetUpStage | — | void | Starts the stage’s setup sequence. Called by the Stage Manager after connecting. |
GetStageName | — | AZStd::string | Returns the configured stage name. |
GetStageNavMesh | — | AZ::EntityId | Returns the NavMesh entity reference for this stage. |
Notification Bus: StageDataNotificationBus
Connect to this bus for level-specific lifecycle events.
| Event | Parameters | Description |
|---|
OnLoadStageComplete | — | Broadcast when this stage’s activation sequence has finished. |
OnBeginSetUpStage | — | Broadcast when the stage setup begins. |
OnTearDownStage | — | Broadcast when the stage is being unloaded. Use for level-specific cleanup. |
ActivateByPriority | int priority | Broadcast for each priority layer during staged activation. Entities at this priority level should activate. |
Local / Virtual Methods
These methods are available when extending the Stage Data component.
| Method | Returns | Description |
|---|
SetUpStage() | bool | Runs the stage’s initial setup. Override to add custom startup logic. Returns true when setup is complete. |
BeginLoadStage() | void | Called when the stage begins loading. Override for custom load-start behavior. |
LoadStageComplete() | void | Called when loading is complete. Override for custom post-load behavior. |
Usage Examples
Listening for Stage Events in a Level Component
#include <GS_Core/GS_CoreBus.h>

class MyLevelController
    : public AZ::Component
    , protected GS_Core::StageDataNotificationBus::Handler
{
protected:
    void Activate() override
    {
        GS_Core::StageDataNotificationBus::Handler::BusConnect();
    }

    void Deactivate() override
    {
        GS_Core::StageDataNotificationBus::Handler::BusDisconnect();
    }

    void OnBeginSetUpStage() override
    {
        // Level setup is starting — initialize level-specific systems
    }

    void OnLoadStageComplete() override
    {
        // Level is fully ready — spawn enemies, start ambient audio, etc.
    }

    void OnTearDownStage() override
    {
        // Level is being unloaded — clean up level-specific resources
    }
};
Priority-Based Activation
#include <GS_Core/GS_CoreBus.h>

class MyPriorityActivator
    : public AZ::Component
    , protected GS_Core::StageDataNotificationBus::Handler
{
    int m_myPriority = 2; // Activate during priority layer 2

protected:
    void Activate() override
    {
        GS_Core::StageDataNotificationBus::Handler::BusConnect();
    }

    void Deactivate() override
    {
        GS_Core::StageDataNotificationBus::Handler::BusDisconnect();
    }

    void ActivateByPriority(int priority) override
    {
        if (priority == m_myPriority)
        {
            // This is our turn — initialize heavy resources
            // (procedural generation, AI setup, physics volumes, etc.)
        }
    }
};
Script Canvas
Getting stage name and NavMesh reference:
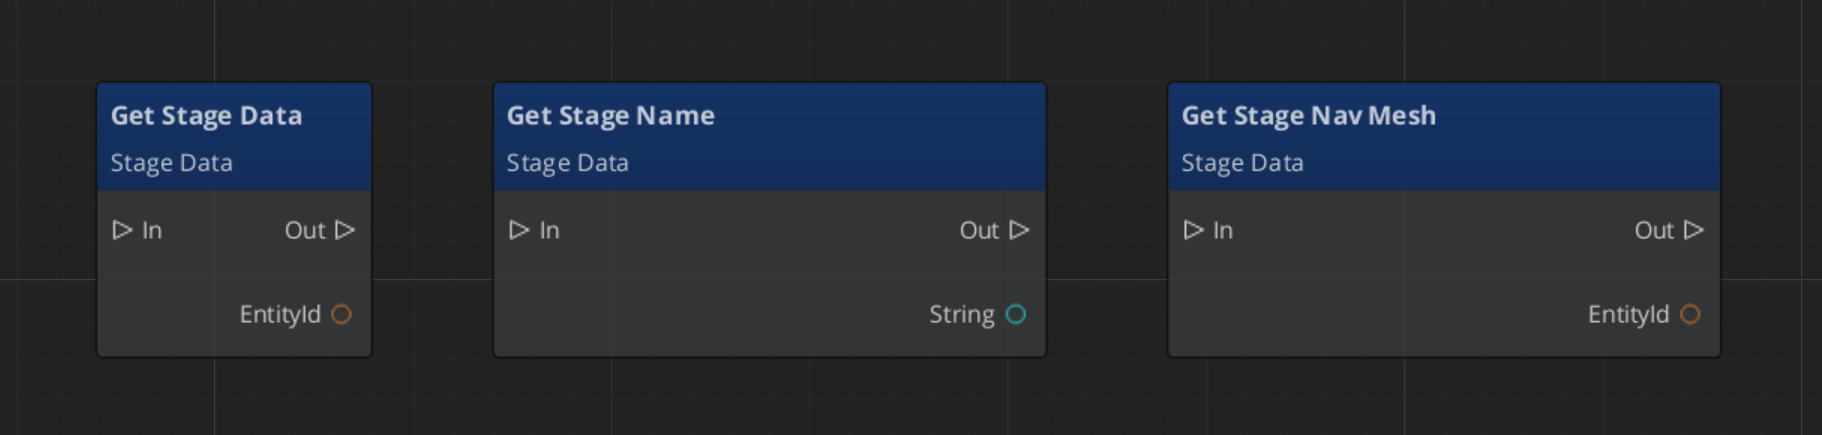
Extending the Stage Data Component
Extend Stage Data when you need custom level startup sequences, procedural generation hooks, or level-specific configuration.
#pragma once
#include <Source/StageManager/GS_StageDataComponent.h>

namespace MyProject
{
    class MyStageDataComponent
        : public GS_Core::GS_StageDataComponent
    {
    public:
        AZ_COMPONENT_DECL(MyStageDataComponent);

        static void Reflect(AZ::ReflectContext* context);

    protected:
        // Override to add custom stage setup
        bool SetUpStage() override;
        void LoadStageComplete() override;

    private:
        bool m_enableProceduralContent = false;
    };
}
Implementation (.cpp)
#include "MyStageDataComponent.h"
#include <AzCore/Serialization/SerializeContext.h>

namespace MyProject
{
    AZ_COMPONENT_IMPL(MyStageDataComponent, "MyStageDataComponent", "{YOUR-UUID-HERE}",
        GS_Core::GS_StageDataComponent);

    void MyStageDataComponent::Reflect(AZ::ReflectContext* context)
    {
        if (auto serializeContext = azrtti_cast<AZ::SerializeContext*>(context))
        {
            serializeContext->Class<MyStageDataComponent, GS_Core::GS_StageDataComponent>()
                ->Version(0)
                ->Field("EnableProceduralContent", &MyStageDataComponent::m_enableProceduralContent);

            if (AZ::EditContext* editContext = serializeContext->GetEditContext())
            {
                editContext->Class<MyStageDataComponent>(
                    "My Stage Data", "Custom stage data with procedural generation support")
                    ->ClassElement(AZ::Edit::ClassElements::EditorData, "")
                        ->Attribute(AZ::Edit::Attributes::Category, "MyProject")
                        ->Attribute(AZ::Edit::Attributes::AppearsInAddComponentMenu, AZ_CRC_CE("Game"))
                    ->DataElement(AZ::Edit::UIHandlers::Default,
                        &MyStageDataComponent::m_enableProceduralContent,
                        "Enable Procedural Content",
                        "Generate procedural content during stage setup");
            }
        }
    }

    bool MyStageDataComponent::SetUpStage()
    {
        if (m_enableProceduralContent)
        {
            // Run procedural generation for this level
            // ... your generation logic ...
        }

        // Call base to continue the standard setup sequence
        return GS_StageDataComponent::SetUpStage();
    }

    void MyStageDataComponent::LoadStageComplete()
    {
        // Custom post-load behavior
        // ... your logic ...

        GS_StageDataComponent::LoadStageComplete();
    }
}
Module Registration
m_descriptors.insert(m_descriptors.end(), {
    MyProject::MyStageDataComponent::CreateDescriptor(),
});
Use your custom Stage Data component in level prefabs instead of the default GS_StageDataComponent.
See Also
For component references:
For related resources:
Get GS_Core
GS_Core — Explore this gem on the product page and add it to your project.
1.4 - GS_Options
The configuration system — input profiles, input readers, and runtime settings management for gameplay and accessibility.
The Options system is the central pillar for handling background systemic configuration. At its simplest, it lets you set up user-facing options like volume, graphics settings, subtitles, and other standard configurable settings. Beyond that, it manages development-side functionality — language settings, current input device type, and other runtime-aware systems — providing that data to hook components throughout the game.
Currently, the Options system’s primary feature is the Input Profile system, which replaces O3DE’s raw input binding files with a more flexible, group-based approach that supports runtime rebinding and per-group enable/disable toggling.
For usage guides and setup examples, see The Basics: GS_Core.
Contents
Components
| Component | Purpose | Documentation |
|---|
| GS_OptionsManagerComponent | Singleton manager. Holds the active Input Profile and provides it to Input Readers. | Options Manager |
| GS_InputProfile | Data asset defining input groups, event mappings, and key bindings. Created in the Asset Editor. | Input Profiles |
| GS_InputReaderComponent | Reads input through the active profile and fires gameplay events. Can be extended for specialized input handling. | Input Options |
Quick Start
- Create an Options Manager prefab with the GS_OptionsManagerComponent.
- Create a GS_InputProfile data asset in the Asset Editor.
- Add input groups and event mappings to the profile.
- Assign the Input Profile to the Options Manager.
- Add the Options Manager
.spawnable to the Game Manager’s Startup Managers list. - Attach GS_InputReaderComponents to entities that need to process input.
See Also
For conceptual overviews and usage guides:
For component references:
For related resources:
Get GS_Core
GS_Core — Explore this gem on the product page and add it to your project.
1.4.1 - Options Manager
The singleton options controller — holds the active Input Profile and provides runtime configuration data to game systems.
For usage guides and setup examples, see The Basics: GS_Core.

Image showing the Options Manager component, as seen in the Entity Inspector.
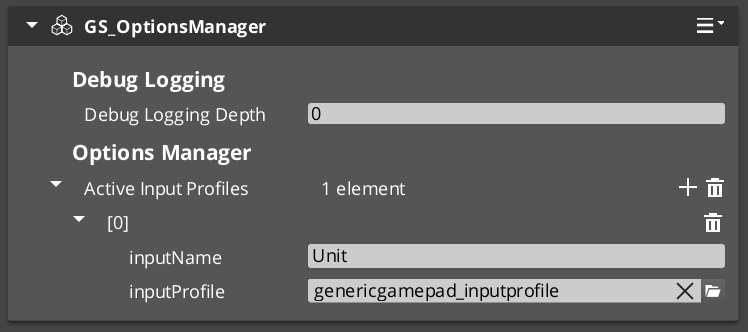
The Options Manager is the central anchor of the Options system. It holds the active Input Profile data asset and provides it to Input Readers and other game systems that need runtime configuration data.
As a Manager, it is spawned by the Game Manager and participates in the standard two-stage initialization lifecycle.
Contents
How It Works
- The Options Manager initializes during the Game Manager’s startup sequence.
- It loads the configured Input Profile data asset.
- Input Readers across the game query the Options Manager for the active profile via
OptionsManagerRequestBus. - The Options Manager responds to standby events — pausing and resuming input processing when the game enters or exits standby mode.
Setup
Image showing the Manager wrapper entity set as Editor-Only inside Prefab Edit Mode.
- Create an entity. Attach the GS_OptionsManagerComponent to it.
- Assign your Input Profile data asset.
- Turn the entity into a prefab.
- Enter prefab edit mode. Set the wrapper entity (parent) to Editor Only. Save.
- Delete the Options Manager entity from the level.
- In the Game Manager prefab, add the Options Manager
.spawnable to the Startup Managers list.
Inspector Properties
| Property | Type | Default | Description |
|---|
| Input Profile | AZ::Data::Asset<GS_InputProfile> | None | The active Input Profile data asset. Input Readers across the game will use this profile for event-to-binding mappings. |
API Reference
Request Bus: OptionsManagerRequestBus
Singleton bus — call via Broadcast.
| Method | Parameters | Returns | Description |
|---|
GetActiveInputProfile | — | AZ::Data::Asset<GS_InputProfile> | Returns the currently active Input Profile data asset. Called by Input Readers on activation. |
Lifecycle Events (from GameManagerNotificationBus)
| Event | Description |
|---|
OnStartupComplete | The Options Manager is fully ready. Input Readers can now query for the active profile. |
OnEnterStandby | Pause input processing. |
OnExitStandby | Resume input processing. |
Usage Examples
#include <GS_Core/GS_CoreBus.h>

AZ::Data::Asset<GS_Core::GS_InputProfile> profile;
GS_Core::OptionsManagerRequestBus::BroadcastResult(
    profile,
    &GS_Core::OptionsManagerRequestBus::Events::GetActiveInputProfile
);

if (profile.IsReady())
{
    // Use the profile to look up bindings, check group states, etc.
}
Extending the Options Manager
Extend the Options Manager when you need additional runtime settings (graphics quality, audio levels, accessibility), custom options persistence, or platform-specific configuration.
#pragma once
#include <Source/OptionsSystem/GS_OptionsManagerComponent.h>

namespace MyProject
{
    class MyOptionsManagerComponent
        : public GS_Core::GS_OptionsManagerComponent
    {
    public:
        AZ_COMPONENT_DECL(MyOptionsManagerComponent);

        static void Reflect(AZ::ReflectContext* context);

    protected:
        void OnStartupComplete() override;

    private:
        float m_masterVolume = 1.0f;
        int m_graphicsQuality = 2; // 0=Low, 1=Med, 2=High
    };
}
Implementation (.cpp)
#include "MyOptionsManagerComponent.h"
#include <AzCore/Serialization/SerializeContext.h>

namespace MyProject
{
    AZ_COMPONENT_IMPL(MyOptionsManagerComponent, "MyOptionsManagerComponent", "{YOUR-UUID-HERE}",
        GS_Core::GS_OptionsManagerComponent);

    void MyOptionsManagerComponent::Reflect(AZ::ReflectContext* context)
    {
        if (auto serializeContext = azrtti_cast<AZ::SerializeContext*>(context))
        {
            serializeContext->Class<MyOptionsManagerComponent, GS_Core::GS_OptionsManagerComponent>()
                ->Version(0)
                ->Field("MasterVolume", &MyOptionsManagerComponent::m_masterVolume)
                ->Field("GraphicsQuality", &MyOptionsManagerComponent::m_graphicsQuality);

            if (AZ::EditContext* editContext = serializeContext->GetEditContext())
            {
                editContext->Class<MyOptionsManagerComponent>(
                    "My Options Manager", "Extended options with audio and graphics settings")
                    ->ClassElement(AZ::Edit::ClassElements::EditorData, "")
                        ->Attribute(AZ::Edit::Attributes::Category, "MyProject")
                        ->Attribute(AZ::Edit::Attributes::AppearsInAddComponentMenu, AZ_CRC_CE("Game"))
                    ->DataElement(AZ::Edit::UIHandlers::Slider,
                        &MyOptionsManagerComponent::m_masterVolume, "Master Volume", "Global audio volume")
                        ->Attribute(AZ::Edit::Attributes::Min, 0.0f)
                        ->Attribute(AZ::Edit::Attributes::Max, 1.0f)
                    ->DataElement(AZ::Edit::UIHandlers::ComboBox,
                        &MyOptionsManagerComponent::m_graphicsQuality, "Graphics Quality", "Rendering quality preset");
            }
        }
    }

    void MyOptionsManagerComponent::OnStartupComplete()
    {
        // Apply saved options on startup
        // ... load from save system and apply settings ...

        GS_OptionsManagerComponent::OnStartupComplete();
    }
}
Module Registration
m_descriptors.insert(m_descriptors.end(), {
    MyProject::MyOptionsManagerComponent::CreateDescriptor(),
});
See Also
For component references:
Get GS_Core
GS_Core — Explore this gem on the product page and add it to your project.
1.4.2 - GS_InputOptions
The input subsystem — Input Profiles for grouped event-to-binding mappings and Input Readers for processing input in gameplay.
Input Options is the input subsystem within the Options system. It provides two core pieces:
- Input Profiles — Data assets that map input bindings to named events, organized into toggleable groups. These replace O3DE’s raw input binding files with a more flexible system that supports runtime rebinding and per-group enable/disable toggling.
- Input Readers — Components that read input through the active profile and fire gameplay events. They can be extended for specialized input handling (player controllers, UI navigation, etc.).
For usage guides and setup examples, see The Basics: GS_Core.
Contents
Architecture
GS_OptionsManagerComponent
  │
  └── Active GS_InputProfile (data asset)
        │
        ├── InputBindingGroup: "Movement"
        │     ├── EventInputMapping: "MoveForward" → [keyboard_key_alphanumeric_W]
        │     ├── EventInputMapping: "MoveBack"    → [keyboard_key_alphanumeric_S]
        │     └── EventInputMapping: "Sprint"      → [keyboard_key_modifier_shift_l]
        │
        ├── InputBindingGroup: "Combat"
        │     ├── EventInputMapping: "Attack"   → [mouse_button_left]
        │     └── EventInputMapping: "Block"    → [mouse_button_right]
        │
        └── InputBindingGroup: "UI"
              ├── EventInputMapping: "Confirm"  → [keyboard_key_alphanumeric_E]
              └── EventInputMapping: "Cancel"   → [keyboard_key_navigation_escape]

GS_InputReaderComponent (on player entity, UI entity, etc.)
  │
  ├── Queries OptionsManager for active profile
  ├── Listens for raw O3DE input events
  ├── Matches bindings → fires named events
  └── EnableInputGroup / DisableInputGroup for runtime control
Data assets that map key bindings to named events, organized into toggleable groups. They replace O3DE’s raw input binding files with a more flexible system that supports runtime rebinding and per-group enable/disable toggling.
| Asset / Type | Purpose |
|---|
| GS_InputProfile | Data asset defining input groups, event mappings, and key bindings. |
| InputBindingGroup | Named group of event mappings — can be toggled at runtime. |
| EventInputMapping | Maps a named event to one or more raw O3DE input bindings. |
Input Profiles API
Components that read input through the active profile and fire named gameplay events. Supports runtime group toggling to enable or disable input categories on the fly, and a claim flag to absorb matched events from other readers.
| Component | Purpose |
|---|
| GS_InputReaderComponent | Per-entity input processor. Queries the active profile, matches raw input, and fires named gameplay events. |
Input Reader API
Setup
- Create a GS_InputProfile data asset in the Asset Editor.
- Add input groups and event mappings to the profile.
- Assign the profile to the Options Manager.
- Attach a GS_InputReaderComponent to any entity that needs to process input.
- The Input Reader automatically queries the Options Manager for the active profile on activation.
See Also
For component references:
For related resources:
Get GS_Core
GS_Core — Explore this gem on the product page and add it to your project.
1.4.2.1 - Input Profiles
Data assets for input binding configuration — map key bindings to named events, organized into toggleable groups for advanced runtime input control.
Input Profiles are data assets that map key bindings to named events, organized into groups that can be enabled and disabled at runtime. They replace O3DE’s raw input binding files with a more flexible system that supports runtime rebinding, per-group toggling, and options menu customization.
For usage guides and setup examples, see The Basics: GS_Core.
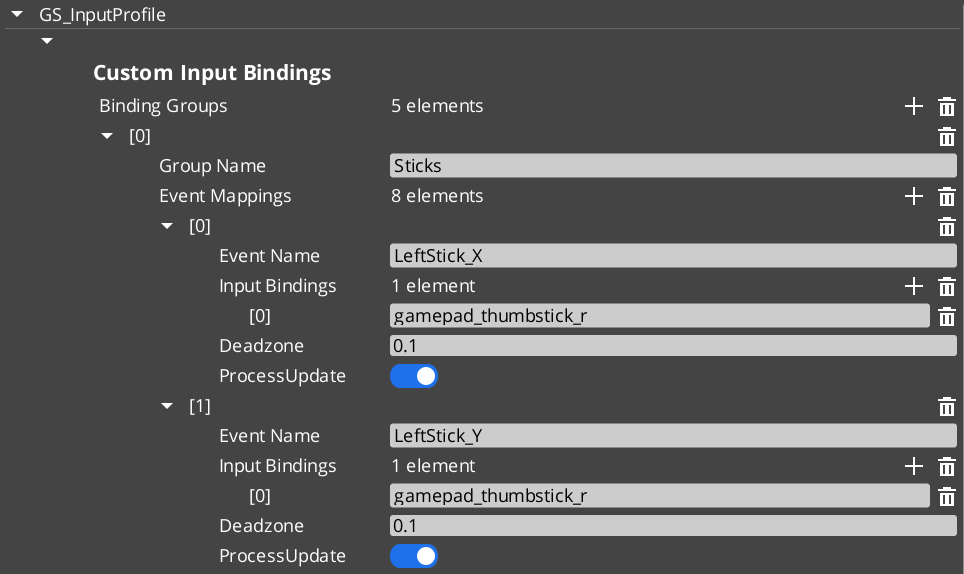
Contents
How It Works
An Input Profile contains a list of InputBindingGroups. Each group contains EventInputMappings that define the relationship between a named event, its key bindings, and processing options.
Data Structure
GS_InputProfile
  └── InputBindingGroups[]
        ├── groupName: "Movement"
        └── eventMappings[]
              ├── EventInputMapping
              │     ├── eventName: "MoveForward"
              │     ├── inputBindings: ["keyboard_key_alphanumeric_W"]
              │     ├── deadzone: 0.0
              │     └── processUpdate: true
              └── EventInputMapping
                    ├── eventName: "Jump"
                    ├── inputBindings: ["keyboard_key_alphanumeric_Space"]
                    ├── deadzone: 0.0
                    └── processUpdate: false
| Field | Type | Description |
|---|
eventName | AZStd::string | The name used to fire this event in gameplay through Input Readers. This is the identifier your gameplay code listens for. |
inputBindings | AZStd::vector<AZStd::string> | One or more raw O3DE input binding names (e.g., keyboard_key_alphanumeric_W, mouse_button_left, gamepad_button_a). Multiple bindings allow the same event to fire from different input sources. |
deadzone | float | Dead zone threshold for analog inputs (joysticks, triggers). Values below this threshold are treated as zero. Set to 0.0 for digital inputs (keys, buttons). |
processUpdate | bool | When true, the event fires continuously while the input is held. When false, the event fires only on initial press and release. Use true for movement and camera input; false for discrete actions like jumping or interacting. |
TypeId: {61421EC2-7B99-4EF2-9C56-2A7F41ED3474}
Reflection: GS_InputProfile extends AZ::Data::AssetData. Its Reflect() function requires GS_AssetReflectionIncludes.h — see Serialization Helpers.
| Field | Type | Description |
|---|
groupName | AZStd::string | Name of the group (e.g., “Movement”, “Combat”, “UI”). Used by Input Readers to enable/disable groups at runtime. |
eventMappings | AZStd::vector<EventInputMapping> | The event mappings belonging to this group. |
TypeId: {37E880D1-9AB4-4E10-9C3C-020B5C32F75B}
For initial startup instructions refer to the Core Set Up Guide.
- In the Asset Editor, open the New menu and select GS_InputProfile. This creates a blank Input Profile.
- Add Input Groups — Create groups that cluster related input events (e.g., “Movement”, “Combat”, “UI”). Groups can be toggled on/off at runtime by Input Readers.
- Add Event Mappings — Within each group, add EventInputMappings. Set the Event Name to the identifier your gameplay code will listen for.
- Set Bindings — Add the raw O3DE input bindings that should trigger each event. These are standard O3DE raw mapping names.
- Configure Deadzone — For gamepad joystick or trigger inputs, set an appropriate deadzone value (e.g.,
0.15). Leave at 0.0 for keyboard and mouse inputs. - Set Process Update — Enable for continuous input (movement, camera look). Disable for discrete actions (jump, interact, attack).
- Assign to Options Manager — Add the profile to the Options Manager’s Input Profile property.
API Reference
These methods are available on the GS_InputProfile data asset class for runtime binding queries and modifications.
| Method | Parameters | Returns | Description |
|---|
GetMappingFromBinding | const AZStd::string& binding, const AZStd::string& groupName = "" | const EventInputMapping* | Looks up the event mapping associated with a raw binding. Optionally restrict the search to a specific group. Returns nullptr if not found. |
GetGroupNameFromBinding | const AZStd::string& binding | const AZStd::string* | Returns the group name that contains the given binding. Returns nullptr if not found. |
HasBinding | const AZStd::string& binding | bool | Returns true if the binding exists anywhere in the profile. |
ReplaceEventInputBinding | const AZStd::string& eventName, const AZStd::string& newBinding | bool | Replaces the existing binding for the named event with a new one. For runtime rebinding in options menus. Returns true on success. |
AddEventInputBinding | const AZStd::string& eventName, const AZStd::string& newBinding | bool | Adds an additional binding to the named event. Returns true on success. |
RemoveEventBinding | const AZStd::string& eventName, const AZStd::string& bindingToRemove | bool | Removes a specific binding from the named event. Returns true on success. |
Usage Examples
Runtime Rebinding (Options Menu)
#include <GS_Core/GS_CoreBus.h>

// Get the active input profile
AZ::Data::Asset<GS_Core::GS_InputProfile> profile;
GS_Core::OptionsManagerRequestBus::BroadcastResult(
    profile,
    &GS_Core::OptionsManagerRequestBus::Events::GetActiveInputProfile
);

if (profile.IsReady())
{
    // Rebind the "Jump" event from Space to E
    profile.Get()->ReplaceEventInputBinding(
        "Jump",
        "keyboard_key_alphanumeric_E"
    );

    // Add an alternative binding (gamepad A button)
    profile.Get()->AddEventInputBinding(
        "Jump",
        "gamepad_button_a"
    );
}
Checking if a Binding Exists
if (profile.IsReady() && profile.Get()->HasBinding("keyboard_key_alphanumeric_W"))
{
    // This binding is mapped to an event in the profile
}
See Also
For component references:
For related resources:
Get GS_Core
GS_Core — Explore this gem on the product page and add it to your project.
1.4.2.2 - Input Reader
Component that reads input through the active profile and fires named gameplay events, with runtime group toggling and input claiming.
The Input Reader component sits on any entity that needs to process input. It queries the Options Manager for the active Input Profile, then listens for raw O3DE input events and matches them against the profile’s bindings to fire named gameplay events.
For usage guides and setup examples, see The Basics: GS_Core.
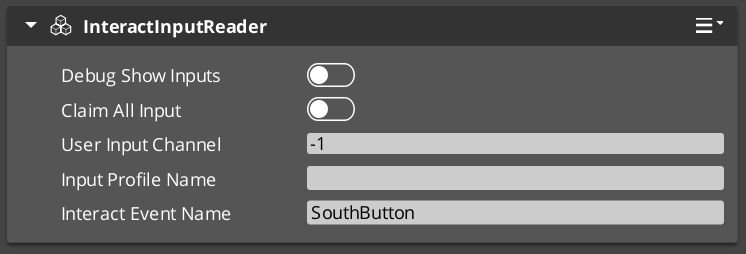
Contents
How It Works
On activation the Input Reader queries the Options Manager for the active Input Profile and subscribes to raw O3DE input events. Each frame it matches incoming raw input against the profile bindings. When a match is found it fires the associated named event into the gameplay event system. Input groups can be enabled or disabled at runtime to control which events are active at any moment.
Key Features
- Group toggling — Enable or disable entire input groups at runtime. For example, disable “Combat” inputs during a dialogue sequence, or disable “Movement” inputs during a cutscene.
- Claim input — The
ClaimAllInput flag causes the reader to absorb matched input events, preventing them from reaching other readers. Useful for layered input (e.g., UI absorbs input before gameplay). - Extensible — Extend the Input Reader for specialized input handling. GS_Play uses this internally for player controller input and UI navigation input.
API Reference
GS_InputReaderComponent
| Field | Value |
|---|
| Header | GS_Core/GS_CoreBus.h |
Request Bus: InputReaderRequestBus
Entity-addressed bus – call via Event(entityId, ...).
| Method | Parameters | Returns | Description |
|---|
EnableInputGroup | const AZStd::string& groupName | void | Enables a named input group for this reader. Events in this group will fire on matched input. |
DisableInputGroup | const AZStd::string& groupName | void | Disables a named input group. Events in this group will be ignored until re-enabled. |
IsGroupDisabled | const AZStd::string& groupName | bool | Returns true if the named group is currently disabled. |
Usage Examples
Toggling Input Groups
#include <GS_Core/GS_CoreBus.h>

// Disable combat inputs during dialogue
GS_Core::InputReaderRequestBus::Event(
    playerEntityId,
    &GS_Core::InputReaderRequestBus::Events::DisableInputGroup,
    AZStd::string("Combat")
);

// Re-enable when dialogue ends
GS_Core::InputReaderRequestBus::Event(
    playerEntityId,
    &GS_Core::InputReaderRequestBus::Events::EnableInputGroup,
    AZStd::string("Combat")
);
Script Canvas
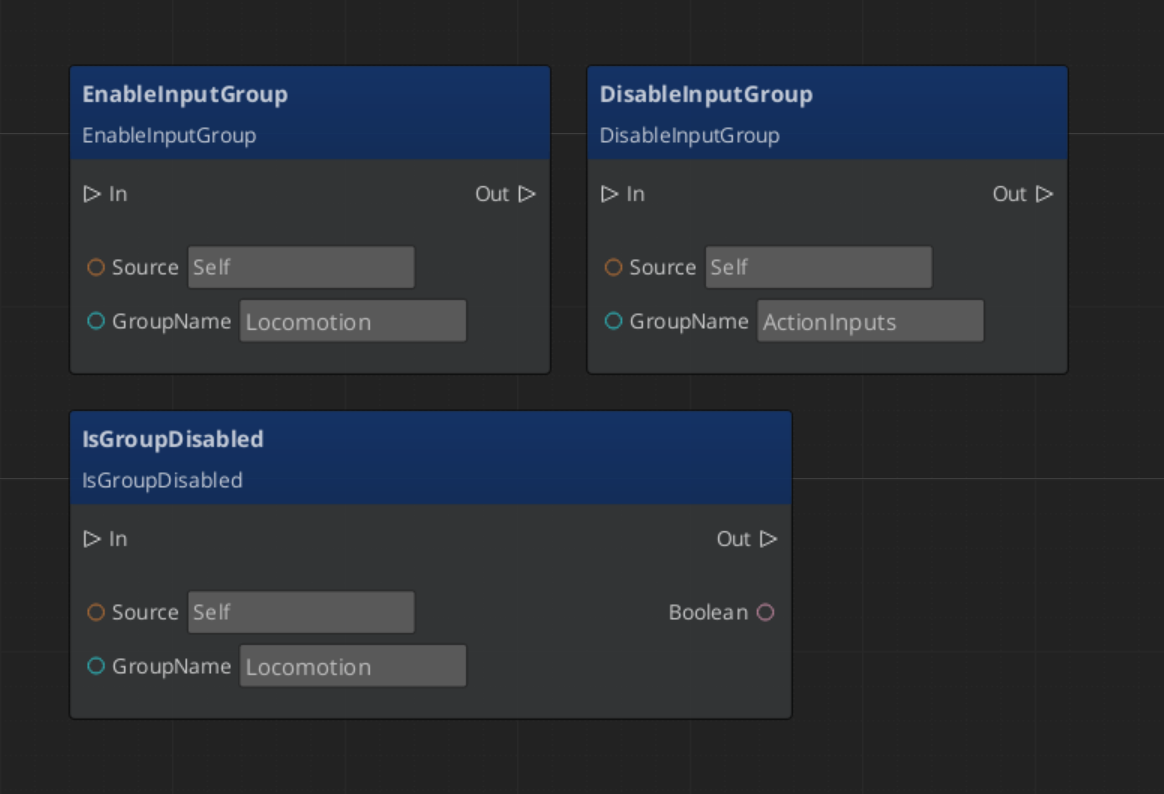
See Also
For component references:
For related resources:
Get GS_Core
GS_Core — Explore this gem on the product page and add it to your project.
1.5 - Systems
Core framework systems — the GS_Motion track-based animation engine and the GS_Actions triggerable behavior system.
For usage guides and setup examples, see The Basics: GS_Core.
Contents
GS_Motion
The track-based animation and tween engine. GS_Motion defines abstract base classes for tracks, assets, composites, and proxies. Domain gems (GS_UI, GS_Juice) extend it with concrete track types and custom asset formats. The system handles playback timing, per-track easing, proxy-based entity targeting, and deep-copy runtime instancing.
GS_Motion
API
See Also
For conceptual overviews and usage guides:
For related resources:
Get GS_Core
GS_Core — Explore this gem on the product page and add it to your project.
1.5.1 - GS_Motion
Track-based animation and tween system — abstract base classes for motions, tracks, composites, assets, and proxies with a domain extension pattern.
GS_Motion is the framework’s central track-based animation system. It defines abstract base classes that domain gems extend with concrete track types — GS_UI extends it with 8 UI animation tracks (.uiam assets), and GS_Juice extends it with 2 feedback tracks (.feedbackmotion assets). The system handles playback timing, per-track easing, proxy-based entity targeting, and deep-copy runtime instancing from data assets.
For usage guides and setup examples, see The Basics: GS_Core.
Contents
Architecture
GS_MotionTrack (abstract base)
    ├── UiMotionTrack (GS_UI domain base)
    │       ├── UiPositionTrack
    │       ├── UiScaleTrack
    │       ├── UiRotationTrack
    │       ├── UiElementAlphaTrack
    │       ├── UiImageAlphaTrack
    │       ├── UiImageColorTrack
    │       ├── UiTextColorTrack
    │       └── UiTextSizeTrack
    └── FeedbackMotionTrack (GS_Juice domain base)
            ├── FeedbackTransformTrack
            └── FeedbackMaterialTrack

GS_MotionAsset (abstract base)
    ├── UiAnimationMotionAsset (.uiam)
    └── FeedbackMotionAsset (.feedbackmotion)

GS_MotionComposite (runtime instance)
    └── Created by asset's CreateRuntimeComposite()
Core Classes
| Class | Description | Page |
|---|
| GS_MotionTrack | Abstract base for all animation tracks — fields, lifecycle, virtual methods, extension guide. | MotionTrack |
| GS_Motion | Playback engine — ticks tracks, computes per-track progress windows, applies easing, manages lifecycle. | Motion Engine |
| GS_MotionComposite | Runtime deep-copy instance with proxy entity overrides — created from GS_MotionAsset. | MotionComposite |
| GS_MotionAsset | Abstract base for motion data assets — holds track definitions and creates runtime composites. | MotionAsset |
| GS_MotionProxy | Serialized struct for track-to-entity redirection — allows designers to target named tracks at different entities. | MotionProxy |
Domain Extensions
GS_Motion is designed to be extended by domain gems. Each domain creates its own track hierarchy, asset type, and file extension.
| Domain | Gem | Base Track | Concrete Tracks | Asset Extension |
|---|
| UI Animation | GS_UI | UiMotionTrack | Position, Scale, Rotation, ElementAlpha, ImageAlpha, ImageColor, TextColor, TextSize (8) | .uiam |
| Feedback | GS_Juice | FeedbackMotionTrack | FeedbackTransformTrack, FeedbackMaterialTrack (2) | .feedbackmotion |
Extension Pattern
To create a new motion domain:
- Create a domain base track —
class MyTrack : public GS_Core::GS_MotionTrack - Create concrete tracks extending the domain base — each overrides
Update(float easedProgress) and GetTypeName() - Create a domain asset —
class MyAsset : public GS_Core::GS_MotionAsset with vector<MyTrack*> m_tracks - Create an instance wrapper struct (not a component) — holds
Asset<MyAsset> + vector<GS_MotionProxy>, manages Initialize / Unload / Play / Stop - Embed the wrapper — components embed the instance wrapper struct as a serialized field
Critical: All track vectors must use raw pointers: vector<MyTrack*>. Never use unique_ptr — O3DE SerializeContext requires raw pointers for polymorphic enumeration in the asset editor.
See Also
For conceptual overviews and usage guides:
For class references:
For domain extensions:
Get GS_Core
GS_Core — Explore this gem on the product page and add it to your project.
1.5.1.1 - GS_MotionTrack
Abstract base class for all animation tracks — fields, lifecycle, and virtual methods for domain extension.
GS_MotionTrack is the abstract base class for all animation tracks in the GS_Motion system. Each track animates one aspect of an entity over a time window within a motion. Domain gems extend this with concrete track types — GS_UI provides 8 LyShine tracks, GS_Juice provides 2 feedback tracks.
For usage guides and setup examples, see The Basics: GS_Core.
Fields
| Field | Type | Description |
|---|
| m_id | AZ::Uuid | Unique track identifier (auto-generated). |
| m_identifier | AZStd::string | Proxy label — if set, the track appears in the proxy list for entity override targeting. |
| curveType | CurveType | Easing curve applied to track progress (from the Curves utility library). |
| startTime | float | Time offset before the track begins playing (seconds). |
| duration | float | Track playback duration (seconds). |
| startVarianceMin | float | Minimum random variance added to start time. |
| startVarianceMax | float | Maximum random variance added to start time. |
Lifecycle
Each track goes through a fixed lifecycle managed by the parent GS_Motion:
| Phase | Method | Description |
|---|
| Initialize | Init(AZ::EntityId owner) | Stores the owner entity. Called once when the motion is initialized. |
| Start | Start() | Called when the track’s time window begins. |
| Update | Update(float easedProgress) | Called each frame with eased progress (0 → 1). Override this in concrete tracks. |
| End | End() | Called when the track’s time window completes. |
| Unload | Unload() | Cleanup. Called when the motion is unloaded. |
Virtual Methods
These methods must be overridden in concrete track implementations:
| Method | Returns | Description |
|---|
Update(float easedProgress) | void | Apply the animation at the given eased progress value (0 → 1). |
GetTypeName() | AZStd::string | Return the track’s display name for proxy labels in the editor. |
Extension Guide
To create a new domain of animation tracks:
- Create a domain base track:
class MyTrack : public GS_Core::GS_MotionTrack — this serves as the common base for all tracks in your domain. - Create concrete tracks extending the domain base — each overrides
Update(float easedProgress) to animate a specific property. - Reflect the track class using O3DE’s
SerializeContext and EditContext. The system discovers the new type automatically.
Critical: Track vectors must use raw pointers (vector<MyTrack*>). Never use unique_ptr — O3DE SerializeContext requires raw pointers for polymorphic enumeration in the asset editor.
See Also
Get GS_Core
GS_Core — Explore this gem on the product page and add it to your project.
1.5.1.2 - GS_Motion
The playback engine — ticks through tracks, computes per-track progress windows, and manages motion lifecycle.
GS_Motion is the playback engine that drives animation tracks. It ticks through all tracks each frame, computes per-track progress windows based on start time and duration, applies easing curves, and calls Update(easedProgress) on each active track. It handles motion lifecycle from initialization through completion.
For usage guides and setup examples, see The Basics: GS_Core.
API Reference
| Method | Parameters | Returns | Description |
|---|
Play | — | void | Begin playback from the start. |
PlayWithCallback | AZStd::function<void()> cb | void | Play and invoke callback on completion. |
Stop | — | void | Stop playback immediately. |
Initialize | AZ::EntityId owner | void | Initialize all tracks with the owner entity. |
Unload | — | void | Unload all tracks and clean up. |
Fields
| Field | Type | Description |
|---|
| motionName | AZStd::string | Display name for the motion. |
| tracks | vector<GS_MotionTrack*> | The tracks in this motion. |
| loop | bool | Whether playback loops. |
| onComplete | function<void()> | Completion callback (set via PlayWithCallback). |
How It Works
Each frame during playback:
- The motion calculates the global elapsed time.
- For each track, it computes the track-local progress based on
startTime and duration. - If the track is within its active window, the progress is eased using the track’s
curveType. Update(easedProgress) is called on the track with the eased value (0 → 1).- When all tracks complete,
OnMotionComplete() is called.
Virtual Methods
| Method | Description |
|---|
OnMotionComplete | Called when playback finishes. Override in subclasses for custom teardown. |
See Also
Get GS_Core
GS_Core — Explore this gem on the product page and add it to your project.
1.5.1.3 - GS_MotionComposite
Runtime deep-copy motion instance with proxy entity overrides — created from GS_MotionAsset for per-entity playback.
GS_MotionComposite is the runtime instance of a motion, created from a GS_MotionAsset. It deep-copies all tracks so each entity gets independent playback state, and applies proxy overrides to redirect specific tracks to different entities in the hierarchy.
For usage guides and setup examples, see The Basics: GS_Core.
GS_MotionComposite extends GS_Motion. When an asset’s CreateRuntimeComposite() is called, all tracks are SC-cloned (serialization-context cloned) into a new composite instance. This ensures each entity playing the same motion has its own independent track state — no shared mutation.
API Reference
| Method | Parameters | Returns | Description |
|---|
ApplyProxies | AZ::EntityId owner, vector<GS_MotionProxy> proxies | void | Matches proxy trackIds to tracks and overrides the target entity for each matched track. |
How It Works
- Creation:
GS_MotionAsset::CreateRuntimeComposite() deep-copies all asset tracks into a new composite. - Proxy Application:
ApplyProxies() walks the proxy list, matching each proxy’s m_trackId to a track’s m_id. Matched tracks redirect their owner entity to the proxy’s m_proxyEntity. - Playback: The composite plays exactly like a regular GS_Motion — it ticks tracks, applies easing, and calls
Update(). - Cleanup: On
Unload(), the composite cleans up all deep-copied tracks.
See Also
Get GS_Core
GS_Core — Explore this gem on the product page and add it to your project.
1.5.1.4 - GS_MotionAsset
Abstract base for motion data assets — holds track definitions and creates runtime composites.
GS_MotionAsset is the abstract base class for motion data assets. Domain gems extend this with their own asset type and file extension — GS_UI creates UiAnimationMotionAsset (.uiam), GS_Juice creates FeedbackMotionAsset (.feedbackmotion). Assets are created and edited in the O3DE Asset Editor.
Extends AZ::Data::AssetData. All subclasses require GS_AssetReflectionIncludes.h in their header — see Serialization Helpers.
For usage guides and setup examples, see The Basics: GS_Core.
API Reference
| Method | Returns | Description |
|---|
GetTrackInfos | vector<GS_TrackInfo> | Returns track UUID + label pairs for proxy list synchronization in the editor. |
CreateRuntimeComposite | GS_MotionComposite* | Factory — deep-copies all asset tracks into a new runtime GS_MotionComposite instance. |
GS_TrackInfo
Lightweight struct used for proxy synchronization between asset tracks and instance proxy lists.
| Field | Type | Description |
|---|
| id | AZ::Uuid | Track identifier (matches the track’s m_id). |
| label | AZStd::string | Track display name (from GetTypeName()). |
Domain Extensions
| Domain | Gem | Asset Class | Extension | Tracks |
|---|
| UI Animation | GS_UI | UiAnimationMotionAsset | .uiam | 8 LyShine-specific tracks |
| Feedback | GS_Juice | FeedbackMotionAsset | .feedbackmotion | 2 feedback tracks |
Extension Guide
To create a new domain asset type:
- Create
class MyAsset : public GS_Core::GS_MotionAsset with vector<MyDomainTrack*> m_tracks. Include GS_AssetReflectionIncludes.h in your asset’s header — see Serialization Helpers. - Implement
GetTrackInfos() — iterate tracks and return UUID + label pairs. - Implement
CreateRuntimeComposite() — deep-copy tracks into a new GS_MotionComposite. - Register the asset type in your gem’s
DataAssetsSystemComponent. - Add a
.setreg entry for the asset processor to recognize your file extension.
Critical: Track vectors must use raw pointers (vector<MyTrack*>). O3DE SerializeContext requires raw pointers for polymorphic enumeration.
See Also
Get GS_Core
GS_Core — Explore this gem on the product page and add it to your project.
1.5.1.5 - GS_MotionProxy
Serialized struct for track-to-entity redirection — allows designers to target named tracks at different entities.
GS_MotionProxy is a serialized struct that allows designers to redirect a named track to a different entity in the hierarchy. This enables a single motion asset to animate multiple entities — for example, a UI animation that moves one element while fading another.
For usage guides and setup examples, see The Basics: GS_Core.
Fields
| Field | Type | Description |
|---|
| m_trackId | AZ::Uuid | References the track’s m_id. Matched during ApplyProxies(). |
| m_label | AZStd::string | Read-only display label (synced from track info at edit time via GetTrackInfos()). |
| m_proxyEntity | AZ::EntityId | The entity this track should target instead of the motion’s owner entity. |
How It Works
- Edit time: The proxy list syncs from the asset’s track info. Each track with an
m_identifier (non-empty label) appears as a proxy slot in the inspector. - Designer assignment: The designer drags an entity reference into the proxy’s
m_proxyEntity field. - Runtime: When
GS_MotionComposite::ApplyProxies() runs, it matches each proxy’s m_trackId to a track’s m_id and overrides that track’s target entity. - Playback: The track now animates the proxy entity instead of the motion’s owner.
Usage
Proxies are embedded in instance wrapper structs (e.g., UiAnimationMotion, FeedbackMotion) alongside the asset reference. Components serialize the proxy list, and the wrapper handles synchronization with the asset.
Only tracks with a non-empty m_identifier appear in the proxy list. Tracks without an identifier always animate the owner entity.
See Also
Get GS_Core
GS_Core — Explore this gem on the product page and add it to your project.
1.5.2 - GS_Actions
A utility system for triggerable single-purpose actions — fire discrete behaviors from any system without recoding logic for each component.
The Actions system provides a simple, universal pattern for triggering discrete behaviors. Instead of recoding common functionality (toggle cursor, play sound, print log) into every component that needs it, you attach Action components to an entity and fire them by channel name.
Actions support chaining — when one action completes, it can fire another action on a different channel, enabling lightweight sequences without custom code.
For usage guides and setup examples, see The Basics: GS_Core.
Architecture
Entity with Actions
  │
  ├── ToggleMouseCursor_GSAction (channel: "enter_menu")
  ├── PlaySound_GSAction           (channel: "enter_menu")
  └── PrintLog_GSAction            (channel: "debug")

Any system calls:
  ActionRequestBus::Event(entityId, DoAction, "enter_menu")
    → Both ToggleMouseCursor and PlaySound fire (matching channel)
    → PrintLog does NOT fire (different channel)
Components
| Component | Purpose | Documentation |
|---|
| GS_ActionComponent | Base class for all actions. Handles channel matching, completion broadcasting, and action chaining. | Action |
| ToggleMouseCursor_GSActionComponent | Toggles the mouse cursor on or off. | Core Actions |
| PrintLog_GSActionComponent | Prints a message to the console log. | Core Actions |
Quick Start
- Attach one or more Action components to an entity.
- Set the Channel on each action to control when it fires.
- From any system, call
DoAction(channelName) on the entity’s ActionRequestBus to trigger matching actions. - Optionally enable Broadcast On Complete and set an On Complete Channel Chain for action sequencing.
See Also
Get GS_Core
GS_Core — Explore this gem on the product page and add it to your project.
1.5.2.1 - Action
The base class for triggerable actions — channel-based firing, completion broadcasting, and action chaining for lightweight behavior sequencing.
GS_ActionComponent is the base class for all triggerable actions. Actions are single-purpose behaviors that fire when their channel matches an incoming DoAction call. They support completion broadcasting and optional chaining to sequence multiple actions together.
Every GS_Play action (Toggle Mouse Cursor, Print Log, and actions from other gems) extends this class. When you need a custom action, you extend it too.
For usage guides and setup examples, see The Basics: GS_Core.
Contents
How It Works
Firing an Action
- A system calls
DoAction(targetChannel) on an entity’s ActionRequestBus. - Every Action component on that entity evaluates whether its channel matches the
targetChannel. - Matching actions call
ProcessAction() to execute their behavior. - When done,
CompleteAction() handles completion:- If Broadcast On Complete is enabled, it fires
OnActionComplete on the ActionNotificationBus. - If On Complete Channel Chain is set, it fires a new
DoAction with that channel name, triggering the next action in the chain.
Chaining Actions
By setting the On Complete Channel Chain to a different channel name, an action can trigger the next step in a sequence when it completes. This enables lightweight behavior chains without custom sequencing code.
Action A (channel: "step1", onCompleteChain: "step2")
  → fires → Action B (channel: "step2", onCompleteChain: "step3")
    → fires → Action C (channel: "step3")
Important: Every custom action must call CompleteAction() when its work is done. If you forget, the action will never complete and chains will break.
Inspector Properties
| Property | Type | Default | Description |
|---|
| Channel | AZStd::string | "" | The channel this action responds to. Only DoAction calls with a matching channel will trigger this action. |
| Broadcast On Complete | bool | false | When enabled, broadcasts OnActionComplete on the ActionNotificationBus when this action finishes. |
| On Complete Channel Chain | AZStd::string | "" | When non-empty, fires a new DoAction with this channel name after completing. Enables action chaining. |
API Reference
Request Bus: ActionRequestBus
Entity-addressed bus — call via Event(entityId, ...).
| Method | Parameters | Returns | Description |
|---|
DoAction | AZStd::string targetChannel | void | Triggers all actions on the target entity whose channel matches targetChannel. |
Notification Bus: ActionNotificationBus
Entity-addressed bus — connect via BusConnect(entityId).
| Event | Parameters | Description |
|---|
OnActionComplete | — | Broadcast when an action with Broadcast On Complete enabled finishes its work. |
Local / Virtual Methods
Override these when creating custom actions.
| Method | Description |
|---|
DoAction(targetChannel) | Evaluates whether this action should fire. Default compares channel to targetChannel. Override for custom evaluation logic. |
ProcessAction() | Your primary override. Executes the action’s behavior. Called when channel evaluation passes. |
CompleteAction() | Handles completion. Default checks broadcastOnComplete, fires OnActionComplete, then checks onCompleteChannelChain for chaining. Override to add custom completion logic, but always call base or handle chaining manually. |
Usage Examples
Firing Actions on an Entity
#include <GS_Core/GS_CoreBus.h>

// Fire all actions on this entity that match the "open_door" channel
GS_Core::ActionRequestBus::Event(
    targetEntityId,
    &GS_Core::ActionRequestBus::Events::DoAction,
    AZStd::string("open_door")
);
Listening for Action Completion
#include <GS_Core/GS_CoreBus.h>

class MyActionListener
    : public AZ::Component
    , protected GS_Core::ActionNotificationBus::Handler
{
protected:
    void Activate() override
    {
        // Listen for action completions on a specific entity
        GS_Core::ActionNotificationBus::Handler::BusConnect(m_targetEntityId);
    }

    void Deactivate() override
    {
        GS_Core::ActionNotificationBus::Handler::BusDisconnect();
    }

    void OnActionComplete() override
    {
        // An action on the target entity has completed
        // React accordingly (advance dialogue, open next door, etc.)
    }

private:
    AZ::EntityId m_targetEntityId;
};
Extending the Action Class
Create a custom action whenever you need a reusable, triggerable behavior that can be attached to any entity.
#pragma once
#include <Source/ActionSystem/GS_ActionComponent.h>

namespace MyProject
{
    class PlayEffect_GSActionComponent
        : public GS_Core::GS_ActionComponent
    {
    public:
        AZ_COMPONENT_DECL(PlayEffect_GSActionComponent);

        static void Reflect(AZ::ReflectContext* context);

    protected:
        // Action overrides
        void ProcessAction() override;
        void CompleteAction() override;

    private:
        AZStd::string m_effectName;
        float m_duration = 1.0f;
    };
}
Implementation (.cpp)
#include "PlayEffect_GSActionComponent.h"
#include <AzCore/Serialization/SerializeContext.h>

namespace MyProject
{
    AZ_COMPONENT_IMPL(PlayEffect_GSActionComponent, "PlayEffect_GSActionComponent", "{YOUR-UUID-HERE}",
        GS_Core::GS_ActionComponent);

    void PlayEffect_GSActionComponent::Reflect(AZ::ReflectContext* context)
    {
        if (auto serializeContext = azrtti_cast<AZ::SerializeContext*>(context))
        {
            serializeContext->Class<PlayEffect_GSActionComponent, GS_Core::GS_ActionComponent>()
                ->Version(0)
                ->Field("EffectName", &PlayEffect_GSActionComponent::m_effectName)
                ->Field("Duration", &PlayEffect_GSActionComponent::m_duration);

            if (AZ::EditContext* editContext = serializeContext->GetEditContext())
            {
                // Pattern: Incoming Channel → Feature Properties → Outgoing Channel
                editContext->Class<PlayEffect_GSActionComponent>(
                    "Play Effect Action", "Triggers a named particle effect")
                    ->ClassElement(AZ::Edit::ClassElements::EditorData, "")
                        ->Attribute(AZ::Edit::Attributes::Category, "MyProject/Actions")
                        ->Attribute(AZ::Edit::Attributes::AppearsInAddComponentMenu, AZ_CRC_CE("Game"))
                    ->DataElement(AZ::Edit::UIHandlers::Default,
                        &PlayEffect_GSActionComponent::m_effectName, "Effect Name",
                        "Name of the particle effect to trigger")
                    ->DataElement(AZ::Edit::UIHandlers::Default,
                        &PlayEffect_GSActionComponent::m_duration, "Duration",
                        "How long the effect plays (seconds)");
            }
        }
    }

    void PlayEffect_GSActionComponent::ProcessAction()
    {
        // Your action logic — trigger the particle effect
        AZ_TracePrintf("Action", "Playing effect: %s for %.1f seconds",
            m_effectName.c_str(), m_duration);

        // ... spawn particle effect, start timer, etc. ...

        // IMPORTANT: Call CompleteAction when done
        // If the action is instant, call it here.
        // If it takes time (animation, timer), call it when the effect finishes.
        CompleteAction();
    }

    void PlayEffect_GSActionComponent::CompleteAction()
    {
        // Custom completion logic (if any)
        // ...

        // IMPORTANT: Call base to handle broadcast and chaining
        GS_ActionComponent::CompleteAction();
    }
}
Module Registration
m_descriptors.insert(m_descriptors.end(), {
    MyProject::PlayEffect_GSActionComponent::CreateDescriptor(),
});
Reflection Pattern
When reflecting custom action properties in the Edit Context, follow this organization pattern so all actions have a consistent inspector layout:
- Incoming Channel — The
channel property (inherited, reflected by base class) - Feature Properties — Your action-specific properties (effect name, duration, etc.)
- Outgoing Channel — The
broadcastOnComplete and onCompleteChannelChain properties (inherited, reflected by base class)
See Also
For component references:
For related resources:
Get GS_Core
GS_Core — Explore this gem on the product page and add it to your project.
1.5.2.1.1 - Core Actions
Pre-built actions included in GS_Core — ready-to-use triggerable behaviors for common game functionality.
GS_Core includes pre-built Action components for common behaviors. Attach them to any entity, set a channel, and fire them from any system without writing code.
All built-in actions inherit from GS_ActionComponent and follow the same channel-matching, completion, and chaining patterns.
For usage guides and setup examples, see The Basics: GS_Core.
Toggle Mouse Cursor
Toggles the operating system mouse cursor on or off.
When to Use
Use this action when transitioning between gameplay (cursor hidden) and menus (cursor visible). Common triggers include opening an inventory, entering a pause menu, or starting a dialogue sequence.
Inspector Properties
| Property | Type | Default | Description |
|---|
| Channel | AZStd::string | "" | Inherited. The channel this action responds to. |
| Broadcast On Complete | bool | false | Inherited. Broadcasts OnActionComplete when the toggle finishes. |
| On Complete Channel Chain | AZStd::string | "" | Inherited. Fires a follow-up DoAction on completion for chaining. |
Usage Example
#include <GS_Core/GS_CoreBus.h>

// Toggle the cursor when opening the pause menu
GS_Core::ActionRequestBus::Event(
    uiEntityId,
    &GS_Core::ActionRequestBus::Events::DoAction,
    AZStd::string("toggle_cursor")
);
Print Log
Prints a configurable message to the console log. Useful for debugging action chains, verifying event flow, or logging gameplay milestones.
When to Use
Use this action during development to verify that action channels fire correctly, test chaining sequences, or log gameplay events without writing custom components.
Inspector Properties
| Property | Type | Default | Description |
|---|
| Channel | AZStd::string | "" | Inherited. The channel this action responds to. |
| Message | AZStd::string | "" | The message to print to the console log. |
| Broadcast On Complete | bool | false | Inherited. Broadcasts OnActionComplete when the print finishes. |
| On Complete Channel Chain | AZStd::string | "" | Inherited. Fires a follow-up DoAction on completion for chaining. |
Usage Example
#include <GS_Core/GS_CoreBus.h>

// Trigger a debug log message
GS_Core::ActionRequestBus::Event(
    debugEntityId,
    &GS_Core::ActionRequestBus::Events::DoAction,
    AZStd::string("debug")
);
// Console output: whatever message was configured on the PrintLog action
Creating Your Own Action
Need custom behavior? See the Extending the Action Class guide for a complete walkthrough with header, implementation, Reflect pattern, and module registration.
See Also
Get GS_Core
GS_Core — Explore this gem on the product page and add it to your project.
1.6 - Interfaces
The cross-gem contract layer — neutral agreements collected in GS_Core so feature gems depend on contracts instead of on each other’s internals. Covers the three contract kinds (TypeBase, Emit, Exchange).
GS_Core/Interfaces/ is the framework’s cross-gem contract layer. Feature gems no longer depend on each other’s internals — they depend on neutral contracts collected here in GS_Core. A contract lives in GS_Core; the feature gem that produces it owns and operates it. GS_Core holds the agreement, the gem holds the behavior.
This is the layer that lets GS_Interaction emit a “pulse received” signal that GS_Juice can react to without either gem including the other.
Contents
Why This Layer Exists
Before this layer, cross-gem features were glued together by bridge components — a component in GS_Complete whose only job was to listen to one gem and drive another (e.g. listen to GS_Unit possession, drive a GS_PhantomCam target). Every such bridge carried a hard dependency on both gems’ internals.
Once both sides speak a Core contract, those bridges collapse into their natural gem and shed the cross-gem-internals dependency. Feature glue now lives in the gem that owns the feature, not in a catch-all integration gem.
The GS_Complete collapse
This effort dissolved GS_Complete’s bridge components: a paper-facing camera handler moved to GS_Performer, and a dialogue-select button, a possession→cam-target utility, and a cinematic controller all repointed to Core contracts and dropped their producing-gem includes.
The Three Contract Kinds
The layer collects exactly three kinds of contract. The kind tells you how to extend it.
| Kind | Pattern | One-line | Extend by |
|---|
| TypeBase | Strategy | “Inherit this and you’re plugged in.” | Subclass a *Type base, reflect it → it appears in the editor’s type-picker. |
| Emit | Observance | “Wait for this signal, then act.” | Handle the *EmissionBus (C++ or ScriptCanvas) and override the event you care about. |
| Exchange | Mediator | “Ask, a provider answers.” | Call the *Exchange query bus. (Rare today — mostly forward-looking.) |
Full mechanics, editor/script appearance, and an authoring how-to for each are on the Classifications page.
The Glance Test
The class/bus suffix encodes scope and kind, so you can classify any bus at a glance:
| Suffix | Meaning |
|---|
*Requests / *Notifications | In-gem bus — internal to one gem, not a cross-gem contract. |
*Type (a base class) | TypeBase contract — a pickable Strategy base. |
*Emissions / *EmissionBus | Emit contract — a one-way observation bus. |
*Exchange / *ExchangeBus | Exchange contract — a two-way request/fulfill bus. |
Never named *Service
A contract bus is never named *Service — that collides with O3DE component-service CRCs (GetProvidedServices). A command/query bus that has not yet earned Exchange status keeps the in-gem *Requests name.
Status at a Glance
| Kind | Shipped | Notes |
|---|
| TypeBase | 9 Strategy bases — built & verified | The compiled, reflected contracts. |
| Emit | 13 observation buses across 8 gems | All built, except GS_Cinematics’ three (Typewriter / Cinematic / DialogueSequence) which are code-complete but pending a build — treat their detail as provisional. |
| Exchange | 1 (CamCoreExchange) | The rest (Play/Stop family, graph parameters, surface query, CamManager queries) are planned and not yet shipped. |
The full per-contract breakdown is in the Contract Reference.
Where Contracts Live
Contracts are collected under GS_Core/Interfaces/<Capability>/ by capability (Camera, Pulse, Trigger, Dialogue, Motion, Targeting, UI, Possession, Cinematics, Time) — not by gem. One capability may be produced by one gem and consumed by several.
- Emit / Exchange buses are header-only in Core (an EBus is runtime, not serialized). The producing gem reflects them to ScriptCanvas.
- TypeBase classes are compiled (
.h + .cpp) and registered in the Core reflection aggregator, so a base is reflected ahead of any gem’s subtypes by module load order.
See the Contract Reference for the full capability-folder map and which gem produces each.
See Also
Get GS_Core
GS_Core — Explore this gem on the product page and add it to your project.
1.6.1 - Classifications
The three GS_Core contract kinds in depth — TypeBase (Strategy), Emit (Observance), and Exchange (Mediator) — each with its authoring how-to, plus the naming guard and the hoisting mechanics authors need.
The interfaces layer collects exactly three kinds of cross-gem contract. Each kind has a single, recognisable extension story — the suffix tells you which one you are looking at (see the glance test). This page covers each kind in depth and shows how to author against it.
For the contract concept and why the layer exists, start at the Interfaces overview.
Contents
TypeBase — Strategy
“Inherit this and you’re plugged in.”
A pickable polymorphic base class. An author writes a subclass, reflects it, and it auto-appears in the editor’s type-picker for any component that holds a list of that base. There is no registration call and no manifest — the O3DE SerializeContext drives the picker directly from the reflected inheritance.
TypeBase contracts are the only compiled contracts: they carry reflection (.h + .cpp) and are registered in the Core reflection aggregator so the base is reflected ahead of any gem’s subtypes.
“TypeBase” is the category name we use to talk about them — the classes themselves keep their domain name (PulseType, DialogueCondition, UiMotionTrack, …). That saved name string is the on-disk identity and is frozen: renaming it breaks existing assets.
Examples: PulseType / ReactorType (interaction pulses), WorldTriggerType / TriggerSensorType (world triggers), DialogueCondition / DialoguePerformance / DialogueEffect (dialogue graph nodes), UiMotionTrack / FeedbackMotionTrack (UI & FX motion tracks).
How to: add a new type
- Derive from the Strategy base —
class MyReactor : public GS_Core::ReactorType. - Reflect it to SerializeContext (and EditContext for inspector fields), exactly like any O3DE class.
- Done — it appears in the type-picker dropdown of every component that holds a
vector of that base. No registration call.
Frozen name
The reflected class name string is the saved-data identity. Once shipped it must never be renamed, or assets that reference it fail to load. Rename the C++ identifier freely; keep the reflected name string stable.
Emit — Observance
“Wait for this signal, then act.”
A one-way observation bus. A producer emits a signal; any number of consumers listen. If the producer is not present at runtime, the signal simply never fires — consumers degrade to silence rather than erroring.
Code shape: an EBus interface named *Emissions, aliased *EmissionBus. Each event has an empty default body, so a handler only implements the events it cares about.
Examples: PossessionEmissions (a controller possessed a unit / a unit was possessed), PulseReactorEmissions (a reactor received a pulse), TimeEmissions (world tick, day/night changed), UIPageEmissions (a page shown/hidden). The full list is in the Contract Reference.
Addressing: per-entity vs global
- By EntityId — listen to a specific entity (interaction, UI interactable, motion, possession buses). Connect at the address of the entity you care about.
- Global broadcast — listen for any occurrence of a state change (
TimeEmissions, CinematicEmissions, DialogueSequenceEmissions, UIPageEmissions). Connect to the broadcast.
The possession bus fires controller-vantage events on the controller entity and unit-vantage events on the unit entity.
Fire on resolved state, not on request
Emits fire at the moment the observable state actually changed, not when a command was issued. You can trust their timing:
- “Active camera changed” fires at blend-complete, not when a new camera was requested.
- “Page shown / hidden” fires after the show/hide animation resolves, not on the call.
- “Unit released” carries the released entity (captured before the reference clears), so the payload is meaningful rather than already-nulled.
How to: react to an event
- Handle the bus —
class MyThing : public GS_Core::PulseReactorEmissionBus::Handler (C++), or drop the bus’s event-handler node into a ScriptCanvas graph. - Connect at the right address —
BusConnect(entityId) for per-entity buses, BusConnect() for global broadcasts. - Override only the events you need. Disconnect when done.
ScriptCanvas names are preserved
When a bus was hoisted from a gem into Core, the gem keeps reflecting it to ScriptCanvas
under its original bus name. Existing graphs keep resolving — the C++ type moved, the script-facing name did not. The one exception is
Possession, a deliberate redesign whose name
did change (see
Hoisting Mechanics).
Exchange — Mediator
“Ask, a provider answers.” — mostly forward-looking
A two-way request/fulfill (query) bus: a consumer asks, a single provider answers. An Exchange is created only when a bidirectional cross-gem need is proven — a pull, not a push. Until then a feature’s command surface stays an in-gem *Requests bus.
Code shape: *Exchange / *ExchangeBus.
Shipped today: only CamCoreExchange (GetCamCore — “which entity is the active camera core?”). It pairs with the CamCore lifecycle Emit and data Emit to form an observable-service trio: learn it exists (Emit) → query it (Exchange) → observe its updates (Emit).
Planned (not yet shipped): Play/Stop a sequence / UI motion / feedback emit / soundtrack / audio event; Get/Set a graph parameter; a terrain surface-info query for footstep sounds; CamManager queries. Each planned Play/Stop Exchange will pair with a completion Emit — command via Exchange, observe via Emit.
How to: query a provider
- Call the Exchange bus with a result —
GS_PhantomCam::CamCoreExchangeBus::BroadcastResult(out, &GS_PhantomCam::CamCoreExchange::GetCamCore). - A single provider answers. If no provider is present, the result is the bus’s default.
Verify before authoring
Exchange is the least-built kind. Treat anything beyond CamCoreExchange as a design sketch and confirm against source before writing against it.
Hoisting Mechanics
The defining idea: a contract lives in GS_Core, but the feature gem owns and operates it. Only the neutral C++ interface moves to Core; everything that needs the producer present stays home.
| Piece | Lives in |
|---|
The EBus interface (*Emissions / *Exchange) or the Strategy base (*Type) | GS_Core |
| The emit / broadcast call sites (where the signal fires) | producing gem |
| The ScriptCanvas binder + its BehaviorContext reflection | producing gem |
The command/query half (*Requests) until proven cross-gem | producing gem |
An observation handler is inert without its emitter, so binding the signal into ScriptCanvas only makes sense where the emitter exists — the producing gem reflects it. GS_Core just publishes the shape.
Transparent hoist vs deliberate redesign
- Transparent hoist (same events, new home) — ScriptCanvas name, handler UUID, and translation assets are all preserved. No graph breakage. This is the norm (Time, Interaction, UI, Cinematics emits all did this).
- Deliberate redesign (events split or renamed) — the ScriptCanvas name intentionally changes and old graphs break by design. The one case is Possession: the single “possessed” event (which fired on both possess and depossess) was split into explicit possess + release, across controller and unit vantages. It is now
PossessionEmissionBus.
Possession — graphs need rewriting
Any C++, graph, or example referencing the old UnitControllerNotificationBus / PossessedTargetUnit or UnitNotificationBus::UnitPossessed is describing a bus that no longer carries possession. Rewrite to the four-event PossessionEmissionBus (OnPossessedUnit, OnReleasedUnit, OnPossessedByController, OnReleasedByController). Note the unit standby events stayed in-gem on UnitNotificationBus.
See Also
Get GS_Core
GS_Core — Explore this gem on the product page and add it to your project.
1.6.2 - Contract Reference
Every GS_Core contract by capability folder and producing gem — the 9 TypeBase Strategy bases, the 13 Emit observation buses, and the Exchange query buses — with shipped-versus-pending status and a per-gem feature index.
Every contract collected under GS_Core/Interfaces/<Capability>/, the gem that produces it, and its status. For what each kind is and how to author against it, see Classifications.
✦ marks an event or contract created during the interfacing effort (a gap-fill, not a pre-existing notification).
Contents
TypeBase — Strategy Bases
Compiled, editor-pickable. Subclass + reflect → the subtype appears in the type-picker. All nine are shipped and build-verified.
| Contract | Capability folder | Producing gem |
|---|
PulseType | Pulse | GS_Interaction |
ReactorType | Pulse | GS_Interaction |
WorldTriggerType | Trigger | GS_Interaction |
TriggerSensorType | Trigger | GS_Interaction |
DialogueCondition | Dialogue | GS_Cinematics |
DialoguePerformance | Dialogue | GS_Cinematics |
DialogueEffect | Dialogue | GS_Cinematics |
UiMotionTrack | Motion | GS_UI |
FeedbackMotionTrack | Motion | GS_Juice |
DialogueEffect is passive — its reversal logic lives in the dialogue node’s teardown rather than a bus handler. An authoring detail, not a contract change.
Emit — Observance Buses
Header-only. Handle the *EmissionBus and override the events you care about.
| Contract | Events | Capability | Producer | Status |
|---|
CamCoreEmissions | UpdateCameraPosition, OnCamCoreRegistered, OnCamCoreUnregistered | Camera | GS_PhantomCam | ✅ Built |
TimeEmissions | WorldTick, DayNightChanged | Time | GS_Environment | ✅ Built |
PulseReactorEmissions | OnPulseReceived | Pulse | GS_Interaction | ✅ Built |
TriggerSensorEmissions | OnTriggered, OnReset | Trigger | GS_Interaction | ✅ Built |
TargetingEmissions | OnUpdateInteractTarget, OnEnterStandby, OnExitStandby, OnInteract✦ | Targeting | GS_Interaction | ✅ Built |
FeedbackMotionEmissions | OnFeedbackMotionComplete, OnFeedbackMotionLooped | Motion | GS_Juice | ✅ Built |
UIInteractableEmissions | OnClicked | UI | GS_UI | ✅ Built |
UiMotionEmissions | OnUiMotionComplete(entity, name), OnUiMotionLooped(entity, name) | Motion | GS_UI | ✅ Built |
UIPageEmissions | OnPageShown(page, name), OnPageHidden(page, name) | UI | GS_UI | ✅ Built |
PossessionEmissions | OnPossessedUnit✦, OnReleasedUnit✦, OnPossessedByController, OnReleasedByController✦ | Possession | GS_Unit | ✅ Built |
TypewriterEmissions | OnTypeFired, OnTypewriterComplete | Dialogue | GS_Cinematics | ⚠️ Pending build |
CinematicEmissions | EnterCinematic, ExitCinematic | Cinematics | GS_Cinematics | ⚠️ Pending build |
DialogueSequenceEmissions | OnDialogueSequenceStarted✦, OnDialogueTextBegin, OnDialogueSequenceComplete | Dialogue | GS_Cinematics | ⚠️ Pending build |
Cinematics emits are not yet built
TypewriterEmissions, CinematicEmissions, and DialogueSequenceEmissions are code-complete but unbuilt as of this writing. Treat their event lists as provisional and confirm against source before authoring against them.Addressing. CamCoreEmissions (data event) is global. The Interaction / UI-interactable / motion / possession buses are addressed by EntityId — listen to a specific entity. TimeEmissions, CinematicEmissions, DialogueSequenceEmissions, and UIPageEmissions are global broadcasts — listen for any occurrence. The possession bus fires controller-vantage events on the controller entity and unit-vantage events on the unit entity.
Possession replaced two older buses
PossessionEmissions is a deliberate redesign, not a transparent hoist. It replaces the old UnitControllerNotificationBus (PossessedTargetUnit) and UnitNotificationBus::UnitPossessed. The single “possessed” event that fired on both possess and depossess was split into explicit possess/release across controller and unit vantages. Graphs, ScriptCanvas translation assets, and examples using the old names are stale and need rewriting. The unit standby events stayed in-gem on UnitNotificationBus.
Exchange — Mediator Buses
Two-way query buses. Only CamCoreExchange ships today; the rest are planned.
| Contract | Methods | Capability | Producer | Status |
|---|
CamCoreExchange | GetCamCore | Camera | GS_PhantomCam | ✅ Built |
| Play/Stop — Sequence · UIMotion · FeedbackEmit · soundtrack · audio event | — | (multi) | Cinematics / UI / Juice / Audio | ⏳ Planned |
| Get/Set Graph Parameter | — | (graphcanvas graphs) | multi | ⏳ Planned |
| Terrain surface-info query (footstep sounds) | — | Environment | GS_Environment | ⏳ Planned |
| CamManager queries | — | Camera | GS_PhantomCam | ⏳ Planned |
Each planned Play/Stop Exchange pairs with a completion Emit — command via Exchange, observe via Emit. GS_Audio’s emits are greenfield and will land with its Play/Stop Exchange, not before.
Per-Gem Feature Index
What each gem contributed to the layer.
| Gem | Contribution |
|---|
| GS_Core | The Interfaces/ tree, the ReflectAllInterfaces aggregator, and a generic motion-loop hook (OnMotionLoop) added to the shared motion runtime to back the UI & Juice motion-loop emits. |
| GS_PhantomCam | CamCore (Exchange + Emit); CamManager rig-lifetime emits; an always-face-camera helper repointed. The internal “set this camera” command stayed an in-gem bus — it is a manager→core pipe, not a cross-gem contract. |
| GS_Environment | TimeManager day/night and world-tick emits; time control stays in-gem. |
| GS_Interaction | Pulse-reactor, trigger-sensor, and targeting emits; a new OnInteract✦ emit; a dead handler base removed. |
| GS_Juice | Feedback-motion complete/loop emits, wired through the emitter. |
| GS_UI | Button “clicked”, UI-motion complete/loop (with a motion name), page shown/hidden. |
| GS_Unit | Possession (controller & unit vantages, possess & release); in-gem consumers repointed. |
| GS_Cinematics | Typewriter, cinematic enter/exit, dialogue-sequence lifecycle (+ a new sequence-started event). Code-complete, pending a build. |
| GS_Complete | Bridge components collapsed: a paper-facing handler moved to GS_Performer; a dialogue-select button, a possession→cam-target utility, and a cinematic controller all repointed to Core contracts and dropped their producing-gem includes. |
| GS_Performer | Received the paper-facing handler from GS_Complete. |
Deferred / Not Yet in This Layer
- GS_Audio emits — greenfield; ship with the planned Play/Stop audio Exchange.
- CamState hoist — unblocks when the neutral EntityId-addressed Camera Exchange replaces its owner-pointer coupling.
- Possession ScriptCanvas translation assets — regeneration pending.
- A legacy UI hub bus header — stale; cleanup pending (GS_Page is the live page system).
See Also
Get GS_Core
GS_Core — Explore this gem on the product page and add it to your project.
1.7 - Utilities
A collection of utility libraries — easing curves, spring dampers, physics trigger volumes, gradients, and entity helpers.
GS_Core includes a rich set of utility libraries for common game development patterns. These are header-only (or lightweight) utilities that any component or system can use without additional setup.
For usage guides and setup examples, see The Basics: GS_Core.
Contents
Physics Trigger Volume
PhysicsTriggeringVolume is a non-component base class that manages the full lifecycle of a physics trigger or collision volume — entity tracking, enter/exit/hold callbacks, and collision contact events. Inherit from it to create interactive volumes without boilerplate physics code. PhysicsTriggerComponent is the concrete O3DE component that wraps this base and adds game-lifecycle awareness (standby handling).
Physics Trigger Volume API
Easing Curves
The Curves namespace provides 40+ easing functions and a CurveType enum for data-driven curve selection. All functions take a normalized t (0 → 1) input. The dispatch function EvaluateCurve(CurveType, t) routes to the correct function at runtime. Curve families: Linear, Quadratic, Cubic, Quartic, Quintic, Sine, Exponential, Circular, Back, Elastic, and Bounce.
Easing Curves API
Spring Dampers
The Springs namespace provides 6 spring-damper types for physics-based animation and smoothing — each available in float, Vector2, and Vector3 overloads (plus a Quaternion variant). All springs use a halflife parameter (seconds to reach 50% of goal) rather than raw stiffness/damping constants.
Spring Dampers API
Orbital Solver
The OrbitalSolver namespace (GS_Core::Math) provides a pivot-aware position and pose blend primitive — Linear / Cylindrical / Spherical shapes around a configurable pivot. Used by PhantomCam’s cross-cam blend execution, DynamicOrbitBody per-tick damping, and LeadingFollowBody band response. The pose form returns a “look at pivot” rotation by default, making it a one-call replacement for spring damping when motion naturally arranges around a pivot.
Orbital Solver API
Noise
The Noise namespace (GS_Core::Noise) provides a project-owned, license-clean Perlin noise toolkit — signed Perlin 1D / 2D / 3D, fractal multi-octave, and the LayeredPerlin1D (amp, freq, phase) stack with its NoiseLayer struct. Used by PhantomCam camera shake (PerlinNoise and ImpulseNoise stages) and open for adoption by any UI / VFX / unit modulation consumer that needs time-varying smooth values. Stateless, deterministic across runs, thread-safe.
Noise API
Gradients
Multi-stop gradient types (FloatGradient, Vector2Gradient, ColorGradient) for sampling values over a normalized [0,1] range. Used throughout the motion system and feedback effects for curve-based value animation. ColorGradient exposes independent EvaluateColor(t) and EvaluateAlpha(t) channels.
Gradients API
Entity Utilities
The EntityUtility namespace provides helper functions for entity lookup by name — returning either an AZ::Entity* or AZ::EntityId.
Entity Utilities API
Weighted Random
RandomUtils::GetRandomWeighted<T> selects a key from an AZStd::unordered_map<T, float> with probability proportional to each entry’s float weight. Requires a caller-provided AZ::SimpleLcgRandom instance.
Weighted Random API
Angle Helpers
The Orientation namespace maps angles to discrete sector indices for directional gameplay — facing directions, animation sectors, compass queries. Includes the SectionConfig enum (x4 through x24 presets), RotationDirection, hysteresis support, and yaw/quaternion helpers.
Angle Helpers API
Spline Utilities
The SplineUtility namespace provides helper functions for O3DE spline queries — closest world point, closest local point, and normalized fraction along a spline — taking an entity ID and world/local position.
Spline Utilities API
Serialization Helpers
Three helpers that reduce reflection boilerplate: GS_ReflectionIncludes.h (single-include for all reflection headers), and GS_AssetReflectionIncludes.h (extends with asset serialization).
Serialization Helpers API
Common Enums
Shared enum types used across the framework: CurveType (maps to all easing functions for serialized curve selection) and BooleanConditions (condition evaluation for dialogue and record-keeping systems).
Common Enums API
See Also
For conceptual overviews and usage guides:
For related resources:
Get GS_Core
GS_Core — Explore this gem on the product page and add it to your project.
1.7.1 - Common Enums
Shared enumeration types used across the GS_Play framework — CurveType for easing curve selection and BooleanConditions for condition evaluation.
Common Enums provides shared enumeration types registered with O3DE’s SerializeContext. They can be used in component properties, asset fields, and ScriptCanvas nodes across any gem in the framework. The two primary enums are CurveType (curve selection for motion and gradient systems) and BooleanConditions (condition evaluation for dialogue and record-keeping systems).
Reflect functions: GS_Core::ReflectCommonEnums(context), GS_Core::ReflectCurveType(context)
For usage guides and setup examples, see The Basics: GS_Core.
Contents
BooleanConditions
Used by condition-evaluation logic in the dialogue and record-keeping systems to compare numeric or string values.
Used by: DialogueCondition, Record_DialogueCondition, RecordKeeperComponent
| Value | Description |
|---|
Equals | Exact equality check |
NotEquals | Inequality check |
GreaterThan | Strict greater-than |
GreaterOrEquals | Greater-than or equal |
LessThan | Strict less-than |
LessOrEquals | Less-than or equal |
CurveType
Maps to all easing curve functions in the Curves utility. Used by GS_Motion tracks, blend profiles, gradient markers, and any system that needs designer-selectable easing.
Used by: GS_MotionTrack, UiMotionTrack, FeedbackMotionTrack, gradient markers, GS_PhantomCamBlendProfile
| Family | Values |
|---|
| Linear | Linear |
| Quadratic | EaseInQuadratic, EaseOutQuadratic, EaseInOutQuadratic |
| Cubic | EaseInCubic, EaseOutCubic, EaseInOutCubic |
| Quartic | EaseInQuartic, EaseOutQuartic, EaseInOutQuartic |
| Quintic | EaseInQuintic, EaseOutQuintic, EaseInOutQuintic |
| Sine | EaseInSine, EaseOutSine, EaseInOutSine |
| Exponential | EaseInExpo, EaseOutExpo, EaseInOutExpo |
| Circular | EaseInCirc, EaseOutCirc, EaseInOutCirc |
| Back | EaseInBack, EaseOutBack, EaseInOutBack |
| Elastic | EaseInElastic, EaseOutElastic, EaseInOutElastic |
| Bounce | EaseInBounce, EaseOutBounce, EaseInOutBounce |
Evaluating a CurveType in C++
#include <GS_Core/Utility/Math/CurvesUtility.h>

// Dispatch to the correct curve function via enum
float result = GS_Core::Curves::EvaluateCurve(GS_Core::CurveType::EaseInOutCubic, t);
Using Enums in Components
Use EnumAttribute on a DataElement with UIHandlers::ComboBox to expose enum selection as an Inspector dropdown.
#include <GS_Core/Utility/Math/CurvesUtility.h>
#include <GS_Core/Utility/CommonEnums.h>

// In your component's Reflect() method:
editContext->Class<MyComponent>("My Component", "Description")
    ->DataElement(AZ::Edit::UIHandlers::ComboBox,
        &MyComponent::m_curveType, "Curve Type",
        "The easing curve applied to this animation.")
        ->EnumAttribute(GS_Core::CurveType::Linear,             "Linear")
        ->EnumAttribute(GS_Core::CurveType::EaseInQuadratic,    "Ease In Quadratic")
        ->EnumAttribute(GS_Core::CurveType::EaseOutQuadratic,   "Ease Out Quadratic")
        ->EnumAttribute(GS_Core::CurveType::EaseInOutQuadratic, "Ease InOut Quadratic")
        ->EnumAttribute(GS_Core::CurveType::EaseInCubic,        "Ease In Cubic")
        ->EnumAttribute(GS_Core::CurveType::EaseOutCubic,       "Ease Out Cubic")
        ->EnumAttribute(GS_Core::CurveType::EaseInOutCubic,     "Ease InOut Cubic")
        // ... continue for all desired variants
    ;
This creates an Inspector dropdown where designers select a curve by name without touching code.
See Also
For related resources:
Get GS_Core
GS_Core — Explore this gem on the product page and add it to your project.
1.7.2 - Serialization Helpers
Three reflection helpers — single-include headers for common and asset serialization, and a generic asset handler template for custom asset types.
Three helpers that eliminate serialization boilerplate: a single-include header for common reflection, an extension for asset fields, and a ready-made O3DE asset handler template for any custom AssetData subclass.
For usage guides and setup examples, see The Basics: GS_Core.
Contents
GS_ReflectionIncludes.h
A single-include header that brings in all O3DE reflection headers needed for any class with an inline Reflect() method.
Includes:
AzCore/RTTI/RTTI.hAzCore/Memory/SystemAllocator.hAzCore/Serialization/SerializeContext.hAzCore/Serialization/EditContext.hAzCore/std/string/string.h
Use this in any header declaring a reflected struct, class, or enum. Does not handle AZ::Data::Asset<T> fields.
#include <GS_Core/Utility/Reflection/GS_ReflectionIncludes.h>

namespace MyProject
{
    struct MyData
    {
        AZ_TYPE_INFO(MyData, "{YOUR-UUID-HERE}");
        static void Reflect(AZ::ReflectContext* context);

        float m_value = 0.0f;
    };
}
GS_AssetReflectionIncludes.h
Extends GS_ReflectionIncludes.h with asset serialization headers.
Adds:
AzCore/Asset/AssetCommon.hAzCore/Asset/AssetSerializer.h
Use this in any header declaring a class with AZ::Data::Asset<T> fields. Ensures SerializeGenericTypeInfo<Asset<T>> is visible and prevents silent failures in Unity builds.
#include <GS_Core/Utility/Reflection/GS_AssetReflectionIncludes.h>

namespace MyProject
{
    struct MyComponent : public AZ::Component
    {
        AZ_COMPONENT_DECL(MyComponent);
        static void Reflect(AZ::ReflectContext* context);

        AZ::Data::Asset<MyAssetType> m_asset;
    };
}
See Also
For related resources:
Get GS_Core
GS_Core — Explore this gem on the product page and add it to your project.
1.7.3 - Curves
40+ easing curve functions for smooth animation and interpolation — organized by family with a CurveType enum for data-driven selection.
The Curves namespace (GS_Core::Curves) provides 40+ easing functions for smooth animation and interpolation. All functions take a normalized t value in [0,1] and return a remapped [0,1] value. The dispatch function EvaluateCurve routes to the correct function by CurveType enum value, making curve selection fully data-driven from the Inspector or asset editor.
Used by every GS_Motion track, all gradient evaluate calls, and the blend profile system.
For usage guides and setup examples, see The Basics: GS_Core.
Contents
Curve Families
| Family | Functions | Character |
|---|
| Linear | Linear | Constant speed |
| Quadratic | EaseInQuadratic, EaseOutQuadratic, EaseInOutQuadratic | Gentle acceleration |
| Cubic | EaseInCubic, EaseOutCubic, EaseInOutCubic | Moderate acceleration |
| Quartic | EaseInQuartic, EaseOutQuartic, EaseInOutQuartic | Strong acceleration |
| Quintic | EaseInQuintic, EaseOutQuintic, EaseInOutQuintic | Very strong acceleration |
| Sine | EaseInSine, EaseOutSine, EaseInOutSine | Gentle, natural feel |
| Exponential | EaseInExpo, EaseOutExpo, EaseInOutExpo | Dramatic speed change |
| Circular | EaseInCirc, EaseOutCirc, EaseInOutCirc | Quarter-circle shape |
| Back | EaseInBack, EaseOutBack, EaseInOutBack | Overshoot and return |
| Elastic | EaseInElastic, EaseOutElastic, EaseInOutElastic | Spring-like oscillation |
| Bounce | EaseInBounce, EaseOutBounce, EaseInOutBounce | Bouncing ball effect |
Variant naming: EaseIn = slow start, EaseOut = slow end, EaseInOut = slow start and end.
API Reference
Dispatch Function
float EvaluateCurve(CurveType curveType, float t);
Dispatches to the correct curve function based on the CurveType enum value. This is the primary call site for all motion and gradient systems. t must be in [0,1].
Individual Functions
One free function per CurveType value, all sharing the signature float <Name>(float t). Examples:
| Function | Description |
|---|
GS_Core::Curves::Linear(t) | Linear — no easing |
GS_Core::Curves::EaseInQuadratic(t) | Quadratic ease-in |
GS_Core::Curves::EaseOutBounce(t) | Bounce ease-out |
GS_Core::Curves::EaseInOutBack(t) | Back ease-in-out (overshoot both ends) |
All functions follow the same naming pattern as the CurveType enum values.
Usage Examples
Dispatch via enum (data-driven)
#include <GS_Core/Utility/Math/CurvesUtility.h>

// Evaluate at normalized progress t (0 → 1)
float eased = GS_Core::Curves::EvaluateCurve(GS_Core::CurveType::EaseInOutCubic, t);

// Interpolate between two values
float result = start + (end - start) * GS_Core::Curves::EvaluateCurve(curveType, t);
Direct function call
// Call the function directly for a known curve
float eased = GS_Core::Curves::EaseOutBack(t);
See Also
For related resources:
Get GS_Core
GS_Core — Explore this gem on the product page and add it to your project.
1.7.4 - Springs
Spring-damper functions for physically-grounded value interpolation — smooth following, overshoot, and settling for floats, vectors, and quaternions.
The Springs namespace (GS_Core::Springs) provides six spring-damper types for physics-based animation and smoothing. Springs produce natural-feeling motion that reacts to velocity — ideal for camera follow, UI motion, and any value that should settle rather than snap.
All springs use a halflife parameter: the number of seconds to cover 50% of the remaining distance to the goal. This is more intuitive than raw stiffness/damping constants. Each spring type is available in float, AZ::Vector2, and AZ::Vector3 overloads where applicable.
Used by: gs_phantomcam (camera smoothing), gs_unit (character movement), gs_juice (feedback motions)
For usage guides and setup examples, see The Basics: GS_Core.
Contents
Spring Types
| Type | Character | Best For |
|---|
SimpleSpringDamperExact | Fast start, ease-out arrival | Simple follow, snap behaviors |
AccelerationSpringDamper | Tracks target velocity, smoother on input changes | Character movement, camera motion |
DoubleSpringDamper | S-curve — slow start AND slow arrival | UI transitions, polished cuts |
TimedSpringDamper | Reaches target by a specified time | Choreographed, loosely timed movements |
VelocitySpringDamper | Predictive — leads the target’s direction | Camera following a moving target |
QuaternionSpringDamper | Rotational spring (angular velocity) | Smooth orientation changes |
SimpleSpringDamperExact
A critically-damped spring that moves toward a target position. Fast start, ease-out arrival. Computed exactly (no approximation). The most common spring for follow and snap behaviors.
| Parameter | Type | Description |
|---|
position | T (in/out) | Current position, updated in-place each frame |
velocity | T (in/out) | Current velocity — must be cached between frames |
targetPosition | T | Goal position to move toward |
halflife | float | Seconds to cover 50% of remaining distance |
deltaTime | float | Frame delta time |
AccelerationSpringDamper
Tracks a target velocity rather than a position. Adds an acceleration memory term for smoother response to sudden direction changes (e.g. thumbstick flicks). Suited for character movement and camera motion where input can change abruptly.
| Parameter | Type | Description |
|---|
position | T (in/out) | Accumulated position |
velocity | T (in/out) | Current velocity — must be cached between frames |
acceleration | T (in/out) | Acceleration memory — must be cached between frames |
targetVelocity | T | The desired velocity to spring toward |
halflife | float | Settling time |
deltaTime | float | Frame delta time |
DoubleSpringDamper
Two springs chained together, producing an S-curve (ease-in AND ease-out). Slower to start and slower to arrive than the simple spring. Gives a more polished feel for UI transitions or cinematic camera cuts.
| Parameter | Type | Description |
|---|
position | T (in/out) | Current position |
velocity | T (in/out) | Current velocity — must be cached between frames |
previousPosition | T (in/out) | Internal state — must be cached between frames |
previousVelocity | T (in/out) | Internal state — must be cached between frames |
targetPosition | T | Goal position |
halflife | float | Settling time |
deltaTime | float | Frame delta time |
TimedSpringDamper
Attempts to reach the target by a specific time. Adjusts halflife internally so the spring arrives near the target time rather than asymptotically. Useful for choreographed movements with loose time targets.
| Parameter | Type | Description |
|---|
position | T (in/out) | Current position |
velocity | T (in/out) | Current velocity — must be cached between frames |
previousTarget | T (in/out) | Last known target — must be cached between frames |
targetPosition | T | Destination |
targetTime | float | Time (in seconds) at which the spring should arrive |
halflife | float | Base settling time |
deltaTime | float | Frame delta time |
VelocitySpringDamper
Tracks a moving target by incorporating the target’s own velocity for predictive lead. The follower anticipates the direction of movement, reducing lag on fast-moving targets. Suited for camera following a character at speed.
| Parameter | Type | Description |
|---|
position | T (in/out) | Follower position |
velocity | T (in/out) | Follower velocity — must be cached between frames |
previousPosition | T (in/out) | Internal state — must be cached between frames |
targetPosition | T | Current target position |
targetVelocity | T | Target’s velocity (used for predictive lead) |
halflife | float | Settling time |
deltaTime | float | Frame delta time |
QuaternionSpringDamper
Rotation spring that operates on angular velocity. Includes a flip option to reverse the rotation direction.
Note: The rotation output jumps to the goal each frame. Extract angularVelocity and integrate externally if you need a continuously smooth rotation output.
| Parameter | Type | Description |
|---|
rotation | AZ::Quaternion (in/out) | Quaternion moved toward targetRotation |
angularVelocity | AZ::Vector3 (in/out) | Angular velocity — must be cached between frames |
targetRotation | AZ::Quaternion | Goal orientation |
halflife | float | Settling time |
deltaTime | float | Frame delta time |
flip | bool | Reverses rotation direction (default: false) |
Usage Example
#include <GS_Core/Utility/Math/SpringsUtility.h>

// Member fields — must persist between frames
AZ::Vector3 m_followVelocity = AZ::Vector3::CreateZero();

// In your tick function:
AZ::Vector3 currentPos = GetEntityTranslation();
AZ::Vector3 targetPos  = GetTargetTranslation();

GS_Core::Springs::SimpleSpringDamperExact(
    currentPos,       // in/out: current position (updated in place)
    m_followVelocity, // in/out: velocity (cached between frames)
    targetPos,        // target position
    0.1f,             // halflife: 0.1 seconds to cover half the distance
    deltaTime
);

SetEntityTranslation(currentPos);
See Also
For related resources:
Get GS_Core
GS_Core — Explore this gem on the product page and add it to your project.
1.7.5 - Noise
Project-owned Perlin noise toolkit — signed Perlin 1D/2D/3D, fractal multi-octave, layered (amp, freq, phase) stacks with the NoiseLayer struct, unit-range wrappers, and decorrelation patterns. Backs PhantomCam noise stages and any time-varying value modulation consumer.
The Noise namespace (GS_Core::Noise) provides a project-owned, stateless, deterministic, thread-safe Perlin noise toolkit. It backs every continuous-noise subsystem in the framework — PhantomCam Noise Profiles and the PerlinNoise / ImpulseNoise additive stages — plus any future UI wobble, unit idle-jitter, or VFX parameter modulation consumer that needs smooth time-varying values.
The same NoiseLayer struct documented below is what CameraNoiseProfile stores in its six per-axis vectors — no duplication. The utility is intentionally outside PhantomCam so non-camera consumers can adopt it without pulling a camera dependency.
Used by: gs_phantomcam (camera noise and impulse stages). Open for adoption by any consumer needing time-varying smooth modulation.
Contents
Signed Perlin
Classic Perlin noise. Output range approximately [-1, 1], statistically zero-biased — typical samples cluster near zero, not the extremes. Amplitude tuning at the consumer side accounts for this.
float Perlin1D(float x);
float Perlin2D(float x, float y);
float Perlin2D(const AZ::Vector2& p);
float Perlin3D(float x, float y, float z);
float Perlin3D(const AZ::Vector3& p);
Normalization details:
- 1D scaled by
* 0.125 (gradient outputs land in ~[-8, 8]). - 2D scaled by
* 1/3 (gradient set in ~[-3, 3]). - 3D natively in ~
[-1, 1] with a GetClamp safety bound.
Fractal Perlin
Multi-octave Perlin renormalized so output stays ~[-1, 1] regardless of octave count. Useful for environmental / spatial noise (terrain undulations, ambient flicker, foliage rustle).
float FractalPerlin1D(float x,
                      int   octaves     = 4,
                      float persistence = 0.5f,
                      float lacunarity  = 2.0f);

float FractalPerlin2D(const AZ::Vector2& p,
                      int   octaves     = 4,
                      float persistence = 0.5f,
                      float lacunarity  = 2.0f);

float FractalPerlin3D(const AZ::Vector3& p,
                      int   octaves     = 4,
                      float persistence = 0.5f,
                      float lacunarity  = 2.0f);
Each octave doubles frequency (lacunarity) and halves amplitude (persistence) by default. The accumulated total is divided by the amplitude sum so the output remains ~[-1, 1] regardless of octave count.
| Parameter | Default | Clamping |
|---|
octaves | 4 | Clamped to [1, 16]. |
persistence | 0.5 | Non-positive values bumped to a safe minimum. |
lacunarity | 2.0 | Non-positive values bumped to a safe minimum. |
Camera noise does NOT use Fractal. PhantomCam’s noise stages use LayeredPerlin1D below, which gives authors explicit per-layer control over the (amp, freq, phase) stack rather than the geometric octave progression Fractal enforces.
NoiseLayer Struct
A single layer in a layered Perlin stack — amplitude, frequency, optional phase.
struct NoiseLayer
{
    AZ_TYPE_INFO(NoiseLayer, "{2D5E9B7A-4C03-4518-8A1C-6F7B1E3D9C40}");
    AZ_CLASS_ALLOCATOR(NoiseLayer, AZ::SystemAllocator);

    float m_amplitude = 0.0f;   // consumer units (m, deg, unitless)
    float m_frequency = 1.0f;   // Hz of input `t`
    float m_phase     = 0.0f;   // per-layer time offset

    static void Reflect(AZ::ReflectContext* context);
};
Reflection
NoiseLayer::Reflect registers the type once, guarded with FindClassData (required because multiple owners may reflect it). On-disk field strings are Amplitude, Frequency, Phase — capitalized, no m_ prefix. The EditContext UI handler uses AutoExpand: true so layers display inline in the Asset Editor without further user action.
This is the same struct CameraNoiseProfile stores in its six per-axis vectors. Other future consumers reuse the same type.
LayeredPerlin1D
Sum of per-layer Perlin1D samples at time t.
float LayeredPerlin1D(float                            t,
                      const AZStd::vector<NoiseLayer>& layers,
                      float                            decorrelate = 0.0f);
Evaluation:
result = Σ Perlin1D(t * layer.frequency + layer.phase + decorrelate) * layer.amplitude
Key behaviors
- Layers with
m_amplitude == 0 or m_frequency == 0 are skipped by the inner loop. Authors can leave dead rows in a profile without paying for them. - Output is NOT renormalized. Unlike Fractal, amplitudes sum directly. Authors choose amplitudes that add up to their intended envelope.
- Layer ordering does not matter — the sum is commutative.
- The
decorrelate parameter is added to every layer’s input — see Decorrelation Pattern.
Camera-shake authoring conventions
| Quantity | Typical range |
|---|
| Position layer amplitude | 0.002 – 0.4 m |
| Rotation layer amplitude | 0.1 – 17 deg |
| Frequency | 0.1 – 60 Hz |
Concrete preset values live in the shipped .camnoiseprofile assets — see Noise Profiles for the asset library.
Unit-Range Wrappers
For consumers that want a 0..1 modulator (UI alpha pulses, scalar VFX drivers) rather than a signed delta.
inline float Perlin1DUnit(float x)              { return Perlin1D(x) * 0.5f + 0.5f; }
inline float Perlin2DUnit(const AZ::Vector2& p) { return Perlin2D(p) * 0.5f + 0.5f; }
inline float Perlin3DUnit(const AZ::Vector3& p) { return Perlin3D(p) * 0.5f + 0.5f; }
A linear * 0.5 + 0.5 remap of the signed signal.
Decorrelation Pattern
For multi-channel consumers that share one stream’s shape but need independent values (camera 6-DoF noise is the canonical case), offset the sample point rather than reseeding:
const float chX = Perlin1D(t * freqX + 1000.0f);
const float chY = Perlin1D(t * freqY + 2000.0f);
const float chZ = Perlin1D(t * freqZ + 3000.0f);
Offsets of a few hundred units in the sample space give effectively independent samples from the shared gradient table. PhantomCam’s PerlinNoise stage applies a per-axis decorrelation offset to LayeredPerlin1D so the same profile drives all six axes without phase-locking them.
Determinism
- The permutation table is built once at static init from a fixed seed. No runtime randomness.
Perlin1D(t) returns the same value every call across runs, platforms, and threads — no shared mutable state in the hot path.- Camera noise stages own
m_time per-instance — replays at the same m_time reproduce the same sway frame-for-frame.
| Operation | Cost |
|---|
Perlin1D hot path | 2 table lookups, 2 gradient evals, 1 fade, 1 lerp. Effectively free at gameplay rates. |
LayeredPerlin1D | Linear in the number of non-skipped layers. Typical 1–3 layers per axis → ~18 Perlin1D evaluations per cam tick across all six axes. |
FractalPerlin* | Linear in octaves. Default 4 octaves is comparable to a 4-layer LayeredPerlin1D. |
Licensing Posture
The toolkit is license-clean for commercial distribution. The header carries a longform license note; the summary:
- Ken Perlin’s noise algorithm (1983, fade refinement 2002) is not patented and never was.
- The expired Simplex patent (US 6,867,776) does not apply — this is classic Perlin, and even Simplex would now be free.
- The permutation table is not transcribed from any reference implementation. It is generated at static init from a deterministic LCG (Numerical Recipes constants) seeded with
0x4E435347 (“GSCN” = GS Core Noise). The 256-byte table is duplicated to 512 so the hot path wraps with & 511 instead of branching. - Gradient sets and the quintic fade (
6t⁵ − 15t⁴ + 10t³) are public-domain math.
Consumers
| Subsystem | Function used | Time source |
|---|
PhantomCam PerlinNoise additive stage | LayeredPerlin1D × 6 axes | m_time += deltaTime since activation. |
PhantomCam ImpulseNoise additive stage | LayeredPerlin1D × 6 axes, ADSR-enveloped | m_elapsed since Trigger(strength). |
Future consumers will live in this table as they ship — UI wobble, unit idle-jitter, VFX scalar drivers, etc. The utility is namespaced under GS_Core::Noise precisely so other gems can adopt it without pulling PhantomCam.
See Also
Related GS_Core utilities:
- Springs — spring-damper smoothing. Use Springs for one-shot smoothing toward a goal; use Noise for sustained time-varying modulation around a baseline.
- Curves —
CurveType enum for easing curves. Often paired with Noise — an ADSR envelope (curve-shaped) gates a Layered Perlin burst, for example. - Orbital Solver — pivot-aware blend primitive. Companion utility consumed by the same PhantomCam systems.
PhantomCam consumer pages:
Get GS_Core
Explore other GS_Play gems on the product page.
1.7.6 - Orbital Solver
Pivot-aware position and pose blend primitive — Linear / Cylindrical / Spherical shapes around a configurable pivot. Powers PhantomCam blend shapes, DynamicOrbitBody damping, and LeadingFollowBody band response.
The OrbitalSolver namespace (GS_Core::Math) provides a stateless, deterministic, pure position / pose blend primitive. Given two positions (or transforms) and a pivot point, it blends them by a fraction t along an arc that preserves the geometric relationship to the pivot — rather than the straight-line lerp that cuts through the pivot when the start and end sit on opposite sides.
The primitive originated as a fix for PhantomCam cross-cam blends (two orbit cams at ~180° around a shared target produced visible “cuts through the target” mid-blend). It has since been reframed as the standard movement primitive for any motion naturally arranged around a pivot — orbit cams, leading-follow band response, post-config stage transitions. Linear lerp becomes the special case used only when no meaningful pivot exists.
Used by: gs_phantomcam (cross-cam blend execution, DynamicOrbitBody damping, LeadingFollowBody band response).
For usage guides and PhantomCam-specific consumption patterns, see the PhantomCam consumer pages linked under Consumers.
Contents
BlendShape
The path shape. The same enum is reflected for authoring on consumers like Blend Profiles and DynamicOrbitBody.
enum class BlendShape : AZ::u8 {
    Linear,
    Cylindrical,
    Spherical,
};
| Shape | Behavior | Right for |
|---|
Linear | Straight-line lerp in world space. Used as the automatic fallback when the pivot or either input is degenerate. | Cams with no meaningful pivot. Short displacements where arcing would be over-engineered. |
Cylindrical | Interpolate in a plane perpendicular to cylinderAxis (default world +Z). Radius and angle lerp in the plane; height along the axis lerps linearly. | Ground cams sweeping horizontally without dipping / rising mid-sweep. PhantomCam LeadingFollowBody band response default. |
Spherical | Full 3D arc on the surface of a sphere centered on the pivot. Radius lerps along the arc. | Cams that change height during the motion (over-shoulder ↔ overhead). Free pitch-aware orbits. PhantomCam DynamicOrbitBody default. |
PivotSource
For two-cam blends, which cam’s pivot drives the arc. Single-pivot consumers don’t need this — they pass the one pivot they already have. The enum exists for cross-cam blend authoring on PhantomBlend.
enum class PivotSource : AZ::u8 {
    Source,
    Destination,
    Shared,
};
| Value | Behavior |
|---|
Source | Sweep around the outgoing cam’s pivot. “Leave cam A elegantly, then settle into wherever cam B is.” |
Destination | Sweep around the incoming cam’s pivot. “Arrive at cam B elegantly, regardless of where cam A was.” |
Shared | Midpoint of both pivots. Collapses identically to either single-pivot mode when the pivots coincide. Recommended default — handles same-target and split-target cases gracefully. |
BlendPositionAroundPivot
Position-only blend.
AZ::Vector3 BlendPositionAroundPivot(
    const AZ::Vector3& a,
    const AZ::Vector3& b,
    const AZ::Vector3& pivot,
    float              t,
    BlendShape         shape,
    const AZ::Vector3& cylinderAxis = AZ::Vector3::CreateAxisZ());
Blend position a toward b around pivot by fraction t along the chosen shape.
Parameters
| Parameter | Purpose |
|---|
a | Start position. |
b | End position. |
pivot | World-space pivot point. The geometric center of the arc. |
t | Blend fraction. NOT pre-clamped — values outside [0, 1] extrapolate. |
shape | Linear / Cylindrical / Spherical. |
cylinderAxis | Up axis for cylindrical mode. Default world +Z. Ignored by Linear and Spherical. |
Degenerate cases (automatic Linear fallback)
The function falls back to linear lerp when:
- Either input position is at or very-near the pivot (degenerate radius makes arc direction undefined).
shape == Linear explicitly.
Occasionally useful — e.g. t = -0.1 to anti-extrapolate slightly past the source for an overshoot effect.
Cylindrical math sketch
height_a = (a - pivot) ⋅ cylinderAxis
height_b = (b - pivot) ⋅ cylinderAxis
plane_a  = a - pivot - height_a * cylinderAxis
plane_b  = b - pivot - height_b * cylinderAxis

radius_a = plane_a.length
radius_b = plane_b.length
angle_a  = atan2(plane_a.y, plane_a.x)
angle_b  = atan2(plane_b.y, plane_b.x)
shortestAngle_b = ShortestArc(angle_a, angle_b)

radius_t = lerp(radius_a, radius_b, t)
angle_t  = lerp(angle_a, shortestAngle_b, t)
height_t = lerp(height_a, height_b, t)

result = pivot + height_t * cylinderAxis +
         radius_t * (cos(angle_t) * basisX + sin(angle_t) * basisY)
Spherical math sketch
dir_a    = (a - pivot).normalized
dir_b    = (b - pivot).normalized
radius_a = (a - pivot).length
radius_b = (b - pivot).length

// Slerp the direction on the unit sphere.
angle = acos(clamp(dir_a · dir_b, -1, 1))
if angle ≈ 0:  dir_t = dir_a
else:
    dir_t = (dir_a * sin((1 - t) * angle) + dir_b * sin(t * angle)) / sin(angle)

radius_t = lerp(radius_a, radius_b, t)

result = pivot + dir_t * radius_t
BlendPoseAroundPivot
Pose-level blend. Position uses BlendPositionAroundPivot. Rotation defaults to “look at pivot from the blended position.”
AZ::Transform BlendPoseAroundPivot(
    const AZ::Transform& a,
    const AZ::Transform& b,
    const AZ::Vector3&   pivot,
    float                t,
    BlendShape           shape,
    const AZ::Vector3&   cylinderAxis    = AZ::Vector3::CreateAxisZ(),
    bool                 slerpRotations  = false);
Rotation modes
slerpRotations | Rotation behavior |
|---|
false (default) | Fresh “look at pivot from the blended position” quaternion. The most-often-correct cam semantic — orientation always faces the pivot regardless of either input cam’s authored aim quirks. Uses +Y forward / +Z up (matches AZ::Transform::CreateLookAt). |
true | Slerp a.GetRotation() → b.GetRotation() directly. For UI / VFX consumers that want raw input-rotation interpolation. |
ResolveCrossCamPivot
For consumers that need to pick between two cams’ pivots based on a PivotSource enum.
struct ResolvedPivot {
    AZ::Vector3 pivot;
    bool        valid;   // false → no meaningful pivot; use Linear
};

ResolvedPivot ResolveCrossCamPivot(
    bool               sourceHasPivot,
    const AZ::Vector3& sourcePivot,
    bool               destHasPivot,
    const AZ::Vector3& destPivot,
    PivotSource        source);
Resolution table
source | Both have pivots | Only source has | Only dest has | Neither |
|---|
Source | sourcePivot | sourcePivot | destPivot (fallback) | invalid |
Destination | destPivot | sourcePivot (fallback) | destPivot | invalid |
Shared | midpoint(s, d) | sourcePivot | destPivot | invalid |
valid = false signals the consumer should fall back to BlendShape::Linear.
Reflection
void ReflectOrbitalSolverEnums(AZ::ReflectContext* context);
Reflects BlendShape and PivotSource into the SerializeContext so authoring sites (PhantomBlend, body stages) can expose them as ComboBox EnumAttributes.
Guarded internally — safe to call multiple times from independent reflect chains. PhantomBlend and DynamicOrbitBody both call it at the top of their own Reflect.
Per-Tick Damping Pattern
The primitive doubles as a per-tick damping operator. Spring damping toward a pivot-arranged destination is exactly this primitive:
m_idealPosition = GS_Core::Math::BlendPositionAroundPivot(
    m_idealPosition,
    desiredPos,
    pivot,
    HalflifeAlpha(halflife, deltaTime),
    shape);
No separate spring needed. HalflifeAlpha comes from the standard halflife → per-frame alpha conversion 1 − exp2(-deltaTime / halflife).
This is how DynamicOrbitBody damps the cam’s position toward whatever its target angles resolve to on the orbit surface — the solver call IS the smoothing. Authors tune one halflife and get spring-like response shaped around the pivot.
Consumers
PhantomCam consumers
| Consumer | Use |
|---|
| Cam Core — cross-cam blend execution | BlendPositionAroundPivot per-tick during cross-cam blends. Pivot resolved by the matched blend entry’s PivotSource choice (Source / Destination / Shared). |
| Blend Profiles — authoring | Each PhantomBlend entry authors BlendShape and PivotSource. |
| DynamicOrbitBody — per-tick damping | Solver IS the damping primitive — yaw / pitch target produces desiredPos on the orbit surface; solver damps m_idealPosition toward it. |
| LeadingFollowBody — band response | Cylindrical default. Cam arcs around the target during band response rather than cutting through. |
Non-PhantomCam consumers
The same primitive serves any system that needs pivot-aware blending — UI elements orbiting a focal point, world-space VFX paths, unit motion patterns. The primitive is namespaced under GS_Core::Math precisely so other gems can adopt it.
See Also
Related GS_Core utilities:
- Springs — spring-damper primitives. Use Springs for non-pivot smoothing; use Orbital Solver when motion naturally arranges around a pivot.
- Curves —
CurveType enum used for blend easing curves. - Angles Helper — yaw wrap / shortest-arc helpers used by orbit body stages.
PhantomCam consumer pages:
Get GS_Core
Explore other GS_Play gems on the product page.
1.7.7 - Gradients
Multi-stop gradient types for sampling color, float, and vector values over a normalized range — used by motion tracks and feedback effects.
The Gradients utility provides three parallel gradient types for interpolating values over a normalized [0,1] range using a sorted list of marker points. All types are fully reflected (SerializeContext + EditContext) and editable in the Inspector with visual marker placement. Gradients are lazily sorted before evaluation.
Used by: FeedbackMaterialTrack (color/float animation), UiImageColorTrack, procedural visual effects, any system needing editable color or value ramps.
For usage guides and setup examples, see The Basics: GS_Core.
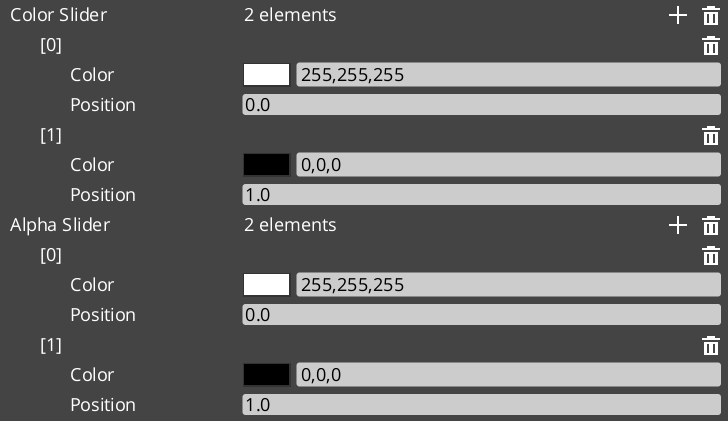
Contents
Gradient Types
| Type | Value Type | Description |
|---|
FloatGradient | float | Single float value ramp |
Vector2Gradient | AZ::Vector2 | 2D vector ramp |
ColorGradient | AZ::Color | RGBA color ramp with separate color and alpha channels |
Marker Structs
Each gradient type has a corresponding marker struct that defines a single stop on the gradient.
FloatGradientMarker
| Field | Type | Description |
|---|
markerValue | float | The float value at this stop |
markerPosition | float | Position in [0, 1] along the gradient |
Vector2GradientMarker
| Field | Type | Description |
|---|
markerValue | AZ::Vector2 | The 2D vector value at this stop |
markerPosition | float | Position in [0, 1] along the gradient |
ColorGradientMarker
| Field | Type | Description |
|---|
markerColor | AZ::Color | The color (RGB + A) at this stop |
markerPosition | float | Position in [0, 1] along the gradient |
Gradient Classes
All three gradient types share the same structure and interface:
| Field / Method | Description |
|---|
slider | AZStd::vector<Marker> — the sorted list of gradient stops (field name for Float/Vector2) |
sorted | Internal dirty flag; gradient is lazily sorted before Evaluate is called |
SortGradient() | Sorts markers by position. Called automatically before evaluation when markers change. |
Evaluate(float t) | Returns the interpolated value at normalized position t in [0, 1] |
ColorGradient
ColorGradient maintains two separate marker lists for independent RGB and alpha control:
| Field | Description |
|---|
colorSlider | AZStd::vector<ColorGradientMarker> — RGB stops |
alphaSlider | AZStd::vector<ColorGradientMarker> — alpha stops |
ColorGradient Channels
ColorGradient exposes three evaluate methods for flexible sampling:
| Method | Returns | Description |
|---|
Evaluate(float t) | AZ::Color | Full RGBA color — samples both colorSlider and alphaSlider |
EvaluateColor(float t) | AZ::Color | RGB only — alpha is always 1.0 |
EvaluateAlpha(float t) | float | Alpha channel only |
Usage Example
#include <GS_Core/Utility/Gradients/FloatGradientUtility.h>
#include <GS_Core/Utility/Gradients/ColorGradientUtility.h>

// Sample a float gradient at normalized progress (0 → 1)
float value = myFloatGradient.Evaluate(normalizedProgress);

// Sample full RGBA color
AZ::Color color = myColorGradient.Evaluate(normalizedProgress);

// Sample RGB and alpha independently
AZ::Color rgb   = myColorGradient.EvaluateColor(normalizedProgress);
float alpha     = myColorGradient.EvaluateAlpha(normalizedProgress);
See Also
For related resources:
Get GS_Core
GS_Core — Explore this gem on the product page and add it to your project.
1.7.8 - Entity Helpers
Utility functions for finding entities in the scene by name — runtime entity lookup without maintaining manual references.
The EntityUtility namespace provides helper functions for finding entities in the active scene by name. Useful for runtime entity lookup without maintaining manual entity references.
For usage guides and setup examples, see The Basics: GS_Core.
API Reference
| Function | Returns | Description |
|---|
GetEntityByName(name) | AZ::Entity* | Finds an active entity with the given name. Returns nullptr if not found. |
GetEntityIdByName(name) | AZ::EntityId | Finds an active entity’s ID by name. Returns an invalid EntityId if not found. |
Usage Example
#include <GS_Core/Utilities/EntityUtility.h>

// Find an entity by name
AZ::EntityId playerId = GS_Core::EntityUtility::GetEntityIdByName("Player");
if (playerId.IsValid())
{
    // Use the entity
}
See Also
For related resources:
Get GS_Core
GS_Core — Explore this gem on the product page and add it to your project.
1.7.9 - Angle Helpers
Angle and orientation math — sector mapping, yaw extraction, quaternion conversion, and hysteresis for directional classification.
The Orientation namespace (GS_Core::Orientation) provides angle-to-sector mapping for directional gameplay — animation direction selection, facing classification, and compass-style sector queries. It splits a full circle into N equal angular sectors and determines which sector a given angle falls into, with hysteresis to prevent rapid sector-switching at boundaries.
Used by: Paper-facing systems (gs_performer), directional input reactors (gs_unit), targeting systems (gs_interaction)
For usage guides and setup examples, see The Basics: GS_Core.
Contents
SectionConfig Enum
A reflected, editor-friendly enum selecting common sector counts and alignment modes. Two alignment modes exist per count:
- cardinal / sideAligned — sector boundaries fall on the cardinal directions; sectors straddle diagonals
- quarters / forwardAligned — sector boundaries fall on diagonals; sectors straddle cardinals
| Family | Values |
|---|
| x4 | x4_cardinal, x4_quarters |
| x6 | x6_sideAligned, x6_forwardAligned |
| x8 | x8_cardinal, x8_quarters |
| x10 | x10_sideAligned, x10_forwardAligned |
| x12 | x12_sideAligned, x12_forwardAligned |
| x14 | x14_sideAligned, x14_forwardAligned |
| x16 | x16_sideAligned, x16_forwardAligned |
| x18 | x18_sideAligned, x18_forwardAligned |
| x20 | x20_sideAligned, x20_forwardAligned |
| x22 | x22_sideAligned, x22_forwardAligned |
| x24 | x24_sideAligned, x24_forwardAligned |
Register with GS_Core::Orientation::ReflectOrientationEnums(context) to expose these in the Inspector.
RotationDirection Enum
Controls the winding convention used when computing sector angles.
| Value | Numeric | Description |
|---|
CCW | 1 | Counter-clockwise winding |
CW | -1 | Clockwise winding |
Pick Struct
Returned by all PickByAngle overloads. Contains full sector geometry for the selected sector.
| Field | Type | Description |
|---|
index | int | Which sector was selected [0, N) |
count | int | Total number of sectors |
angle | float | The input angle as provided |
width | float | Angular width of each sector (2π / N) |
center | float | Center angle of the selected sector |
start | float | Start angle of the selected sector |
end | float | End angle of the selected sector |
Use GS_Core::Orientation::Changed(pick, prevIndex) to detect when the sector index changes between frames.
API Reference
Sector Mapping
| Function | Description |
|---|
PickByAngle(angle, count, halfAligned, prevIndex, hysteresisDeg, startAngle, dir) | Primary overload — full parameter control |
PickByAngle(angle, SectionConfig, prevIndex, hysteresisDeg, startAngle, dir) | Convenience overload using SectionConfig enum |
PickByAngle(angle, count, offsetRad, prevIndex, hysteresisDeg, startAngle, dir) | Low-level overload with explicit alignment offset |
ConfigToParams(cfg) | Maps a SectionConfig value to its (count, halfAligned) pair |
Changed(pick, prevIndex) | Returns true if the sector index changed from prevIndex |
Angle Math
| Function | Description |
|---|
WrapToTwoPi(x) | Wraps any angle to [0, 2π) |
WrapToPi(x) | Wraps any angle to (-π, π] |
AlignmentOffsetRad(N, halfAligned) | Returns the alignment shift in radians for a given count and mode |
Yaw and Quaternion
| Function | Description |
|---|
YawFromDir(dir, rotDir) | Flat yaw from a direction vector (Z-up world) |
YawFromDir(dir, upAxis, forwardHint, rotDir) | General yaw with custom up and forward axes |
FlatSignedYaw_ToCam(camFwd, rootFwd, up, dir) | Signed yaw from camera-forward to entity-forward, projected flat |
QuatFromYaw(yawRad, upAxis) | Builds a rotation quaternion from a yaw angle and up axis |
Reflection
| Function | Description |
|---|
ReflectOrientationEnums(context) | Registers SectionConfig and RotationDirection with SerializeContext |
Usage Example
#include <GS_Core/Utility/Math/SectionByAngle.h>

// Member field — track previous sector to enable hysteresis
int m_prevSectorIndex = -1;

// In your tick / update function:
AZ::Vector3 moveDir = GetMovementDirection();

// Get the yaw from the movement direction (Z-up world)
float yaw = GS_Core::Orientation::YawFromDir(moveDir, GS_Core::Orientation::RotationDirection::CCW);

// Map to an 8-way sector with 5-degree hysteresis
GS_Core::Orientation::Pick pick = GS_Core::Orientation::PickByAngle(
    yaw,
    GS_Core::Orientation::SectionConfig::x8_cardinal,
    m_prevSectorIndex,  // previous index for hysteresis
    5.0f                // hysteresis in degrees
);

if (GS_Core::Orientation::Changed(pick, m_prevSectorIndex))
{
    m_prevSectorIndex = pick.index;
    // React to direction change: play animation, update facing, etc.
}
See Also
For related resources:
Get GS_Core
GS_Core — Explore this gem on the product page and add it to your project.
1.7.10 - Spline Helpers
Utility functions for O3DE spline queries — closest point, fraction, and local/world space conversion by entity ID.
The SplineUtility namespace (GS_Core::SplineUtility) provides free functions for querying the closest point on an O3DE spline component attached to an entity. All functions take an entity ID and a position in world or local space.
Used by: PathTo_DialoguePerformance (gs_cinematics), any system that guides an entity along a spline path.
For usage guides and setup examples, see The Basics: GS_Core.
Contents
API Reference
| Function | Parameters | Description |
|---|
FindClosestWorldPoint | AZ::EntityId entityId, AZ::Vector3 worldPos | Returns the closest world-space point on the spline attached to entityId |
FindClosestLocalPoint | AZ::EntityId entityId, AZ::Vector3 localPos | Returns the closest point in local spline space |
FindClosestFraction | AZ::EntityId entityId, AZ::Vector3 worldPos | Returns the normalized [0, 1] fraction along the spline of the closest point to worldPos |
Usage Example
#include <GS_Core/Utility/SplineUtility.h>

// Find how far along a path the player is (0 = start, 1 = end)
AZ::Vector3 playerPos = GetPlayerWorldPosition();
float fraction = GS_Core::SplineUtility::FindClosestFraction(splineEntityId, playerPos);

// Get the actual closest world position on the path
AZ::Vector3 closestPoint = GS_Core::SplineUtility::FindClosestWorldPoint(splineEntityId, playerPos);
See Also
For related resources:
Get GS_Core
GS_Core — Explore this gem on the product page and add it to your project.
1.7.11 - Physics Trigger Volume
Base class and component for physics trigger and collision handling — inherit to create interactive volumes with enter, exit, and hold callbacks.
The physics trigger system is two classes: PhysicsTriggeringVolume (the non-component base class with all trigger logic) and PhysicsTriggerComponent (the concrete O3DE component that wraps it with game-lifecycle awareness). Inherit from either to create interactive volumes — damage zones, pickup areas, dialogue triggers, environmental hazards — without writing boilerplate physics code.
The base class handles entity tracking (one enter/exit per entity), supports both trigger overlaps and collision contacts, and provides optional hold/persist callbacks for continuous processing.
For usage guides and setup examples, see The Basics: GS_Core.
Contents
PhysicsTriggeringVolume
File: Physics/PhysicsTriggeringVolume.h
Namespace: GS_Core
Base classes: Physics::RigidBodyNotificationBus::Handler, DebugLoggingHelper
A non-component base class that manages the full lifecycle of a physics trigger or collision volume. Add it alongside your own AZ::Component via multiple inheritance.
Configuration Fields
| Field | Type | Default | Description |
|---|
EnableCollisionAsTrigger | bool | false | Treat collision begin/persist/end events as trigger-style callbacks |
EnableTriggerHoldUpdate | bool | false | Enable per-physics-tick TriggerHold callback while entities are inside |
Lifecycle Methods
| Method | Description |
|---|
ConnectTriggering(AZ::EntityId entityId) | Subscribes to physics events on the given entity. Call from your component’s Activate(). |
DisconnectTriggering() | Unsubscribes and clears all handlers. Call from your component’s Deactivate(). |
OnPhysicsEnabled(AZ::EntityId entityId) | Called when the physics body becomes active. Internally calls InitPhysicsTriggerHandler. |
OnPhysicsDisabled(AZ::EntityId entityId) | Called when the physics body is destroyed. Internally calls DisconnectTriggering. |
Virtual Callbacks
Override these in your subclass to react to trigger and collision events.
| Method | Parameters | Returns | Description |
|---|
TriggerEnter | AZ::EntityId entity | bool | Called when an entity enters the volume. Return false to reject the entity. |
TriggerHold | float fixedDeltaTime | void | Called each physics tick while entities are inside. Requires EnableTriggerHoldUpdate = true. |
CollisionHold | AZ::EntityId entity | void | Called per-entity each physics tick for collision events. Requires EnableCollisionAsTrigger = true. |
TriggerExit | AZ::EntityId entity | bool | Called when an entity exits the volume. Return false to reject. |
Internal State
| Field | Description |
|---|
m_entities | AZStd::unordered_set<AZ::EntityId> — entities currently inside the volume |
m_triggerEntity | The entity whose physics body is being monitored |
PhysicsTriggerComponent
File: Physics/PhysicsTriggerComponent.h
Namespace: GS_Core
Base classes: PhysicsTriggeringVolume, GameManagerNotificationBus::Handler
A concrete O3DE component that wraps PhysicsTriggeringVolume and adds game-lifecycle awareness. Automatically disables the trigger during game standby and re-enables it on exit.
Used by: WorldTriggerComponent (gs_interaction), ColliderTriggerSensorComponent — these subclass PhysicsTriggerComponent to implement game-specific trigger behaviors.
Data Fields
| Field | Type | Default | Description |
|---|
isActive | bool | false | Whether the trigger is currently armed |
triggerEntity | AZ::EntityId | invalid | The entity providing the physics body to monitor |
Virtual Methods
Override these to implement game-specific trigger behavior.
| Method | Description |
|---|
ActivatePhysicsTrigger(AZ::EntityId entity) | Called when triggered. Subclasses perform the response here. |
DeactivatePhysicsTrigger() | Called on exit. Subclasses clean up here. |
Standby Handling
| Method | Description |
|---|
OnEnterStandby() | Disables the trigger when the game enters standby |
OnExitStandby() | Re-enables the trigger when the game exits standby |
Extending Physics Trigger Volume
Use the PhysicsTriggerComponent ClassWizard template to generate a new trigger component with boilerplate already in place — see GS_Core Templates.
Inherit directly from PhysicsTriggeringVolume alongside AZ::Component for a lightweight custom trigger. Use PhysicsTriggerComponent as your base if you need the built-in standby handling.
Use public virtual inheritance with PhysicsTriggeringVolume to avoid issues with multiple inheritance chains that include AZ::Component.
#pragma once
#include <AzCore/Component/Component.h>
#include <GS_Core/Utility/Physics/PhysicsTriggeringVolume.h>

namespace MyProject
{
    class DamageZoneComponent
        : public AZ::Component
        , public virtual GS_Core::PhysicsTriggeringVolume
    {
    public:
        AZ_COMPONENT_DECL(DamageZoneComponent);

        static void Reflect(AZ::ReflectContext* context);

    protected:
        void Activate() override;
        void Deactivate() override;

        // Trigger overrides
        bool TriggerEnter(AZ::EntityId entity) override;
        void TriggerHold(float fixedDeltaTime) override;
        bool TriggerExit(AZ::EntityId entity) override;

    private:
        float m_damagePerSecond = 10.0f;
    };
}
Implementation (.cpp)
#include "DamageZoneComponent.h"
#include <AzCore/Serialization/SerializeContext.h>

namespace MyProject
{
    AZ_COMPONENT_IMPL(DamageZoneComponent, "DamageZoneComponent", "{YOUR-UUID-HERE}");

    void DamageZoneComponent::Reflect(AZ::ReflectContext* context)
    {
        if (auto sc = azrtti_cast<AZ::SerializeContext*>(context))
        {
            sc->Class<DamageZoneComponent, AZ::Component, GS_Core::PhysicsTriggeringVolume>()
                ->Version(0)
                ->Field("DamagePerSecond", &DamageZoneComponent::m_damagePerSecond);

            if (AZ::EditContext* ec = sc->GetEditContext())
            {
                ec->Class<DamageZoneComponent>("Damage Zone", "Deals damage inside the trigger volume")
                    ->ClassElement(AZ::Edit::ClassElements::EditorData, "")
                        ->Attribute(AZ::Edit::Attributes::Category, "MyProject")
                        ->Attribute(AZ::Edit::Attributes::AppearsInAddComponentMenu, AZ_CRC_CE("Game"))
                    ->DataElement(AZ::Edit::UIHandlers::Default,
                        &DamageZoneComponent::m_damagePerSecond,
                        "Damage Per Second", "Damage dealt per second while inside");
            }
        }
    }

    void DamageZoneComponent::Activate()
    {
        EnableTriggerHoldUpdate = true;  // Enable hold callbacks for continuous damage
        GS_Core::PhysicsTriggeringVolume::ConnectTriggering(GetEntityId());
    }

    void DamageZoneComponent::Deactivate()
    {
        GS_Core::PhysicsTriggeringVolume::DisconnectTriggering();
    }

    bool DamageZoneComponent::TriggerEnter(AZ::EntityId entity)
    {
        AZ_TracePrintf("DamageZone", "Entity entered damage zone");
        return true; // Accept the entity
    }

    void DamageZoneComponent::TriggerHold(float fixedDeltaTime)
    {
        // Apply damage to all entities currently inside
        for (const AZ::EntityId& entity : m_entities)
        {
            // Apply m_damagePerSecond * fixedDeltaTime damage to entity...
        }
    }

    bool DamageZoneComponent::TriggerExit(AZ::EntityId entity)
    {
        AZ_TracePrintf("DamageZone", "Entity exited damage zone");
        return true;
    }
}
Setup
- Create an entity with a PhysX Collider component set as a trigger.
- Add your custom trigger component (e.g.,
DamageZoneComponent). - Configure the collider shape and component properties.
- Entities with PhysX rigid bodies that enter the collider will trigger your callbacks.
See Also
For conceptual overviews and usage guides:
For related resources:
Get GS_Core
GS_Core — Explore this gem on the product page and add it to your project.
1.7.12 - Weighted Random
Weighted random selection — pick a key from a weighted map with probability proportional to each entry’s float weight.
RandomUtils (GS_Core::RandomUtils) provides a single templated static method for weighted random selection from a map. The caller provides their own AZ::SimpleLcgRandom instance for deterministic control over the random sequence.
Used by: RandomNodeData (dialogue random node), KlattVoiceComponent (phoneme selection), any system needing weighted random draws.
For usage guides and setup examples, see The Basics: GS_Core.
Contents
API Reference
template<typename T>
static T GetRandomWeighted(
    AZ::SimpleLcgRandom* rand,
    const AZStd::unordered_map<T, float>& weightedTable
);
Selects one key from weightedTable with probability proportional to its float weight value. Higher weights mean higher probability of selection.
| Parameter | Description |
|---|
rand | Caller-owned AZ::SimpleLcgRandom instance. The caller controls seeding and lifetime. |
weightedTable | Map of candidates to weights. Keys are the items to select from; values are their relative weights. |
Returns: The selected key of type T.
Edge cases:
- Falls back to the last entry on floating-point precision edge cases.
- Asserts if
weightedTable is empty.
Usage Example
#include <GS_Core/Utility/Random/RandomUtils.h>
#include <AzCore/Math/Random.h>

// Member field — keep the random instance alive across calls
AZ::SimpleLcgRandom m_random;

// Build a weighted table: key = item, value = relative weight
AZStd::unordered_map<AZStd::string, float> lootTable;
lootTable["Common Sword"]    = 50.0f;
lootTable["Rare Shield"]     = 30.0f;
lootTable["Epic Helmet"]     = 15.0f;
lootTable["Legendary Ring"]  =  5.0f;

// Select an item — "Common Sword" is 10x more likely than "Legendary Ring"
AZStd::string selected = GS_Core::RandomUtils::GetRandomWeighted(&m_random, lootTable);
See Also
For related resources:
Get GS_Core
GS_Core — Explore this gem on the product page and add it to your project.
1.8 - Templates
ClassWizard templates for GS_Core — manager components, save system savers, input readers, and physics trigger volumes.
All GS_Core extension types are generated through the ClassWizard CLI. The wizard handles UUID generation, cmake file-list registration, and module descriptor injection automatically. Never create these files from scratch.
For usage guides and setup examples, see The Basics: GS_Core.
python ClassWizard.py \
    --template <TemplateName> \
    --gem <GemPath> \
    --name <SymbolName> \
    [--input-var key=value ...]
<GemPath> is the full path to your gem root. <SymbolName> becomes ${Name} — the prefix on all generated filenames and class names.
Contents
Manager Component
Template: GS_ManagerComponent
Creates a standard game component with an optional EBus interface header. This is the baseline component pattern for all GS_Play manager-style objects — systems that own state and expose it to other components via a request bus.
Generated files:
Source/${Name}ManagerComponent.h/.cppInclude/${GemName}/${Name}Bus.h (optional — the EBus interface)
CLI:
python ClassWizard.py --template GS_ManagerComponent --gem <GemPath> --name <Name>

# Skip the EBus header if no bus is needed:
python ClassWizard.py --template GS_ManagerComponent --gem <GemPath> --name <Name> \
    --input-var skip_interface=true
Input vars:
| Var | Type | Default | Description |
|---|
skip_interface | toggle | false | Omit the ${Name}Bus.h EBus interface header |
Post-generation: None — cmake registration and module descriptor are fully automatic.
See also: GS_Managers — the built-in manager system this component integrates with.
Saver Component
Template: SaverComponent
Creates a component that participates in the save system. Handles serializing and restoring a specific block of game state when the save system broadcasts its save/load events.
Generated files:
Source/${Name}SaverComponent.h/.cpp
CLI:
python ClassWizard.py --template SaverComponent --gem <GemPath> --name <Name>
Post-generation: Implement BuildSaveData() and ProcessLoad() bodies with save record reads/writes via GS_Core::SaveSystemRequestBus. Set GetSubComponentName() to a unique string so save keys do not collide with other savers.
See also: GS_Save / Savers — full extension guide with header and implementation examples.
Template: GS_InputReaderComponent
Sits on the Controller Entity. Reads raw hardware input events (keyboard, gamepad) and translates them into named input data events broadcast via InputDataNotificationBus. Downstream InputReactor components on the Unit Entity subscribe to those named events.
Generated files:
Source/${Name}InputReaderComponent.h/.cpp
CLI:
python ClassWizard.py --template GS_InputReaderComponent --gem <GemPath> --name <Name>
Post-generation: Bind specific hardware input channels in Activate() and implement event handlers that call InputDataNotificationBus::Broadcast(...). Pair with a corresponding InputReactor on the Unit side.
See also: GS_Unit / Input Data — the full input pipeline overview.
Physics Trigger Component
Template: PhysicsTriggerComponent
Creates a component that wraps a PhysX trigger volume. Responds to TriggerEnter / TriggerExit events to fire game logic when entities enter or leave a physics shape.
Generated files:
Source/${Name}PhysicsTriggerComponent.h/.cpp
CLI:
python ClassWizard.py --template PhysicsTriggerComponent --gem <GemPath> --name <Name>
Post-generation: Implement TriggerEnter / TriggerExit / TriggerHold bodies. Requires a PhysX Shape component on the same entity with Trigger mode enabled. Stack multiple trigger components on one entity for compound logic.
See also: Physics Trigger Volume — full extension guide with header and implementation examples.
See Also
For the full API, component properties, and C++ extension guide:
For all ClassWizard templates across GS_Play gems:
Get GS_Core
GS_Core — Explore this gem on the product page and add it to your project.
1.9 - 3rd Party Implementations
For usage guides and setup examples, see The Basics: GS_Core.
Get GS_Core
GS_Core — Explore this gem on the product page and add it to your project.
2 - GS_AI
Foundation scaffold for AI controller integration in GS_Play projects. Provides the system component and extension point for custom AI controller gems.
GS_AI is the AI foundation gem for GS_Play. It installs the system-level scaffold that custom AI controller gems and in-project AI logic hook into. The gem itself ships a single system component — it does not provide ready-made AI behaviours. Instead it defines the integration pattern: your AI controllers extend the provided base classes and register against the system component at activation. The gem depends on GS_Core.
For usage guides and setup examples, see The Basics: GS_AI.
Contents
AI System
The AI system component is the runtime anchor for the gem. It initializes the AI subsystem, manages the controller registry, and provides the bus interface that AI controllers and external systems use to query active agents. All custom AI controllers in a project register through this component.
| Component | Purpose |
|---|
| GS_AISystemComponent | Runtime system component. Initializes the AI subsystem and hosts the controller registry. Extension point for custom AI controller gems and in-project AI logic. |
Extension pattern:
Custom AI controllers are O3DE components that extend the GS_AI base controller interface and activate/deactivate against GS_AISystemComponent. No gem source modification is required — new controllers self-register on Activate() via the system bus and deregister on Deactivate().
AI System API
Installation
GS_AI requires GS_Core and is a prerequisite for any project that uses custom AI controller gems.
- Enable GS_AI and GS_Core in your O3DE project’s gem list.
- The GS_AISystemComponent activates automatically as a system component — no manual placement in the level is required.
- Implement your AI controller as an O3DE component that connects to
GS_AIRequestBus on Activate() and disconnects on Deactivate(). - Add your custom AI controller component to agent entities in the level.
See Also
For conceptual overviews and usage guides:
For related resources:
Get GS_AI
GS_AI — Explore this gem on the product page and add it to your project.
2.1 - 3rd Party Implementations
For usage guides and setup examples, see The Basics: GS_AI.
Get GS_AI
GS_AI — Explore this gem on the product page and add it to your project.
3 - GS_Audio
Audio management, event-based sound playback, multi-layer music scoring, mixing buses with effects, and Klatt formant voice synthesis with 3D spatial audio.
GS_Audio provides a complete audio solution for GS_Play projects. It includes a visual node-based audio event authoring system, multi-layer music scoring, named mixing buses with configurable effects chains, and a built-in Klatt formant voice synthesizer with 3D spatial audio. All features integrate with the GS_Play manager lifecycle and respond to standby mode automatically.
For usage guides and setup examples, see The Basics: GS_Audio.
Contents
Audio Management
The Audio Manager singleton initializes the MiniAudio engine, manages mixing buses, and coordinates score track playback. It extends GS_ManagerComponent and participates in the standard two-stage initialization.
| Component | Purpose |
|---|
| Audio Manager | Master audio controller – engine lifecycle, bus routing, event library loading, score management. |
Audio Manager API
Audio Event Graph
A visual node-based editor for authoring complex sound events. Build audio processing chains with sources, filters, effects, and conditional routing — all evaluated as a data-flow graph at runtime using the gs_graphcanvas framework.
| Feature | Purpose |
|---|
| Audio Event Graph | Visual sound event editor — sources, filters, effects, routing, and phase lifecycle. |
Audio Event Graph
Mixing & Effects
Named audio buses with configurable effects chains and environmental influence. Includes 9 built-in audio filter types.
Mixing & Effects API
Score Arrangement
Multi-layer music scoring with configurable time signatures, tempo, and layer control.
Score Arrangement API
Klatt Voice Synthesis
Built-in text-to-speech using Klatt formant synthesis with 3D spatial audio.
Klatt Voice API
Dependencies
- GS_Core (required)
- MiniAudio (third-party audio library)
- SoLoud (embedded, for voice synthesis)
Installation
- Enable the GS_Audio gem in your project configuration.
- Ensure GS_Core and MiniAudio are also enabled.
- Create an Audio Manager prefab and add it to the Game Manager’s Startup Managers list.
See Also
For conceptual overviews and usage guides:
For related resources:
Get GS_Audio
GS_Audio — Explore this gem on the product page and add it to your project.
3.1 - Audio Manager
Master audio controller – engine initialization, mixing bus routing, event library loading, score playback, and Audio Event Graph instance management.
The Audio Manager is the master audio controller for every GS_Play project. It extends GS_ManagerComponent and participates in the standard two-stage initialization managed by the Game Manager. On startup it initializes the MiniAudio engine, creates the named mixing bus graph, and coordinates score track playback.
Like all GS_Play managers, the Audio Manager responds to standby mode automatically — muting or pausing audio output when the game enters a blocking operation such as a stage change.
For usage guides and setup examples, see The Basics: GS_Audio.
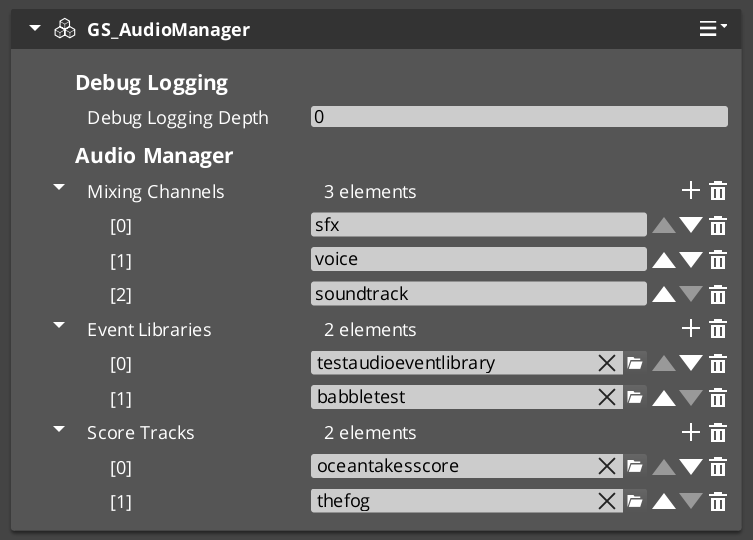
Contents
How It Works
Engine Lifecycle
When the Audio Manager activates, it initializes a MiniAudio engine instance and builds the mixing bus graph from its configured bus list.
Mixing Bus Routing
All audio output flows through named mixing buses. Each bus is a GS_MixingBus node in the MiniAudio graph with its own volume level and optional effects chain. The Audio Manager owns the top-level routing and exposes volume control per bus through the request bus.
Audio Event Graph Pooling
The Audio Manager maintains a template cache and instance pool for Audio Event Graphs. When a graph is played:
- First request for a path loads and caches the
GraphDocumentAsset - A
GraphInstance is created from the cached asset - On release, idle instances are pooled for reuse (default pool size: 8)
- Each instance is fully independent — variables, phase, and state do not bleed between instances
Score Playback
The Audio Manager coordinates playback of ScoreArrangementTrack assets — multi-layer musical scores with configurable tempo, time signature, and layer selection.
Inspector Properties
| Property | Type | Description |
|---|
| Mixing Buses | AZStd::vector<BusEffectsPair> | Named mixing buses with optional effects chains. |
| Default Master Volume | float | Initial master volume (0.0 to 1.0). |
API Reference
GS_AudioManagerComponent
| Field | Value |
|---|
| TypeId | {F28721FD-B9FD-4C04-8CD1-6344BD8A3B78} |
| Extends | GS_Core::GS_ManagerComponent |
| Header | GS_Audio/GS_AudioManagerBus.h |
Audio Event Graph
Instanced, visual-graph-based sound events with full lifecycle control, variable injection, and 3D spatialization.
Playback Control
| Method | Parameters | Returns | Description |
|---|
PlayAudioGraph | const AZStd::string& assetPath | AZ::u32 instanceId | Fire-and-forget graph playback. Auto-cleaned up when finished. Returns an instance ID. |
AcquireAudioGraph | const AZStd::string& assetPath | AZ::u32 instanceId | Acquires a graph instance for manual control. Caller is responsible for release. |
FireAudioGraph | AZ::u32 instanceId | void | Starts or restarts playback on an acquired instance. |
StopAudioGraph | AZ::u32 instanceId | void | Stops playback cleanly and returns the instance to the pool. |
StopAllAudioGraphs | — | void | Emergency stops all playing graph instances. |
ReleaseAudioGraph | AZ::u32 instanceId | void | Releases a manually acquired instance back to the pool. |
StopAudioGraphFade | AZ::u32 instanceId, float fadeTime | void | Fades out and stops over the specified duration (seconds). |
Lifecycle
| Method | Parameters | Returns | Description |
|---|
SetAudioGraphLooping | AZ::u32 instanceId, bool looping | void | Enables or disables the Loop phase. |
FinishAudioGraph | AZ::u32 instanceId | void | Transitions to the Finish phase after current sounds complete. |
Variable Control
Set graph variables at runtime to drive filter parameters, routing, and source selection.
| Method | Parameters | Returns | Description |
|---|
SetAudioGraphVariable | AZ::u32 instanceId, const AZStd::string& name, float value | void | Sets a float variable on the instance. |
SetAudioGraphVariableInt | AZ::u32 instanceId, const AZStd::string& name, int value | void | Sets an int variable. |
SetAudioGraphVariableBool | AZ::u32 instanceId, const AZStd::string& name, bool value | void | Sets a bool variable. |
SetAudioGraphVariableString | AZ::u32 instanceId, const AZStd::string& name, const AZStd::string& value | void | Sets a string variable. |
Setting a variable marks dependent nodes dirty and re-evaluates only the affected portion of the graph on the next tick.
3D Spatialization
| Method | Parameters | Returns | Description |
|---|
SetAudioGraphEntity | AZ::u32 instanceId, const AZ::EntityId& entityId | void | Tracks entity position for 3D audio. Updated each tick. |
SetAudioGraphPosition | AZ::u32 instanceId, const AZ::Vector3& position | void | Fixed world position for 3D audio. |
ClearAudioGraphSpatialization | AZ::u32 instanceId | void | Disables 3D spatialization (plays as 2D). |
Usage Pattern
// Fire-and-forget
AudioManagerRequestBus::Broadcast(&AudioManagerRequests::PlayAudioGraph,
    "Assets/Audio/Footstep_Stone.audiograph");

// Manual control with variable injection
AZ::u32 instanceId = 0;
AudioManagerRequestBus::BroadcastResult(instanceId,
    &AudioManagerRequests::AcquireAudioGraph,
    "Assets/Audio/Ambience_Forest.audiograph");

AudioManagerRequestBus::Broadcast(&AudioManagerRequests::SetAudioGraphLooping, instanceId, true);
AudioManagerRequestBus::Broadcast(&AudioManagerRequests::SetAudioGraphEntity, instanceId, entityId);
AudioManagerRequestBus::Broadcast(&AudioManagerRequests::FireAudioGraph, instanceId);

// Later: set a variable to mute underwater
AudioManagerRequestBus::Broadcast(&AudioManagerRequests::SetAudioGraphVariable,
    instanceId, "underwater", 0.8f);

// Stop when done
AudioManagerRequestBus::Broadcast(&AudioManagerRequests::StopAudioGraph, instanceId);
AudioManagerRequestBus::Broadcast(&AudioManagerRequests::ReleaseAudioGraph, instanceId);
Mixing
| Method | Parameters | Returns | Description |
|---|
SetMixerVolume | const AZStd::string& busName, float volume | void | Sets the volume of a named mixing bus (0.0 – 1.0). |
GetMixerVolume | const AZStd::string& busName | float | Returns the current volume of a named mixing bus. |
SetMasterVolume | float volume | void | Sets master output volume (0.0 – 1.0). |
GetMasterVolume | — | float | Returns current master output volume. |
Score
| Method | Parameters | Returns | Description |
|---|
PlayScoreTrack | const AZ::Data::Asset<ScoreArrangementTrack>& track | void | Begins playback of a score arrangement track. |
StopScoreTrack | — | void | Stops the currently playing score track. |
Notification Bus: AudioManagerNotificationBus
Events broadcast by the Audio Manager. Multiple handler bus — any number of components can subscribe.
| Event | Parameters | Description |
|---|
OnScoreTrackStarted | — | Fired when a score track begins. |
OnScoreTrackStopped | — | Fired when a score track stops. |
OnMixerVolumeChanged | const AZStd::string& busName, float volume | Fired when a mixing bus volume changes. |
See Also
Get GS_Audio
GS_Audio — Explore this gem on the product page and add it to your project.
3.2 - Audio Event Graph
Visual graph editor for authoring complex sound events with filters, effects, routing, and phase lifecycle.
The Audio Event Graph is an FMOD-style visual editor for authoring complex sound events. Each .audiograph file defines one sound event as a node graph — sources, filters, effects, and routing all connected visually. At runtime, the graph maps directly to a miniaudio processing pipeline.
The Audio Event Graph uses the gs_graphcanvas framework with a DataFlowGraph topology. Nodes evaluate in topological order with dirty-propagation — only nodes affected by a change are re-evaluated.
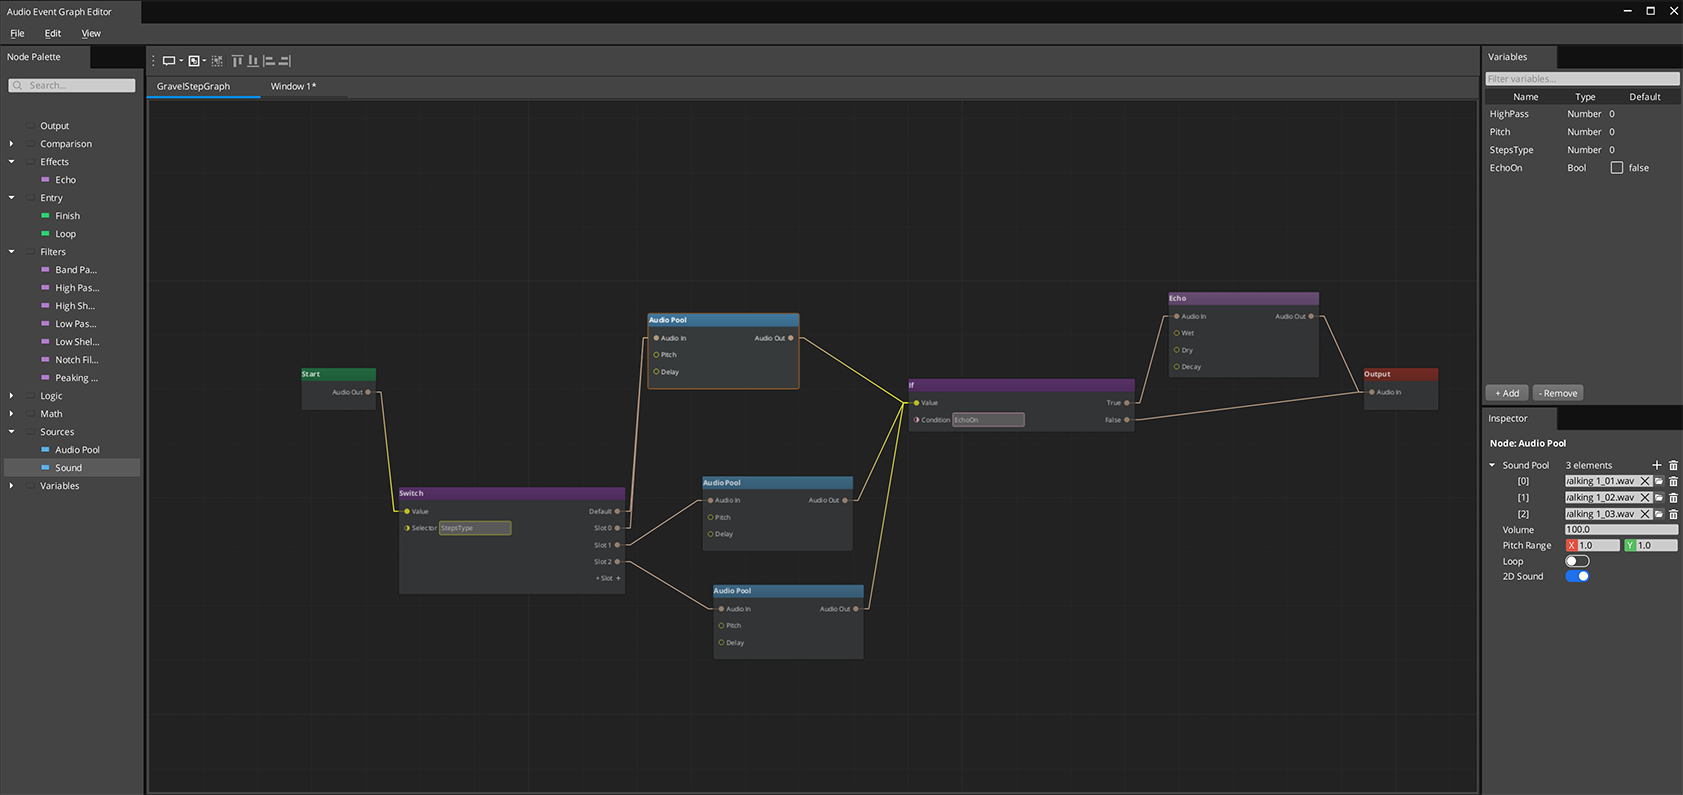
Contents
Opening the Editor
Open the Audio Event Graph editor from the O3DE Editor menu: GS Tools > Audio Event Graph Editor.
Each graph is a standalone .audiograph file — use File > New to create one, or File > Open to load an existing graph. Multiple graphs can be open simultaneously in separate tabs.
How It Works
Audio Event Graphs use a data-flow model. Connections carry AudioRoute values — handles that represent a point in the miniaudio processing chain. The signal flows left to right:
- Entry nodes gate which phase is active (Start, Loop, or Finish)
- Source nodes create sound instances and output an AudioRoute
- Filter and effect nodes process the audio and pass it along
- Routing nodes (If/Switch) direct the signal based on conditions or variables
- The Output node wires the final AudioRoute to a mixing bus
Variables can be set from gameplay code at any time, causing affected nodes to re-evaluate without restarting the entire graph.
Node Catalog
Entry Nodes (Phase Gates)
| Node | Purpose |
|---|
| Aud_StartNode | Active during the Start phase |
| Aud_LoopNode | Active during the Loop phase |
| Aud_FinishNode | Active during the Finish phase |
Entry nodes output a gate signal. Downstream nodes only produce audio when their entry gate is active.
Source Nodes
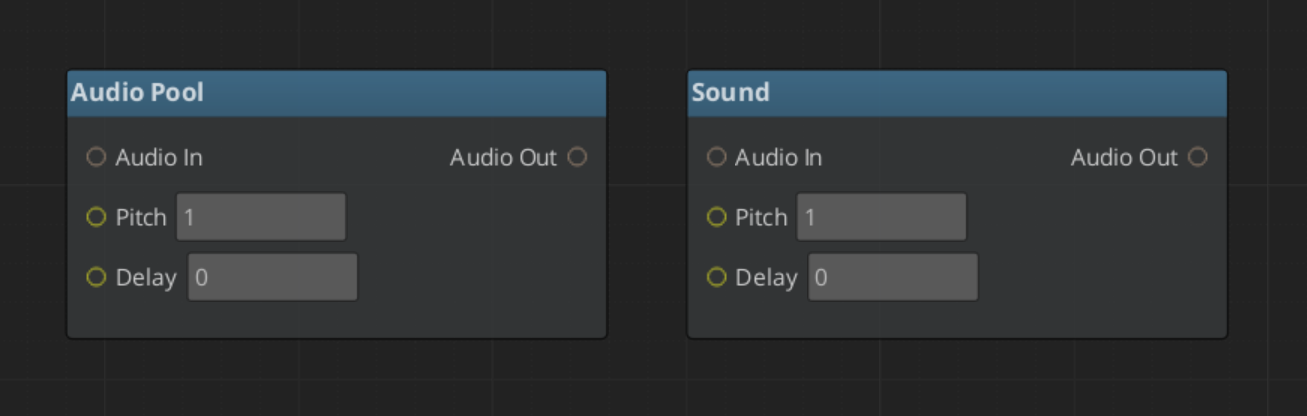
| Node | Purpose | Key Properties |
|---|
| Aud_SoundNode | Single audio asset playback | Volume, pitch, delay, looping, 3D spatialization |
| Aud_AudioPoolNode | Random selection from a pool of audio assets | Same as SoundNode, plus asset pool list |
Filter Nodes
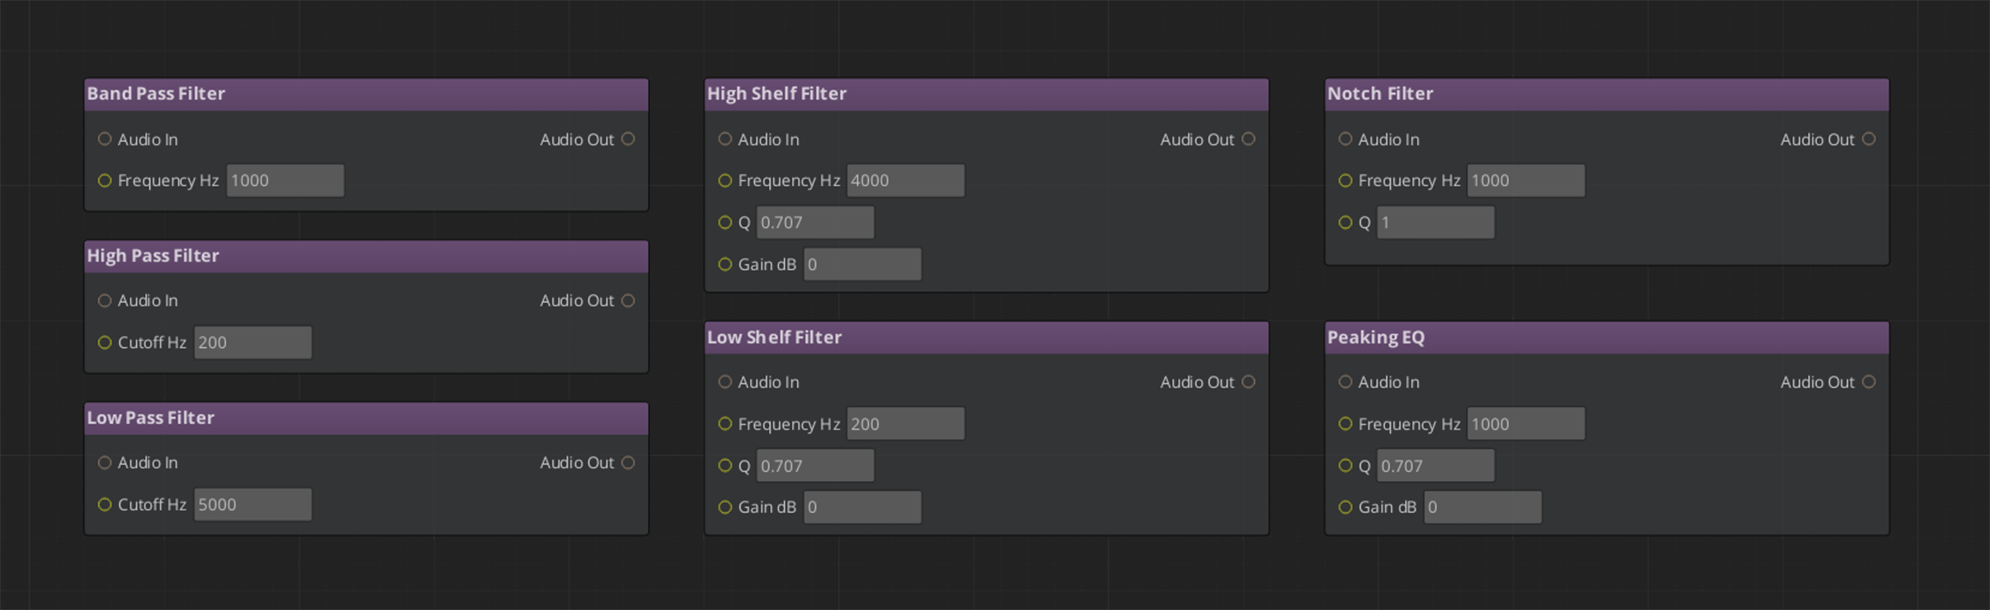
| Node | Filter Type |
|---|
| LowPass | Low-pass filter |
| HighPass | High-pass filter |
| BandPass | Band-pass filter |
| Notch | Notch (band-reject) filter |
| PeakingEQ | Peaking EQ |
| LowShelf | Low shelf filter |
| HighShelf | High shelf filter |
All filter nodes take an audio_in input and produce an audio_out output. Filter parameters (cutoff frequency, Q factor, gain) are configurable per-node or bindable to variables.
Effect Nodes
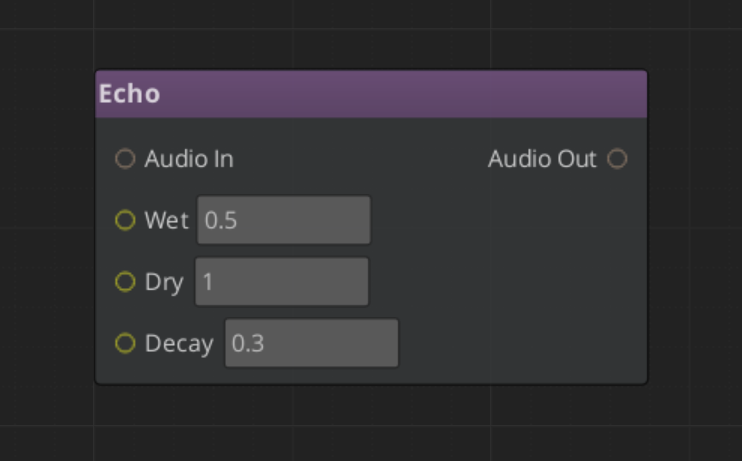
| Node | Purpose |
|---|
| Aud_EchoNode | Echo / reverb effect |
Routing Nodes
The built-in gs_graphcanvas IfNode and SwitchNode work with AudioRoute values. Use them for conditional audio paths based on game state variables (e.g., play different sounds based on surface type or weather).
Terminal Node
| Node | Purpose |
|---|
| Aud_OutputNode | Wires the final audio chain to the mixing bus |
Every graph needs exactly one Output node.
Phase Lifecycle

Audio Event Graphs support a three-phase lifecycle for structured sound playback:
- Start — Initial playback. The Aud_StartNode gate is active. One-shot intro sounds play here.
- Loop — Repeating section. The Aud_LoopNode gate is active. Ambient loops and sustained sounds live here.
- Finish — Outro/tail. The Aud_FinishNode gate is active. Fade-outs and release tails play here.
Phases transition automatically: Start plays once, then Loop repeats (if looping is enabled), then Finish plays when FinishAudioGraph() is called. Not all phases are required — a simple one-shot sound only needs a Start node.
Notice that the Entry nodes share routing. The system determines the final sound stemming from the specific entry with no limits to crossover.
Using Variables
Variables let gameplay code control sound behavior at runtime. Common uses:
- Filter parameters — Bind a filter’s cutoff frequency to a variable, then adjust it from code (e.g., underwater muffling)
- Routing conditions — Use a variable as the condition for an If/Switch node to select different sound paths
- Source selection — Gate different source nodes based on game state
Declare variables in the Variable Panel, then either bind them to input slots (right-click > Convert to Reference) or use Get/Set variable nodes.
At runtime, set variables via the Audio Manager API:
AudioManagerRequestBus::Broadcast(&AudioManagerRequests::SetAudioGraphVariable, instanceId, "underwater", 0.8f);
Setting a variable marks dependent nodes dirty and re-evaluates only the affected portion of the graph.
Extending with Custom Nodes
To add a custom audio node:
- Create a class inheriting from
BaseNode and IDataFlowNode - Register it with
GS_AUTO_REGISTER_NODE_FOR(MyAudioNode, "audiograph") - Implement
Process(GraphExecutionContext& context) - Follow the empty any pattern for inactive outputs:
void MyAudioNode::Process(GraphExecutionContext& context)
{
    auto inputAny = context.GetInputValueAny(this, "audio_in");
    if (inputAny.empty())
    {
        context.SetOutputValueAny(this, "audio_out", AZStd::any{});  // CRITICAL: truly empty
        return;
    }
    // Process audio...
    context.SetOutputValue(this, "audio_out", outputRoute);
}
The empty any pattern ensures that inactive paths don’t mask valid audio from other connections in multi-input slots.
For full details on node creation, see gs_graphcanvas Nodes.
Runtime API
Audio Event Graphs are played through the Audio Manager component. Key methods:
| Method | Description |
|---|
PlayAudioGraph(path) | Fire-and-forget playback (auto-cleanup) |
AcquireAudioGraph(path) | Get a handle for manual control |
FireAudioGraph(id) | Start/restart playback |
StopAudioGraph(id) | Stop playback |
FinishAudioGraph(id) | Transition to the Finish phase |
SetAudioGraphVariable(id, name, value) | Set a graph variable at runtime |
SetAudioGraphLooping(id, looping) | Enable/disable loop phase |
SetAudioGraphEntity(id, entityId) | Track entity position for 3D spatialization |
SetAudioGraphPosition(id, pos) | Fixed world position for 3D |
StopAudioGraphFade(id, fadeTime) | Fade out and stop |
See the Audio Manager documentation for the full API reference.
See Also
3.3 - Mixing & Effects
Named audio mixing buses with configurable effects chains, environmental influence, and 9 built-in audio filter types.
GS_Audio provides a named mixing bus system built on custom MiniAudio nodes. Each GS_MixingBus is a node in the audio graph with its own volume level and an optional chain of audio filters. Buses are configured in the Audio Manager Inspector and can be controlled at runtime through the mixing request bus.
The effects system includes 9 built-in filter types covering frequency shaping, equalization, delay, and reverb. Environmental influence effects allow game world volumes (rooms, weather zones) to push effects onto buses with priority-based stacking.
For usage guides and setup examples, see The Basics: GS_Audio.
GS_Audio is in Early Development. Full support planned soon: 2026.
Contents
GS_MixingBus
Custom MiniAudio node for mixing and effects processing.
| Field | Value |
|---|
| TypeId | {26E5BA8D-33E0-42E4-BBC0-6A3B2C46F52E} |
API Reference
Request Bus: GS_MixingRequestBus
Mixer control commands. Singleton bus – Single address, single handler.
| Method | Parameters | Returns | Description |
|---|
SetBusVolume | const AZStd::string& busName, float volume | void | Sets the volume of a named mixing bus (0.0 to 1.0). |
GetBusVolume | const AZStd::string& busName | float | Returns the current volume of a named mixing bus. |
MuteBus | const AZStd::string& busName, bool mute | void | Mutes or unmutes a named mixing bus. |
IsBusMuted | const AZStd::string& busName | bool | Returns whether a named mixing bus is currently muted. |
ApplyBusEffects | const AZStd::string& busName, const AudioBusEffects& effects | void | Applies an effects chain to a named mixing bus, replacing any existing effects. |
ClearBusEffects | const AZStd::string& busName | void | Removes all effects from a named mixing bus. |
PushInfluenceEffects | const AZStd::string& busName, const AudioBusInfluenceEffects& effects | void | Pushes environmental influence effects onto a bus with priority stacking. |
PopInfluenceEffects | const AZStd::string& busName, int priority | void | Removes influence effects at the specified priority level from a bus. |
Audio Filters
All 9 built-in filter types. Each filter is configured as part of an effects chain applied to a mixing bus.
| Filter | Type | Description |
|---|
| GS_LowPassFilter | Frequency cutoff | Attenuates frequencies above the cutoff point. Used for muffling, distance simulation, and underwater effects. |
| GS_HighPassFilter | Frequency cutoff | Attenuates frequencies below the cutoff point. Used for thinning audio, radio/telephone effects. |
| GS_BandPassFilter | Band isolation | Passes only frequencies within a specified band, attenuating everything outside. Combines low-pass and high-pass behavior. |
| GS_NotchFilter | Band removal | Attenuates frequencies within a narrow band while passing everything outside. The inverse of band-pass. |
| GS_PeakingEQFilter | Band boost/cut | Boosts or cuts frequencies around a center frequency with configurable bandwidth. Used for tonal shaping. |
| GS_LowShelfFilter | Low frequency shelf | Boosts or cuts all frequencies below a threshold by a fixed amount. Used for bass adjustment. |
| GS_HighShelfFilter | High frequency shelf | Boosts or cuts all frequencies above a threshold by a fixed amount. Used for treble adjustment. |
| GS_DelayFilter | Echo/delay | Produces delayed repetitions of the input signal. Configurable delay time and feedback amount. |
| GS_ReverbFilter | Room reverb | Simulates room acoustics by adding dense reflections. Configurable room size and damping. |
Data Structures
BusEffectsPair
Maps a bus name to an effects chain configuration. Used in the Audio Manager’s Inspector to define per-bus effects at design time.
| Field | Value |
|---|
| TypeId | {AD9E26C9-C172-42BF-B38C-BB06FC704E36} |
| Field | Type | Description |
|---|
| Bus Name | AZStd::string | The name of the mixing bus this effects chain applies to. |
| Effects | AudioBusEffects | The effects chain configuration for this bus. |
AudioBusEffects
A collection of audio filter configurations that form an effects chain on a mixing bus.
| Field | Value |
|---|
| TypeId | {15EC6932-1F88-4EC0-9683-6D80AE982820} |
| Field | Type | Description |
|---|
| Filters | AZStd::vector<AudioFilter> | Ordered list of audio filters applied in sequence. |
AudioBusInfluenceEffects
Environmental effects with priority-based stacking. Game world volumes (rooms, weather zones, underwater areas) push influence effects onto mixing buses. Higher priority influences override lower ones.
| Field | Value |
|---|
| TypeId | {75D039EC-7EE2-4988-A2ED-86689449B575} |
| Field | Type | Description |
|---|
| Priority | int | Stacking priority. Higher values override lower values when multiple influences target the same bus. |
| Effects | AudioBusEffects | The effects chain to apply as an environmental influence. |
See Also
For conceptual overviews and usage guides:
For component references:
For related resources:
- Audio Events – Events route their output through mixing buses
Get GS_Audio
GS_Audio — Explore this gem on the product page and add it to your project.
3.4 - Score Arrangement
Multi-layer musical score system for dynamic music – tempo, time signatures, fade control, and layer selection.
The Score Arrangement system provides multi-layer dynamic music for GS_Play projects. A ScoreArrangementTrack asset defines a musical score with configurable tempo, time signature, fade behavior, and multiple layers that can be enabled or disabled at runtime. This allows game music to adapt to gameplay state – adding or removing instrumental layers, changing intensity, or crossfading between sections.
Score tracks are loaded and controlled through the Audio Manager request bus.
For usage guides and setup examples, see The Basics: GS_Audio.
GS_Audio is in Early Development. Full support planned soon: 2026.
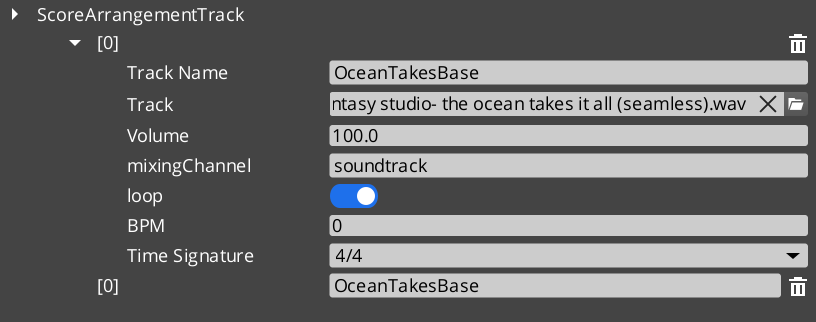
Contents
Data Model
ScoreArrangementTrack
A multi-layer musical score asset. Each track defines the musical structure and contains one or more layers that play simultaneously.
| Field | Value |
|---|
| TypeId | {DBB48082-1834-4DFF-BAD2-6EA8D83F1AD0} |
| Extends | AZ::Data::AssetData |
| Reflection | Requires GS_AssetReflectionIncludes.h — see Serialization Helpers |
| Field | Type | Description |
|---|
| Track Name | AZStd::string | Identifier for this score track. |
| Time Signature | TimeSignatures | The time signature for this score (e.g. 4/4, 3/4, 6/8). |
| BPM | float | Tempo in beats per minute. |
| Fade In Time | float | Duration in seconds for the score to fade in when playback begins. |
| Fade Out Time | float | Duration in seconds for the score to fade out when playback stops. |
| Loop | bool | Whether the score loops back to the beginning when it reaches the end. |
| Layers | AZStd::vector<ScoreLayer> | The musical layers that compose this score. |
| Active Layers | AZStd::vector<int> | Indices of layers that are active (audible) at the start of playback. |
ScoreLayer
A single musical layer within a score arrangement. Each layer represents one track of audio (e.g. drums, bass, melody) that can be independently enabled or disabled.
| Field | Value |
|---|
| TypeId | {C8B2669A-FAEA-4910-9218-6FE50D2E588E} |
| Field | Type | Description |
|---|
| Layer Name | AZStd::string | Identifier for this layer within the score. |
| Audio Asset | AZ::Data::Asset<AudioClipAsset> | The audio clip for this layer. |
| Volume | float | Base volume level for this layer (0.0 to 1.0). |
| Fade Time | float | Duration in seconds for this layer to fade in or out when toggled. |
TimeSignatures (Enum)
Supported musical time signatures for score arrangement tracks.
| Field | Value |
|---|
| TypeId | {6D6B5657-746C-4FCA-A0AC-671C0F064570} |
| Value | Beats per Measure | Beat Unit | Description |
|---|
FourFour | 4 | Quarter note | 4/4 – Common time. The most widely used time signature. |
FourTwo | 4 | Half note | 4/2 – Four half-note beats per measure. |
TwelveEight | 12 | Eighth note | 12/8 – Compound quadruple meter. Four groups of three eighth notes. |
TwoTwo | 2 | Half note | 2/2 – Cut time (alla breve). Two half-note beats per measure. |
TwoFour | 2 | Quarter note | 2/4 – Two quarter-note beats per measure. March time. |
SixEight | 6 | Eighth note | 6/8 – Compound duple meter. Two groups of three eighth notes. |
ThreeFour | 3 | Quarter note | 3/4 – Waltz time. Three quarter-note beats per measure. |
ThreeTwo | 3 | Half note | 3/2 – Three half-note beats per measure. |
NineEight | 9 | Eighth note | 9/8 – Compound triple meter. Three groups of three eighth notes. |
See Also
For conceptual overviews and usage guides:
For component references:
Get GS_Audio
GS_Audio — Explore this gem on the product page and add it to your project.
3.5 - Klatt Voice Synthesis
Custom text-to-speech via Klatt formant synthesis with 3D spatial audio, phoneme mapping, and voice profiling.
The Klatt Voice Synthesis system provides custom text-to-speech for GS_Play projects using Klatt formant synthesis with full 3D spatial audio. It uses SoLoud internally for speech generation and MiniAudio for spatial positioning.
The system has two layers:
- KlattVoiceSystemComponent – A singleton that manages the shared SoLoud engine instance and tracks the 3D audio listener position.
- KlattVoiceComponent – A per-entity component that generates speech, queues segments, applies voice profiles, and emits spatialized audio from the entity’s position.
Voice characteristics are defined through KlattVoiceProfile assets containing frequency, speed, waveform, formant, and phoneme mapping configuration. Phoneme maps convert input text to ARPABET phonemes for the Klatt synthesizer, with support for custom pronunciation overrides.
For usage guides and setup examples, see The Basics: GS_Audio.
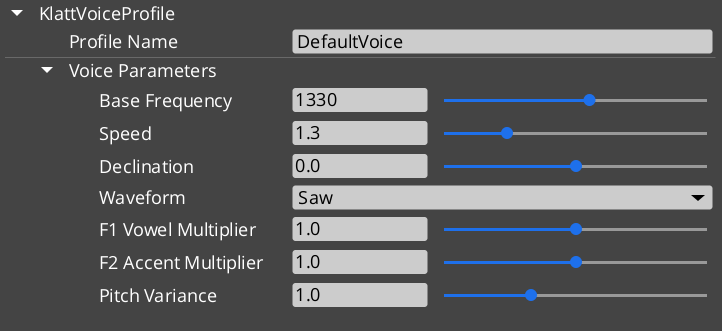
Contents
Components
KlattVoiceSystemComponent
Singleton component that manages the shared SoLoud engine and 3D listener tracking.
| Field | Value |
|---|
| TypeId | {F4A5D6E7-8B9C-4D5E-A1F2-3B4C5D6E7F8A} |
| Extends | AZ::Component, AZ::TickBus::Handler |
| Bus | KlattVoiceSystemRequestBus (Single/Single) |
KlattVoiceComponent
Per-entity voice component with spatial audio, phoneme mapping, and segment queue.
| Field | Value |
|---|
| TypeId | {4A8B9C7D-6E5F-4D3C-2B1A-0F9E8D7C6B5A} |
| Extends | AZ::Component, AZ::TickBus::Handler |
| Request Bus | KlattVoiceRequestBus (Single/ById, entity-addressed) |
| Notification Bus | KlattVoiceNotificationBus (Multiple/Multiple) |
API Reference
Request Bus: KlattVoiceSystemRequestBus
System-level voice management. Singleton bus – Single address, single handler.
| Method | Parameters | Returns | Description |
|---|
GetSoLoudEngine | – | SoLoud::Soloud* | Returns a pointer to the shared SoLoud engine instance. |
SetListenerPosition | const AZ::Vector3& position | void | Updates the 3D audio listener position for spatial voice playback. |
SetListenerOrientation | const AZ::Vector3& forward, const AZ::Vector3& up | void | Updates the 3D audio listener orientation. |
GetListenerPosition | – | AZ::Vector3 | Returns the current listener position. |
IsEngineReady | – | bool | Returns whether the SoLoud engine has been initialized and is ready. |
Request Bus: KlattVoiceRequestBus
Per-entity voice synthesis controls. Entity-addressed bus – Single handler per entity ID.
| Method | Parameters | Returns | Description |
|---|
Speak | const AZStd::string& text | void | Converts text to speech and plays it. Uses the component’s configured voice profile. |
SpeakWithParams | const AZStd::string& text, const KlattVoiceParams& params | void | Converts text to speech using the specified voice parameters instead of the profile defaults. |
StopSpeaking | – | void | Immediately stops any speech in progress and clears the segment queue. |
IsSpeaking | – | bool | Returns whether this entity’s voice is currently producing speech. |
QueueSegment | const AZStd::string& text | void | Adds a speech segment to the queue. Queued segments play in order after the current segment finishes. |
ClearQueue | – | void | Clears all queued speech segments without stopping current playback. |
SetVoiceProfile | const AZ::Data::Asset<KlattVoiceProfile>& profile | void | Changes the voice profile used by this component. |
GetVoiceProfile | – | AZ::Data::Asset<KlattVoiceProfile> | Returns the currently assigned voice profile asset. |
SetSpatialConfig | const KlattSpatialConfig& config | void | Updates the 3D spatial audio configuration for this voice. |
GetSpatialConfig | – | KlattSpatialConfig | Returns the current spatial audio configuration. |
SetVolume | float volume | void | Sets the output volume for this voice (0.0 to 1.0). |
GetVolume | – | float | Returns the current output volume. |
Notification Bus: KlattVoiceNotificationBus
Events broadcast by voice components. Multiple handler bus – any number of components can subscribe.
| Event | Parameters | Description |
|---|
OnSpeechStarted | const AZ::EntityId& entityId | Fired when an entity begins speaking. |
OnSpeechFinished | const AZ::EntityId& entityId | Fired when an entity finishes speaking (including all queued segments). |
OnSegmentStarted | const AZ::EntityId& entityId, int segmentIndex | Fired when a new speech segment begins playing. |
OnSegmentFinished | const AZ::EntityId& entityId, int segmentIndex | Fired when a speech segment finishes playing. |
Data Types
KlattVoiceParams
Core voice synthesis parameters controlling the Klatt formant synthesizer output.
| Field | Value |
|---|
| TypeId | {8A9C7F3B-4E2D-4C1A-9B5E-6D8F9A2C1B4E} |
| Field | Type | Description |
|---|
| Base Frequency | float | Fundamental frequency (F0) in Hz. Controls the base pitch of the voice. |
| Speed | float | Speech rate multiplier. 1.0 is normal speed. |
| Declination | float | Pitch declination rate. Controls how pitch drops over the course of an utterance. |
| Waveform | KlattWaveform | Glottal waveform type used by the synthesizer. |
| Formant Shift | float | Shifts all formant frequencies up or down. Positive values raise pitch character, negative values lower it. |
| Pitch Variance | float | Amount of random pitch variation applied during speech for natural-sounding intonation. |
KlattVoiceProfile
A voice profile asset combining synthesis parameters with a phoneme mapping.
| Field | Value |
|---|
| TypeId | {2CEB777E-DAA7-40B1-BFF4-0F772ADE86CF} |
| Reflection | Requires GS_AssetReflectionIncludes.h — see Serialization Helpers |
| Field | Type | Description |
|---|
| Voice Params | KlattVoiceParams | The synthesis parameters for this voice profile. |
| Phoneme Map | AZ::Data::Asset<KlattPhonemeMap> | The phoneme mapping asset used for text-to-phoneme conversion. |
KlattVoicePreset
A preset configuration for quick voice setup.
| Field | Value |
|---|
| TypeId | {2B8D9E4F-7C6A-4D3B-8E9F-1A2B3C4D5E6F} |
| Field | Type | Description |
|---|
| Preset Name | AZStd::string | Display name for this preset. |
| Profile | KlattVoiceProfile | The voice profile configuration stored in this preset. |
KlattSpatialConfig
3D spatial audio configuration for voice positioning.
| Field | Value |
|---|
| TypeId | {7C9F8E2D-3A4B-5F6C-1E0D-9A8B7C6D5E4F} |
| Field | Type | Description |
|---|
| Enable 3D | bool | Whether this voice uses 3D spatialization. When false, audio plays as 2D. |
| Min Distance | float | Distance at which attenuation begins. Below this distance the voice plays at full volume. |
| Max Distance | float | Distance at which the voice reaches minimum volume. |
| Attenuation Model | int | The distance attenuation curve type (linear, inverse, exponential). |
| Doppler Factor | float | Intensity of the Doppler effect applied to this voice. 0.0 disables Doppler. |
KlattPhonemeMap
Phoneme mapping asset for text-to-ARPABET conversion with custom overrides.
| Field | Value |
|---|
| TypeId | {F3E9D7C1-2A4B-5E8F-9C3D-6A1B4E7F2D5C} |
| Reflection | Requires GS_AssetReflectionIncludes.h — see Serialization Helpers |
| Field | Type | Description |
|---|
| Base Map | BasePhonemeMap | The base phoneme dictionary to use as the foundation for conversion. |
| Overrides | AZStd::vector<PhonemeOverride> | Custom pronunciation overrides for specific words or patterns. |
PhonemeOverride
A custom pronunciation rule that overrides the base phoneme map for a specific word or pattern.
| Field | Value |
|---|
| TypeId | {A2B5C8D1-4E7F-3A9C-6B2D-1F5E8A3C7D9B} |
| Field | Type | Description |
|---|
| Word | AZStd::string | The word or pattern to match. |
| Phonemes | AZStd::string | The ARPABET phoneme sequence to use for this word. |
Enumerations
Glottal waveform types available for the Klatt synthesizer.
| Field | Value |
|---|
| TypeId | {8ED1DABE-3347-44A5-B43A-C171D36AE780} |
| Value | Description |
|---|
Saw | Sawtooth waveform. Bright, buzzy character. |
Triangle | Triangle waveform. Softer than sawtooth, slightly hollow. |
Sin | Sine waveform. Pure tone, smooth and clean. |
Square | Square waveform. Hollow, reed-like character. |
Pulse | Pulse waveform. Variable duty cycle for varied timbres. |
Noise | Noise waveform. Breathy, whisper-like quality. |
Warble | Warble waveform. Modulated tone with vibrato-like character. |
BasePhonemeMap
Available base phoneme dictionaries for text-to-ARPABET conversion.
| Field | Value |
|---|
| TypeId | {D8F2A3C5-1B4E-7A9F-6D2C-5E8A1B3F4C7D} |
| Value | Description |
|---|
SoLoud_Default | The default phoneme mapping built into SoLoud. Covers standard English pronunciation. |
CMU_Full | The full CMU Pronouncing Dictionary. Comprehensive English phoneme coverage with over 130,000 entries. |
KTT (Klatt Text Tags) are inline commands embedded in strings passed to KlattVoiceComponent::SpeakText. They are parsed by KlattCommandParser::Parse and stripped from the spoken text before synthesis begins — they are never heard.
Format: <ktt attr1=value1 attr2=value2>
Multiple attributes can be combined in a single tag. Attribute names are case-insensitive. String values may optionally be wrapped in quotes. An empty value (e.g. speed=) resets that parameter to the voice profile default.
speed=X
Override the speech speed multiplier from this point forward.
| |
|---|
| Range | 0.1 – 5.0 |
| Default reset | speed= (restores profile default) |
| 1.0 | Normal speed |
Normal speech <ktt speed=2.0> fast bit <ktt speed=> back to default.
decl=X / declination=X
Pitch declination — how much pitch falls over the course of the utterance. Both decl and declination are accepted.
| |
|---|
| Range | 0.0 – 1.0 |
| 0.0 | Steady pitch (no fall) |
| 0.8 | Strong downward drift |
Rising <ktt decl=0.0> steady <ktt decl=0.8> falling voice.
Change the glottal waveform used by the synthesizer, setting the overall character of the voice.
| Value | Character |
|---|
saw | Default, neutral voice |
triangle | Softer, smoother |
sin / sine | Pure tone, robotic |
square | Harsh, mechanical |
pulse | Raspy, textured |
noise | Whispered, breathy |
warble | Wobbly, character voice |
<ktt waveform="noise"> whispered section <ktt waveform="saw"> normal voice.
vowel=X
First formant (F1) frequency multiplier. Shifts the quality of synthesised vowel sounds.
| |
|---|
| 1.0 | Normal |
| > 1.0 | More open vowel quality |
| < 1.0 | More closed vowel quality |
<ktt vowel=1.4> different vowel colour here.
accent=X
Second formant (F2) frequency multiplier. Shifts accent or dialect colouration.
| |
|---|
| 1.0 | Normal |
| < 1.0 | Shifted accent colouring |
<ktt accent=0.8> shifted accent here.
pitch=X
F0 pitch variance amount. Controls how much pitch varies during synthesis.
| |
|---|
| 1.0 | Normal variance |
| > 1.0 | More expressive intonation |
| < 1.0 | Flatter, more monotone |
<ktt pitch=2.0> very expressive speech <ktt pitch=0.1> flat monotone.
pause=X
Insert a pause of X seconds at this position in the voice playback. Value is required — there is no default.
Hello.<ktt pause=0.8> How are you?
Combined Example
Dialogue string using typewriter text commands and KTT voice tags together:
[b]Warning:[/b] [color=#FF0000]do not[/color] proceed.[pause=1]
<ktt waveform="square" pitch=1.8>This is a mechanical override.<ktt pause=0.5><ktt waveform="saw" pitch=1.0>
[speed=3]Resuming normal protocol.[/speed]
See Also
For conceptual overviews and usage guides:
For component references:
- Audio Manager – Manager lifecycle that the voice system participates in
Get GS_Audio
GS_Audio — Explore this gem on the product page and add it to your project.
3.6 - Third Party Implementations
Integration guides for third-party audio systems with GS_Audio.
This section will contain integration guides for connecting third-party audio middleware and tools with the GS_Audio system.
For usage guides and setup examples, see The Basics: GS_Audio.
Get GS_Audio
GS_Audio — Explore this gem on the product page and add it to your project.
4 - GS_Cinematics
Dialogue graphs, cinematic staging, UI display, localization, and extensible condition/effect/performance systems for authored narrative experiences.
GS_Cinematics is the narrative and staging gem for GS_Play. It provides a node-based dialogue graph system backed by .dialoguedb assets, extensible polymorphic conditions, effects, and performances, world-space and screen-space dialogue UI with typewriter effects, audio babble, cinematic stage marker management, and a full localization pipeline. The gem depends on GS_Core, LyShine, and RecastNavigation.
For usage guides and setup examples, see The Basics: GS_Cinematics.
Contents
Cinematics Manager
The top-level cinematic lifecycle controller. The Cinematics Manager is a GS_Play manager that enters and exits cinematic mode for the current level. Stage Marker components are placed in the scene as named anchor points that performances and sequences can reference at runtime.
| Component | Purpose |
|---|
| GS_CinematicsManagerComponent | Begins and ends cinematic mode. Registers and retrieves stage markers. Broadcasts EnterCinematic / ExitCinematic notifications. |
| CinematicStageMarkerComponent | Named world-space anchor placed in the level. Retrieved by the manager and referenced by sequences and performances. |
Dialogue System API
Dialogue System
The core playback engine. The Dialogue Manager owns the active .dialoguedb asset and performer registry. The Dialogue Sequencer executes sequences node-by-node, issuing performances, conditions, and effects as it traverses the graph. The system is fully extensible — custom conditions, effects, and performances are discovered automatically through O3DE serialization at startup.
| Component / Asset | Purpose |
|---|
| GS_DialogueManagerComponent | GS_Play manager. Loads and swaps dialogue databases. Registers performer markers by name. |
| DialogueSequencerComponent | Executes a DialogueSequence node graph. Manages runtime tokens and signals sequence completion. |
| DialogueDatabase (.dialoguedb) | Persistent asset. Contains actor definitions, sequences, and all node data. |
| Node Types | TextNodeData, SelectionNodeData, RandomNodeData, EffectsNodeData, PerformanceNodeData. |
| Conditions | Polymorphic DialogueCondition hierarchy. Built-in: Boolean_DialogueCondition, Record_DialogueCondition. |
| Effects | Polymorphic DialogueEffect hierarchy. Built-in: SetRecords_DialogueEffect, ToggleEntitiesActive_DialogueEffect. |
| LocalizedStringId | Reference to a localizable string with a key and default fallback text. Resolved at runtime. |
| LocalizedStringTable | Runtime string lookup table loaded alongside the active database. |
Dialogue System API
Dialogue UI
Screen-space and world-space presentation layer. The UI Bridge routes active dialogue to whichever UI component is registered — swapping from screen-space to world-space at runtime requires no sequencer changes. The Typewriter and Babble components provide character-by-character text reveal and procedural audio babble respectively.
Dialogue UI API
Polymorphic, async performance types executed from PerformanceNodeData within a sequence. Each performance drives a performer entity in the world and signals completion back to the sequencer. External gems register additional performance types automatically by extending the base class.
Dialogue System API
Installation
GS_Cinematics requires GS_Core, LyShine, and RecastNavigation to be enabled in your project first.
- Enable GS_Cinematics, GS_Core, LyShine, and RecastNavigation in your O3DE project’s gem list.
- Add a GS_CinematicsManagerComponent to your Game Manager prefab and register it in the Startup Managers list.
- Create a
.dialoguedb asset using the Dialogue Editor and assign it to the Dialogue Manager component. - Place CinematicStageMarkerComponent entities in your level and register them by name.
- Add a DialogueSequencerComponent to the entity that will drive dialogue playback.
- Add a DialogueUIBridgeComponent and connect it to your chosen
DialogueUIComponent variant.
See Also
For conceptual overviews and usage guides:
For sub-system references:
For related resources:
Get GS_Cinematics
GS_Cinematics — Explore this gem on the product page and add it to your project.
4.1 - Cinematics Manager
Full API reference for GS_CinematicsManagerComponent — cinematic lifecycle control, stage marker registration, and the CinematicStageMarkerComponent.
GS_CinematicsManagerComponent is the top-level cinematic lifecycle controller for GS_Cinematics. It extends GS_Core::GS_ManagerComponent and participates in the standard Game Manager startup sequence.
For usage guides and setup examples, see The Basics: Cinematics Manager.
Contents
GS_CinematicsManagerComponent
Singleton GS_Play manager that controls cinematic mode for the current level. Registered with the Game Manager startup sequence via GS_Core::GS_ManagerComponent.
| Property | Value |
|---|
| Extends | GS_Core::GS_ManagerComponent |
| Bus | CinematicsManagerRequestBus (Single address, single handler) |
| Notifications | CinematicsManagerNotificationBus |
Request Bus: CinematicsManagerRequestBus
Singleton bus — Single address, single handler.
| Method | Parameters | Returns | Description |
|---|
BeginCinematic | – | void | Enters cinematic mode for the current level. Broadcasts EnterCinematic to all listeners. |
EndCinematic | – | void | Exits cinematic mode. Broadcasts ExitCinematic to all listeners. |
RegisterStageMarker | const AZStd::string& name, AZ::EntityId entity | void | Registers a CinematicStageMarkerComponent entity under the given name. |
GetStageMarker | const AZStd::string& name | AZ::EntityId | Returns the entity registered under the given stage marker name. |
Notification Bus: CinematicsManagerNotificationBus
Multiple handler bus — any number of components can subscribe.
| Event | Description |
|---|
EnterCinematic | Fired when cinematic mode begins. Listeners should suppress gameplay systems. |
ExitCinematic | Fired when cinematic mode ends. Listeners should resume gameplay systems. |
CinematicStageMarkerComponent
A simple world-space anchor component placed on entities in the level. Stage markers are registered by name with the Cinematics Manager during activation. Performances and sequences reference markers by name to position performers in the world.
Attach a CinematicStageMarkerComponent to any entity, give it a unique name, and it self-registers with the CinematicsManagerRequestBus on Activate().
Script Canvas Examples
Entering and exiting cinematic mode:
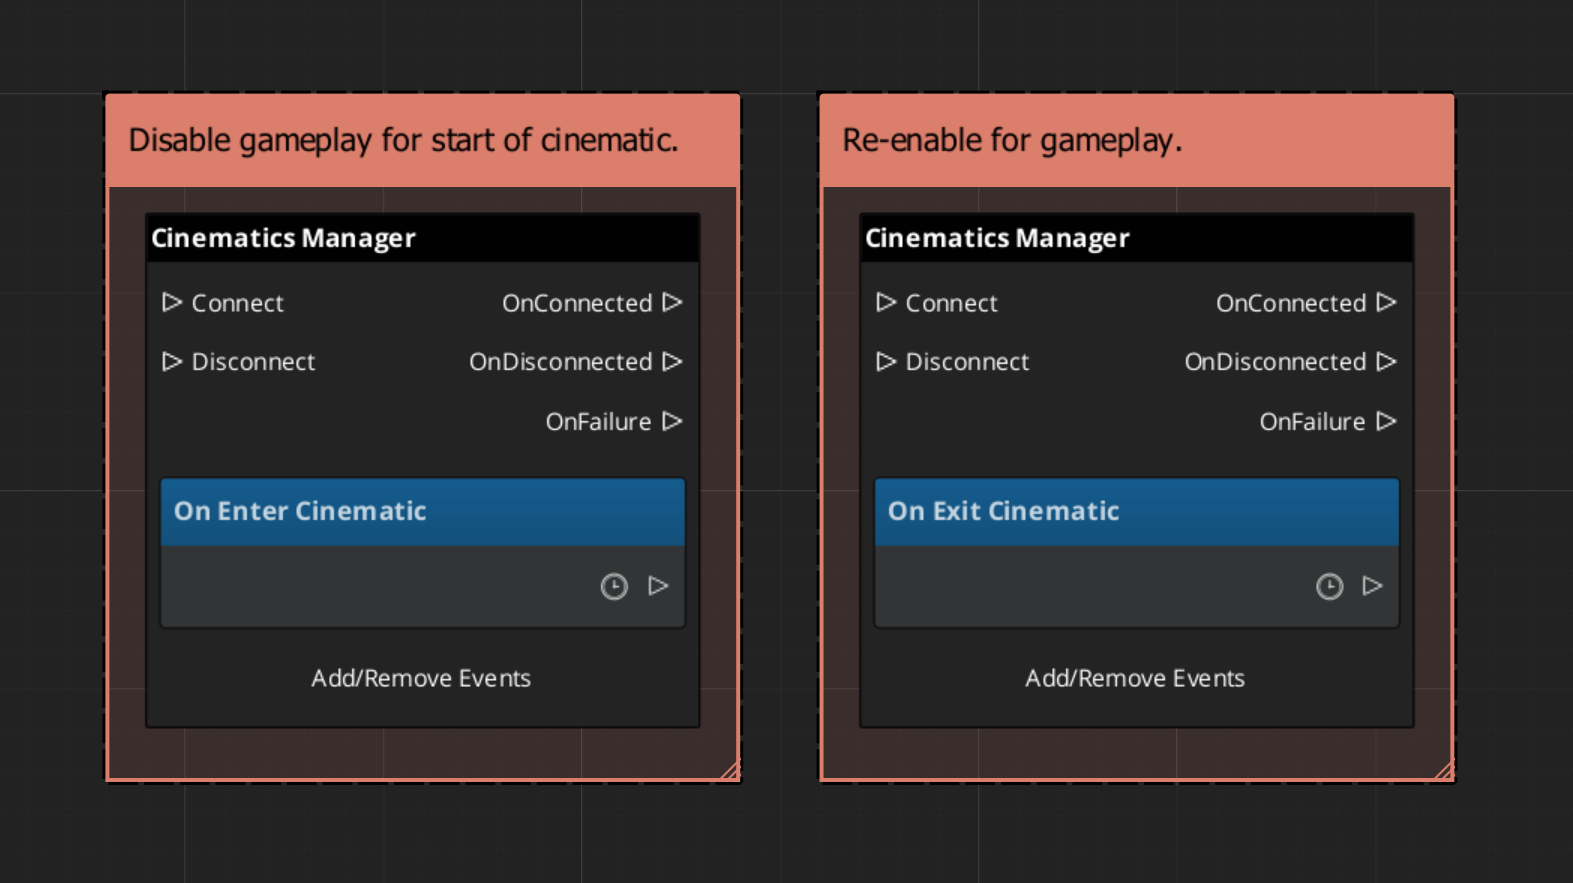
Getting a stage marker entity by name:
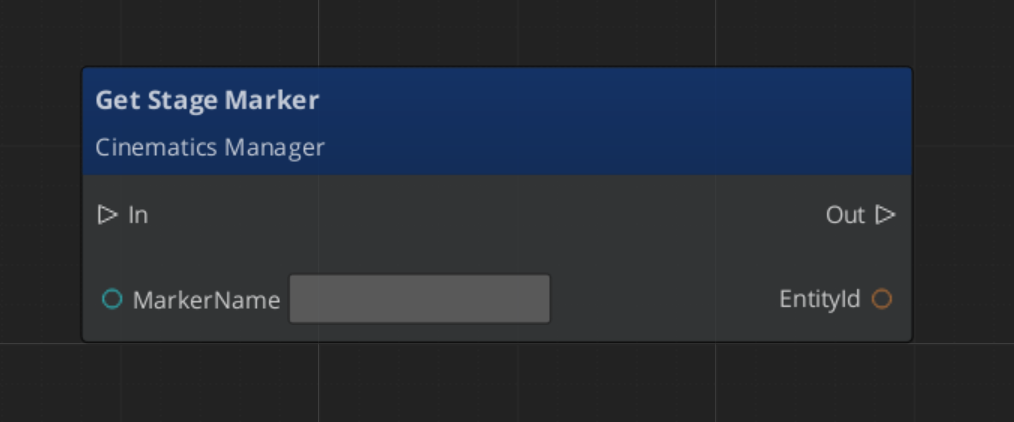
See Also
For usage guides:
For related references:
Get GS_Cinematics
GS_Cinematics — Explore this gem on the product page and add it to your project.
4.2 - Dialogue System
Architecture overview of the GS_Cinematics dialogue system — the Dialogue Editor, sequencing, UI display, actors, and extensible conditions, effects, and performances.
The Dialogue System is the runtime engine inside GS_Cinematics that drives all authored narrative experiences. Dialogue is authored visually in the Dialogue Editor — a graph-based tool built on gs_graphcanvas — and executed at runtime by a node-graph sequencer. World-space and screen-space UI display, and an extensible set of polymorphic conditions, effects, and performances connect dialogue to gameplay.
Every piece communicates through EBus interfaces, so any layer can be replaced or extended without modifying the gem itself.
The system is managed by the GS_DialogueManagerComponent, which participates in the standard Game Manager startup sequence.
For usage guides and setup examples, see The Basics: GS_Cinematics.
Contents
Dialogue Editor
The in-engine visual graph editor for authoring dialogue databases, sequences, and node graphs. Built on gs_graphcanvas with a FlowGraph topology.

The editor manages a .dialoguedatabase container file holding all sequences for a dialogue set, along with performer definitions and database-level settings. Each sequence is an independent graph opened as a tab.
Dialogue Editor
Dialogue Manager
GS_DialogueManagerComponent owns the active dialogue database and performer registry. Extends GS_Core::GS_ManagerComponent.
Dialogue Manager API
Dialogue Sequencer
DialogueSequencerComponent traverses a node graph at runtime. The DialogueUIBridgeComponent routes dialogue and selection events to whichever UI is registered.
Dialogue Sequencer API
Effects
Polymorphic DialogueEffect types executed synchronously from Effects nodes. Built-in: SetRecords_DialogueEffect, ToggleEntitiesActive_DialogueEffect. Fully extensible.
Effects API
Polymorphic DialoguePerformance types executed asynchronously from Performance nodes. Built-in: MoveTo, PathTo, RepositionPerformer. Fully extensible.
Performances API
Dialogue UI
Screen-space and world-space dialogue display, selection menus, the typewriter text-reveal system, and the babble audio system.
Dialogue UI API
Actors
DialoguePerformerMarkerComponent places named performer anchors in the world, plus the ActorDefinition data model.
Dialogue Actors API
See Also
For conceptual overviews and usage guides:
For related references:
Get GS_Cinematics
GS_Cinematics — Explore this gem on the product page and add it to your project.
4.2.1 - Dialogue Manager
Full API reference for GS_DialogueManagerComponent — dialogue database management, performer marker registration, and the DialoguePerformerMarkerComponent.
GS_DialogueManagerComponent owns the active dialogue database and performer registry. It extends GS_Core::GS_ManagerComponent and participates in the standard Game Manager startup sequence.
For usage guides and setup examples, see The Basics: GS_Cinematics.
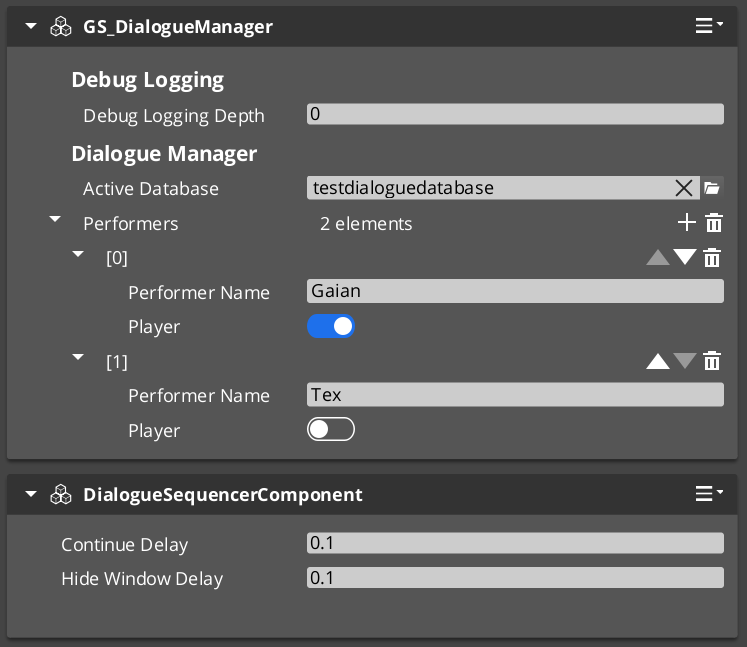
Contents
GS_DialogueManagerComponent
Singleton GS_Play manager that owns the active .dialoguedb asset and the performer registry. Registered with the Game Manager startup sequence via GS_Core::GS_ManagerComponent.
| Property | Value |
|---|
| Extends | GS_Core::GS_ManagerComponent |
| Bus | DialogueManagerRequestBus (Single address, single handler) |
| Notifications | DialogueManagerNotificationBus (inherited from ManagerBaseOutgoingEvents) |
Request Bus: DialogueManagerRequestBus
Singleton bus — Single address, single handler.
| Method | Parameters | Returns | Description |
|---|
StartDialogueSequenceByName | const AZStd::string& sequenceName | void | Looks up a sequence by name in the active database and starts playback through the sequencer. |
ChangeDialogueDatabase | AZ::Data::Asset<DialogueDatabase> database | void | Swaps the active .dialoguedb asset at runtime. |
RegisterPerformerMarker | const AZStd::string& name, AZ::EntityId entity | void | Registers a DialoguePerformerMarkerComponent entity under the given performer name. |
GetPerformer | const AZStd::string& name | AZ::EntityId | Returns the entity registered under the given performer name. |
Notification Bus: DialogueManagerNotificationBus
Dialogue Manager notifications are inherited from ManagerBaseOutgoingEvents. See Manager for the full notification interface.
A world-space anchor component placed on NPC entities in the level. Performer markers register by name with the Dialogue Manager during activation. The dialogue system resolves actor names from the database to these world-space entities.
| Method | Parameters | Returns | Description |
|---|
GetPerformerName | – | AZStd::string | Returns the registered name for this performer. |
GetPosEntity | – | AZ::EntityId | Returns the entity used as the position reference for this performer. |
GetPosPoint | – | AZ::Vector3 | Returns the world-space position of the performer anchor. |
ShouldTrackTarget | – | bool | Returns whether this performer should track a target entity. |
Script Canvas Examples
Starting a dialogue sequence by name:
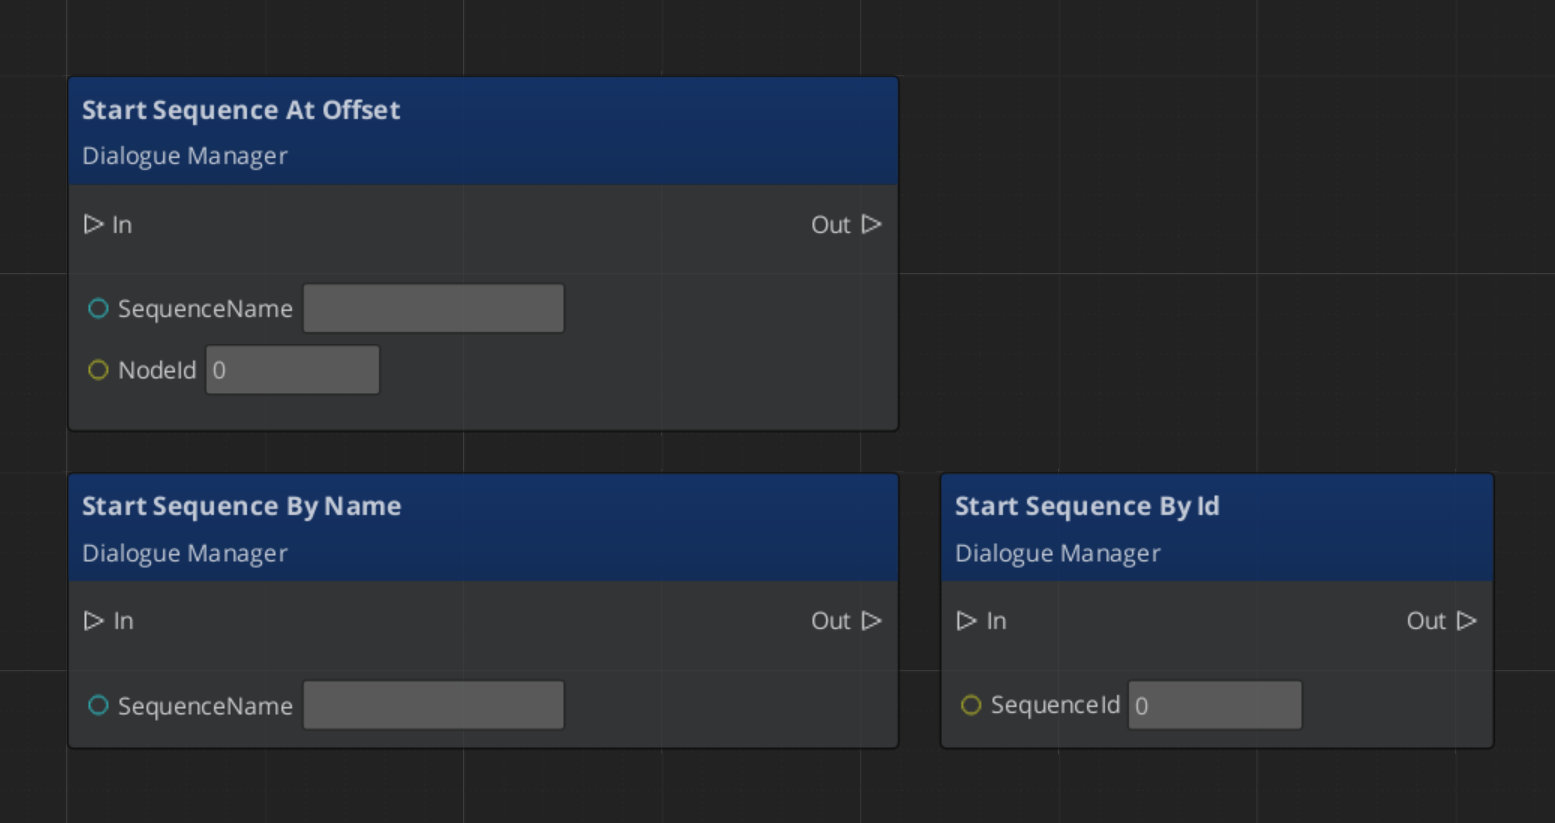
See Also
For usage guides:
For component references:
For related resources:
Get GS_Cinematics
GS_Cinematics — Explore this gem on the product page and add it to your project.
4.2.2 - Dialogue Editor
Visual graph editor for authoring branching dialogue sequences — database model, node catalog, and extensibility.
The Dialogue Editor is a visual graph editor for authoring branching dialogue sequences. It uses the gs_graphcanvas framework with a FlowGraph topology — nodes execute sequentially following FlowIn/FlowOut connections.
The key architectural feature is the container model: multiple dialogue sequences live inside a single .dialoguedatabase file, managed through a sequence sidebar.
For usage guides and setup examples, see The Basics: GS_Cinematics.
Contents
Opening the Editor
Open the Dialogue Editor from the O3DE Editor menu: Tools > Dialogue Editor, or select the Speech Bubble Icon  in the Editor Tool Bar.
Use File > New to create a new .dialoguedatabase file, or File > Open to load an existing one. The editor saves and loads the entire database as a single file — individual sequences are not separate files.
Editor Layout
The Dialogue Editor has three pages, selectable via the tab bar at the top:
Sequences Page (Graph Editor)
The main workspace. The graph canvas occupies the center, with docks for:
- Sequence Sidebar — Lists all sequences in the database. Add, remove, rename, or duplicate sequences.
- Node Palette — Drag-drop available node types onto the canvas.
- Inspector — Properties for the selected node.
- Variable Panel — Declare and manage graph variables.
Performers Page
Define actors and characters for the dialogue system. Each performer has a name, voice configuration, portrait, and other display properties. Performers are referenced by name in Text nodes.
System Page
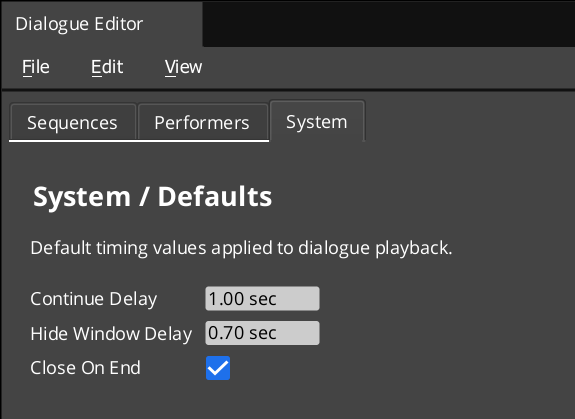
Database-level settings and configuration.
Database Model
A .dialoguedatabase file is a container holding:
- Actors — Character definitions (name, voice, portrait)
- Default settings — Database-wide defaults
- Sequences — Each sequence is an independent dialogue graph
Opening a sequence from the sidebar opens it as a graph tab. Multiple sequences can be open simultaneously. Saving writes all open sequences back to the database file.
Working with Sequences
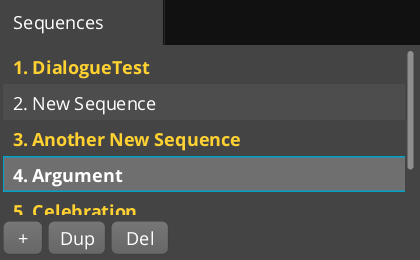
Use the Sequence Sidebar to manage sequences:
- Add — Create a new blank sequence with a Start node
- Remove — Delete a sequence from the database
- Rename — Double-click to rename
- Duplicate — Copy an existing sequence as a starting point
Click a sequence name to open it in a graph tab. Each tab tracks its own dirty state — the asterisk * appears when a sequence has unsaved changes.
The Performers page defines the cast of characters available in the dialogue. Each performer has properties used by the dialogue UI at runtime (name display, portrait image, voice settings). Text nodes reference performers by name to identify the speaker.
Nodes
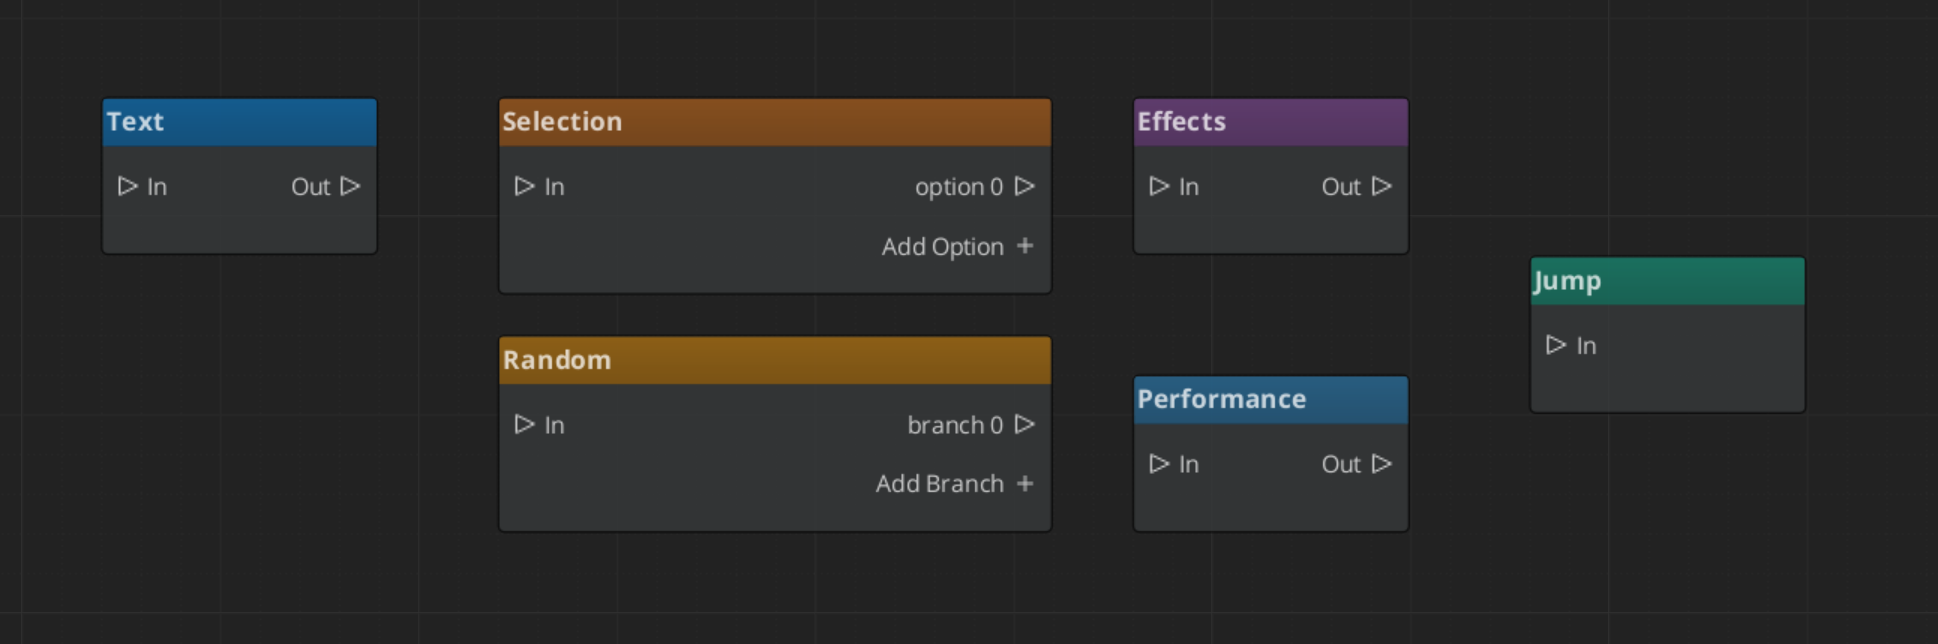
All dialogue nodes use FlowIn/FlowOut slots for sequential execution. The evaluator steps through nodes one at a time, waiting when a node needs player input or time to display.
| Node | Purpose | Key Properties |
|---|
| Start | Entry point for the sequence | Auto-spawned, one per sequence, cannot be deleted |
| Text | Display dialogue from a speaker | Speaker (LocalizedStringId), text (LocalizedStringId), close-on-end |
| Selection | Present player with choices | Question text, dynamic output slots (one per choice option) |
| Random | Random branch selection | Optional weighted randomization |
| Effects | Trigger game effects during dialogue | Polymorphic list of DialogueEffect objects |
| Performance | Character actions (move, animate) | Polymorphic list of DialoguePerformance objects, wait-to-continue flag |
| End | Terminate the sequence | No properties |
Text Node
The most common node. Set the Speaker to a performer name and the Text to the dialogue line. Uses LocalizedStringId for both fields — a localization key plus fallback text. The node footer previews the text content.
Selection Node
Presents the player with choices. Each SelectionOption creates a dynamic FlowOut slot. Add or remove options in the inspector. The evaluator waits for the player to pick an option, then follows the corresponding output.
Both use polymorphic lists — the inspector shows a type picker dropdown to add new entries. This is the primary extension point (see Extending below).
Conditions
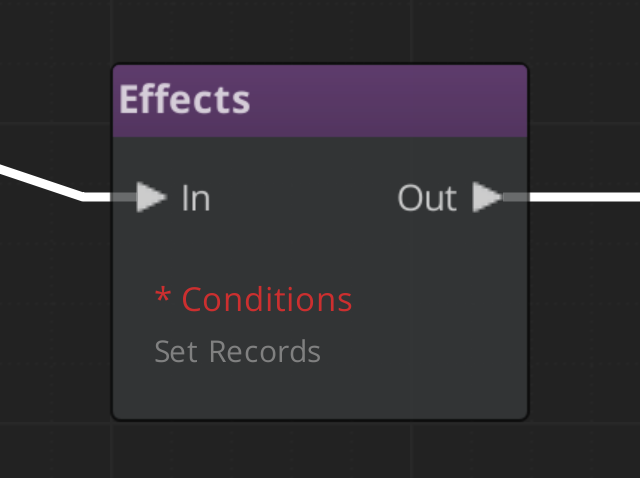
Any dialogue node can have conditions that gate whether the node is entered. Conditions are evaluated before the node executes — if conditions fail, the evaluator skips to the next option.
Conditions use the same polymorphic extension pattern as effects. Built-in conditions:
| Condition | Description |
|---|
Boolean_DialogueCondition | Checks a boolean variable |
Record_DialogueCondition | Checks a record/flag state |
Conditions are not limited to player choice branches — they can gate any node in the sequence for conditional dialogue flow.
Extending
The Dialogue Editor uses O3DE’s polymorphic type discovery. Adding new conditions, effects, or performances requires only:
- Create a subclass of
DialogueCondition, DialogueEffect, or DialoguePerformance - Add
AZ_RTTI and implement Reflect() with SerializeContext and EditContext - Add
#include and ::Reflect(context) call to DialogueSequencerComponent::Reflect()
The inspector’s type picker dropdown automatically discovers all registered subtypes via SerializeContext::EnumerateDerived(). No registry code or manual wiring needed.
Custom Nodes
To add entirely new node types to the dialogue palette:
- Inherit from
Dlg_BaseNode (which extends BaseNode + IExecutableNode) - Register with
GS_AUTO_REGISTER_NODE_FOR(MyDialogueNode, "dialogue") - Implement
Execute() returning FlowResult::Continue, Wait, or Stop
Variables
The Dialogue Editor supports graph variables. Common uses:
- Dialogue flags — Track conversation state (has the player seen this line before?)
- Counters — Count visits or choices
- Condition inputs — Variable values drive condition checks on nodes
Variables can be read and set by Effects nodes or from external game systems.
See Also
Get GS_Cinematics
GS_Cinematics — Explore this gem on the product page and add it to your project.
4.2.3 - Dialogue Sequencer
Full API reference for the DialogueSequencerComponent and DialogueUIBridgeComponent — runtime dialogue graph traversal, node processing, and UI routing.
The Dialogue Sequencer is the runtime engine that executes dialogue sequences node-by-node. It receives a DialogueSequence from the Dialogue Manager, traverses the node graph, evaluates conditions, fires effects and performances, and routes text and selection events to the UI layer through the DialogueUIBridgeComponent.
The two components on this page work together:
| Component | Role |
|---|
| DialogueSequencerComponent | Traverses the node graph. Processes each DialogueNodeData in order, manages runtime tokens, and signals sequence completion. |
| DialogueUIBridgeComponent | Decouples the sequencer from presentation. Routes dialogue text and selection events to whichever DialogueUIComponent or DialogueUISelectionComponent is currently registered. |
For usage guides and setup examples, see The Basics: GS_Cinematics.
Contents
DialogueSequencerComponent
The sequencer is the core playback controller. When a sequence starts, the sequencer reads the startNodeId, resolves the first node, and begins processing. Each node type has its own processing logic:
- TextNodeData – Sends text, speaker, and portrait data to the UI bridge for display.
- SelectionNodeData – Sends options to the UI bridge. Waits for a player selection before continuing.
- RandomNodeData – Picks a random outgoing connection (pure random or weighted) and continues.
- EffectsNodeData – Executes all attached
DialogueEffect instances, then continues. - PerformanceNodeData – Starts a
DialoguePerformance. Waits for the performance to signal completion before continuing.
At each node, outgoing connections are evaluated. Conditions on connections are tested in priority order; the first connection whose conditions all pass is followed. When no outgoing connections remain, the sequence ends.
Request Bus: DialogueSequencerRequestBus
Singleton bus – Single address, single handler.
| Method | Parameters | Returns | Description |
|---|
StartDialogueBySequence | const DialogueSequence& sequence | void | Begins playback of the given sequence from its startNodeId. |
OnPerformanceComplete | – | void | Called by a running DialoguePerformance when it finishes. The sequencer advances to the next node. |
Notification Bus: DialogueSequencerNotificationBus
Multiple handler bus – any number of components can subscribe.
| Event | Parameters | Description |
|---|
OnDialogueTextBegin | const DialogueTextPayload& payload | Fired when the sequencer begins processing a text node. Contains speaker name, text, portrait, and display settings. |
OnDialogueSequenceComplete | – | Fired when the sequencer reaches the end of a sequence (no further outgoing connections). |
Runtime Token Management
The sequencer maintains a set of runtime tokens that track state within a single sequence execution. Tokens are used internally to prevent infinite loops, track visited nodes, and manage branching state. They are cleared when a sequence completes or is interrupted.
DialogueUIBridgeComponent
The UI Bridge sits between the sequencer and the presentation layer. It holds a reference to the currently registered DialogueUIComponent and DialogueUISelectionComponent. When the sequencer needs to display text or a selection menu, it calls the bridge, which forwards the request to the active UI. This allows you to swap between screen-space, world-space, or custom UI implementations at runtime without changing the sequencer or the dialogue data.
Request Bus: DialogueUIBridgeRequestBus
Singleton bus.
| Method | Parameters | Returns | Description |
|---|
RunDialogue | const DialogueTextPayload& payload | void | Forwards a dialogue text event to the registered DialogueUIComponent. |
RunSelection | const DialogueSelectionPayload& payload | void | Forwards a selection event to the registered DialogueUISelectionComponent. |
RegisterDialogueUI | AZ::EntityId uiEntity | void | Registers the entity whose DialogueUIComponent and/or DialogueUISelectionComponent will receive events. |
CloseDialogue | – | void | Tells the registered UI to close and clean up. |
Notification Bus: DialogueUIBridgeNotificationBus
Multiple handler bus.
| Event | Parameters | Description |
|---|
OnDialogueComplete | – | Fired when the registered UI finishes displaying a dialogue line (after typewriter completes or the player advances). The sequencer listens for this to advance to the next node. |
OnSelectionComplete | int selectedIndex | Fired when the player selects an option. The sequencer uses the index to follow the corresponding connection. |
Execution Flow
A typical dialogue playback follows this path:
- Start –
DialogueManagerRequestBus::StartDialogueSequenceByName("MySequence") looks up the sequence in the active database and calls DialogueSequencerRequestBus::StartDialogueBySequence(sequence). - Node Processing – The sequencer reads the start node and begins processing. For each node:
- Text – The sequencer calls
DialogueUIBridgeRequestBus::RunDialogue(payload). The bridge forwards to the registered UI. The UI displays text (via TypewriterComponent), then fires OnDialogueComplete. The sequencer advances. - Selection – The sequencer calls
DialogueUIBridgeRequestBus::RunSelection(payload). The bridge forwards to the selection UI. The player picks an option, the UI fires OnSelectionComplete(index). The sequencer follows the indexed connection. - Effects – The sequencer executes each
DialogueEffect on the node, then advances immediately. - Performance – The sequencer starts the
DialoguePerformance. When the performance calls OnPerformanceComplete, the sequencer advances. - Random – The sequencer picks a connection and advances immediately.
- End – When no outgoing connections remain, the sequencer fires
OnDialogueSequenceComplete and calls DialogueUIBridgeRequestBus::CloseDialogue().
C++ Usage
Starting a Sequence
#include <GS_Cinematics/GS_CinematicsBus.h>

// Start by name through the Dialogue Manager
GS_Cinematics::DialogueManagerRequestBus::Broadcast(
    &GS_Cinematics::DialogueManagerRequestBus::Events::StartDialogueSequenceByName,
    AZStd::string("PerryConfrontation")
);
Listening for Sequence Completion
#include <GS_Cinematics/GS_CinematicsBus.h>

class MyListener
    : public AZ::Component
    , protected GS_Cinematics::DialogueSequencerNotificationBus::Handler
{
protected:
    void Activate() override
    {
        GS_Cinematics::DialogueSequencerNotificationBus::Handler::BusConnect();
    }

    void Deactivate() override
    {
        GS_Cinematics::DialogueSequencerNotificationBus::Handler::BusDisconnect();
    }

    void OnDialogueSequenceComplete() override
    {
        // Sequence finished — resume gameplay, unlock camera, etc.
    }
};
See Also
For conceptual overviews and usage guides:
For component references:
For related resources:
Get GS_Cinematics
GS_Cinematics — Explore this gem on the product page and add it to your project.
4.2.4 - Dialogue UI
Full API reference for all dialogue UI components — screen-space and world-space dialogue display, selection menus, typewriter text reveal, and babble audio.
The Dialogue UI layer handles all player-facing presentation of dialogue content. It is completely decoupled from the sequencer through the DialogueUIBridgeComponent – the sequencer never talks to a UI component directly. This page documents the seven components that make up the built-in UI system.
For usage guides and setup examples, see The Basics: GS_Cinematics.
Contents
DialogueUIComponent
The standard screen-space dialogue display. Receives dialogue payloads from the UI Bridge and renders speaker name, portrait, and text lines using LyShine UI canvases.
Request Bus: DialogueUIRequestBus
| Method | Parameters | Returns | Description |
|---|
DoDialogue | const DialogueTextPayload& payload | void | Processes a full dialogue payload: sets speaker name, portrait, and begins text display through the typewriter. |
ShowDialogue | – | void | Makes the dialogue UI canvas visible. |
HideDialogue | – | void | Hides the dialogue UI canvas without destroying it. |
CloseUI | – | void | Fully closes and cleans up the dialogue UI. |
GetTypewriter | – | AZ::EntityId | Returns the entity that holds the TypewriterComponent used by this UI. |
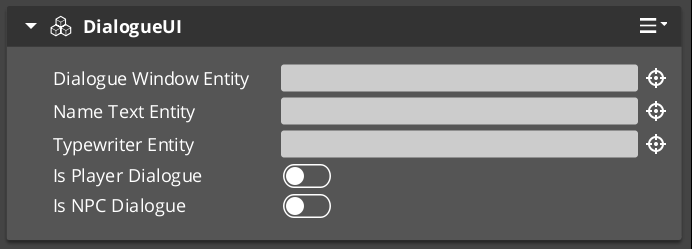
WorldDialogueUIComponent
Extends DialogueUIComponent for world-space rendering. Displays speech bubbles attached to performer entities in 3D space. Shares the same DialogueUIRequestBus interface as the base class. The world-space variant tracks the performer entity’s position and orients the UI element toward the camera.
Use WorldDialogueUIComponent when you want dialogue to appear as in-world speech bubbles rather than as a screen overlay.
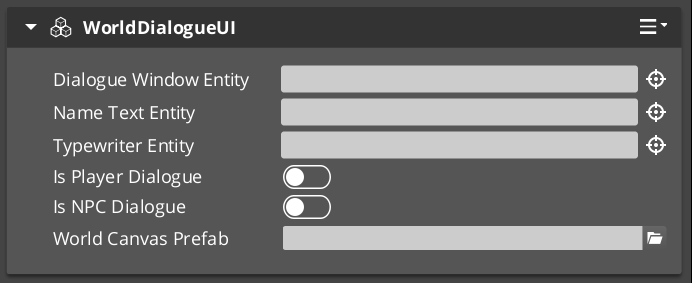
DialogueUISelectionComponent
Screen-space player choice display. Builds a list of selectable options from a DialogueSelectionPayload, spawns DialogueSelectButtonComponent instances for each valid option, and waits for the player to pick one.
Request Bus: DialogueUISelectionRequestBus
| Method | Parameters | Returns | Description |
|---|
DoSelection | const DialogueSelectionPayload& payload | void | Builds and displays the selection menu from the provided options. |
OnSelection | int selectedIndex | void | Called when a button is pressed. Processes the selection and notifies the bridge. |
ShowSelection | – | void | Makes the selection UI canvas visible. |
ClearSelection | – | void | Removes all spawned option buttons and resets the selection state. |
CloseUI | – | void | Fully closes and cleans up the selection UI. |
WorldDialogueUISelectionComponent
Extends DialogueUISelectionComponent for world-space rendering. Displays selection options as in-world UI elements attached to performer entities. Shares the same DialogueUISelectionRequestBus interface as the base class.
An individual button within a selection menu. One instance is spawned per valid option. The button displays option text and forwards press events to the parent selection component.
| Method | Parameters | Returns | Description |
|---|
SetupOption | const SelectionOption& option, int index | void | Configures the button with display text and its index in the selection list. |
GetInteractableEntity | – | AZ::EntityId | Returns the LyShine interactable entity used for input detection. |
TypewriterComponent
Character-by-character text reveal system. The typewriter receives a full text string and reveals it one character at a time at a configurable speed. It fires events on each character reveal and when the full text has been displayed. The typewriter is used internally by DialogueUIComponent but can also be used independently for any text reveal effect.
For detailed usage and standalone setup, see the Typewriter sub-page.
Request Bus: TypewriterRequestBus
| Method | Parameters | Returns | Description |
|---|
StartTypewriter | const AZStd::string& text, float speed | void | Begins revealing the given text at the specified characters-per-second speed. |
ForceComplete | – | void | Immediately reveals all remaining text. Fires OnTypewriterComplete. |
ClearTypewriter | – | void | Clears all displayed text and resets the typewriter state. |
Notification Bus: TypewriterNotificationBus
Multiple handler bus.
| Event | Parameters | Description |
|---|
OnTypeFired | char character | Fired each time a character is revealed. Used by the BabbleComponent to synchronize audio. |
OnTypewriterComplete | – | Fired when all characters have been revealed, either naturally or via ForceComplete. |
BabbleComponent
Procedural audio babble that plays in sync with the typewriter. Each character reveal from OnTypeFired can trigger a short audio event, creating a character-by-character speech sound. Different speakers can have different babble tones.
Request Bus: BabbleRequestBus
| Method | Parameters | Returns | Description |
|---|
GetBabbleEvent | const AZStd::string& speakerName | BabbleToneEvent | Returns the babble audio event associated with the given speaker. |
Data Types
| Type | Description |
|---|
| BabbleToneEvent | A single audio event reference (FMOD or Wwise event) that represents one character’s babble sound. |
| SpeakerBabbleEvents | A mapping of speaker names to BabbleToneEvent instances. Stored on the BabbleComponent and queried at runtime. |
Setup Guide
Screen-Space Dialogue
- Create a UI canvas entity with your dialogue layout (speaker name text, portrait image, dialogue text area).
- Attach a DialogueUIComponent to the entity.
- Attach a TypewriterComponent to the text entity (or the same entity).
- Optionally attach a BabbleComponent and configure speaker babble events.
- Attach a DialogueUISelectionComponent to a separate entity (or the same canvas) for player choices.
- Register the UI entity with
DialogueUIBridgeRequestBus::RegisterDialogueUI(uiEntityId).
World-Space Dialogue
- Follow the same steps as screen-space, but use WorldDialogueUIComponent and WorldDialogueUISelectionComponent instead.
- The world-space components will track the performer entity’s position automatically.
- Register the UI entity with the bridge the same way.
Swapping between screen-space and world-space at runtime requires only changing which UI entity is registered with the bridge. No sequencer or dialogue data changes are needed.
See Also
For conceptual overviews and usage guides:
For component references:
For related resources:
Get GS_Cinematics
GS_Cinematics — Explore this gem on the product page and add it to your project.
4.2.4.1 - Typewriter
Full API reference for the TypewriterComponent — character-by-character text reveal with configurable speed, force-complete, and notification events.
The TypewriterComponent provides character-by-character text reveal for dialogue display. It receives a string and a speed value, then reveals one character at a time on tick. It fires a notification on every character reveal and again when the full text is complete. The component is used internally by the DialogueUIComponent but can also be attached to any text entity independently for non-dialogue text effects.
For usage guides and setup examples, see The Basics: GS_Cinematics.

Contents
Request Bus: TypewriterRequestBus
Entity-addressed bus.
| Method | Parameters | Returns | Description |
|---|
StartTypewriter | const AZStd::string& text, float speed | void | Begins revealing the given text. speed is in characters per second. The component connects to TickBus and reveals characters on each tick. |
ForceComplete | – | void | Immediately reveals all remaining text. Fires OnTypewriterComplete. Useful when the player presses a button to skip the reveal. |
ClearTypewriter | – | void | Clears all displayed text and resets the internal state. Disconnects from TickBus. |
Notification Bus: TypewriterNotificationBus
Multiple handler bus – any number of listeners can connect.
| Event | Parameters | Description |
|---|
OnTypeFired | char character | Fired each time a single character is revealed. The BabbleComponent listens to this event to trigger per-character audio. Custom effects (particles, screen shake, emphasis) can also listen here. |
OnTypewriterComplete | – | Fired when all characters have been revealed, either through normal tick-based reveal or through ForceComplete. The dialogue UI listens for this to know when the line is fully displayed. |
How It Works
- A caller (typically
DialogueUIComponent) calls StartTypewriter(text, speed). - The component runs
ParseFormattedText on the input string, stripping inline [command] tags and building an internal command schedule — pauses, speed changes, and style runs are all resolved before the first tick. - The component stores the parsed text, resets its character index to zero, and connects to
TickBus. - On each tick, the component calculates how many characters should be visible based on elapsed time and the current speed. For each newly revealed character it fires
OnTypeFired(character). Scheduled commands (pauses, speed changes, style tags) execute when their character position is reached. - The component updates the associated LyShine text element — style tags (
[color], [b], etc.) are output as LyShine <font> / <b> / <i> markup inside the visible string. - When the last character is revealed, the component fires
OnTypewriterComplete and disconnects from TickBus. - If
ForceComplete is called mid-reveal, all remaining characters are revealed at once, OnTypewriterComplete fires, and the tick handler disconnects.
Text Command Reference
Inline commands are embedded directly in dialogue text strings and parsed by ParseFormattedText before reveal begins. Commands do not appear in the displayed text.
Format: [command=value] to open, [/command] to close where applicable.
[pause=X]
Pause the reveal for X seconds before continuing. If no value is given, defaults to 1.0 second. No closing tag.
[speed=X] / [/speed]
Change the typing speed to X characters per second from this point forward. [/speed] resets to the component’s configured default speed. Setting speed=0 causes all following text to appear instantly until the next speed tag.
Normal text [speed=5]fast text[/speed] normal again.
[color=VALUE] / [/color]
Change text colour. VALUE is any valid LyShine <font color> value — hex (#FF0000) or a named colour. Outputs <font color="VALUE">…</font> to the text element. Styles are tracked on a stack so nested formatting closes correctly.
Regular [color=#FF4444]danger text[/color] back to normal.
[size=VALUE] / [/size]
Change font size. VALUE is a numeric point size (e.g. 32). Outputs <font size="VALUE">…</font> to the text element.
Normal [size=48]big text[/size] normal.
[bold] or [b] / [/bold] or [/b]
Apply bold formatting. Both bold and b are valid keywords. Outputs <b>…</b>.
This is [b]bold[/b] text.
[italic] or [i] / [/italic] or [/i]
Apply italic formatting. Both italic and i are valid keywords. Outputs <i>…</i>.
This is [i]italic[/i] text.
[n] or [new]
Insert a newline character. No closing tag. Both n and new are valid.
First line[n]Second line.
Standalone Usage
The typewriter is not limited to dialogue. You can attach it to any entity with a LyShine text element for effects like:
- Tutorial text that types out instructions
- Item descriptions that reveal on hover
- Narrative text during loading screens
- Any text that benefits from a gradual reveal
Setup
- Create an entity with a LyShine text component.
- Attach a TypewriterComponent to the same entity.
- Call
TypewriterRequestBus::Event(entityId, &TypewriterRequestBus::Events::StartTypewriter, text, speed) from C++ or ScriptCanvas. - Optionally listen to
TypewriterNotificationBus for per-character or completion events.
C++ Usage
#include <GS_Cinematics/GS_CinematicsBus.h>

// Start typewriter on a specific entity
AZ::EntityId textEntity = /* your text entity */;
GS_Cinematics::TypewriterRequestBus::Event(
    textEntity,
    &GS_Cinematics::TypewriterRequestBus::Events::StartTypewriter,
    AZStd::string("Hello, traveler. Welcome to the village."),
    12.0f  // 12 characters per second
);

// Force-complete if the player presses a button
GS_Cinematics::TypewriterRequestBus::Event(
    textEntity,
    &GS_Cinematics::TypewriterRequestBus::Events::ForceComplete
);
Script Canvas
Typewriter requests and notification events:
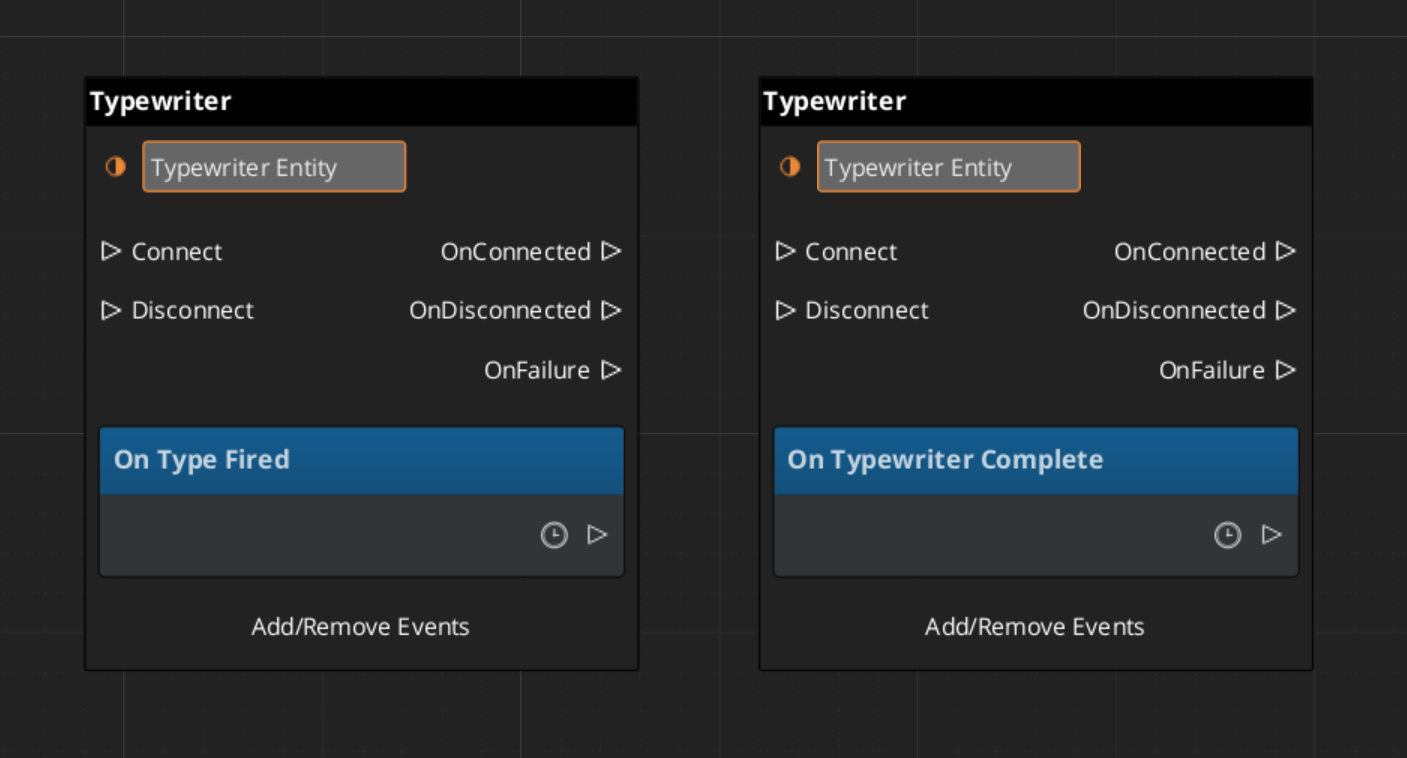
See Also
For conceptual overviews and usage guides:
For component references:
Get GS_Cinematics
GS_Cinematics — Explore this gem on the product page and add it to your project.
4.2.5 - Dialogue Actors
Full API reference for DialoguePerformerMarkerComponent, ActorDefinition data model, and the performer registration and lookup system.
Dialogue Actors connect authored character data in the .dialoguedb asset to world-space entities in the level. The system has two halves:
- ActorDefinition – The data side. Defined in the DialogueDatabase, it holds the actor’s name, portrait, and metadata.
- DialoguePerformerMarkerComponent – The world side. Attached to an entity in the level, it registers a named performer with the Dialogue Manager so the sequencer can find it at runtime.
When a dialogue sequence references an actor by name, the sequencer looks up the matching performer entity through DialogueManagerRequestBus::GetPerformer(name). This links the authored text, portraits, and performance instructions to a specific entity in the world.
For usage guides and setup examples, see The Basics: GS_Cinematics.
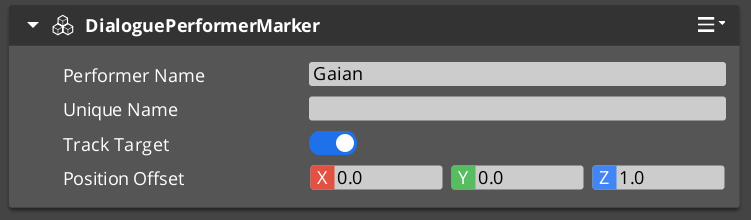
A component placed on any entity that represents a dialogue performer in the level. On Activate(), the marker registers itself with the Dialogue Manager by name. Multiple performers with the same name can exist in different levels, but only one should be active at a time within a single level.
Entity-addressed bus – each marker entity responds on its own address.
| Method | Parameters | Returns | Description |
|---|
GetPerformerName | – | AZStd::string | Returns the performer’s registered name. This name must match the actor name in the dialogue database. |
GetPosEntity | – | AZ::EntityId | Returns the entity to use as the performer’s position source. Typically the marker entity itself, but can point to a child entity for offset control. |
GetPosPoint | – | AZ::Vector3 | Returns the performer’s current world-space position. |
ShouldTrackTarget | – | bool | Returns whether the performer entity should continuously track and face its dialogue target during a sequence. |
ActorDefinition Data Model
The ActorDefinition is the authored data for a single character, stored inside the DialogueDatabase.
| Property | Type | Description |
|---|
| TypeId | {1A2B3C4D-5E6F-7A8B-9C0D-1E2F3A4B5C6D} | |
| Actor Name | AZStd::string | Internal lookup name. Must match the performer marker name in the level. |
| Display Name | AZStd::string | The name shown to the player in dialogue UI. Can differ from the internal name. |
| Portrait | Asset reference | Default portrait image. Overridden per-node in TextNodeData when needed. |
| Emotion Categories | AZStd::vector | Groupings of emotional states (e.g. happy, angry, sad). Used to organize profile images and poses. |
| Profile Image Sets | AZStd::vector | Sets of portrait images keyed by emotion or attitude. The sequencer can switch profiles during dialogue. |
| Pose Sets | AZStd::vector | Sets of body poses and idle animations keyed by attitude. Referenced by performance nodes. |
Registration Flow
- A
DialoguePerformerMarkerComponent activates on an entity in the level. - During
Activate(), the component calls DialogueManagerRequestBus::RegisterPerformerMarker(name, entityId). - The Dialogue Manager stores the mapping from name to entity ID.
- When the component deactivates, it unregisters itself.
Lookup Flow
- The sequencer processes a node that references an actor name (e.g. a
TextNodeData with speaker “perry” or a PerformanceNodeData targeting “perry”). - The sequencer calls
DialogueManagerRequestBus::GetPerformer("perry"). - The Dialogue Manager returns the registered entity ID.
- The sequencer (or performance) can now query the performer’s position, facing, and tracking state through
PerformerMarkerRequestBus.
The actorTargetId field on node data allows a sequence to target a specific instance of a performer when multiple entities share the same actor name. This supports scenarios like having the same NPC appear in multiple locations across different levels while keeping the same actor definition in the database.
Setup
- In your
.dialoguedb asset, define an actor with a unique name (e.g. “perry”) using the Dialogue Editor. - In your level, create an entity and attach a DialoguePerformerMarkerComponent.
- Set the marker’s performer name to match the actor name in the database (e.g. “perry”).
- Position the entity where the performer should appear in the world.
- Optionally, add child entities for position offsets or attach visual representation (mesh, animation) to the same entity.
The marker entity will self-register with the Dialogue Manager on activation. The sequencer can now find this performer when processing sequences that reference the matching actor name.
Script Canvas Examples
Getting a performer’s name and world position:
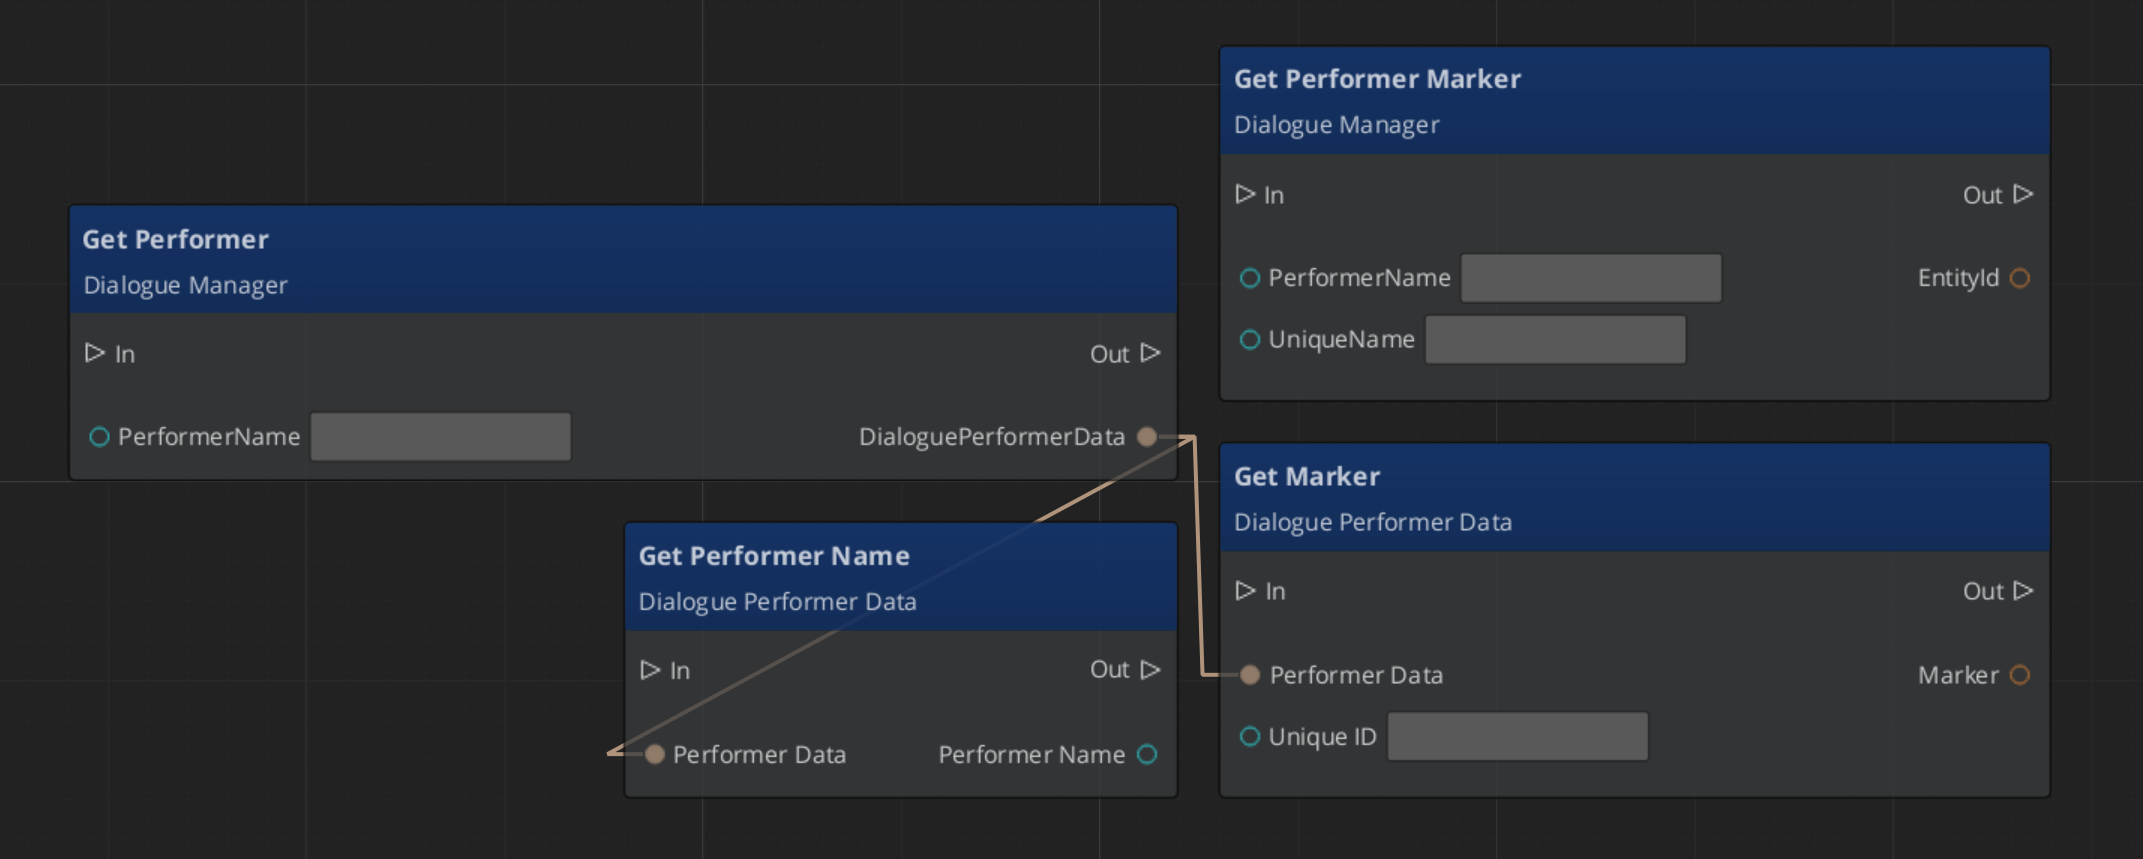
See Also
Get GS_Cinematics
GS_Cinematics — Explore this gem on the product page and add it to your project.
4.2.6 - Effects
Full API reference for the DialogueEffect base class and built-in effect types — SetRecords and ToggleEntitiesActive.
Effects are synchronous actions executed from EffectsNodeData nodes within a dialogue sequence. When the Dialogue Sequencer encounters an Effects node, it calls DoEffect() on each DialogueEffect in the node’s list in order, then immediately advances to the next node.
All effects are polymorphic — extending the base class automatically populates the effects list in the dialogue editor at startup.
For usage guides and setup examples, see The Basics: GS_Cinematics.
Contents
DialogueEffect (Abstract Base)
The base class for all dialogue effects. Effects execute synchronously and can be reversed for rollback scenarios.
| Property | Type | Description |
|---|
| TypeId | {71E2E05E-A7A3-4EB3-8954-2F75B26D5E3A} | |
Virtual Methods
| Method | Description |
|---|
DoEffect() | Executes the effect. Called by the sequencer when the EffectsNodeData is processed. |
ReverseEffect() | Undoes the effect. Used for rollback or undo scenarios. |
Lifecycle
- The sequencer encounters an
EffectsNodeData node. - The sequencer calls
DoEffect() on each effect in the node’s list in order. - All effects complete synchronously within the same frame.
- The sequencer immediately advances to the next node.
SetRecords_DialogueEffect
Sets one or more game records in the GS_Save RecordKeeper system. Commonly used to flag quest progress, NPC disposition, or world state changes triggered by dialogue.
| Property | Type | Description |
|---|
| TypeId | {FFCACF63-0625-4EE5-A74B-86C809B7BF80} | |
| Records | AZStd::vector<RecordEntry> | List of record name/value pairs to set on execution. |
ToggleEntitiesActive_DialogueEffect
Activates or deactivates a list of entities in the level. Used to show or hide objects, enable or disable triggers, or change world state during dialogue.
| Property | Type | Description |
|---|
| TypeId | {F97E1B87-EE7A-4D26-814C-D2F9FA810B28} | |
| Entities | AZStd::vector<AZ::EntityId> | The entities to activate or deactivate. |
| Active | bool | Target active state: true to activate, false to deactivate. |
Complete Effect Type Reference
| Type | TypeId | Description |
|---|
DialogueEffect | {71E2E05E-A7A3-4EB3-8954-2F75B26D5E3A} | Abstract base |
SetRecords_DialogueEffect | {FFCACF63-0625-4EE5-A74B-86C809B7BF80} | Sets game records |
ToggleEntitiesActive_DialogueEffect | {F97E1B87-EE7A-4D26-814C-D2F9FA810B28} | Activates/deactivates entities |
Creating a Custom Effect
To add a custom effect type from an external gem:
1. Define the class
#pragma once
#include <GS_Cinematics/Dialogue/Effects/DialogueEffect.h>

namespace MyGem
{
    class PlaySound_DialogueEffect : public GS_Cinematics::DialogueEffect
    {
    public:
        AZ_RTTI(PlaySound_DialogueEffect, "{YOUR-UUID-HERE}", GS_Cinematics::DialogueEffect);
        AZ_CLASS_ALLOCATOR(PlaySound_DialogueEffect, AZ::SystemAllocator);

        static void Reflect(AZ::ReflectContext* context);

        void DoEffect() override;
        void ReverseEffect() override;

    private:
        AZStd::string m_soundEvent;
    };
}
2. Implement and reflect
#include "PlaySound_DialogueEffect.h"
#include <AzCore/Serialization/SerializeContext.h>

namespace MyGem
{
    void PlaySound_DialogueEffect::Reflect(AZ::ReflectContext* context)
    {
        if (auto sc = azrtti_cast<AZ::SerializeContext*>(context))
        {
            sc->Class<PlaySound_DialogueEffect, GS_Cinematics::DialogueEffect>()
                ->Version(1)
                ->Field("SoundEvent", &PlaySound_DialogueEffect::m_soundEvent);

            if (auto ec = sc->GetEditContext())
            {
                ec->Class<PlaySound_DialogueEffect>("Play Sound", "Fires a sound event during dialogue.")
                    ->ClassElement(AZ::Edit::ClassElements::EditorData, "")
                        ->Attribute(AZ::Edit::Attributes::Category, "MyGem/Effects")
                    ->DataElement(AZ::Edit::UIHandlers::Default, &PlaySound_DialogueEffect::m_soundEvent, "Sound Event", "");
            }
        }
    }

    void PlaySound_DialogueEffect::DoEffect()
    {
        // Fire the sound event
    }

    void PlaySound_DialogueEffect::ReverseEffect()
    {
        // Stop the sound if needed
    }
}
Custom effects are discovered automatically at startup through O3DE serialization — no manual registration step is required.
See Also
For conceptual overviews and usage guides:
For component references:
For related resources:
Get GS_Cinematics
GS_Cinematics — Explore this gem on the product page and add it to your project.
4.2.7 - Performances
Full API reference for the DialoguePerformance base class and built-in performance types — MoveTo, PathTo, and RepositionPerformer.
Performances are asynchronous actions executed from PerformanceNodeData nodes within a dialogue sequence. When the Dialogue Sequencer encounters a performance node, it instantiates the appropriate DialoguePerformance subclass, starts it, and waits for it to signal completion before advancing to the next node.
All performances are polymorphic by extending the class they automatically populate the performances list when adding performances to a node.
For usage guides and setup examples, see The Basics: GS_Cinematics.
Contents
The base class for all dialogue performances. Extends AZ::TickBus::Handler so that performances can drive time-based behavior across multiple frames.
| Property | Type | Description |
|---|
| TypeId | {BCCF5C52-42C3-49D4-8202-958120EA8743} | |
| Tick Handler | AZ::TickBus::Handler | Performances connect to TickBus during execution for frame-by-frame updates. |
Virtual Methods
| Method | Description |
|---|
DoPerformance() | Entry point called by the sequencer. Sets up the performance and calls ExecutePerformance(). |
ExecutePerformance() | Core execution logic. Override this in subclasses to implement the actual behavior (movement, animation, etc.). |
FinishPerformance() | Called when the performance is complete. Disconnects from TickBus and signals the sequencer via DialogueSequencerRequestBus::OnPerformanceComplete(). |
- The sequencer encounters a
PerformanceNodeData and instantiates the corresponding DialoguePerformance subclass. - The sequencer calls
DoPerformance(). DoPerformance() connects to TickBus and calls ExecutePerformance().- The performance runs across multiple ticks until its completion condition is met.
- The performance calls
FinishPerformance(), which disconnects from TickBus and notifies the sequencer. - The sequencer advances to the next node.
Moves a performer entity to a named stage marker position over time using direct interpolation (no navmesh). Suitable for short-distance movements within a scene where pathfinding is unnecessary.
| Property | Type | Description |
|---|
| TypeId | {6033A69D-F46F-40DF-A4A0-A64C4E28D6D5} | |
| Target | Stage marker name | The destination position, resolved through CinematicsManagerRequestBus::GetStageMarker(). |
| Speed / Duration | float | Controls how quickly the performer reaches the target. |
Request Bus: MoveTo_PerformanceRequestBus
| Method | Parameters | Returns | Description |
|---|
StartMoveTo | AZ::EntityId performer, AZ::Vector3 target, float speed | void | Begins moving the performer entity toward the target position. |
Notification Bus: MoveTo_PerformanceNotificationBus
| Event | Description |
|---|
OnMoveToComplete | Fired when the performer reaches the target position. The performance calls FinishPerformance() in response. |
Navigates a performer entity to a named stage marker along a RecastNavigation navmesh path. Suitable for longer-distance movements where the performer must navigate around obstacles. Requires RecastNavigation to be enabled in the project.
| Property | Type | Description |
|---|
| TypeId | {C0DF4B0E-924D-4C38-BD26-5A286161D95C} | |
| Target | Stage marker name | The destination position, resolved through CinematicsManagerRequestBus::GetStageMarker(). |
| Navigation | RecastNavigation | Uses the navmesh to compute a valid path from the performer’s current position to the target. |
Request Bus: PathTo_PerformanceRequestBus
| Method | Parameters | Returns | Description |
|---|
StartPathTo | AZ::EntityId performer, AZ::Vector3 target | void | Computes a navmesh path and begins navigating the performer toward the target. |
Notification Bus: PathTo_PerformanceNotificationBus
| Event | Description |
|---|
OnPathToComplete | Fired when the performer reaches the end of the computed path. The performance calls FinishPerformance() in response. |
Instantly teleports a performer entity to a named stage marker position. No interpolation, no pathfinding – the entity is moved in a single frame. Useful for off-screen repositioning between scenes or for snapping a performer to a mark before a sequence begins.
| Property | Type | Description |
|---|
| TypeId | {DE1E0930-F0A4-4F60-A741-4FB530610AEE} | |
| Target | Stage marker name | The destination position, resolved through CinematicsManagerRequestBus::GetStageMarker(). |
Notification Bus: RepositionPerformer_PerformanceNotificationBus
| Event | Description |
|---|
OnRepositionComplete | Fired immediately after the performer is teleported. The performance calls FinishPerformance() in the same frame. |
| Type | TypeId | Movement | Navigation |
|---|
DialoguePerformance | {BCCF5C52-42C3-49D4-8202-958120EA8743} | Abstract base | – |
MoveTo_DialoguePerformance | {6033A69D-F46F-40DF-A4A0-A64C4E28D6D5} | Interpolated | None |
PathTo_DialoguePerformance | {C0DF4B0E-924D-4C38-BD26-5A286161D95C} | Navmesh path | RecastNavigation |
RepositionPerformer_DialoguePerformance | {DE1E0930-F0A4-4F60-A741-4FB530610AEE} | Instant teleport | None |
To add a custom performance type from an external gem:
1. Define the class
#pragma once
#include <GS_Cinematics/Dialogue/Performances/DialoguePerformance.h>

namespace MyGem
{
    class PlayAnimation_DialoguePerformance : public GS_Cinematics::DialoguePerformance
    {
    public:
        AZ_RTTI(PlayAnimation_DialoguePerformance, "{YOUR-UUID-HERE}", GS_Cinematics::DialoguePerformance);
        AZ_CLASS_ALLOCATOR(PlayAnimation_DialoguePerformance, AZ::SystemAllocator);

        static void Reflect(AZ::ReflectContext* context);

    protected:
        void ExecutePerformance() override;
        void OnTick(float deltaTime, AZ::ScriptTimePoint time) override;

    private:
        AZStd::string m_animationName;
        bool m_animationComplete = false;
    };
}
2. Implement and register
void PlayAnimation_DialoguePerformance::ExecutePerformance()
{
    // Start the animation on the performer entity
    // Listen for animation completion
}

void PlayAnimation_DialoguePerformance::OnTick(float deltaTime, AZ::ScriptTimePoint time)
{
    if (m_animationComplete)
    {
        FinishPerformance();
    }
}
See Also
For conceptual overviews and usage guides:
For component references:
For related resources:
Get GS_Cinematics
GS_Cinematics — Explore this gem on the product page and add it to your project.
4.3 - Timeline Expansion
For usage guides and setup examples, see The Basics: GS_Cinematics.
Get GS_Cinematics
GS_Cinematics — Explore this gem on the product page and add it to your project.
4.4 - Templates
ClassWizard templates for GS_Cinematics — dialogue conditions, effects, and performance objects for the dialogue sequencer.
All GS_Cinematics extension types are generated through the ClassWizard CLI. The wizard handles UUID generation and cmake file-list registration automatically.
For usage guides and setup examples, see The Basics: GS_Cinematics.
python ClassWizard.py \
    --template <TemplateName> \
    --gem <GemPath> \
    --name <SymbolName> \
    [--input-var key=value ...]
Contents
Dialogue Condition
Template: DialogueCondition
Creates a condition object that gates a dialogue node connection at runtime. Assigned to a node’s conditions list in the DialogueDatabase asset. EvaluateCondition() is called before the connected node is offered to the player — return true to allow it, false to hide it.
Two types available via --input-var:
| Option | Description |
|---|
| Basic Condition (default) | Free-form stub — implement EvaluateCondition() however the design requires |
| Boolean Condition | Pre-wired to read a save record key and compare it with GS_Core::BooleanConditions |
Generated files (Basic):
Source/${Name}_DialogueCondition.h/.cpp
Generated files (Boolean):
Source/${Name}_BooleanDialogueCondition.h/.cpp
CLI:
# Basic Condition:
python ClassWizard.py --template DialogueCondition --gem <GemPath> --name <Name> \
    --input-var condition_type="Basic Condition"

# Boolean Condition:
python ClassWizard.py --template DialogueCondition --gem <GemPath> --name <Name> \
    --input-var condition_type="Boolean Condition"
Post-generation — manual registration required:
In DialogueSequencerComponent.cpp, add:
#include <path/to/${Name}_DialogueCondition.h>
// inside Reflect(context):
${Name}_DialogueCondition::Reflect(context);
Extensibility: Fully polymorphic. The conditions list on each DialogueNodeData holds DialogueCondition* raw pointers — O3DE’s property editor type picker discovers all registered subtypes via EnumerateDerived. Add as many condition types as needed; they appear in the picker automatically once reflected.
See also: Dialogue Data Structure — full extension walkthrough with header and implementation examples.
Dialogue Effect
Template: DialogueEffect
Creates an effect object that fires world events when the sequencer reaches an Effects node. If the node’s temporary flag is set, ReverseEffect() is called at sequence end to undo the change. Used for enabling/disabling lights, playing sounds, showing UI, or changing world state during dialogue.
Generated files:
Source/${Name}_DialogueEffect.h/.cpp
CLI:
python ClassWizard.py --template DialogueEffect --gem <GemPath> --name <Name>
Post-generation — manual registration required:
In DialogueSequencerComponent.cpp, add:
#include <path/to/${Name}_DialogueEffect.h>
// inside Reflect(context):
${Name}_DialogueEffect::Reflect(context);
Key overrides:
| Method | When called |
|---|
DoEffect() | When the Effects node is reached in the sequence |
ReverseEffect() | At sequence end, only if the node’s temporary flag is true |
Extensibility: Same polymorphic pattern as DialogueCondition. The effects list holds DialogueEffect* pointers. All reflected subtypes appear in the editor type picker automatically.
See also: Dialogue Data Structure — full extension walkthrough.
Template: DialoguePerformance
Creates a performance object that drives world-space NPC actions from a Performance node in the dialogue sequence. The sequencer waits at the node until all performances signal completion (unless waitToContinue is false). Used for NPC movement, animation, repositioning, or any async world action that must complete before the dialogue continues.
Generated files:
Source/${Name}_DialoguePerformance.h/.cpp
CLI:
python ClassWizard.py --template DialoguePerformance --gem <GemPath> --name <Name>
Post-generation — manual registration required:
In DialogueSequencerComponent.cpp, add:
#include <path/to/${Name}_DialoguePerformance.h>
// inside Reflect(context):
${Name}_DialoguePerformance::Reflect(context);
Lifecycle:
| Method | Role |
|---|
ExecutePerformance() | Entry point — start the world action here |
FinishPerformance() | Call when the action is done (may be async); clean up state, then call base |
PerformanceComplete() | Called by base after FinishPerformance() — signals the sequencer to advance |
Inherited fields: delayStartTime (seconds before ExecutePerformance is called), delayEndTime (seconds before PerformanceComplete fires after finish).
For instant actions, call FinishPerformance() at the end of ExecutePerformance(). For async actions, store a callback or subscribe to a bus and call FinishPerformance() from the completion handler.
Extensibility: Same polymorphic pattern as the other dialogue types. The performances list on a Performance node holds DialoguePerformance* pointers. All reflected subtypes appear in the editor picker automatically.
See also: Dialogue Data Structure — full extension walkthrough.
See Also
For the full API, component properties, and C++ extension guide:
For all ClassWizard templates across GS_Play gems:
Get GS_Cinematics
GS_Cinematics — Explore this gem on the product page and add it to your project.
4.5 - 3rd Party Implementations
For usage guides and setup examples, see The Basics: GS_Cinematics.
Get GS_Cinematics
GS_Cinematics — Explore this gem on the product page and add it to your project.
5 - GS_Environment
Time of day progression, day/night cycle management, and sky colour configuration for GS_Play projects.
GS_Environment is the time and world atmosphere gem for GS_Play. It drives a configurable time-of-day clock, broadcasts day/night transition events, exposes per-tick world time notifications for dependent systems, and provides a sky colour configuration asset for Atom renderer integration. The gem depends on GS_Core.
For usage guides and setup examples, see The Basics: GS_Environment.
GS_Environment is in Early Development. Full support planned soon: 2026.
Contents
Time Manager
The Time Manager singleton owns the world clock. It advances time at a configurable speed, determines whether the current time of day is day or night, and registers the active main camera for sky calculations. Listeners subscribe via the GS_Core TimeEmissionBus to react to time changes or the day/night boundary crossing.
| Component / Asset | Purpose |
|---|
| GS_TimeManagerComponent | GS_Play manager. Owns the world clock. Controls time passage speed and exposes day/night state queries. |
| SkyColourConfiguration | Asset class for sky colour settings used by Atom renderer integration. |
Time Manager API
Environment System
The system component manages gem-level initialization and global environment state. It runs on AZ::TickBus to advance the world clock each frame and coordinates environment requests across the level.
| Component | Purpose |
|---|
| GS_EnvironmentSystemComponent | Runtime system component. Advances the world clock on tick. Handles GS_EnvironmentRequestBus queries. |
Environment System API
Dependencies
Installation
- Enable GS_Environment and GS_Core in your O3DE project’s gem list.
- Add GS_TimeManagerComponent to your Game Manager prefab and include it in the Startup Managers list.
- Configure the day window (start and end time values) on the Time Manager component.
- Set time passage speed to
0 if you want a static time of day, or to a positive value for a live clock. - Call
SetMainCam via TimeManagerRequestBus once your active camera entity is known (typically from a stage startup sequence). - Subscribe to the GS_Core
TimeEmissionBus (WorldTick / DayNightChanged) on any entities that respond to time changes.
See Also
For conceptual overviews and usage guides:
For related resources:
Get GS_Environment
GS_Environment — Explore this gem on the product page and add it to your project.
5.1 - Time Manager
World clock management, time-of-day control, day/night cycle detection, and per-tick time notifications.
The Time Manager is the singleton world clock for every GS_Play project. It extends GS_ManagerComponent and participates in the standard two-stage initialization managed by the Game Manager. On activation it begins advancing a time-of-day value each frame, determines whether the current time falls within the configured day window, and registers the active main camera for sky positioning calculations.
Listeners subscribe to the GS_Core TimeEmissionBus to react to per-frame ticks or the day/night boundary crossing.
For usage guides and setup examples, see The Basics: Time Manager.

GS_Environment is in Early Development. Full support planned soon: 2026.
Contents
How It Works
Time Progression
Each frame the Time Manager advances the current time-of-day value by deltaTime × timePassageSpeed. A speed of 0 freezes the clock at the configured initial time; positive values run the clock forward in real time.
Day/Night State
The Time Manager compares the current time against a configured day window (start and end values). When the time crosses either threshold it fires DayNightChanged once. IsDay() returns the cached state and is safe to call every tick.
Sky Integration
Call SetMainCam with the active camera entity after stage startup. The Time Manager uses this reference to pass sky positioning data to the SkyColourConfiguration asset used by the Atom renderer.
Inspector Properties
| Property | Type | Description |
|---|
| Day Start | float | Normalized time value (0.0–1.0) at which day begins. |
| Day End | float | Normalized time value (0.0–1.0) at which night begins. |
| Initial Time | float | Starting time-of-day value when the component activates. |
| Time Passage Speed | float | Multiplier controlling how fast time advances each frame. Set to 0 for a static clock. |
| Sky Colour Config | AZ::Data::Asset<SkyColourConfiguration> | Sky colour configuration asset used by the Atom renderer integration. |
API Reference
GS_TimeManagerComponent
| Field | Value |
|---|
| Extends | GS_Core::GS_ManagerComponent |
| Header | GS_Environment/GS_TimeManagerBus.h |
Request Bus: TimeManagerRequestBus
Commands sent to the Time Manager. Singleton bus – Single address, single handler.
| Method | Parameters | Returns | Description |
|---|
SetTimeOfDay | float time | void | Sets the current time of day (0.0–1.0 normalized range). |
GetTimeOfDay | – | float | Returns the current time of day value. |
GetWorldTime | – | float | Returns the total elapsed world time since startup. |
SetTimePassageSpeed | float speed | void | Sets the multiplier controlling how fast time advances each frame. |
IsDay | – | bool | Returns whether the current time falls within the configured day window. |
SetMainCam | AZ::EntityId entityId | void | Registers the active main camera entity for sky positioning calculations. |
Cross-Gem Contract: GS_Core::TimeEmissionBus
World-time signals are observed through the GS_Core TimeEmissionBus — the in-gem TimeManagerNotificationBus was hoisted to GS_Core in the interfaces migration (the ScriptCanvas-facing name is preserved). Global broadcast, multiple handlers. Time control (SetTimeOfDay, SetTimePassageSpeed, IsDay) stays on the in-gem TimeManagerRequestBus.
| Event | Parameters | Description |
|---|
WorldTick | float deltaTime | Fired every frame while the Time Manager is active. Use for time-dependent per-frame updates. |
DayNightChanged | bool isDay | Fired once when the time-of-day crosses the day/night boundary in either direction. |
SkyColourConfiguration
Asset class for sky colour settings. Referenced by GS_TimeManagerComponent and consumed by the Atom renderer integration to drive sun, moon, and ambient colour values across the day/night cycle.
See Also
For conceptual overviews and usage guides:
For component references:
Get GS_Environment
GS_Environment — Explore this gem on the product page and add it to your project.
5.2 - Environment System
Runtime system component that drives the world clock tick and handles GS_EnvironmentRequestBus queries.
The Environment System Component is the gem-level runtime system for GS_Environment. It extends AZ::Component and implements AZ::TickBus::Handler to advance the world clock each frame. It handles GS_EnvironmentRequestBus queries and coordinates global environment state across the level.
This component activates automatically as part of the GS_Environment gem – it does not need to be added manually to any entity.
For usage guides and setup examples, see The Basics: GS_Environment.
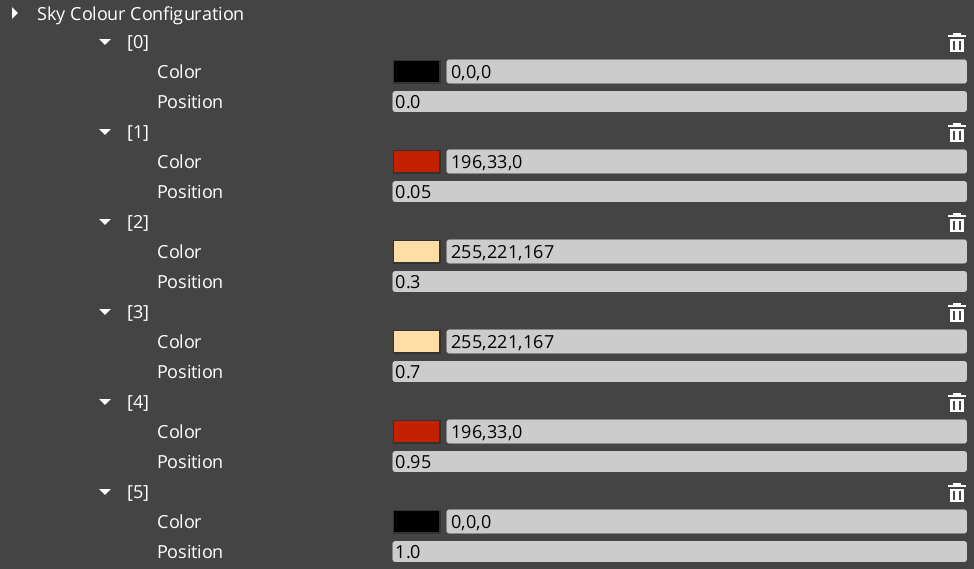
GS_Environment is in Early Development. Full support planned soon: 2026.
Contents
How It Works
Tick Integration
The Environment System Component connects to AZ::TickBus on activation. Each tick it drives the Time Manager’s clock advancement and ensures all environment-dependent systems receive their frame update in the correct order.
Environment Requests
GS_EnvironmentRequestBus provides a global access point for querying environment state. The system component is the sole handler; any gem or component can broadcast requests to read current environment conditions.
API Reference
GS_EnvironmentSystemComponent
| Field | Value |
|---|
| TypeId | {57B91AE7-B0EC-467E-A359-150B5FB993F9} |
| Extends | AZ::Component, AZ::TickBus::Handler |
| Header | GS_Environment/GS_EnvironmentBus.h |
Request Bus: GS_EnvironmentRequestBus
Commands sent to the Environment System. Singleton bus – Single address, single handler.
| Field | Value |
|---|
| Interface TypeId | {39599FDC-B6DC-4143-A474-9B525599C919} |
| Method | Parameters | Returns | Description |
|---|
| (base interface) | – | – | Extended by project-level environment systems as needed. |
See Also
For conceptual overviews and usage guides:
For component references:
- Time Manager – World clock, day/night cycle, and per-tick notifications
Get GS_Environment
GS_Environment — Explore this gem on the product page and add it to your project.
5.3 - 3rd Party Implementations
For usage guides and setup examples, see The Basics: GS_Environment.
Get GS_Environment
GS_Environment — Explore this gem on the product page and add it to your project.
6 - GS_GraphCanvas
A framework for building custom visual graph editors in O3DE — descriptors, nodes, variables, execution engines, and editor infrastructure.
GS_GraphCanvas is a higher-level framework built on top of O3DE’s GraphCanvas and GraphModel gems. It lets you create fully-featured visual graph editors — dialogue trees, audio event graphs, state machines, or any domain-specific tool — without touching the complex boilerplate of the underlying engine systems. You provide a descriptor, a context, and your nodes; the framework gives you a complete editor.
Contents
Architecture
GS_GraphCanvas sits between your gem and the engine’s graph infrastructure. The layer model:
[Your Gem]              (gs_cinematics, gs_audio, gs_unit, or your own)
   Provides: GraphSystemDescriptor, GraphContext subclass, Node definitions
        |
[gs_graphcanvas]        (STATIC LIB — framework layer)
   Provides: MainWindow, save/load, undo/redo, variables, inspector,
             node registry, palette, execution engines, multi-doc, pages
        |
[O3DE GraphModel]       (engine — data model)
   Provides: Graph, Node, Slot, Connection, DataType, GraphContext
        |
[O3DE GraphCanvas]      (engine — visual rendering)
   Provides: QGraphicsScene rendering, node visuals, slot widgets,
             connection rendering, selection, copy/paste, bookmarks
Downstream gems inherit from the framework’s MainWindow and extend it without fighting the base infrastructure. The base MainWindow is a fully functional single-graph editor. Downstream editors add domain-specific behavior (database containers, sequence sidebars, layer systems) on top.
Build Model
gs_graphcanvas is a static library. Each downstream gem links against it and gets its own compiled copy. This means reflected types can be registered multiple times from different DLLs — all Reflect() methods must include FindClassData guards to prevent duplicate registration crashes.
Descriptor & Topology
The GraphSystemDescriptor is the identity card for a graph editor type. It tells the framework what kind of editor to build — its name, file extension, topology, and enabled features.
The topology is the most important decision. It determines connection style, execution model, and slot types:
| Topology | Use Case | Connections | Execution Model |
|---|
| FlowGraph | Sequential processes, dialogue trees | Directional FlowIn/FlowOut | Step/wait/resume |
| DataFlowGraph | Signal processing, audio, shaders | Directional data slots | Topological dirty-propagation |
| StateMachineGraph | State machines, HFSM, behavior trees | Multidirectional perimeter arrows | Tick-based state transitions |
See Descriptor & Topology for full field reference and the GraphContext data type system.
Nodes
All gs_graphcanvas nodes inherit from BaseNode. The framework provides macros for slot registration, auto-registration into the node palette, and rapid node creation for simple cases.
Three tiers of complexity:
- Macro node (~5 lines) —
DEFINE_SIMPLE_NODE_WITH_SLOTS generates the entire class - Helper macro node (~15 lines) — Use slot macros with a custom class
- Full custom node (30+ lines) — Full control over slots, properties, and behavior
See Nodes for the node system, slot macros, and auto-registration.
Editor Window
The MainWindow class provides a complete editor out of the box:
- Multi-document tabs with dirty tracking and close-with-save prompts
- File menu (New, Open, Save, Save As, Open Recent)
- Edit menu (Undo/Redo, Cut/Copy/Paste)
- Node palette with drag-drop creation
- Inspector panel for node and connection properties
- Variable panel (when enabled)
- Full-window page system for non-graph pages (e.g., Performers, Settings)
- In-memory graph operations for container/database editors
Downstream editors subclass MainWindow and override virtual hooks to add domain-specific behavior.
See Editor Window for virtual hooks, page system, and container editor patterns.
Variables
When variablesEnabled = true in the descriptor, the framework provides a complete variable system:
- Variable Panel dock widget for declaring typed variables
- Get/Set Variable nodes automatically included in the palette
- Convert to Reference — right-click any input slot to bind it to a variable
- Drag to Canvas — drag a variable from the panel onto the canvas to create a Get or Set node
- Rename propagation — renaming a variable updates all referencing nodes
See Variables for the variable system and runtime bindings.
Execution Engines
gs_graphcanvas includes three execution engines matching the three topologies:
| Engine | Topology | Pattern |
|---|
FlowGraphEvaluator | FlowGraph | Step/wait/resume along FlowIn/FlowOut connections |
DataFlowGraphEvaluator | DataFlowGraph | Topological ordering, dirty-propagation, re-evaluate only changed nodes |
StateMachineEvaluator | StateMachineGraph | Tick-based with OnEnter/OnTick/OnExit lifecycle and transition conditions |
All engines share GraphExecutionContext for variable storage and value resolution. GraphInstance provides independent runtime copies of a graph for safe concurrent execution.
See Execution Engines for engine details and the runtime pipeline.
Inspector & Save/Load
Inspector Panel
The inspector auto-generates UI from node EditContext reflection. Select a node to edit its properties; in state machine graphs, click a transition line to edit its priority and conditions.
Save/Load
Graphs are saved as GraphDocumentAsset — a plain struct (not AZ::Data::AssetData) containing the graph as a binary byte buffer wrapped in XML. This avoids ObjectStream and AssetManager interaction issues.
Undo/Redo
Snapshot-based: each undo point captures the entire graph state as a byte buffer. Per-graph undo stacks. Ctrl+Z / Ctrl+Y.
Installation
In your gem’s editor module CMakeLists.txt, add gs_graphcanvas as a build dependency:
ly_add_target(
    NAME GS_MyTool.Editor.Static STATIC
    ...
    BUILD_DEPENDENCIES
        PRIVATE
            Gem::GraphCanvas.Editor.Static
            Gem::GraphModel.Editor.Static
            Gem::GS_GraphCanvas.Editor.Static
            ...
)
See Also
6.1 - Descriptor & Topology
GraphSystemDescriptor fields, topology selection, and GraphContext data type registration.
The GraphSystemDescriptor tells gs_graphcanvas what kind of editor to build. It is a plain struct that you fill out and pass to the MainWindow constructor.
GraphSystemDescriptor Fields
Identity
| Field | Type | Description |
|---|
systemId | const char* | Unique ID string (e.g., "dialogue", "audiograph", "unitaction"). Used for node filtering. |
systemName | const char* | Display name shown in the editor title bar. |
fileExtension | const char* | File extension for graph files (e.g., ".dialogue", ".audiograph"). |
mimeType | const char* | MIME type for drag-drop from the node palette. |
saveIdentifier | const char* | QSettings key for persisting window layout state. |
editorId | GraphCanvas::EditorId | Unique editor ID for the GraphCanvas system. |
Topology
| Field | Type | Default | Description |
|---|
topology | GraphTopology | FlowGraph | Determines connection style, slot types, and execution model. |
Topology options:
FlowGraph — Directional flow slots (FlowIn/FlowOut), sequential step/wait/resume execution. Best for: dialogue trees, scripting, sequential processes.DataFlowGraph — No flow slots, data-only connections with dirty-propagation evaluation. Best for: audio, shaders, procedural generation, signal processing.StateMachineGraph — Multidirectional perimeter connections with tick-based state transitions. Best for: HFSM, behavior trees, character controllers.
See Execution Engines for detailed Topology Flow reference and internal API for runtime execution.
Feature Flags
| Field | Type | Default | Description |
|---|
variablesEnabled | bool | false | Enables the variable panel, Get/Set variable nodes, and reference bindings. |
allowConnectionLoopback | bool | false | Whether cycles are allowed in the graph. |
State Machine Features
These fields are only relevant when topology == StateMachineGraph:
| Field | Type | Default | Description |
|---|
hierarchicalStates | bool | false | Enable compound/nested states. |
parallelLayers | bool | false | Enable parallel layer evaluation. |
transitionConditions | bool | false | Enable polymorphic transition conditions on connections. |
UI
| Field | Type | Description |
|---|
autoSpawnNodeTypes | AZStd::vector<AZ::TypeId> | Node types automatically created in every new graph (e.g., entry nodes). |
stylesheetPath | const char* | Optional path to a custom QSS stylesheet for node styling. |
windowTitle | const char* | Window title text. |
menuCategory | const char* | Menu path in the O3DE editor (e.g., "GS Tools"). |
GraphContext
Each graph system needs a GraphContext subclass that registers the data types available in that system. The framework provides a set of built-in CommonDataTypes available to all systems:
| Type | Enum | C++ Type |
|---|
| Bool | GS_Bool | bool |
| Int | GS_Int | int |
| Float | GS_Float | float |
| String | GS_Text | AZStd::string |
| Vector2 | GS_Vec2 | AZ::Vector2 |
| Vector3 | GS_Vec3 | AZ::Vector3 |
| Color | GS_Color | AZ::Color |
| EntityId | GS_EntityId | AZ::EntityId |
If your tool only uses these built-in types, your GraphContext subclass may be trivial. Domain-specific types (e.g., AudioRoute for audio graphs) are registered by calling context->RegisterDataType(...) in your subclass.
Topology Decision Matrix
| Consideration | FlowGraph | DataFlowGraph | StateMachineGraph |
|---|
| Flow slots (FlowIn/FlowOut) | Yes | No | No |
| Connection direction | Left-to-right | Left-to-right | Multidirectional (perimeter) |
| Execution model | Step/wait/resume | Topological dirty-propagation | Tick-based state transitions |
| Node interface | IExecutableNode | IDataFlowNode | IStateMachineNode |
| Evaluator | FlowGraphEvaluator | DataFlowGraphEvaluator | StateMachineEvaluator |
| Cycles allowed | Optional | No (DAG required) | Yes (inherent) |
| Transition conditions | N/A | N/A | TransitionCondition base class |
| Example downstream | Dialogue Editor | Audio Event Graph | Unit Action Graph |
6.2 - Nodes
BaseNode, slot macros, auto-registration, rapid node creation, and built-in node types.
All gs_graphcanvas nodes inherit from BaseNode, which extends GraphModel::Node. BaseNode provides slot registration helpers, flow slot support, inspector property reflection, and transition descriptor management for state machines.
Slot Registration
Slots are registered in the RegisterSlots() override using helper macros:
GS_INPUT_SLOT_TYPED("slot_name", "Display Name", DataTypeEnum, DefaultValue)
GS_OUTPUT_SLOT_TYPED("slot_name", "Display Name", DataTypeEnum)
GS_INPUT_SLOT_CONNECTION("slot_name", "Display Name")        // Connection-only, no inline editor
GS_MULTI_INPUT_SLOT_CONNECTION("slot_name", "Display Name")  // Multiple connections allowed
All input slots use editableOnNode=true by default, providing inline value editing directly on the node in the graph canvas.
For flow-based graphs, call RegisterFlowSlots() to add FlowIn and FlowOut slots. Override HasFlowIn() or HasFlowOut() to control which flow slots appear (e.g., a Start node has no FlowIn).
For state machine graphs, call RegisterTransitionSlots() to add transition_in and transition_out perimeter slots. Override HasTransitionIn() / HasTransitionOut() to control slot presence.
Auto-Registration
Nodes self-register into the node palette via macros:
// Register for ALL graph systems:
GS_AUTO_REGISTER_NODE(MyNode)

// Register for a specific system only:
GS_AUTO_REGISTER_NODE_FOR(MyNode, "dialogue")
Each registered node includes a category string (from CATEGORY constant), display name (from TITLE), and a creation lambda. The NodeRegistry singleton manages all registrations and handles MIME event reflection for drag-drop.
Rapid Node Creation
For simple nodes with no custom logic, a single macro generates the entire class:
DEFINE_SIMPLE_NODE_WITH_SLOTS(
    MyNode,
    "{UNIQUE-UUID}",
    "My Node",
    "My Category",
    {INPUT_SLOT("input", GS_Text, "Input text")},
    {OUTPUT_SLOT("output", GS_Text, "Output text")}
)
This generates the class with TITLE, CATEGORY, Reflect(), RegisterSlots(), and the constructor.
Three Tiers of Node Complexity
| Tier | Lines | When to Use |
|---|
| Macro node | ~5 | Simple pass-through or data-holding nodes |
| Helper macro node | ~15 | Nodes with custom properties but standard slot patterns |
| Full custom node | 30+ | Nodes with custom execution logic, dynamic slots, or complex behavior |
Reflect Pattern
Every node’s Reflect() method must include a FindClassData guard because gs_graphcanvas is a static library and types can be registered from multiple DLLs:
void MyNode::Reflect(AZ::ReflectContext* context)
{
    if (auto* sc = azrtti_cast<AZ::SerializeContext*>(context))
    {
        if (sc->FindClassData(azrtti_typeid<MyNode>())) { return; }  // MANDATORY guard
        sc->Class<MyNode, GS_GraphCanvas::BaseNode>()
            ->Version(1)
            ->Field("MyProperty", &MyNode::m_myProperty)
            ;
    }
    if (auto* ec = azrtti_cast<AZ::EditContext*>(context))
    {
        ec->Class<MyNode>("My Node", "Description")
            ->ClassElement(AZ::Edit::ClassElements::EditorData, "")
                ->Attribute(AZ::Edit::Attributes::AutoExpand, true)
            ->DataElement(AZ::Edit::UIHandlers::Default, &MyNode::m_myProperty,
                "My Property", "Tooltip")
            ;
    }
}
Built-in Nodes
gs_graphcanvas includes several utility nodes available to all graph systems:
| Node | Category | Purpose |
|---|
| IfNode | Routing | Routes data based on a boolean condition |
| SwitchNode | Routing | Routes data based on a selector value |
| GetVariableNode | Variables | Outputs the value of a declared variable |
| SetVariableNode | Variables | Writes a value to a declared variable |
Variable nodes are automatically included in the palette when variablesEnabled = true in the descriptor.
6.3 - Editor Window
MainWindow features, virtual hooks, page system, and container editor patterns.
The MainWindow class provides a complete graph editor out of the box. Downstream editors subclass it and override virtual hooks to add domain-specific behavior.
Out-of-the-Box Features
Every MainWindow instance includes:
- Multi-document tabs — Each graph opens in its own tab with dirty tracking (asterisk
* in tab title) and close-with-save prompts - File menu — New, Open, Save, Save As, Open Recent (tracks last 10 files)
- Edit menu — Undo/Redo (Ctrl+Z / Ctrl+Y), Cut/Copy/Paste
- Node palette — Searchable list of available nodes with drag-drop creation
- Inspector panel — Auto-generated property editor from node EditContext reflection
- Variable panel — Variable declarations, type selection, and default value editing (when enabled)
Virtual Hooks
MainWindow provides virtual methods for downstream customization:
virtual void AddFileNewAction();
virtual void AddFileOpenAction();
virtual void AddFileSaveAction();
virtual void AddFileSaveAsAction();
Override these to replace per-file behavior with container-level behavior (e.g., the Dialogue Editor overrides these to save the entire database instead of individual graphs).
Lifecycle Hooks
| Hook | Called When |
|---|
OnEditorOpened() | A graph tab is opened |
OnEditorClosing() | A graph tab is being closed |
OnActiveGraphChanged() | The user switches between graph tabs |
OnNewGraphRequested(QString& outTitle) | Before a new graph tab is created. Return false to cancel. |
OnNodeDoubleClicked(BaseNode* node) | A node is double-clicked. Used to open sub-graph editors. |
Full-Window Page System
The page system lets you add non-graph pages alongside the graph editor in the same window:
AddFullWindowPage("Performers", m_performersWidget);
AddFullWindowPage("System", m_systemWidget);
SetGraphPageTitle("Sequences");  // Rename the default graph tab
SetActivePage(index);            // Switch between pages
The base class creates a tab bar on the first call. When switching to a non-graph page, the graph canvas and all docks are hidden; the page widget fills the entire window. Dock layout is preserved between switches.
Examples in practice:
- Dialogue Editor: Sequences (graph) + Performers + System
- Unit Action Editor: Layers (graph) + Layer Details
Container Editor Pattern
For editors where multiple graphs live inside a single file (like dialogue sequences in a database, or state machine layers in a unit action asset), MainWindow provides in-memory graph operations:
Opening Sub-Graphs
OpenGraphFromAsset(GraphDocumentAsset& asset, const QString& title, AZ::SerializeContext* sc);
Deserializes a graph from an asset’s byte buffer and opens it as a new tab.
Capturing Sub-Graphs
CaptureGraphToAsset(GraphModel::GraphId graphId, GraphDocumentAsset& outAsset, AZ::SerializeContext* sc);
Serializes an open graph back into the asset’s byte buffer. Used before saving the container.
Creating Empty Graphs
OpenNewGraphTab(const QString& title);
Opens a blank graph tab for a new sub-object.
Clearing Dirty State
Clears dirty markers on all open tabs. Called after a container-level save so that individual tab dirty states don’t linger.
Typical Container Save Flow
- Iterate all open graph tabs
- Call
CaptureGraphToAsset() for each to write graphs back to the container - Serialize the container to disk
- Call
ClearAllDocumentDirty() to clear all tab markers
6.4 - Variables
Variable declarations, Get/Set nodes, reference bindings, and drag-to-canvas interactions.
When variablesEnabled = true in the GraphSystemDescriptor, the framework provides a complete variable system for storing and reading named values within a graph.
Variable Panel
The Variable Panel is a dock widget with a table listing all declared variables. Each variable has:
- Name — User-defined identifier
- Data Type — Selected from a dropdown of registered types (Bool, Int, Float, String, etc.)
- Default Value — Type-specific editor (checkbox for Bool, spinner for numeric, text field for String, multi-field for vectors, color picker for Color)
Variables are per-graph. Add or remove variables using the panel controls. Undo/redo integration is automatic.
Get / Set Variable Nodes
When variables are enabled, GetVariableNode and SetVariableNode are automatically included in the node palette under the “Variables” category.
- GetVariableNode — Outputs the current value of a named variable
- SetVariableNode — Writes a value to a named variable
Both nodes reference a variable by name. If the variable is renamed, all referencing Get/Set nodes update automatically.
Convert to Reference
Right-click any typed input slot on a node to convert it to a variable reference. A dropdown appears listing all declared variables that match the slot’s data type. Once bound:
- The slot displays the variable name instead of an inline value
- The slot reads the variable’s value at evaluation time
- Right-click again and select “Convert to Value” to unbind
Reference bindings are persisted as VariableBinding structs (NodeId + SlotName + VariableId) and restored automatically on load.
Drag to Canvas
Drag a variable from the Variable Panel directly onto the graph canvas. A popup menu asks whether to create a Get or Set node for that variable. The node is automatically configured with the variable name and data type.
Runtime Variable Access
At runtime, variables live in the GraphExecutionContext blackboard. The execution context provides:
- Read/write access by variable name
InitializeBindings() resolves VariableId references to names- Variable changes can trigger re-evaluation (in DataFlowGraph,
MarkDirty(variableName) propagates to dependent nodes)
Downstream gems expose variable control through their own APIs. For example, the Audio Event Graph provides SetAudioGraphVariable(instanceId, name, value) to control graph variables from gameplay code.
6.5 - Execution Engines
FlowGraphEvaluator, DataFlowGraphEvaluator, StateMachineEvaluator, GraphExecutionContext, and GraphInstance.
gs_graphcanvas provides three execution engines — one for each topology. All share a common GraphExecutionContext for variable storage and value resolution, and GraphInstance for creating independent runtime copies.
FlowGraphEvaluator
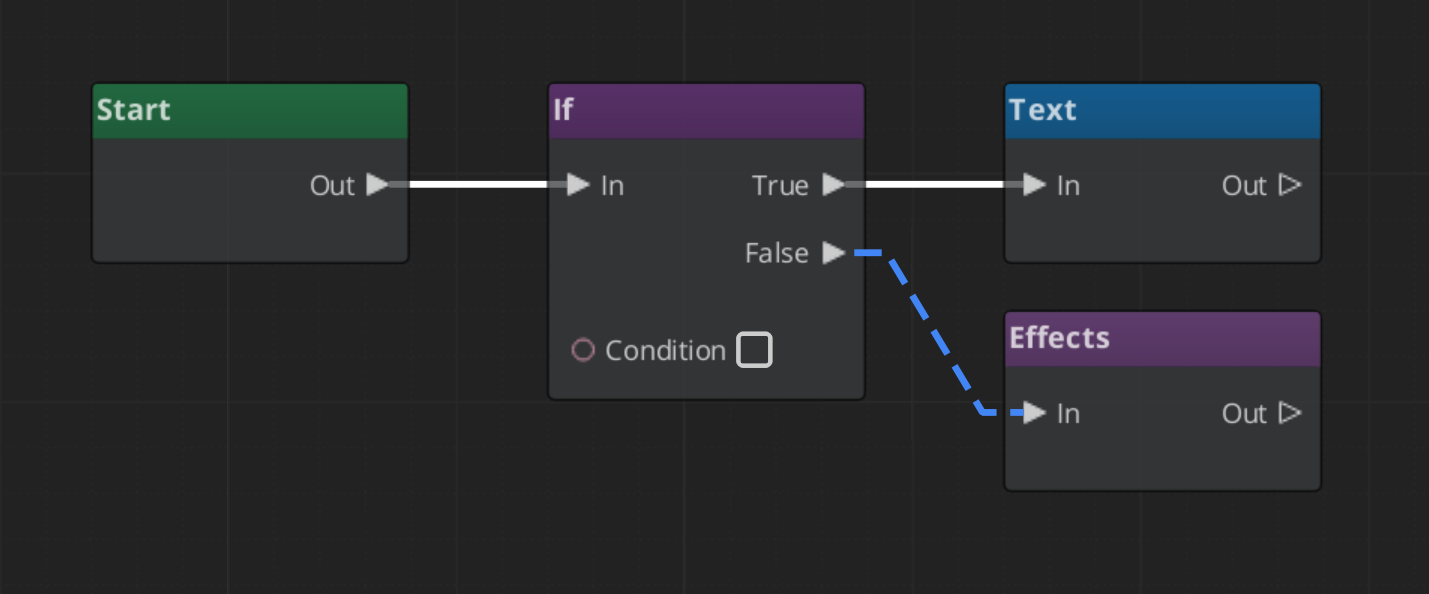
Topology: FlowGraph
Step/wait/resume execution model for sequential graphs. The evaluator follows FlowIn/FlowOut connections from node to node.
Nodes implement the IExecutableNode interface:
FlowResult Execute(GraphExecutionContext& context);
FlowResult controls what happens after a node executes:
| Result | Behavior |
|---|
Continue | Immediately proceed to the next connected node |
Wait | Pause execution until Resume() is called externally |
Stop | End graph execution |
Used by: Dialogue Editor — text nodes return Wait while dialogue is displayed, then Resume() advances to the next node.
DataFlowGraphEvaluator

Topology: DataFlowGraph
Dirty-propagation evaluator for continuously-evaluated graphs. On initialization, builds a topological ordering of all nodes via Kahn’s algorithm.
Nodes implement the IDataFlowNode interface:
void Process(GraphExecutionContext& context);
Evaluation Pipeline
- Initialize — Build topological order from the graph’s connection structure
- Track dependencies — Map which nodes depend on which variables
- Mark dirty —
MarkDirty(variableName) marks dependent nodes dirty, then transitively marks all downstream nodes - Evaluate — Iterate nodes in topological order, re-running only dirty nodes
The explicit dirty marking (not automatic) gives downstream code batching control — set multiple variables, then call Evaluate() once.
Empty Any Pattern
When a data-flow node has no valid output (gated off, no valid input), it must output AZStd::any{} (truly empty), never a default-constructed value:
if (validInput)
    context.SetOutputValue(this, "result", computedValue);
else
    context.SetOutputValueAny(this, "result", AZStd::any{});
This is critical because multi-input resolution returns the first non-empty AZStd::any. A default-constructed struct inside an any is non-empty and will mask valid values from other connections.
Used by: Audio Event Graph — entry gate nodes, filter nodes, and effect nodes all follow this pattern.
StateMachineEvaluator
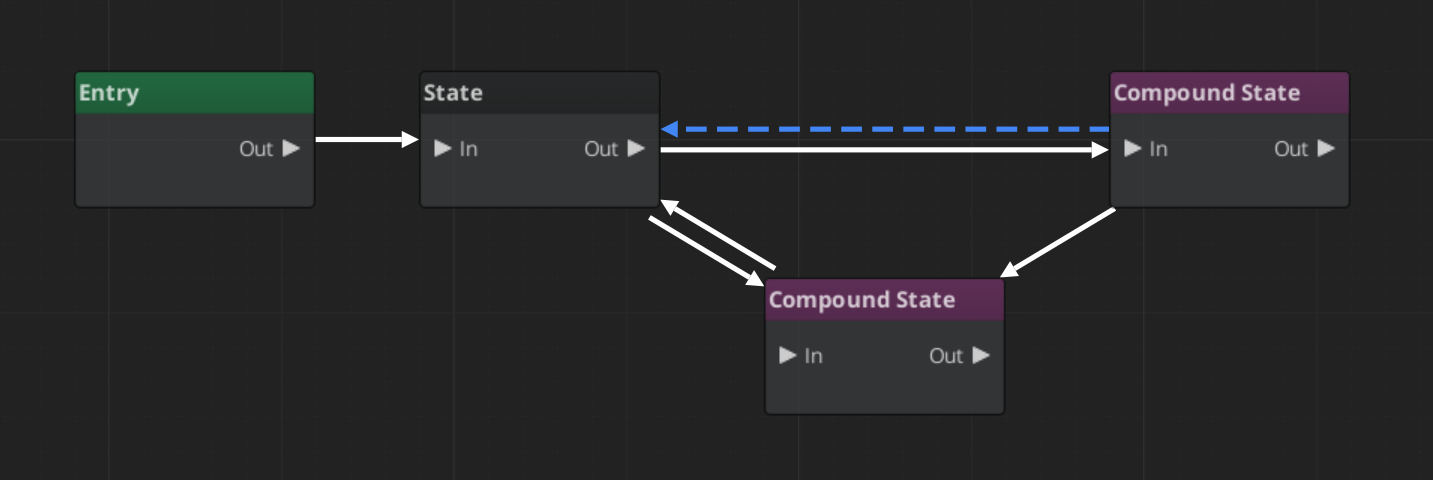
Topology: StateMachineGraph
Tick-based evaluator for hierarchical finite state machines. Maintains the current active state and evaluates transitions each tick.
Nodes implement the IStateMachineNode interface:
void OnEnter(GraphExecutionContext& context);
void OnTick(GraphExecutionContext& context, float deltaTime);
void OnExit(GraphExecutionContext& context);
Tick Cycle
- Increment
__stateTime auto-variable - Gather all outgoing transitions from the current state
- Evaluate conditions on each transition
- Fire the highest-priority valid transition (
OnExit on source, OnEnter on destination) - Call
OnTick on the active state
Transition Conditions
Each connection carries a TransitionDescriptor with a priority and a list of polymorphic TransitionCondition objects. Built-in conditions:
| Condition | Description |
|---|
VariableCompareCondition | Compares a variable to a value using a comparison operator |
TimeElapsedCondition | Fires after N seconds in the current state (reads __stateTime) |
VariableTrueCondition | Fires when a boolean variable is true |
Custom conditions are created by subclassing TransitionCondition, reflecting it, and it auto-discovers via SerializeContext::EnumerateDerived().
ParallelLayerEvaluator
Wraps multiple StateMachineEvaluator instances (one per layer) with shared context synchronization. Each layer evaluates independently but shares the same variable context for cross-layer reads.
Used by: Unit Action Graph — parallel Movement, Action, and Rotation layers.
GraphExecutionContext
Shared context for all evaluator types. Provides:
- Input value resolution —
GetInputValue<T>() and GetInputValueAny() with multi-input resolution (returns first non-empty value) - Output values —
SetOutputValue() and SetOutputValueAny() - Blackboard — Variable storage by name
- Binding initialization —
InitializeBindings() resolves VariableId references to variable names
GraphInstance
An independent runtime copy of a graph. GraphInstance::CreateFromAsset() deserializes a fresh graph from a GraphDocumentAsset’s byte buffer, initializes variables and bindings. Each instance is fully independent — downstream gems can pool instances for high-frequency execution paths.
7 - GS_Interaction
Entity interaction systems — physics-based pulse events, targeting and cursor management, and extensible world trigger actions.
GS_Interaction is the gem that connects entities to each other and to the player. It provides three distinct systems: a physics-based pulse emitter/reactor pair for broadcasting typed events through trigger volumes, a targeting subsystem that tracks and selects interact candidates relative to a cursor, and a world trigger framework that composes trigger conditions with discrete world-state actions. All three systems are designed to be extended — custom pulse types, reactor types, trigger actions, and world trigger behaviors can be registered without modifying the gem.
For usage guides and setup examples, see The Basics: GS_Interaction.
Contents
Pulsors
A physics-based event broadcast system. A PulsorComponent emits a typed pulse event when its physics trigger volume fires. PulseReactorComponents on nearby entities receive the pulse and execute their registered reactor logic. Pulse and reactor types are extensible, so any gem can contribute new pulse/reactor pairs.
Pulsors API
Targeting
A targeting and cursor management system. The Targeting Handler selects the best available interact target from registered candidates detected through proximity trigger volumes. The cursor components manage visual cursor representation on a LyShine canvas. An input reader component bridges raw player input into interaction events.
Targeting API
World Triggers
A composable trigger-action framework for world-state changes. Trigger Sensor components define the condition that fires the trigger (player interact, physics collision, save record state). World Trigger components define the effect (log a message, set a record, toggle entity activation, change stage). Any number of trigger actions can drive any number of world triggers on the same entity.
World Triggers API
Cross-Gem Contracts
GS_Interaction’s extensible types and observation signals are collected in the GS_Core Interfaces layer, so other gems depend on the contracts rather than on GS_Interaction:
| Contract | Kind | Used for |
|---|
PulseType · ReactorType | TypeBase | Author new pulse / reactor types — they appear in the editor picker. |
WorldTriggerType · TriggerSensorType | TypeBase | Author new trigger conditions and effects. |
PulseReactorEmissionBus | Emit | OnPulseReceived — a reactor processed a pulse. |
TriggerSensorEmissionBus | Emit | OnTriggered / OnReset. |
TargetingEmissionBus | Emit | OnUpdateInteractTarget, OnEnterStandby, OnExitStandby, OnInteract. |
See the Contract Reference for the full table and addressing details.
Installation
GS_Interaction requires GS_Core, LmbrCentral, LyShine, and CommonFeaturesAtom to be active in your project.
- Enable GS_Interaction in Project Manager or
project.json. - Add a GS_TargetingHandlerComponent to the player entity and configure its proximity trigger.
- Add GS_CursorComponent and GS_CursorCanvasComponent to the cursor entity and link them together.
- Place TriggerSensorComponent and WorldTriggerComponent variants on any entity that should react to the world.
- Refer to the Interaction Set Up Guide for a full walkthrough.
See Also
For conceptual overviews and usage guides:
For related resources:
Get GS_Interaction
GS_Interaction — Explore this gem on the product page and add it to your project.
7.1 - Pulsors
Physics-based pulse emitter and reactor system — extensible typed interactions via polymorphic PulseType and ReactorType classes.
The Pulsor system is a physics-driven interaction layer. A PulsorComponent emits typed pulses when its physics trigger fires. PulseReactorComponents on other entities receive and process those pulses based on their type. The system is fully extensible — new pulse and reactor types are discovered automatically through O3DE serialization, so new interaction types can be added from any gem without modifying GS_Interaction.
For usage guides and setup examples, see The Basics: GS_Interaction.
Contents
Architecture
Breakdown
When an entity enters a Pulsor’s trigger volume, the Pulsor emits its configured pulse type to all Reactors on the entering entity:
| Step | What It Means |
|---|
| 1 — Collider overlap | Physics detects an entity entering the Pulsor’s trigger volume. |
| 2 — Pulse emit | PulsorComponent reads its configured PulseType and prepares the event. |
| 3 — Reactor query | Each PulseReactorComponent on the entering entity is checked with IsReactor(). |
| 4 — Reaction | Reactors returning true have ReceivePulses() called and execute their response. |
Pulse types are polymorphic — new types are discovered automatically at startup via EnumerateDerived. Any gem can define custom interaction semantics without modifying GS_Interaction.
E Indicates extensible classes and methods.
Patterns - Complete list of system patterns used in GS_Play.
Components
PulsorComponent
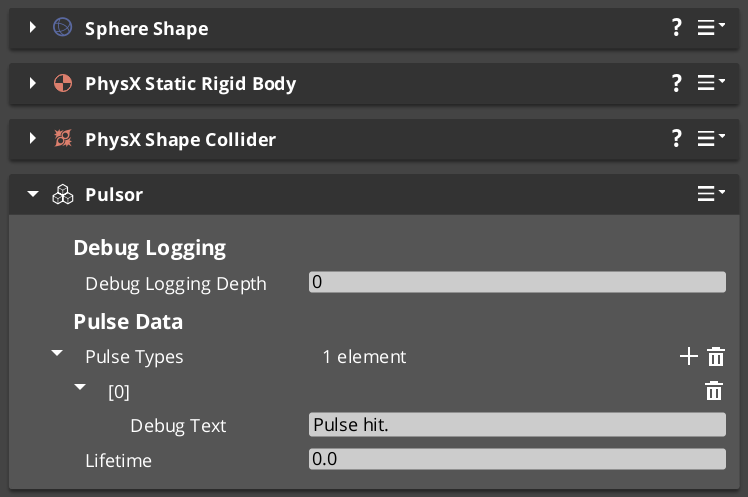
Emits typed pulses when its physics trigger fires. Extends AZ::Component and PhysicsTriggeringVolume.
| Property | Type | Description |
|---|
| Pulse Types | vector<PulseType*> | The pulse types this pulsor emits on trigger. |
The pulsor fires all configured pulse types simultaneously when an entity enters its trigger volume.
PulseReactorComponent
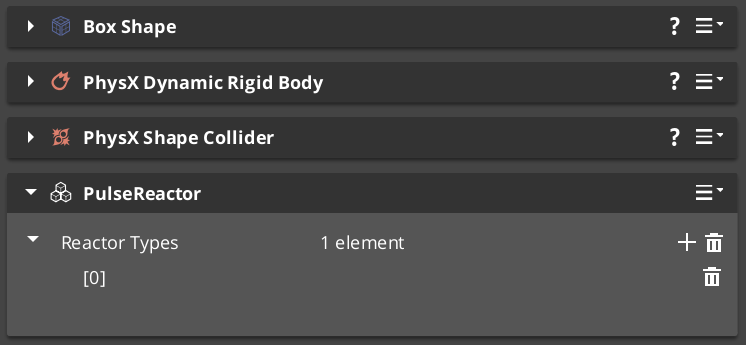
Receives and processes typed pulses from pulsors.
Bus: PulseReactorRequestBus (ById, Multiple)
| Method | Parameters | Returns | Description |
|---|
ReceivePulses | — | void | Process incoming pulse events. |
IsReactor | — | bool | Returns whether this component is an active reactor. |
Pulse Types
Pulse types define what kind of interaction a pulsor emits. All types extend the abstract PulseType base class.
| Type | TypeId | Description |
|---|
| PulseType (base) | {8A1B2C3D-4E5F-6A7B-8C9D-0E1F2A3B4C5D} | Abstract base class for all pulse types. |
| Debug_Pulse | {123D83FD-027C-4DA4-B44B-3E0520420E44} | Test and debug pulse for development. |
| Destruct_Pulse | {98EC44DA-C838-4A44-A37A-FA1A502A506B} | Destruction pulse — triggers destructible reactions. |
Pulse Types API
Reactor Types
Reactor types define how an entity responds to incoming pulses. All types extend the abstract ReactorType base class.
| Type | TypeId | Description |
|---|
| ReactorType (base) | {9B2C3D4E-5F6A-7B8C-9D0E-1F2A3B4C5D6E} | Abstract base class for all reactor types. |
| Debug_Reactor | {38CC0EA0-0975-497A-B2E5-299F5B4222F7} | Test and debug reactor for development. |
| Destructable_Reactor | {47C9B959-2A9F-4E06-8187-E32DDA3449EC} | Handles destruction responses to Destruct_Pulse. |
Reactor Types API
Extension Guide
Use the ClassWizard templates to generate new pulse and reactor classes with boilerplate already in place — see GS_Interaction Templates:
PulsorPulse — generates a new PulseType subclass with a named channel and payload stub. Supply type_display_name and type_category input vars to control how it appears in the editor dropdown.PulsorReactor — generates a new ReactorType subclass. Supply the required pulse_channel var — the channel string is baked into the header at generation time.
To create a custom pulse or reactor type manually:
- Create a class extending
PulseType (or ReactorType) with a unique RTTI TypeId. - Reflect the class using O3DE’s
SerializeContext and EditContext. The system discovers the new type automatically.
Channels are string-matched at runtime — keep the channel string consistent between the Pulse and the Reactor that receives it.
See Also
For related resources:
Get GS_Interaction
GS_Interaction — Explore this gem on the product page and add it to your project.
7.1.1 - Pulse Types
Built-in pulse types for the Pulsor interaction system.
Pulse types define what kind of interaction a PulsorComponent emits. Each pulse type is a data class extending the abstract PulseType base. The PulsorComponent holds an array of pulse types and emits all of them simultaneously when its physics trigger fires.
For usage guides and setup examples, see The Basics: GS_Interaction.
Component
PulsorComponent
Emits configured pulse types when its physics trigger fires. Extends AZ::Component and PhysicsTriggeringVolume.
| Field | Type | Description |
|---|
pulseTypes | vector<PulseType*> | Pulse types emitted to all PulseReactorComponent instances on any entering entity. |
All pulse types in the array fire simultaneously on a single trigger event. Configure multiple pulse types to target reactors on different channels in one emission.
Base Class
PulseType
Abstract base class for all pulse types. Not a component — discovered automatically at startup via EnumerateDerived and reflected into the editor dropdown.
| Field / Virtual | Type | Description |
|---|
TypeId | {8A1B2C3D-4E5F-6A7B-8C9D-0E1F2A3B4C5D} | RTTI identifier. Each subclass must define its own unique TypeId. |
GetChannel() | AZStd::string | Returns the channel string this pulse is sent on. Matched against reactor channel strings at runtime. |
Subclass PulseType to define custom pulse data (damage values, force vectors, status effect references) and a unique channel name.
Built-in Types
Debug_Pulse
Test and debug pulse for verifying pulsor setups during development.
| Field | TypeId |
|---|
| TypeId | {123D83FD-027C-4DA4-B44B-3E0520420E44} |
Use Debug_Reactor on the receiving entity to verify the pulse is arriving correctly.
Destruct_Pulse
Destruction pulse — triggers destructible reactions on receiving entities.
| Field | TypeId |
|---|
| TypeId | {98EC44DA-C838-4A44-A37A-FA1A502A506B} |
Pair with Destructable_Reactor on entities that should respond to destruction events.
Creating Custom Pulse Types
Use the ClassWizard PulsorPulse template to scaffold a new PulseType subclass with boilerplate already in place — see GS_Interaction Templates. Supply type_display_name and type_category input vars to control how the type appears in the editor dropdown.
To create a custom pulse type manually:
- Create a class extending
PulseType with a unique RTTI TypeId. - Override
GetChannel() to return a unique channel name string. - Add any data fields your pulse carries (damage values, force vectors, status effect references).
- Reflect the class using O3DE’s
SerializeContext and EditContext. The system discovers the type automatically via EnumerateDerived — no registration step required. - Configure
PulsorComponent instances to emit your custom pulse type.
Keep the channel string consistent between your pulse type and the reactor types that should receive it.
See Also
Get GS_Interaction
GS_Interaction — Explore this gem on the product page and add it to your project.
7.1.2 - Reactor Types
Built-in reactor types for the Pulsor interaction system.
Reactor types define how a PulseReactorComponent responds to incoming pulses. Each reactor type is a data class extending the abstract ReactorType base. The PulseReactorComponent holds an array of reactor types and processes all of them when a matching pulse arrives.
For usage guides and setup examples, see The Basics: GS_Interaction.
Component
PulseReactorComponent
Owns and processes reactor types when pulses arrive from PulsorComponent instances. Extends AZ::Component.
Bus: PulseReactorRequestBus (ById, Multiple)
| Field | Type | Description |
|---|
reactorTypes | vector<ReactorType*> | Reactor types evaluated and executed when a pulse is received. |
| Method | Returns | Description |
|---|
IsReactor | bool | Returns true if this component has active reactor types. The PulsorComponent checks this before calling ReceivePulses. |
ReceivePulses | void | Processes incoming pulse events. Iterates all reactor types and calls React() on types whose channel matches the incoming pulse. |
The PulsorComponent queries IsReactor() first — only components that return true have ReceivePulses() called. This allows entities with no reactor types to be skipped without iterating all types.
Base Class
ReactorType
Abstract base class for all reactor types. Not a component — discovered automatically at startup via EnumerateDerived and reflected into the editor dropdown. ReactorType is a GS_Core TypeBase Strategy contract: subclass it, reflect the subclass, and it appears in the reactor-type picker. When a reactor processes a pulse, the component emits OnPulseReceived on the GS_Core PulseReactorEmissionBus.
| Field / Virtual | Type | Description |
|---|
TypeId | {9B2C3D4E-5F6A-7B8C-9D0E-1F2A3B4C5D6E} | RTTI identifier. Each subclass must define its own unique TypeId. |
GetChannel() | AZStd::string | Returns the channel string this reactor listens on. Matched against incoming pulse channel strings at runtime. |
React(pulse, sourceEntity) | void | Override to implement the reaction behavior when a matching pulse is received. |
Subclass ReactorType to define custom reaction behavior for a specific channel. The channel string must match the emitting PulseType’s channel exactly.
Built-in Types
Debug_Reactor
Test and debug reactor for verifying reactor setups during development. Logs a message when it receives a Debug_Pulse.
| Field | TypeId |
|---|
| TypeId | {38CC0EA0-0975-497A-B2E5-299F5B4222F7} |
Destructable_Reactor
Handles destruction responses — processes Destruct_Pulse events on the receiving entity.
| Field | TypeId |
|---|
| TypeId | {47C9B959-2A9F-4E06-8187-E32DDA3449EC} |
Add this to any entity that should respond to destruction pulses — props, breakables, or enemy characters.
Creating Custom Reactor Types
Use the ClassWizard PulsorReactor template to scaffold a new ReactorType subclass with boilerplate already in place — see GS_Interaction Templates. Supply the pulse_channel input var — the channel string is baked into the generated header at generation time.
To create a custom reactor type manually:
- Create a class extending
ReactorType with a unique RTTI TypeId. - Override
GetChannel() to return the channel name this reactor listens on. - Override
React(pulse, sourceEntity) to implement the reaction logic. - Reflect the class using O3DE’s
SerializeContext and EditContext. The system discovers the type automatically via EnumerateDerived — no registration step required. - Add the custom reactor type to
PulseReactorComponent instances on entities that should respond.
The channel string in GetChannel() must exactly match the GetChannel() return value of the PulseType you want to receive.
See Also
Get GS_Interaction
GS_Interaction — Explore this gem on the product page and add it to your project.
7.2 - Targeting
Target detection, selection, and cursor management — scanning, filtering, and selecting entities based on proximity and sensory fields.
The targeting system provides spatial awareness and entity selection for units and other entities. A TargetingHandler component serves as the central processor — it receives target registrations from sensory fields, maintains categorized target lists, and selects the best interact target based on proximity and type filtering. The system supports a cursor overlay for visual feedback and an input reader for triggering interactions.
For usage guides and setup examples, see The Basics: GS_Interaction.
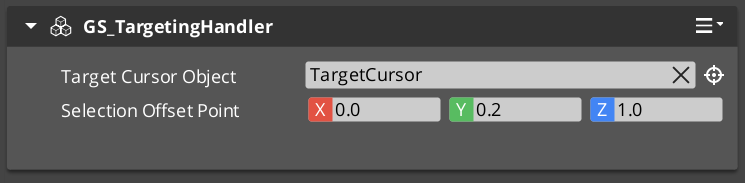
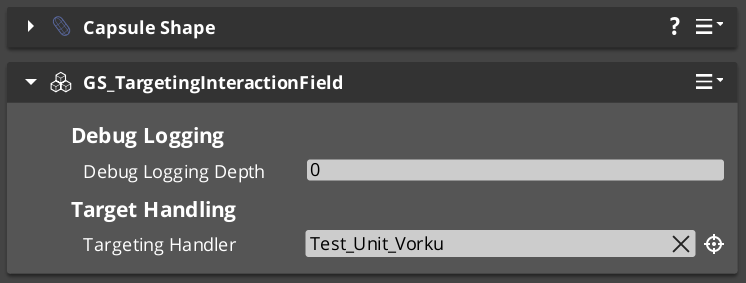
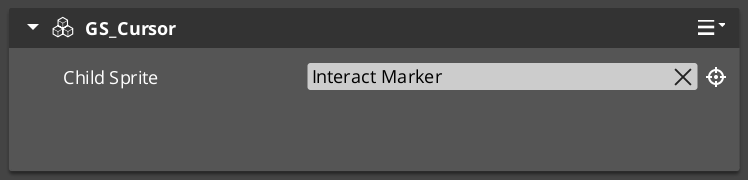
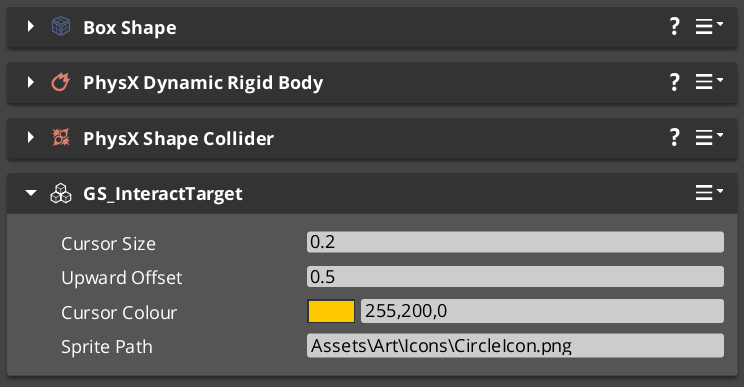
Contents
Components
EBus Summary
Request Buses
| Bus | Address | Handler | Key Methods |
|---|
| GS_TargetingHandlerRequestBus | ById | Multiple | RegisterTarget, UnregisterTarget, RegisterInteractionRangeTarget, UnregisterInteractionRangeTarget, GetInteractTarget |
| GS_TargetRequestBus | ById | Multiple | GetTargetSize, GetTargetOffset, GetTargetColour, GetTargetSprite |
| GS_CursorRequestBus | Single | Multiple | RegisterCursorCanvas, HideCursor, SetCursorOffset, SetCursorVisuals, SetCursorPosition |
| GS_CursorCanvasRequestBus | ById | Multiple | HideSprite, SetCursorSprite |
Cross-Gem Contracts
Targeting observation is collected in the GS_Core interfaces layer:
| Bus | Address | Handler | Key Events |
|---|
GS_Core::TargetingEmissionBus | ById | Multiple | OnUpdateInteractTarget, OnEnterStandby, OnExitStandby, OnInteract |
See Also
For component references:
For related resources:
Get GS_Interaction
GS_Interaction — Explore this gem on the product page and add it to your project.
7.2.1 - Targeting Handler
Central targeting processor — receives target registrations from sensory fields, selects best interact target, and manages cursor feedback.
The GS_TargetingHandlerComponent is the central processor for the targeting system. It receives target registrations from sensory fields, maintains categorized lists of detected targets, and selects the best interact target based on proximity and type. It also manages cursor feedback and interaction range tracking.
For usage guides and setup examples, see The Basics: GS_Interaction.
The Targeting Handler sits on the same entity as the unit it serves (typically the player or an AI character). Sensory fields register and unregister targets as they enter and exit detection volumes. The handler evaluates all registered targets each tick to determine the closest interactable, which becomes the active interact target.
Contents
How It Works
Target Selection
Each tick, the handler runs ProcessClosestInteractable to evaluate all registered targets. It filters by type, checks interaction range, and selects the closest valid target. The result is emitted via OnUpdateInteractTarget on the GS_Core TargetingEmissionBus.
Interaction Range
A separate interaction range field provides a close-proximity subset of targets. Targets within this range are prioritized for interact selection. The range is driven by a dedicated GS_TargetingInteractionFieldComponent trigger volume.
Cursor Tracking
The handler updates the cursor position to follow the active interact target. Cursor visuals change based on target type (interact, item, unit, etc.).
API Reference
GS_TargetingHandlerRequestBus
Bus policy: ById, Multiple
| Method | Parameters | Returns | Description |
|---|
RegisterTarget | AZ::EntityId entity | bool | Registers a target entity detected by a sensory field. |
UnregisterTarget | AZ::EntityId entity | bool | Removes a target entity from the detection list. |
RegisterInteractionRangeTarget | AZ::EntityId entity | bool | Registers a target within the close interaction range. |
UnregisterInteractionRangeTarget | AZ::EntityId entity | bool | Removes a target from the interaction range list. |
GetInteractTarget | — | AZ::EntityId | Returns the current best interact target. |
Cross-Gem Contract: GS_Core::TargetingEmissionBus
Targeting events are observed through the GS_Core TargetingEmissionBus — the in-gem GS_TargetingHandlerNotificationBus was hoisted to GS_Core in the interfaces migration (the ScriptCanvas-facing name is preserved). The command/query surface (RegisterTarget / GetInteractTarget) stays on the in-gem GS_TargetingHandlerRequestBus.
Bus policy: ById, Multiple
| Event | Parameters | Description |
|---|
OnUpdateInteractTarget | AZ::EntityId target | Fired when the active interact target changes (invalid = none). |
OnEnterStandby | — | Fired when the interactor enters targeting standby. |
OnExitStandby | — | Fired when the interactor exits targeting standby. |
OnInteract | AZ::EntityId target | Fired when the interactor performs an interaction on its target. |
Virtual Methods
| Method | Parameters | Returns | Description |
|---|
CheckForTick | — | void | Called each tick to evaluate whether target processing should run. |
ProcessClosestInteractable | — | void | Determines the closest interactable target and sets it as the active interact target. |
GS_CursorComponent
Manages cursor display and positioning for targeting feedback.
GS_CursorRequestBus
Bus policy: Single, Multiple
| Method | Parameters | Returns | Description |
|---|
RegisterCursorCanvas | AZ::EntityId canvas | void | Registers the UI canvas for cursor rendering. |
HideCursor | bool hide | void | Shows or hides the cursor. |
SetCursorOffset | AZ::Vector2 offset | void | Sets the screen-space offset for cursor positioning. |
SetCursorVisuals | visual data | void | Configures cursor appearance. |
SetCursorPosition | AZ::Vector2 pos | void | Sets the cursor screen position directly. |
GS_CursorCanvasComponent
UI canvas layer that renders the cursor sprite.
GS_CursorCanvasRequestBus
Bus policy: ById, Multiple
| Method | Parameters | Returns | Description |
|---|
HideSprite | bool hide | void | Shows or hides the cursor sprite element. |
SetCursorSprite | sprite data | void | Sets the cursor sprite image. |
Extension Guide
The Targeting Handler is designed for extension via companion components. Add custom targeting logic by creating components that handle the GS_Core TargetingEmissionBus on the same entity. Override ProcessClosestInteractable for custom target selection algorithms.
Script Canvas Examples
Getting the current interact target:
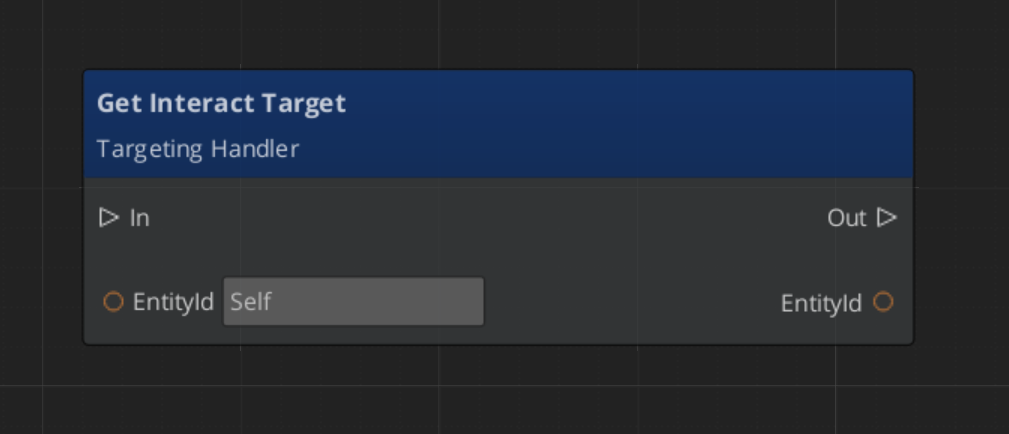
Reacting to interact target changes:
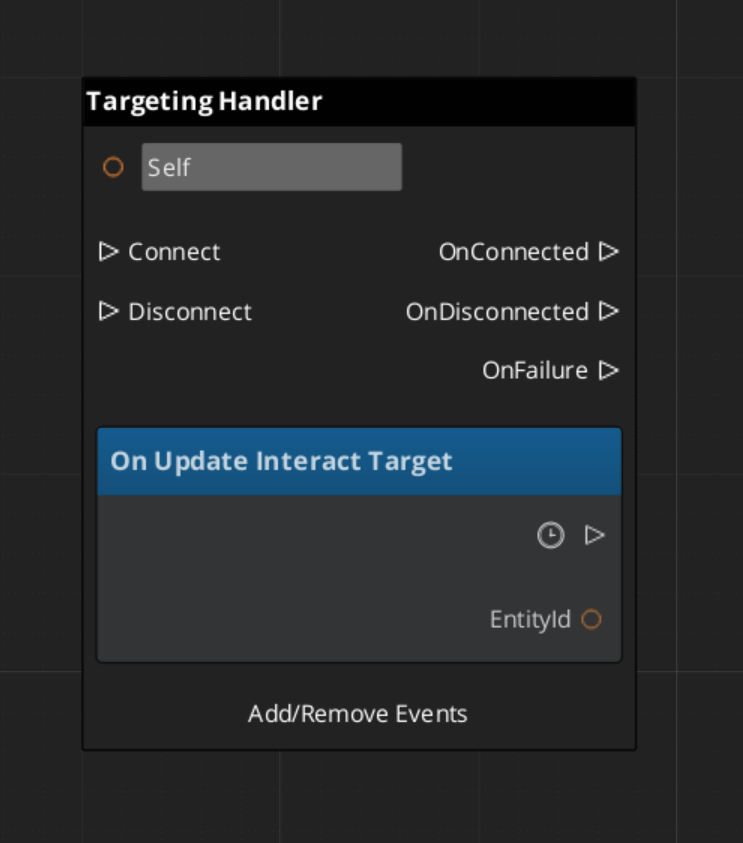
See Also
For conceptual overviews and usage guides:
For component references:
Get GS_Interaction
GS_Interaction — Explore this gem on the product page and add it to your project.
7.2.2 - Senses & Targeting Fields
Physics-based detection volumes for the targeting system — interaction fields and sensory detection.
Targeting fields are physics-based detection volumes that feed target registrations into the Targeting Handler. The GS_TargetingInteractionFieldComponent provides proximity detection for interact-range targets. Fields use their own collision layers and should be placed on child entities rather than the main unit capsule.
For usage guides and setup examples, see The Basics: GS_Interaction.
GS_TargetingInteractionFieldComponent
A physics trigger volume that detects targets entering and exiting the interaction range. Extends AZ::Component and PhysicsTriggeringVolume. Registers detected entities with the parent Targeting Handler.
API
| Method | Parameters | Returns | Description |
|---|
TriggerEnter | AZ::EntityId entity | bool | Called when an entity enters the field. Registers the entity as an interaction-range target. |
TriggerExit | AZ::EntityId entity | bool | Called when an entity exits the field. Unregisters the entity from the interaction-range list. |
Setup
- Create a child entity under the unit entity that owns the Targeting Handler.
- Add a PhysX collider configured as a trigger shape.
- Add the GS_TargetingInteractionFieldComponent.
- Set the collider to use a dedicated interaction collision layer — do not share the unit’s physics layer.
- Point the field to the parent Targeting Handler entity.
Extension Guide
Custom sensory fields can be created by extending the base field pattern:
- Create a component that extends
AZ::Component and PhysicsTriggeringVolume. - On trigger enter/exit, call
RegisterTarget / UnregisterTarget on the Targeting Handler via GS_TargetingHandlerRequestBus. - Add custom filtering logic (line of sight, tag filtering, team affiliation) in your trigger callbacks.
See Also
Get GS_Interaction
GS_Interaction — Explore this gem on the product page and add it to your project.
7.2.3 - Targets
Target component types — base target markers and specialized interact targets that make entities detectable by the targeting system.
Target components mark entities as detectable by the targeting system. The base GS_TargetComponent provides core target data (size, offset, visual properties). Specialized variants like GS_InteractTargetComponent add interaction-specific behavior.
For usage guides and setup examples, see The Basics: GS_Interaction.
GS_TargetComponent
Base target component. Makes an entity visible to the targeting system with configurable visual properties for cursor feedback.
GS_TargetRequestBus
Bus policy: ById, Multiple
| Method | Parameters | Returns | Description |
|---|
GetTargetSize | — | float | Returns the target’s visual size for cursor scaling. |
GetTargetOffset | — | AZ::Vector3 | Returns the world-space offset for cursor positioning above the target. |
GetTargetColour | — | AZ::Color | Returns the target’s highlight colour. |
GetTargetSprite | — | sprite ref | Returns the target’s cursor sprite override, if any. |
GS_InteractTargetComponent
Extends GS_TargetComponent with interact-specific properties. Entities with this component can be selected as interact targets by the Targeting Handler and triggered via the Interact Input system.
Cross-Gem Target Types
Additional target types are conditionally compiled when GS_Interaction is available alongside other gems:
| Type | Source Gem | Condition | Description |
|---|
| ItemTarget | GS_Item | #IF GS_INTERACTION | Makes item entities targetable for pickup and inspection. |
| UnitTarget | GS_Unit | #IF GS_INTERACTION | Makes unit entities targetable for interaction and AI awareness. |
Extension Guide
Create custom target types by extending GS_TargetComponent:
- Create a new component class extending
GS_TargetComponent. - Override the target data methods (
GetTargetSize, GetTargetOffset, etc.) to return your custom values. - Add any additional data fields specific to your target type.
- The targeting system will automatically detect and categorize your custom targets when they enter sensory fields.
See Also
Get GS_Interaction
GS_Interaction — Explore this gem on the product page and add it to your project.
7.2.4 - Interact Input Reader
For usage guides and setup examples, see The Basics: GS_Interaction.

Image showing the InteractInputReader component, as seen in the Entity Inspector.
Extends Input Reader.
This component is a standalone input detector utility to enable Interact Input firing outside of the GS_Unit Gem.
It intakes the Event Name for your chosen interaction input, as defined in your Input Profile and ignores all other input.
Functionality
Interact Input Reader needs to be put in the same entity as the Targeting Handler.
After firing the correct Input Event, the Interact Input Reader requests the current InteractTarget from the Targeting Handler. It then sends a DoInteractAction event, with a reference to its EntityId as caller, to the InteractTriggerSensor component that should be present on the Interact Target.
The World Trigger and Trigger Sensor system takes care of the rest.
Assure that the component is placed on the same Entity as the Targeting Handler.

Image showing the Interact Input Reader Component alongside the Targeting Handler Component.
Fill the Interact Event Name with the Event Name for your chosen interaction input, as defined in your Input Profile.
So long as the Input Profile that’s set in your GS_OptionsManager has that event set. The rest should work as is.
API
// OptionsManagerNotificationBus
void HandleStartup() override;

// Local Methods (Parent Input Reader Component Class)
void HandleFireInput(AZStd::string eventName, float value) override;
Get GS_Interaction
GS_Interaction — Explore this gem on the product page and add it to your project.
7.3 - World Triggers
Trigger sensor and world trigger system — event-driven world state changes via composable polymorphic type objects on two container components.
The World Trigger system pairs a TriggerSensorComponent (condition side) with a WorldTriggerComponent (response side) to create event-driven world state changes. Each component owns an array of polymorphic type objects — sensor types define what conditions to evaluate, trigger types define what happens when the condition passes. Any combination of types can be composed on a single entity without scripting.
For usage guides and setup examples, see The Basics: GS_Interaction.
Contents
Architecture
Breakdown
World Triggers split conditions from responses using a polymorphic type/component pattern. The two container components sit on the entity; logic lives in the type objects they own.
| Part | What It Does |
|---|
| TriggerSensorComponent | Owns arrays of TriggerSensorType objects (andConditions, orConditions). Evaluates all conditions and fires WorldTriggerRequestBus::Trigger on success. Automatically activates a PhysicsTriggerComponent if any sensor type requires it. |
| WorldTriggerComponent | Owns an array of WorldTriggerType objects (triggerTypes). On Trigger(), calls Execute() on every type. On Reset(), calls OnReset(). On Activate(), calls OnComponentActivate() for startup initialization. |
No scripting is required for standard patterns. Compose sensor types and trigger types in the editor to cover the majority of interactive world objects.
E Indicates extensible classes and methods.
Patterns - Complete list of system patterns used in GS_Play.
Trigger Sensors
The sensory side. TriggerSensorComponent holds arrays of TriggerSensorType objects that define evaluation logic — collisions, interactions, record conditions. Supports AND conditions (all must pass) and OR conditions (any must pass).
Trigger Sensors API
World Triggers
The response side. WorldTriggerComponent holds an array of WorldTriggerType objects that execute when triggered — toggling entities, setting records, changing stages, logging messages.
World Triggers API
Extension Guide
Use the ClassWizard templates to generate new sensor and trigger type classes — see GS_Interaction Templates:
TriggerSensorType — generates a new TriggerSensorType subclass with EvaluateAction(), EvaluateResetAction(), and lifecycle stubs.WorldTriggerType — generates a new WorldTriggerType subclass with Execute(), OnReset(), and OnComponentActivate() stubs.
Custom Sensor Types
- Create a class extending
TriggerSensorType. - Override
EvaluateAction() to define your condition logic. - Override
EvaluateResetAction() if your type supports reset evaluation. - Override
Activate(entityId) / Deactivate() for lifecycle setup. - If your type needs a physics trigger volume, return
true from NeedsPhysicsTrigger(). - For event-driven types, listen on a bus and call
TriggerSensorRequestBus::DoAction() or DoResetAction() when the event fires. - Reflect the class manually in
GS_InteractionSystemComponent::Reflect().
Custom Trigger Types
- Create a class extending
WorldTriggerType. - Override
Execute(entityId) — implement the world state change here. - Override
OnReset(entityId) to reverse or re-arm the effect. - Override
OnComponentActivate(entityId) for any initial state that must be set at startup. - Reflect the class manually in
GS_InteractionSystemComponent::Reflect().
See Also
For component references:
For related resources:
Get GS_Interaction
GS_Interaction — Explore this gem on the product page and add it to your project.
7.3.1 - Trigger Sensors
Trigger sensor component and sensor types — condition evaluation objects for physics, interact, and record-based world trigger activation.
TriggerSensorComponent is the condition container of the World Trigger system. It owns arrays of TriggerSensorType objects that define evaluation logic — collisions, interactions, record checks. When conditions pass, it fires WorldTriggerRequestBus::Trigger on the same entity.
For usage guides and setup examples, see The Basics: GS_Interaction.
Container Component
TriggerSensorComponent
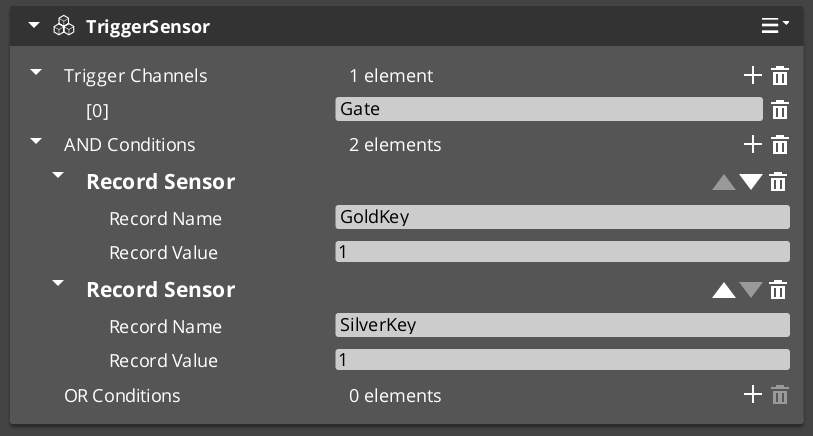
Owns and evaluates all sensor type objects. Not subclassed — extended by adding TriggerSensorType objects to its arrays.
Bus: TriggerSensorRequestBus (ById, Single)
| Field | Type | Description |
|---|
andConditions | vector<TriggerSensorType*> | All types must pass for the trigger to fire. |
orConditions | vector<TriggerSensorType*> | Any type passing is sufficient to fire. |
| Method | Returns | Description |
|---|
DoAction | void | Evaluates all conditions. On pass, fires WorldTriggerRequestBus::Trigger and emits OnTriggered on the GS_Core TriggerSensorEmissionBus. |
DoResetAction | void | Evaluates reset conditions and, on pass, emits OnReset on the GS_Core TriggerSensorEmissionBus. |
On Activate, automatically activates a PhysicsTriggerComponent on the entity if any sensor type returns true from NeedsPhysicsTrigger().
Base Type Class
TriggerSensorType
Abstract base for all sensor evaluation logic. Not a component — reflected manually in GS_InteractionSystemComponent::Reflect(). Subclass this to add new condition types.
| Virtual | Returns | Description |
|---|
Activate(entityId) | void | Called when the owning component activates. Connect to buses here. |
Deactivate() | void | Called when the owning component deactivates. Disconnect from buses here. |
EvaluateAction() | bool | Returns true if the condition is currently satisfied. |
EvaluateResetAction() | bool | Returns true if the reset condition is satisfied. Returns true by default. |
NeedsPhysicsTrigger() | bool | Return true to signal that a PhysicsTriggerComponent should be activated. Returns false by default. |
OnTriggerEnter(entity) | void | Called by the physics trigger when an entity enters the volume. |
OnTriggerExit(entity) | void | Called by the physics trigger when an entity exits the volume. |
Stores m_ownerEntityId for calling back to TriggerSensorRequestBus::DoAction() or DoResetAction() from event-driven types.
Built-in Sensor Types
SensorType_Collider
Physics overlap sensor. Returns NeedsPhysicsTrigger() = true, causing the owning component to activate a PhysicsTriggerComponent.
OnTriggerEnter stores the entering entity.OnTriggerExit clears the stored entity.EvaluateAction() returns true while a valid entity is present.EvaluateResetAction() returns true when no entity is present.
SensorType_Record
Fires when a named save record changes to a configured value. Extends RecordKeeperNotificationBus — connects on Activate and fires DoAction automatically when the matching record changes.
EvaluateAction() calls GetRecord and compares against recordValue.
→ Record Sensor Type Reference
| Field | Description |
|---|
recordName | Name of the record to watch. |
recordValue | Value the record must reach to fire. |
SensorType_Interact
Fires when any unit interacts with this entity via the targeting system. Extends InteractTriggerSensorRequestBus.
- On interact: stores
lastCaller and calls DoAction. EvaluateAction() returns true while lastCaller is a valid entity.
SensorType_PlayerInteract
Player-only variant of SensorType_Interact. Extends SensorType_Interact and adds a tag check — lastCaller must have the "Player" tag for the condition to pass.
Extension Guide
To create a custom sensor type:
- Create a class extending
TriggerSensorType. - Override
EvaluateAction() to define when your condition is satisfied. - Override
Activate(entityId) / Deactivate() to connect and disconnect from any buses. - For event-driven evaluation, listen on a bus and call
TriggerSensorRequestBus::DoAction(m_ownerEntityId) when the event fires — the component will run the full evaluation pipeline. - Return
true from NeedsPhysicsTrigger() if your type needs a physics volume. - Reflect the class in
GS_InteractionSystemComponent::Reflect() — types are not components and are not registered via CreateDescriptor().
See Also
Get GS_Interaction
GS_Interaction — Explore this gem on the product page and add it to your project.
7.3.1.1 - SensorType_Record
Record-based sensor type — fires when a named RecordKeeper entry reaches a configured value.
For usage guides and setup examples, see The Basics: GS_Interaction.
Overview
SensorType_Record is a TriggerSensorType that fires when a named save record is changed to a configured value. Add it to the andConditions or orConditions array on a TriggerSensorComponent.
Inherits from RecordKeeperNotificationBus — connects automatically on Activate and listens for record changes without polling. When a matching record change arrives, it calls TriggerSensorRequestBus::DoAction on the owning component, which runs the full condition evaluation pipeline.
Fields
| Field | Type | Description |
|---|
recordName | string | Name of the record to watch in the RecordKeeper. |
recordValue | int | Value the record must reach for the condition to pass. |
Evaluation
EvaluateAction() calls RecordKeeperRequestBus::GetRecord(recordName) and compares the result to recordValue. Returns true if they match.
The type self-triggers on record change events — you do not need to poll or script a check manually.
Setup
- Add a
TriggerSensorComponent to your entity. - Add a
SensorType_Record entry to the andConditions or orConditions array. - Set
recordName to the record you want to watch. - Set
recordValue to the value that should fire the trigger. - Add a
WorldTriggerComponent with the desired WorldTriggerType objects to the same entity.
API
From TriggerSensorType:
//! Returns true if the watched record currently matches recordValue.
virtual bool EvaluateAction();

//! Connects to RecordKeeperNotificationBus on component activate.
virtual void Activate(AZ::EntityId entityId);

//! Disconnects from RecordKeeperNotificationBus on component deactivate.
virtual void Deactivate();
From RecordKeeperNotificationBus:
//! Called when any record changes. Fires DoAction if recordName and recordValue match.
virtual void RecordChanged(const AZStd::string& name, int value);
Get GS_Interaction
GS_Interaction — Explore this gem on the product page and add it to your project.
7.3.2 - World Triggers
World trigger component and trigger types — response execution objects that change world state when a trigger sensor fires.
WorldTriggerComponent is the response container of the World Trigger system. It owns an array of WorldTriggerType objects that execute when triggered — toggling entities, setting records, changing stages, logging messages.
For usage guides and setup examples, see The Basics: GS_Interaction.
Container Component
WorldTriggerComponent
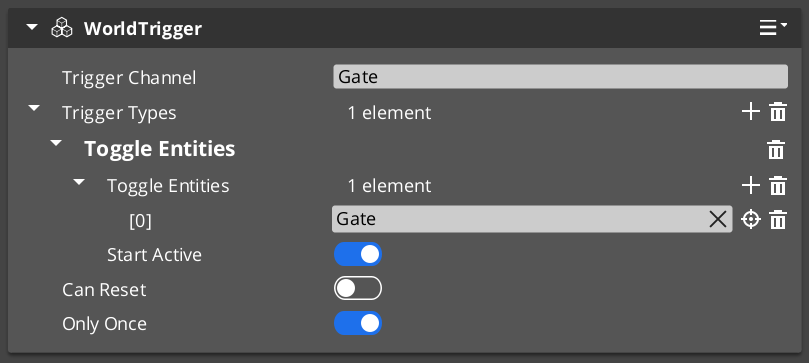
Owns and drives all trigger type objects. Not subclassed — extended by adding WorldTriggerType objects to triggerTypes.
Bus: WorldTriggerRequestBus (ById)
| Field | Type | Description |
|---|
triggerTypes | vector<WorldTriggerType*> | All types are executed on each trigger or reset event. |
| Method | Description |
|---|
Trigger() | Calls Execute(entityId) on every type in triggerTypes. |
Reset() | Calls OnReset(entityId) on every type in triggerTypes. |
On Activate(), calls OnComponentActivate(entityId) on every type — use this for initial state seeding (e.g. entity visibility setup before any trigger fires).
Base Type Class
WorldTriggerType
Abstract base for all trigger response logic. Not a component — reflected manually in GS_InteractionSystemComponent::Reflect(). Subclass this to add new response types.
| Virtual | Parameters | Description |
|---|
OnComponentActivate(entityId) | AZ::EntityId | Called at component activation for startup initialization. |
Execute(entityId) | AZ::EntityId | Called on Trigger(). Implement the world state change here. |
OnReset(entityId) | AZ::EntityId | Called on Reset(). Reverse or re-arm the effect here. |
Built-in Trigger Types
| Type Class | Response |
|---|
| TriggerType_PrintLog | Prints logMessage to the development log on Execute. |
| TriggerType_SetRecord | Sets recordName to recordProgress via the RecordKeeper on Execute. |
| TriggerType_ToggleEntities | Toggles toggleEntities[] active/inactive. OnComponentActivate seeds initial state from startActive. Execute and OnReset invert the state each call. |
| TriggerType_ChangeStage | Queues StageManagerRequestBus::ChangeStageRequest(targetStageName, targetExitPoint) on the next tick via Execute. |
Extension Guide
To create a custom trigger type:
- Create a class extending
WorldTriggerType. - Override
Execute(entityId) — implement your world state change here. - Override
OnReset(entityId) for reversible or re-armable effects. - Override
OnComponentActivate(entityId) if your type needs to set up initial state at startup (e.g. TriggerType_ToggleEntities uses this to seed entity visibility). - Reflect the class in
GS_InteractionSystemComponent::Reflect() — types are not components and are not registered via CreateDescriptor().
See Also
Get GS_Interaction
GS_Interaction — Explore this gem on the product page and add it to your project.
7.4 - Templates
ClassWizard templates for GS_Interaction — Pulsor pulses, reactors, world triggers, and trigger sensors.
All GS_Interaction extension types are generated through the ClassWizard CLI. The wizard handles UUID generation, cmake file-list registration, and reflection automatically.
For usage guides and setup examples, see The Basics: GS_Interaction.
python ClassWizard.py \
    --template <TemplateName> \
    --gem <GemPath> \
    --name <SymbolName> \
    [--input-var key=value ...]
Contents
Pulsor Pulse
Template: PulsorPulse
Creates a Pulse — the sender side of the Pulsor system. A Pulse fires on a named channel and carries a typed payload. Any PulsorReactor on the same entity listening to the same channel will receive it.
Generated files:
Source/${Name}_Pulse.h/.cpp
CLI:
python ClassWizard.py --template PulsorPulse --gem <GemPath> --name <Name> \
    --input-var type_display_name="My Pulse" \
    --input-var type_category="Input"
Input vars:
| Var | Type | Default | Description |
|---|
type_display_name | text | ${Name} | Label shown in the Pulse type dropdown in the editor |
type_category | text | (empty) | Grouping category in the dropdown (e.g. Input, Physics, Timer) |
Post-generation: Implement Fire() with the data payload your channel requires. Match the channel string to the Reactor that will receive it. Each Pulse/Reactor pair is one interaction channel — channels are string-matched.
See also: Pulsors — full pulsor architecture, built-in pulse types, and extension guide.
Pulsor Reactor
Template: PulsorReactor
Creates a Reactor — the receiver side of the Pulsor system. Listens on a specific named channel and executes a response when a matching Pulse fires on the same entity.
Generated files:
Source/${Name}_Reactor.h/.cpp
CLI:
python ClassWizard.py --template PulsorReactor --gem <GemPath> --name <Name> \
    --input-var pulse_channel=MyChannel \
    --input-var type_display_name="My Reactor" \
    --input-var type_category="Input"
Input vars:
| Var | Type | Required | Description |
|---|
pulse_channel | text | yes | The channel name this reactor subscribes to — must match the Pulse’s channel |
type_display_name | text | no | Label shown in the Reactor type dropdown |
type_category | text | no | Grouping category in the dropdown |
Important: pulse_channel is required. The channel string is baked into the header at generation time. If you need to change it later, edit the m_channel field directly in the generated header.
Post-generation: Implement OnPulse(...) with the response logic. Multiple Reactor instances of different types can coexist on one entity, each listening to a different channel.
See also: Pulsors — full pulsor architecture, built-in reactor types, and extension guide.
World Trigger
Template: WorldTrigger
Creates a WorldTrigger component — a logical trigger in the world that fires a named event when activated. Used to start dialogue sequences, cutscenes, or other scripted events from gameplay code or Script Canvas.
Generated files:
Source/${Name}_WorldTrigger.h/.cpp
CLI:
python ClassWizard.py --template WorldTrigger --gem <GemPath> --name <Name>
Post-generation: Wire the trigger activation to whatever condition suits the design (physics overlap, input event, distance check, etc.). Override Trigger() — call the parent first to check channels and conditions. Override Reset() for reversible triggers.
See also: World Triggers — full world trigger architecture and extension guide.
Trigger Sensor
Template: TriggerSensor
Creates a TriggerSensor — the listening side of a trigger pair. Registers to receive named trigger events from a WorldTrigger and executes a response action.
Generated files:
Source/${Name}_TriggerSensor.h/.cpp
CLI:
python ClassWizard.py --template TriggerSensor --gem <GemPath> --name <Name>
Post-generation: Subscribe to the matching trigger event name in Activate(). Override EvaluateAction() to define your trigger condition. Override DoAction() — call the parent first, then add custom behavior if it succeeds. Stack sensors to react to the same trigger in different ways.
See also: Trigger Sensors — full trigger sensor reference.
See Also
For the full API, component properties, and C++ extension guide:
For all ClassWizard templates across GS_Play gems:
Get GS_Interaction
GS_Interaction — Explore this gem on the product page and add it to your project.
7.5 - 3rd Party Implementations
For usage guides and setup examples, see The Basics: GS_Interaction.
Get GS_Interaction
GS_Interaction — Explore this gem on the product page and add it to your project.
8 - GS_Juice
Game feel and feedback motion system — GS_Motion extension with transform and material tracks for visual feedback effects.
GS_Juice provides motion-based visual feedback effects for game feel. It extends the GS_Motion system with feedback-specific track types — transform animation (position, scale, rotation) and material property animation (opacity, emissive, color). Effects are authored as .feedbackmotion data assets and played by FeedbackEmitter components on entities.
For usage guides and setup examples, see The Basics: GS_Juice.
Contents
Feedback System
The feedback system follows the standard GS_Motion domain extension pattern. FeedbackMotionTrack is the domain base class, with two concrete track types. FeedbackMotionAsset holds the track definitions. FeedbackMotion is the instance wrapper struct that manages the runtime lifecycle. FeedbackEmitter is the component that plays effects.
| Component / Type | Purpose |
|---|
| FeedbackEmitter | Component — plays a feedback motion on its entity or a target entity. |
| FeedbackMotion | Instance wrapper struct — asset reference, proxies, runtime composite. |
| FeedbackMotionAsset | Data asset (.feedbackmotion) — holds vector<FeedbackMotionTrack*>. |
| FeedbackMotionTrack | Domain base track — extends GS_Core::GS_MotionTrack. |
| FeedbackTransformTrack | Concrete track — position (Vector2Gradient), scale (FloatGradient), rotation (FloatGradient). |
| FeedbackMaterialTrack | Concrete track — opacity (FloatGradient), emissive (FloatGradient), color (ColorGradient). |
Feedback API
PostProcessing (Planned)
Planned for post-processing feedback effects (screen distortion, color grading, vignette). Not yet implemented.
System Components
| Component | Purpose |
|---|
| GS_JuiceSystemComponent | Runtime system component for GS_Juice. |
Dependencies
- GS_Core (required — provides GS_Motion base system)
Cross-Gem Contracts
GS_Juice’s feedback-track base and completion signals are collected in the GS_Core Interfaces layer:
| Contract | Kind | Used for |
|---|
FeedbackMotionTrack | TypeBase | Author new feedback tracks — they appear in the asset-editor picker. |
FeedbackMotionEmissionBus | Emit | OnFeedbackMotionComplete / OnFeedbackMotionLooped (addressed by the emitter entity). |
See the Contract Reference for the full table.
Installation
- Enable the GS_Juice gem in your project configuration.
- Ensure GS_Core is also enabled.
- Create
.feedbackmotion assets in the O3DE Asset Editor. - Add
FeedbackEmitter components to entities that need feedback effects.
See Also
For conceptual overviews and usage guides:
For sub-system references:
For related resources:
Get GS_Juice
GS_Juice — Explore this gem on the product page and add it to your project.
8.1 - Feedback System
Feedback motion tracks, FeedbackEmitter component, and FeedbackMotionAsset reference.
The Feedback System provides the concrete implementation of GS_Juice’s game feel effects. It includes the FeedbackEmitter component for playback, FeedbackMotionAsset for data storage, and two concrete track types for transform and material animation.
For usage guides and setup examples, see The Basics: GS_Juice.
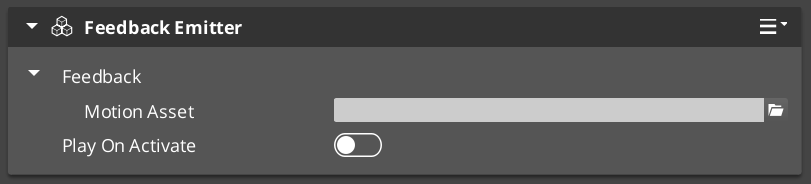
Contents
FeedbackEmitter
The FeedbackEmitter component plays a Feedback Motion on its entity or on a specified target entity.
Inspector Properties
| Property | Type | Description |
|---|
| FeedbackMotion | FeedbackMotion | The motion instance — holds the asset reference, proxy list, and runtime composite. |
| playOnActivate | bool | When true, the motion plays automatically when the entity activates. |
API Reference
| Method | Parameters | Returns | Description |
|---|
Play | — | void | Plays the feedback motion on the owning entity. |
PlayOnTarget | AZ::EntityId target | void | Plays the feedback motion on a different entity. |
Stop | — | void | Stops the currently playing motion. |
FeedbackMotionAsset
The data asset that defines a feedback effect. Created and edited in the O3DE Asset Editor with the .feedbackmotion extension. Extends GS_Core::GS_MotionAsset → AZ::Data::AssetData. Requires GS_AssetReflectionIncludes.h when reflecting — see Serialization Helpers.
Properties
| Property | Type | Description |
|---|
| m_tracks | vector<FeedbackMotionTrack*> | The tracks in this motion. |
| motionName | AZStd::string | Display name for the motion. |
| loop | bool | Whether the motion loops. |
Methods
| Method | Returns | Description |
|---|
GetTrackInfos | vector<GS_TrackInfo> | Returns track UUID + label pairs for proxy sync. |
CreateRuntimeComposite | GS_MotionComposite* | Creates a deep-copy runtime instance of all tracks. |
To understand how to author Feedback Motions, refer to Feedback: Authoring Feedback Motions
Animates entity transform properties. All fields use gradient types for full curve control.
| Field | Type | What It Animates |
|---|
| Position | Vector2Gradient | XY offset from origin (additive). |
| Scale | FloatGradient | Uniform scale factor over time. |
| Rotation | FloatGradient | Rotation angle over time. |
The track captures the entity’s origin transform on Init() and applies offsets relative to it. Effects are additive — multiple transform tracks on the same entity stack correctly.
FeedbackMaterialTrack
Animates entity material properties via the render component.
| Field | Type | What It Animates |
|---|
| Opacity | FloatGradient | Material opacity. |
| Emissive | FloatGradient | Emissive intensity. |
| Color | ColorGradient | Color tint. |
Adding Custom Tracks
Use the FeedbackMotionTrack ClassWizard template to generate a new world-space track — see GS_Juice Templates. The only manual step after generation is adding a Reflect(context) call in {$Gem}DataAssetSystemComponent.cpp. Once reflected, the new track type is discovered automatically and appears in the asset editor type picker.
Override Init(ownerEntityId) to cache entity context, and Update(easedProgress) to drive the target property via its bus.
void ${Custom}Track::Init(AZ::EntityId ownerEntity)
{
    // Always call the base first — it sets m_owner.
    GS_Juice::FeedbackMotionTrack::Init(ownerEntity);

    // Cache the entity's origin value so the track can apply additive offsets.
    // Example:
    //   AZ::TransformBus::EventResult(m_originPosition, ownerEntity, &AZ::TransformInterface::GetWorldTranslation);
    //   AZ::TransformBus::EventResult(m_originRotation, ownerEntity, &AZ::TransformInterface::GetWorldRotationQuaternion);
}

void ${Custom}Track::Update(float easedProgress)
{
    // Evaluate the gradient at the current eased progress and apply to the entity.
    // easedProgress is in [0, 1] and already passed through the track's CurveType.
    // Example:
    //   const AZ::Vector3 offset = valueGradient.Evaluate(easedProgress);
    //   AZ::TransformBus::Event(m_owner, &AZ::TransformInterface::SetWorldTranslation, m_originPosition + offset);
}
See Also
For conceptual overviews and usage guides:
For component references:
For related resources:
Get GS_Juice
GS_Juice — Explore this gem on the product page and add it to your project.
8.2 - Third Party Implementations
Integration guides for third-party feedback systems with GS_Juice.
This section will contain integration guides for connecting third-party game feel and feedback tools with the GS_Juice system.
For usage guides and setup examples, see The Basics: GS_Juice.
Get GS_Juice
GS_Juice — Explore this gem on the product page and add it to your project.
8.3 - Templates
ClassWizard templates for GS_Juice — custom feedback motion tracks for world-space game-feel effects.
All GS_Juice extension types are generated through the ClassWizard CLI. The wizard handles UUID generation and cmake file-list registration automatically.
For usage guides and setup examples, see The Basics: GS_Juice.
python ClassWizard.py \
    --template <TemplateName> \
    --gem <GemPath> \
    --name <SymbolName> \
    [--input-var key=value ...]
Contents
Feedback Motion Track
Template: FeedbackMotionTrack
Creates a custom animation track for GS_Juice feedback sequences. A FeedbackMotionTrack child animates a world-space entity property (transform, material, audio, particle, etc.) via O3DE buses over a normalised [0,1] eased progress value. Tracks are referenced from GS_FeedbackSequence data assets.
Generated files:
Include/${GemName}/GS_Feedback/MotionTracks/${Name}Track.hSource/GS_Feedback/MotionTracks/${Name}Track.cpp
CLI:
python ClassWizard.py --template FeedbackMotionTrack --gem <GemPath> --name <Name>
Post-generation — manual registration required:
In GS_JuiceDataAssetSystemComponent.cpp, add:
#include <path/to/${Name}Track.h>
// inside Reflect(context):
${Name}Track::Reflect(context);
Extensibility: Same polymorphic pattern as UiMotionTrack — any number of track types, discovered automatically via EnumerateDerived. World-space tracks differ from UI tracks in that they act on entity buses (TransformBus, material buses, etc.) rather than LyShine element interfaces. Init(ownerEntityId) caches the entity context; Update(easedProgress) drives the property.
See also: Feedback — the full feedback system architecture, built-in track types, and domain extension pattern.
See Also
For the full API, component properties, and C++ extension guide:
For all ClassWizard templates across GS_Play gems:
Get GS_Juice
GS_Juice — Explore this gem on the product page and add it to your project.
9 - GS_Item
Data-driven inventory containers and equipment slot management for collectible, usable, and equippable items in GS_Play projects.
GS_Item provides the inventory and equipment systems for GS_Play. It gives entities inventory containers that hold stacks of item data, and an equipment system that maps items to named slots on a character entity. Items are defined as data assets, making the full catalog editable without code changes. GS_Item is under active development — the API surface is evolving and additional item behaviours will be added in future releases.
For usage guides and setup examples, see The Basics: GS_Item.
Contents
Inventory
The inventory system manages ordered collections of item stacks on an entity. Stacks track item type, quantity, and metadata. The inventory component exposes add, remove, query, and transfer operations and broadcasts notifications when contents change.
| Area | Contents |
|---|
| Inventory Component | Per-entity container that holds item stacks and manages quantity limits. |
| Item Data Assets | Data-driven item definitions: display name, icon, stack limit, categories, and custom properties. |
| Stack Operations | Add, remove, transfer, split, and query by item type or category. |
| Notifications | Change events broadcast when items are added, removed, or quantities updated. |
Inventory API
Equipment
The equipment system maps item assets to named slots on a character or entity. Equipping an item occupies its designated slot and can trigger stat modifications via GS_RPStats integration. Unequipping returns the item to inventory or discards it based on configured policy.
| Area | Contents |
|---|
| Equipment Component | Per-entity slot manager. Maps slot names to currently equipped item assets. |
| Slot Definitions | Named slot configuration (e.g. weapon_main, armour_chest, accessory_1) defined per entity type. |
| Equip / Unequip Flow | Validates slot compatibility, optionally modifies stats via GS_RPStats, and notifies listeners. |
| Notifications | Change events broadcast when slots are filled, cleared, or swapped. |
Equipment API
Installation
GS_Item is a standalone gem. GS_RPStats integration is optional but recommended for stat-modifying equipment.
- Enable GS_Item and GS_Core in your O3DE project’s gem list.
- Create item data assets in your project’s asset directory and populate them in the Editor.
- Add the inventory component to any entity (player, chest, NPC) that should hold items.
- Add the equipment component to character entities that support equippable slots.
- Configure slot names on the equipment component to match your game’s equipment schema.
- Optionally enable GS_RPStats to wire equipment stat modifiers into the character stat pipeline.
Note: GS_Item is under active development. Check the changelog for the latest additions before starting integration work.
See Also
For conceptual overviews and usage guides:
For sub-system references:
For related resources:
Get GS_Item
GS_Item — Explore this gem on the product page and add it to your project.
9.1 - 3rd Party Implementations
For usage guides and setup examples, see The Basics: GS_Item.
Get GS_Item
GS_Item — Explore this gem on the product page and add it to your project.
9.2 - Equipment
For usage guides and setup examples, see The Basics: GS_Item.
Get GS_Item
GS_Item — Explore this gem on the product page and add it to your project.
9.3 - Inventory
For usage guides and setup examples, see The Basics: GS_Item.
Get GS_Item
GS_Item — Explore this gem on the product page and add it to your project.
10 - GS_Performer
Modular character rendering via skin slots, paper billboard performers, velocity-driven locomotion, head tracking, and audio babble integration.
GS_Performer is the character rendering and presentation gem for GS_Play. It provides a slot-based skinning system for composing modular character appearances at runtime, a paper (billboard) performer system for 2.5D and top-down projects, velocity-driven locomotion parameter hooks, head tracking, and audio babble. The gem depends on GS_Core and integrates optionally with EMotionFX and GS_Unit.
For usage guides and setup examples, see The Basics: GS_Performer.
GS_Performer is in Early Development. Full support planned soon: 2026.
Contents
Manager
The Performer Manager is a GS_Play manager that owns the global performer registry and coordinates skin slot configuration across the level.
| Component | Purpose |
|---|
| GS_PerformerManagerComponent | GS_Play manager. Global performer registry. Coordinates skin slot profiles and performer lookups. |
Performer API
Skin Slots
A slot-based system for composing character appearance from swappable actor meshes and material sets. Each slot holds an actor asset and material list. The handler component manages the full set of slots for a character and applies PerformerSkinSlotsConfigProfile presets.
| Component / Asset | Purpose |
|---|
| PerformerSkinSlotComponent | Individual skin slot. Holds one actor mesh and its material overrides. Addressed by slot ID. |
| SkinSlotHandlerComponent | Manages the full collection of skin slots for a character entity. Applies profile presets. |
| SkinSlotData | Data structure holding actor asset and material asset list for a single slot. |
| PerformerSkinSlotsConfigProfile | Asset class defining a named preset of skin slot assignments. Loaded and applied at runtime. |
Skin Slot API
Billboard-based character rendering for 2.5D and top-down games. The facing handler keeps sprite quads oriented toward the camera or a configurable facing target. A camera-aware variant (in GS_Complete) extends this with PhantomCam integration.
Paper Performer API
Locomotion
Velocity-driven animation parameter hooks. The locomotion component samples entity velocity each tick and pushes values into the animation graph, driving blend trees without manual parameter management.
Performer API
Head Tracking
Procedural head look-at targeting for performer entities. Drives bone orientation toward a world-space target using configurable angle limits and spring damping.
Head Tracking API
Babble
Audio babble synchronized to dialogue typewriter output. The Babble component generates procedural vocalisation tones keyed to speaker identity and tone configuration, complementing the Typewriter system in GS_Cinematics.
Babble API
Installation
GS_Performer requires GS_Core. EMotionFX and GS_Unit are optional integrations.
- Enable GS_Performer and GS_Core in your O3DE project’s gem list.
- Add GS_PerformerManagerComponent to your Game Manager prefab and include it in the Startup Managers list.
- For skin slots, add SkinSlotHandlerComponent to the character root entity, then add one PerformerSkinSlotComponent per modular slot.
- For paper performers, add PaperFacingHandlerComponent to sprite entities that should billboard toward the camera.
- For locomotion, add VelocityLocomotionHookComponent to entities with an EMotionFX actor and configure the parameter name bindings.
See Also
For conceptual overviews and usage guides:
For sub-system references:
For related resources:
Get GS_Performer
GS_Performer — Explore this gem on the product page and add it to your project.
10.1 - Performer Manager & Skin Slots
Performer manager lifecycle, skin slot system for modular character appearance, and config profile assets.
The Performer Manager and Skin Slot system provide modular character appearance management at runtime. The manager handles global performer registration and lookup. Skin slots define individual mesh/material combinations that can be swapped independently, enabling runtime costume and equipment changes.
For usage guides and setup examples, see The Basics: GS_Performer.
GS_Performer is in Early Development. Full support planned soon: 2026.
Contents
GS_PerformerManagerComponent
Singleton manager extending GS_ManagerComponent. Handles global performer registration, coordinates skin slot configuration across the level, and provides performer lookup.
Bus: PerformerManagerRequestBus (Single, Single)
Skin Slot System
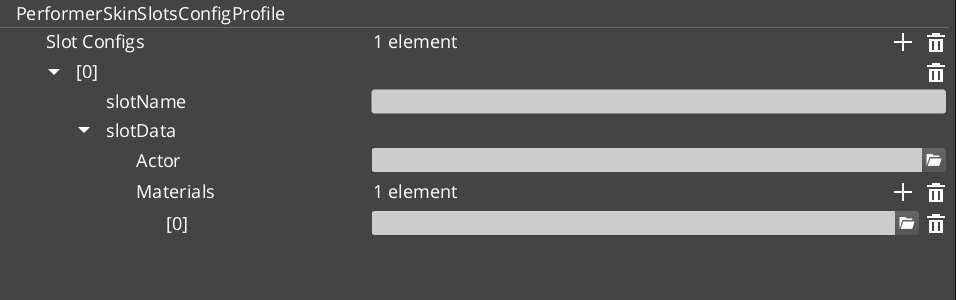
PerformerSkinSlotComponent
Individual skin slot component. Each slot holds one actor mesh asset and its material overrides. Addressed by slot ID.
Bus: PerformerSkinSlotRequestBus (ById, Single)
| Property | Type | Description |
|---|
| Slot Name | AZStd::string | Identifier for this skin slot. |
| Skin Data | SkinSlotData | Actor asset and material list for this slot. |
SkinSlotHandlerComponent
Manages the complete collection of skin slots for a character entity. Applies PerformerSkinSlotsConfigProfile presets to swap entire outfits at once.
Bus: SkinSlotHandlerRequestBus (ById, Single)
Data Types
| Type | Description |
|---|
| SkinSlotData | Actor asset reference + material asset list for a single slot. |
| SkinSlotNameDataPair | Slot name string + SkinSlotData pair for serialization. |
| PerformerSkinSlotsConfigProfile | Asset class defining a named preset of skin slot assignments. Loaded and applied at runtime for outfit/costume changes. |
VelocityLocomotionHookComponent
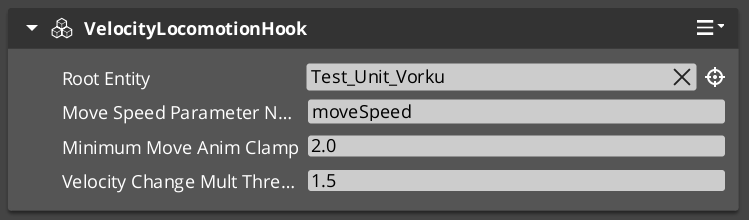
Reads entity velocity each tick and writes locomotion parameters (speed, direction) to the EMotionFX animation graph. Drives blend trees automatically without manual parameter management.
| Property | Type | Description |
|---|
| Speed Parameter | AZStd::string | The EMotionFX parameter name to write speed values into. |
| Direction Parameter | AZStd::string | The EMotionFX parameter name to write direction values into. |
PrefabAnimAssetsReloaderComponent
Hot-reloads prefab animation assets during development without requiring a full level restart.
Setup
- Add GS_PerformerManagerComponent to the Game Manager prefab and include it in the Startup Managers list.
- Add SkinSlotHandlerComponent to the character root entity.
- Add one PerformerSkinSlotComponent per modular slot (head, body, arms, legs, etc.) to child entities.
- Create PerformerSkinSlotsConfigProfile assets in the Asset Editor for each outfit configuration.
- For locomotion, add VelocityLocomotionHookComponent to entities with an EMotionFX actor.
Extension Guide
The Skin Slot system uses the companion component pattern. Custom slot behavior (equipment integration, visual effects on swap) should be added as companion components that listen to SkinSlotHandler bus events on the same entity.
See Also
For related component references:
For conceptual overviews and usage guides:
Get GS_Performer
GS_Performer — Explore this gem on the product page and add it to your project.
10.2 - Performers
Billboard and 3D character entity types — PaperFacingHandlerComponent for 2.5D rendering and the Avatar pipeline for rigged EMotionFX characters.
The Performers sub-system defines the character entity types in GS_Performer. Each type encapsulates a complete rendering strategy — from the lightweight billboard paper performer to the full 3D avatar pipeline integrating EMotionFX, skin slots, and locomotion.
The performer type determines the fundamental visual structure of the character entity. Performer Features then layer onto it, independent of type.
For usage guides and setup examples, see The Basics: Performers.
GS_Performer is in Early Development. Full support planned soon: 2026.
Contents
Core Pattern
Each performer type is a self-contained entity configuration. The Paper Performer requires only sprite geometry and a facing handler component. The Avatar Performer drives an EMotionFX actor and composes with skin slots and the locomotion hook. Both types participate in Performer Manager registration and support the full Performer Features set.
Billboard-based character rendering for 2.5D and top-down games. The facing handler orients the sprite quad toward the active camera or a configurable target each tick. The base component allows custom facing strategies through extension.
| Component | Purpose | Reference |
|---|
| PaperFacingHandlerBaseComponent | Abstract base for billboard facing logic. Extend to implement custom facing strategies. | Paper Performer |
| PaperFacingHandlerComponent | Concrete implementation. Orients the entity quad toward the active camera each tick. | Paper Performer |
Paper Performer API
The full 3D character pipeline. Drives a rigged EMotionFX actor with support for skin slot equipment, velocity locomotion parameter binding, and animation asset hot-reloading during development.
| Component | Purpose | Reference |
|---|
| VelocityLocomotionHookComponent | Reads entity velocity each tick and writes speed and direction blend parameters to the EMotionFX animation graph. | Avatar Performer |
| PrefabAnimAssetsReloaderComponent | Hot-reloads prefab animation assets without a level restart. Development utility. | Avatar Performer |
Avatar Performer API
Extension Guide
Custom paper facing strategies are supported by extending PaperFacingHandlerBaseComponent. Override the tick method to compute any desired facing rotation and apply it to the entity transform each frame. See Paper Performer API for the full extension walkthrough.
See Also
For conceptual overviews and usage guides:
For related component references:
Get GS_Performer
GS_Performer — Explore this gem on the product page and add it to your project.
10.2.1 - Avatar Performer
How to work with GS_Play avatar performers.
Avatar Performer Under Construction
Get GS_Performer
GS_Performer — Explore this gem on the product page and add it to your project.
10.2.2 - Paper Performer
Billboard-based character rendering — paper facing handlers that orient sprite quads toward the camera.
The Paper Performer system provides billboard-based character rendering for 2.5D and top-down games. Facing handler components keep sprite quads oriented toward the camera or a configurable facing target each tick.
For usage guides and setup examples, see The Basics: GS_Performer.
GS_Performer is in Early Development. Full support planned soon: 2026.
Contents
PaperFacingHandlerBaseComponent
Abstract base component for billboard facing logic. Extend this to implement custom facing strategies (face camera, face movement direction, face target entity).
PaperFacingHandlerComponent
Concrete paper-facing implementation. Orients the entity’s quad toward the active camera each tick. Suitable for standard 2.5D billboard characters.
| Property | Type | Description |
|---|
| Face Mode | enum | How the billboard faces: toward camera, along movement direction, or toward a target. |
Camera-Aware Variant
A camera-aware paper facing handler is provided by GS_Complete as a cross-gem component (PhantomCam + Performer):
| Component | Gems | Description |
|---|
| CamCorePaperFacingHandlerComponent | Performer + PhantomCam | Uses CamCore notifications to adjust paper performer facing direction relative to the active phantom camera. |
See Utility: Angles Helper for details.
Extension Guide
Create custom facing strategies by extending PaperFacingHandlerBaseComponent:
- Create a class extending
PaperFacingHandlerBaseComponent. - Override the tick/update method to compute your desired facing rotation.
- Apply the rotation to the entity transform each frame.
See Also
For related component references:
For conceptual overviews and usage guides:
For related resources:
Get GS_Performer
GS_Performer — Explore this gem on the product page and add it to your project.
10.3 - Performer Features
Universal capabilities for any performer entity — procedural head tracking, typewriter-synchronized babble, and mesh swapping.
Performer Features are components that apply to any performer entity, independent of performer type. They represent capabilities that layer onto the character rather than define it — procedural bone targeting via head tracking, typewriter-synchronized vocalization via babble, and runtime mesh swapping.
The performer type (Paper or Avatar) defines the character’s rendering pipeline. Performer Features extend what that character can do within it.
For usage guides and setup examples, see The Basics: Performer Features.
GS_Performer is in Early Development. Full support planned soon: 2026.
Contents
Head Tracking
Procedural look-at targeting for performer bones. Drives bone orientation toward a world-space target each tick using configurable angle limits and spring damping, enabling characters to naturally track targets, speakers, or points of interest.
| Component | Purpose | Reference |
|---|
| Head Tracking Component | Reads a target position each tick and computes bone rotation within clamped horizontal and vertical limits, smoothed by spring damping. | Head Tracking |
Head Tracking API
Babble
Procedural vocalization tones synchronized to Typewriter text output. Fires audio tone events on each character reveal, keyed to speaker identity, creating the characteristic character-voice effect.
| Component | Purpose | Reference |
|---|
| BabbleComponent | Generates babble tones on OnTypeFired events. Returns BabbleToneEvent for audio playback. Speaker mapped via SpeakerBabbleEvents. | Babble |
Babble API
Mesh Swap
Runtime mesh and material swapping for performer entities. Provides lightweight visual variation without the full slot-based equipment system.
Mesh Swap API
See Also
For conceptual overviews and usage guides:
For related component references:
Get GS_Performer
GS_Performer — Explore this gem on the product page and add it to your project.
10.3.1 - Locomotion
Velocity-driven animation hooks and prefab animation asset reloading for performer entities.
The Locomotion system bridges entity movement to animation. The VelocityLocomotionHookComponent samples entity velocity each tick and pushes values into the EMotionFX animation graph, driving blend trees without manual parameter management. The PrefabAnimAssetsReloaderComponent supports hot-reloading animation assets during development.
For usage guides and setup examples, see The Basics: GS_Performer.
GS_Performer is in Early Development. Full support planned soon: 2026.
Contents
VelocityLocomotionHookComponent
Reads the entity’s current velocity each tick and writes locomotion parameters (speed, direction) to the EMotionFX animation graph. This drives blend trees automatically — characters walk, run, and idle based on their actual movement speed.
| Property | Type | Description |
|---|
| Speed Parameter | AZStd::string | The EMotionFX parameter name to write speed values into. |
| Direction Parameter | AZStd::string | The EMotionFX parameter name to write direction values into. |
PrefabAnimAssetsReloaderComponent
Hot-reloads prefab animation assets during development without requiring a full level restart. Monitors animation asset files for changes and reapplies them to the entity’s EMotionFX actor.
Setup
- Add VelocityLocomotionHookComponent to an entity with an EMotionFX actor and a movement system (GS_Unit mover or physics rigidbody).
- Configure the speed and direction parameter names to match your EMotionFX blend tree parameters.
- Add PrefabAnimAssetsReloaderComponent during development for faster animation iteration.
See Also
For related component references:
For conceptual overviews and usage guides:
Get GS_Performer
GS_Performer — Explore this gem on the product page and add it to your project.
10.3.2 - Head Tracking
Procedural head look-at targeting — drives bone orientation toward a world-space target with configurable angle limits and damping.
The Head Tracking system provides procedural head look-at targeting for performer entities. It drives bone orientation toward a world-space target using configurable angle limits and spring damping, enabling characters to naturally track targets, speakers, or points of interest.
For usage guides and setup examples, see The Basics: GS_Performer.
GS_Performer is in Early Development. Full support planned soon: 2026.
Contents
How It Works
The head tracking component reads the target position each tick and computes the desired bone rotation to face it. The rotation is clamped to configurable angle limits (horizontal and vertical) and smoothed via spring damping to avoid snapping.
Setup
- Add the head tracking component to an entity with an EMotionFX actor.
- Configure the target bone (typically the head or neck bone).
- Set angle limits for horizontal and vertical rotation.
- Configure spring damping parameters for smooth tracking.
- Set the look-at target via code or companion component.
See Also
For related component references:
For conceptual overviews and usage guides:
Get GS_Performer
GS_Performer — Explore this gem on the product page and add it to your project.
10.3.3 - Babble
Audio babble synchronized to dialogue typewriter output — procedural vocalization tones keyed to speaker identity.
The Babble system generates procedural vocalization tones synchronized to the dialogue Typewriter output. Each speaker can have unique babble tone events that fire with each character reveal, creating the characteristic “character voice” effect used in games like Animal Crossing or Undertale.
For usage guides and setup examples, see The Basics: GS_Performer.
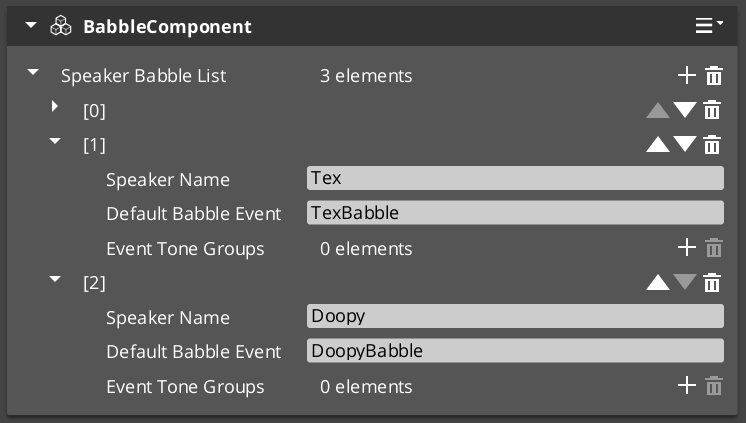
GS_Performer is in Early Development. Full support planned soon: 2026.
Contents
BabbleComponent
Bus: BabbleRequestBus (ById)
| Method | Parameters | Returns | Description |
|---|
GetBabbleEvent | — | BabbleToneEvent | Returns the current babble tone event for audio playback. |
Data Types
| Type | Description |
|---|
| BabbleToneEvent | Audio event configuration for a single babble tone. |
| SpeakerBabbleEvents | Collection of babble events mapped to a specific speaker/actor. |
How It Works
- The TypewriterComponent (GS_Cinematics) reveals text character by character.
- On each
OnTypeFired notification, the BabbleComponent triggers its configured babble tone. - The tone varies based on the speaker’s
SpeakerBabbleEvents configuration. - The result is a procedural “voice” that matches the text reveal rhythm.
See Also
For related component references:
For conceptual overviews and usage guides:
Get GS_Performer
GS_Performer — Explore this gem on the product page and add it to your project.
10.4 - 3rd Party Implementations
For usage guides and setup examples, see The Basics: GS_Performer.
Get GS_Performer
GS_Performer — Explore this gem on the product page and add it to your project.
11 - GS_PhantomCam
Priority-based virtual camera framework — composable stage pipeline, channel-aware instancing, blend profiles, influence fields, group targets, tug fields, and noise.
Rather than moving a single camera directly, GS_PhantomCam lets you place lightweight virtual cameras — “phantoms” — throughout the scene. Each phantom holds a complete camera state and a priority value. The Cam Core component drives the real camera to match whichever phantom currently has the highest effective priority. Transitions are animated by Blend Profiles that specify duration, easing, blend shape, and optional state inheritance. Influence Fields modify camera selection spatially or globally without changing base priorities.
Each phantom is not a fixed-behavior camera. It hosts a composable Body → Aim → Reposition additives → Noise additives stage pipeline — so the same component drives follow cams, orbital cams, tracking dollies, third-person shoulder cams, and cinematic stingers depending on which stages are slotted. The framework also runs a channel system that scales from arcade single-cam through 4-player split-screen co-op with no changes to the per-cam authoring surface.
For usage guides and setup examples, see The Basics: GS_PhantomCam.
Contents
Architecture
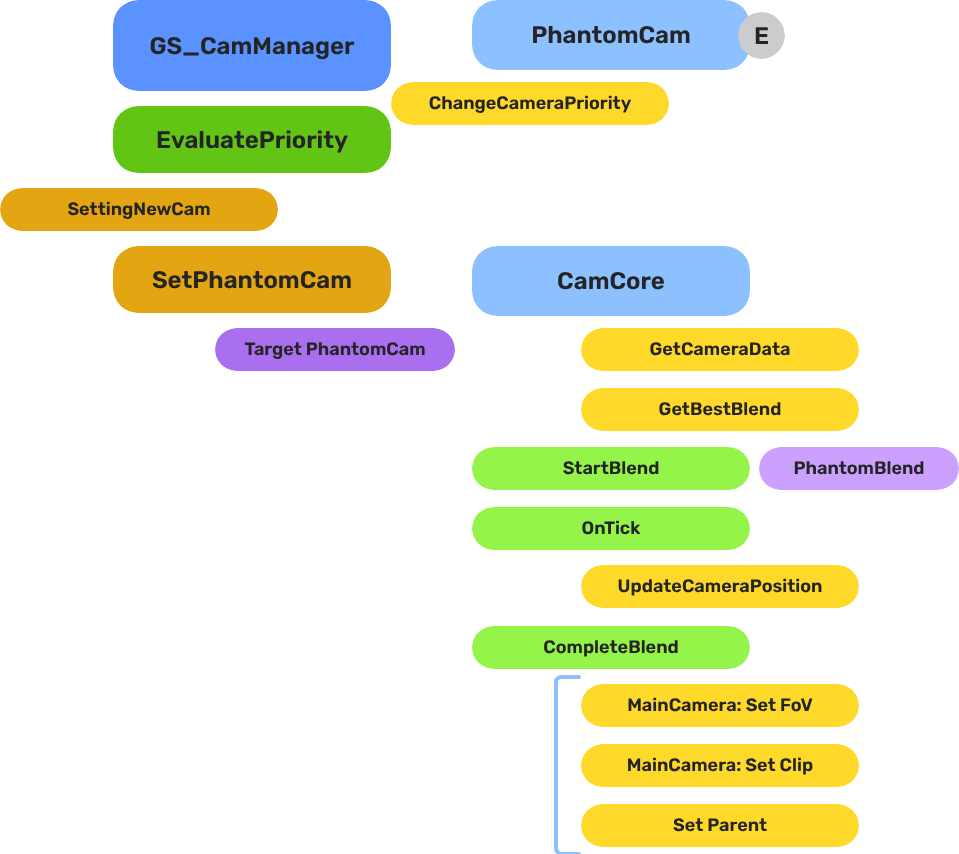
Breakdown
Each phantom camera publishes a pose every tick by running its stage pipeline. The Cam Manager arbitrates priority across all registered phantoms inside a channel and notifies the channel’s Cam Core when the winner changes. The Cam Core then blends from the outgoing pose to the new one, optionally inheriting pose state across the transition and applying mid-blend interrupt correction when a new winner appears before the current blend completes.
| Step | What it means |
|---|
| 1 — Per-tick pipeline | Each phantom threads a CameraState through Body → Aim → Reposition additives → Noise additives → Finalize. The committed transform is published to the entity. |
| 2 — Priority arbitration | The Cam Manager re-evaluates base + sum(influences) per channel. Channel 0 covers all legacy / single-player flows. |
| 3 — Dominance change | When a channel’s winner changes, the Cam Manager fires SettingNewCam (or SettingNewCamOnChannel when channel instancing is on). |
| 4 — Profile query | Cam Core calls GetBestBlend(fromCam, toCam) on the assigned Blend Profile. The matched entry returns blend time, easing curve, blend shape (Linear / Spherical / Cylindrical), an inherit-state flag, and a pivot source selector. |
| 5 — State inheritance | If inherit-state is set, the outgoing cam publishes a CamPoseSnapshot; the incoming cam’s Body adopts it through its own kinematic interpretation (orbit yaw/pitch, track param, lead-follow seed). |
| 6 — Interpolation | Cam Core blends position, rotation, and FOV over the entry’s blend time using the configured easing + shape. If a new blend interrupts this one, a correction window pulls the new start curve back from the rendered TM. |
E Indicates extensible classes and methods.
Patterns - Complete list of system patterns used in GS_Play.
Cam Manager
The Cam Manager is the singleton controller for the entire camera system. It extends GS_ManagerComponent and now owns six responsibilities:
- Registration — Every phantom camera and Cam Core self-registers on activate; the Cam Manager holds authoritative per-channel tables.
- Priority evaluation — When any camera’s priority changes,
EvaluatePriority re-sorts each channel and determines its dominant camera. A dominance change fires SettingNewCam (instancing off) or SettingNewCamOnChannel (instancing on). - Influence routing — Priority influences from Influence Fields or gameplay code are routed to the channel of the affected target via
AddCameraInfluence(sourceEntity, targetEntity, camName, influence). Influences whose target isn’t bound to any channel are silently dropped. - Target system — Per-channel target bindings via
SetChannelTarget(channelId, target). Legacy single-arg SetTarget forwards to channel 0. - Group target registry — Named Group Targets self-register on activate so stages can resolve them by name.
- Dispatch overrides & active main-view — Cross-channel cinematic dispatch (
DispatchCamToCamCore) and engine main-view selection (SetActiveChannel / SetActiveCamCore) wrap O3DE’s MakeActiveView for orchestrated multi-view flows.
| Component | Purpose |
|---|
| GS_CamManagerComponent | Singleton manager. Channel registries, priority arbitration, influence routing, group-target registry, dispatch, active-view selection, rig spawning. |
Cam Manager API
Cam Core
The Cam Core is the per-frame driver that makes the real O3DE camera match the dominant phantom for its channel. It lives on the main camera entity, which must be a child entity of the Cam Manager entity (or of a rig-prefab root in Tier 3) so it spawns and despawns with the camera system.
Every frame, when locked to a phantom, the Cam Core parents the main camera to that phantom entity and reads its position, rotation, and FOV directly. During a blend transition:
- The Cam Core receives
SettingNewCam (or SettingNewCamOnChannel) from the Cam Manager. - It queries the assigned Blend Profile for the best matching entry between the outgoing and incoming cameras.
- The matched entry returns duration, easing, blend shape, an inherit-state flag, and a pivot source. If no profile entry matches, the Cam Core falls back to its own default blend time, easing, and shape.
- If inherit-state is set, the outgoing cam’s Body publishes a
CamPoseSnapshot and the incoming cam’s Body adopts it before the blend executes. - Over the blend duration, position, rotation, and FOV are interpolated using the configured easing curve and shape (Linear / Spherical-around-pivot / Cylindrical-around-pivot).
- If a new blend starts mid-flight, a mid-blend correction window pulls the new start curve back from the rendered TM so the camera does not snap.
- On completion, the Cam Core parents the main camera to the new dominant phantom, locking them together until the next transition.
| Component | Purpose |
|---|
| GS_CamCoreComponent | Core camera driver. Blend execution (including interrupt correction), inheritance handoff site, drives the engine view, channel-aware via CamCoreRequestBus. |
Cam Core API
Phantom Cameras
A Phantom Camera is a single entity component — GS_PhantomCameraComponent — that holds priority, lens, snap/focus state, target routing, and one stage pipeline slot authored by the user. It does not render anything. It registers with the Cam Manager on activation (auto-routing to the correct channel via its ChannelStampComponent ancestor) and publishes a per-tick pose from its Body + Aim + Additive stages.
Where previous versions of GS_PhantomCam shipped separate components per behavior (clamped-look, static-orbit, track, etc.), all of those behaviors are now stage variants layered on top of the single base component. Authors pick a Body stage, an Aim stage, and zero-or-more Additive stages from the editor’s type-picker.
| Component | Purpose |
|---|
| GS_PhantomCameraComponent | Base virtual camera. Carries the stage pipeline slot, priority, target routing, lens, snap/focus/blendingOut state. |
| AlwaysFaceCameraComponent | Billboard utility — keeps an entity facing the active camera. Not a camera type itself. |
Phantom Cameras API
Retired components. StaticOrbit_PhantomCamComponent, ClampedLook_PhantomCamComponent, and Track_PhantomCamComponent no longer exist as separate components. Their behavior is now provided by Body / Aim stage variants. Legacy URLs redirect to the matching stage docs.
Stage Pipeline
Every phantom camera runs the same fixed pipeline per tick:
Body → Aim → Reposition additives → Noise additives → Finalize
- Body writes
state.position. Examples: DefaultFollowBody, OrbitBody, DynamicOrbitBody, LeadingFollowBody, TrackBody. - Aim writes
state.rotation. Examples: DefaultAim, ClampedLookAim. (Other gems — notably gs_performer — register additional aim variants.) - Reposition additives correct the smoothed pose. Run BEFORE noise so noise can’t be undone. Examples: collision pushback, occlusion, tug listeners.
- Noise additives perturb the final pose. Examples: PerlinNoise (continuous handheld shake), ImpulseNoise (event-triggered ADSR burst).
- Finalize publishes the committed transform and lens.
Each stage owns its own damping. Stages are reflected polymorphic types — derived from IBodyStage / IAimStage / IAdditiveStage, not AZ::Component. The editor’s type-picker enumerates all registered derivations from the SerializeContext class hierarchy, so other gems can extend the catalog cleanly.
Stage Pipeline API
Channels & Instancing
A channel is one player viewpoint slot. Each channel owns its own rig (spawned from a prefab), its own Cam Core, its own target binding, its own priority table, and its own active influence set. Channel 0 is the implicit default for all single-player flows.
The system progressively discloses across three authoring tiers:
| Tier | Setup | Behavior |
|---|
| Tier 1 — Arcade | Drop CamCore + PhantomCams in the level. Call SetTarget(player). | Legacy fallback. Cam Manager synthesizes channel 0 around level-placed cams. |
| Tier 2 — Standard single-player | Set m_primaryRigPrefab on the Cam Manager. Call SetTarget(player). | Cam Manager spawns the rig at startup; the prefab’s CamCore + cams self-register to channel 0. |
| Tier 3 — Co-op / split-screen / cinematic | Toggle m_enableInstancedChannels = true. Fill m_channelConfigs. | Per-channel arbitration, channel-aware influence routing, cross-channel dispatch, active-main toggling. |
| Concept | Purpose |
|---|
| Channel system | Scope enum (Local / AllChannels / TrueUnique), ChannelStampComponent runtime plumbing, spawn lifecycle, cross-channel dispatch, active-view selection. |
Channels & Instancing API
Pending — multi-view rendering. Multi-view rendering ships with the AttImage render-target binding work. Until then, the engine renders one channel at a time even when multiple are arbitrating internally.
Blend Profiles
Blend Profiles are data assets (.camblendprofile) that define how the Cam Core transitions between phantom cameras. Each profile contains a list of blend entries. Each entry specifies a From camera, a To camera, a blend duration, an easing curve, a blend shape, an inherit-state flag, and a pivot source. This allows every camera-to-camera transition in your project to have unique timing, feel, and geometry.
Entry Resolution Order
- Exact match — From name and To name both match.
- Any-to-specific — From is blank/“any”, To matches the incoming camera.
- Specific-to-any — From matches the outgoing camera, To is blank/“any”.
- Default fallback — The Cam Core’s own default blend settings.
Blend Entry Fields
| Field | Description |
|---|
FromCamera | Outgoing phantom camera entity name. Blank/“any” matches all. |
ToCamera | Incoming phantom camera entity name. Blank/“any” matches all. |
BlendTime | Transition duration in seconds. |
EasingType | Interpolation curve applied during the blend. See Curves Utility. |
BlendShape | Linear, Spherical-around-pivot, or Cylindrical-around-pivot. Spherical sweeps the camera through a great-circle arc around a pivot; cylindrical does the same but only on the yaw axis. |
InheritState | When set, the outgoing cam publishes a CamPoseSnapshot and the incoming cam’s Body adopts it before the blend executes. See State Inheritance. |
PivotSource | Which point the shape uses as its pivot — target world position, body anchor, or look-at point. |
Camera names correspond to entity names of the phantom camera entities in the scene.
| Asset | Purpose |
|---|
| GS_PhantomCamBlendProfile | Blend settings asset. Per-pair transition duration, easing, shape, inherit-state, pivot source. |
Blend Profiles API
Camera Influence Fields
Influence components modify the effective priority of phantom cameras without touching their base priority values. They work by calling AddCameraInfluence(sourceEntity, targetEntity, camName, influence) on the Cam Manager bus, identified by camera name. Multiple influences on the same camera stack additively.
The signature carries two entity arguments: the source (the field emitting the influence — used as the per-channel storage key so overlapping fields don’t collide) and the target (the entity that triggered the influence — used as the routing key to look up which channel the influence applies to). Influences whose target isn’t bound to any channel are silently dropped, which gives clean isolation between players in co-op.
GlobalCameraInfluenceComponent
Applies a constant priority modifier for its entire active lifetime. Useful for gameplay states that should always favor a particular camera — boosting a cutscene camera’s priority during a scripted sequence, for example.
Placement: Place GlobalCameraInfluenceComponent on the StageData entity. It activates and deactivates automatically with the stage, keeping camera influence scoped to the level that defines it.
CameraInfluenceFieldComponent
Applies a priority modifier only when the camera subject enters a defined spatial volume. Requires a PhysX Collider (set as trigger) on the same entity to define the volume. On entry, the influence is added; on exit, it is removed. See Physics Trigger Volume Utility for setup details.
Useful for level design — switching to an overhead camera when the player enters a room, or boosting a scenic camera in a vista area.
Camera Influence Fields API
Group Targets
A Group Target is a target entity whose world transform is the weighted centroid of a subject set. Phantom Cameras point at it like any other target. The Cam Manager hosts a named registry so stages can resolve a group entity by string name.
| Component | Purpose |
|---|
| GroupTargetComponent | Weighted multi-subject focal entity. Centroid modes (weighted mean, bbox center, sphere center). Optional derived rotation. Physics-aware cadence. |
Group Targets API
Tug Fields
Tug Fields are collider-driven spatial reposition sources. A volume in the world pulls the camera’s body position and/or aim rotation toward a configured destination while a proxy attached to the rig is in contact with the volume. The system is decoupled into three components — CameraTugVolumeComponent (the trigger volume), CameraTugSourceComponent (the falloff geometry and destination), and TugFieldProxyComponent (the cam-side receiver) — and is PhysX-paired through dedicated TugProxy / TugField collision layers so the engine itself filters contacts. No registry, no Cam Manager involvement.
Naming note. Tug-field m_channels are arbitrary string tags (“Cinematic”, “Combat”) that match volumes to listeners. They are not the same as instancing ChannelIds, which are integer per-player slots — see Channels & Instancing.
| Components | Purpose |
|---|
| Tug Fields | Volume / source / proxy three-component model, tug listeners (TugAimListener, TugBodyListener), PhysX layer contract. |
Tug Fields API
Noise & Impulse
Noise stages perturb the final pose in the Noise phase of the pipeline, autonomous from Body / Aim. Two stages ship: PerlinNoise (continuous handheld / idle shake driven by a .camnoiseprofile asset) and ImpulseNoise (event-triggered ADSR burst). Multiple noise stages compose freely on one cam.
| Asset | Purpose |
|---|
| CameraNoiseProfile | .camnoiseprofile — layered Perlin noise definitions for the NoiseStage. Six per-axis layer lists (position xyz, rotation xyz). |
Noise Profiles API
Orbit Profiles
CameraOrbitShape is a .camorbit asset that defines the shape of an orbital sweep — a power-bulge family that smoothly interpolates between a diamond (Roundness 0), a sphere (Roundness 0.5), and a cube (Roundness 1). Arc-length reparameterization keeps spatial speed constant as the camera traces the shape. Consumed by DynamicOrbitBody.
| Asset | Purpose |
|---|
| CameraOrbitShape | .camorbit — power-bulge orbit shape with arc-length reparameterization. |
Orbit Profiles API
State Inheritance
State inheritance lets the incoming cam in a transition start from a kinematic interpretation of the outgoing cam’s pose, rather than its own ideal. The protocol is universal: every Body stage may publish a CamPoseSnapshot (TryGetPoseSnapshot) and may adopt one (TryAdoptPoseSnapshot). Orbit back-derives yaw / pitch from the snapshot. Track projects to its spline. LeadingFollow seeds at the band-natural distance from the source’s facing.
Inheritance is opt-in per blend entry via the InheritState flag on the matched Blend Profile entry. The default is OFF; enable it only when the smoother handoff is worth the kinematic cost.
State Inheritance API
The Camera Input Reader provides yaw / pitch input deltas to Body and Aim stages that drive their pose from player input (notably DynamicOrbitBody). It implements the OrbitInputProvider interface and integrates with PlayerControllerInputReader from gs_unit. It distinguishes sensitivity (raw input scale) from halflife (damping rate) and applies ResetPendingInput semantics so a stage that didn’t tick this frame doesn’t accumulate a stale input buffer.
Camera Input Reader API
Cross-Gem Contracts
The Cam Core exposes the camera as an observable service through the GS_Core Interfaces layer — the observable-service trio: learn a core exists (Emit), query it (Exchange), observe its updates (Emit):
| Contract | Kind | Used for |
|---|
CamCoreEmissionBus | Emit | UpdateCameraPosition (per-frame pose), OnCamCoreRegistered / OnCamCoreUnregistered (rig lifetime). Global broadcast. |
CamCoreExchangeBus | Exchange | GetCamCore — resolve the active Cam Core’s entity. |
The internal SetPhantomCam command stays an in-gem bus (Cam Manager → Cam Core), not a cross-gem contract. See the Contract Reference for details.
Installation
GS_PhantomCam requires only GS_Core.
- Enable GS_PhantomCam in Project Manager or
project.json. - Add GS_CamManagerComponent to a dedicated entity and register it in the Game Manager Startup Managers list. Save this entity as a prefab.
- Author a rig prefab containing GS_CamCoreComponent on a main O3DE camera entity plus the phantom cameras you want to ship with the rig. Assign this prefab to the Cam Manager’s
m_primaryRigPrefab for Tier 2 (single-player) or to m_channelConfigs[i].m_rigPrefab for Tier 3 (per-channel). For Tier 1 / legacy, hand-place the CamCore as a child of the Cam Manager entity instead. - Assign a Blend Profile asset to the Cam Core’s Blend Profile slot. Configure default blend time, easing, and shape on the component for fallback transitions.
- Place phantom camera entities (either in the rig prefab or in the level). Author their Body, Aim, and Additive stages from the type-picker.
- For spatial influence zones, add CameraInfluenceFieldComponent alongside a PhysX Collider (trigger) to define the volume.
- For global per-stage influence, add GlobalCameraInfluenceComponent to the StageData entity.
- For multi-player or split-screen, toggle
m_enableInstancedChannels = true on the Cam Manager and populate m_channelConfigs. See Channels & Instancing.
For a full guided walkthrough, see the PhantomCam Set Up Guide.
See Also
For conceptual overviews and usage guides:
For related resources:
Get GS_PhantomCam
GS_PhantomCam — Explore this gem on the product page and add it to your project.
11.1 - Cam Manager
Camera system lifecycle controller — channel registry, per-channel priority arbitration, group target registry, influence routing, dispatch overrides, and active main-view selection.
The Cam Manager is the singleton controller for the GS_PhantomCam camera system. It extends GS_ManagerComponent and owns the full lifecycle of virtual cameras: per-channel registration of phantom cameras and Cam Cores, per-channel priority arbitration, channel-aware target binding, influence routing, the named Group Target registry, cross-channel cinematic dispatch, and engine main-view selection.
When a phantom camera activates, it walks transform ancestors looking for a ChannelStampComponent, identifies its channel, and self-registers with the Cam Manager. When priorities change — through direct calls, enable/disable toggling, or influence fields — the Cam Manager re-evaluates the affected channel(s) and notifies the channel’s Cam Core to begin blending toward the new winner.
For usage guides and setup examples, see The Basics: GS_PhantomCam.
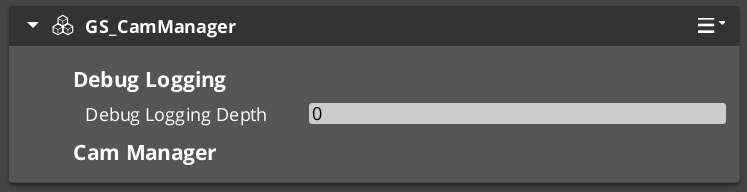
Contents
How It Works
Camera Registration
Every Phantom Camera registers with the Cam Manager on activation and unregisters on deactivation. The registration path depends on the cam’s CamChannelScope and whether it lives under a ChannelStampComponent ancestor — see Channels. For legacy / single-player flows (no stamp ancestor), the cam routes through channel 0 via the legacy RegisterPhantomCam method.
Priority Evaluation
When any camera’s priority changes, the Cam Manager calls EvaluatePriority(), which iterates every active channel. Each channel computes effective = base + sum(influences) per cam and picks the highest. A change in a channel’s winner triggers SettingNewCamOnChannel(channelId, targetCam) (when channel instancing is enabled) or the legacy SettingNewCam(targetCam) (when it is not). The channel’s Cam Core listens for this to begin its blend transition.
Camera Influences
Camera influences are named priority modifiers that shift a camera’s effective priority. They are added and removed through AddCameraInfluence(sourceEntity, targetEntity, camName, influence) and RemoveCameraInfluence(sourceEntity, targetEntity). The sourceEntity is the storage key (so multiple overlapping fields don’t collide); the targetEntity is the routing key — the Cam Manager looks up the channel via GetChannelForTarget(targetEntity). Influences whose target isn’t bound to any channel are silently dropped. See Camera Influence Fields.
Target Assignment
Each channel holds its own target binding. SetChannelTarget(channelId, target) sets the target for one channel; the legacy SetTarget(target) forwards to channel 0. Setting a valid target on a channel propagates it to every cam in the channel via SetCameraTarget and pushes a synchronous SnapCameraNow so the cam’s evaluated pose lands before downstream consumers query its transform. Clearing the target (invalid EntityId) does not push snap — this preserves the depossess-guard pose-hold behavior.
Authoring Tiers
The Cam Manager exposes a tiered author surface via progressive disclosure. Three top-level inspector fields control which tier is active:
| Tier | Configuration | Behavior |
|---|
| Tier 1 — Standard single-player | m_primaryRigPrefab set; m_enableInstancedChannels = false | Cam Manager spawns one rig from the primary prefab on startup; everything routes through channel 0. Most projects use this tier. |
| Tier 2 — Legacy level-placed | No m_primaryRigPrefab; m_enableInstancedChannels = false | The CamCore is hand-placed in the level instead of spawned from a rig prefab. Legacy author flow — supported but not preferred. |
| Tier 3 — Multi-channel | m_enableInstancedChannels = true; m_channelConfigs populated | Per-channel rig spawning, per-channel arbitration, channel-aware notifications, cross-channel cinematic dispatch. Split-screen and co-op projects use this tier. |
| Inspector field | Visibility | Purpose |
|---|
m_primaryRigPrefab | Always | Default rig prefab. Universal fallback for any channel with no override. |
m_enableInstancedChannels | Always | Master gate. When OFF, channel-aware fields are hidden and legacy bus signatures are routed. When ON, the full channel surface is live. |
m_channelConfigs | When master gate is ON | Array of CameraChannelConfig rows. |
m_activeChannelCount | When master gate is ON | Lobby-driven cap. Channels configured beyond this count stay dormant at startup. |
CameraChannelConfig per-row fields:
| Field | Inspector label | Purpose |
|---|
m_channelName | Channel Name | Display label (“P1”, “P2”). Not a lookup key. |
m_policy | Channel Policy | PerChannelInstance (default — Cam Manager spawns this channel’s rig) or LegacyLevelPlaced (channel uses level-placed cams, channel 0 only). |
m_rigPrefab | Rig Override Prefab | Per-channel rig. Leave empty to inherit m_primaryRigPrefab. |
m_enabledByDefault | Enabled By Default | Whether this channel spawns on startup. |
Channels
A channel is one player viewpoint slot. Each channel owns its own rig, target binding, priority table, active influence set, and Cam Core. Channel 0 (DefaultChannelId) is the implicit default for legacy / single-player flows.
Channel addressing covers most of the Cam Manager’s runtime surface. The bus exposes paired methods — a legacy single-arg form that forwards to channel 0, and a channel-aware multi-arg form for Tier 3:
| Concern | Legacy | Channel-aware |
|---|
| Set the target | SetTarget(entity) | SetChannelTarget(channelId, entity) |
| Get the target | GetTarget() | GetChannelTarget(channelId) |
| Register a cam | RegisterPhantomCam(cam) | RegisterPhantomCamForChannel(cam, stampEntity, channelId, token) |
| Register a CamCore | RegisterCamCore(camCore) | RegisterCamCoreToChannel(camCore, stampEntity, channelId, token) |
| Dominance notification | SettingNewCam(cam) | SettingNewCamOnChannel(channelId, cam) |
Direct registration variants (RegisterPhantomCamDirect, RegisterPhantomCamShared) cover author-explicit CamChannelScope::TrueUnique cams that bypass the stamp-walk path. See Channels & Instancing for the full scope enum and stamp-walk semantics.
| Method | Use |
|---|
GetChannelForTarget(target) | Reverse lookup — returns the channel an entity is bound to (or InvalidChannelId). Used by influence routing. |
SetActiveChannelCount(count) | Pre-startup lobby cap. Configured-but-extra channels stay dormant. |
EnableChannel(channelId) | Spawn a configured channel mid-session. Fires ChannelSpawned. |
DisableChannel(channelId) | Despawn a spawned channel. Fires ChannelDespawned. |
GetChannelCamCore(channelId) | Query the bound CamCore entity for a channel. |
Group Target Registry
The Cam Manager is the single global authority for named Group Targets. A GroupTargetComponent self-registers on activate; stages with CamTargetMode::GroupTarget resolve the group’s entity by name.
| Method | Use |
|---|
RegisterGroupTarget(name, groupEntity) | Called by GroupTargetComponent::Activate. |
UnregisterGroupTarget(groupEntity) | Called by GroupTargetComponent::Deactivate. |
FindGroupTargetByName(name) | Stages query this to resolve a group entity. |
GetRegisteredGroupTargetNames() | Returns the full list. Used by editor dropdowns and debug. |
Dispatch Overrides
For cinematic / cross-channel scenarios — e.g. player 3’s wide cam should temporarily render on player 1’s Cam Core — the Cam Manager exposes a dispatch override. Channel arbitration still runs internally during dispatch (SettingNewCamOnChannel still fires with the arbitrated winner); only the physical Cam Core route is overridden.
| Method | Use |
|---|
FindCamForTarget(logicalName, targetEntity) | Resolves a cam by logical (entity) name with multi-tier fallback: channel-of-target match → shared-cam scan → reserved AllChannels duplicate path. |
DispatchCamToCamCore(cam, camCoreEntity) | Force the Cam Core to render the specified cam. Persists until release. Fires OnCamCoreDispatched. |
ReleaseCamCoreDispatch(camCoreEntity) | Clear the override. Re-runs arbitration so the Cam Core routes back to its arbitrated winner. Fires OnCamCoreDispatchReleased. |
Active Main View
Wraps O3DE’s AzFramework::Camera::CameraRequests::MakeActiveView so the channel system can orchestrate which Cam Core is the engine’s main view. Orthogonal to dispatch (what cam) and render-target binding (where pixels go).
| Method | Use |
|---|
SetActiveChannel(channelId) | Resolves the channel’s Cam Core, delegates to SetActiveCamCore. |
SetActiveCamCore(camCoreEntity) | Calls MakeActiveView on the Cam Core. Idempotent. |
GetActiveChannel() | Reverse query — returns the channel that owns the engine’s active camera, or InvalidChannelId if the active cam isn’t channel-bound. |
GetActiveCamCore() | Direct passthrough to the engine. |
Listeners receive OnActiveCameraChanged(channelId, camCoreEntity). External MakeActiveView calls made outside this API are not observed — subscribe to AzFramework::Camera::CameraNotificationBus directly if you need to detect engine-level changes.
Spawn Lifecycle
The Cam Manager’s OnStartupComplete hook (driven by the Game Manager) spawns all configured rigs before broadcasting HandleStartup so spawned cams settle into the same startup wave. Stage transitions (BeginLoadStage / LoadStageComplete) despawn and respawn rigs cleanly.
OnStartupComplete:
  if m_enableInstancedChannels == false:
    Tier 1: if m_primaryRigPrefab valid → spawn one rig for channel 0
    Tier 2: no spawn (assumes level-placed CamCore)
  else:
    Tier 3: iterate m_channelConfigs[0 .. min(size, m_activeChannelCount)]
      for each PerChannelInstance config with valid prefab and m_enabledByDefault:
        SpawnChannelRig(channelId, GetEffectiveRigPrefab(channelId))
SpawnChannelRig uses an EntitySpawnTicket with two callbacks:
- Pre-insertion — Cam Manager attaches a
ChannelStampComponent to the spawn root and calls StampChannel(channelId). This bumps the channel’s stamp token and fires OnStamped to any subscribers. - Completion — Entities activate. Cam Cores and PhantomCams walk ancestors, find the stamp, and self-register to the channel via token-aware methods. Cam Manager then walks activated entities into
channel.m_rigSpawnedEntities, marks the channel active, folds shared TrueUnique cams into the channel’s priority table, validates a Cam Core registered, broadcasts ChannelSpawned(channelId, camCoreEntity), and re-runs EvaluatePriority so the arbitration result reaches the Cam Core.
Mid-session EnableChannel / DisableChannel reuse the same spawn / despawn paths and fire the same notifications.
Setup
- Add GS_CamManagerComponent to a dedicated entity (commonly inside a Cam Manager prefab).
- Register the manager prefab in the Game Manager Startup Managers list.
- Choose your tier:
- Tier 1 — Assign a rig prefab (containing a Cam Core entity and your phantom cameras) to
m_primaryRigPrefab. Leave m_enableInstancedChannels off. - Tier 2 — Place the Cam Core entity as a child of the Cam Manager entity directly. Leave
m_primaryRigPrefab empty and m_enableInstancedChannels off. - Tier 3 — Toggle
m_enableInstancedChannels on and populate m_channelConfigs with one row per supported player slot. Use m_primaryRigPrefab as the universal default and per-row Rig Override Prefab for asymmetric setups.
- Place or author phantom cameras with priorities, target modes, and stage compositions.
For a full walkthrough, see the PhantomCam Set Up Guide.
API Reference
Request Bus: CamManagerRequestBus
Commands sent to the Cam Manager. Global bus — single address, single handler. Extends GS_Core::ManagerBaseRequests.
Registration
| Method | Parameters | Returns | Description |
|---|
RegisterPhantomCam | AZ::EntityId cam | void | Legacy registration. Routes the cam through channel 0. Used by cams without a ChannelStampComponent ancestor. |
UnRegisterPhantomCam | AZ::EntityId cam | void | Legacy unregister. |
RegisterPhantomCamForChannel | AZ::EntityId cam, AZ::EntityId stampEntity, ChannelId claimedChannelId, AZ::u32 claimedToken | void | Stamp-aware registration. Cam Manager verifies the (channelId, token) against the live stamp on stampEntity before mutating channel tables — mismatched tokens are rejected. |
UnRegisterPhantomCamFromChannel | AZ::EntityId cam, AZ::EntityId stampEntity, ChannelId, AZ::u32 token | void | Stamp-aware unregister. |
RegisterPhantomCamDirect | AZ::EntityId cam, ChannelId channelId | void | Author-explicit binding via CamChannelScope::TrueUnique + m_boundChannelId. Bypasses stamp-walk. |
UnRegisterPhantomCamDirect | AZ::EntityId cam, ChannelId channelId | void | Direct unregister. |
RegisterPhantomCamShared | AZ::EntityId cam | void | Adds the cam to every active channel’s priority table. Used by CamChannelScope::TrueUnique + m_allChannelsShare. |
UnRegisterPhantomCamShared | AZ::EntityId cam | void | Shared unregister. |
RegisterCamCore | AZ::EntityId camCore | void | Legacy Cam Core registration (channel 0). |
UnregisterCamCore | AZ::EntityId camCore | void | Legacy unregister. |
RegisterCamCoreToChannel | AZ::EntityId camCore, AZ::EntityId stampEntity, ChannelId, AZ::u32 token | void | Stamp-aware Cam Core registration. |
UnregisterCamCoreFromChannel | AZ::EntityId camCore, AZ::EntityId stampEntity, ChannelId, AZ::u32 token | void | Stamp-aware unregister. |
Priority and influence
| Method | Parameters | Returns | Description |
|---|
ChangeCameraPriority | AZ::EntityId cam, AZ::u32 priority | void | Sets base priority. Cam Manager walks every channel where the cam is registered and re-evaluates. |
AddCameraInfluence | AZ::EntityId sourceEntity, AZ::EntityId targetEntity, AZStd::string camName, AZ::u32 influence | void | Channel-routed. sourceEntity is the per-channel storage key; targetEntity is the routing key (channel resolved via GetChannelForTarget). Silently dropped if the target isn’t channel-bound. |
RemoveCameraInfluence | AZ::EntityId sourceEntity, AZ::EntityId targetEntity | void | Channel-routed removal by (source, target) key. |
Targets
| Method | Parameters | Returns | Description |
|---|
SetTarget | AZ::EntityId target | void | Legacy. Forwards to SetChannelTarget(DefaultChannelId, target). |
GetTarget | — | AZ::EntityId | Legacy. Returns channel 0’s target. |
SetChannelTarget | ChannelId, AZ::EntityId target | void | Channel-aware. Propagates the new target to every cam in the channel via SetCameraTarget, and pushes SnapCameraNow when binding to a valid target so evaluated pose lands before downstream queries. Clearing the target does not push snap. |
GetChannelTarget | ChannelId | AZ::EntityId | Returns the channel’s current target binding. |
GetChannelForTarget | AZ::EntityId target | ChannelId | Reverse lookup. Returns InvalidChannelId if the entity isn’t bound. |
GetCamManager | — | AZ::EntityId | Returns the Cam Manager’s own entity id. |
GetPhantomCam | AZStd::string camName | AZ::EntityId | Resolves a cam by entity name. |
Runtime channel management
| Method | Parameters | Returns | Description |
|---|
SetActiveChannelCount | AZ::u32 count | void | Pre-startup only. Lobby-driven cap. Mid-session calls warn and are ignored — use EnableChannel / DisableChannel instead. |
GetActiveChannelCount | — | AZ::u32 | Query. |
EnableChannel | ChannelId | void | Spawn a configured channel mid-session. Fires ChannelSpawned. |
DisableChannel | ChannelId | void | Despawn. Fires ChannelDespawned. No-op if not spawned. |
GetChannelCamCore | ChannelId | AZ::EntityId | Returns the bound Cam Core entity, invalid if none. |
Dispatch and active view
| Method | Parameters | Returns | Description |
|---|
FindCamForTarget | AZStd::string logicalName, AZ::EntityId targetEntity | AZ::EntityId | Multi-tier resolution. Channel-of-target first, then shared-cam scan. |
DispatchCamToCamCore | AZ::EntityId cam, AZ::EntityId camCoreEntity | void | Force a Cam Core to render the specified cam. Persists until release. |
ReleaseCamCoreDispatch | AZ::EntityId camCoreEntity | void | Clear override; restore arbitration. |
SetActiveChannel | ChannelId | void | Resolves the channel’s Cam Core and delegates to SetActiveCamCore. |
SetActiveCamCore | AZ::EntityId camCoreEntity | void | Calls MakeActiveView. Idempotent. |
GetActiveChannel | — | ChannelId | Returns the channel owning the engine’s active camera. |
GetActiveCamCore | — | AZ::EntityId | Direct passthrough to the engine. |
Group target registry
| Method | Parameters | Returns | Description |
|---|
RegisterGroupTarget | AZStd::string name, AZ::EntityId groupEntity | void | Called by GroupTargetComponent::Activate. |
UnregisterGroupTarget | AZ::EntityId groupEntity | void | Called by GroupTargetComponent::Deactivate. |
FindGroupTargetByName | AZStd::string name | AZ::EntityId | Resolves a group entity for stages set to CamTargetMode::GroupTarget. |
GetRegisteredGroupTargetNames | — | AZStd::vector<AZStd::string> | Returns the full list. |
Notification Bus: CamManagerNotificationBus
Events broadcast by the Cam Manager. Multiple handler bus — any number of components can subscribe. Extends GS_Core::ManagerBaseNotifications.
Legacy (instancing OFF)
| Event | Description |
|---|
EnableCameraSystem | Fired when the camera system is fully initialized. |
DisableCameraSystem | Fired when the camera system is shutting down. |
SettingNewCam(targetCam) | A new phantom camera became dominant in channel 0. The Cam Core listens for this to begin blending. |
Channel-aware (instancing ON)
| Event | Description |
|---|
SettingNewCamOnChannel(channelId, targetCam) | Per-channel arbitration produced a new winner. Replaces the legacy SettingNewCam when instancing is on. |
ChannelSpawned(channelId, camCoreEntity) | A configured channel finished spawning AND its Cam Core self-registered. Listeners can treat this as a ready-to-render signal. |
ChannelDespawned(channelId) | Fires before entity teardown when a channel rig is despawned. |
OnAllChannelsActivatedSharedCam(sharedCam) | Edge-triggered: every active channel simultaneously selected the same shared TrueUnique cam. Typical cause: a shared cinematic cam paired with a Group Target at convergence radius. |
OnCamCoreDispatched(camCoreEntity, dispatchedCam) | A cross-channel dispatch override was applied. |
OnCamCoreDispatchReleased(camCoreEntity) | Dispatch override cleared. |
OnActiveCameraChanged(channelId, camCoreEntity) | The engine’s main-view active camera changed via this API. channelId == InvalidChannelId when the active cam isn’t channel-bound. External MakeActiveView calls outside this API are not observed. |
Virtual Methods
Override these when extending the Cam Manager. Always call the base implementation.
| Method | Parameters | Returns | Description |
|---|
EvaluatePriority() | — | void | Top-level arbitration entry point. Iterates every active channel. Override to add system-wide rules (gameplay-state gates, distance weighting, lock rules). |
EvaluatePriorityForChannel(channelId) | ChannelId | AZ::EntityId | Per-channel arbitration. Computes effective = base + sum(influences) and returns the winner. Override for per-channel custom logic in Tier 3 projects. |
Extending the Cam Manager
Extend the Cam Manager to add custom priority logic, additional registration behavior, or project-specific camera selection rules. Extension is done in C++.
#pragma once
#include <GS_PhantomCam/GS_CamManagerBus.h>
#include <Source/GS_CamManagerComponent.h>

namespace MyProject
{
    class MyCamManager : public GS_PhantomCam::GS_CamManagerComponent
    {
    public:
        AZ_COMPONENT_DECL(MyCamManager);

        static void Reflect(AZ::ReflectContext* context);

    protected:
        void EvaluatePriority() override;
        AZ::EntityId EvaluatePriorityForChannel(GS_PhantomCam::ChannelId channelId) override;
    };
}
Implementation (.cpp)
#include "MyCamManager.h"
#include <AzCore/Serialization/SerializeContext.h>

namespace MyProject
{
    AZ_COMPONENT_IMPL(MyCamManager, "MyCamManager", "{YOUR-UUID-HERE}");

    void MyCamManager::Reflect(AZ::ReflectContext* context)
    {
        if (auto serializeContext = azrtti_cast<AZ::SerializeContext*>(context))
        {
            serializeContext->Class<MyCamManager, GS_PhantomCam::GS_CamManagerComponent>()
                ->Version(0);

            if (AZ::EditContext* editContext = serializeContext->GetEditContext())
            {
                editContext->Class<MyCamManager>("My Cam Manager", "Custom camera manager")
                    ->ClassElement(AZ::Edit::ClassElements::EditorData, "")
                        ->Attribute(AZ::Edit::Attributes::Category, "MyProject")
                        ->Attribute(AZ::Edit::Attributes::AppearsInAddComponentMenu, AZ_CRC_CE("Game"));
            }
        }
    }

    void MyCamManager::EvaluatePriority()
    {
        // Call base to run standard per-channel arbitration.
        GS_CamManagerComponent::EvaluatePriority();

        // Custom system-wide logic here.
    }

    AZ::EntityId MyCamManager::EvaluatePriorityForChannel(GS_PhantomCam::ChannelId channelId)
    {
        // Apply per-channel rules before falling back to base arbitration.
        // Example: lock to a specific cam during a scripted sequence.
        // if (m_lockedCam.IsValid()) return m_lockedCam;
        return GS_CamManagerComponent::EvaluatePriorityForChannel(channelId);
    }
}
Script Canvas Examples
Enabling and disabling the camera system:
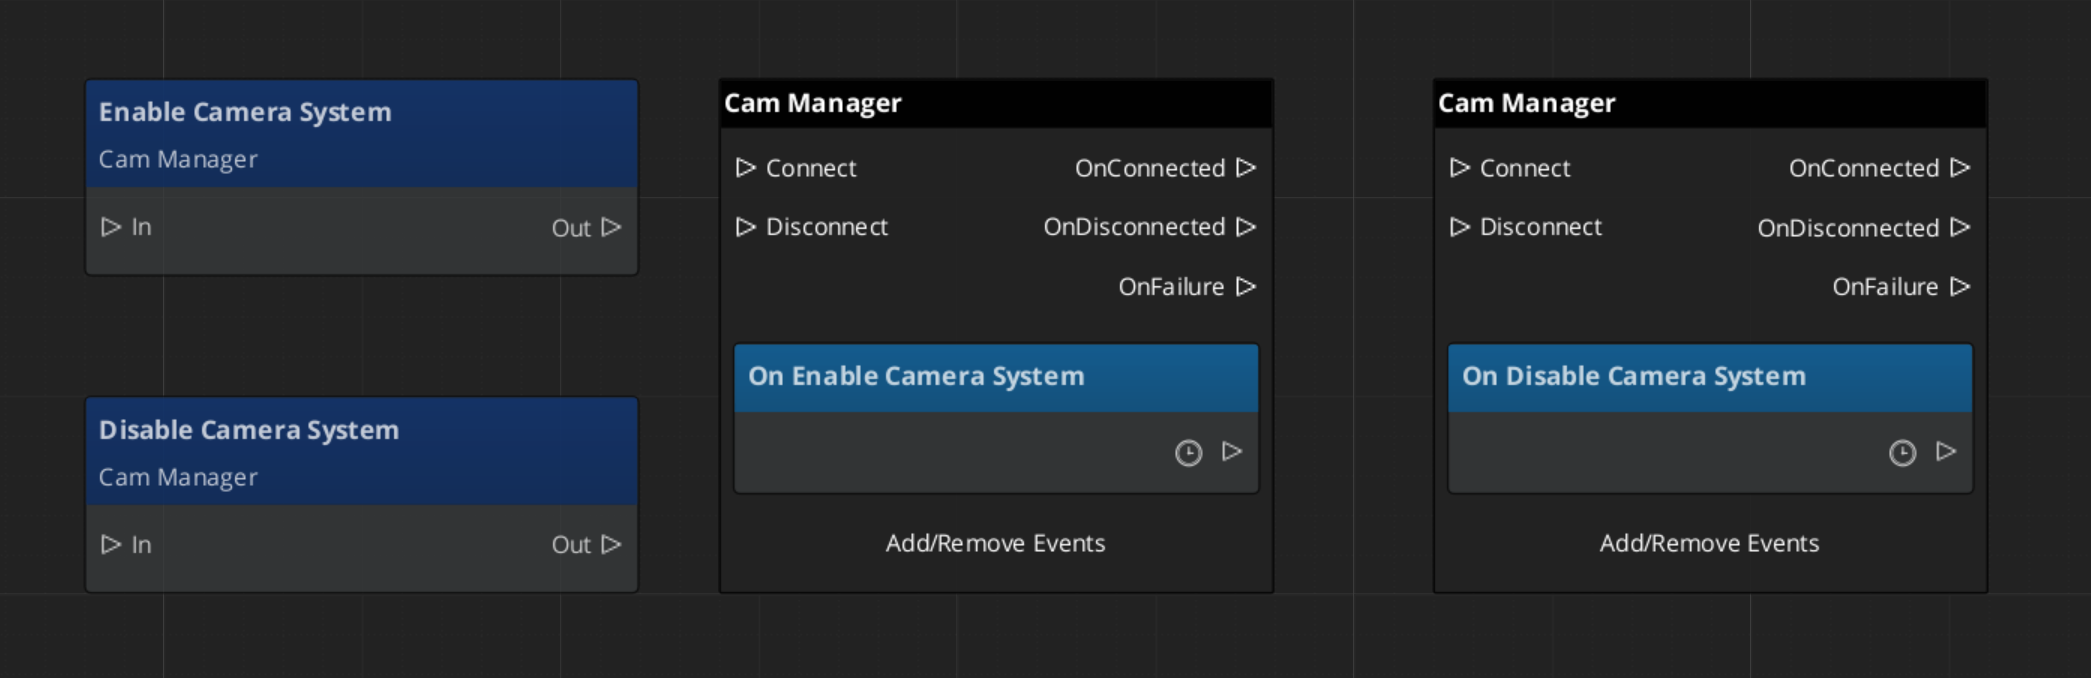
Setting the global camera target:
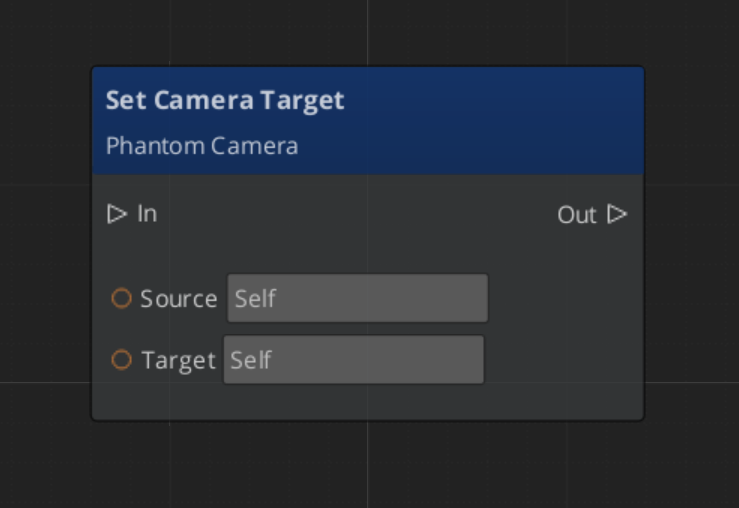
Reacting to a new dominant camera:
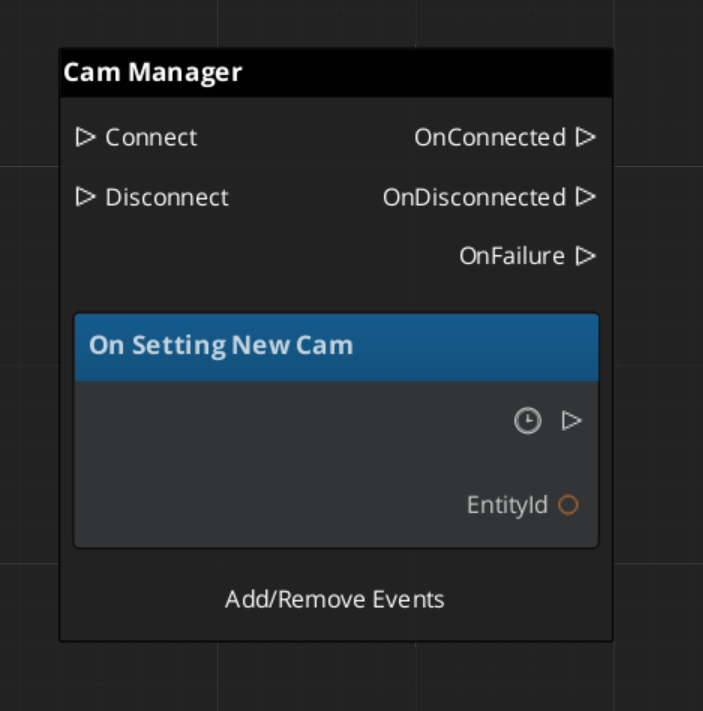
See Also
For related PhantomCam components:
For foundational systems:
For conceptual overviews and usage guides:
Get GS_PhantomCam
GS_PhantomCam — Explore this gem on the product page and add it to your project.
11.1.1 - Channels & Instancing
PhantomCam channel system — per-player viewpoint slots, scope enum, ChannelStampComponent, rig spawn lifecycle, cross-channel dispatch, active main-view selection.
A channel is one player viewpoint slot. Each channel owns its own rig (spawned from a prefab), its own Cam Core, zero or more Phantom Cameras registered to it, a bound target, and its own priority table. Channel 0 (DefaultChannelId) is the implicit default for all legacy / single-player flows.
The channel system progressively discloses across three authoring tiers — Tier 1 single-cam, Tier 2 single-player rig, Tier 3 multi-channel. The per-cam authoring surface is identical across tiers; only the Cam Manager configuration changes.
Pending — multi-view rendering (I.9b). The channel system architecturally supports per-channel render targets via AttachmentImage assets, but the Atom RPI binding has not landed yet. Until it does, the engine renders one channel at a time even when multiple are arbitrating internally. The active main-view selector decides which channel reaches the engine framebuffer; see Active Main View.
Contents
Three Authoring Tiers
The Cam Manager exposes three top-level inspector fields that control the system tier. See Cam Manager — Authoring Tiers for the full author surface.
| Tier | Master Gate | Channel Count | Use case |
|---|
| Tier 1 — Single player | m_enableInstancedChannels = false, m_primaryRigPrefab set | 1 (channel 0) | Most projects. Spawn one rig from the primary prefab. |
| Tier 2 — Single player, level-placed CamCore | m_enableInstancedChannels = false, no primary prefab | 1 (channel 0) | Legacy. Author hand-places Cam Core in the level. |
| Tier 3 — Multi-channel | m_enableInstancedChannels = true, m_channelConfigs populated | N (lobby-driven) | Split-screen, per-player rigs, cross-channel cinematic dispatch. |
The Master Gate is m_enableInstancedChannels. When OFF, channel-aware fields are hidden in the inspector and only the legacy bus signatures (SetTarget, SettingNewCam) route through. When ON, the full channel surface is live and channel-aware notifications (SettingNewCamOnChannel) replace the legacy ones.
ChannelId
using ChannelId = AZ::u32;
static constexpr ChannelId InvalidChannelId = static_cast<ChannelId>(-1);
static constexpr ChannelId DefaultChannelId = 0;
Channel ids are integers (0 … max − 1). The default channel id is 0. Legacy single-arg bus calls (SetTarget(target), RegisterPhantomCam(cam)) forward to channel 0.
Logical cam names — the entity names of phantom cameras inside a rig prefab — are scoped within their channel. The same name can appear in all four channels’ rigs without collision. Authors never type _i1 / _i2 suffixes.
Cam Channel Scope
Each Phantom Camera authors a CamChannelScope that decides how it participates in the channel system:
enum class CamChannelScope : AZ::u8 {
    Local       = 0,  // Default. Lives in its owning channel's scope.
    AllChannels = 1,  // In-rig natural duplicate — every rig instance carries one.
    TrueUnique  = 2,  // Exactly one instance total; bound or shared.
};
| Scope | Stamp-walk behavior | Use for |
|---|
Local (default) | Walks ancestors for a ChannelStampComponent. Found → registers to that channel via RegisterPhantomCamForChannel. No stamp → legacy RegisterPhantomCam (channel 0). | Cams inside a rig prefab. Each spawned rig instance hosts its own copy. |
AllChannels | Same stamp-walk as Local for the in-rig case. Out-of-rig (no stamp ancestor) warns and falls back to channel 0 (full runtime cloning is deferred). | Per-player tailored broadcast cam inside a rig prefab. |
TrueUnique | Bypasses the stamp-walk. Sub-modes via the fields below. | Hero-perspective or shared cinematic cams that need explicit binding. |
TrueUnique sub-fields (visible only when scope is TrueUnique):
| Field | Visibility | Purpose |
|---|
m_boundChannelId | Always when TrueUnique | Explicit channel binding for direct mode. |
m_allChannelsShare | When m_showAdvanced is true | Shared mode — cam appears in every active channel’s priority table. |
m_showAdvanced | When TrueUnique | Reveals advanced fields. |
Author recipes:
- Cam inside a rig prefab — leave as
Local. - Per-player tailored broadcast cam in the level —
AllChannels (in-rig); deferred for out-of-rig. - Hero-perspective cam for a specific player —
TrueUnique + m_boundChannelId = N. - Shared cinematic collapse cam —
TrueUnique + advanced + m_allChannelsShare = true. Pair with a Group Target to trigger OnAllChannelsActivatedSharedCam.
ChannelStampComponent
Pure runtime plumbing. Marks an entity (typically a rig root) with a (ChannelId, stampToken) pair. Phantom Camera and Cam Core components walk transform ancestors looking for this stamp at activate time to determine which channel they belong to.
Authored visibility: none. The stamp is reflected for serialization only — no EditContext block. The author never sees or sets it; the Cam Manager auto-attaches one during the spawn pre-insertion callback and calls StampChannel(channelId) to bump the token.
Why the token
m_stampToken bumps on every StampChannel(id) call (including idempotent re-stamps). The Cam Manager validates the supplied (channelId, token) against the live stamp on every registration call — mismatched tokens are rejected with a warning. This prevents stale messages from a previous stamp generation overwriting fresh bindings.
Buses
| Bus | Type | Purpose |
|---|
ChannelStampRequestBus | Per-entity, read-side | GetStampedChannelId, GetStampToken, IsStamped. Presence-tested via HasHandlers. |
ChannelStampNotificationBus | Per-entity, multi-handler | OnStamped(channelId, token) — every PhantomCam / CamCore beneath the stamp subscribes. |
Static helper
static AZ::EntityId ChannelStampComponent::FindStampAncestor(AZ::EntityId start);
Walks transform ancestors via the request bus and returns the closest stamped entity (or invalid id if no stamp ancestor).
Rig Prefab Resolution

Three inspector fields on the Cam Manager control where each channel’s rig comes from:
| Field | Tier | Purpose |
|---|
m_primaryRigPrefab | Always visible | The default rig. Tier 1 / 2 single-rig source. In Tier 3 it is the universal fallback for any channel whose own override is empty. |
m_channelConfigs[i].m_rigPrefab | Tier 3 (master gate ON) | Per-channel override. Inspector label: “Rig Override Prefab”. Leave empty to inherit the primary. |
m_enableInstancedChannels | Always visible | Master gate. |
The Cam Manager’s GetEffectiveRigPrefab(channelId) returns:
m_channelConfigs[channelId].m_rigPrefab if set.- Else
m_primaryRigPrefab. - Else invalid (the channel emits a warning at spawn time and stays inert).
Symmetric multi-channel co-op (all players use the same rig) sets the primary once; every channel inherits. Asymmetric setups (e.g. P1 third-person, P2 top-down) set per-channel overrides.
Spawn Pipeline
The Cam Manager spawns configured rigs on startup (driven by OnStartupComplete) and re-spawns them on stage transitions.
OnStartupComplete:
  if m_enableInstancedChannels == false:
    Tier 1: m_primaryRigPrefab valid → SpawnChannelRig(DefaultChannelId, m_primaryRigPrefab)
    Tier 2: no spawn (assumes level-placed CamCore)
  else:
    Tier 3: iterate m_channelConfigs[0 .. min(size, m_activeChannelCount)]
      for each PerChannelInstance config with m_enabledByDefault and valid prefab:
        SpawnChannelRig(channelId, GetEffectiveRigPrefab(channelId))
SpawnChannelRig uses an EntitySpawnTicket with two callbacks:
- Pre-insertion callback (entities created, not yet activated):
- Cam Manager identifies the spawn root (first entity in the spawn container).
- Attaches a
ChannelStampComponent to it. - Calls
StampChannel(channelId) — bumps the token, fires OnStamped to any subscribers.
- Completion callback (entities activated):
- Cam Manager walks activated entities into
channel.m_rigSpawnedEntities. - Marks the channel
m_active = true. - Folds any
TrueUnique-shared cams into the new channel’s priority table. - Validates that a Cam Core registered (warns if not).
- Broadcasts
ChannelSpawned(channelId, camCoreEntity). - Re-runs
EvaluatePriority(channelId) so the channel’s arbitration result reaches its Cam Core.
Stage transitions
BeginLoadStage    → DespawnAllChannelRigs (lock arbitration first)
LoadStageComplete → SpawnAllConfiguredRigs BEFORE broadcasting HandleStartup
                    so fresh-stage cams come up in the startup wave.
Stamp-Walk Registration
When a Phantom Camera (or Cam Core) activates, it walks ancestors for a ChannelStampComponent and branches:
RegisterWithCamManager:
   branch on m_channelScope (PhantomCam only — CamCore is always Local-equivalent):

   ┌── Local:
   │      stamp = FindStampAncestor(myEntity)
   │      if stamp valid:
   │         RegisterPhantomCamForChannel(myEntity, stamp, channelId, token)
   │         registrationMode = StampAware
   │      else:
   │         RegisterPhantomCam(myEntity)             // legacy channel 0
   │         registrationMode = LegacyChan0
   │
   ├── AllChannels:
   │      stamp = FindStampAncestor(myEntity)
   │      if stamp valid:
   │         RegisterPhantomCamForChannel(myEntity, stamp, channelId, token)
   │         registrationMode = StampAware
   │      else:
   │         warn (out-of-rig cloning deferred)
   │         fall back to legacy channel 0
   │         registrationMode = LegacyChan0
   │
   └── TrueUnique:
          if m_boundChannelId valid AND !m_allChannelsShare:
             RegisterPhantomCamDirect(myEntity, m_boundChannelId)
             registrationMode = Direct
          elif !m_boundChannelId AND m_allChannelsShare:
             RegisterPhantomCamShared(myEntity)
             registrationMode = (Shared, stored as Direct for unregister routing)
          else:
             warn (fragile manual-control mode)
             stay unregistered
             registrationMode = None
registrationMode is cached on the component so UnregisterFromCamManager can route symmetrically.
OnStamped — mid-session re-stamp handling
If a rig is re-stamped mid-session (rare; typically only during stage transitions or hot-reload), the cam handles it:
OnStamped(newChannelId, newToken):
   Only acts in StampAware or None modes.
   In Direct or LegacyChan0 modes, the signal is ignored — author intent
   takes precedence over stamps.

   UnregisterFromCamManager (old binding)
   m_resolvedChannelId  = newChannelId
   m_resolvedStampToken = newToken
   RegisterWithCamManager (new binding)
The Cam Core mirrors the same pattern.
Shared Cams and Collapse Detection
RegisterPhantomCamShared(cam) adds the cam to every active channel’s priority table. The Cam Manager tracks the list in m_sharedCams. A shared cam:
- Wins arbitration in every channel where it has the highest priority.
- Gains focus from any channel selecting it.
- Never DROPS focus via channel notifications — a shared cam losing in channel N doesn’t preclude winning in channel M.
Collapse detection
EvaluatePriority collects per-channel winners. If every active channel picked the same cam AND that cam is in m_sharedCams, the Cam Manager edge-triggers OnAllChannelsActivatedSharedCam(sharedCam) via m_lastSharedCollapsedCam — fires once on entry into the condition, and once on cam-A → cam-B shared-cam transitions.
Typical use case: a shared cinematic cam paired with a Group Target tracking all players. When players converge such that the shared cam wins in every channel, UI receives the collapse signal and can switch from split-screen layout to single-view layout.
No counterpart “uncollapsed” event exists — listeners dedupe locally if they care about exit.
Cross-Channel Dispatch
For cinematic / cross-channel scenarios — e.g. player 3’s wide cam should temporarily render on player 1’s Cam Core — the Cam Manager exposes a dispatch override.
| Method | Use |
|---|
FindCamForTarget(logicalName, targetEntity) | Multi-tier resolution. (1) if targetEntity is channel-bound, look up logicalName in that channel’s m_logicalToEntity. (2) Walk m_sharedCams matching by entity name. (3) Reserved for AllChannels-duplicate fallback. Returns invalid EntityId on no match. |
DispatchCamToCamCore(cam, camCoreEntity) | Force the Cam Core to render the specified cam. Persists until release. Fires OnCamCoreDispatched. |
ReleaseCamCoreDispatch(camCoreEntity) | Clear the override; re-run arbitration so the Cam Core routes back to its arbitrated winner. Fires OnCamCoreDispatchReleased. |
Channel arbitration still runs internally during dispatch. SettingNewCamOnChannel continues to fire with the arbitrated winner — only the physical Cam Core route is overridden. This means downstream listeners still see what “would have” arbitrated, useful for HUD or AI behavior that shouldn’t follow the cinematic override.
Active Main View
Wraps O3DE’s AzFramework::Camera::CameraRequests::MakeActiveView so the channel system can orchestrate “this player’s view is on main right now” without callers reaching into camera bus plumbing. Orthogonal to dispatch (what cam) and render-target binding (where pixels go).
| Method | Use |
|---|
SetActiveChannel(channelId) | Resolves the channel’s Cam Core, delegates to SetActiveCamCore. |
SetActiveCamCore(camCoreEntity) | Calls MakeActiveView. Idempotent — silently no-ops if already active. |
GetActiveChannel() | Reverse query: returns the channel owning the engine’s active camera, or InvalidChannelId if the active cam isn’t channel-bound. |
GetActiveCamCore() | Direct passthrough to the engine. |
Listeners receive OnActiveCameraChanged(channelId, camCoreEntity). channelId == InvalidChannelId when the active cam isn’t channel-bound (e.g. a direct SetActiveCamCore to an external entity). External MakeActiveView calls made outside this API are not observed — subscribe to AzFramework::Camera::CameraNotificationBus directly if you need to detect engine-level changes.
Runtime Channel API
| Method | Use |
|---|
SetActiveChannelCount(count) | Lobby-driven cap. Pre-startup only. Mid-session calls warn and are ignored — use EnableChannel / DisableChannel instead. |
GetActiveChannelCount() | Query. |
EnableChannel(channelId) | Spawn a configured channel mid-session. Validates id in bounds, not already spawned, policy is PerChannelInstance, rig prefab assigned. Fires ChannelSpawned. |
DisableChannel(channelId) | Despawn. Fires ChannelDespawned. No-op if not spawned. |
GetChannelCamCore(channelId) | Returns the bound Cam Core EntityId, invalid if no Cam Core. |
Intended lobby flow: author sets m_channelConfigs to N (primed max), pre-startup the lobby calls SetActiveChannelCount(actualPlayerCount), then OnStartupComplete spawns just actualPlayerCount rigs. Mid-session join / drop uses EnableChannel / DisableChannel.
Notifications
Channel-related events on CamManagerNotificationBus. See Cam Manager — Notifications for the full notification surface.
| Event | When |
|---|
SettingNewCamOnChannel(channelId, targetCam) | Per-channel arbitration produced a new winner. Replaces legacy SettingNewCam when instancing is ON. |
ChannelSpawned(channelId, camCoreEntity) | A configured channel finished spawning AND its Cam Core self-registered. Ready-to-render signal. |
ChannelDespawned(channelId) | Fires before entity teardown when a channel rig is despawned. |
OnAllChannelsActivatedSharedCam(sharedCam) | Edge-triggered. Every active channel simultaneously selected the same shared TrueUnique cam. |
OnCamCoreDispatched(camCoreEntity, dispatchedCam) | A cross-channel dispatch override was applied. |
OnCamCoreDispatchReleased(camCoreEntity) | Dispatch override cleared. |
OnActiveCameraChanged(channelId, camCoreEntity) | Engine main-view active camera changed via this API. |
Tier 3 Author Workflow
- On the Cam Manager: toggle
m_enableInstancedChannels = true. - Set
m_primaryRigPrefab to the project’s default rig (used as universal fallback). - Populate
m_channelConfigs with one entry per supported player slot:- Set
m_channelName for inspector readability (“P1”, “P2”, …). - Optionally set
m_rigPrefab (the “Rig Override Prefab”) — leave empty to inherit the primary. - Set
m_enabledByDefault = true for slots that should spawn on startup.
- Optionally set
m_activeChannelCount for the lobby cap, or call SetActiveChannelCount at runtime before startup. - Per-player cams placed inside the rig prefab will auto-stamp on spawn — no per-cam authoring required for normal
Local-scope cams. - For shared cinematic cams (one cam to rule them all), set the cam’s
m_channelScope = TrueUnique + m_showAdvanced = true + m_allChannelsShare = true. - For author-explicit per-channel cams (rare), use
m_channelScope = TrueUnique + m_boundChannelId = N + m_allChannelsShare = false.
For the basics-side walkthrough with screenshots and step-by-step recipes, see The Basics: Channels & Instancing.
Naming Collision Callout
Tug-field m_channels ≠ instancing ChannelId. Tug-field channels are arbitrary string tags (“Cinematic”, “Combat”) that match tug volumes to listeners — see Tug Fields. Instancing channels documented on this page are integer ChannelIds for per-player viewpoint routing. The two systems are unrelated despite the shared word. The system uses the same identifier name in the codebase for both; the docs make the distinction prominent here and in the tug-fields page.
See Also
For related PhantomCam pages:
For the basics-side walkthrough:
Get GS_PhantomCam
GS_PhantomCam — Explore this gem on the product page and add it to your project.
11.2 - Cam Core
The runtime camera driver — applies phantom camera state to the real camera with blend interpolation, mid-blend interrupt correction, state inheritance handoff, and orbital blend shapes.
The Cam Core is the runtime driver of the GS_PhantomCam system. It lives on a camera entity (the main O3DE camera entity for single-player, or a per-channel Cam Core entity for multi-channel projects) and is responsible for one job: making the engine’s camera match the dominant Phantom Camera for its channel. Every frame, the Cam Core reads the target phantom camera’s position, rotation, and field of view, then applies those values to the actual camera entity — either instantly (when locked) or through a timed blend transition.
When the Cam Manager determines a new dominant phantom camera for the Cam Core’s channel, it fires a per-channel notification and routes the new cam to the Cam Core via SetPhantomCam. The Cam Core then looks up the best matching blend in the active Blend Profile, optionally inherits state from the outgoing cam, and begins interpolating toward the new phantom camera over the specified duration, easing curve, and blend shape. If a new transition starts before the current blend completes, a small correction window pulls the new blend back from the rendered TM so the cam does not snap. Once a blend completes, the main camera locks to the phantom camera as a child entity, matching its transforms exactly until the next transition.
For usage guides and setup examples, see The Basics: GS_PhantomCam.
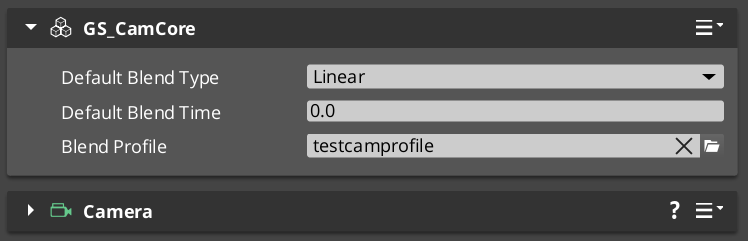
Contents
How It Works
Blend Transitions
When a camera transition is triggered:
- The Cam Core receives
SetPhantomCam(targetCam) from the Cam Manager, routed to its own entity address. - It queries the assigned Blend Profile for the best matching blend entry between the outgoing and incoming cameras (by entity name).
- The matched entry returns duration, easing curve, blend shape (Linear / Spherical / Cylindrical), an inherit-state flag, and a pivot source. If no entry matches, the Cam Core falls back to its own defaults.
- If the entry’s inherit-state is set, the state inheritance handoff runs before the blend starts so the destination cam’s body adopts a kinematic interpretation of the outgoing cam’s pose.
- The outgoing cam’s
m_blendingOut flag is set so it continues ticking through the transition (keeps the source pose live if the target is moving). - Over the blend duration, the Cam Core interpolates position (using the chosen shape), rotation (slerp), and lens (FOV / near / far) from the outgoing state to the incoming state.
- If a new blend interrupts this one, the interrupt correction window pulls the new start curve back so the cam doesn’t snap.
- On completion, the Cam Core parents the main camera to the new dominant phantom, locking them together until the next transition.
Blend Profile Resolution
The Cam Core holds a reference to a GS_PhantomCamBlendProfile asset. When a transition occurs, it calls GetBestBlend(fromCam, toCam) on the profile to find the most specific matching entry. Resolution order:
- Exact match — From camera name to To camera name.
- Any-to-specific — “Any” to the To camera name.
- Specific-to-any — From camera name to “Any”.
- Default fallback — The Cam Core’s own default blend time, easing, and shape.
See Blend Profiles for full details.
Camera Locking
Once a blend completes, the main camera becomes a child of the dominant phantom camera entity. All position, rotation, and property updates from the phantom camera are reflected immediately on the real camera. This lock persists until the next transition begins.
Blend Shape and Pivot
Each blend entry specifies a shape that controls how position interpolates:
| Shape | Behavior |
|---|
Linear | Straight-line lerp from source to destination. The default and the cheapest. No pivot used. |
Cylindrical | Sweeps through a yaw arc around a pivot, preserving the heading change as a rotation rather than a translation. Pitch and radius interpolate independently. |
Spherical | Sweeps through a great-circle arc around a pivot. Both yaw and pitch animate around the pivot, producing an orbital flight path between source and destination. |
The pivot point is resolved by the entry’s pivot source:
| Pivot source | Resolution |
|---|
Shared | Midpoint of both cams’ published pivots. Falls back gracefully if either is missing. |
Source | Outgoing cam’s pivot. Falls back to the incoming cam, then to Linear if neither publishes. |
Destination | Incoming cam’s pivot. Falls back to the outgoing cam, then to Linear. |
Cams publish their pivot as the pivotPos field on CamPoseSnapshot (see State Inheritance). Stages that don’t publish a pivot disqualify themselves from being the pivot source.
The math is implemented by the Orbital Solver Utility in GS_Core — BlendPositionAroundPivot(from, to, pivot, alpha, shape, axis).
State Inheritance Handoff
When a blend entry has m_inheritState = true, the Cam Core runs a handoff between the outgoing and incoming cams before starting the blend:
- Pull a
CamPoseSnapshot from the outgoing cam via PhantomCameraRequests::TryGetPoseSnapshot. - If the snapshot is valid, push it to the incoming cam via
PhantomCameraRequests::TryAdoptPoseSnapshot.
The Get / Adopt calls forward to the cam’s Body stage. Bodies that don’t implement the protocol return false; the handoff is a silent no-op and the blend proceeds normally.
The handoff runs before StartBlend, so by the time the blend captures source and destination poses, the destination cam’s body has already adopted the seed pose. This makes inherited blends feel like a continuation of the outgoing cam’s motion rather than a clean start.
See State Inheritance for the full protocol and per-stage adoption semantics.
Interrupt Correction
When a blend A → B is in flight and a new blend A’ → C kicks off, snapping the cam’s source TM produces a perceptible velocity jolt — the cam visibly changes direction at the interrupt moment. The Cam Core’s mid-blend correction window prevents this.
Mechanism
- Capture the cam’s currently-rendered TM at the interrupt moment →
m_interruptSnapshotTM. - Compute
T_natural = 1 - oldBlendFactor — the curve point on the new blend at which the cam’s velocity matches its current motion. - Compute
T_start = max(0, T_natural − m_interruptCorrection) — pull the new blend back by the correction window. - Seed the new blend at curve point
T_start. - Over the window
[T_start, T_natural], the rendered pose is a Y-blend between the snapshot and the new blend’s natural pose, with the Y factor sweeping 0 → 1. - After
T_natural, the Y-blend yields fully to the new blend; pure new-blend interpolation continues with live source / destination TMs.
The cam starts in the snapshot pose at the interrupt, ramps gracefully into the new trajectory across the correction window, and proceeds normally.
Window width
m_interruptCorrection is authored on the Cam Core, default 0.03 (3% of the new blend’s curve). Larger windows feel smoother but produce more visible lag in the handoff territory; smaller windows feel snappier but reintroduce the velocity jolt. Setting it to 0 degenerates to legacy hard-anchor behavior.
Channel Addressing
The Cam Core self-registers with the Cam Manager on activate. It walks transform ancestors looking for a ChannelStampComponent to determine its channel:
- Stamp found — Registers via
RegisterCamCoreToChannel(camCore, stampEntity, channelId, token). Listens at its own entity address on CamCoreRequestBus so the Cam Manager can route per-channel SetPhantomCam calls. - No stamp — Registers via the legacy
RegisterCamCore. Routes through channel 0 in single-player projects.
If the Cam Core’s parent rig is re-stamped (rare; typically during stage transitions or hot-reload), the ChannelStampNotificationBus::OnStamped handler un-registers from the old channel and re-registers to the new one. The Cam Manager’s token validation rejects mismatched stamp tokens to prevent stale messages from overwriting fresh bindings.
One Cam Core per channel. Multi-channel projects (Tier 3) spawn one per active channel; single-player projects use a single Cam Core at channel 0.
Setup
- Add GS_CamCoreComponent to a camera entity. For Tier 1 / Tier 2 (single-player), this is the main O3DE camera entity, parented under the Cam Manager entity. For Tier 3 (multi-channel), include one Cam Core per rig inside the rig prefab.
- Create a Blend Profile data asset in the Asset Editor and assign it to the Cam Core’s Blend Profile slot.
- Configure default blend time, easing, and blend shape on the Cam Core for cases where no profile entry matches. See Curves Utility for available easing types.
- Optionally adjust Interrupt Correction (default
0.03) if your project has unusually short or long blends.
API Reference
Request Bus: CamCoreRequestBus
Internal command bus, Cam Manager → Cam Core. Per-entity — each Cam Core listens at its own entity id so the Cam Manager can route per-channel events; Broadcast hits every connected Cam Core (stage-transition global clear). This is not a cross-gem contract and is not script-reflected — external systems observe the camera through the two GS_Core contracts below.
| Method | Parameters | Returns | Description |
|---|
SetPhantomCam | AZ::EntityId targetCam | void | Sets the phantom camera that the Cam Core should blend toward or lock to. Called by the Cam Manager when arbitration produces a new winner. Triggers the inheritance handoff and blend start. EntityId() clears it. |
Cross-Gem Contract: CamCoreExchangeBus
The query half of the camera’s observable-service trio, housed in GS_Core. Addressed by the Cam Core’s EntityId; single provider.
| Method | Parameters | Returns | Description |
|---|
GetCamCore | — | AZ::EntityId | Resolves the Cam Core’s entity (late-joiner / poll for the current core). Was CamCoreRequestBus::GetCamCore before the interfaces migration. |
Cross-Gem Contract: CamCoreEmissionBus
The emit half of the trio, housed in GS_Core. Global broadcast, multiple handlers — any number of components can subscribe without depending on GS_PhantomCam. Was CamCoreNotificationBus before the interfaces migration; the ScriptCanvas-facing name is preserved by GS_PhantomCam’s binder, so existing graphs keep resolving.
| Event | Parameters | Description |
|---|
UpdateCameraPosition | camPos, camFacing, deltaTime | Fired each tick with the committed camera position, forward vector, and frame delta. Subscribe to react to camera movement in real time (audio, UI, gameplay readback). |
OnCamCoreRegistered | AZ::EntityId camCore | A Cam Core came online (rig lifetime). Pair with GetCamCore to resolve it, then observe its updates. |
OnCamCoreUnregistered | AZ::EntityId camCore | A Cam Core went away. |
Inspector Fields
| Field | Default | Purpose |
|---|
defaultBlendType | CurveType::Linear | Easing curve used when no Blend Profile entry matches. |
defaultBlendTime | 1.0 | Fallback blend duration in seconds. |
defaultBlendShape | BlendShape::Linear | Fallback blend shape when no profile entry matches. |
activeBlendProfileAsset | — | The active .camblendprofile asset. |
m_interruptCorrection | 0.03 | Width of the mid-blend interrupt correction window as a fraction of the new blend’s curve. See Interrupt Correction. |
Usage Examples
C++ — Querying the Main Camera Entity
#include <GS_Core/Interfaces/Camera/CamCoreExchangeBus.h>

AZ::EntityId mainCameraId;
GS_Core::CamCoreExchangeBus::BroadcastResult(
    mainCameraId,
    &GS_Core::CamCoreExchange::GetCamCore);
For a multi-channel project, query the Cam Manager for a specific channel’s Cam Core instead:
#include <GS_PhantomCam/GS_CamManagerBus.h>

AZ::EntityId p1CamCore;
GS_PhantomCam::CamManagerRequestBus::BroadcastResult(
    p1CamCore,
    &GS_PhantomCam::CamManagerRequests::GetChannelCamCore,
    GS_PhantomCam::ChannelId(0));
C++ — Listening for Camera Updates
#include <GS_Core/Interfaces/Camera/CamCoreEmissionBus.h>

class MyCameraListener
    : public AZ::Component
    , protected GS_Core::CamCoreEmissionBus::Handler
{
protected:
    void Activate() override
    {
        GS_Core::CamCoreEmissionBus::Handler::BusConnect();
    }

    void Deactivate() override
    {
        GS_Core::CamCoreEmissionBus::Handler::BusDisconnect();
    }

    void UpdateCameraPosition(
        const AZ::Vector3& camPos,
        const AZ::Vector3& camFacing,
        float deltaTime) override
    {
        // React to per-tick camera position / facing changes.
    }
};
Script Canvas
Reacting to camera position updates:
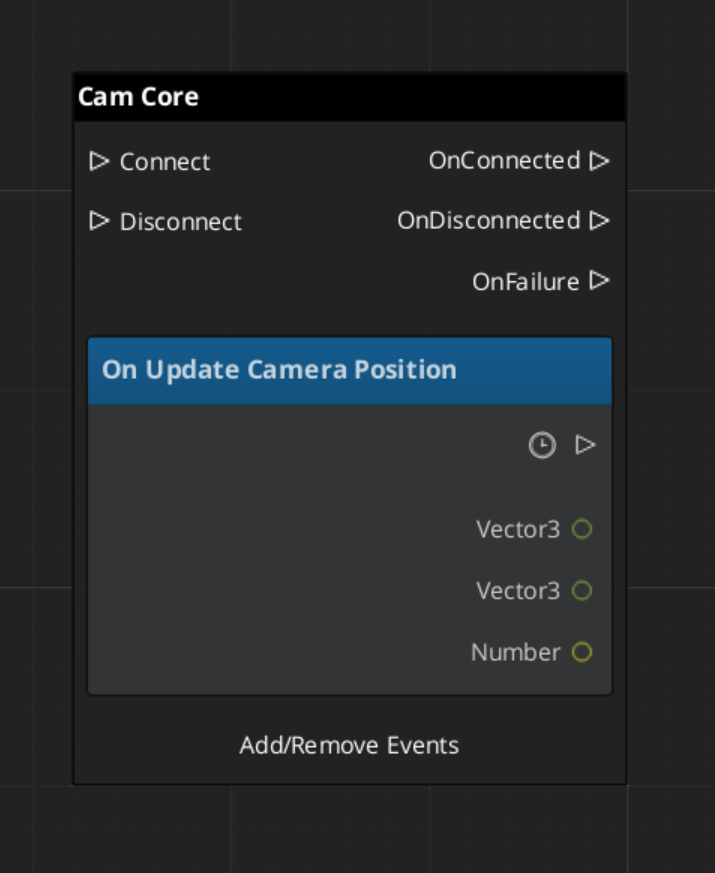
Extending the Cam Core
The Cam Core can be extended in C++ to customize blend behavior, add post-processing logic, or integrate with external camera systems.
#pragma once
#include <GS_PhantomCam/Core/GS_CamCoreBus.h>
#include <Source/Core/GS_CamCoreComponent.h>

namespace MyProject
{
    class MyCamCore : public GS_PhantomCam::GS_CamCoreComponent
    {
    public:
        AZ_COMPONENT_DECL(MyCamCore);

        static void Reflect(AZ::ReflectContext* context);
    };
}
Implementation (.cpp)
#include "MyCamCore.h"
#include <AzCore/Serialization/SerializeContext.h>

namespace MyProject
{
    AZ_COMPONENT_IMPL(MyCamCore, "MyCamCore", "{YOUR-UUID-HERE}");

    void MyCamCore::Reflect(AZ::ReflectContext* context)
    {
        if (auto serializeContext = azrtti_cast<AZ::SerializeContext*>(context))
        {
            serializeContext->Class<MyCamCore, GS_PhantomCam::GS_CamCoreComponent>()
                ->Version(0);

            if (AZ::EditContext* editContext = serializeContext->GetEditContext())
            {
                editContext->Class<MyCamCore>("My Cam Core", "Custom camera core driver")
                    ->ClassElement(AZ::Edit::ClassElements::EditorData, "")
                        ->Attribute(AZ::Edit::Attributes::Category, "MyProject")
                        ->Attribute(AZ::Edit::Attributes::AppearsInAddComponentMenu, AZ_CRC_CE("Game"));
            }
        }
    }
}
See Also
For related PhantomCam components:
For utilities used by the blend math:
For conceptual overviews and usage guides:
Get GS_PhantomCam
GS_PhantomCam — Explore this gem on the product page and add it to your project.
11.2.1 - Blend Profiles
Data assets defining camera transition behavior — blend duration, easing curves, blend shape, pivot source, and state inheritance per camera pair.
Blend Profiles are data assets that control how the Cam Core transitions between Phantom Cameras. Each profile contains a list of blend entries. Each entry defines a From camera, a To camera, a blend duration, an easing curve, a blend shape, a pivot source, and an inherit-state flag. This allows every camera-to-camera transition in your project to have unique timing, feel, and geometry.
The GS_PhantomCamBlendProfile asset is authored in the Asset Editor as a .camblendprofile file. It is registered at startup by PhantomCamDataAssetsSystemComponent and assigned to the Cam Core component. When a camera transition occurs, the Cam Core queries the profile for the best matching blend entry.
For usage guides and setup examples, see The Basics: GS_PhantomCam.
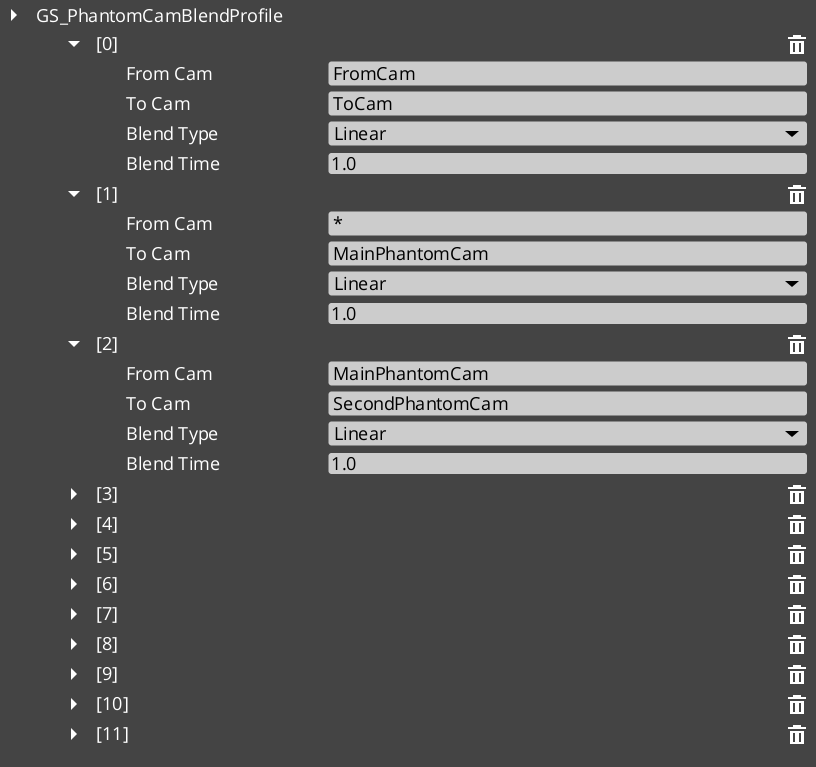
Contents
How It Works
Blend Entries
Each entry in a Blend Profile defines a single transition rule:
- From Camera — The name of the outgoing camera (the entity name of the phantom camera being left).
- To Camera — The name of the incoming camera (the entity name of the phantom camera being transitioned to).
- Blend Time — The duration of the transition in seconds.
- Blend Type — The interpolation curve applied during the blend. See Curves Utility for the full list.
- Blend Shape — Linear, Cylindrical, or Spherical. See Blend Shape.
- Pivot Source — Source, Destination, or Shared. See Pivot Source. Only consulted when blend shape is not Linear.
- Inherit State — Opt-in cam-to-cam pose handoff. See Inherit State.
Camera names correspond to the entity names of your phantom camera entities in the scene.
Best Target Blend
When the Cam Core needs to transition, it calls GetBestBlend(fromCam, toCam) on the assigned Blend Profile. The system evaluates blend entries in order of specificity:
- Exact match — An entry with both the From and To camera names matching exactly.
- Any-to-specific — An entry with From set to blank or “any” and To matching the incoming camera name.
- Specific-to-any — An entry with From matching the outgoing camera name and To set to blank or “any”.
- Default fallback — If no entry matches, the Cam Core uses its own default blend time, easing, and shape configured on the component.
This layered resolution allows you to define broad defaults (“any” to “any” at 1.0 seconds) while overriding specific transitions (“MenuCam” to “GameplayCam” at 2.5 seconds with ease-in-out and a spherical sweep).
The first match within a specificity tier wins (no further tie-breaking).
Blend Shape
The blend shape controls how the camera’s position interpolates between source and destination. Defaults to Linear so unconfigured / pre-v3 assets retain straight-lerp behavior.
| Shape | Behavior |
|---|
Linear | Straight world-space lerp. No orbital math. The default. |
Cylindrical | Arc around the resolved pivot on the yaw axis. Pitch and radius interpolate independently. Right for ground cams sharing a target. |
Spherical | Full 3D arc around the resolved pivot. Right when source and destination cams sit at different heights around a shared target. |
When the shape is not Linear, the Cam Core calls the Orbital Solver Utility — BlendPositionAroundPivot(from, to, pivot, alpha, shape, axis) — to compute each tick’s position.
Auto-fallback to Linear. When neither cam reports a pivot (e.g. environmental cams without follow / lookAt targets), the orbital solver isn’t called and the blend lerps straight regardless of the authored shape.
Rotation always slerps; the shape only affects position.
Pivot Source
The pivot is the world-space point that Cylindrical / Spherical shapes arc around. It is resolved at blend start from the cams’ pivots. The pivot source selects which cam’s pivot to use:
| Pivot Source | Behavior |
|---|
Source | Outgoing cam’s pivot. “Leave A elegantly” — the source cam’s framing reference defines the arc. |
Destination | Incoming cam’s pivot. “Arrive at B elegantly” — the destination’s framing reference defines the arc. |
Shared (default) | Midpoint of both pivots. Collapses identically when both cams target the same point. |
Pivots come from the cams’ bodies via GetCameraPivot. A cam that doesn’t publish a pivot disqualifies itself from being the pivot source; Cam Core falls back to whichever cam does publish one, or to Linear if neither does.
This field is ignored when Blend Shape is Linear.
Inherit State
Setting Inherit State opts the matched pair into the state inheritance protocol. When the Cam Core is about to start this blend, it:
- Calls
TryGetPoseSnapshot on the outgoing cam — the body publishes a CamPoseSnapshot. - Calls
TryAdoptPoseSnapshot on the incoming cam — the body consumes the snapshot, re-deriving its internal kinematic state to start from a continuation of the outgoing pose. - Bodies that don’t speak the protocol silently no-op and the blend proceeds without inheritance.
The blend then runs from the source cam’s pose to the destination cam’s already-inherited pose — reads as a small smooth drift rather than a swing.
Default is false so cinematic shots authored at specific poses land at those poses unless the author opts in.
Authoring gotcha. If the inherit flag is unchecked on a matched pair, the destination cam falls through to its snap-on-activation seed. For a LeadingFollowBody this looks like “cam orients behind player’s travel direction regardless of source facing.” For DynamicOrbitBody or OrbitBody the cam swings to authored yaw / pitch and blends from there. Both symptoms point at the same root cause — verify the flag in the asset.
Data Model
GS_PhantomCamBlendProfile
The top-level asset class. Extends AZ::Data::AssetData. Registered through PhantomCamDataAssetsSystemComponent. Authored as .camblendprofile.
| Field | Type | Description |
|---|
BlendList | AZStd::vector<PhantomBlend> | The list of blend entries defining camera transitions. |
PhantomBlend
A single blend entry within the profile. Reflected at Version 4 with a version converter that defaults Blend Shape / Pivot Source to Linear / Shared (pre-v3 assets) and Inherit State to false (pre-v4 assets).
| Field | Type | Default | Description |
|---|
FromCamera | AZStd::string | "" | Entity name of the outgoing phantom camera. Blank or “any” matches all outgoing cameras. |
ToCamera | AZStd::string | "" | Entity name of the incoming phantom camera. Blank or “any” matches all incoming cameras. |
BlendTime | float | 1.0 | Duration of the blend transition in seconds. |
BlendType | GS_Core::CurveType | Linear | The easing curve. See Curves Utility for the full enum. |
BlendShape | GS_Core::Math::BlendShape | Linear | Path geometry — Linear / Cylindrical / Spherical. See Blend Shape. |
PivotSource | GS_Core::Math::PivotSource | Shared | Which cam’s pivot to use — Source / Destination / Shared. See Pivot Source. |
InheritState | bool | false | Opt-in cam-to-cam pose handoff. See Inherit State. |
API Reference
GS_PhantomCamBlendProfile Methods
| Method | Parameters | Returns | Description |
|---|
GetBestBlend | AZStd::string fromCam, AZStd::string toCam | const PhantomBlend* | Returns the best matching blend entry for the given camera pair, or nullptr if no match is found. Resolution follows the specificity hierarchy. |
Creating a Blend Profile
- Open the Asset Editor in O3DE.
- Select New and choose GS_PhantomCamBlendProfile from the asset type list.
- Add blend entries using the + button on the Blend List array.
- For each entry:
- Set the From Camera name (or leave blank for “any”).
- Set the To Camera name (or leave blank for “any”).
- Set the Blend Time in seconds.
- Choose a Blend Type (easing curve) from the dropdown.
- Choose a Blend Shape (Linear / Cylindrical / Spherical).
- Choose a Pivot Source (Source / Destination / Shared) — ignored when Blend Shape is Linear.
- Tick Inherit State if you want the incoming cam’s body to seed from the outgoing cam’s pose.
- Save the asset.
- Assign the asset to the Cam Core component’s Blend Profile inspector slot.
For a full walkthrough, see the PhantomCam Set Up Guide.
See Also
For related PhantomCam components:
For related utilities:
For conceptual overviews and usage guides:
Get GS_PhantomCam
GS_PhantomCam — Explore this gem on the product page and add it to your project.
11.2.2 - State Inheritance
PhantomCam cam-to-cam pose handoff protocol — CamPoseSnapshot universal trait, m_inheritState blend toggle, per-body-stage Get/Adopt implementations, ANGULAR vs POSITION mode, consumedAdoption gate.
State inheritance is a universal pose-handoff protocol: when the Cam Core transitions cam A → cam B, the matched Blend Profile entry may opt into inheritance via the InheritState flag. The outgoing cam publishes a CamPoseSnapshot; the incoming cam consumes it through its own kinematic model. The blend then reads as a small smooth drift instead of a swing.
Inheritance is body-only by design. Aim and additive stages don’t participate — the destination cam’s aim runs fresh on the inherited body pose.
Contents
The CamPoseSnapshot Trait
Universal pose-handoff struct. Runtime only — not serialized.
struct CamPoseSnapshot
{
    // Universal — every cam can produce this from its committed transform.
    AZ::Vector3  worldPos = Vector3::Zero();
    AZ::Vector3  worldFwd = Vector3::AxisY();

    // Source cam's resolved pivot in world space at the time of Get.
    // Orbit-style adopters use this to back-derive angular state in the
    // SOURCE cam's frame — preserves orientation even when the incoming
    // cam resolves a different pivot.
    AZ::Vector3  pivotPos      = Vector3::Zero();
    bool         pivotPosValid = false;

    AZ::EntityId pivotEntity;

    // Orbit-specific authored angular state. Populated by orbit-style Get
    // implementations; consumed by orbit-style Adopters directly, bypassing
    // back-derivation. Preserves A's exact yaw / pitch on B across different
    // orbit shapes — angular continuity wins over spatial back-fit.
    float        yawRad             = 0.0f;
    float        pitchRad           = 0.0f;
    bool         angularStateValid  = false;

    // Producer signal — set by TryGetPoseSnapshot when the snapshot is usable.
    bool         valid = false;

    static void Reflect(AZ::ReflectContext* context);
};
A snapshot may carry partial information. worldPos + worldFwd are always populated when valid is true. pivotPos is populated by bodies that publish a pivot (orbit-style, lead-follow). angularStateValid is set only by orbit-style bodies that publish authored yaw / pitch directly.
Opting In — The Blend Profile Toggle
Authored per-pair on PhantomBlend entries inside a .camblendprofile:
struct PhantomBlend {
    // ... other fields ...
    bool m_inheritState = false;
};
Default false so cinematic shots authored at specific poses land at those poses unless the author opts in. See Blend Profiles — Inherit State for the authoring surface.
The IBodyStage Virtuals
class IBodyStage {
public:
    // ... other interface ...

    // Default returns false — stage doesn't speak the protocol.
    virtual bool TryGetPoseSnapshot(CamPoseSnapshot& out)        const { return false; }
    virtual bool TryAdoptPoseSnapshot(const CamPoseSnapshot& in)       { return false; }
};
A body stage may implement only one side of the protocol. Static-shot bodies (OrbitBody) implement Get but leave Adopt at default false — their authored angles define their identity. Other body stages typically implement both.
Forwarders on the Phantom Camera
The component forwards both calls to the body slot:
bool GS_PhantomCameraComponent::TryGetPoseSnapshot(CamPoseSnapshot& out) const {
    if (IBodyStage* body = GetBody()) {
        return body->TryGetPoseSnapshot(out);
    }
    return false;
}

bool GS_PhantomCameraComponent::TryAdoptPoseSnapshot(const CamPoseSnapshot& in) {
    if (IBodyStage* body = GetBody()) {
        return body->TryAdoptPoseSnapshot(in);
    }
    return false;
}
Exposed on PhantomCameraRequestBus so the Cam Core can address cams uniformly.
Cam Core Handoff Site
Inside SetPhantomCam, after lastCam / currentCam are determined and before StartBlend:
const bool wantInherit = (bestBlend && bestBlend->m_inheritState
                          && lastCam.IsValid() && currentCam.IsValid());

if (wantInherit)
{
    CamPoseSnapshot snap;
    bool gotPose = false;
    PhantomCameraRequestBus::EventResult(gotPose, lastCam,
        &PhantomCameraRequests::TryGetPoseSnapshot, snap);

    if (gotPose && snap.valid)
    {
        bool adopted = false;
        PhantomCameraRequestBus::EventResult(adopted, currentCam,
            &PhantomCameraRequests::TryAdoptPoseSnapshot, snap);
        (void)adopted;
    }
}

// ... then StartBlend.
The handoff runs before StartBlend, so by the time the blend captures source and destination poses, the destination cam’s body has already adopted the seed pose. The blend then interpolates from the source’s literal position to the destination’s already-inherited pose.
Bodies that don’t speak the protocol (or that reject the inbound pose) return false; the handoff is silent and the blend proceeds normally.
Per-Variant Implementations
DefaultFollowBody
| Side | Behavior |
|---|
Get | Not implemented (default false). |
Adopt | Not implemented (default false). |
Inheritance into a Default Follow falls through to the Blend Profile’s visual bridge.
OrbitBody (Get-only)
| Side | Behavior |
|---|
Get | Publishes the cleanest snapshot in the framework. worldPos = m_idealPosition, worldFwd toward cached pivot, pivotPos = m_lastPivot (post-offset target, pre-orbit), AND direct authored yawRad / pitchRad + angularStateValid = true. Orbit-style adopters receive ANGULAR-mode handoff with no back-derivation. |
Adopt | Disabled (default false). The authored yaw / pitch define the static shot’s identity; accepting inbound pose would defeat author intent. |
DynamicOrbitBody (full Get + Adopt)
Get:
out.worldPos          = m_idealPosition;
out.worldFwd          = (m_lastResolvedPivot - m_idealPosition).GetNormalizedSafe();
out.pivotPos          = m_lastResolvedPivot;
out.pivotPosValid     = true;
out.pivotEntity       = m_lastResolvedPivotEntity;
out.yawRad            = m_targetYaw;
out.pitchRad          = m_targetPitch;
out.angularStateValid = true;
out.valid             = true;
return true;
Requires a committed pose AND a cached pivot. First-tick adopters that haven’t ticked yet return false.
Adopt stashes the snapshot. The actual derivation happens in the next Evaluate where pivot resolution has run:
if (m_hasPendingAdoption && m_orbitShape.Get())
{
    if (m_pendingAdoption.angularStateValid)
    {
        // ANGULAR mode (preferred). Inherit raw yaw / pitch directly.
        m_targetYaw   = WrapYawToPi(
            ShortestYawTarget(m_targetYaw, m_pendingAdoption.yawRad));
        m_targetPitch = AZ::GetClamp(m_pendingAdoption.pitchRad,
                                     CameraOrbitShape::kPitchAtLow,
                                     CameraOrbitShape::kPitchAtHigh);
    }
    else
    {
        // POSITION mode (fallback). Back-derive yaw from worldPos.
        const AZ::Vector3 referencePivot = m_pendingAdoption.pivotPosValid
            ? m_pendingAdoption.pivotPos
            : pivot;
        const AZ::Vector3 off = m_pendingAdoption.worldPos - referencePivot;

        const float yawObserved    = std::atan2(off.GetY(), off.GetX());
        const float radiusObserved = std::sqrt(off.GetX()*off.GetX() + off.GetY()*off.GetY());
        const float heightObserved = off.GetZ();

        m_targetYaw   = WrapYawToPi(ShortestYawTarget(m_targetYaw, yawObserved));
        m_targetPitch = FindPitchOnShape(*m_orbitShape.Get(), radiusObserved, heightObserved);
    }

    m_idealPosition       = m_pendingAdoption.worldPos;   // seed at adopted pose
    m_hasIdeal            = true;
    consumedAdoption      = true;
    m_hasPendingAdoption  = false;
}
The ANGULAR path is preferred — it preserves authored angular state across different orbit shape assets, which the position back-derivation cannot. The POSITION path is the safety net for source bodies that don’t publish angular state.
LeadingFollowBody (facing-seeded standoff)
Get returns m_idealPosition, world-forward toward cached target, pivotPos = m_lastTargetPoint. No angular state — lead-follow has no degree of freedom other than position-in-band.
Adopt stashes the snapshot. The consume block in Evaluate reads source worldFwd, flattens to the XY plane, and seeds the cam at band-natural standoff distance:
AZ::Vector3 inboundFwd = m_pendingAdoption.worldFwd;
inboundFwd.SetZ(0.0f);
inboundFwd = inboundFwd.GetNormalizedSafe();
if (inboundFwd.GetLengthSq() < epsilon)
    inboundFwd = GetHorizontalForward(stageTargetTM);   // fallback

const float seedDist = AZ::Lerp(m_innerRadius, m_outerRadius, 0.6f);
m_idealPosition = targetPoint - inboundFwd * seedDist;

m_hasIdeal           = true;
m_idleTimer          = 0.0f;
m_hasLastTarget      = true;
consumedAdoption     = true;
m_hasPendingAdoption = false;
Why facing-seeded, not position-seeded? Lead-follow is heading-agnostic. Seeding with the source’s literal worldPos would lock the cam at an off-band angle, defeating the body’s authored intent. The cam inherits the source’s facing at this body’s preferred standoff. Z naturally lands at targetPoint.Z (inboundFwd is XY-flattened) — a from-below source produces a band-natural pose, not stuck-below framing.
TrackBody (path-projection with threshold)
Get returns m_idealPosition plus world-forward toward cached target. No angular state, no pivot — the path is the kinematic reference, not a point.
Adopt stashes. The consume block projects the source’s position onto the spline and rejects when the source sits too far from the path:
EnsureSplineResolved();
if (!m_spline) { m_hasPendingAdoption = false; return; }

AZ::Vector3 nearestWorld;
const float dist = m_spline->FindClosestWorldPoint(
    m_pendingAdoption.worldPos, nearestWorld, /*outT*/);

if (dist > m_adoptionPathThreshold)
{
    // Source sits too far from path — reject, fall back to plain blend.
    m_hasPendingAdoption = false;
    return;
}

m_idealPosition  = m_pendingAdoption.worldPos;
m_springVelocity = AZ::Vector3::CreateZero();
m_hasIdeal       = true;
consumedAdoption = true;
m_hasPendingAdoption = false;
m_adoptionPathThreshold is authored on the TrackBody (default 5.0 m). Prevents teleport-snap when the source cam sits well off the dolly’s path.
The consumedAdoption Gate
Problem: With ctx.snapThisFrame = true on activation, every body’s damping clause snap-clobbers m_idealPosition = desiredPos, discarding the adoption seed. Symptom: cam jerks to its natural ideal then blends from there.
Fix: The snap-on-activation block in every body is gated on !consumedAdoption:
if ((ctx.snapThisFrame || !m_hasIdeal) && !consumedAdoption)
{
    // Snap-seed path. Skipped when adoption already placed m_idealPosition.
}
Adoption-tick uses standard damping from the adopted seed, not snap-seed. When inheritance fires, the seed pose is preserved through the activation tick.
Authoring Gotcha — Matched but Not Inheriting
If m_inheritState is unchecked on a matched blend pair, the destination cam falls through to its snap-on-activation seed instead of consuming the source’s pose. Symptoms vary by body type but all point to the same root cause:
| Body | Symptom |
|---|
LeadingFollowBody | “Cam orients behind player’s travel direction regardless of source facing.” The snap block uses GetHorizontalForward(stageTargetTM) = target’s BasisY. |
DynamicOrbitBody / OrbitBody | Cam swings to authored yaw / pitch then blends from there. |
TrackBody | Dolly starts at its untouched starting spline parameter. |
The fix is data-side: check the Inherit State flag on the matched blend entry inside the .camblendprofile asset.
If diagnostic prints are added during debugging, the smoking gun looks like:
Handoff: from=OrbitCam to=LeadCam inherit=0 (matched=1)
matched = 1, inherit = 0 means the blend pair IS in the asset, but m_inheritState is unchecked on it.
Adoption Coverage Matrix
| Body Variant | Get | Adopt | Source publishes |
|---|
DefaultFollowBody | — | — | — |
OrbitBody (static) | ✓ | — (Get-only) | worldPos, worldFwd, pivotPos, full angular |
DynamicOrbitBody | ✓ | ✓ (ANGULAR / POSITION) | worldPos, worldFwd, pivotPos, full angular |
LeadingFollowBody | ✓ | ✓ (facing-seeded standoff) | worldPos, worldFwd, pivotPos (= target), no angular |
TrackBody | ✓ | ✓ (path-project + threshold) | worldPos, worldFwd, no angular, no pivot |
See Also
Related PhantomCam pages:
Basics-side authoring guide:
Get GS_PhantomCam
GS_PhantomCam — Explore this gem on the product page and add it to your project.
11.2.3 - Interrupt Blending
Mid-blend interrupt correction window — m_interruptCorrection, T_start / T_natural derivation, snapshot Y-blend. Prevents velocity discontinuities when a new blend starts before the current one finishes.
When a blend A → B is in flight and a new blend A’ → C kicks off, snapping the cam’s source pose produces a perceptible velocity jolt — the cam visibly changes direction at the interrupt moment. The Cam Core’s mid-blend correction window prevents this by seeding the new blend at a velocity-matched curve point and Y-blending between the snapshot pose and the new blend’s natural pose across a small window.
This replaces the legacy BlendFromCore hard-anchor approach, which produced a velocity-zero discontinuity at every interrupt.
Contents
The Problem
Consider a blend A → B running at 50% progress. A new winner C is arbitrated; the system needs a new blend A’ → C. Two naive approaches both fail:
| Approach | Behavior | Failure |
|---|
| Snap to mid-blend pose, start new blend from there | Source pose = currently-rendered TM | The new blend’s start velocity is whatever its curve dictates at t=0 (often zero) — does not match the cam’s current motion vector. Visible direction change at interrupt. |
| Hard-anchor the snapshot as the new blend’s source for the entire duration | Source TM frozen at interrupt | The cam’s velocity drops to zero at t=0 of the new blend — instant velocity discontinuity. |
The legacy BlendFromCore flag implemented the second approach. The new correction window replaces it.
The Mechanism
The Cam Core introduces a small correction window at the start of the new blend during which the rendered TM is a Y-blend between the snapshot pose and the new blend’s natural pose. After the window, pure new blend with live source / destination TMs.
Step by step
- Capture the cam’s currently-rendered TM at the interrupt moment →
m_interruptSnapshotTM. - Compute
oldBlendFactor = oldCurTime / oldTargetTime (how far through the OLD blend we were). - Compute
T_natural = 1 − oldBlendFactor — the curve point on the new blend at which the cam’s velocity matches its current motion. - Compute
T_start = max(0, T_natural − m_interruptCorrection) — pull the new blend back by the configurable window width. - Seed
curBlendTime = T_start * blendTime so the new blend starts at curve-point T_start. - Over the window
[T_start, T_natural], the rendered pose is a Y-blend between m_interruptSnapshotTM and the new blend’s natural pose at the current curve point. The Y-factor sweeps 0 → 1 across the window. - After
T_natural, the Y-blend yields fully to the new blend; pure new-blend interpolation continues with live source / destination TMs.
Net effect: the rendered cam starts in the snapshot pose at the interrupt, ramps gracefully into the new blend’s natural trajectory across the correction window, and proceeds normally.
Window Width
m_interruptCorrection is authored on the Cam Core, default 0.03 (3% of the new blend’s curve duration). The tradeoff:
| Setting | Behavior |
|---|
| Larger window (e.g. 0.08) | Smoother handoff, but the cam is “stuck” in snapshot territory for longer — can feel like lag. |
| Smaller window (e.g. 0.01) | Quicker handoff, less smoothness. |
| 0 | Degenerates to legacy hard-anchor behavior with the perceptible jolt. |
3% is a balance that’s invisibly smooth for typical blend durations (~1s → 30ms correction window).
Edge Cases
Old blend nearly complete
If oldBlendFactor is close to 1 (the old blend was almost done), T_natural ≈ 0 and T_start ≈ −m_interruptCorrection. The window may compress to nothing — T_start clamps at 0:
T_start = max(0.0, T_natural - m_interruptCorrection);
When clamped, the new blend effectively starts from its natural beginning. The cam may still have a small handoff jolt because the correction can’t pull back further.
Old blend just started
If oldBlendFactor is close to 0 (old blend barely started), T_natural ≈ 1 and T_start ≈ 1 − m_interruptCorrection. Most of the new blend happens in pure new mode after a brief correction window. The snapshot influence is short-lived.
Non-blending interrupt (cold start of new blend)
If IsBlending == false when StartBlend is called, no interrupt — set m_inCorrectionWindow = false and run the new blend normally.
Cam Core State
class GS_CamCoreComponent {
    // ...
    float          m_interruptCorrection = 0.03f;     // authored

    bool           m_inCorrectionWindow   = false;
    float          m_correctionStart      = 0.0f;     // blendFactor where window begins
    float          m_correctionEnd        = 0.0f;     // blendFactor where window ends (= T_natural)
    AZ::Transform  m_interruptSnapshotTM  = AZ::Transform::CreateIdentity();
};
StartBlend Detection
void GS_CamCoreComponent::StartBlend(
    float blendTime,
    GS_Core::CurveType blendType,
    GS_Core::Math::BlendShape blendShape,
    GS_Core::Math::PivotSource pivotSource)
{
    if (IsBlending)
    {
        // Mid-blend interrupt.
        const float oldBlendFactor = curBlendTime / targetBlendTime;
        const float T_natural      = 1.0f - oldBlendFactor;
        const float T_start        = AZ::GetMax(0.0f, T_natural - m_interruptCorrection);

        // Snapshot current rendered TM.
        AZ::TransformBus::EventResult(m_interruptSnapshotTM, m_entityId,
            &AZ::TransformInterface::GetWorldTM);

        m_inCorrectionWindow = true;
        m_correctionStart    = T_start;
        m_correctionEnd      = T_natural;

        // Seed new blend's curve position so velocity matches.
        curBlendTime = T_start * blendTime;
    }
    else
    {
        // Cold start.
        m_inCorrectionWindow = false;
        curBlendTime = 0.0f;
    }

    // Capture source / dest poses, blend params.
    prevTransform      = ... ;          // cam's current world TM at this moment
    targetBlendTime    = blendTime;
    currentBlendType   = blendType;
    currentBlendShape  = blendShape;
    currentPivotSource = pivotSource;
    IsBlending         = true;
}
OnTick Application
void GS_CamCoreComponent::OnTick(float deltaTime, AZ::ScriptTimePoint)
{
    if (!IsBlending)
    {
        // Locked phase — read currentCam's TM, write it directly.
        return;
    }

    curBlendTime += deltaTime;
    const float blendFactor = AZ::GetMin(1.0f, curBlendTime / targetBlendTime);
    const float easedFactor = ApplyCurve(blendFactor, currentBlendType);

    // Compute the "natural" blended pose for this curve point.
    AZ::Vector3 blendedPos;
    if (currentBlendShape == BlendShape::Linear)
    {
        blendedPos = AZ::Vector3::Lerp(
            prevTransform.GetTranslation(),
            currentTM.GetTranslation(),
            easedFactor);
    }
    else
    {
        AZ::Vector3 pivot = ResolvePivot(currentPivotSource, lastCam, currentCam);
        blendedPos = GS_Core::Math::BlendPositionAroundPivot(
            prevTransform.GetTranslation(),
            currentTM.GetTranslation(),
            pivot, easedFactor, currentBlendShape, AZ::Vector3::CreateAxisZ());
    }
    AZ::Quaternion blendedRot = prevTransform.GetRotation().Slerp(
        currentTM.GetRotation(), easedFactor);

    AZ::Vector3    appliedPos;
    AZ::Quaternion appliedRot;

    if (m_inCorrectionWindow && blendFactor < m_correctionEnd)
    {
        // Y-blend the snapshot with the natural pose.
        float yFactor = (blendFactor - m_correctionStart) / m_interruptCorrection;
        yFactor = AZ::GetClamp(yFactor, 0.0f, 1.0f);

        appliedPos = AZ::Vector3::Lerp(
            m_interruptSnapshotTM.GetTranslation(), blendedPos, yFactor);
        appliedRot = m_interruptSnapshotTM.GetRotation().Slerp(blendedRot, yFactor);
    }
    else
    {
        // Past the correction window — pure new blend.
        appliedPos = blendedPos;
        appliedRot = blendedRot;
    }

    // Write final TM. Apply lens interpolation similarly.
    AZ::TransformBus::Event(m_entityId,
        &AZ::TransformInterface::SetWorldTranslation, appliedPos);
    AZ::TransformBus::Event(m_entityId,
        &AZ::TransformInterface::SetWorldRotationQuaternion, appliedRot);

    if (blendFactor >= 1.0f)
    {
        CompleteBlend();
    }
}
Inspector Field
| Field | Default | Purpose |
|---|
m_interruptCorrection | 0.03 | Fraction of the new blend’s curve over which the cam’s snapshot pose at interrupt blends to the new blend’s natural pose. Smaller = snappier interrupts but more visible jolts. 0 = legacy hard-anchor. |
What This Replaces
Pre-correction, the system used a BlendFromCore flag on the Cam Core. When set, the blend’s source pose was hard-anchored to the cam’s currently-rendered TM at the interrupt moment, for the entire duration of the new blend. The new blend’s velocity at t = 0 was therefore zero — an instant velocity discontinuity at the interrupt point.
The correction-window approach replaces this entirely. BlendFromCore is retained as a field on the Cam Core for back-compat but is not used in the new flow.
See Also
Related PhantomCam pages:
Get GS_PhantomCam
GS_PhantomCam — Explore this gem on the product page and add it to your project.
11.3 - Phantom Cameras
The base virtual camera component — priority, target routing, lens, channel scope, snap and focus state, and the composable Body / Aim / Additive stage pipeline.
A Phantom Camera is a single entity component — GS_PhantomCameraComponent — that publishes a candidate camera pose every tick. It holds priority, target routing, lens, channel scope, and snap / focus / blendingOut state, plus the stage pipeline slot that authors fill in to give the cam its behavior. Phantom cameras do not render anything themselves; they register with the Cam Manager and the Cam Core drives the engine view toward whichever phantom currently wins arbitration.
Where previous versions of GS_PhantomCam shipped separate components for each behavior (clamped-look, static-orbit, spline tracking, etc.), all of those behaviors now live as stage variants on the single base component. An author picks a Body stage, an Aim stage, and zero-or-more Additive stages from the type-picker, and the same GS_PhantomCameraComponent becomes a follow cam, an orbital cam, a tracking dolly, a third-person shoulder cam, or a cinematic stinger depending on which stages are slotted.
For usage guides and setup examples, see The Basics: GS_PhantomCam.
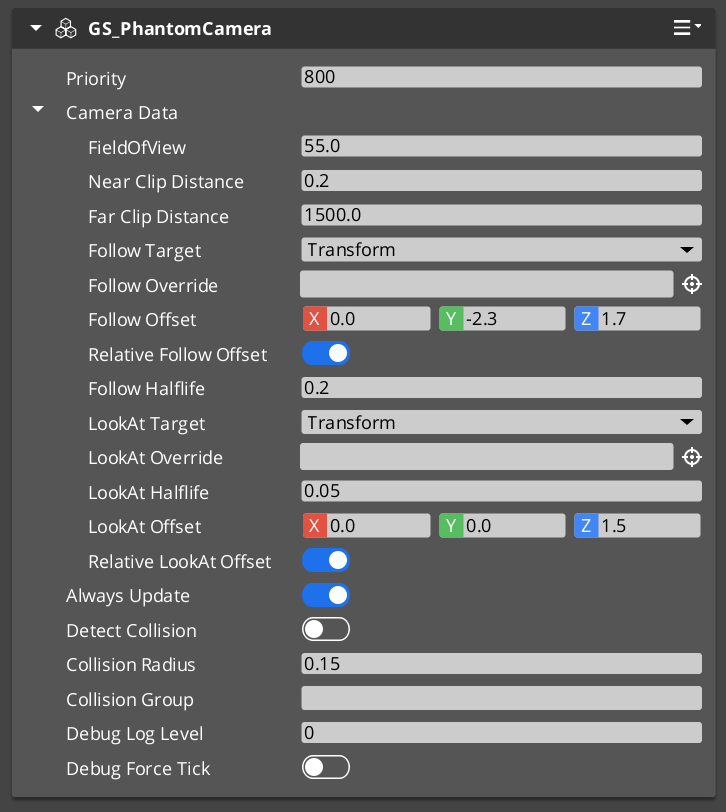
The Phantom Camera component in the Entity Inspector.
Contents
How It Works
Priority-Based Selection
Every phantom camera has a base priority. The camera with the highest effective priority (base plus any active influences) wins arbitration within its channel. You can control which camera wins through several strategies:
- Raise priority — Set the desired camera’s priority above all others via
SetCameraPriority. - Disable / Enable — Call
DisableCamera to drop the camera’s effective priority, EnableCamera to restore it. - Change priority directly — Call
ChangeCameraPriority on the Cam Manager bus. - Influence — Add temporary priority modifiers through Influence Fields without touching base priorities.
Follow and Look-At
Follow and look-at behavior is no longer hardcoded on the component; it is provided by the Body and Aim stages slotted on the pipeline. Each tick the cam threads a CameraState accumulator through:
Body → Aim → Reposition additives → Noise additives → Finalize
- The Body stage writes
state.position — different variants implement spring-damped follow, orbital sweep, spline traversal, etc. - The Aim stage writes
state.rotation — including angle-clamped look, head-tracking look, etc. - Additive stages correct or perturb the pose without poisoning Body / Aim ideals.
See Stage Pipeline for the per-tick contract.
Camera Data
Each phantom camera stores its lens and target configuration in a PhantomCamData structure. This data is read by the Cam Core during blending and by stages during evaluation. The stage list lives separately on the component (m_bodySlot, m_aimSlot, m_additives).
Stage Pipeline
Each phantom camera is a container for stages. The component owns three slots:
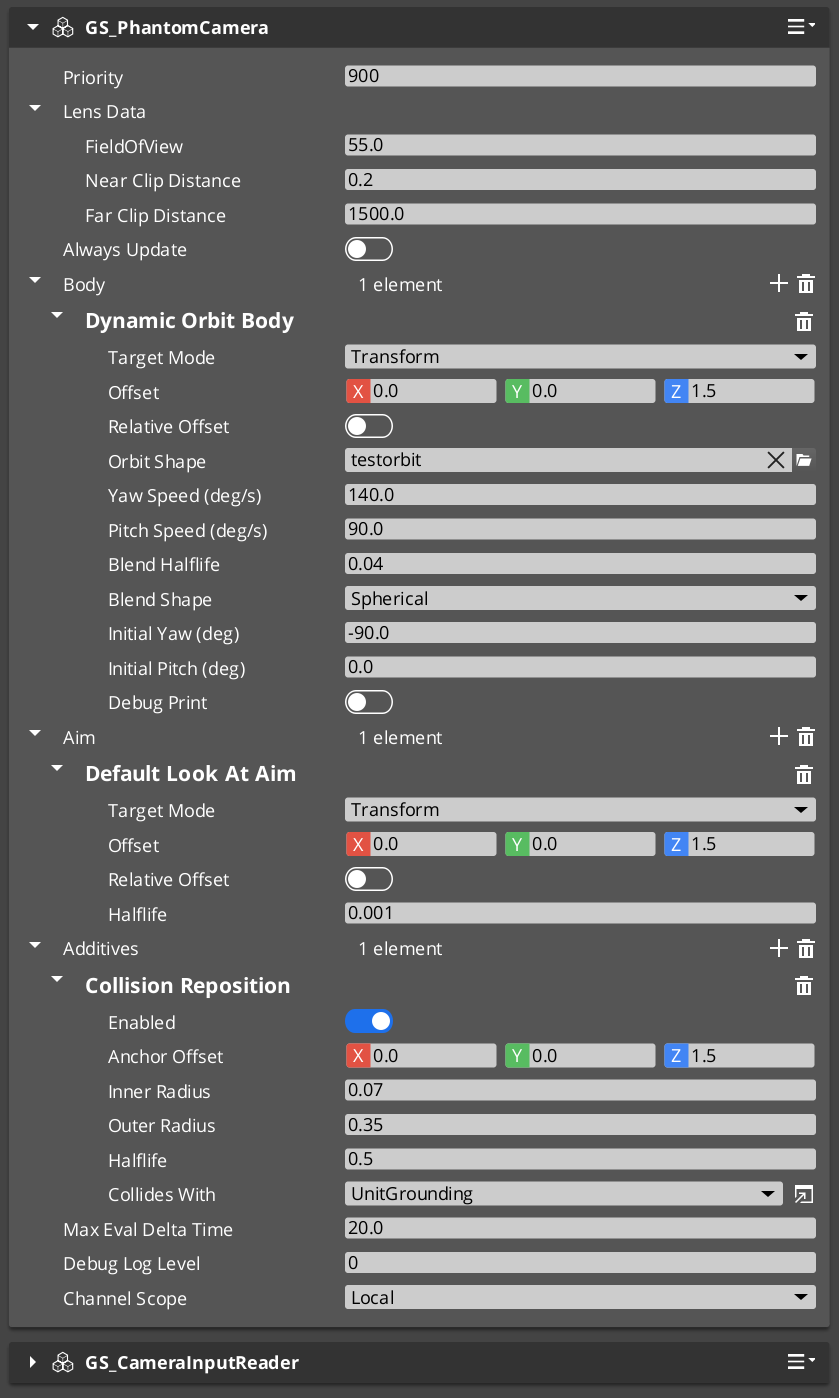
| Slot | Type | Cardinality | Examples |
|---|
m_bodySlot | IBodyStage | One per cam (single-element vector by policy) | DefaultFollowBody, OrbitBody, DynamicOrbitBody, LeadingFollowBody, TrackBody. |
m_aimSlot | IAimStage | One per cam (single-element vector by policy) | DefaultAim, ClampedLookAim. Other gems (notably gs_performer) register additional variants. |
m_additives | IAdditiveStage | Zero or more, each self-declares Reposition or Noise phase | NoiseStage (Perlin), ImpulseStage (ADSR), TugAimListener, TugBodyListener, collision / occlusion reposition. |
Stages are reflected polymorphic types — derived from IBodyStage / IAimStage / IAdditiveStage, not AZ::Component. The editor type-picker enumerates all registered derivations from the SerializeContext class hierarchy, so other gems can extend the catalog cleanly.
Per-tick orchestration (run by the component each OnTick):
EvaluateCamTick — eligibility check (see Execution States)
   │ tickActive == true
   ▼
EvaluatePose
   ├─► Build CameraContext (target, deltaTime, lifecycle flags, snapThisFrame)
   ├─► IBodyStage::Evaluate    → writes state.position, state.bodyAnchor
   ├─► IAimStage::Evaluate     → writes state.rotation, state.lookAtPoint
   ├─► snapshot m_desiredPose
   ├─► For each Reposition additive → corrects state
   ├─► snapshot m_stablePose
   ├─► For each Noise additive → perturbs state
   ├─► snapshot m_finalPose
   ├─► Resolve cached pivot (state.lookAtPoint, else target world position)
   └─► Commit m_finalPose to TransformBus + apply lens to engine Camera component
See Stage Pipeline reference for the full per-stage contract, init / asset-fresh-load semantics, and variant catalogs.
Channel Scope
Each phantom camera authors a CamChannelScope that decides how it participates in the channel system:
enum class CamChannelScope : AZ::u8 {
    Local,         // Default. Registers to ancestor stamp's channel, or channel 0 if no stamp.
    AllChannels,   // Stamped: per-rig-instance natural duplicate. Unstamped: warns + falls back.
    TrueUnique,    // Single instance. Either bound to a specific channel or shared across all.
};
| Field | Visibility | Purpose |
|---|
m_channelScope | Always | The scope mode. |
m_boundChannelId | When m_channelScope == TrueUnique | Explicit channel binding for direct mode. |
m_allChannelsShare | When m_channelScope == TrueUnique AND m_showAdvanced | Shared mode toggle — appears in every active channel’s priority table. |
m_showAdvanced | When m_channelScope == TrueUnique | Reveals advanced TrueUnique fields. |
Author recipes:
- Cam inside a rig prefab — leave as
Local. Each spawned rig instance hosts its own copy via the stamp-walk path. - Per-player tailored broadcast cam in the level —
AllChannels (works naturally for in-rig cams; out-of-rig duplication is deferred). - Hero-perspective cam for a specific player —
TrueUnique + m_boundChannelId = N. - Shared cinematic collapse cam —
TrueUnique + advanced + m_allChannelsShare = true. Paired with a Group Target, this triggers OnAllChannelsActivatedSharedCam when every channel selects the cam.
See Channels & Instancing for the resolution algorithm.
Execution States
A phantom camera carries three boolean states that gate whether it ticks each frame. The tick-eligibility predicate is:
tickActive = m_hasFocus || m_alwaysUpdate || m_blendingOut
When tickActive is false the cam is fully dormant — its stages don’t run, its body doesn’t integrate input, its damping doesn’t advance.
The three flags
| Flag | Origin | Meaning |
|---|
m_hasFocus | Runtime — set by SettingNewCam / SettingNewCamOnChannel notifications. | True while this cam is the channel’s currently-driven cam. |
m_alwaysUpdate | Authored on the component. | If true, the cam ticks every frame regardless of focus. Use for background-tracking cams that should be up-to-date the moment focus arrives, at the cost of constant CPU. |
m_blendingOut | Runtime — set by Cam Core via SetBlendingOut while this cam is the outgoing source of an in-flight blend. | Keeps a !alwaysUpdate outgoing cam ticking through the blend so its body can keep tracking the target — otherwise the blend’s “from” pose would freeze. |
snapThisFrame and m_snapNextEval
When a cam should bypass damping for a single tick — to commit its ideal pose directly without spring lag — the component sets m_snapNextEval = true. The next Evaluate consumes the flag, sets ctx.snapThisFrame = true, and resets m_snapNextEval.
m_snapNextEval is set on:
- Focus gain —
m_hasFocus flipped from false to true (gated on focus specifically; blend-out wake does NOT trigger snap, which would otherwise yank an outgoing cam back to its initial yaw). SetCameraTarget(validEntity) — new follow target.SetTargetFocusGroup(validEntity) — new group target.QueueSnapCamera() — explicit API call.- Mid-spawn channel binding — the Cam Manager pushes a synchronous
SnapCameraNow when a channel target is already present at registration time. See Cam Manager.
SnapCameraNow vs QueueSnapCamera
| Method | Timing |
|---|
QueueSnapCamera() | Sets m_snapNextEval = true. Honored on next Evaluate. Most code paths use this. |
SnapCameraNow() | Synchronous. Evaluates Body + Aim with dt = 0 and writes the snapped TM straight to the transform bus. Required when the Cam Core is about to read the cam’s TM on the same call stack (mid-spawn binding). Early-returns if neither follow target nor look-at target is set. |
Body stages that drive pose from input (notably DynamicOrbitBody) integrate input on the same predicate, mirrored into CameraContext:
integrateInput = ctx.hasFocus || ctx.alwaysUpdate || ctx.blendingOut
The body still polls the input reader every tick regardless of integrateInput — the poll drains Delta-mode buffers so they don’t accumulate during dormancy. The integration result is discarded when !integrateInput.
Staged Poses
The pipeline produces three pose snapshots per tick:
| Snapshot | Where it lands | Use it for… |
|---|
m_desiredPose | Post Body + Aim, pre-Reposition. “Clean” ideal — no collision correction, no shake. | Debug visualization of the cam’s ideal trajectory. |
m_stablePose | Post Reposition, pre-Noise. Collision-safe, shake-free. | Gameplay readback — Unit movement input driven by camera facing should use this. |
m_finalPose | Post Noise. What gets written to the transform bus. | Anything that needs the actual rendered pose (audio listener placement, screen-space UI). |
Three snapshots exist because consumers vary. A Unit that uses camera-forward to drive movement input should query GetStablePose — querying GetFinalPose would let the noise stage drag the character around.
The component also caches a pivot each tick (m_cachedPivot) resolved from the Aim stage’s state.lookAtPoint, falling back to the target’s world position. The Cam Core queries this via GetCameraPivot to drive orbital blend shapes.
Setup
- Create an entity and add GS_PhantomCameraComponent.
- Set the Priority value. Higher values take precedence within the channel.
- Configure FOV, near clip, and far clip on the lens fields.
- Assign a Cam Target entity (the follow target). Leave empty to inherit the channel target from the Cam Manager.
- From the Body type-picker, slot a body stage. Configure its target mode, offset, and damping halflife.
- From the Aim type-picker, slot an aim stage. Configure its target mode, offset, and damping halflife.
- Optionally add Additive stages — noise, impulse, tug listeners, collision reposition.
- Set the Channel Scope (Local is the default and almost always correct).
- Place the entity in your scene or inside a rig prefab. The component registers with the Cam Manager automatically on activation.
For a full walkthrough, see the PhantomCam Set Up Guide.
PhantomCamData Structure
The PhantomCamData structure holds the lens and priority configuration for a phantom camera. Stages are stored separately on the component.
| Field | Type | Description |
|---|
Priority | AZ::s32 | Base priority used in arbitration. |
FOV | float | Field of view in degrees. |
NearClip | float | Near clipping plane distance. |
FarClip | float | Far clipping plane distance. |
CamTarget | AZ::EntityId | The follow target. May be left empty to inherit the channel target. |
Follow / look-at offsets, damping halflives, and target modes now live on the stages, not on PhantomCamData.
API Reference
Request Bus: PhantomCameraRequestBus
Commands sent to a specific phantom camera. ById bus — addressed by entity ID, single handler per address.
Lifecycle
| Method | Parameters | Returns | Description |
|---|
EnableCamera | — | void | Restores the cam’s effective priority and registers it for evaluation. |
DisableCamera | — | void | Drops the cam’s effective priority to 0. |
IsCamEnabled | — | bool | Query. |
Priority and target
| Method | Parameters | Returns | Description |
|---|
SetCameraPriority | AZ::s32 newPriority | void | Sets base priority. Triggers Cam Manager re-evaluation. |
GetCameraPriority | — | AZ::s32 | Query. |
SetCameraTarget | AZ::EntityId targetEntity | void | Sets the follow target. Triggers a snap on next tick when the entity is valid. Clearing (invalid id) does NOT snap — preserves depossess pose-hold. |
SetTargetFocusGroup | AZ::EntityId targetFocusGroup | void | Sets the target to a Group Target entity. Body / aim stages with CamTargetMode::GroupTarget route through this. |
GetCameraData | — | const PhantomCamData* | Returns const pointer to the cam’s lens / priority / target data. Consumed by the Cam Core. |
Snap
| Method | Parameters | Returns | Description |
|---|
QueueSnapCamera | — | void | Sets m_snapNextEval = true. Honored on next Evaluate. |
SnapCameraNow | — | void | Synchronous snap. Evaluates Body + Aim with dt = 0 and writes the snapped TM. Early-returns if neither follow nor look-at target is set. |
Staged pose accessors
| Method | Parameters | Returns | Description |
|---|
GetDesiredPose | — | AZ::Transform | Post Body + Aim, pre-Reposition. |
GetStablePose | — | AZ::Transform | Post Reposition, pre-Noise. Recommended default for gameplay readback. |
GetFinalPose | — | AZ::Transform | Committed pose (post-Noise). |
GetCameraPivot | AZ::Vector3& outPivot, bool& outHasPivot | void | Returns the cam’s cached pivot. Used by Cam Core to drive non-Linear blend shapes. |
Impulse
| Method | Parameters | Returns | Description |
|---|
TriggerCameraImpulse | float strength | void | Fires every ImpulseNoise additive on this cam. strength multiplies each stage’s AmplitudeGain — typically pass distance-falloff values in 0..1. |
Inheritance forwarders
| Method | Parameters | Returns | Description |
|---|
TryGetPoseSnapshot | CamPoseSnapshot& out | bool | Forwards to the body stage’s virtual. The Cam Core invokes this on the outgoing cam during the inheritance handoff. Returns false if the body doesn’t implement the protocol. |
TryAdoptPoseSnapshot | const CamPoseSnapshot& in | bool | Forwards to the body stage’s virtual. The Cam Core invokes this on the incoming cam. |
Blend-out lifecycle
| Method | Parameters | Returns | Description |
|---|
SetBlendingOut | bool isBlendingOut | void | Cam Core sets this on the outgoing cam during a blend. While true, the cam ticks (and integrates input) even if !alwaysUpdate && !hasFocus. Cleared on blend completion. |
Camera Behavior Types
Retired components. ClampedLook_PhantomCamComponent, StaticOrbit_PhantomCamComponent, and Track_PhantomCamComponent no longer exist as separate components. Their behavior is now provided by stage variants on the base GS_PhantomCameraComponent. Legacy URLs for these subpages redirect to the matching stage docs.
| Retired component | Replacement |
|---|
StaticOrbit_PhantomCamComponent | OrbitBody Body stage variant. See Stage Pipeline. |
ClampedLook_PhantomCamComponent | ClampedLookAim Aim stage variant. See Stage Pipeline. |
Track_PhantomCamComponent | TrackBody Body stage variant. See Stage Pipeline. |
AlwaysFaceCameraComponent
A billboard helper component. Keeps the attached entity always facing the active camera. This is not a phantom camera type itself but a utility for objects that should always face the viewer (UI elements in world space, sprite-based effects, etc.). Unchanged by the refactor.
Usage Examples
Switching Cameras by Priority
To make a specific phantom camera dominant, raise its priority above all others:
#include <GS_PhantomCam/Cameras/GS_PhantomCameraBus.h>

GS_PhantomCam::PhantomCameraRequestBus::Event(
    myCameraEntityId,
    &GS_PhantomCam::PhantomCameraRequests::SetCameraPriority,
    100);
Disabling the Current Camera
Disable the current dominant camera to let the next-highest priority camera take over:
GS_PhantomCam::PhantomCameraRequestBus::Event(
    currentCameraEntityId,
    &GS_PhantomCam::PhantomCameraRequests::DisableCamera);
Triggering a Camera Impulse
Fire all ImpulseNoise additives on the active cam at a strength scaled by distance:
const float strength = AZ::GetClamp(1.0f - distance / radius, 0.0f, 1.0f);
GS_PhantomCam::PhantomCameraRequestBus::Event(
    activeCameraEntityId,
    &GS_PhantomCam::PhantomCameraRequests::TriggerCameraImpulse,
    strength);
Script Canvas
Enabling and disabling a phantom camera:
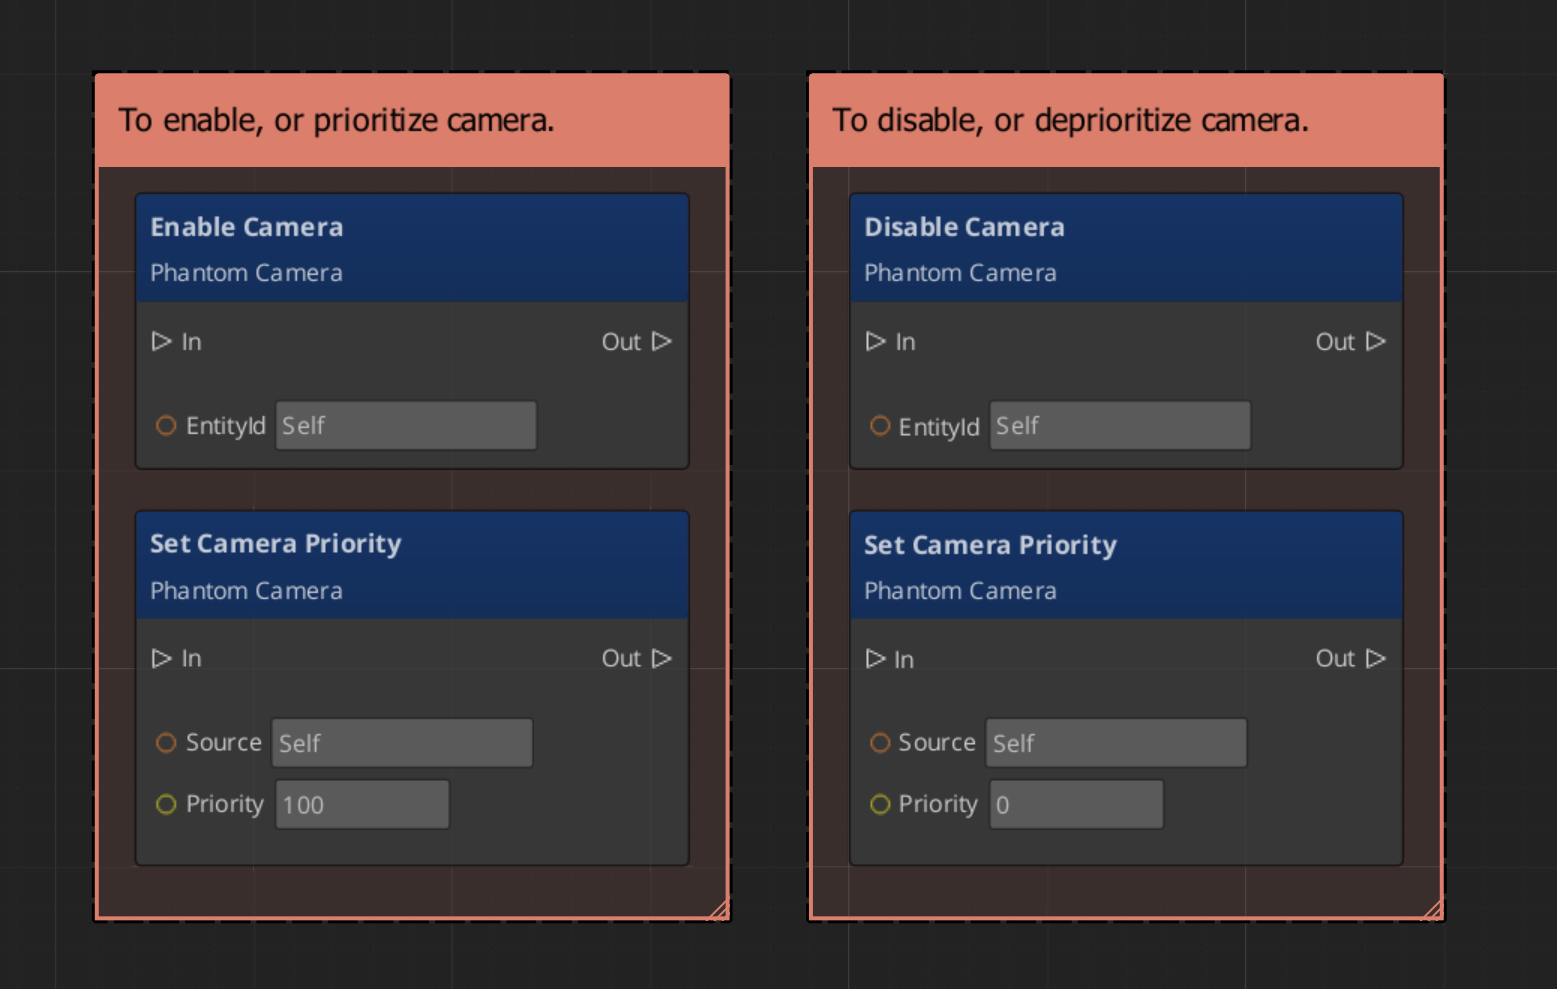
Getting a phantom camera’s data:
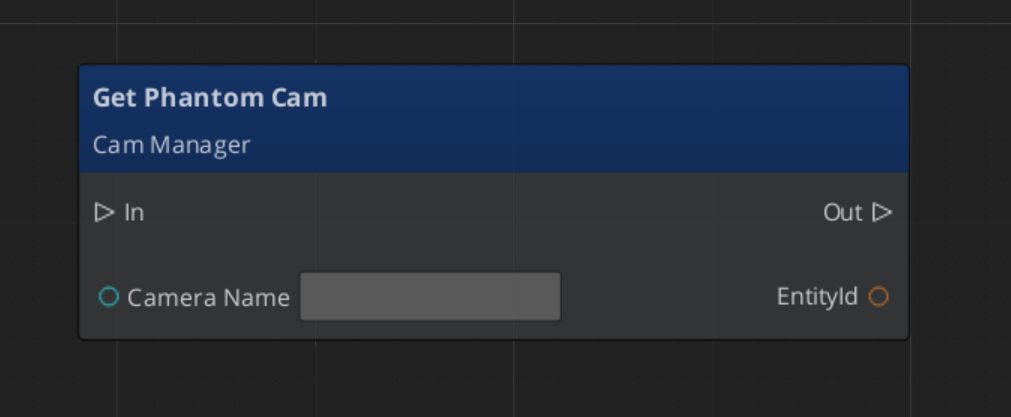
Extending Phantom Cameras
Most camera customization now happens by authoring a new stage variant rather than subclassing the component. Stages are reflected polymorphic types — derive from IBodyStage, IAimStage, or IAdditiveStage, register with AZ_RTTI + AZ_CLASS_ALLOCATOR, and reflect under the base interface’s class hierarchy. The editor type-picker discovers the new variant automatically.
Use the PhantomCamera ClassWizard template to generate a new camera component when you need component-level customization (rare) — see GS_PhantomCam Templates.
#pragma once
#include <GS_PhantomCam/Cameras/GS_PhantomCameraBus.h>
#include <Source/Cameras/GS_PhantomCameraComponent.h>

namespace MyProject
{
    class MyCustomCam : public GS_PhantomCam::GS_PhantomCameraComponent
    {
    public:
        AZ_COMPONENT_DECL(MyCustomCam);

        static void Reflect(AZ::ReflectContext* context);
    };
}
Implementation (.cpp)
#include "MyCustomCam.h"
#include <AzCore/Serialization/SerializeContext.h>

namespace MyProject
{
    AZ_COMPONENT_IMPL(MyCustomCam, "MyCustomCam", "{YOUR-UUID-HERE}");

    void MyCustomCam::Reflect(AZ::ReflectContext* context)
    {
        if (auto serializeContext = azrtti_cast<AZ::SerializeContext*>(context))
        {
            serializeContext->Class<MyCustomCam, GS_PhantomCam::GS_PhantomCameraComponent>()
                ->Version(0);

            if (AZ::EditContext* editContext = serializeContext->GetEditContext())
            {
                editContext->Class<MyCustomCam>("My Custom Camera", "Custom phantom camera component")
                    ->ClassElement(AZ::Edit::ClassElements::EditorData, "")
                        ->Attribute(AZ::Edit::Attributes::Category, "MyProject")
                        ->Attribute(AZ::Edit::Attributes::AppearsInAddComponentMenu, AZ_CRC_CE("Game"));
            }
        }
    }
}
For stage-level extension (the more common case), see the Stage Pipeline reference.
See Also
For related PhantomCam components:
For conceptual overviews and usage guides:
Get GS_PhantomCam
GS_PhantomCam — Explore this gem on the product page and add it to your project.
11.3.1 - Stage Pipeline
The composable per-tick pipeline each Phantom Camera runs — Body, Aim, Reposition additives, Noise additives. Stage interfaces, CameraState accumulator, target routing, decoupled-ideal pattern, init contract.
Every Phantom Camera runs the same fixed pipeline per tick:
Body → Aim → Reposition additives → Noise additives → Finalize
The Body and Aim stages produce the cam’s smoothed ideal pose; Reposition additives correct it for collision / tug volumes; Noise additives perturb it for shake and impulse; Finalize commits the result to the entity transform and the engine camera component.
Stages are not AZ::Components. They are reflected polymorphic types — derived from IBodyStage, IAimStage, or IAdditiveStage. The editor’s type-picker enumerates registered derivations from the SerializeContext class hierarchy, so other gems can extend the catalog cleanly without touching the base component.
For per-variant detail, see the catalog pages:
- Body Stage Variants —
DefaultFollowBody, OrbitBody, DynamicOrbitBody, LeadingFollowBody, TrackBody. - Aim Stage Variants —
DefaultLookAtAim, ClampedLookAim. Plus extensions from gs_performer. - Additive Stage Variants —
CollisionReposition, OcclusionReposition, TugAimListener, TugBodyListener, PerlinNoise, ImpulseNoise.
Contents
Per-Tick Model
Each tick, the owning Phantom Camera threads a CameraState accumulator through the pipeline:
GS_PhantomCameraComponent::EvaluatePose
   │
   ├─► Build CameraContext (target, deltaTime, lifecycle flags, snapThisFrame)
   │
   ├─► CameraState state;  // zero-initialized accumulator
   │
   ├─► IBodyStage::Evaluate(state, ctx, dt)
   │       writes state.position, state.bodyAnchor
   │
   ├─► IAimStage::Evaluate(state, ctx, dt)
   │       writes state.rotation, state.lookAtPoint
   │
   ├─► m_desiredPose = (state.position, state.rotation)
   │
   ├─► For each additive in m_repositionStages:
   │       Evaluate(state, ctx, dt) — may correct state.position/rotation
   │
   ├─► m_stablePose = (state.position, state.rotation)
   │
   ├─► For each additive in m_noiseStages:
   │       Evaluate(state, ctx, dt) — perturbs state.position/rotation
   │
   ├─► m_finalPose = (state.position, state.rotation)
   │
   ├─► Resolve cached pivot from state.lookAtPoint (else fallback to target world pos)
   │
   └─► Commit m_finalPose to TransformBus + apply lens to engine Camera component
The component partitions additives into m_repositionStages and m_noiseStages once at slot-assign time (or whenever the additive list changes) based on each additive’s GetStage() result — per-tick code does not re-check the enum each frame.
CamPipelineStage is a fixed ordered enum:
enum class CamPipelineStage {
    Body,
    Aim,
    Reposition,
    Noise,
    Finalize
};
Reposition and Noise are the values an additive may return from GetStage. Body, Aim, and Finalize exist for symmetry but are not author-selectable.
Stage Interfaces
IBodyStage
Single slot per cam. Computes the smoothed follow position.
class IBodyStage {
public:
    AZ_RTTI(IBodyStage, "{6A78E21A-9A5F-4AB5-8F20-08B4D09E5C01}");
    AZ_CLASS_ALLOCATOR(IBodyStage, AZ::SystemAllocator);

    virtual ~IBodyStage() = default;

    virtual void Init() {}

    virtual void Evaluate(CameraState& state, const CameraContext& ctx, float dt) = 0;
    virtual AZ::EntityId ResolveTarget(AZ::EntityId incoming, TargetSignalKind kind) = 0;
    virtual const char* GetDisplayName() const { return "Body Stage"; }

    // State inheritance — default returns false (no protocol).
    virtual bool TryGetPoseSnapshot(CamPoseSnapshot& out) const  { return false; }
    virtual bool TryAdoptPoseSnapshot(const CamPoseSnapshot& in) { return false; }

    static void Reflect(AZ::ReflectContext* context);
};
See Body Stage Variants for the catalog.
IAimStage
Single slot per cam. Computes the smoothed look rotation.
class IAimStage {
public:
    AZ_RTTI(IAimStage, "{9F37E4C6-04AD-4B1F-A9E2-0D3A4B8F1E02}");
    AZ_CLASS_ALLOCATOR(IAimStage, AZ::SystemAllocator);

    virtual ~IAimStage() = default;

    virtual void Init() {}

    virtual void Evaluate(CameraState& state, const CameraContext& ctx, float dt) = 0;
    virtual AZ::EntityId ResolveTarget(AZ::EntityId incoming, TargetSignalKind kind) = 0;
    virtual const char* GetDisplayName() const { return "Aim Stage"; }

    static void Reflect(AZ::ReflectContext* context);
};
Aim does not implement state inheritance — inheritance is body-only by design. See Aim Stage Variants.
IAdditiveStage
Stackable. Self-declares phase via GetStage.
class IAdditiveStage {
public:
    AZ_RTTI(IAdditiveStage, "{B7D2F618-3E44-4A71-9C21-0F3B7C5E0D04}");
    AZ_CLASS_ALLOCATOR(IAdditiveStage, AZ::SystemAllocator);

    virtual ~IAdditiveStage() = default;

    virtual void Init() {}

    virtual CamPipelineStage GetStage() const = 0;  // returns Reposition or Noise
    virtual void Evaluate(CameraState& state, const CameraContext& ctx, float dt) = 0;
    virtual const char* GetDisplayName() const { return "Additive Stage"; }

    static void Reflect(AZ::ReflectContext* context);
};
See Additive Stage Variants.
CameraState and CameraContext
CameraState
The mutable pose accumulator threaded through every stage. Not serialized.
struct CameraState {
    AZ::Vector3    position    = Vector3::Zero();        // accumulator
    AZ::Quaternion rotation    = Quaternion::Identity();

    // Sidecar hints populated by Body/Aim for downstream stages.
    AZ::Vector3    bodyAnchor  = Vector3::Zero();   // post-offset follow anchor
    AZ::Vector3    lookAtPoint = Vector3::Zero();   // world-space focal point
};
The two sidecar fields exist so Reposition additives can read the “natural” pose Body / Aim intended rather than the live state (which may have been displaced by an earlier additive). Tug listeners, for example, blend toward the source point starting from the Body’s bodyAnchor rather than the cam’s possibly-perturbed state.position — prevents compound feedback across ticks.
CameraContext
Read-only per-tick context. Not serialized.
struct CameraContext {
    GS_PhantomCameraComponent* owner;        // for owner helpers (WriteLensFieldOfView, QueueSnapCamera).

    AZ::EntityId               camEntityId;
    AZ::EntityId               targetEntityId;

    AZ::Transform              camInitialTM;     // cam TM read at start of tick
    AZ::Transform              targetTM;         // resolved target world TM
    AZ::Vector3                targetVelocity;

    bool                       targetIsPhysical;
    bool                       hasFocus;
    bool                       alwaysUpdate;
    bool                       blendingOut;
    bool                       snapThisFrame;    // bypass damping this tick

    float                      deltaTime;
};
hasFocus || alwaysUpdate || blendingOut is the input-integration gate — Body stages that drive pose from input (notably DynamicOrbitBody) integrate input only when any of these is true. See Execution States.
snapThisFrame is set on focus gain, target swap, queued snap, and a few other lifecycle events. Stages honor it by bypassing damping for the one tick it is true.
Target Routing
Every Body and Aim variant authors a CamTargetMode enum and (depending on mode) supporting fields. This is the front-end every variant uses to decide which entity it actually follows.
enum class CamTargetMode : AZ::u8 {
    None               = 0,  // no-op for target resolution
    Transform          = 1,  // follow / look at the dispatched CameraTarget
    TargetOffsetEntity = 2,  // reserved — not yet implemented
    // 3 was FocusGroup — removed; use GroupTarget.
    Head               = 4,  // reserved — not yet implemented
    Override           = 5,  // manually-set m_overrideEntity on this stage
    GroupTarget        = 6   // resolve a named GroupTargetComponent via CamManager
};
TargetSignalKind identifies which bus call dispatched the target signal. Lets stages filter by target mode:
enum class TargetSignalKind {
    CameraTarget,  // SetCameraTarget
    FocusGroup     // SetTargetFocusGroup
};
Legacy scenes storing FocusGroup = 3 deserialize as an unknown value; the author re-picks GroupTarget. The newer mode is the canonical way for a stage to track a named group via Group Targets.
Decoupled Ideal Pattern
A subtle but critical convention: each Body / Aim variant maintains an m_idealPosition / m_idealRotation independent of what gets committed to the entity transform.
Why: Reposition additives (collision, occlusion, tug) and Noise additives mutate state.position and state.rotation AFTER Body / Aim runs. If the Body read the committed transform back next tick, the spring would re-try its advance every frame against a collision clamp — producing shudder. By tracking an internal ideal, the Body’s spring runs in clean kinematic space; the committed transform may differ (clamped by collision, shaken by noise) but the Body’s trajectory stays smooth.
The same applies to Aim — m_idealRotation is the slerp’s working value; downstream rotation-modifying additives can freely displace state.rotation without poisoning next tick’s slerp trajectory.
m_idealPosition / m_idealRotation are also what state inheritance reads for TryGetPoseSnapshot and writes for TryAdoptPoseSnapshot — see State Inheritance.
Damping Convention
There is no separate Smoothing stage. Each stage owns its damping internally:
| Stage | What it damps |
|---|
| Body | Pursuit of the follow target — halflife on m_idealPosition. |
| Aim | Slerp toward the look-at rotation — halflife on m_idealRotation. |
| Reposition additives | Their own correction delta — collision pushback, tug-source approach. |
| Noise additives | Operate in their own time domain (noise time, ADSR envelope). |
Different halflives capture different physical slownesses and compose naturally. Damping uses the frame-rate-independent HalflifeAlpha(halflife, dt) = 1 - exp2(-dt / halflife) helper.
ctx.deltaTime is clamped at tick entry (maxEvalDeltaTime = 0.05s default) so editor hitches don’t spike damping.
Init Contract
Each stage’s Init() runs once per Activate, after the slot is populated, before any Evaluate. The default is a no-op.
Critical use case — asset-fresh-load. Stages holding asset references (e.g. DynamicOrbitBody.m_orbitShape, PerlinNoise.m_profile) override Init to force a fresh AssetManager load. The deserialized asset reference only carries an AssetId — without an explicit GetAsset call in Init, in-editor edits to the asset don’t propagate to the runtime instance.
Pattern:
void DynamicOrbitBody::Init()
{
    if (m_orbitShape.GetId().IsValid())
    {
        m_orbitShape = AZ::Data::AssetManager::Instance().GetAsset<CameraOrbitShape>(
            m_orbitShape.GetId(),
            AZ::Data::AssetLoadBehavior::PreLoad);
        m_orbitShape.BlockUntilLoadComplete();
    }
}
Any new stage you author that holds an AZ::Data::Asset<T> should follow this pattern.
Polymorphic-Array Convention
The component’s stage slots hold raw pointers in a vector:
AZStd::vector<IBodyStage*>     m_bodySlot;     // single-element conceptually
AZStd::vector<IAimStage*>      m_aimSlot;      // single-element conceptually
AZStd::vector<IAdditiveStage*> m_additives;
Why vectors instead of single pointers? The vector enables the editor’s type-picker for polymorphic types — the user picks from a dropdown of all registered derived classes. The runtime treats Body and Aim slots as single-element; the dropdown for those slots is constrained to one entry by policy.
The component owns the pointers (newed by the editor’s type instantiation; deleted by the component’s Deactivate / destructor).
StageHelpers Utility
StageHelpers.h provides free inline functions used by multiple variants:
| Helper | Purpose |
|---|
ResolveByMode(mode, incoming, override, kind, groupTargetName) | Resolves the actual tracked entity from a CamTargetMode. Shared by every Body and Aim variant. |
ResolveStageTargetTM(mode, groupTargetName, ctx) | Resolves the target world TM. Handles Transform (uses ctx.targetTM), Override (looks up m_overrideEntity), GroupTarget (calls Cam Manager’s group registry). |
ApplyFollowOffset(point, targetTM, offset, isRelative) | Adds the offset to the point. World axes or target-relative basis. |
HalflifeAlpha(halflife, deltaTime) | Frame-rate-independent damping alpha: 1 - exp2(-deltaTime / halflife). |
WrapYawToPi(yaw) | Wraps yaw into (-π, π]. |
ShortestYawTarget(currentYaw, desiredYaw) | Returns the equivalent of desiredYaw that is numerically closest to currentYaw (avoids 2π wraparound jumps for monotonic damping). |
FindPitchOnShape(shape, radiusObserved, heightObserved) | Inverse search on a CameraOrbitShape — given an observed (radius, height) pair, returns the pitch that produces that point on the curve. Used by DynamicOrbitBody’s POSITION-mode adoption fallback. |
Reflection Conventions
Every stage class follows the same Reflect pattern:
void MyStage::Reflect(AZ::ReflectContext* context)
{
    if (auto* sc = azrtti_cast<AZ::SerializeContext*>(context))
    {
        if (sc->FindClassData(azrtti_typeid<MyStage>())) { return; }  // guard

        sc->Class<MyStage, IBodyStage>()   // base = IBodyStage / IAimStage / IAdditiveStage
            ->Version(1)
            ->Field("TargetMode", &MyStage::m_targetMode)
            ->Field("Offset",     &MyStage::m_offset)
            // ...
            ;

        if (auto* ec = sc->GetEditContext())
        {
            ec->Class<MyStage>("Display Name", "Tooltip description")
                ->ClassElement(AZ::Edit::ClassElements::EditorData, "")
                    ->Attribute(AZ::Edit::Attributes::AutoExpand, true)
                    ->Attribute(AZ::Edit::Attributes::NameLabelOverride, "<h3>My Stage</h3>")
                ->DataElement(AZ::Edit::UIHandlers::ComboBox, &MyStage::m_targetMode, "Target Mode", "...")
                    ->EnumAttribute(CamTargetMode::Transform, "Transform")
                    // ...
                ;
        }
    }
}
Hard rules for stage authors:
- The
FindClassData guard is mandatory. Multiple stages reflect the shared curve type / common enums chain, and an unguarded reflect call triggers a double-registration crash. EnableForAssetEditor belongs under SerializeContext only, not EditContext. Stages don’t typically need this attribute, but it applies when reflecting asset types.- Members are named with the
m_ prefix per the O3DE code-style guideline; field strings inside Reflect keep the un-prefixed form for save-data compatibility.
See Also
Stage variant catalogs:
For related PhantomCam pages:
For conceptual overviews and usage guides:
Get GS_PhantomCam
GS_PhantomCam — Explore this gem on the product page and add it to your project.
11.3.1.1 - Body Stage Variants
Body stage catalog — DefaultFollowBody, OrbitBody, DynamicOrbitBody, LeadingFollowBody, TrackBody. Each variant’s kinematic model, authored fields, and state-inheritance support.
The Body stage owns state.position for each tick. Five variants ship with GS_PhantomCam — each with its own kinematic model (orbit math, spring damping, path interpolation, band response, etc.). All variants share a target-routing front-end via the CamTargetMode enum documented in Stage Pipeline. Per-variant state inheritance support is summarized below; see State Inheritance for the full protocol.
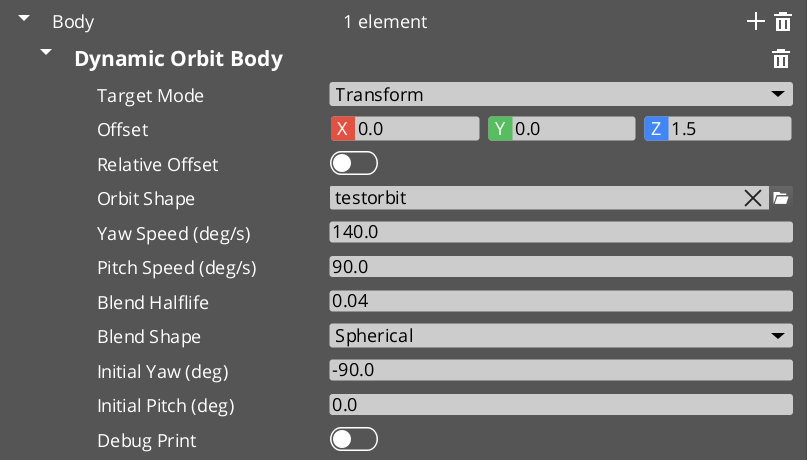
Contents
DefaultFollowBody
Simple follow camera. Tracks a target at an authored offset, position-space spring damped.
Kinematic model
destPos        = targetTM.translation + ApplyOffset(offset, targetTM, isRelative)
state.position = SimpleSpringDamperExact(m_idealPosition, m_springVelocity,
                                         destPos, halflife, dt)
Spring runs against an internal m_idealPosition per the decoupled-ideal pattern. On ctx.snapThisFrame, m_idealPosition = destPos directly.
Authored fields
| Field | Default | Purpose |
|---|
m_targetMode | Transform | How to resolve the follow target. |
m_overrideEntity | (entity slot) | Used when m_targetMode == Override. |
m_groupTargetName | "" | Used when m_targetMode == GroupTarget. |
m_offset | (0, 0, 0) | Offset applied before damping. |
m_offsetIsRelative | false | World axes (false) or target-relative basis (true). |
m_halflife | 0.1 | Spring halflife. |
State inheritance
None. Default IBodyStage virtuals return false. Inheritance into a Default Follow falls through to the Blend Profile’s visual bridge.
OrbitBody
Fixed orbital pose around the target — authored yaw, pitch, and radius, no input. The “static orbit cam.” Successor to the retired StaticOrbit_PhantomCamComponent.
Kinematic model
destPos     = targetTM.translation + offset
pitchRad    = clamp(degToRad(m_orbitPitchDeg), -89°, +89°)
yawRad      = degToRad(m_orbitYawDeg)

orbitOffset = m_orbitRadius * (cos(pitch)*cos(yaw), cos(pitch)*sin(yaw), sin(pitch))
destPos    += orbitOffset

state.position = SimpleSpringDamperExact(m_idealPosition, m_springVelocity,
                                         destPos, m_halflife, dt)
The cached pivot m_lastPivot (the post-offset, pre-orbit pivot point) is published through TryGetPoseSnapshot for inheritance into orbit-style adopters.
Authored fields
| Field | Default | Purpose |
|---|
m_targetMode | Transform | Target routing. |
m_overrideEntity | — | When m_targetMode == Override. |
m_groupTargetName | "" | When m_targetMode == GroupTarget. |
m_offset | (0, 0, 0) | Pre-orbit offset. |
m_offsetIsRelative | false | Basis. |
m_orbitRadius | 5.0 | Distance from pivot to cam. |
m_orbitYawDeg | 45.0 | Horizontal angle around pivot. |
m_orbitPitchDeg | 20.0 | Vertical angle (clamped −89° to +89°). |
m_halflife | 0.1 | Spring halflife (0 = snap). |
State inheritance
| Direction | Behavior |
|---|
| Get | Publishes the cleanest snapshot in the framework: worldPos = m_idealPosition, worldFwd toward cached pivot, pivotPos = m_lastPivot, AND direct angular state from authored yaw / pitch (yawRad, pitchRad, angularStateValid = true). Orbit-style adopters receive ANGULAR-mode handoff with no back-derivation. |
| Adopt | Not implemented — left at default false. The authored yaw / pitch define the static shot’s identity; accepting inbound pose would defeat author intent. Blend Profile’s visual bridge handles inbound transitions. |
DynamicOrbitBody
Input-driven orbit camera around a target, shaped by a CameraOrbitShape (.camorbit) asset. The current go-to body for orbit-style player cams. Successor to the retired OrbitCam variant.
Unified drive model
The stage holds target angles (m_targetYaw, m_targetPitch) and damps the cam’s position toward whatever those angles imply on the orbit surface via the Orbital Solver Utility. Target angles are written by:
- Snap seeding (
m_initialYawDeg / m_initialPitchDeg) on first activate or ctx.snapThisFrame. - External scripted calls via
DynamicOrbitBodyRequestBus::SetOrbit(yawRad, pitchRad). - Per-tick input integration — when an
OrbitInputProvider bus handler is bound to the cam’s entity (the Camera Input Reader component), the body polls input deltas and integrates them. Gated on ctx.hasFocus || ctx.alwaysUpdate || ctx.blendingOut.
No drive-mode enum. Multiple writers compose; last write wins per tick; solver damping shapes the visual response.
Static-orbit behavior is also achievable here by authoring initial angles and not installing an input provider — target angles never change, solver damps once, holds. The separate OrbitBody class is retained for the explicit “static shot” identity case.
Kinematic model
// 1. Resolve pivot (post-offset target).
pivot = targetTM.translation + offset
m_lastResolvedPivot = pivot   // cached for inheritance Get

// 2. Inheritance consume (if pending). Sets m_targetYaw / m_targetPitch /
//    m_idealPosition. See [State Inheritance].

// 3. Snap handling — reset target angles to authored seeds on
//    ctx.snapThisFrame (unless inheritance just consumed).
if (ctx.snapThisFrame && !consumedAdoption):
    m_targetYaw   = degToRad(m_initialYawDeg)
    m_targetPitch = degToRad(m_initialPitchDeg)

// 4. Input integration (if cam has an OrbitInputProvider AND
//    ctx.hasFocus || alwaysUpdate || blendingOut).
yawDelta, pitchDelta = poll OrbitInputProvider
m_targetYaw   += yawDelta   * degToRad(m_yawSpeed)   * dt
m_targetPitch += pitchDelta * degToRad(m_pitchSpeed) * dt
m_targetYaw   = WrapYawToPi(m_targetYaw)
m_targetPitch = clamp(m_targetPitch, kPitchAtLow, kPitchAtHigh)

// 5. Orbit shape evaluation.
shapePoint = m_orbitShape->EvaluateAtPitch(m_targetPitch)  // (radius, height)
desiredPos = pivot + (shapePoint.radius * cos(m_targetYaw),
                     shapePoint.radius * sin(m_targetYaw),
                     shapePoint.height)

// 6. Solver damping via BlendPositionAroundPivot.
alpha = HalflifeAlpha(m_blendHalflife, dt)
m_idealPosition = GS_Core::Math::BlendPositionAroundPivot(
                    m_idealPosition, desiredPos, pivot,
                    alpha, m_blendShape, +Z)

state.position = m_idealPosition
Authored fields
| Field | Default | Purpose |
|---|
m_targetMode | Transform | Target routing. |
m_overrideEntity | — | When m_targetMode == Override. |
m_groupTargetName | "" | When m_targetMode == GroupTarget. |
m_offset | (0, 0, 0) | Pivot offset from target. |
m_offsetIsRelative | false | Basis. |
m_orbitShape | (asset slot) | .camorbit asset defining the surface. See Orbit Profiles. |
m_yawSpeed | 90 | Degrees / sec per unit input on yaw. |
m_pitchSpeed | 60 | Degrees / sec per unit input on pitch. |
m_blendHalflife | 0.10 | Damping halflife — the solver call IS the smoothing. |
m_blendShape | Spherical | Solver shape (Spherical allows arbitrary surface; Cylindrical constrains height). |
m_initialYawDeg | 180.0 | Snap seed yaw. 180° = directly behind target. |
m_initialPitchDeg | 0.0 | Snap seed pitch. 0° = mid band height. |
m_debugPrint | false | Per-tick AZ_Printf of inputs / target angles / shape output / committed position. |
Companion bus
DynamicOrbitBodyRequestBus (per-entity, addressed by cam EntityId):
virtual void  SetOrbit(float yawRad, float pitchRad) = 0;
virtual float GetCurrentTargetYaw()   const = 0;
virtual float GetCurrentTargetPitch() const = 0;
SetOrbit uses ShortestYawTarget to keep the damping arc bounded — prevents the solver taking the long way around for distant yaw writes.
State inheritance
Full Get + Adopt. Two derivation paths:
| Path | Trigger | Behavior |
|---|
| ANGULAR (preferred) | snap.angularStateValid == true (source published authored angles) | Inherit raw yawRad / pitchRad directly via ShortestYawTarget + WrapYawToPi + pitch clamp. Preserves angular continuity across different shape assets. |
| POSITION (fallback) | Source has no angular state, just worldPos + optional pivotPos | Back-derive yaw from (worldPos − pivot) via atan2; search the shape for the matching pitch via FindPitchOnShape. |
Both seed m_idealPosition = snap.worldPos and set consumedAdoption = true so subsequent snap-clobber logic is gated.
Get publishes m_idealPosition, world-forward toward cached pivot, pivotPos = m_lastResolvedPivot, pivotEntity = m_lastResolvedPivotEntity, and direct authored m_targetYaw / m_targetPitch + angularStateValid = true.
Init contract
Init() overrides to force-load m_orbitShape via AssetManager::GetAsset + BlockUntilLoadComplete per the asset-fresh-load pattern. Without this, in-editor .camorbit edits don’t propagate to the runtime body until restart.
LeadingFollowBody
Held-position cam that slides along an arc around the target only when the target leaves an authored distance band. Leading-look / “Gears of War”-style follow — heading-agnostic, so abrupt 180° turns by the target don’t swing the cam.
Kinematic model
distXY = horizontal distance between cam and target (at offset's height)

if inner < distXY < outer:
    hold position   // cam stays put within the band
else if distXY > outer:
    slide toward target along an arc until just inside outer
else if distXY < inner:
    slide away from target along an arc until just outside inner

// Slides use the orbital solver around the target as pivot — cam arcs
// around the target during band response rather than cutting through.

// Z tracking: independent linear-halflife lowpass on the Z axis, mirroring
// target Z without affecting XY band math.

// Optional center-on-heading: after a configurable stillness delay, cam arcs
// around target to settle behind (or off-axis behind via m_idleYawOffsetDeg)
// at the current radius.
Authored fields
| Field | Default | Purpose |
|---|
m_targetMode | Transform | Target routing. |
m_overrideEntity / m_groupTargetName | — | Mode-dependent. |
m_offset | (0, 0, 1.6) | Offset applied before band math. Cam rides at this Z height. |
m_offsetIsRelative | false | Basis. |
m_innerRadius | 2.0 | Min cam-target XY distance. |
m_outerRadius | 5.0 | Max cam-target XY distance. |
m_hardClampEnabled | false | Optional absolute outer cap. |
m_hardClampDistance | 8.0 | Hard cap (when enabled). |
m_radialHalflife | 0.25 | Arc-slide halflife when outside the envelope. |
m_heightHalflife | 0.50 | Independent Z follow halflife. |
m_blendShape | Cylindrical | Solver shape for band response — cam stays in working height plane. Downgradable to Linear for short displacements. |
m_centerOnHeading | false | Enable idle reposition. |
m_idleVelocityThreshold | 0.10 m/s | XY speed below which the idle timer accumulates. |
m_idleDelay | 1.50 s | Stillness duration before reposition engages. |
m_reorientHalflife | 0.60 | Idle reposition arc halflife. |
m_idleYawOffsetDeg | 0 | Offset from “directly behind” during reposition. ± shifts off-axis. |
State inheritance
| Direction | Behavior |
|---|
| Get | Returns m_idealPosition, world-forward toward cached target, pivotPos = m_lastTargetPoint. No angular state. |
| Adopt | Pure stash. Evaluate consume block takes source snap.worldFwd, flattens to XY, places m_idealPosition = targetPoint − inboundFwd * seedDist at band-natural distance (lerp(inner, outer, 0.6)). Cam inherits source’s facing at this body’s preferred standoff. Z naturally lands at targetPoint.Z (inboundFwd is XY-flattened) — a from-below source produces a band-natural pose, not stuck-below framing. |
Authoring gotcha. If the matched Blend Profile entry has m_inheritState unchecked, the snap-on-activation block fires instead of the consume block. Symptom: “cam orients behind the player’s travel direction regardless of source facing.” The fix is data-side — check the inherit flag in the asset.
TrackBody
Spline-bound dolly camera. Slides along a SplineComponent, interpolating two authored TrackBodyData blocks (start + end) by spline position (globalT 0..1). Successor to the retired Track_PhantomCamComponent.
Per-endpoint data blocks carry offset, halflife, and an optional FoV override.
Kinematic model
// Resolve nearest spline point to current target.
splineHit = spline->FindClosestWorldPoint(targetTM.translation)
globalT   = splineHit.normalizedDistance   // 0..1 along spline

// Lerp data blocks.
offset    = lerp(m_startData.offset,   m_endData.offset,   globalT)
halflife  = lerp(m_startData.halflife, m_endData.halflife, globalT)
fovDest   = (m_endData.fieldOfView > 0)
            ? lerp(m_startData.fieldOfView, m_endData.fieldOfView, globalT)
            : 0

// Position = spline point + offset (relative or world basis).
destPos        = splineHit.worldPoint + ApplyBasis(offset, splineTangent, isRelative)
state.position = SpringDamp(m_idealPosition, m_springVelocity, destPos, halflife, dt)

// Push FoV to owner via WriteLensFieldOfView so Cam Core picks it up live.
if (fovDest > 0):
    ctx.owner->WriteLensFieldOfView(fovDest)
Authored fields
| Field | Default | Purpose |
|---|
m_targetMode | Transform | Used to compute the closest spline point. Typically Transform. |
m_overrideEntity / m_groupTargetName | — | Mode-dependent. |
m_splineTrack | (entity slot) | Entity carrying a SplineComponent. |
m_startData | — | Endpoint A (TrackBodyData). |
m_endData | — | Endpoint B. |
m_adoptionPathThreshold | 5.0 m | Inheritance: max distance from spline an inbound pose may sit before adoption is rejected. |
TrackBodyData
struct TrackBodyData {
    AZ::Vector3 m_offset            = (0, 0, 0);
    bool        m_offsetIsRelative  = false;
    float       m_halflife          = 0.1f;
    float       m_fieldOfView       = 0.0f;   // 0 = don't push lens
};
State inheritance
| Direction | Behavior |
|---|
| Get | Returns m_idealPosition + world-forward toward cached m_lastTargetPos. No angular state. No pivot (the path is the kinematic reference, not a point). |
| Adopt | Pure stash. Evaluate consume block: EnsureSplineResolved, project snap.worldPos via FindClosestWorldPoint. Reject if Euclidean distance to projected point > m_adoptionPathThreshold — prevents teleport-snap when the source sits well off the dolly’s path. Inside threshold: seed m_idealPosition = snap.worldPos, clear spring velocity. |
Spline resolution timing
EnsureSplineResolved is lazy — runs on first Evaluate with a valid target. Caches m_spline and m_splineEntity so subsequent ticks don’t re-look-up.
Cross-Variant Summary
| Variant | Degrees of Freedom | Damping | Pivot | Inheritance Get | Inheritance Adopt |
|---|
DefaultFollowBody | Position only | Spring | None | — | — |
OrbitBody | Authored yaw / pitch / radius | Spring | Post-offset target | Full angular | Disabled (Get-only) |
DynamicOrbitBody | Dynamic yaw / pitch | Solver | Post-offset target | Full angular | Full (ANGULAR / POSITION) |
LeadingFollowBody | XY band + Z follow | Solver (band-arc) | Post-offset target | worldPos + fwd | Facing-seeded standoff |
TrackBody | Spline-bound | Spring | None (path) | worldPos + fwd | Project + threshold |
See Also
Get GS_PhantomCam
GS_PhantomCam — Explore this gem on the product page and add it to your project.
11.3.1.2 - Aim Stage Variants
Aim stage catalog — DefaultLookAtAim, ClampedLookAim. Aim-origin convention, decoupled ideal rotation, extension points.
The Aim stage owns state.rotation for each tick. Two variants ship with GS_PhantomCam; other gems (notably gs_performer) register additional variants through the same IAimStage interface. All variants share a target-routing front-end via the CamTargetMode enum documented in Stage Pipeline.
Aim does not implement state inheritance by design — inheritance is body-only. The destination cam’s aim runs fresh on the inherited body pose.
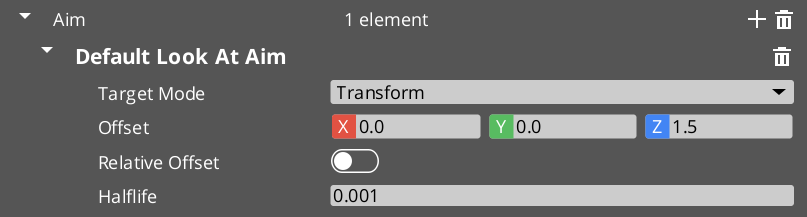
Contents
Aim-Origin Convention
A subtle but important rule: every Aim variant uses ctx.camInitialTM.GetTranslation() as the aim origin — the cam’s current world position at the start of the tick — not state.position (which the Body just wrote this tick).
Aiming from a position the cam hasn’t moved to yet would produce a frame-delayed look-at vector. Using camInitialTM keeps the aim ray geometry consistent with where the cam is actually rendered from.
Author your own aim variants the same way.
Decoupled Ideal Rotation
Same convention as the Body stage. Aim variants hold an internal m_idealRotation slerp working value, separate from state.rotation. Downstream rotation-modifying additives (Noise, Impulse, Tug aim listener) can perturb state.rotation without poisoning next tick’s slerp trajectory.
A m_lastValidRotation field preserves the last non-degenerate rotation for zero-forward recovery (the case where the cam ends up coincident with its look-at target and the forward vector collapses).
DefaultLookAtAim
Straightforward look-at. Aims the camera at a target (with optional offset), slerp-damped.
Kinematic model
lookAtPoint = targetTM.translation + ApplyOffset(offset, targetTM, isRelative)
state.lookAtPoint = lookAtPoint        // sidecar — for downstream Reposition consumers

aimOrigin = ctx.camInitialTM.translation     // NOT state.position
forward   = (lookAtPoint - aimOrigin).GetNormalizedSafe()

if (forward.GetLengthSq() < epsilon):
    targetRot = m_lastValidRotation          // zero-forward recovery
else:
    targetRot = Quaternion::CreateLookAt(forward, +Z)
    m_lastValidRotation = targetRot

if (ctx.snapThisFrame || !m_hasIdeal):
    m_idealRotation = targetRot
    m_hasIdeal      = true
else:
    alpha = HalflifeAlpha(m_halflife, dt)
    m_idealRotation = m_idealRotation.Slerp(targetRot, alpha)

state.rotation = m_idealRotation
Authored fields
| Field | Default | Purpose |
|---|
m_targetMode | Transform | Look-at target routing. |
m_overrideEntity | — | When m_targetMode == Override. |
m_groupTargetName | "" | When m_targetMode == GroupTarget. |
m_offset | (0, 0, 0) | Offset applied to look-at point. |
m_offsetIsRelative | false | World axes (false) or target-relative basis (true). |
m_halflife | 0.1 | Slerp halflife. |
ClampedLookAim
Aims at a target clamped within a pitch / yaw envelope relative to a starting forward captured on first evaluation. Replacement for the retired ClampedLook_PhantomCamComponent.
Used for first-person and constrained-look scenarios — e.g. the cam can rotate ±45° pitch and ±90° yaw from its initial facing, but not beyond.
Two clamp modes
| Mode | Behavior |
|---|
false (world-space, default) | Yaw clamps around world +Z, pitch clamps in the world-vertical plane. Yaw / pitch reconstruction from quaternion. |
true (local-space pivot) | Pivot relative to m_startingForward. Useful when the cam should rotate within a local envelope independent of world axes. |
Kinematic model (world-space mode)
On first Evaluate or ctx.snapThisFrame:
    m_startingForward = ctx.camInitialTM.GetRotation()   // capture once

lookAtPoint = targetTM.translation + offset
forward     = (lookAtPoint - ctx.camInitialTM.translation).GetNormalizedSafe()

// Convert forward to yaw / pitch.
yaw   = atan2(forward.y, forward.x)
pitch = asin(forward.z)

// Clamp to envelope (degrees → radians for comparison).
yaw   = clamp(yaw,   degToRad(m_minRelClamp.z), degToRad(m_maxRelClamp.z))
pitch = clamp(pitch, degToRad(m_minRelClamp.x), degToRad(m_maxRelClamp.x))

// Reconstruct quaternion from clamped angles.
clampedForward = (cos(pitch)*cos(yaw), cos(pitch)*sin(yaw), sin(pitch))
targetRot      = LookAtQuaternion(clampedForward, +Z)

// Slerp damping with decoupled m_idealRotation.
state.rotation = Slerp(m_idealRotation, targetRot, HalflifeAlpha(m_halflife, dt))
Authored fields
| Field | Default | Purpose |
|---|
m_targetMode | Transform | Look-at target routing. |
m_overrideEntity / m_groupTargetName | — | Mode-dependent. |
m_offset | (0, 0, 0) | Look-at offset. |
m_offsetIsRelative | false | Basis. |
m_minRelClamp | (-45, 0, -90) | Lower bound — x = pitch min, z = yaw min. (Layout mirrors the legacy component for scene-data migration.) |
m_maxRelClamp | (45, 0, 90) | Upper bound — x = pitch max, z = yaw max. |
m_localSpace | false | Clamp mode (world-space or local-space pivot). |
m_halflife | 0.1 | Slerp halflife. |
Runtime state
| Field | Purpose |
|---|
m_startingForward | Captured on first Evaluate. The “origin” relative to which the clamp envelope is anchored. |
m_hasStartingForward | True after first capture. |
m_idealRotation | Decoupled slerp working value. |
m_hasIdeal | True after first ideal write. |
m_lastValidRotation | Last non-degenerate rotation, used for zero-forward recovery. |
Extension Surface
Other gems can ship additional aim stage variants. The editor’s type-picker on the cam’s m_aimSlot enumerates all derived IAimStage classes registered through SerializeContext. gs_performer, for example, registers aim stages that read performer head / eye tracking state.
Convention for authoring an aim variant in another gem:
- Header in
Code/Include/<GemName>/Stages/Variants/<MyAim>.h. - Source in
Code/Source/Stages/Variants/<MyAim>.cpp. - Use
AZ_RTTI(<MyAim>, "{UUID}", IAimStage) so the picker finds it. - Reflect with the
FindClassData guard. - Honor the aim-origin convention — use
ctx.camInitialTM.translation, not state.position. - Use the decoupled ideal rotation pattern if you want downstream Noise / Impulse / Tug aim listener to behave well.
See Also
Get GS_PhantomCam
GS_PhantomCam — Explore this gem on the product page and add it to your project.
11.3.1.3 - Additive Stage Variants
Additive stage catalog — collision and tug listener Reposition stages, Perlin and Impulse Noise stages. Phase semantics, composition rules, per-variant fields.
Additive stages stack — multiple may run per cam. Each declares its phase via GetStage():
Reposition — runs BEFORE noise. Corrections (collision, occlusion, tug reposition). State after this phase is captured as m_stablePose.Noise — runs AFTER reposition. Perturbations (camera shake, drift, impulses). State after this phase is captured as m_finalPose.
The Phantom Camera component partitions additives into m_repositionStages and m_noiseStages once at slot-assign time so per-tick code does not re-check the enum each frame.
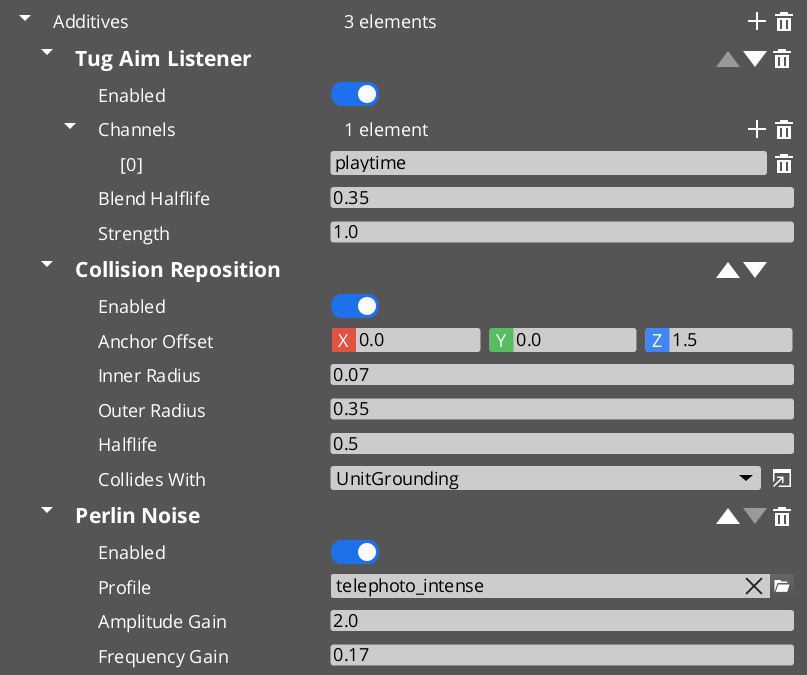
Contents
Reposition Additives
CollisionReposition
Soft / hard sphere collision correction.
Header: Stages/StageDefaults.h · Source: Source/Stages/StageDefaults.cpp
Algorithm
Sphere-cast from (target root + anchorOffset) toward the Body’s ideal cam position (state.position). Two radii define behavior:
- Inner radius — hard clamp. Cam is never permitted closer to the hit surface than this. Correction is immediate.
- Outer radius — soft buffer. Cam glides toward this preferred distance from the wall over
halflife seconds via a damped cached correction delta.
When the Body’s ideal is inside the outer zone (between inner and outer), only the soft correction applies. When it is past the inner zone (closer than inner), hard correction snaps the cam to the inner boundary, and soft continues gliding it toward the outer resting spot.
The cached correction m_appliedCorrection damps cleanly toward zero when the target walks out of collision — no feedback loop fighting the Body’s spring (which runs on its own m_idealPosition per the decoupled-ideal pattern).
Authored fields
| Field | Default | Purpose |
|---|
m_enabled | true | Master toggle. |
m_anchorOffset | (0, 0, 1.5) | Added to target root to produce the cast origin. Typically cam-height so the cast sweeps at cam altitude. |
m_innerRadius | 0.15 | Hard clamp distance. Serialized as "Radius" for back-compat. |
m_outerRadius | 0.45 | Soft buffer distance. Clamped at evaluate time to be ≥ inner. |
m_halflife | 0.15 | Soft correction halflife (0 = snap). |
m_collisionGroupId | (null = All) | UUID reference to a PhysX collision-group preset. Rendered as a dropdown by PhysX’s property handler — matches the “Collides With” field on PhysX colliders. |
OcclusionReposition
Stub. Math is future work. The damping scaffold (m_halflife, m_appliedCorrection) is in place so authored fields are stable when the real implementation lands.
| Field | Default | Purpose |
|---|
m_enabled | true | Master toggle. |
m_halflife | 0.15 | Correction halflife. |
TugAimListener
Reposition-phase consumer of Tug Fields. Slerps state.rotation toward look-at the smoothed tug source point while a TugFieldProxyComponent on the rig is in contact with a tug volume.
Header: Stages/TugListeners.h · Source: Source/Stages/TugListeners.cpp
Derives from the abstract TugListenerBase which holds the channel matching, proxy resolution, active-source cache, and smoothed-influence state.
Authored fields
| Field | Default | Purpose |
|---|
m_enabled | true | Master toggle. |
m_channels | [] | String tags the listener matches against tug volume channels. Crc32-cached at activate. |
m_blendHalflife | 0.15 | Smoothing halflife for influence and source-point. |
m_strength | 1.0 | Per-cam force multiplier. |
Per-tick algorithm
1. ResolveProxy(ctx)
   - If target changed since last tick, walk for proxy descendant.
   - If proxy changed, bind to it and repopulate from volume world.

2. Sum contributions from m_activeSources (weighted by source strength × channel match).
   totalInfluence, weightedSourcePoint = Σ source contributions

3. If totalInfluence == 0 AND m_smoothedInfluence ≈ 0:
     m_dormant = true; early-return.

4. If transitioning out of dormancy:
     m_smoothedSourcePoint = GetSeedSourcePoint(state) — a point along the cam's
     current forward, so the ramp-in produces zero displacement at first engagement.

5. Damp m_smoothedInfluence and m_smoothedSourcePoint toward their target values.

6. ApplyModulation: derive the "natural" rotation from ctx (cam toward primary target)
   rather than reading state.rotation. Avoids compound-feedback issue where prior tug
   modifications would loop into next tick's blend source.
TugBodyListener
Reposition-phase consumer of Tug Fields. Lerps state.position toward the smoothed source point.
Header: Stages/TugListeners.h · Source: Source/Stages/TugListeners.cpp
Same base class, fields, and dormancy semantics as TugAimListener.
Algorithm differences from TugAimListener
| Step | TugBodyListener |
|---|
GetSeedSourcePoint | Returns state.position — first engaged tick produces zero displacement (the cam doesn’t yank). |
ApplyModulation | Derives the natural pose source from ctx.targetTM and the Body’s published state.bodyAnchor sidecar, not state.position directly. Prevents compound feedback. |
A cam can run only the aim listener, only the body listener, both, or neither — each is independent.
Noise Additives
PerlinNoise
Continuous Perlin-noise displacement. Samples a Camera Noise Profile (.camnoiseprofile) through GS_Core::Noise::Perlin1D across six channels (translation X / Y / Z, rotation pitch / yaw / roll).
Header: Stages/NoiseStages.h · Source: Source/Stages/NoiseStages.cpp
Algorithm
m_time += deltaTime

For each of 6 channels in profile:
    sample = Perlin1D(m_time * profile.frequency[i] * m_frequencyGain,
                      profile.octaves[i],
                      profile.persistence[i])
    delta[i] = sample * profile.amplitude[i] * m_amplitudeGain

state.position += (delta[Tx], delta[Ty], delta[Tz])
state.rotation  = state.rotation * Quaternion::CreateFromEuler(
                    delta[Pitch], delta[Yaw], delta[Roll])
Never reads back the committed transform between frames — only adds deltas to state in-flight. Body / Aim ideals stay untouched (decoupled-ideal convention).
Authored fields
| Field | Default | Purpose |
|---|
m_enabled | true | Master toggle. |
m_profile | (asset slot) | .camnoiseprofile asset. |
m_amplitudeGain | 1.0 | Multiplier over profile amplitudes. |
m_frequencyGain | 1.0 | Multiplier over profile frequencies. |
Init contract
Init() force-loads m_profile via AssetManager per the asset-fresh-load pattern.
ImpulseNoise
Event-triggered one-shot noise burst. Same profile schema as PerlinNoise, same layered Perlin math — only the time source differs.
Stays silent until Trigger(strength) fires, then plays a time-windowed burst shaped by an ADSR envelope (GS_Core::Envelope::ADSREnvelope).
Triggered externally via PhantomCameraRequestBus::TriggerCameraImpulse(strength) on the cam — see Phantom Cameras. The author’s own impulse-source detection system (explosions, foot-stomps, gun kicks) decides when and with what strength.
Stacks freely with PerlinNoise on the same cam — baseline handheld sway plus event-driven shake is the canonical configuration.
Algorithm
On Trigger(strength):
    m_elapsed         = 0.0
    m_triggerStrength = strength
    m_active          = true       // overrides any in-progress release

Per tick (if m_active):
    m_elapsed += deltaTime
    envelopeGain = m_envelope.Evaluate(m_elapsed)   // ADSR 0..1
    if (envelopeGain == 0 AND past sustain end):
        m_active = false
    else:
        // Same Perlin sampling as PerlinNoise,
        // scaled by envelopeGain × triggerStrength × m_amplitudeGain.
        Apply position + rotation deltas to state.
Authored fields
| Field | Default | Purpose |
|---|
m_enabled | true | Master toggle. |
m_profile | (asset slot) | .camnoiseprofile. |
m_envelope | (ADSR struct) | Attack / Decay / Sustain level / Sustain duration / Release. See GS_Core::Envelope::ADSREnvelope. |
m_amplitudeGain | 1.0 | Multiplier over profile amplitudes. |
m_frequencyGain | 1.0 | Multiplier over profile frequencies. |
Trigger entry point
void ImpulseNoise::Trigger(float strength);
Called by GS_PhantomCameraComponent::TriggerCameraImpulse(strength) for every ImpulseNoise additive on the cam. strength multiplies amplitude for that specific burst. Pass 1.0 for full profile intensity, smaller for attenuated distance falloff, larger to boost.
The owning component routes the call by walking m_noiseStages and dispatching to each ImpulseNoise it finds via RTTI check. Other noise additive types ignore.
Cross-Variant Summary
| Variant | Phase | Reads ctx natural pose? | Notes |
|---|
CollisionReposition | Reposition | — | PhysX sphere-cast pushback. Soft buffer + hard clamp. |
OcclusionReposition | Reposition | — | Stub. Damping scaffold present. |
TugAimListener | Reposition | Yes (cam-to-target forward) | Slerps rotation toward source. |
TugBodyListener | Reposition | Yes (target / bodyAnchor) | Lerps position toward source. |
PerlinNoise | Noise | — | Continuous Perlin sampled by accumulated time. |
ImpulseNoise | Noise | — | Event-triggered; ADSR-gated. |
See Also
Get GS_PhantomCam
GS_PhantomCam — Explore this gem on the product page and add it to your project.
11.3.2 - Noise Profiles
CameraNoiseProfile (.camnoiseprofile) — reusable Perlin-noise shape asset for camera shake, handheld feel, and event-triggered impulses.
A Camera Noise Profile is a .camnoiseprofile data asset that defines a layered Perlin-noise shape. It is consumed by the PerlinNoise (continuous) and ImpulseNoise (event-triggered) additive stages. Profiles are reusable — one “Handheld_subtle” profile can drive both a baseline sway and a triggered impact burst at different intensities by adjusting per-stage gains.
Profiles are registered through PhantomCamDataAssetsSystemComponent alongside .camblendprofile and .camorbit. The asset reflects with EnableForAssetEditor so the Asset Editor opens it directly.
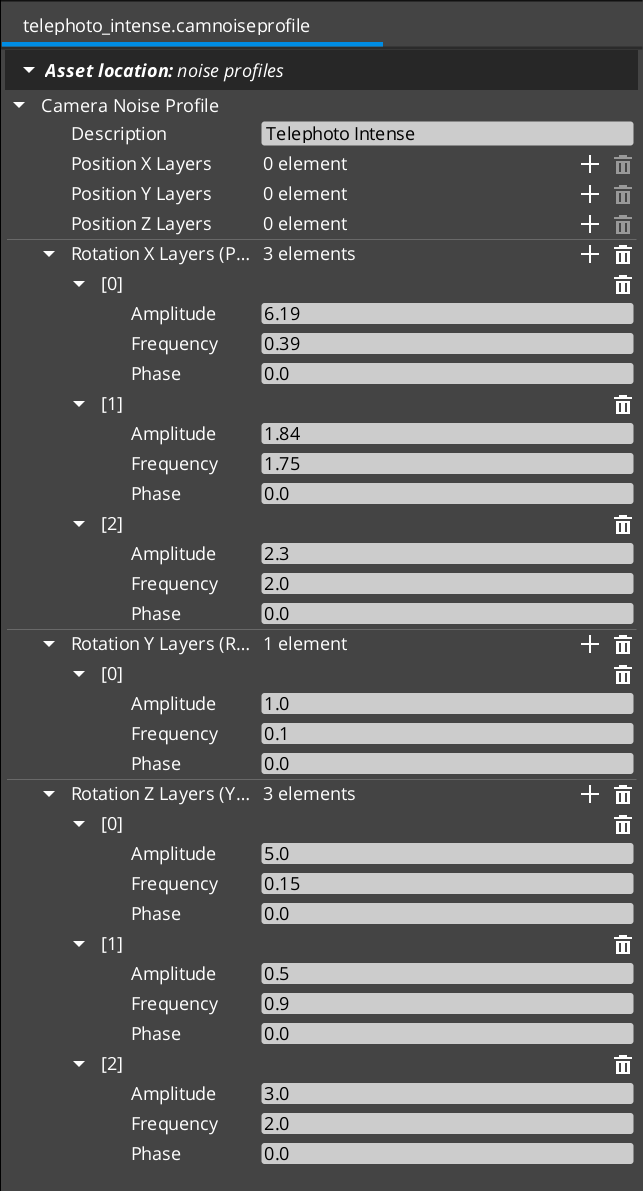
Contents
Authoring Model — Six Per-Axis Layer Stacks
Six independent layer lists, one per axis:
using LayerList = AZStd::vector<GS_Core::Noise::NoiseLayer>;

LayerList m_posX, m_posY, m_posZ;   // position (world-space meters)
LayerList m_rotX, m_rotY, m_rotZ;   // rotation (Euler degrees, applied as multiplicative deltas)
Each layer is a GS_Core::Noise::NoiseLayer carrying amplitude, frequency, and phase. At evaluate time, the noise stage sums every layer’s Perlin1D contribution per axis, scaled by amplitude.
Layered noise is the common authoring rhythm — three layers per axis: one slow / low-frequency layer for sway, one mid layer for flutter, one fast / low-amplitude layer for micro-jitter. Each layer composes additively at evaluate time.
NoiseLayer
The primitive lives in GS_Core:
namespace GS_Core::Noise {
    struct NoiseLayer {
        float m_amplitude = 0.0f;
        float m_frequency = 1.0f;
        float m_phase     = 0.0f;
    };

    // Sums layers via GS_Core::Noise::LayeredPerlin1D.
    // Each layer samples Perlin1D(time * freq + phase) * amp.
}
The same NoiseLayer primitive is used elsewhere in the engine — UI wobble, unit idle jitter, etc. — so multiple subsystems share the underlying Noise utility. The full per-axis evaluation goes through GS_Core::Noise::LayeredPerlin1D documented there.
Unit Conventions
| Axis group | Units | Typical amplitude |
|---|
| Position layers | meters | 0.01 – 0.2 |
| Rotation layers | degrees | 0.1 – 8 |
| Frequency (any axis) | Hz | Handheld profiles 0.1 – 2 Hz; shake / impact 3 – 60 Hz |
Authored Fields
| Field | Default | Purpose |
|---|
m_posX / m_posY / m_posZ | {} | Layer stacks for translation noise (meters). |
m_rotX / m_rotY / m_rotZ | {} | Layer stacks for rotation noise (degrees). |
m_description | "" | Free-form note for preset identity, intent, tweak history. |
Consumption Pattern
A profile is shared across multiple cams / stages. Per-cam intensity dialing happens on the additive stage, not on the profile:
// On a PerlinNoise additive:
m_profile        = (asset slot)            // shared profile reference
m_amplitudeGain  = 1.0                     // per-cam intensity multiplier
m_frequencyGain  = 1.0                     // per-cam speed multiplier
So a single “Handheld_subtle” profile can drive both a subtle baseline sway (m_amplitudeGain = 0.3) and a full-strength impact shake (m_amplitudeGain = 2.0) without re-authoring the profile.
Both consumers honor the same fields:
| Stage | Use | Time source |
|---|
PerlinNoise | Continuous handheld sway, drift | m_time += deltaTime, accumulated since activation |
ImpulseNoise | Event-triggered burst | m_elapsed += deltaTime since Trigger(strength), gated by ADSR envelope |
See Additive Stage Variants for the per-stage kinematic model.
Shipped Presets
The gem ships a starter library of .camnoiseprofile assets in gs_phantomcam/Assets/Noise Profiles/. Drop a preset onto a PerlinNoise or ImpulseNoise stage’s Profile slot for an immediate baseline, then either tune intensity per cam via the stage’s m_amplitudeGain / m_frequencyGain or author project-specific profiles.
Handheld lens family
Three lens characters × two intensities. Rotation-dominant; long-period sway with mid-frequency flutter and a touch of micro-jitter.
| Asset | Use for |
|---|
Normal_Mild.camnoiseprofile | Normal-lens handheld baseline — balanced position and rotation, moderate frequencies. |
Normal_Intense.camnoiseprofile | Aggressive normal-lens handheld — same shape, larger amplitudes. |
Telephoto_Mild.camnoiseprofile | Telephoto-lens handheld baseline — tighter angular response, low position amplitude. |
Telephoto_Intense.camnoiseprofile | Aggressive telephoto handheld — same shape, larger amplitudes. |
Wide_Mild.camnoiseprofile | Wide-lens handheld baseline — translation dominates; rotation low. |
Wide_Intense.camnoiseprofile | Aggressive wide-lens handheld — larger translation amplitudes. |
All-axes shake family
Position + rotation across all six axes. Use for event-triggered impulses (ImpulseNoise) or aggressive ambient shake.
| Asset | Use for |
|---|
6D_Shake.camnoiseprofile | Earthquake / impact aftermath — all six axes, high-frequency micro-jitter on top of mid-frequency sway. |
6D_Wobble.camnoiseprofile | Floaty / dreamlike — all six axes, low-frequency long sway. |
Authoring more
The full per-axis layer values are inspectable in the Asset Editor when you open any preset. To author additional characters — fast-handheld for chase sequences, ultra-mild for cutscenes, gunfire impulse profiles — follow the authoring conventions above starting from a copy of the closest shipped preset.
Creating a Noise Profile
- Open the Asset Editor in O3DE.
- Select New and choose CameraNoiseProfile from the asset type list.
- For each axis where you want noise, add layers via the + button. Three layers per axis is the typical authoring rhythm (slow / mid / fast).
- For each layer:
- Set the Amplitude in axis-appropriate units (meters for position, degrees for rotation).
- Set the Frequency in Hz.
- Optionally set a Phase offset (decorrelates layers from each other when they share frequency).
- Set the Description to record the preset’s intent or tuning history.
- Save the asset.
- Assign the asset to a
PerlinNoise or ImpulseNoise additive stage’s Profile slot.
See Also
Consumers:
Underlying utility:
- GS_Core Noise — the Perlin primitives,
NoiseLayer struct, and LayeredPerlin1D that this asset stores and feeds.
Related assets:
Basics-side authoring guide:
Get GS_PhantomCam
GS_PhantomCam — Explore this gem on the product page and add it to your project.
11.3.3 - Orbit Profiles
CameraOrbitShape (.camorbit) — parametric orbit-surface asset for DynamicOrbitBody. Three-band power-bulge family with arc-length reparameterization for constant spatial speed.
A Camera Orbit Profile is a .camorbit data asset that defines a parametric orbit surface around a target. It is consumed by the DynamicOrbitBody Body stage variant. Authors define three bands (low / mid / high) of (radius, height) and a Roundness slider that walks a power-bulge family — diamond → sphere → cube — across them. Arc-length reparameterization keeps spatial speed constant as the cam traces the shape, for any roundness value.
Profiles are registered through PhantomCamDataAssetsSystemComponent alongside .camblendprofile and .camnoiseprofile. The asset reflects with EnableForAssetEditor so the Asset Editor opens it directly.
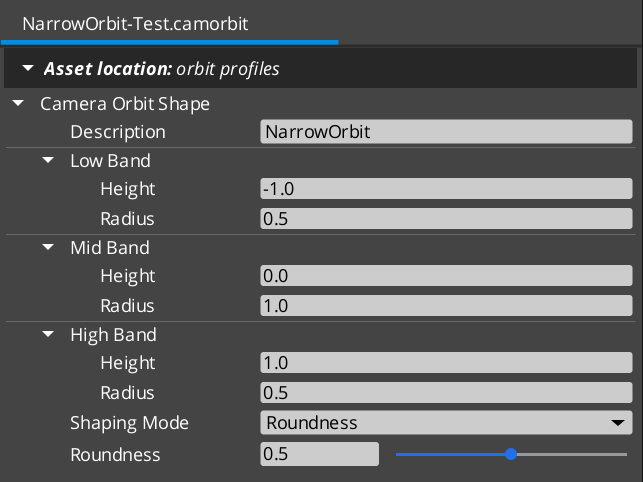
Contents
Three-Band Authoring Model
Authors define three (height, radius) bands around the target:
struct OrbitBand {
    float m_height = 0.0f;   // local-Z offset from cam target (meters)
    float m_radius = 5.0f;   // XY-plane distance from cam target (meters)
};
| Band | Default | Selected at pitch |
|---|
m_lowBand | (-2.0, 4.0) | −π/2 (cam below pivot) |
m_midBand | ( 0.0, 5.0) | 0 (the “centered / level” rest position) |
m_highBand | ( 3.0, 3.0) | +π/2 (cam above pivot) |
Z-up convention. m_height is the local-Z offset from the cam target; m_radius is the XY-plane distance.
Pitch Convention
Pitch ∈ [-π/2, +π/2] radians. Pitch is decoupled from the bands’ authored geometry:
pitch = 0 → mid band exactly (the “centered / level” rest pose).pitch = +π/2 → high band.pitch = −π/2 → low band.
Authors can put m_midBand.m_height at any value — pitch = 0 always selects mid regardless. Positive pitch always moves the cam toward high; negative always toward low. The bands’ actual heights / radii determine the cam’s spatial position; pitch is a band-interpolation parameter, NOT a literal elevation angle.
This decoupling lets authors think in spatial terms (mid is where the cam rests; low / high are the framing extremes) without needing mid.height = 0 for pitch = 0 to mean “level.”
Shape Family — Roundness Power-Bulge
A single m_roundness slider walks a power-bulge family:
pos(t) = chord(t) + p(t) · offset
where:
    chord(t) = lerp(endpoint, opposite endpoint, t)   // straight line low → high
    offset   = mid − midpoint(low, high)              // how far the bulge pokes out at mid
    p(t)     = 1 − |2t − 1|^n                         // bulge envelope
    n        = piecewise-linear in m_roundness         // 0 → 1 → kMaxBulge
p(t) is 0 at endpoints (t = 0 and t = 1) and 1 at midpoint (t = 0.5) for any n.
m_roundness | n | Shape | Description |
|---|
0.0 | 1 | Diamond | Piecewise linear. Sharp corner at mid. Bulge envelope is 1 − |2t − 1| — a tent. |
0.5 | 2 | Sphere | Smooth quadratic through low / mid / high. Bulge envelope is 1 − (2t − 1)². Default. |
1.0 | ~6 (kMaxBulge) | Square / rounded-square | Flat sides, sharp tapers near low / high. Bulge envelope is 1 − |2t − 1|^6 — almost a square wave. |
Mid is always the apex of the bulge for any n. pitch = 0 always lands exactly on mid. Angular velocity stays smooth throughout the slider’s range — no derivative discontinuities.
Curve Mode (Advanced)
For non-monotonic shapes (Bounce, Elastic, Back) that the power-bulge family cannot produce, authors can switch to ShapingMode::Curve and pick a GS_Core::CurveType enum value:
enum class ShapingMode : AZ::u8 {
    Roundness,  // power-bulge family (default)
    Curve,      // CurveType enum (advanced, supports overshoot)
};
When m_shapingMode == Curve, m_curve is consulted instead of m_roundness. The asset’s IsRoundnessVisible / IsCurveVisible predicates hide whichever field doesn’t match the current mode.
Curve mode skips arc-length reparameterization. Overshooting curves expressly want temporal shape, not constant spatial speed.
Arc-Length Reparameterization
EvaluateAtPitch treats input pitch as an arc-length fraction along the (radius, height) curve, not the curve’s intrinsic parameter t.
Why: without reparameterization, the cam covers wildly unequal spatial distances per unit pitch input. On a square shape (high roundness), constant pitch would whip past the tapers near low / high and crawl along the flat sides — feels broken.
With reparameterization:
- Internally sample the raw curve at 64 t-points, building a cumulative-length table.
- For a requested pitch fraction
s ∈ [0, 1], resolve the t such that cumulative arc length up to that t equals s · total length. - Evaluate the raw curve at that
t.
Result: constant pitch input → constant spatial speed of the cam along the orbit surface, for any roundness value.
Arc-length reparameterization is applied in Roundness mode only. Curve mode skips it.
Evaluation Entry Point
void CameraOrbitShape::EvaluateAtPitch(
    float  pitchRad,
    float& outRadius,
    float& outHeight) const;
pitchRad is clamped to [kPitchAtLow, kPitchAtHigh] = [-π/2, +π/2].- Returns
(radius, height) — XY-plane distance from the cam target plus local-Z offset.
The DynamicOrbitBody consumer wraps the call:
shape->EvaluateAtPitch(m_targetPitch, radius, height);
desiredPos = pivot + Vector3(radius * cos(m_targetYaw),
                             radius * sin(m_targetYaw),
                             height);
Constants
static constexpr float kPitchAtLow  = -π/2;
static constexpr float kPitchAtMid  =  0.0;
static constexpr float kPitchAtHigh =  π/2;
Available for editor visualization, body pitch clamping, and adoption-time pitch clamping.
Authored Fields
| Field | Default | Purpose |
|---|
m_lowBand | (-2.0, 4.0) | (height, radius) at pitch = −π/2. |
m_midBand | ( 0.0, 5.0) | (height, radius) at pitch = 0. The rest pose. |
m_highBand | ( 3.0, 3.0) | (height, radius) at pitch = +π/2. |
m_shapingMode | Roundness | Roundness or Curve. |
m_roundness | 0.5 | 0..1. Only visible when m_shapingMode == Roundness. 0 = diamond, 0.5 = sphere, 1 = square. |
m_curve | Linear | GS_Core::CurveType enum. Only visible when m_shapingMode == Curve. |
m_description | "" | Free-form author description. |
Creating an Orbit Profile
- Open the Asset Editor in O3DE.
- Select New and choose CameraOrbitShape from the asset type list.
- Set the three bands:
- Low Band —
(height, radius) for the cam-below-pivot extreme. - Mid Band —
(height, radius) for the cam’s level / rest pose. - High Band —
(height, radius) for the cam-above-pivot extreme.
- Choose a Shaping Mode:
- Roundness (default) — set the slider between 0 (diamond), 0.5 (sphere), 1 (square).
- Curve (advanced) — pick a
CurveType enum value for overshoot / bounce effects. Note that curve mode skips arc-length reparameterization.
- Set the Description to record the preset’s intent.
- Save the asset.
- Assign the asset to a
DynamicOrbitBody stage’s Orbit Shape slot.
See Also
Consumer:
Math primitive:
Related assets:
Get GS_PhantomCam
GS_PhantomCam — Explore this gem on the product page and add it to your project.
11.4 - Camera Influence Fields
Global and spatial camera influence components — priority modifiers that affect phantom camera selection without changing base priorities. Channel-aware routing via target entity.
Camera Influence Fields modify the effective priority of Phantom Cameras without changing their base priority values. They call AddCameraInfluence(sourceEntity, targetEntity, camName, influence) and RemoveCameraInfluence(sourceEntity, targetEntity) on the Cam Manager bus. The Cam Manager routes the influence to the channel that owns the target entity. Multiple influences on the same camera stack additively within a channel.
There are two influence component types:
- GlobalCameraInfluenceComponent — Applies a priority influence globally for its entire active lifetime. Place this on the StageData entity so it activates and deactivates automatically with the stage.
- CameraInfluenceFieldComponent — Applies a priority influence only when an entity (typically a player unit) enters a defined spatial volume. Requires a PhysX Collider set as a trigger on the same entity. See Physics Trigger Volume Utility.
For usage guides and setup examples, see The Basics: GS_PhantomCam.
Contents
How It Works
Global Influence
The GlobalCameraInfluenceComponent applies a constant priority modifier to a named phantom camera. On Activate(), it calls AddCameraInfluence on the Cam Manager bus. On Deactivate(), it calls RemoveCameraInfluence.
Placement: Add this component to the StageData entity. Because StageData activates at stage load and deactivates at stage unload, the camera influence is automatically scoped to the stage that defines it — no manual enable/disable management needed.
Global influences have no specific target entity, so in multi-channel projects they currently route through the channel-0 fallback. For Tier 3 projects that need a “global” influence applied to every channel, the cleaner pattern is one Global influence per channel — or use the Tug Field model which doesn’t go through the influence bus.
Spatial Influence
The CameraInfluenceFieldComponent uses a PhysX Collider (trigger mode) to detect when an entity enters or exits a defined region. On entry, it adds the influence with the crossing entity as the routing target; on exit, it removes the influence. See Physics Trigger Volume Utility for collider setup.
This is useful for level design — switching to an overhead camera when the player enters a specific room, or boosting a scenic camera in a vista area.
Influence Stacking
Multiple influences can be active on the same camera within a channel simultaneously. The Cam Manager sums all active influences with the base priority to compute the effective priority used during EvaluatePriority. The sourceEntity parameter is the per-channel storage key, so multiple overlapping fields applied to the same channel do not collide.
Channel Routing
The bus signature carries two entity arguments:
AddCameraInfluence(
    AZ::EntityId sourceEntity,   // the field volume's entity (storage key)
    AZ::EntityId targetEntity,   // the entity that triggered the influence (routing key)
    AZStd::string camName,
    AZ::u32 influence);
The Cam Manager looks up the channel via GetChannelForTarget(targetEntity):
| Resolution result | Behavior |
|---|
| Target is bound to a channel | Influence is stored in that channel’s priority table. Only that channel’s arbitration sees the boost. |
| Target is not bound to any channel | Influence is silently dropped. |
This gives clean isolation between players in co-op (player 1 entering a field does not affect player 2’s cam priorities) and natural behavior for non-player triggers (an enemy walking into a player-cam field doesn’t influence anything).
Subtle limitation. If an entity enters a field BEFORE SetTarget runs on its channel, the influence is dropped at trigger-enter time and not replayed when the target is later bound. Acceptable for typical “set target on player spawn” project patterns.
Cam Influence Data
The component authoring surface uses a CamInfluenceData structure to define the effect of one influence.
| Field | Type | Description |
|---|
CameraName | AZStd::string | Entity name of the phantom camera to influence. Must match exactly. |
Influence | AZ::u32 | Priority modifier applied to the named camera’s effective priority during arbitration. |
API Reference
The influence bus methods live on CamManagerRequestBus. Field components call the Cam Manager directly; the influence components do not expose their own request bus for AddCameraInfluence / RemoveCameraInfluence.
Request Bus: CamManagerRequestBus (influence methods)
| Method | Parameters | Returns | Description |
|---|
AddCameraInfluence | AZ::EntityId sourceEntity, AZ::EntityId targetEntity, AZStd::string camName, AZ::u32 influence | void | Adds a priority influence to the named camera in the channel that owns targetEntity. Silently dropped if the target isn’t channel-bound. |
RemoveCameraInfluence | AZ::EntityId sourceEntity, AZ::EntityId targetEntity | void | Removes the influence stored under (sourceEntity, targetEntity). |
Per-component inspection buses (GlobalCameraRequestBus and similar) expose component-local queries (GetGlobalCamera, etc.) for editor and runtime tooling but do not duplicate the influence-add API.
Note. AddCameraInfluence is not exposed to BehaviorContext / Script Canvas. Field components call it via C++ broadcast. Gameplay code that needs to drive influences from SC should author per-component surfaces or use the Tug Field system.
Component Reference
GlobalCameraInfluenceComponent
Applies a camera priority influence globally for its entire active lifetime.
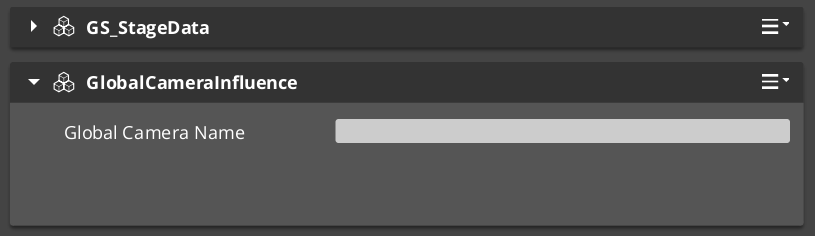
| Property | Type | Description |
|---|
CamInfluenceData | CamInfluenceData | The camera name and influence value to apply. |
Behavior: On Activate(), calls AddCameraInfluence(GetEntityId() /*source*/, AZ::EntityId() /*target*/, camName, influence). The invalid target id causes the influence to route through the channel-0 fallback in single-player projects.
On Deactivate(), calls RemoveCameraInfluence(GetEntityId(), AZ::EntityId()).
Placement: Add to the StageData entity to scope the influence to the stage lifecycle.
CameraInfluenceFieldComponent
Applies a camera priority influence when an entity enters a spatial trigger volume.
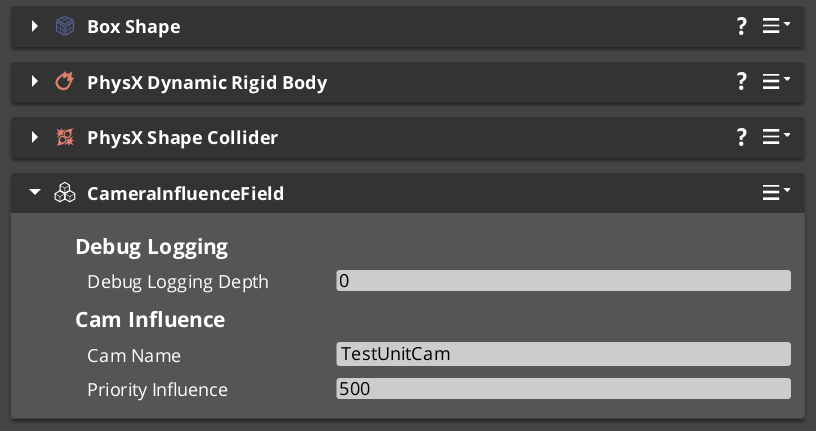
| Property | Type | Description |
|---|
CamInfluenceData | CamInfluenceData | The camera name and influence value to apply when triggered. |
Behavior: Requires a PhysX Collider (trigger) on the same entity. Inherits from GS_Core::PhysicsTriggerComponent for the trigger logic.
TriggerEnter(crossingEntity):
    CamManagerRequestBus::Broadcast(
        AddCameraInfluence,
        GetEntityId(),    // source — this field volume
        crossingEntity,   // target — what walked in (routing key)
        camName,
        influence);

TriggerExit(crossingEntity):
    CamManagerRequestBus::Broadcast(
        RemoveCameraInfluence,
        GetEntityId(),
        crossingEntity);
The crossingEntity is what makes this component channel-aware. In Tier 3 multi-channel projects, only the channel whose target matches the crossing entity sees the influence.
Setup:
- Add CameraInfluenceFieldComponent to an entity.
- Add a PhysX Collider (set as trigger) to the same entity. See Physics Trigger Volume Utility.
- Configure the PhysX collision filter so the collider detects the entities you want to trigger on (typically player units).
- Set the Camera Name to the target phantom camera’s entity name.
- Set the Influence value (positive to boost, negative to reduce priority).
Usage Examples
C++ — Adding an Influence Directly
#include <GS_PhantomCam/GS_CamManagerBus.h>

// Boost "CinematicCam" priority by 50 for player1 during a cutscene.
GS_PhantomCam::CamManagerRequestBus::Broadcast(
    &GS_PhantomCam::CamManagerRequests::AddCameraInfluence,
    AZ::EntityId(GetEntityId()),  // source — your gameplay system's entity
    AZ::EntityId(player1Entity),  // target — routes to player1's channel
    AZStd::string("CinematicCam"),
    AZ::u32(50));

// Remove the boost when the cutscene ends.
GS_PhantomCam::CamManagerRequestBus::Broadcast(
    &GS_PhantomCam::CamManagerRequests::RemoveCameraInfluence,
    AZ::EntityId(GetEntityId()),
    AZ::EntityId(player1Entity));
For a Tier 1 / single-player project, pass AZ::EntityId() for targetEntity to route through channel 0’s fallback.
See Also
For related PhantomCam components:
For related utilities:
For conceptual overviews and usage guides:
Get GS_PhantomCam
GS_PhantomCam — Explore this gem on the product page and add it to your project.
11.5 - Group Targets
GroupTargetComponent — weighted-centroid focal entity. Computes a centroid from a subject list and writes it to its own transform. Phantom Cameras point at it like any other target.
A Group Target is an entity whose world transform is the weighted centroid of a runtime-editable subject set. Phantom Cameras with CamTargetMode::GroupTarget point at it like any other target. The Cam Manager hosts a global name → entity registry so stages can resolve a group entity by string name without holding a direct reference.
Typical use cases:
- Two-player co-op — a group target tracks both players; the cam follows the group target.
- “Move when group is contained” cinematic cams — frame all subjects, ignore individual wandering.
- Combat encounters with multiple participants — track the weighted centroid of all combatants.
- Collapse-to-single-view in multi-channel projects — pair with a shared TrueUnique cam to detect when all channels converge.
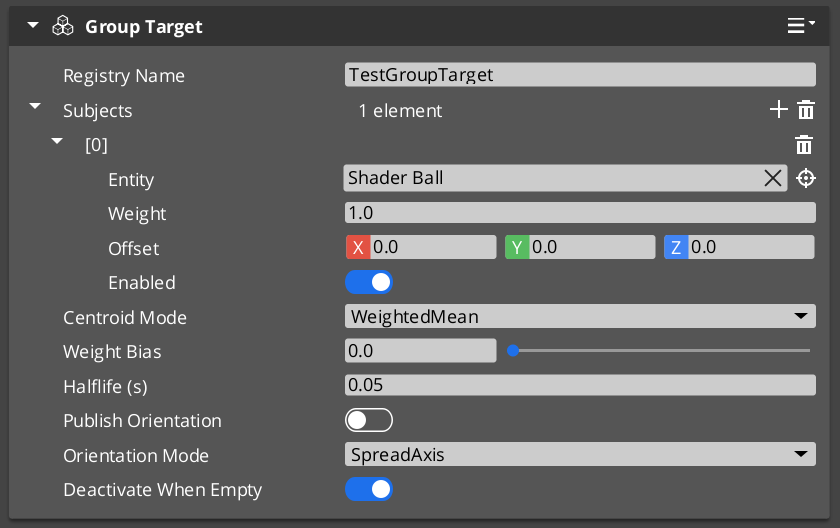
Contents
Registry Pattern
The Cam Manager owns a global name → entity registry for group targets.
On GroupTargetComponent::Activate:
CamManagerRequestBus::Broadcast(
    &CamManagerRequests::RegisterGroupTarget,
    m_name,
    GetEntityId());
On Deactivate:
CamManagerRequestBus::Broadcast(
    &CamManagerRequests::UnregisterGroupTarget,
    GetEntityId());
Stages resolve a group entity via:
AZ::EntityId groupEntity;
CamManagerRequestBus::BroadcastResult(
    groupEntity,
    &CamManagerRequests::FindGroupTargetByName,
    "MyGroup");
The editor dropdown for m_groupTargetName on Body / Aim stages populates from GetRegisteredGroupTargetNames.
See Cam Manager — Group Target Registry for the manager-side bus.
Evaluation Cadence
The component picks one of two cadences automatically:
| Cadence | When | Why |
|---|
| PhysX post-simulate | Any enabled subject is physics-driven (has a RigidBodyRequestBus handler) | Ensures the centroid uses post-simulate positions — no lag against physically-moving subjects. |
| TickBus | No physics subjects | Simple per-frame evaluation. |
Cadence is re-evaluated on every subject mutation (AddSubject, RemoveSubject, SetSubjectEnabled). m_boundToPostSim / m_boundToTick track the current binding.
Centroid Modes
enum class CentroidMode : AZ::u8 {
    WeightedMean,            // Σ(pos · weight) / Σ(weight)
    BoundingBoxCenter,       // (min + max) / 2 of axis-aligned bbox, biased toward weighted mean
    BoundingSphereCenter,    // Welzl-style sphere center, biased toward weighted mean
};
The bounding modes blend toward the weighted mean by m_weightBias ∈ [0, 1]:
m_weightBias = 0 — pure geometric center.m_weightBias = 1 — pure weighted mean.- Intermediate values produce a weighted-biased geometric center.
This lets weights still influence the framing point even when the geometric extent (bbox / sphere) is what really defines the group’s spread.
Orientation Modes
enum class OrientationMode : AZ::u8 {
    Identity,                  // group entity stays at identity rotation
    SpreadAxis,                // forward axis points along the long axis of subjects' spread
    WeightedAverageForward,    // weighted-average of subjects' forward vectors
};
m_publishOrientation is the master toggle. If false, the group entity stays at identity rotation regardless of mode.
Authored Fields
| Field | Default | Purpose |
|---|
m_name | "" | Registry key. Authored once; stages reference by this name. Empty = unregistered. |
m_subjects | {} | List of GroupSubject rows. |
m_mode | WeightedMean | Centroid mode. |
m_weightBias | 0.0 | When mode is not WeightedMean: blend factor toward weighted mean. |
m_smoothingHalflife | 0.0 | Optional centroid damping (0 = no smoothing). |
m_publishOrientation | false | Whether to write rotation to the group entity. |
m_orientationMode | SpreadAxis | Rotation derivation (when publishOrientation enabled). |
m_deactivateWhenEmpty | true | If true and m_subjects becomes empty, the group entity stops ticking — cam bodies see “no target” and fall back to hold-last pose. |
GroupSubject Struct
struct GroupSubject {
    AZ::EntityId  m_entity;
    float         m_weight  = 1.0f;
    AZ::Vector3   m_offset  = (0, 0, 0);   // applied to subject's world pos
    bool          m_enabled = true;
};
Each subject carries an offset and an enabled flag. Toggling m_enabled lets gameplay code temporarily exclude a subject without removing it from the list (cheaper than RemoveSubject + AddSubject since cadence rebind is suppressed).
Request Bus
GroupTargetRequestBus — per-entity addressed (the group’s own entity id).
Subject management
| Method | Use |
|---|
AddSubject(entity, weight) | Add with default offset. |
AddSubjectWithOffset(entity, weight, offset) | Add with custom offset. |
RemoveSubject(entity) | Remove. |
SetSubjectWeight(entity, weight) | Adjust weight. |
SetSubjectEnabled(entity, enabled) | Toggle without removing from list. |
ClearSubjects() | Remove all. |
GetSubjectEntities() | Returns list of EntityIds. |
Mode and smoothing
| Method | Use |
|---|
SetCentroidMode(mode) | Runtime mode swap. |
SetWeightBias(bias) | Adjust bias. |
SetSmoothingHalflife(halflife) | Adjust smoothing. |
SetPublishOrientation(enabled) | Toggle rotation publishing. |
SetOrientationMode(mode) | Runtime orientation mode swap. |
Query / diagnostics
| Method | Use |
|---|
GetCurrentCentroid() | Last evaluated centroid (post-smoothing if enabled). |
IsEvaluatingPostSim() | Diagnostic — returns true if currently bound to PhysX post-sim. |
Cadence-affecting mutations (AddSubject, RemoveSubject, SetSubjectEnabled) automatically call RebindEvaluationCadence.
Evaluation Algorithm
EvaluateCentroid(deltaTime):

    Collect (pos, weight) for every enabled subject:
        pos    = subject.entity.worldTM.translation + subject.offset
        weight = subject.weight

    Compute centroid by mode:
        WeightedMean         → Σ(pos · weight) / Σ(weight)
        BoundingBoxCenter    → lerp((min + max) / 2,  weightedMean, m_weightBias)
        BoundingSphereCenter → lerp(welzlCenter,      weightedMean, m_weightBias)

    If m_smoothingHalflife > 0:
        alpha = HalflifeAlpha(m_smoothingHalflife, deltaTime)
        m_lastCentroid = lerp(m_lastCentroid, centroid, alpha)
    Else:
        m_lastCentroid = centroid

    If m_publishOrientation:
        rotation = ComputeOrientation(positions, weights)
    Else:
        rotation = Identity

    Write (m_lastCentroid, rotation) to GetEntityId()'s TransformBus.
Cam-Side Usage
A Phantom Camera body or aim stage authored with m_targetMode = CamTargetMode::GroupTarget sets m_groupTargetName to the group’s registered name. At runtime, the stage resolves the group entity via the Cam Manager registry:
// In the stage's ResolveTarget or StageHelpers::ResolveStageTargetTM:
AZ::EntityId groupEntity;
CamManagerRequestBus::BroadcastResult(
    groupEntity,
    &CamManagerRequests::FindGroupTargetByName,
    m_groupTargetName);

return groupEntity;   // body / aim then reads this entity's world TM as the target
The same pattern applies to Body stages (for follow) and Aim stages (for look-at) — each can independently target a group.
Pairing with Shared Cams
A GroupTargetComponent paired with a shared TrueUnique cam (see Channels & Instancing — Cam Channel Scope) is the canonical “collapse to one view” trigger:
- The group target tracks all players.
- The shared cam targets the group entity.
- When all rigs / channels select the shared cam (typical at convergence radius),
OnAllChannelsActivatedSharedCam(sharedCam) fires once on the Cam Manager notification bus. - UI switches from split-screen to single-view layout.
See Channels & Instancing — Shared Cams and Collapse Detection for the collapse-detection details.
See Also
Related PhantomCam pages:
Basics-side authoring guide:
Get GS_PhantomCam
GS_PhantomCam — Explore this gem on the product page and add it to your project.
11.6 - Tug Fields
Spatial cam-pose reposition system — CameraTugVolumeComponent, CameraTugSourceComponent, TugFieldProxyComponent, TugAimListener, TugBodyListener. Decoupled volume / source / proxy, PhysX layer-gated, no central registry.
Tug Fields are a spatial reposition system that modulates the camera’s pose (position and / or rotation) when a designated proxy entity enters a defined volume. Used for environmental cinematography — pulling the cam toward a vista point when the player walks past a railing, slerping the aim toward a focal point as the player passes a mantle, etc.
The system is three-part decoupled:
CameraTugVolumeComponent — spatial gate. Lives on an entity with a PhysX trigger collider on the TugField layer.CameraTugSourceComponent — geometric pull configuration. Decoupled from the volume so the activation region and the focal point can be physically apart.TugFieldProxyComponent — opt-in marker on entities that should engage tug fields. Lives on the target (or its descendant, or a cam-side descendant).
The cam-side consumers are reposition-phase additives:
TugAimListener — slerps state.rotation toward the smoothed source point.TugBodyListener — lerps state.position toward the smoothed source point.
No central registry. Filtering happens at PhysX layer config (TugProxy ↔ TugField collision-group pair). Tug volumes broadcast on a per-proxy TugProxyNotificationBus address; listeners maintain their own active-source cache. Per-tick cost is O(volumes the proxy is in) — independent of total world volume count.
Tug-field m_channels ≠ instancing ChannelId. Tug-field channels are arbitrary string tags (“Cinematic”, “Combat”) that match volumes to listeners. They are unrelated to the integer ChannelIds on the Channels & Instancing page despite the shared word. The codebase reuses the identifier name; the docs make the distinction prominent here.
Contents
CameraTugVolumeComponent
Spatial gate. Wraps GS_Core::PhysicsTriggerComponent. Lives on an entity with a PhysX trigger collider configured on the dedicated TugField layer.
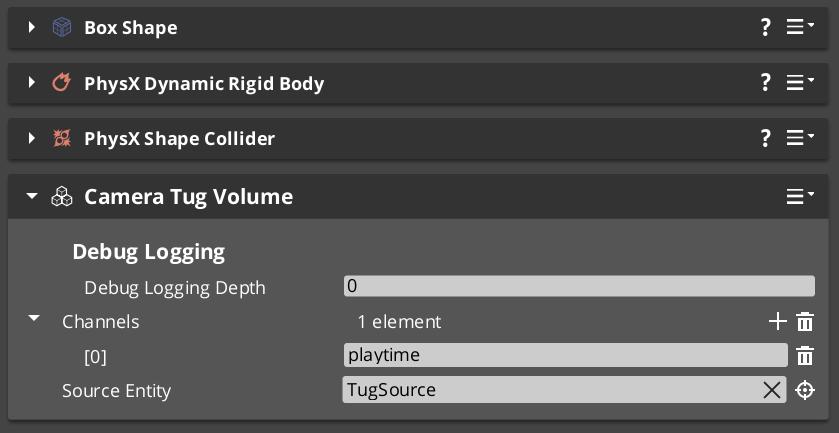
Source resolution rules
The volume’s authored m_sourceEntity:
- Unset → falls back to self (the volume’s own entity).
- Valid + source resolved → uses that entity’s
CameraTugSourceComponent. - Set but unresolvable → field is INERT. Warns once at Activate;
TriggerEnter early-returns without notifying.
Authored fields
| Field | Default | Purpose |
|---|
m_channels | {} | List of channel tag strings (“env”, “cinematic”, etc.). Hashed to Crc32 once at Activate. Listeners filter by intersection. |
m_sourceEntity | (entity slot) | Optional. Unset → use self. |
Per-trigger broadcast
TriggerEnter(proxyEntity):
    if not m_resolvedSource:  return false (inert)
    TugProxyNotificationBus::Event(
        proxyEntity,
        &TugProxyNotifications::OnVolumeEnter,
        GetEntityId() /*volume*/,
        m_channelHashes,
        m_resolvedSource);
    return true

TriggerExit(proxyEntity):
    TugProxyNotificationBus::Event(
        proxyEntity,
        &TugProxyNotifications::OnVolumeExit,
        GetEntityId());
    return true
OnVolumeExit broadcasts unconditionally — listeners that didn’t cache the volume on enter erase a non-existent key (silent no-op).
Request bus
CameraTugVolumeRequestBus — per-entity addressed.
| Method | Use |
|---|
IsProxyInContact(proxyEntity) | Predicate — does this volume currently contain the proxy? |
GetChannelHashes() | Returns the cached Crc32 channel hashes. |
GetResolvedSource() | Returns the resolved source component (or null if inert). |
GetVolumeEntityId() | Returns the volume’s own entity id. |
Used by listeners during proxy rebind to discover volumes already containing a newly-resolved proxy — PhysX doesn’t re-fire enters when the bus reconnects mid-overlap. See Proxy Rebind Walk.
CameraTugSourceComponent
Pure data + helpers that resolve source and destination world-space points. No collider, no triggering.
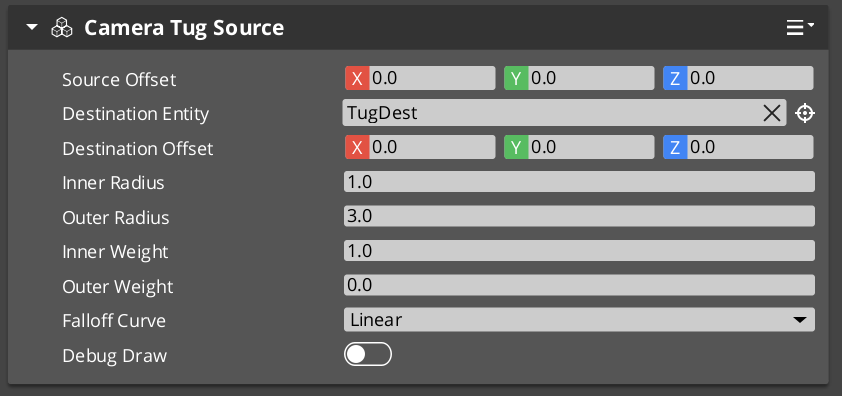
Source vs. destination — fully decoupled
| Concept | Meaning |
|---|
| Source point | Where proximity is measured FROM. The radii are centered on this point; the gravity-well falloff evaluates against the proxy’s distance to it. |
| Destination point | Where the cam is pulled TOWARD. Modulation drags the cam (Body) or its forward (Aim) toward this point, weighted by the proximity-derived influence. |
| Case | Setup |
|---|
| Common — source == destination | Cam pulls toward where proximity is measured. Leave m_destinationEntity unset. |
| Decoupled | Source measured around a doorway threshold; destination 10 m past the doorway pointing at a vista. Set m_destinationEntity to the destination point’s entity. |
| Fallback | If m_destinationEntity is unset, destination = source point. |
Authored fields
| Field | Default | Purpose |
|---|
m_tugPointOffset | (0, 0, 0) | Local-space offset from THIS entity’s transform — places the proximity-reference point distinct from the entity’s pivot. |
m_destinationEntity | (entity slot) | Optional. Valid → destination = that entity’s world TM × m_destinationOffset. |
m_destinationOffset | (0, 0, 0) | Local-space offset from m_destinationEntity. Ignored when unset. |
m_innerRadius | 1.0 m | Deadzone. distance ≤ this = full influence. |
m_outerRadius | 8.0 m | Zero-influence boundary. distance ≥ this = no contribution. |
m_innerWeight | 1.0 | Influence at deadzone (full strength). |
m_outerWeight | 0.0 | Influence at outer boundary. Default zero so engagement ramps smoothly. |
m_falloffCurve | EaseInOutQuadratic | GS_Core::CurveType applied across the outer → inner falloff span. |
Helper methods
AZ::Vector3 GetSourcePoint()      const;
AZ::Vector3 GetDestinationPoint() const;
float GetInnerRadius()  const;
float GetOuterRadius()  const;
float GetInnerWeight()  const;
float GetOuterWeight()  const;
GS_Core::CurveType GetFalloffCurve() const;
Listeners read these directly via a cached pointer (no per-tick bus call).
TugFieldProxyComponent
Lightweight opt-in marker. Functions as a marker + bus address. No fields. No logic beyond existing.
The PhysX trigger collider that actually overlaps tug volumes must be authored alongside this component on the same entity, set to the dedicated TugProxy collision layer.
Authoring placements
| Placement | Use for |
|---|
| On the target entity directly (player root, boss root) | Simple cases. |
| On a child entity of the target | When the proxy should be at chest height, vehicle COM, etc. Tug listeners walk target descendants to find proxies. |
| On the cam entity (or its child) | Fallback for cams that should react to environmental fields without target cooperation. |
TugProxyNotificationBus
Per-entity addressed (the proxy entity’s id).
class TugProxyNotifications : public AZ::EBusTraits
{
public:
using BusIdType = AZ::EntityId;
static const AZ::EBusAddressPolicy AddressPolicy = AZ::EBusAddressPolicy::ById;
static const AZ::EBusHandlerPolicy HandlerPolicy = AZ::EBusHandlerPolicy::Multiple;
virtual void OnVolumeEnter(
AZ::EntityId volumeEntity,
const AZStd::vector<AZ::Crc32>& volumeChannels,
const CameraTugSourceComponent* source) {}
virtual void OnVolumeExit(AZ::EntityId volumeEntity) {}
};
Multi-handler so multiple listeners (Body + Aim on the same cam, plus diagnostic tooling) can subscribe at the same proxy address.
Listener Stages
TugAimListener and TugBodyListener are reposition-phase additives — see Additive Stage Variants. Both derive from a shared TugListenerBase that holds the channel-matching, proxy resolution, active-source cache, smoothed-influence state, and the per-tick algorithm.
Shared authored fields
| Field | Default | Purpose |
|---|
m_enabled | true | Master toggle. |
m_channels | {} | Channel tag strings to match against volume channels. Empty = match all. |
m_blendHalflife | 0.25 | Smoothing on engagement / disengagement. |
m_strength | 1.0 | Overall multiplier. |
A cam can run only the aim listener, only the body listener, both, or neither — each is independent.
Per-Tick Algorithm
1. ResolveProxy(ctx)
Walk target descendants → cam-self descendants → inert.
If changed since last tick, rebind bus + RepopulateFromVolumeWorld.
2. Sum contributions from m_activeSources:
For each (volume, source) in m_activeSources:
distance = (proxy.worldPos - source.GetSourcePoint()).length
if distance >= source.outerRadius: skip
t = (source.outerRadius - distance)
/ (source.outerRadius - source.innerRadius)
t = ApplyCurve(clamp(t, 0, 1), source.falloffCurve)
weight = lerp(source.outerWeight, source.innerWeight, t) * m_strength
contribute (weight, source.GetDestinationPoint())
totalInfluence, weightedSourcePoint = combined
3. Dormancy check:
If totalInfluence == 0 AND m_smoothedInfluence ≈ 0:
m_dormant = true; return. // full early-exit when settled
4. Dormant → engaged seeding (if transitioning):
m_smoothedSourcePoint = derived.GetSeedSourcePoint(state)
// Aim: point along cam's current forward — zero-displacement transition.
// Body: state.position — zero-displacement transition.
5. Damping:
alpha = HalflifeAlpha(m_blendHalflife, dt)
m_smoothedInfluence = lerp(m_smoothedInfluence, totalInfluence, alpha)
m_smoothedSourcePoint = lerp(m_smoothedSourcePoint, weightedSourcePoint, alpha)
6. derived.ApplyModulation(state, ctx, m_smoothedInfluence, m_smoothedSourcePoint)
TugAimListener.ApplyModulation
Derives the natural rotation directly from ctx (cam → primary target forward), not from state.rotation. This prevents compound-feedback where prior tug modifications would loop into the next tick’s blend source.
naturalFwd = (ctx.targetTM.translation - ctx.camInitialTM.translation).normalized
naturalRot = LookAt(naturalFwd, +Z)
modulatedRot = LookAt((sourcePoint - ctx.camInitialTM.translation).normalized, +Z)
state.rotation = Slerp(naturalRot, modulatedRot, smoothedInfluence * m_strength)
TugBodyListener.ApplyModulation
Derives natural pose source from ctx.targetTM / the Body’s state.bodyAnchor sidecar, not state.position.
naturalPos = state.bodyAnchor // or ctx.targetTM.translation + body offset
state.position = Lerp(naturalPos, smoothedSourcePoint, smoothedInfluence * m_strength)
Proxy Rebind Walk
When the listener’s resolved proxy changes (target switched, proxy entity destroyed), the listener:
- Unbinds from the old proxy’s
TugProxyNotificationBus. - Clears
m_activeSources cache. - Binds to the new proxy’s bus address.
RepopulateFromVolumeWorld — walks all CameraTugVolumeRequestBus handlers and synthesizes OnVolumeEnter for any that already contain the new proxy.
PhysX does not re-fire enter events when a bus reconnects mid-overlap, so this catchup walk is essential. Without it, a switched proxy would miss every volume it’s already inside until it leaves and re-enters.
PhysX Layer Setup
The system requires a specific PhysX collision-group preset configured at project setup time:
| Layer | Used by | Pair with |
|---|
TugProxy | TugFieldProxyComponent’s sibling collider | TugField |
TugField | CameraTugVolumeComponent’s sibling collider (trigger) | TugProxy |
Both layers overlap only with each other in the collision-group preset. This ensures tug volumes fire triggers only for registered proxies — no general-world filtering needed at runtime.
This is the single most common authoring failure. If you set up volumes and listeners but nothing fires, the PhysX layer config is the first thing to verify. Without the TugProxy ↔ TugField pair, no triggers ever fire.
Authoring Workflow
- Set up PhysX layers (one-time project setup): create
TugProxy and TugField layers; pair them via collision-group preset. - On the player entity (or child): Add
TugFieldProxyComponent + a PhysX trigger collider on the TugProxy layer. - On each level entity that should be a tug field: Add
CameraTugVolumeComponent + a PhysX trigger collider (trigger mode) on the TugField layer. Set m_channels for filtering. - For decoupled source / destination: Add
CameraTugSourceComponent to a separate entity at the focal point; point the volume’s m_sourceEntity at it. Set its m_destinationEntity if the pull point differs from the source. - On the cam: Add
TugAimListener and / or TugBodyListener to the cam’s m_additives. Set the listener’s m_channels to match the volumes’ channels (or leave empty to match all).
See Also
Related PhantomCam pages:
Basics-side authoring guide:
Get GS_PhantomCam
GS_PhantomCam — Explore this gem on the product page and add it to your project.
11.7 - Camera Input Reader
GS_CameraInputReaderComponent and OrbitInputProvider bus — translates input profile events into per-tick yaw / pitch deltas for DynamicOrbitBody. Per-axis Axis vs Delta style, sensitivity, buffer drain, ResetPendingInput invariant.
The Camera Input Reader translates GS_InputProfile events into per-tick yaw / pitch deltas for the DynamicOrbitBody Body stage. It subclasses GS_Core::GS_InputReaderComponent (inherits profile binding, channel filtering, deadzone handling) and publishes results on the OrbitInputProvider bus that the orbit body polls each tick.
It mirrors the GS_PlayerControllerInputReaderComponent pattern from gs_unit: the parent resolves which named events to fire; the subclass routes those events to the system that consumes them.
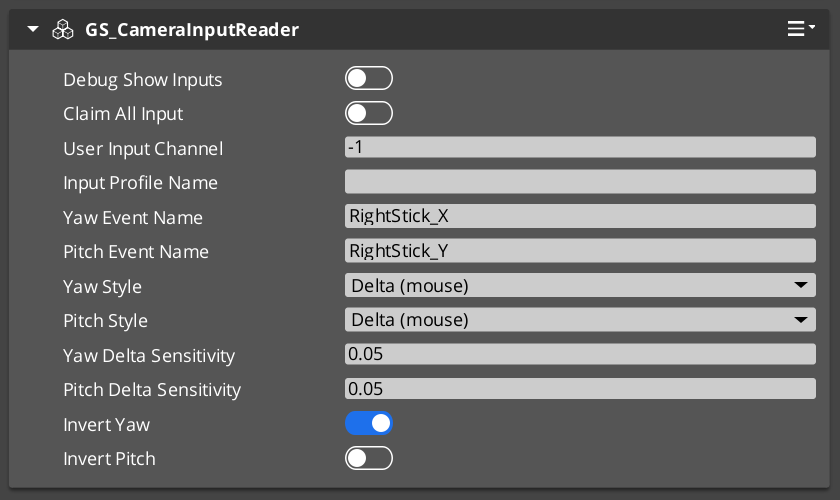
Contents
The Camera Input Reader implements OrbitInputProvider on the cam’s entity address. The DynamicOrbitBody binds to this bus at first Evaluate and polls it every tick.
class OrbitInputProvider : public AZ::EBusTraits
{
public:
using BusIdType = AZ::EntityId;
static const AZ::EBusAddressPolicy AddressPolicy = AZ::EBusAddressPolicy::ById;
static const AZ::EBusHandlerPolicy HandlerPolicy = AZ::EBusHandlerPolicy::Single;
virtual void GetOrbitInputDelta(float& outYawDelta, float& outPitchDelta) const = 0;
virtual void ResetPendingInput() = 0;
};
Per-entity addressed, single-handler. The reader component must live on the cam entity (or a child whose ancestor walk resolves to the cam) so the bus address matches ctx.camEntityId.
Each axis (yaw, pitch) authors an independent style. The reader handles the two source semantics differently:
| Style | Source | Behavior |
|---|
Axis | Joystick / continuous analog | Last-write-wins state. Held axis = continuous rotation. The input profile fires StateUpdated each frame and the reader overwrites; release fires value 0 and rotation stops. |
Delta | Mouse / per-frame deltas | Accumulating buffer reset on poll. Per-frame pixel deltas are scaled by sensitivity and accumulated. On poll, the reader returns the accumulated value AND resets the buffer to zero. Mouse rest = no rotation. |
A reader can mix styles — joystick yaw + mouse pitch, for example — by setting m_yawStyle = Axis and m_pitchStyle = Delta.
Authored Fields
| Field | Default | Purpose |
|---|
m_yawEventName | "OrbitYaw" | The named event in the InputProfile that yaw should listen for. |
m_pitchEventName | "OrbitPitch" | Pitch event name. |
m_yawStyle | Axis | Per-axis style (Axis or Delta). |
m_pitchStyle | Axis | Per-axis style. |
m_yawDeltaSensitivity | 0.05 | Pixels-per-frame → axis units. Only used in Delta mode. Default 0.05 means a 20-pixel mouse swing in one frame produces 1.0 axis unit (= one tick at the body’s full m_yawSpeed). |
m_pitchDeltaSensitivity | 0.05 | Same, pitch. |
m_invertYaw | false | Invert yaw axis. |
m_invertPitch | false | Invert pitch axis. |
GS_InputProfile asset assignment is inherited from GS_InputReaderComponent — author the profile separately and reference it in the component’s standard input-profile slot.
Runtime State
mutable float m_pendingYaw = 0.0f;
mutable float m_pendingPitch = 0.0f;
mutable so the const GetOrbitInputDelta override can reset Delta-mode buffers on poll. Axis-mode buffers are written from HandleFireInput and read back unchanged.
Event Handling
When an InputProfile event fires:
HandleFireInput(eventName, value):
if eventName == m_yawEventName:
v = m_invertYaw ? -value : value
if m_yawStyle == Axis:
m_pendingYaw = v // last-write-wins
else /* Delta */:
m_pendingYaw += v * m_yawDeltaSensitivity // accumulate
elif eventName == m_pitchEventName:
v = m_invertPitch ? -value : value
if m_pitchStyle == Axis:
m_pendingPitch = v
else /* Delta */:
m_pendingPitch += v * m_pitchDeltaSensitivity
Poll Handling
When the body polls the bus:
GetOrbitInputDelta(out outYawDelta, out outPitchDelta):
outYawDelta = m_pendingYaw
outPitchDelta = m_pendingPitch
if m_yawStyle == Delta: m_pendingYaw = 0.0 // drain on read
if m_pitchStyle == Delta: m_pendingPitch = 0.0
Axis-mode buffers are NOT drained on poll — the body’s next tick reads the same held value (consistent with “held stick = continuous rotation”). Delta-mode buffers are drained because mouse-rest must mean no rotation.
ResetPendingInput():
m_pendingYaw = 0.0
m_pendingPitch = 0.0
Called by the DynamicOrbitBody when ctx.snapThisFrame == true. Critical for cams with alwaysUpdate = false:
When such a cam is dormant, mouse motion still accumulates into m_pendingYaw / m_pendingPitch via Delta-mode event handling (the input profile keeps firing). Without the snap-time reset, the cam would “burst” all the accumulated input the moment it became active.
This is defense-in-depth paired with the per-tick drain. The body polls every tick (regardless of whether it integrates the result), so Delta buffers don’t accumulate while the cam ticks but is dormant. ResetPendingInput clears any stragglers at the moment activation snap occurs.
See Phantom Cameras — Execution States for the dormancy + reactivation lifecycle.
DynamicOrbitBody Consumption
// In DynamicOrbitBody::Evaluate:
// 1. Ensure bus binding.
EnsureBusConnected(ctx.camEntityId);
// 2. Poll input deltas every tick (regardless of integration eligibility,
// so Delta-mode buffers drain whether we integrate or not).
float yawDelta = 0.0f, pitchDelta = 0.0f;
OrbitInputProviderBus::Event(ctx.camEntityId,
&OrbitInputProvider::GetOrbitInputDelta, yawDelta, pitchDelta);
// 3. Gate integration on input-eligibility predicate.
const bool integrateInput = (ctx.hasFocus || ctx.alwaysUpdate || ctx.blendingOut);
if (integrateInput)
{
m_targetYaw += yawDelta * AZ::DegToRad(m_yawSpeed) * dt;
m_targetPitch += pitchDelta * AZ::DegToRad(m_pitchSpeed) * dt;
// Apply WrapYawToPi + pitch clamp.
}
// 4. On snap: reset reader buffers.
if (ctx.snapThisFrame)
{
OrbitInputProviderBus::Event(ctx.camEntityId,
&OrbitInputProvider::ResetPendingInput);
}
Sensitivity vs Halflife vs Speed
A common authoring confusion — three different controls, three different purposes:
| Control | Lives on | Effect | When to tune |
|---|
Sensitivity (m_yawDeltaSensitivity / m_pitchDeltaSensitivity) | Camera Input Reader, Delta mode only | Converts raw input units (pixels) → axis units. “How much axis movement per unit of physical input.” | Mouse feel — pixel-to-rotation conversion. |
Speed (m_yawSpeed / m_pitchSpeed) | DynamicOrbitBody | Degrees / sec per unit axis input. “How fast the cam rotates per unit of axis movement.” | Overall rotation speed at full stick / full mouse delta. |
Halflife (m_blendHalflife) | DynamicOrbitBody | Solver damping — how fast the cam catches up to the target angles. “How responsive the cam feels.” | Visual snap vs glide on the cam’s response. |
Don’t conflate. Sensitivity controls input mapping; Speed controls rotation amount per input; Halflife controls visual responsiveness.
Authoring Workflow
- Place
GS_CameraInputReaderComponent on the cam entity (or its child — the bus is per-entity addressed, so the entity ID must match ctx.camEntityId, which is the cam entity itself). - Assign a
GS_InputProfile asset in the parent’s slot (inherited from GS_InputReaderComponent). - Author profile events named
OrbitYaw and OrbitPitch (or rename the reader’s m_yawEventName / m_pitchEventName to match your profile). - Set per-axis style:
- Mouse-driven cams → both axes
Delta. Tune m_*DeltaSensitivity to taste. - Joystick-driven cams → both axes
Axis. Sensitivity is ignored. - Mixed (mouse for yaw, gamepad stick for pitch) → mix as needed.
- Optionally toggle
m_invertYaw / m_invertPitch.
See Also
Consumer:
Related PhantomCam pages:
Parent input system:
Get GS_PhantomCam
GS_PhantomCam — Explore this gem on the product page and add it to your project.
11.8 - Templates
ClassWizard templates for GS_PhantomCam — custom phantom camera behaviour components.
All GS_PhantomCam extension types are generated through the ClassWizard CLI. The wizard handles UUID generation, cmake file-list registration, and module descriptor injection automatically.
For usage guides and setup examples, see The Basics: GS_PhantomCam.
python ClassWizard.py \
--template <TemplateName> \
--gem <GemPath> \
--name <SymbolName> \
[--input-var key=value ...]
Contents
Phantom Camera Component
Template: PhantomCamera
Creates a custom camera behaviour component, a child of GS_PhantomCameraComponent. Multiple camera components can coexist on a Camera Entity; the GS_CamManagerComponent activates them by priority. Override the follow, look-at, and tick virtuals to define custom camera positioning and aiming logic.
Generated files:
Source/${Name}PhantomCamComponent.h/.cpp
CLI:
python ClassWizard.py --template PhantomCamera --gem <GemPath> --name <Name>
Post-generation: None — cmake and module registration are fully automatic. Override the following virtual methods:
| Method | Purpose |
|---|
ProcessPhysicsFollow() | Drive camera position each physics tick using VelocitySpringDamper |
ProcessPhysicsLookAt() | Drive camera rotation using QuaternionSpringDamper |
EvaluateCamTick(dt) | Per-frame camera logic (blend weights, FOV, offsets) |
ProcessTransformFollow() | Position follow when physics is not available |
ProcessTransformLookAt() | Rotation follow when physics is not available |
Extensibility: One component per camera mode (e.g. ThirdPerson, Aim, Dialogue, Cinematic). Components declare incompatibility with GS_PhantomCameraComponentService so only one camera behaviour is active at a time on an entity. Swap active cameras by toggling component activation, or let the CamManager handle priority.
See also: Phantom Cameras — full extension guide with complete header and implementation examples.
See Also
For the full API, component properties, and C++ extension guide:
For all ClassWizard templates across GS_Play gems:
Get GS_PhantomCam
GS_PhantomCam — Explore this gem on the product page and add it to your project.
11.9 - 3rd Party Implementations
For usage guides and setup examples, see The Basics: GS_PhantomCam.
Get GS_PhantomCam
GS_PhantomCam — Explore this gem on the product page and add it to your project.
12 - GS_Stats
RPG stat definitions, stat containers, and a polymorphic status effect system for character and entity attribute management.
GS_Stats provides the attribute and status effect layer for GS_Play projects. It gives entities a stat container that holds named, typed values (health, stamina, speed, and any custom stat you define), and a status effect system that applies timed or conditional modifications to those stats. GS_Stats is under active development — the API surface is evolving and some features listed here may expand in future releases.
For usage guides and setup examples, see The Basics: GS_Stats.
Contents
Status Effects
The status effect system applies timed or trigger-driven modifications to entity stats. Effects are polymorphic data assets that define what stat they target, how they modify it, and when they expire. Multiple effects stack on the same entity and resolve in a defined order.
| Area | Contents |
|---|
| Effect Assets | Data-driven effect definitions with target stat, modification type, magnitude, and duration. |
| Effect Container | Runtime component that holds the active effect stack for an entity and processes tick-based expiry. |
| Modification Types | Additive, multiplicative, and override modification strategies. |
| Conditions | Conditional triggers for applying or removing effects based on stat thresholds or game records. |
Status Effects API
Installation
GS_Stats is a standalone gem with no external GS gem dependencies beyond GS_Core.
- Enable GS_Stats and GS_Core in your O3DE project’s gem list.
- Add the stat container component to any entity that requires tracked attributes.
- Define stat definitions in your project’s stat registry (data asset).
- Add status effect asset files to your project and reference them from abilities, items, or world triggers.
Note: GS_Stats is under active development. Check the changelog for the latest additions before starting integration work.
See Also
For conceptual overviews and usage guides:
For sub-system references:
For related resources:
Get GS_Stats
GS_Stats — Explore this gem on the product page and add it to your project.
12.1 - 3rd Party Implementations
For usage guides and setup examples, see The Basics: GS_Stats.
Get GS_Stats
GS_Stats — Explore this gem on the product page and add it to your project.
12.2 - Status Effect
The core gem for the GS_Play framework.
For usage guides and setup examples, see The Basics: GS_Stats.
Get GS_Stats
GS_Stats — Explore this gem on the product page and add it to your project.
13 - GS_Complete
Cross-gem integration layer — reference components that combine multiple GS_Play gems for camera-aware performers, cinematic controllers, and dialogue UI selection.
GS_Complete is the cross-gem integration layer. It depends on every other GS gem and provides reference components that combine functionality from two or more gems — camera-aware paper facing, cinematic-driven unit controllers, dialogue camera effects, and dialogue UI selection buttons. GS_Complete exists as a pattern reference: it proves that gem combination works cleanly via companion components and bus events, without modifying any gem’s source code.
Contents
Cinematics + PhantomCam
Dialogue effects that control camera behavior during conversations. These extend DialogueEffect and are discovered automatically through O3DE serialization, demonstrating how external gems add new dialogue effects without modifying GS_Cinematics.
| Component | Purpose |
|---|
| SetCamPriority_DialogueEffectComponent | Dialogue effect that changes a phantom camera’s priority during a dialogue sequence. |
| TogglePhantomCam_DialogueEffectComponent | Dialogue effect that enables or disables a phantom camera during a dialogue sequence. |
Cinematics + UI
Connects LyShine button interactions to the dialogue selection system, enabling player choice UI in dialogue sequences.
| Component | Purpose |
|---|
| GS_UIDialogueSelectButtonComponent | Button component for dialogue choice selection — bridges LyShine button events to dialogue selection bus events. |
Camera-aware extensions for the Performer system, enabling 2.5D paper characters to face the active camera correctly.
| Component | Purpose |
|---|
| CamCorePaperFacingHandlerComponent | Camera-aware paper facing for 2.5D performers — uses CamCore notifications to adjust paper performer facing direction relative to the active camera. |
Unit + Cinematics
Unit controller extensions driven by the cinematic system rather than player input.
| Component | Purpose |
|---|
| CinematicControllerComponent | Unit controller driven by cinematic sequences — extends GS_UnitControllerComponent to be driven by cinematic playback. |
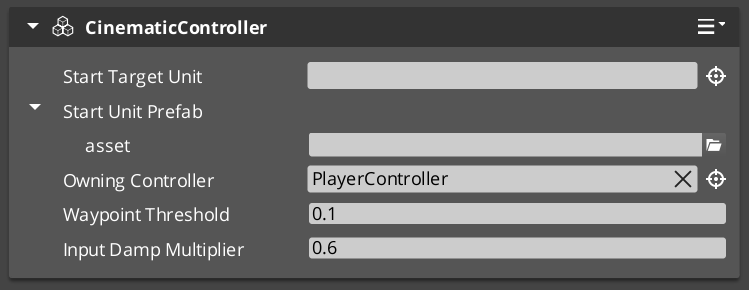
Architecture
GS_Complete follows the companion component pattern — each cross-gem component lives on the same entity as the components it integrates, communicating via their existing EBus interfaces. No gem source code is modified.
GS_Complete (integration layer)
├── Cinematics × PhantomCam
│ ├── SetCamPriority_DialogueEffectComponent
│ └── TogglePhantomCam_DialogueEffectComponent
├── Cinematics × UI
│ └── GS_UIDialogueSelectButtonComponent
├── Performer × PhantomCam
│ └── CamCorePaperFacingHandlerComponent
└── Unit × Cinematics
└── CinematicControllerComponent
System Components
| Component | Purpose |
|---|
| GS_CompleteSystemComponent | Runtime system component for GS_Complete. |
Dependencies
- All GS gems (required — GS_Core, GS_Audio, GS_Cinematics, GS_Environment, GS_Interaction, GS_Juice, GS_Performer, GS_PhantomCam, GS_UI, GS_Unit, GS_AI, GS_Platform)
- LyShine (required — for dialogue UI selection)
- RecastNavigation (required — via GS_Cinematics)
Installation
- Enable the GS_Complete gem in your project configuration.
- Ensure all other GS gems are also enabled — GS_Complete depends on the full suite.
- Add cross-gem components to entities alongside the gem components they integrate.
See Also
For conceptual overviews and usage guides:
For related API references:
13.1 - Third Party Implementations
Integration guides for third-party cross-gem components with GS_Complete.
This section will contain integration guides for connecting third-party cross-gem components with the GS_Complete integration layer.
14 - GS_UI
The complete UI framework — single-tier page navigation, motion-based animations, enhanced buttons, input interception, load screens, and pause menus.
GS_UI is the gem that builds the game’s interface layer on top of O3DE’s LyShine system. It replaces the old multi-tier Hub/Window/Page hierarchy with a clean single-tier model: the UI Manager owns canvases, and each canvas root is a Page that can parent any depth of nested child Pages. Navigation is fully recursive — any page can push, pop, or swap focus within its subtree. Animations are authored as .uiam data assets using eight LyShine-specific motion tracks (position, scale, rotation, alpha, color, text). Buttons, input interception, load screens, and pause menus round out the feature set.
For usage guides and setup examples, see The Basics: GS_UI.
Contents
UI Manager
The singleton that owns all loaded canvases. The UI Manager loads and unloads canvases by name, maintains a global focus stack across canvases, and drives the startup focus sequence deterministically.
| Component | Purpose |
|---|
| GS_UIManagerComponent | Singleton manager. Loads canvases, maintains global focus stack, drives startup focus. |
UI Manager API
Page Navigation
The core navigation system. A single GS_UIPageComponent replaces the old Hub, Window, and Page roles. When m_isRoot is true, the page registers itself with the UI Manager as a root canvas entry point. Pages can parent other pages to form any navigation depth. Focus is managed through push/pop stacks at each level.
| Component | Purpose |
|---|
| GS_UIPageComponent | Core navigation component. Handles root canvas registration, child page management, focus push/pop, and show/hide transitions. |
Pages API
UI Interaction
The button and input interception layer. GS_ButtonComponent plays motion-based animations on hover and select. GS_UIInputInterceptorComponent captures input events while a canvas is focused, preventing them from reaching gameplay systems.
UI Interaction API
UI Animation
A GS_Motion extension with eight LyShine-specific animation tracks. Animations are authored as .uiam assets in the editor and referenced by page transition fields or played directly by the standalone motion component.
UI Animation API
Standalone UI components for game-event-driven scenarios outside the page navigation model — load screens during transitions, pause menus overlaying gameplay.
Widgets API
Cross-Gem Contracts
GS_UI’s motion-track base and its observation signals are collected in the GS_Core Interfaces layer:
| Contract | Kind | Used for |
|---|
UiMotionTrack | TypeBase | Author new UI animation tracks — they appear in the asset-editor picker. |
UIInteractableEmissionBus | Emit | OnClicked — a button was activated (addressed by the button entity). |
UiMotionEmissionBus | Emit | OnUiMotionComplete / OnUiMotionLooped (carry the motion name). |
UIPageEmissionBus | Emit | OnPageShown / OnPageHidden — global, fired after the show/hide animation resolves. |
See the Contract Reference for the full table and addressing details.
Installation
GS_UI requires GS_Core, LyShine, and LmbrCentral.
- Enable GS_UI in Project Manager or
project.json. - Add GS_UIManagerComponent to the Game Manager entity and register it in the Startup Managers list.
- Create a LyShine canvas and add GS_UIPageComponent (with
m_isRoot = true) to the root element. - Set
m_uiName on the root page to match the name you will use when calling LoadGSUI. - Nest child pages under the root by adding GS_UIPageComponent to child entities and connecting them through
m_defaultChildPage. - Refer to the UI Set Up Guide for a full walkthrough.
See Also
For conceptual overviews and usage guides:
For related resources:
Get GS_UI
GS_UI — Explore this gem on the product page and add it to your project.
14.1 - UI Manager
The singleton manager that owns all loaded UI canvases, maintains a global focus stack, and drives the startup focus sequence.
For usage guides and setup examples, see The Basics: GS_UI.
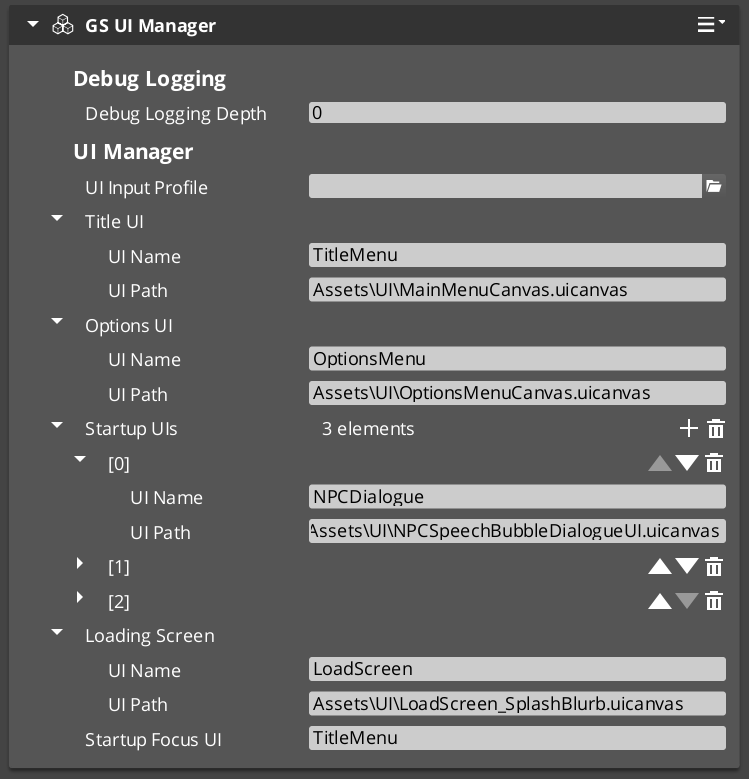
The UI Manager is the singleton that controls the lifecycle of every UI canvas in your project. It loads and unloads LyShine canvases by name, maintains a global focus stack that tracks which canvas is currently active, and drives the startup focus sequence so that the correct UI appears automatically when the game finishes initializing.
GS_UIManagerComponent extends GS_ManagerComponent, which means it participates in the Game Manager’s staged startup. It is spawned by the Game Manager alongside other managers and receives OnStartupComplete to begin loading canvases and focusing the startup UI.
Contents
How It Works
Canvas Lifecycle
Each UI canvas is identified by a unique name string. You call LoadGSUI(name, path) to load a canvas from a .uicanvas asset path and associate it with the given name. The manager stores this in its m_activeUIs map. When you no longer need the canvas, call UnloadGSUI(name) to destroy it and remove it from the map.
Once a canvas is loaded, its root page component (a GS_UIPageComponent with m_isRoot = true) calls RegisterRootPage(name, entity) to register itself as the entry point for that canvas. The manager returns true if registration succeeds, false if the name is already registered or does not match a loaded canvas.
Global Focus Stack
The UI Manager maintains m_globalFocusStack, which tracks the order of focused canvases. When you call FocusUI(name), the named canvas is pushed onto the focus stack and becomes the active UI. NavLastUI() pops the current canvas and returns focus to the previous one. This allows layered UI flows such as opening a settings menu on top of a pause menu and navigating back through them in order.
ToggleUI(name, on) shows or hides a canvas by name. When toggling on, it calls FocusUI internally; when toggling off, it removes the canvas from the focus stack.
GetFocusedUI() returns the name of the currently focused canvas (the top of the stack).
Startup Sequence
The UI Manager’s startup follows this deterministic sequence:
- OnStartupComplete — The Game Manager broadcasts startup complete. The UI Manager loads all configured canvases via
LoadGSUI. - Root Page Registration — Each canvas’s root page component calls
RegisterRootPage(name, entity) during its own activation. - Startup Focus — The UI Manager checks each registered root page name against
m_startupFocusUI. When it finds a match, it calls FocusUI(name) to focus that canvas as the initial UI.
This sequence ensures that canvases are loaded before pages register, and the correct startup UI receives focus without race conditions.
Data Types
UICanvasWindowPair
A pairing of a loaded LyShine canvas entity with its associated root page entity. Used internally by the UI Manager to track loaded canvases.
UINamePathPair
A pairing of a UI name string with a .uicanvas asset path. Used to configure which canvases the UI Manager loads on startup.
Inspector Properties
| Property | Type | Description |
|---|
| Startup Focus UI | AZStd::string | The name of the UI canvas to focus automatically after startup completes. Must match a registered root page name. |
| UI Name Path Pairs | AZStd::vector<UINamePathPair> | The list of canvas name/path pairs to load on startup. Each entry maps a unique name to a .uicanvas asset path. |
API Reference
Request Bus: UIManagerRequestBus
Commands sent to the UI Manager. Singleton bus — Single address, single handler.
| Method | Parameters | Returns | Description |
|---|
LoadGSUI | const AZStd::string& name, const AZStd::string& path | void | Loads a LyShine canvas from the given asset path and registers it under the given name. |
UnloadGSUI | const AZStd::string& name | void | Destroys the canvas registered under the given name and removes it from the active UI map. |
RegisterRootPage | const AZStd::string& name, AZ::EntityId entity | bool | Registers a root page entity for the named canvas. Returns true on success, false if the name is unrecognized or already registered. |
UnregisterRootPage | const AZStd::string& name | void | Removes the root page registration for the named canvas. |
FocusUI | const AZStd::string& name | void | Pushes the named canvas onto the global focus stack and activates it. |
NavLastUI | — | void | Pops the current canvas from the global focus stack and returns focus to the previous canvas. |
ToggleUI | const AZStd::string& name, bool on | void | Shows or hides the named canvas. Toggling on focuses it; toggling off removes it from the focus stack. |
GetFocusedUI | — | AZStd::string | Returns the name of the currently focused UI canvas (top of the global focus stack). |
GetUICanvasEntity | const AZStd::string& name | AZ::EntityId | Returns the LyShine canvas entity for the named UI. |
GetUIRootPageEntity | const AZStd::string& name | AZ::EntityId | Returns the root page entity registered for the named UI. |
Usage Examples
C++ – Loading and Focusing a UI Canvas
#include <GS_UI/GS_UIBus.h>
// Load a canvas
GS_UI::UIManagerRequestBus::Broadcast(
&GS_UI::UIManagerRequestBus::Events::LoadGSUI,
AZStd::string("TitleScreen"),
AZStd::string("ui/titlescreen.uicanvas")
);
// Focus it
GS_UI::UIManagerRequestBus::Broadcast(
&GS_UI::UIManagerRequestBus::Events::FocusUI,
AZStd::string("TitleScreen")
);
C++ – Navigating Back
// Return to the previous UI in the focus stack
GS_UI::UIManagerRequestBus::Broadcast(
&GS_UI::UIManagerRequestBus::Events::NavLastUI
);
C++ – Toggling a UI Canvas
// Show the pause menu
GS_UI::UIManagerRequestBus::Broadcast(
&GS_UI::UIManagerRequestBus::Events::ToggleUI,
AZStd::string("PauseMenu"),
true
);
See Also
For conceptual overviews and usage guides:
For component references:
Get GS_UI
GS_UI — Explore this gem on the product page and add it to your project.
14.2 - Page Navigation
The core single-tier navigation component – root canvas registration, nested child page management, focus push/pop stacks, and show/hide transitions.
For usage guides and setup examples, see The Basics: GS_UI.

The GS_UIPageComponent in the UI Editor, configured as a root page with a default child page assigned.
GS_UIPageComponent is the core navigation component of the GS_UI system. It replaces the legacy multi-tier Hub/Window/Page hierarchy with a single, unified component that handles all levels of UI navigation. A single GS_UIPageComponent can serve as a root canvas entry point, a mid-level container, or a leaf page – its role is determined entirely by configuration.
When m_isRoot is set to true, the page registers itself with the UI Manager as the root entry point for its canvas. Non-root pages are nested as children of other pages and managed through their parent’s child page system. This creates a single-tier model where any depth of navigation is achieved through recursive nesting of the same component.
Focus management uses push/pop stacks at each level. When a child page is focused, it is pushed onto its parent’s focus stack. Navigating back pops the stack and restores the previous child. The NavigationReturnPolicy enum controls whether returning to a page restores the last focused child or always resets to the default.
Required Companion Components
Root pages depend on two O3DE components placed on the same entity:
| Component | Purpose |
|---|
| FaderComponent | Drives alpha-based fade transitions during show/hide animations. Required for UiAnimationMotion tracks that animate element alpha. |
| HierarchicalInteractionToggleComponent | Enables or disables the entire interactable subtree when the page shows or hides. Prevents input from reaching hidden page elements. |
These are standard LyShine/LmbrCentral components — add them alongside GS_UIPageComponent on every root page entity.
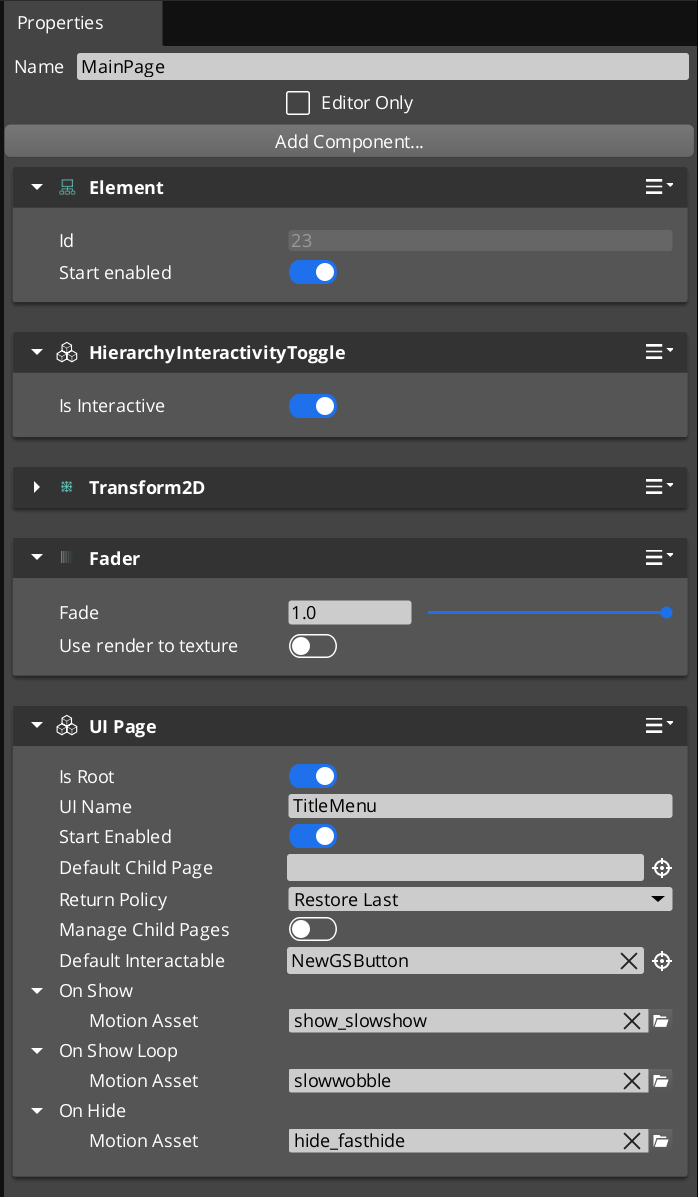
Contents
How It Works
Root Pages
A root page (m_isRoot = true) is the entry point for a UI canvas. During activation, it calls RegisterRootPage(m_uiName, entityId) on the UIManagerRequestBus to register itself. The m_uiName field must match the name used when the canvas was loaded via LoadGSUI.
When m_startEnabled is true, the root page shows itself immediately upon registration. Otherwise, it remains hidden until the UI Manager calls FocusUI for its canvas name.
Child Page Management
When m_manageChildPages is true, the page acts as a container for child pages. Child pages register themselves with their parent during activation via RegisterChildPage(entity). The parent tracks all registered children and manages which one is currently visible and focused.
Each page maintains its own focus stack. When a child is focused, it is pushed onto the parent’s stack via PushFocus. PopFocus restores the previous child. The m_returnPolicy field controls behavior when navigating back to this page:
- RestoreLast – Restores the last child that was focused before navigating away.
- AlwaysDefault – Always resets to
m_defaultChildPage, ignoring the focus history.
NavigateTo Algorithm
NavigateTo(forced) navigates the UI to show the calling page, regardless of where focus currently sits in the page tree. The algorithm works by building a path from the calling page up to the root, then cascading focus changes downward:
- Build path – Walk up from the calling page to the root, collecting each ancestor into a path array.
- Find divergence point – Starting from the highest ancestor, find the first level where the parent’s currently focused child does not match the path node. This is the “push point.”
- Change pages – From the push point downward, call
ChangePage at each level to switch the visible child to the path node. - Push focus – At the push point, call
PushFocus to record the new child on the parent’s focus stack. - Cascade – Continue down the path to the target page, focusing each level.
This algorithm ensures that navigating to a deeply nested page correctly updates every intermediate level.
NavigateBack Algorithm
NavigateBack() walks up from the calling page to find the first ancestor with a non-empty focus stack, then pops it:
- Walk up – Starting from the calling page, check each ancestor’s focus stack.
- Pop focus – At the first ancestor with a non-empty stack, call
PopFocus to restore the previous child. - Fallback to UI Manager – If no ancestor has a non-empty stack (the user has navigated all the way back to the root), call
NavLastUI() on the UIManagerRequestBus to return to the previous canvas in the global focus stack.
Show/Hide Transitions
Each page can have three UiAnimationMotion assets assigned:
- m_onShow – Played when the page becomes visible.
- m_onShowLoop – Played in a loop after the show animation completes.
- m_onHide – Played when the page is hidden.
These motion assets drive LyShine property animations (position, scale, rotation, alpha, color) to create smooth transitions between pages.
Data Types
NavigationReturnPolicy
Controls how a page restores child focus when navigated back to.
| Value | Description |
|---|
RestoreLast | Restores the last focused child page from the focus stack. |
AlwaysDefault | Always resets to m_defaultChildPage, clearing focus history. |
FocusEntry
A single entry in a page’s focus stack.
| Field | Type | Description |
|---|
focusedChild | AZ::EntityId | The entity ID of the child page that was focused. |
Inspector Properties
| Property | Type | Description |
|---|
| Is Root | bool | When true, this page registers itself with the UI Manager as a root canvas entry point. |
| UI Name | AZStd::string | (Root only) The name this root page registers under. Must match the name used in LoadGSUI. |
| Start Enabled | bool | (Root only) When true, the root page shows itself immediately upon registration. |
| Page Name | AZStd::string | A human-readable name for this page, used for identification and debugging. |
| Default Child Page | AZ::EntityId | The child page entity to show by default when this page is focused. |
| Return Policy | NavigationReturnPolicy | Controls whether returning to this page restores the last child or always resets to the default. |
| Manage Child Pages | bool | When true, this page acts as a container that manages nested child pages. |
| Default Interactable | AZ::EntityId | The LyShine interactable element to focus by default when this page is shown (e.g. the first button). |
| On Show | UiAnimationMotion | Animation played when this page becomes visible. |
| On Show Loop | UiAnimationMotion | Looping animation played after the show animation completes. |
| On Hide | UiAnimationMotion | Animation played when this page is hidden. |
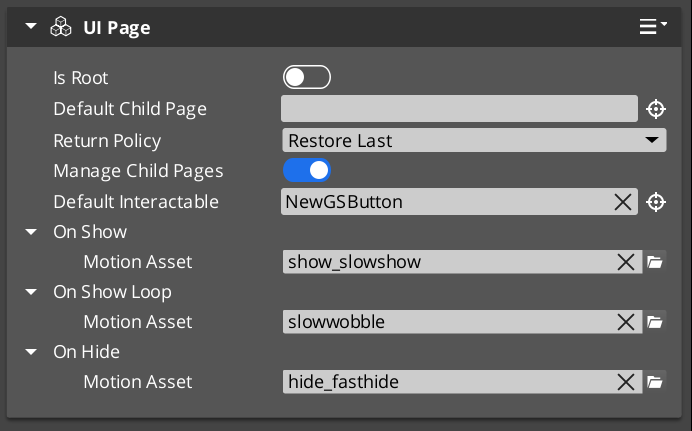
API Reference
Request Bus: UIPageRequestBus
Commands sent to a specific page by entity ID. Addressed bus – addressed by EntityId.
User-Facing Methods
These methods are intended to be called from gameplay code, ScriptCanvas, or other UI components to drive navigation.
| Method | Parameters | Returns | Description |
|---|
NavigateTo | bool forced | void | Navigates the entire page tree to show this page. Builds a path to root and cascades focus changes downward. When forced is true, bypasses transition guards. |
NavigateBack | — | void | Walks up from this page to find the first ancestor with focus history and pops it. Falls back to NavLastUI if no ancestor has history. |
ChangePage | AZ::EntityId target, bool takeFocus, bool forced | void | Switches this page’s visible child to the target entity. When takeFocus is true, the target also receives interactable focus. |
ToggleShow | bool on | void | Shows or hides this page. Plays the appropriate show/hide animation. |
ChangeUI | const AZStd::string& targetUI, bool takeFocus, bool hideThis | void | Switches to a different UI canvas by name. Optionally hides this page and gives focus to the target canvas. |
FocusChildPageByName | const AZStd::string& name, bool forced | void | Finds a child page by its m_pageName and focuses it. |
Internal Methods
These methods are used internally by the navigation system. They can be called from C++ when building custom navigation behavior, but are not typically called from ScriptCanvas.
| Method | Parameters | Returns | Description |
|---|
FocusPage | bool forced | void | Activates this page, shows it, and focuses its default interactable. Called as part of the NavigateTo cascade. |
PushFocus | AZ::EntityId child, bool forced | void | Pushes a child page onto this page’s focus stack and focuses it. |
PopFocus | — | void | Pops the top entry from this page’s focus stack and restores the previous child. Respects m_returnPolicy. |
ClearFocusHistory | — | void | Clears this page’s entire focus stack. |
RegisterChildPage | AZ::EntityId entity | void | Registers a child page entity with this parent. Called by child pages during their activation. |
NotifyInteractableFocused | AZ::EntityId entity | void | Notifies this page that a LyShine interactable has received focus. Used for tracking the current interactable selection. |
GetResolvedInteractable | — | AZ::EntityId | Returns the currently resolved default interactable for this page, accounting for child page focus state. |
Usage Examples
C++ – Navigating to a Specific Page
#include <GS_UI/GS_UIBus.h>
// Navigate to a specific page entity, forcing the transition
GS_UI::UIPageRequestBus::Event(
settingsPageEntityId,
&GS_UI::UIPageRequestBus::Events::NavigateTo,
true // forced
);
C++ – Navigating Back
// Navigate back from the current page
GS_UI::UIPageRequestBus::Event(
currentPageEntityId,
&GS_UI::UIPageRequestBus::Events::NavigateBack
);
C++ – Switching Between UI Canvases
// From the title screen, switch to the gameplay HUD
GS_UI::UIPageRequestBus::Event(
titlePageEntityId,
&GS_UI::UIPageRequestBus::Events::ChangeUI,
AZStd::string("GameplayHUD"),
true, // takeFocus
true // hideThis
);
Companion Component Pattern
GS_UIPageComponent handles navigation structure, but it does not contain game-specific logic. The intended pattern is to place a companion component on the same entity as the page component. The companion component listens for page show/hide events and drives game-specific behavior (populating lists, starting timers, sending analytics events).
This separation keeps the navigation system generic and reusable while allowing each page to have unique behavior through its companion.
See Also
For component references:
- UI Manager – The singleton that owns canvases and drives the global focus stack
- UI Animation – Motion assets used for page show/hide transitions
For conceptual overviews and usage guides:
Get GS_UI
GS_UI — Explore this gem on the product page and add it to your project.
14.3 - UI Animation
GS_Motion extension with eight LyShine-specific animation tracks, data-driven .uiam assets, and a standalone playback component.
UI Animation is a domain extension of the GS_Motion system, purpose-built for animating LyShine UI elements. It provides eight concrete track types that target LyShine component properties (position, scale, rotation, alpha, color, text), a data asset format (.uiam) for authoring animations, and a standalone component for playing them on any entity.
The architecture follows the GS_Motion domain extension pattern: UiMotionTrack extends GS_MotionTrack as the domain base, each concrete track type targets a specific LyShine property, and UiAnimationMotionAsset extends GS_MotionAsset to bundle tracks into a single asset file.
For usage guides and setup examples, see The Basics: GS_UI.
Contents
Domain Extension Pattern
To add a custom track type, use the UiMotionTrack ClassWizard template — see GS_UI Templates. The template generates the header and source, and the only manual step is adding a Reflect(context) call in UIDataAssetsSystemComponent.cpp. Once reflected, the new track type appears automatically in the asset editor type picker via EnumerateDerived.
GS_Motion is designed to be extended per domain. GS_UI provides the UI domain extension:
| GS_Motion Base | GS_UI Extension |
|---|
GS_MotionTrack | UiMotionTrack – Domain base for all UI tracks |
GS_MotionAsset | UiAnimationMotionAsset – Asset container for UI tracks |
GS_MotionComposite | Used internally by UiAnimationMotion for multi-track playback |
GS_MotionProxy | Used internally by UiAnimationMotion for asset instance binding |
See GS_Motion for the full base system reference.
Track Types
UiMotionTrack
The domain base class that all UI-specific tracks extend. Inherits from GS_Core::GS_MotionTrack and provides LyShine entity targeting common to all UI tracks.
Concrete Tracks
Each track type animates a specific LyShine component property. All tracks are authored inside a .uiam asset.
| Track Type | Target Component | Property Animated | Value Type |
|---|
UiPositionTrack | UiTransform2dComponent | Position offset | AZ::Vector2 |
UiScaleTrack | UiTransform2dComponent | Scale | AZ::Vector2 |
UiRotationTrack | UiTransform2dComponent | Rotation | float |
UiElementAlphaTrack | UiElementComponent | Element-level alpha | float |
UiImageAlphaTrack | UiImageComponent | Image alpha | float |
UiImageColorTrack | UiImageComponent | Color tint | AZ::Color |
UiTextColorTrack | UiTextComponent | Text color | AZ::Color |
UiTextSizeTrack | UiTextComponent | Font size | float |
UiAnimationMotionAsset
The data asset that holds a complete UI animation. Extends GS_Core::GS_MotionAsset → AZ::Data::AssetData. Requires GS_AssetReflectionIncludes.h when reflecting — see Serialization Helpers.
| Property | Type | Description |
|---|
| Extension | — | .uiam |
| Motion Name | AZStd::string | A human-readable name for this animation. |
| Loop | bool | Whether this animation loops continuously after completing. |
| Tracks | AZStd::vector<UiMotionTrack*> | The list of animation tracks that make up this motion. Each track targets a specific LyShine property on a specific entity. |
To understand how to author Feedback Motions, refer to UI Animation: Authoring UIAnimation Motions
UiAnimationMotion
A serializable wrapper struct that bridges a .uiam asset to runtime playback. This is not a component – it is a data struct used as a field type in other components (such as GS_UIPageComponent’s m_onShow, m_onHide, and GS_ButtonComponent’s hover/select fields).
| Field | Type | Description |
|---|
| Asset | AZ::Data::Asset<UiAnimationMotionAsset> | Reference to the .uiam asset to play. |
| Motion Proxies | AZStd::vector<GS_MotionProxy> | Instance-specific bindings that map track targets to actual entities at runtime. |
| Motion Composite | AZStd::unique_ptr<GS_MotionComposite> | The runtime composite that coordinates multi-track playback. Created automatically from the asset data. |
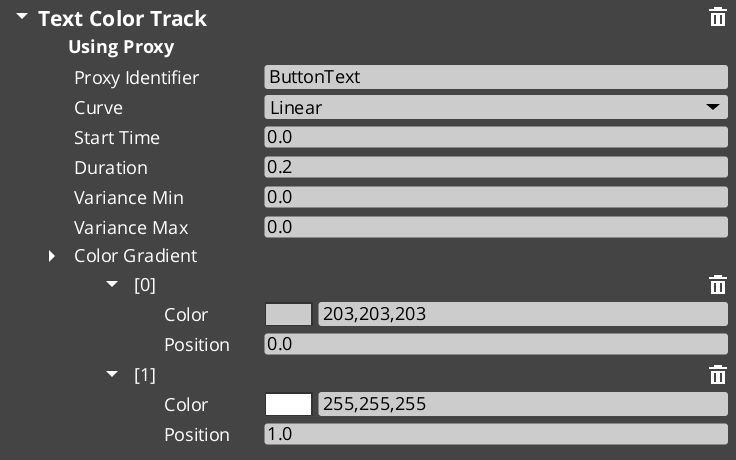
UiAnimationMotionComponent
A standalone component that plays a UiAnimationMotion on any entity. Use this when you need to trigger a UI animation outside of the page navigation or button systems – for example, an ambient animation on a background element, or a custom transition triggered from ScriptCanvas.
The component exposes the UiAnimationMotion struct in the Inspector, allowing you to assign a .uiam asset and configure it directly on any entity.
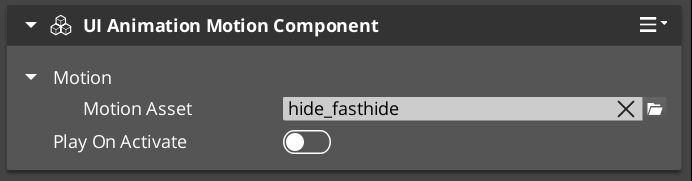
Adding Custom Tracks
Use the UIMotionTrack ClassWizard template to generate a new world-space track — see GS_UI Templates. The only manual step after generation is adding a Reflect(context) call in your {$Gem}DataAssetSystemComponent.cpp. Once reflected, the new track type is discovered automatically and appears in the asset editor type picker.
Override Init(ownerEntityId) to cache entity context, and Update(easedProgress) to drive the target property via its bus.
void ${Custom}Track::Init(AZ::EntityId ownerEntity)
{
// Always call the base first — it sets m_owner.
GS_UI::UiMotionTrack::Init(ownerEntity);
// Cache the element's origin value so the track can apply additive offsets.
// Example:
// UiTransformBus::EventResult(m_originPosition, ownerEntity, &UiTransformBus::Events::GetLocalPosition);
}
void ${Custom}Track::Update(float easedProgress)
{
// Evaluate the gradient at the current eased progress and apply to the element.
// easedProgress is in [0, 1] and already passed through the track's CurveType.
// Example:
// const AZ::Vector2 offset = valueGradient.Evaluate(easedProgress);
// UiTransformBus::Event(m_owner, &UiTransformBus::Events::SetLocalPosition, m_originPosition + offset);
}
Usage Examples
Typical Animation Setup
A page fade-in animation might use two tracks in a single .uiam asset:
- A
UiElementAlphaTrack that fades from 0 to 1 over 0.3 seconds. - A
UiPositionTrack that slides the element 20 pixels upward over the same duration.
Assign this asset to a page’s On Show field and the page will automatically play the animation whenever it becomes visible.
A button scale-bounce on hover:
- A
UiScaleTrack that scales from 1.0 to 1.1 and back to 1.0 over 0.15 seconds.
Assign this to the button’s Hover Motion field. Assign the reverse (scale from current back to 1.0) to Unhover Motion.
See Also
For component references:
- Page Navigation – Pages use UiAnimationMotion for show/hide transitions
- Buttons – Buttons use UiAnimationMotion for hover/select animations
For conceptual overviews and usage guides:
For related resources:
- GS_Motion – The base motion system that UI Animation extends
Get GS_UI
GS_UI — Explore this gem on the product page and add it to your project.
14.4 - UI Interaction
Button animations and input interception — motion-driven hover/select states and input channel management for focused UI canvases.
UI Interaction covers the two systems that handle player input at the UI layer: the enhanced button component that plays motion-based animations on hover and select, and the input interceptor that captures and routes input events while a canvas is focused.
For usage guides and setup examples, see The Basics: GS_UI.
Contents
An enhanced button component that extends LyShine interactable behavior with motion-driven hover and select state animations. Attach alongside a UiButtonComponent and assign .uiam assets for hover, unhover, and select states.
| Component | Purpose |
|---|
| GS_ButtonComponent | Enhanced button. Plays UiAnimationMotion assets on hover, unhover, and select events. |
Button API
An input interceptor component that captures and redirects input events for UI-specific handling, preventing input from propagating to gameplay systems while a UI canvas is focused.
| Component / Type | Purpose |
|---|
| GS_UIInputInterceptorComponent | Intercepts configured input events and re-broadcasts them on UIInputNotificationBus. |
| GS_UIInputProfile | Data asset defining which input channels to intercept and how to route them. |
UI Input API
See Also
For component references:
- Page Navigation – Pages use the same UiAnimationMotion system for show/hide transitions
- UI Animation – The motion asset system used by buttons and pages
- UI Manager – Controls which canvas is focused, activating the input interceptor
For conceptual overviews and usage guides:
Get GS_UI
GS_UI — Explore this gem on the product page and add it to your project.
14.4.1 - Buttons
Enhanced button component with motion-driven hover and select animations, built on top of LyShine interactable notifications.
GS_ButtonComponent is an enhanced button that extends O3DE’s LyShine interactable system with UiAnimationMotion support. Instead of relying on LyShine’s built-in state sprites or color transitions, GS_ButtonComponent plays data-driven motion assets for hover, unhover, and select states, giving you full control over animated button feedback using the same animation system that drives page transitions.
The component attaches to any entity that already has a LyShine interactable (e.g. UiButtonComponent). It listens for LyShine interactable notifications and triggers the appropriate motion asset when the interactable state changes.
For usage guides and setup examples, see The Basics: GS_UI.
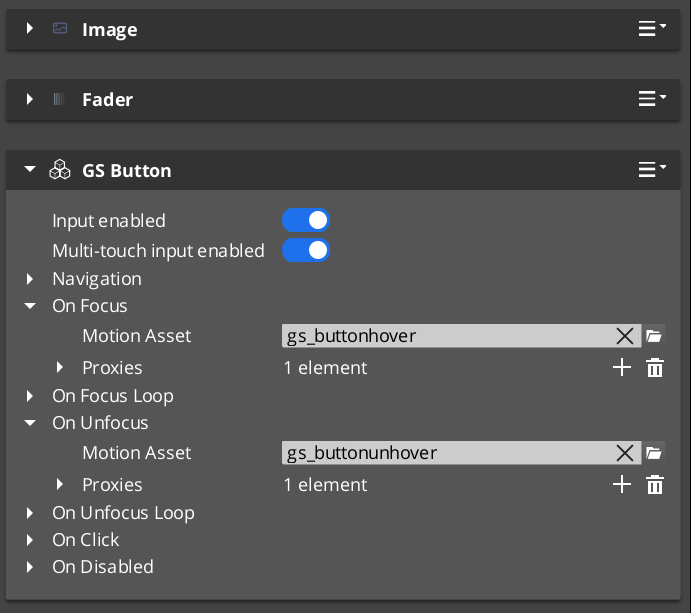
Contents
How It Works
LyShine Integration
GS_ButtonComponent connects to O3DE’s UiInteractableNotificationBus on the same entity. When LyShine fires hover, unhover, or press events, the component intercepts them and plays the corresponding UiAnimationMotion asset. This means you author your button animations as .uiam assets in the same workflow as page transitions and other UI animations.
The component does not replace LyShine’s interactable – it works alongside it. The LyShine UiButtonComponent still handles click detection, navigation, and accessibility. GS_ButtonComponent adds the visual animation layer on top.
Motion States
Each button can have up to three motion assets assigned:
- Hover Motion – Played when the interactable receives hover focus (mouse enter or gamepad navigation highlight).
- Unhover Motion – Played when the interactable loses hover focus.
- Select Motion – Played when the interactable is pressed/selected.
Each of these is a UiAnimationMotion struct that references a .uiam asset. The motion can animate any combination of the eight UI track types (position, scale, rotation, alpha, color, text size) to create rich button feedback.
Inspector Properties
| Property | Type | Description |
|---|
| Hover Motion | UiAnimationMotion | The animation played when this button receives hover focus. |
| Unhover Motion | UiAnimationMotion | The animation played when this button loses hover focus. |
| Select Motion | UiAnimationMotion | The animation played when this button is pressed. |
Usage
Setup
- Add a LyShine
UiButtonComponent (or other interactable) to your entity. - Add
GS_ButtonComponent to the same entity. - Author
.uiam assets for the hover, unhover, and select states using the UiAnimationMotion system. - Assign the
.uiam assets to the corresponding fields in the Inspector.
The button will now play the assigned animations automatically when the user interacts with it. No ScriptCanvas or C++ code is required for the animation behavior.
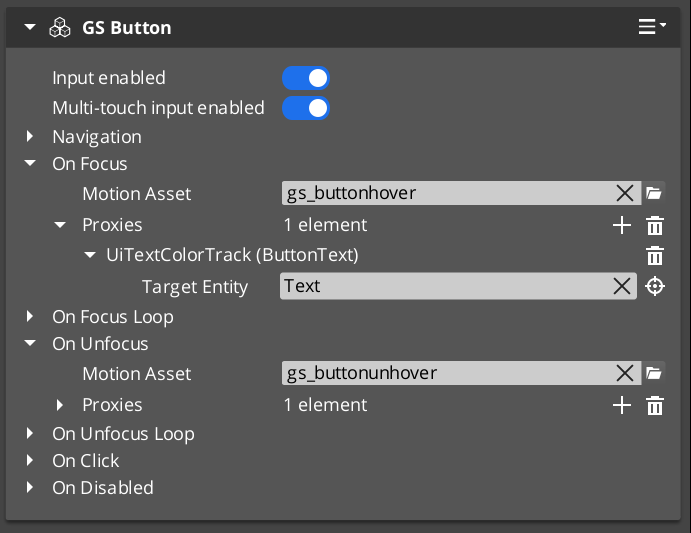
See Also
For component references:
- UI Animation – The motion asset system that drives button animations
- Page Navigation – Pages use the same UiAnimationMotion system for show/hide transitions
- UI Input – Input interception used alongside buttons in interactive canvases
For conceptual overviews and usage guides:
Get GS_UI
GS_UI — Explore this gem on the product page and add it to your project.
14.4.2 - UI Input
Input interception for UI canvases – captures and redirects input events to prevent gameplay propagation while a UI is focused.
GS_UIInputInterceptorComponent intercepts input events when a UI canvas is active, preventing them from propagating to gameplay systems. This solves the common problem of button presses or navigation inputs leaking through to the game world while a menu is open.
The component uses a GS_UIInputProfile to define which input events to intercept and how to route them. When the associated UI canvas is focused, the interceptor captures configured input events and broadcasts them on the UIInputNotificationBus instead of allowing them to reach gameplay input handlers.
For usage guides and setup examples, see The Basics: GS_UI.
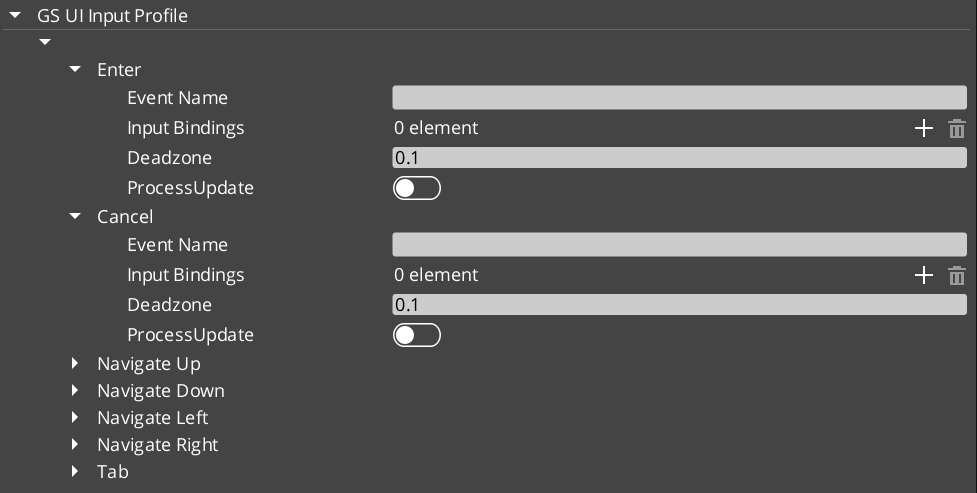
Contents
How It Works
When a UI canvas receives focus through the UI Manager, the input interceptor activates. It listens for input events that match its configured GS_UIInputProfile and consumes them before they reach the gameplay input system. The intercepted events are then re-broadcast on the UIInputNotificationBus so that UI-specific logic can respond to them.
When the canvas loses focus, the interceptor deactivates and input flows normally to gameplay systems.
The input profile defines which input channels to intercept and how to map them for UI use. This allows different UI canvases to intercept different sets of inputs – a pause menu might intercept all gameplay inputs, while a HUD overlay might only intercept specific menu navigation inputs.
API Reference
Notification Bus: UIInputNotificationBus
Events broadcast when the interceptor captures input. Multiple handler bus – any number of components can subscribe to receive intercepted input notifications.
Components that need to respond to UI-specific input (such as custom navigation logic or input-driven UI animations) connect to this bus to receive intercepted events while a canvas is focused.
Inspector Properties
| Property | Type | Description |
|---|
| Input Profile | GS_UIInputProfile | Defines which input events to intercept and how to route them for UI handling. |
Usage
Setup
- Add
GS_UIInputInterceptorComponent to the same entity as your root GS_UIPageComponent. - Configure the
GS_UIInputProfile to specify which input channels should be intercepted when this canvas is focused. - Any component that needs to respond to intercepted input connects to
UIInputNotificationBus.
See Also
For component references:
- UI Manager – Controls which canvas is focused and therefore which interceptor is active
- Page Navigation – The page system that drives canvas focus changes
- Button – Button animations used alongside input interception
For conceptual overviews and usage guides:
Get GS_UI
GS_UI — Explore this gem on the product page and add it to your project.
14.5 - Widgets
Standalone UI widget components — load screens, pause menus, and other self-contained UI elements that operate outside the page navigation model.
Widgets are standalone UI components that handle specific UI scenarios outside the page navigation hierarchy. Unlike pages, which are navigated to and from, widgets activate and deactivate in response to game events — a load screen appears during a stage transition, a pause menu overlays gameplay when the player pauses.
For usage guides and setup examples, see The Basics: GS_UI.
Contents
Load Screen
GS_LoadScreenComponent manages loading screen display during stage transitions. It listens for stage load lifecycle events and shows or hides a designated LyShine canvas accordingly.
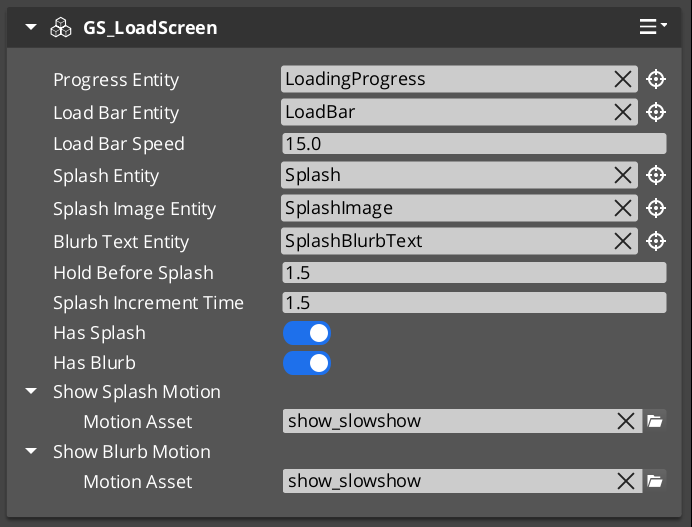
| Component | Purpose |
|---|
| GS_LoadScreenComponent | Displays a loading canvas during stage transitions. Hides automatically when loading is complete. |
PauseMenuComponent manages the pause overlay. It responds to pause input, activates the pause canvas, and suppresses gameplay systems while the menu is open.
| Component | Purpose |
|---|
| PauseMenuComponent | Toggles pause state and the pause menu canvas overlay. |
See Also
For component references:
- UI Manager – Loads and manages the canvases that widgets display on
- Page Navigation – The navigation system for menus within widget canvases
For conceptual overviews and usage guides:
Get GS_UI
GS_UI — Explore this gem on the product page and add it to your project.
14.6 - Templates
ClassWizard templates for GS_UI — custom UI animation motion tracks.
All GS_UI extension types are generated through the ClassWizard CLI. The wizard handles UUID generation and cmake file-list registration automatically.
For usage guides and setup examples, see The Basics: GS_UI.
python ClassWizard.py \
--template <TemplateName> \
--gem <GemPath> \
--name <SymbolName> \
[--input-var key=value ...]
Contents
Ui Motion Track
Template: UiMotionTrack
Creates a custom animation track for the GS_UI motion system. A UiMotionTrack child animates one LyShine UI element property (position, scale, alpha, color, rotation, etc.) over a normalised [0,1] eased progress value. Tracks are added to UiMotionAnimations assets in the editor and played by UIMotionAnimationComponent.
Generated files:
Include/${GemName}/UIMotions/MotionTracks/${Name}Track.hSource/UIMotions/MotionTracks/${Name}Track.cpp
CLI:
python ClassWizard.py --template UiMotionTrack --gem <GemPath> --name <Name>
Post-generation — manual registration required:
In UIDataAssetsSystemComponent.cpp, add:
#include <path/to/${Name}Track.h>
// inside Reflect(context):
${Name}Track::Reflect(context);
Extensibility: One track class per animatable property. Any number of track types can be registered. Instances are stored as polymorphic pointers in UiMotionAnimation assets — the property editor’s type picker discovers them automatically via O3DE’s serialization reflection (EnumerateDerived).
See also: UI Animation — the full track architecture, domain extension pattern, and built-in track type reference.
See Also
For the full API, component properties, and C++ extension guide:
For all ClassWizard templates across GS_Play gems:
Get GS_UI
GS_UI — Explore this gem on the product page and add it to your project.
14.7 - 3rd Party Implementations
For usage guides and setup examples, see The Basics: GS_UI.
Get GS_UI
GS_UI — Explore this gem on the product page and add it to your project.
15 - GS_Unit
Character and entity control — unit lifecycle, player and AI controllers, input processing, movement, and grounding.
GS_Unit is the gem that gives entities agency. It provides a unit lifecycle system for spawning and possessing controllable entities, a controller layer that separates player and AI concerns, an input pipeline that converts raw device input into movement vectors, a family of mover components covering free 3D, surface-sliding, and physics-driven movement, and grounding components for stable surface contact. The gem depends only on GS_Core and introduces one data asset, GS_UnitMovementProfile, for authoring movement parameters outside of code.
For usage guides and setup examples, see The Basics: GS_Unit.
Contents
Unit Manager
The lifecycle system for spawnable, possessable units. The Unit Manager is a singleton that handles unit spawn requests and tracks the active player controller. Individual Unit components identify an entity as a game unit and manage possession state.
| Component | Purpose |
|---|
| GS_UnitManagerComponent | Singleton manager. Handles unit spawn requests and player controller registration. |
| GS_UnitComponent | Marks an entity as a unit. Manages possession, controller access, and standby state. |
Unit Manager API
Controllers
The controller layer separates how a unit is driven from what the unit is. A base controller handles possession handshake. The player controller adds input-driven behavior. The AI controller provides a hook for script or code-driven NPC logic.
Unit Controllers API
The input pipeline converts raw device events into a normalised input state that movement and interaction systems can read. Input Reactor components handle discrete button events. Axis Reactor components handle analogue axes. Concrete implementations cover keyboard WASD and joystick movement.
Input Data API
Movement
The mover stack translates input vectors and influences into entity motion. The Mover Context component tracks current movement state. Concrete movers cover three locomotion modes. Grounder components maintain stable surface contact and feed grounded state back to the mover. Influence components apply persistent or volume-scoped forces on top of any mover.
Movement API
Unit Action Graph
Under Construction
The Unit Action Graph is in early development. Editor infrastructure and runtime architecture are defined, but integration with unit components is not yet implemented.A visual HFSM editor for authoring character behavior with parallel layers, state transitions, and polymorphic conditions. Built on the gs_graphcanvas framework with a StateMachineGraph topology.
| Feature | Purpose |
|---|
| Unit Action Graph | HFSM editor — states, transitions, conditions, and parallel layers. |
Unit Action Graph
Installation
GS_Unit requires only GS_Core. It is one of the lightest gems in the framework to add.
- Enable GS_Unit in Project Manager or
project.json. - Add GS_UnitManagerComponent to the Game Manager entity and register it in the Startup Managers list.
- Build your unit prefab: add GS_UnitComponent, the appropriate Controller, GS_InputDataComponent, and a Mover for the locomotion type you need.
- Add GS_PlayerControllerInputReaderComponent and the relevant input reactor components to the player unit prefab.
- Refer to the Unit Set Up Guide for a full walkthrough.
See Also
For conceptual overviews and usage guides:
For related resources:
Get GS_Unit
GS_Unit — Explore this gem on the product page and add it to your project.
15.1 - Unit Manager
The central manager for unit lifecycle — spawning, registration, standby coordination, and unit tracking across the game session.
The Unit Manager is the GS_Unit gem’s central lifecycle controller. It extends GS_ManagerComponent and coordinates all unit-related operations: spawning new units from prefabs, registering player controllers, tracking which entities qualify as units, and propagating standby signals to the unit subsystem.
Like all GS_Play managers, the Unit Manager is spawned by the Game Manager during the startup sequence and participates in the two-stage initialization pattern. It connects to the GameManagerNotificationBus for lifecycle events and standby coordination.
For usage guides and setup examples, see The Basics: GS_Unit.
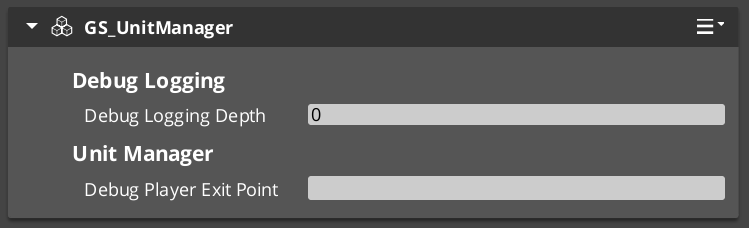
Contents
How It Works
Unit Spawning
When a system requests a new unit via RequestSpawnNewUnit, the Unit Manager instantiates the provided unit prefab under the specified parent entity. Once the unit entity activates and its GS_UnitComponent registers, the manager broadcasts ReturnNewUnit back to the caller with the new unit’s entity ID.
Player Controller Registration
Player controllers register themselves with the Unit Manager via RegisterPlayerController. This allows the manager to track which controllers are active and route unit possession accordingly.
Unit Validation
Any system can call CheckIsUnit with an entity ID to verify whether that entity is a registered unit. This is useful for targeting systems, interaction checks, and other gameplay logic that needs to distinguish units from ordinary entities.
Standby Propagation
When the Game Manager enters or exits standby, the Unit Manager receives the signal and broadcasts EnterStandby / ExitStandby on the UnitManagerNotificationBus. All unit subsystems (controllers, movers, input readers) should listen for these notifications and pause or resume accordingly.
API Reference
GS_UnitManagerComponent
Extends GS_Core::GS_ManagerComponent. Handles unit spawning, controller registration, and standby propagation.
Data Fields
| Field | Type | Description |
|---|
debugExitPoint | AZ::EntityId | Entity used as the spawn/exit point when PlaceUnitAtExit is called. Configured in the Inspector. |
m_unitSpawnTickets | AZStd::vector<AzFramework::EntitySpawnTicket> | Spawn tickets for all active unit spawn operations. Keeps spawns alive until the unit entity registers. |
playerList | AZStd::vector<AZ::EntityId> | Registered player controller entity IDs. Populated via RegisterPlayerController. |
Request Bus: UnitManagerRequestBus
Commands sent to the Unit Manager. Global bus — multiple handlers.
| Method | Parameters | Returns | Description |
|---|
RequestSpawnNewUnit | AZ::EntityId callingEntityId, SpawnableScriptAssetRef unitPrefab, AZ::EntityId spawnParentEntityId | void | Requests the manager to spawn a new unit from the given prefab under the specified parent entity. The caller receives the result via ReturnNewUnit. |
RegisterPlayerController | AZ::EntityId controllerId | void | Registers a player controller entity with the manager for tracking and routing. |
CheckIsUnit | AZ::EntityId unitId | bool | Returns whether the given entity ID is a registered unit. |
Notification Bus: UnitManagerNotificationBus
Events broadcast by the Unit Manager. Multiple handler bus — any number of components can subscribe.
| Event | Parameters | Description |
|---|
HandleStartup | — | Fired during the manager startup sequence. Override in subclasses to hook into the two-stage initialization before OnStartupComplete. |
ReturnNewUnit | AZ::EntityId caller, AZ::EntityId newUnit | Fired when a requested unit has been spawned and registered. The caller ID matches the original requester. |
EnterStandby | — | Fired when the unit subsystem enters standby. Pause unit-related logic. |
ExitStandby | — | Fired when the unit subsystem exits standby. Resume unit-related logic. |
GS_UnitComponent
The GS_UnitComponent is the component that makes an entity a “unit.” It handles possession by controllers, tracks its owning controller, and provides identity via a unique name. For full unit entity setup details, see the Units page.
Request Bus: UnitRequestBus
Commands sent to a specific unit. ById bus — addressed by entity ID, multiple handlers.
| Method | Parameters | Returns | Description |
|---|
Possess | AZ::EntityId possessingController | void | Assigns a controller to this unit. The unit stores the controller reference and notifies listeners. |
DePossess | — | void | Removes the current controller from this unit. |
GetController | — | AZ::EntityId | Returns the entity ID of the currently possessing controller. |
GetUniqueName | — | AZStd::string | Returns the unique name assigned to this unit. |
Notification Bus: UnitNotificationBus
Events broadcast by a unit. ById bus — addressed by the unit’s entity ID. Carries the standby signals only; possession moved to the GS_Core PossessionEmissionBus in the interfaces migration.
| Event | Parameters | Description |
|---|
UnitEnteringStandby | — | Fired when this unit enters standby. |
UnitExitingStandby | — | Fired when this unit exits standby. |
Usage Examples
C++ – Spawning a Unit
#include <GS_Unit/GS_UnitBus.h>
// Request a new unit spawn
GS_Unit::UnitManagerRequestBus::Broadcast(
&GS_Unit::UnitManagerRequestBus::Events::RequestSpawnNewUnit,
GetEntityId(), // caller
myUnitPrefab, // SpawnableScriptAssetRef
spawnParentEntity // parent entity
);
C++ – Listening for Unit Spawn Results
#include <GS_Unit/GS_UnitBus.h>
class MySpawner
: public AZ::Component
, protected GS_Unit::UnitManagerNotificationBus::Handler
{
protected:
void Activate() override
{
GS_Unit::UnitManagerNotificationBus::Handler::BusConnect();
}
void Deactivate() override
{
GS_Unit::UnitManagerNotificationBus::Handler::BusDisconnect();
}
void ReturnNewUnit(AZ::EntityId caller, AZ::EntityId newUnit) override
{
if (caller == GetEntityId())
{
// This is the unit we requested — possess it, configure it, etc.
}
}
};
Script Canvas
Spawning a unit and receiving the result:
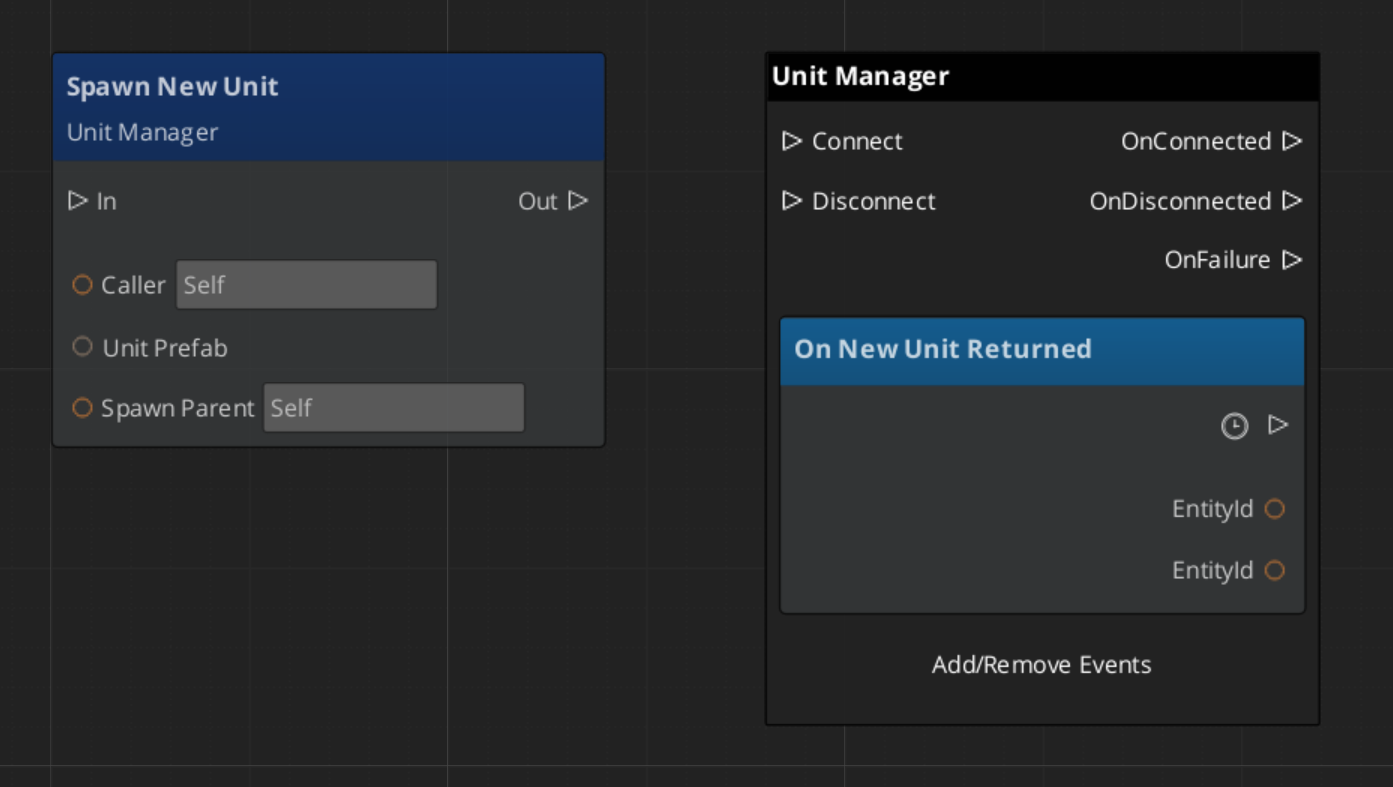
Getting the controller on a unit:
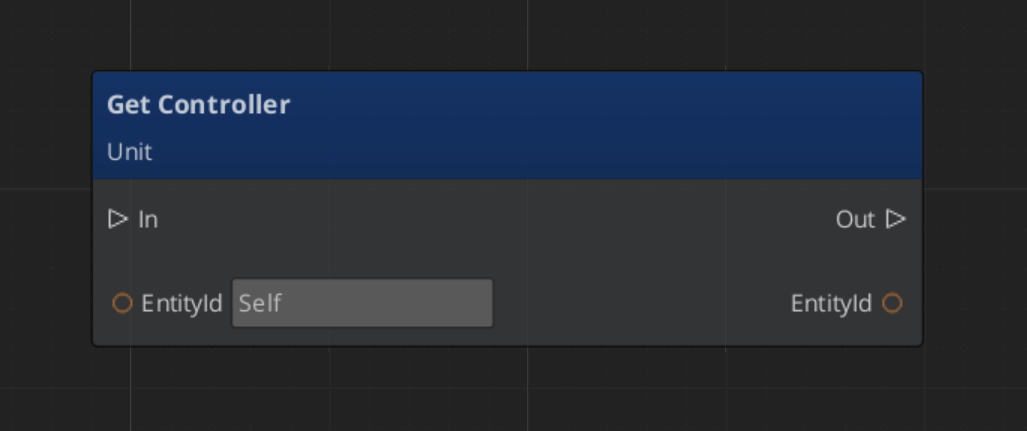
Possessing and de-possessing a unit:
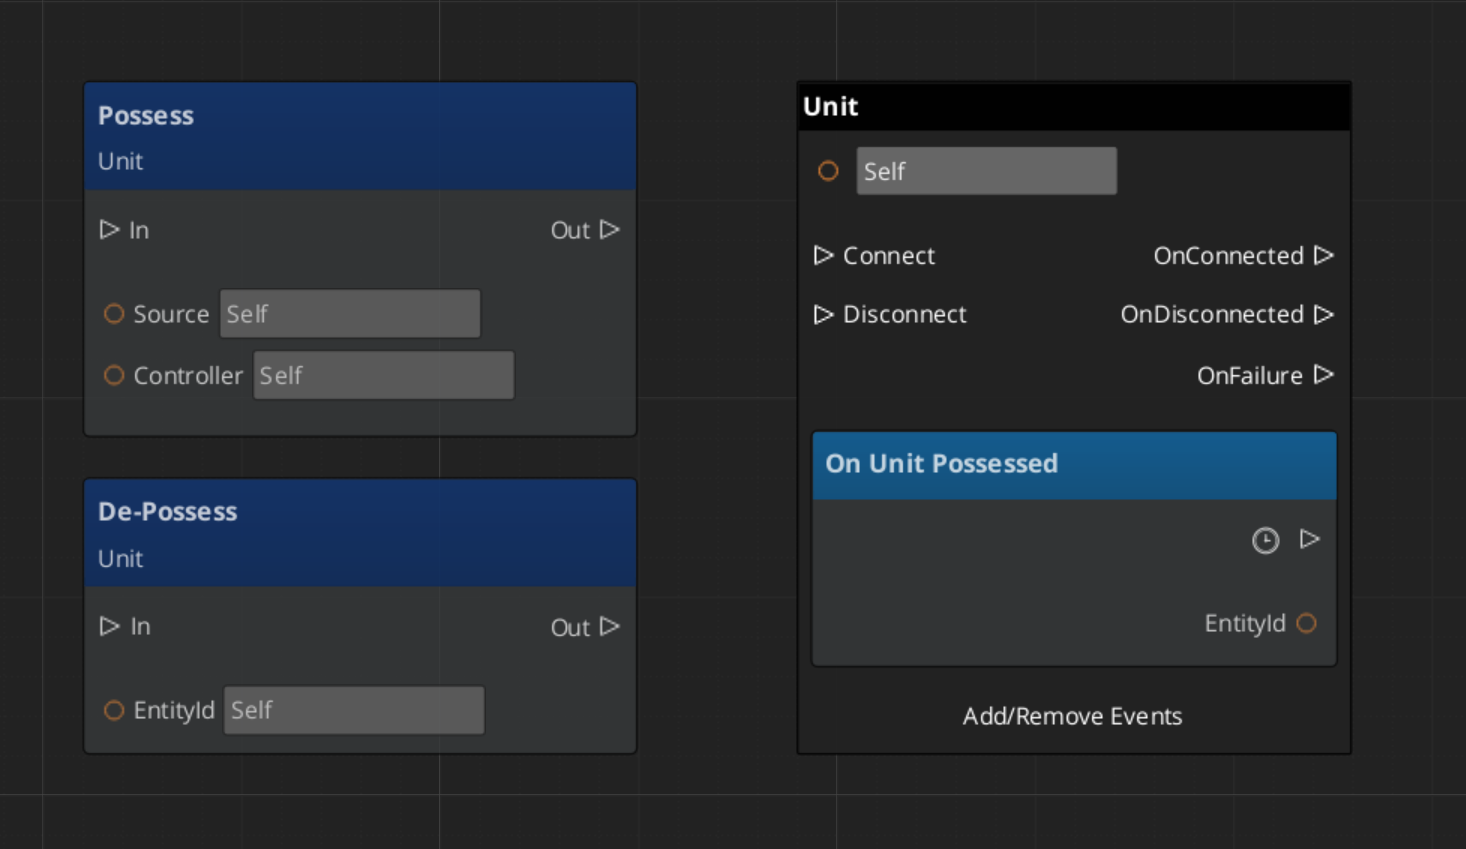
Reacting to unit standby events:
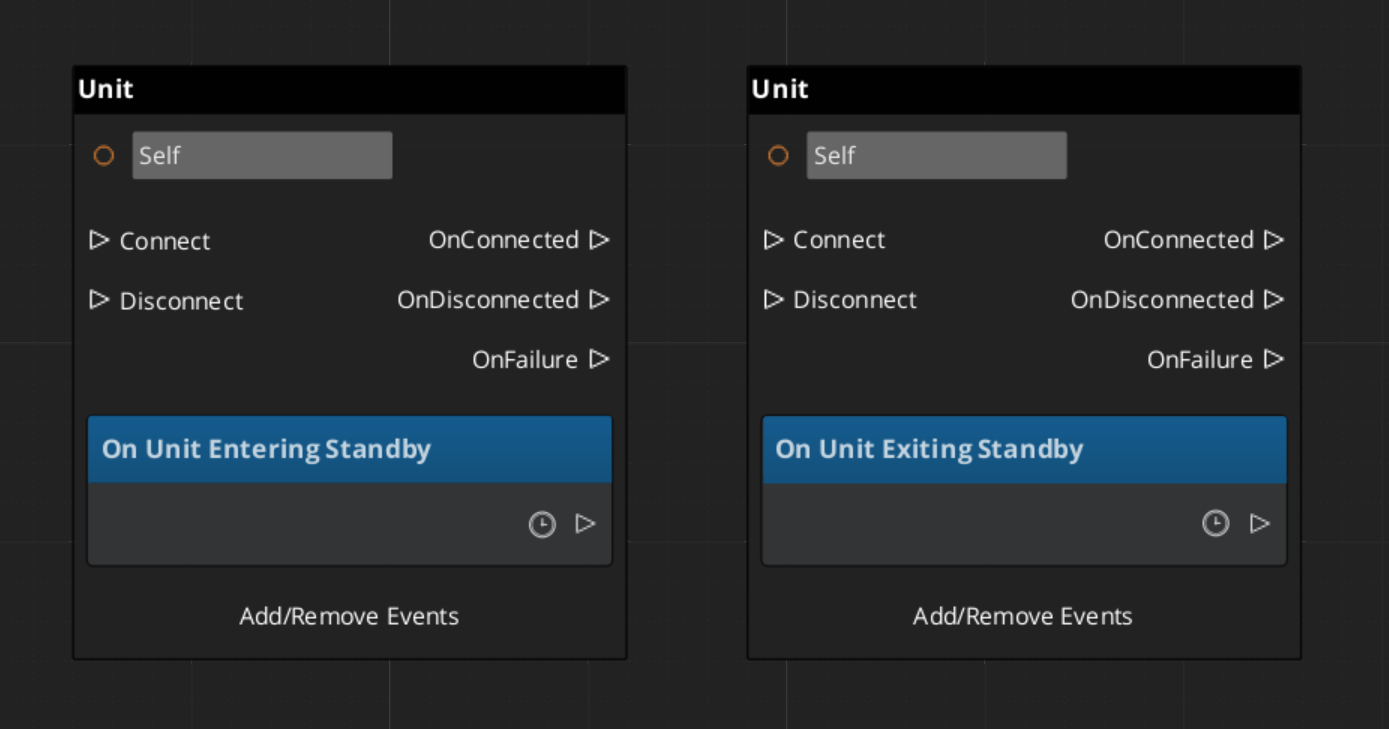
Extension Guide
Extend the Unit Manager to add custom spawn logic, additional tracking, or project-specific unit lifecycle behavior. The Unit Manager extends GS_ManagerComponent, so follow the standard Manager extension pattern.
#pragma once
#include <GS_Unit/GS_UnitBus.h>
#include <Source/Managers/GS_UnitManagerComponent.h>
namespace MyProject
{
class MyUnitManager : public GS_Unit::GS_UnitManagerComponent
{
public:
AZ_COMPONENT_DECL(MyUnitManager);
static void Reflect(AZ::ReflectContext* context);
protected:
// Override manager lifecycle hooks
void OnStartupComplete() override;
void OnEnterStandby() override;
void OnExitStandby() override;
};
}
Implementation (.cpp)
#include "MyUnitManager.h"
#include <AzCore/Serialization/SerializeContext.h>
namespace MyProject
{
AZ_COMPONENT_IMPL(MyUnitManager, "MyUnitManager", "{YOUR-UUID-HERE}");
void MyUnitManager::Reflect(AZ::ReflectContext* context)
{
if (auto serializeContext = azrtti_cast<AZ::SerializeContext*>(context))
{
serializeContext->Class<MyUnitManager, GS_Unit::GS_UnitManagerComponent>()
->Version(0);
if (AZ::EditContext* editContext = serializeContext->GetEditContext())
{
editContext->Class<MyUnitManager>("My Unit Manager", "Custom unit manager")
->ClassElement(AZ::Edit::ClassElements::EditorData, "")
->Attribute(AZ::Edit::Attributes::Category, "MyProject")
->Attribute(AZ::Edit::Attributes::AppearsInAddComponentMenu, AZ_CRC_CE("Game"));
}
}
}
void MyUnitManager::OnStartupComplete()
{
GS_UnitManagerComponent::OnStartupComplete();
// Custom post-startup logic
}
void MyUnitManager::OnEnterStandby()
{
GS_UnitManagerComponent::OnEnterStandby();
// Custom standby logic
}
void MyUnitManager::OnExitStandby()
{
GS_UnitManagerComponent::OnExitStandby();
// Custom resume logic
}
}
See Also
For component references:
For related resources:
Get GS_Unit
GS_Unit — Explore this gem on the product page and add it to your project.
15.2 - Unit Controllers
The controller-unit possession model — base controller, player controller, and AI controller components for driving unit behavior.
Unit Controllers are the decision-making layer in the GS_Unit architecture. A controller “possesses” a unit entity, giving it authority over that unit’s actions. This possession model cleanly separates the what (the unit with its movement, abilities, and stats) from the who (the controller providing intent — player input or AI logic).
The system provides three controller components:
- GS_UnitControllerComponent – The base controller with possession logic, placement helpers, and the virtual interface for extension.
- GS_PlayerControllerComponent – A player-specific controller that integrates with the Input Data subsystem to translate player input into unit commands.
- GS_AIControllerComponent – An AI controller for NPC units, providing hooks for behavior trees or custom AI logic.
For usage guides and setup examples, see The Basics: GS_Unit.
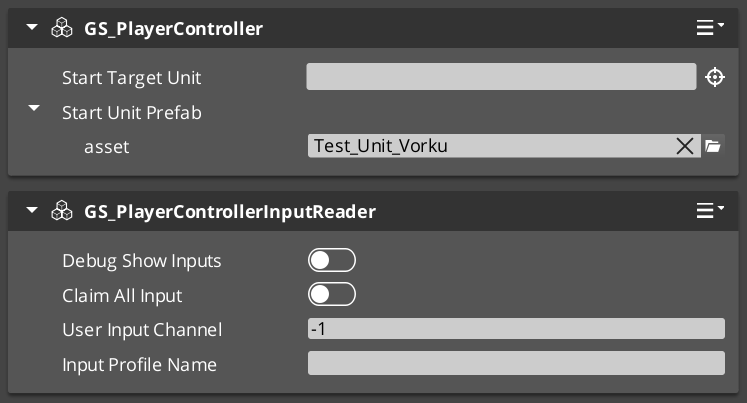
Contents
How It Works
Possession Model
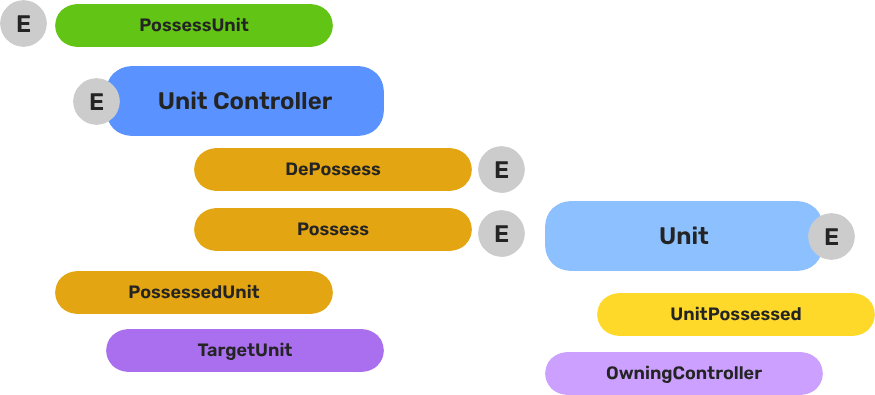
Breakdown
Every unit has exactly one controller at a time, or no controller at all. Possession is established by calling PossessUnit on the controller and released by calling DePossessUnit. Possession is observed through the GS_Core cross-gem contract PossessionEmissionBus — the controller fires OnPossessedUnit / OnReleasedUnit on its own entity, and the unit fires OnPossessedByController / OnReleasedByController on its entity — so other systems can react without depending on GS_Unit.
| Concept | Description |
|---|
| Possession | A controller attaches to a unit. The unit accepts input and movement commands from that controller only. |
| DePossession | The controller releases the unit. The unit halts input processing and enters a neutral state. |
| Possession events | Fire on the GS_Core PossessionEmissionBus (addressed by entity ID) whenever a unit’s controller changes. |
| GetController | Returns the entity ID of the current controller, or an invalid ID if none. |
| GetUniqueName | Returns the string name assigned by the Unit Manager when this unit was spawned. |
Unit Placement
Controllers provide helper methods for positioning their possessed unit:
PlaceUnitAtExit – Places the unit at the level’s designated exit point.PlaceUnitAtEntity – Places the unit at a specific entity’s world position.
Unique Names
Both controllers and units maintain a unique name string. The base controller provides a virtual SetUniqueName() method that subclasses override to generate names from their specific context (e.g., player slot number, AI template name).
Component Reference
GS_UnitControllerComponent (Base)
The base controller class. All controller types inherit from this. It handles possession, placement, unique name generation, and the notification plumbing. Extend this class to create custom controller types.
GS_PlayerControllerComponent
Extends AZ::Component. The player controller adds input handling on top of the base controller pattern. It registers itself with the Unit Manager via RegisterPlayerController and integrates with the Input Data subsystem to feed player input into the possessed unit’s movement and action systems.
Typical entity setup for a player controller:
GS_PlayerControllerComponentGS_InputDataComponent – Holds the current input stateGS_PlayerControllerInputReaderComponent – Reads raw input into InputData- One or more
InputReactorComponents – Translate input data into movement vectors or action triggers
GS_AIControllerComponent
Extends AZ::Component. The AI controller provides the same possession interface as the player controller but is driven by AI logic rather than player input. It does not connect to the input subsystem. Instead, it exposes hooks for behavior trees, scripted sequences, or custom AI decision-making to issue commands to the possessed unit.
API Reference
Request Bus: UnitControllerRequestBus
Commands sent to a specific controller. ById bus — addressed by the controller’s entity ID.
| Method | Parameters | Returns | Description |
|---|
PossessUnit | AZ::EntityId targetUnit | void | Possesses the target unit. Fires OnPossessedUnit on the GS_Core PossessionEmissionBus (controller entity). |
DePossessUnit | — | void | Releases the currently possessed unit. Fires OnReleasedUnit on the GS_Core PossessionEmissionBus (controller entity). |
PlaceUnitAtExit | — | void | Moves the possessed unit to the level’s exit point. |
PlaceUnitAtEntity | AZ::EntityId targetEntity | void | Moves the possessed unit to the world position of the target entity. |
GetUnit | — | AZ::EntityId | Returns the entity ID of the currently possessed unit. |
GetUniqueName | — | AZStd::string | Returns the unique name of this controller. |
Cross-Gem Contract: PossessionEmissionBus
Possession is observed through the GS_Core contract bus PossessionEmissionBus — the old in-gem UnitControllerNotificationBus was retired in the interfaces migration. The bus is addressed by EntityId with Multiple handlers; any gem or script may listen without depending on GS_Unit. Controller-vantage events fire on the controller entity:
| Event | Parameters | Description |
|---|
OnPossessedUnit | AZ::EntityId unit | Fired on the controller entity when it possesses a unit (invalid unit = now possessing none). GS_PlayerControllerInputReaderComponent handles this to begin routing input to the new unit. |
OnReleasedUnit | AZ::EntityId unit | Fired on the controller entity when it releases the unit it held. |
The matching unit-vantage events (OnPossessedByController / OnReleasedByController) fire on the unit entity — see GS_Unit Units. For how to handle an emission bus, see Core Interfaces → Emit.
Virtual Methods
Override these when extending the base controller. Always call the base implementation.
| Method | Parameters | Returns | Description |
|---|
PostActivateProcessing() | — | void | Called after the controller’s Activate() completes. Override to add custom initialization that depends on the controller being fully active. |
SetUniqueName() | — | void | Called during initialization to set the controller’s unique name. Override to generate names from your project’s naming scheme. |
Usage Examples
C++ – Possessing a Unit
#include <GS_Unit/GS_UnitBus.h>
// From a controller, possess a unit
GS_Unit::UnitControllerRequestBus::Event(
GetEntityId(),
&GS_Unit::UnitControllerRequestBus::Events::PossessUnit,
targetUnitEntityId
);
C++ – Querying a Controller’s Unit
#include <GS_Unit/GS_UnitBus.h>
AZ::EntityId possessedUnit;
GS_Unit::UnitControllerRequestBus::EventResult(
possessedUnit,
controllerEntityId,
&GS_Unit::UnitControllerRequestBus::Events::GetUnit
);
Script Canvas
Possessing and de-possessing a unit from a controller:
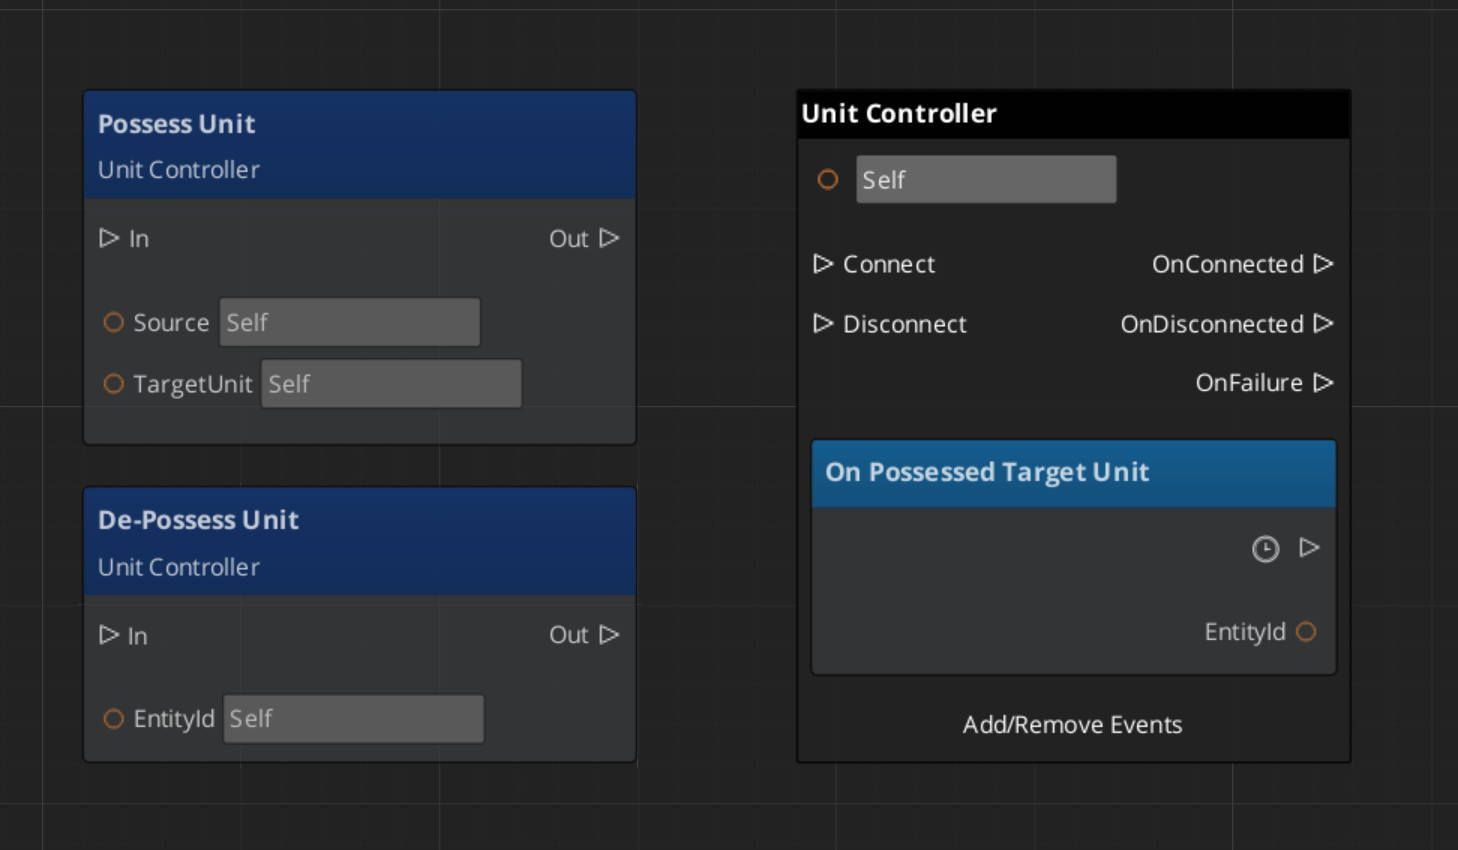
Getting the unit possessed by a controller:
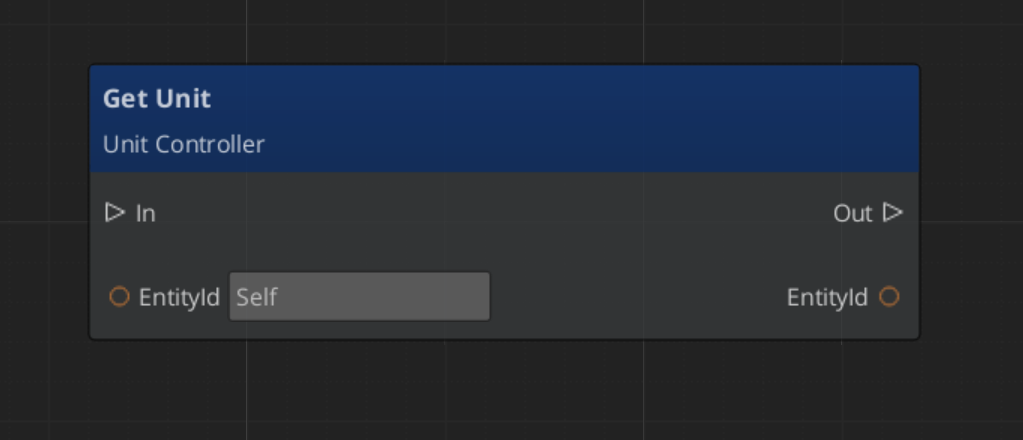
Extension Guide
Use the UnitController ClassWizard template to generate a new controller with boilerplate already in place — see GS_Unit Templates.
Create custom controllers by extending GS_UnitControllerComponent. This is the standard approach for game-specific controller logic such as party management, vehicle control, or specialized AI behaviors.
#pragma once
#include <GS_Unit/GS_UnitBus.h>
#include <Source/Controllers/GS_UnitControllerComponent.h>
namespace MyProject
{
class MyCustomController : public GS_Unit::GS_UnitControllerComponent
{
public:
AZ_COMPONENT_DECL(MyCustomController);
static void Reflect(AZ::ReflectContext* context);
protected:
void PostActivateProcessing() override;
void SetUniqueName() override;
};
}
Implementation (.cpp)
#include "MyCustomController.h"
#include <AzCore/Serialization/SerializeContext.h>
namespace MyProject
{
AZ_COMPONENT_IMPL(MyCustomController, "MyCustomController", "{YOUR-UUID-HERE}");
void MyCustomController::Reflect(AZ::ReflectContext* context)
{
if (auto serializeContext = azrtti_cast<AZ::SerializeContext*>(context))
{
serializeContext->Class<MyCustomController, GS_Unit::GS_UnitControllerComponent>()
->Version(0);
if (AZ::EditContext* editContext = serializeContext->GetEditContext())
{
editContext->Class<MyCustomController>(
"My Custom Controller", "Project-specific controller logic")
->ClassElement(AZ::Edit::ClassElements::EditorData, "")
->Attribute(AZ::Edit::Attributes::Category, "MyProject")
->Attribute(AZ::Edit::Attributes::AppearsInAddComponentMenu, AZ_CRC_CE("Game"));
}
}
}
void MyCustomController::PostActivateProcessing()
{
GS_UnitControllerComponent::PostActivateProcessing();
// Custom post-activation logic — connect to AI systems, load profiles, etc.
}
void MyCustomController::SetUniqueName()
{
// Generate a unique name from your project's naming scheme
uniqueName = AZStd::string::format("CustomController_%d", m_controllerIndex);
}
}
See Also
For component references:
- Unit Manager – Spawning and lifecycle management
- Units – Unit entity setup and the GS_UnitComponent
- Input Data – Input state and reaction components used by player controllers
- Movement – Movement components driven by controller input
Get GS_Unit
GS_Unit — Explore this gem on the product page and add it to your project.
15.3 - Input Data
The decoupled input pipeline — reading hardware events on the controller, storing state on the unit, and reacting to state changes through reactor components.
The Input Data subsystem bridges the controller entity (where hardware input is read) and the unit entity (where input is acted on). The controller reads raw device events and routes named event values into the unit’s GS_InputDataComponent. Reactor components on the unit then convert that stored state into movement vectors or game actions.
This separation keeps units ignorant of input bindings — any controller can possess any unit without the unit needing to change.
For usage guides and setup examples, see The Basics: GS_Unit.
Contents
How It Works
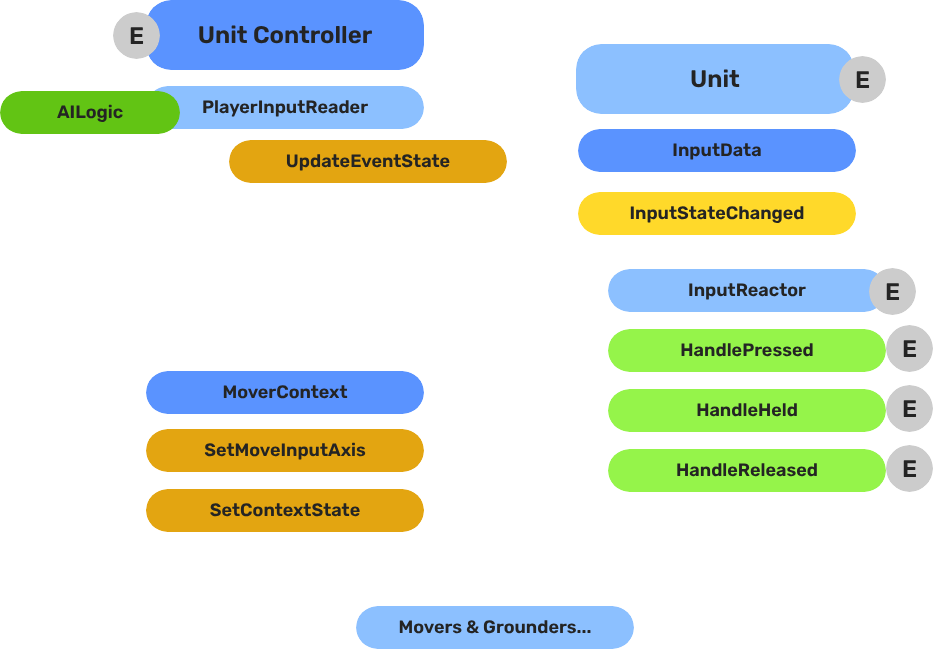
Breakdown
The input pipeline has three stages. Each stage is a separate component on the unit entity, and they run in order every frame:
| Stage | Component | What It Does |
|---|
| 1 — Read | GS_PlayerControllerInputReaderComponent | Reads raw input events from the active input profile and writes them into GS_InputDataComponent. |
| 2 — Store | GS_InputDataComponent | Holds the current frame’s input state — button presses, axis values — as structured data. |
| 3 — React | Reactor components | Read from GS_InputDataComponent and produce intent: movement vectors, action triggers, etc. |
All reactor components downstream of the store stage read from the same GS_InputDataComponent, so there is no duplicated hardware polling and no risk of two reactors seeing different input states for the same frame.
- The Basics: Controllers — Possession, input routing, and controller assignment.
- The Basics: Core Input — Input profiles, action mappings, and options setup.
- The Basics: Unit Input — Input readers, axis configuration, and ScriptCanvas usage.
- Framework API: Unit Controllers — Controller components, possession API, and C++ extension.
- Framework API: Input Reader — Profile binding, action event reading, and C++ extension.
- Framework API: Input Reactor — InputDataComponent schema, reactor base class, and C++ extension.
- Framework API: Mover Context — Context state, mode authority, and C++ extension.
Component Reference
Stores the current input state for a unit as a name-value map. Receives input from the controller via InputDataRequestBus. Broadcasts state changes to reactor components via InputDataNotificationBus.
Data: AZStd::unordered_map<AZStd::string, float> inputEventStates
The owning controller reference is established when a controller takes possession, observed through the GS_Core PossessionEmissionBus (see Player Input Reader).
Listens to InputDataNotificationBus. Tracks a set of event names (inputReactEvents). Fires the correct virtual based on zero-crossing:
| Virtual | Trigger |
|---|
HandlePressed(stateName) | Value changed 0 → non-zero |
HandleHeld(stateName) | Value remains non-zero |
HandleReleased(stateName) | Value changed non-zero → 0 |
Variant for analogue axis input. Fires HandleAxisChanged(stateName, value) whenever the value changes, without pressed/held/released semantics.
KeyboardMovement_InputReactorComponent
Converts four discrete key events into a 2D movement axis. Maps moveUp/moveDown/moveLeft/moveRight event names to +1/-1 contributions on X and Y, then calls MoverContextRequestBus::SetMoveInputAxis("x"/"y", value).
| Field | Description |
|---|
moveUpEvent | Event name for the forward/up key |
moveDownEvent | Event name for the back/down key |
moveLeftEvent | Event name for the left key |
moveRightEvent | Event name for the right key |
JoyAxisMovement_AxisReactorComponent
Directly maps two joystick axis event names to the mover context X and Y axes via SetMoveInputAxis.
| Field | Description |
|---|
xAxisName | Input event name for the horizontal axis |
yAxisName | Input event name for the vertical axis |
Extends GS_Core::GS_InputReaderComponent. Sits on the controller entity. Routes input to the possessed unit on HandleFireInput. Updates its possessedUnit reference when OnPossessedUnit fires on the GS_Core PossessionEmissionBus (controller entity). See Player Input Reader for full details.
API Reference
Commands sent to a specific unit’s input data component. ById bus — addressed by unit entity ID.
| Method | Parameters | Returns | Description |
|---|
UpdateEventState | AZStd::string stateName, float value | void | Writes the value for the named event and broadcasts InputStateChanged. |
ClearInputState | — | void | Zeros all stored values and broadcasts ClearInput. |
GetEventState | AZStd::string stateName | float | Returns the current float value for the named event. |
Events broadcast to reactor components on the unit. ById bus — addressed by unit entity ID.
| Event | Parameters | Description |
|---|
InputStateChanged | AZStd::string stateName, float value | Fired when any input event value changes. Reactor components compare against their tracked events and respond. |
ClearInput | — | Fired when all input states are cleared. |
See Also
For detailed component pages:
For related components:
Get GS_Unit
GS_Unit — Explore this gem on the product page and add it to your project.
15.3.1 - Input Reactor
Base and concrete reactor components — convert unit input state into pressed/held/released events or axis changes for movement and actions.
Input reactor components sit on the unit entity and listen to InputDataNotificationBus. They are the unit-side response layer that turns stored input state into game actions — movement vectors, ability triggers, UI navigation, etc.
For usage guides and setup examples, see The Basics: GS_Unit.

Contents
How It Works
Each reactor declares which event names it cares about (inputReactEvents). When InputDataNotificationBus::InputStateChanged fires, the reactor compares the incoming stateName against its list. If it matches, it compares the new value against the previously stored value and calls the correct virtual method:
- 0 → non-zero →
HandlePressed - non-zero → non-zero →
HandleHeld - non-zero → 0 →
HandleReleased - any change →
HandleAxisChanged (axis variant only)
Reactors store lastInputValues per event name to track zero-crossings between frames.
Base Classes
GS_InputReactorComponent
Base class for discrete button/key input. Extend this to react to named input events with press, hold, and release semantics.
Virtual methods to override:
| Method | Parameters | Description |
|---|
HandlePressed | AZStd::string stateName | Called when the event value crosses from 0 to non-zero. |
HandleHeld | AZStd::string stateName | Called each frame while the event value remains non-zero. |
HandleReleased | AZStd::string stateName | Called when the event value crosses from non-zero to 0. |
Fields:
| Field | Description |
|---|
inputReactEvents | List of event name strings this reactor listens for |
lastInputValues | Map of {eventName → float} tracking previous values for zero-crossing detection |
GS_InputAxisReactorComponent
Base class for analogue axis input. Extend this for joystick, trigger, or any continuous value that should not use pressed/held/released semantics.
Virtual methods to override:
| Method | Parameters | Description |
|---|
HandleAxisChanged | AZStd::string stateName, float value | Called whenever the axis value changes. |
Concrete Reactors
KeyboardMovement_InputReactorComponent
Converts four discrete directional key events into a 2D movement axis. Maps moveUp/moveDown/moveLeft/moveRight to +1/-1 contributions on the X and Y axes. On any key press or release, recomputes the combined axis and calls MoverContextRequestBus::SetMoveInputAxis("x"/"y", value) on the unit.
| Field | Description |
|---|
moveUpEvent | Event name for the forward/up key |
moveDownEvent | Event name for the back/down key |
moveLeftEvent | Event name for the left key |
moveRightEvent | Event name for the right key |
Internal accumulation fields:
| Field | Description |
|---|
xAxisPositive / xAxisNegative | Accumulated +X and -X contributions |
yAxisPositive / yAxisNegative | Accumulated +Y and -Y contributions |
JoyAxisMovement_AxisReactorComponent
Directly maps two joystick axis event names to the Mover Context X and Y movement axes. Calls MoverContextRequestBus::SetMoveInputAxis("x"/"y", value) directly from HandleAxisChanged.
| Field | Description |
|---|
xAxisName | Input event name for the horizontal axis |
yAxisName | Input event name for the vertical axis |
API Reference
Reactors themselves do not expose a request bus. They consume InputDataNotificationBus and produce calls to MoverContextRequestBus or other action buses.
InputDataNotificationBus (consumed)
| Event | Description |
|---|
InputStateChanged(stateName, value) | Triggers zero-crossing comparison and calls HandlePressed/HandleHeld/HandleReleased/HandleAxisChanged. |
ClearInput() | Resets all lastInputValues to zero, triggering releases for any held inputs. |
MoverContextRequestBus (produced by movement reactors)
| Call | Description |
|---|
SetMoveInputAxis("x", value) | Sets the horizontal axis input (−1 to 1) on the unit’s MoverContext. |
SetMoveInputAxis("y", value) | Sets the vertical axis input (−1 to 1) on the unit’s MoverContext. |
Extension Guide
Use the InputReactor ClassWizard template to generate a new input reactor with boilerplate already in place — see GS_Unit Templates.
Create custom reactor components by extending GS_InputReactorComponent or GS_InputAxisReactorComponent.
#pragma once
#include <GS_Unit/InputData/GS_InputReactorComponent.h>
namespace MyProject
{
class AbilityInputReactor : public GS_Unit::GS_InputReactorComponent
{
public:
AZ_COMPONENT_DECL(AbilityInputReactor);
static void Reflect(AZ::ReflectContext* context);
protected:
void HandlePressed(const AZStd::string& stateName) override;
void HandleReleased(const AZStd::string& stateName) override;
};
}
In Reflect(), add the event names you want to listen to:
// In your component's activation or reflection, populate inputReactEvents:
inputReactEvents.push_back("ability_primary");
inputReactEvents.push_back("ability_secondary");
See Also
Get GS_Unit
GS_Unit — Explore this gem on the product page and add it to your project.
15.3.2 - Player Input Reader
Controller-side component that reads hardware input events and routes them to the possessed unit’s input data component.
GS_PlayerControllerInputReaderComponent is the bridge between the O3DE input system and the GS_Unit input pipeline. It sits on the controller entity alongside GS_PlayerControllerComponent and is responsible for reading raw hardware events and routing them to whichever unit is currently possessed.
For usage guides and setup examples, see The Basics: GS_Unit.

Contents
How It Works
Inheritance Chain
GS_PlayerControllerInputReaderComponent extends GS_Core::GS_InputReaderComponent, which listens to AzFramework::InputChannelNotificationBus. When a hardware input fires, the base class matches the event against the configured GS_InputProfile and calls HandleFireInput(eventName, value).
HandleFireInput(eventName, value) checks whether a unit is currently possessed. If so, it routes the event to the unit:
GS_Unit::InputDataRequestBus::Event(
possessedUnit,
&GS_Unit::InputDataRequestBus::Events::UpdateEventState,
eventName, value
);
If no unit is possessed, the input is silently dropped.
Tracking the Possessed Unit
The component handles the GS_Core PossessionEmissionBus on its own controller entity and overrides OnPossessedUnit. When the controller possesses a new unit, this callback fires and the component updates its local possessedUnit reference. All future input calls then route to the new unit automatically.
Setup
Add GS_PlayerControllerInputReaderComponent to the controller entity alongside:
GS_PlayerControllerComponent — the controller that manages possession- A
GS_InputProfile asset assigned to the input reader’s inspector slot — defines which input events to listen for and their names
The input reader does not need to be configured per-unit. Changing possession automatically redirects all future input.
API Reference
GS_PlayerControllerInputReaderComponent does not expose a public request bus. It consumes two buses and produces one:
Consumed
| Bus | Event | Description |
|---|
AzFramework::InputChannelNotificationBus | OnInputChannelEvent | Receives raw hardware input from O3DE. Matched against the GS_InputProfile. |
GS_Core::PossessionEmissionBus | OnPossessedUnit(unit) | Updates the local possessedUnit reference when the controller possesses a new unit. Handled on the controller’s own entity. |
Produced
| Bus | Method | Description |
|---|
InputDataRequestBus | UpdateEventState(eventName, value) | Routes matched input events to the possessed unit’s GS_InputDataComponent. |
Virtual Methods
| Method | Parameters | Description |
|---|
HandleFireInput | AZStd::string eventName, float value | Called by the base class when a matched input event fires. Routes to the possessed unit if valid. |
See Also
Get GS_Unit
GS_Unit — Explore this gem on the product page and add it to your project.
15.4 - Units
What makes an entity a unit — the GS_UnitComponent, entity configuration, collision setup, and links to movement subsystems.
A “unit” in GS_Play is any entity that can be possessed by a controller and driven through gameplay. The GS_UnitComponent is the marker that transforms an ordinary entity into a unit. It provides the possession interface, unique naming, standby awareness, and registration with the Unit Manager.
Units are the characters, vehicles, creatures, or any other controllable actors in your game. They do not contain decision-making logic themselves — that comes from the controller that possesses them. A unit provides the body: movement, collision, visuals, and stats. The controller provides the brain: player input or AI logic.
For usage guides and setup examples, see The Basics: GS_Unit.

Contents
How It Works
Registration
When a GS_UnitComponent activates, it registers itself with the Unit Manager. This allows the manager to track all active units and respond to CheckIsUnit queries. When the component deactivates, it unregisters.
Possession
Units are possessed by controllers through the UnitRequestBus:
- A controller calls
Possess(controllerEntityId) on the unit. - The unit stores the controller reference and fires
OnPossessedByController on the GS_Core PossessionEmissionBus (unit entity). - The controller can now issue commands to the unit’s subsystems (movement, actions, etc.).
- Calling
DePossess() clears the controller reference.
Standby
Units receive standby signals from the Unit Manager. When entering standby, the unit broadcasts UnitEnteringStandby on its notification bus. Child components (movers, input reactors, etc.) listen for this and pause their processing. UnitExitingStandby reverses the process.
GS_UnitComponent Reference
Request Bus: UnitRequestBus
Commands sent to a specific unit. ById bus — addressed by the unit’s entity ID, multiple handlers.
| Method | Parameters | Returns | Description |
|---|
Possess | AZ::EntityId possessingController | void | Assigns a controller to this unit. |
DePossess | — | void | Removes the current controller from this unit. |
GetController | — | AZ::EntityId | Returns the entity ID of the currently possessing controller. |
GetUniqueName | — | AZStd::string | Returns the unique name assigned to this unit. |
Notification Bus: UnitNotificationBus
Events broadcast by a unit. ById bus — addressed by the unit’s entity ID. Carries the standby signals only; the possession signal moved to the GS_Core PossessionEmissionBus in the interfaces migration, where the unit fires OnPossessedByController / OnReleasedByController on its own entity.
| Event | Parameters | Description |
|---|
UnitEnteringStandby | — | Fired when this unit enters standby. |
UnitExitingStandby | — | Fired when this unit exits standby. |
Virtual Methods
| Method | Parameters | Returns | Description |
|---|
SetUniqueName() | — | void | Called during initialization to generate the unit’s unique name. Override in subclasses to use project-specific naming. |
Setup
Unit Entity Configuration
A minimal unit entity requires:
- GS_UnitComponent – Registers the entity as a unit and provides the possession interface.
- Movement components – At least a mover and optionally a grounder for ground detection.
- PhysX collider – For physics interaction and ground detection.
A fully featured unit entity typically includes:
GS_UnitComponentGS_MoverContextComponent – Aggregates movement input from movers- A mover component (e.g.,
GS_3DFreeMoverComponent, GS_3DSlideMoverComponent, or GS_PhysicsMoverComponent) - A grounder component (e.g.,
GS_PhysicsRayGrounderComponent) for surface detection - PhysX Rigid Body and Collider components
- Mesh or Actor component for visuals
Unit Collider Configuration

Collision layers used for a unit collider, as seen in the Entity Inspector.
Units require properly configured PhysX collision layers to interact with the environment and other units. If you have not set up your PhysX Collision Layers or Groups yet, refer to the Setting Up Your Project Environment guide.
Typical collision layer assignments:
- Unit layer – The unit’s own collider. Collides with environment and other units.
- Ground detection layer – Used by grounder raycasts. Collides with terrain and walkable surfaces only.
Unit Action Graph
Under Construction
The Unit Action Graph is in early development. Integration with the movement system is not yet implemented.The Unit Action Graph is a visual HFSM editor for authoring character behavioral logic — separate from and complementary to the Movement components. While Movers handle locomotion physics, the Unit Action Graph defines what the character is doing and when it transitions between behaviors.
Unit Action Graph
See Also
For component references:
Get GS_Unit
GS_Unit — Explore this gem on the product page and add it to your project.
15.4.1 - Movement
The complete movement subsystem — movers, grounders, movement influence, and the movement profile asset for configuring unit locomotion.
The Movement subsystem handles all unit locomotion. It is mode-driven: a single named mode is active at a time, and only the mover and grounder whose mode name matches will run each tick. This makes locomotion fully composable without any mover combining logic.
The subsystem has four layers:
- Mover Context — Central hub. Transforms raw input into camera-relative and ground-projected vectors, owns mode switching, context states, and profile management.
- Movers — Translate MoverContext input into physics forces on the rigid body. One mover is active at a time per mode.
- Grounders — Detect ground contact, slope, and surface normal. Write results to the MoverContext and trigger mode switches.
- Movement Influence — Spatial zones and global fallbacks that supply the active
GS_UnitMovementProfile.
For usage guides and setup examples, see The Basics: GS_Unit.
Contents
Architecture
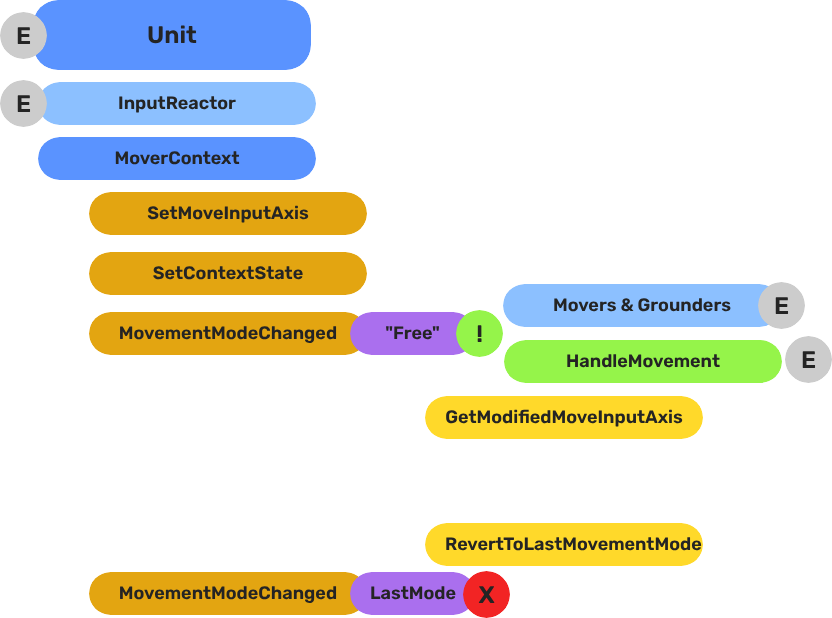
Breakdown
Movers and Grounders are multiple components on a Unit that are constantly changing activation based on the units state. When a mover is active, it freely processes the unit’s movement based on it’s functionality. At any moment, through internal or external forces, the Movement, Rotation, or Grounding state can change, which disables the old movers, and activates the new one to continue controlling the Unit.
Input
↓ InputDataNotificationBus::InputStateChanged
Input Reactor Components
↓ MoverContextRequestBus::SetMoveInputAxis
GS_MoverContextComponent
↓ ModifyInputAxis() → camera-relative
↓ GroundInputAxis() → ground-projected
↓ MoverContextNotificationBus::MovementModeChanged("Free")
GS_3DFreeMoverComponent [active when mode == "Free"]
↓ AccelerationSpringDamper → rigidBody->SetLinearVelocity
GS_PhysicsRayGrounderComponent [active when grounding mode == "Free"]
↓ MoverContextRequestBus::SetGroundNormal / SetContextState("grounding", ...)
↓ MoverContextRequestBus::ChangeMovementMode("Slide") ← when slope too steep
GS_3DSlideMoverComponent [active when mode == "Slide"]
The Slide mover activates when the Unit is walking on too steep an angle. It takes control over the unit, slides down the hill, then restores the previous movement behaviour.
- The Basics: Mover Context — Movement modes, grounding states, and configuration.
- The Basics: Movement — Mover types, grounder types, and ScriptCanvas usage.
- Framework API: Input Reactor — InputDataComponent schema, reactor base class, and C++ extension.
- Framework API: Mover Context — Context state, mode authority, and C++ extension.
- Framework API: Movers — Mover and grounder components, movement APIs, and C++ extension.
Movement Profile
GS_UnitMovementProfile is an asset that holds locomotion parameters. Movers read from the active profile via activeProfile pointer, which the MoverContext updates whenever the profile changes.
| Field | Type | Description |
|---|
LocomotionStyle | enum | Movement style archetype (affects animation matching). |
moveSpeed | float | Target movement speed (m/s). |
speedChangeSmoothing | float | Lerp factor for speed transitions between profiles. |
canSprint | bool | Whether this profile allows sprinting. |
canJump | bool | Whether this profile allows jumping. |
canRoll | bool | Whether this profile allows rolling. |
Create movement profiles as data assets in the Asset Editor. Assign a default profile to the GS_MoverContextComponent in the Inspector. Spatial influence zones can override the active profile at runtime.
Reading Movement Profile Data - ScriptCanvas
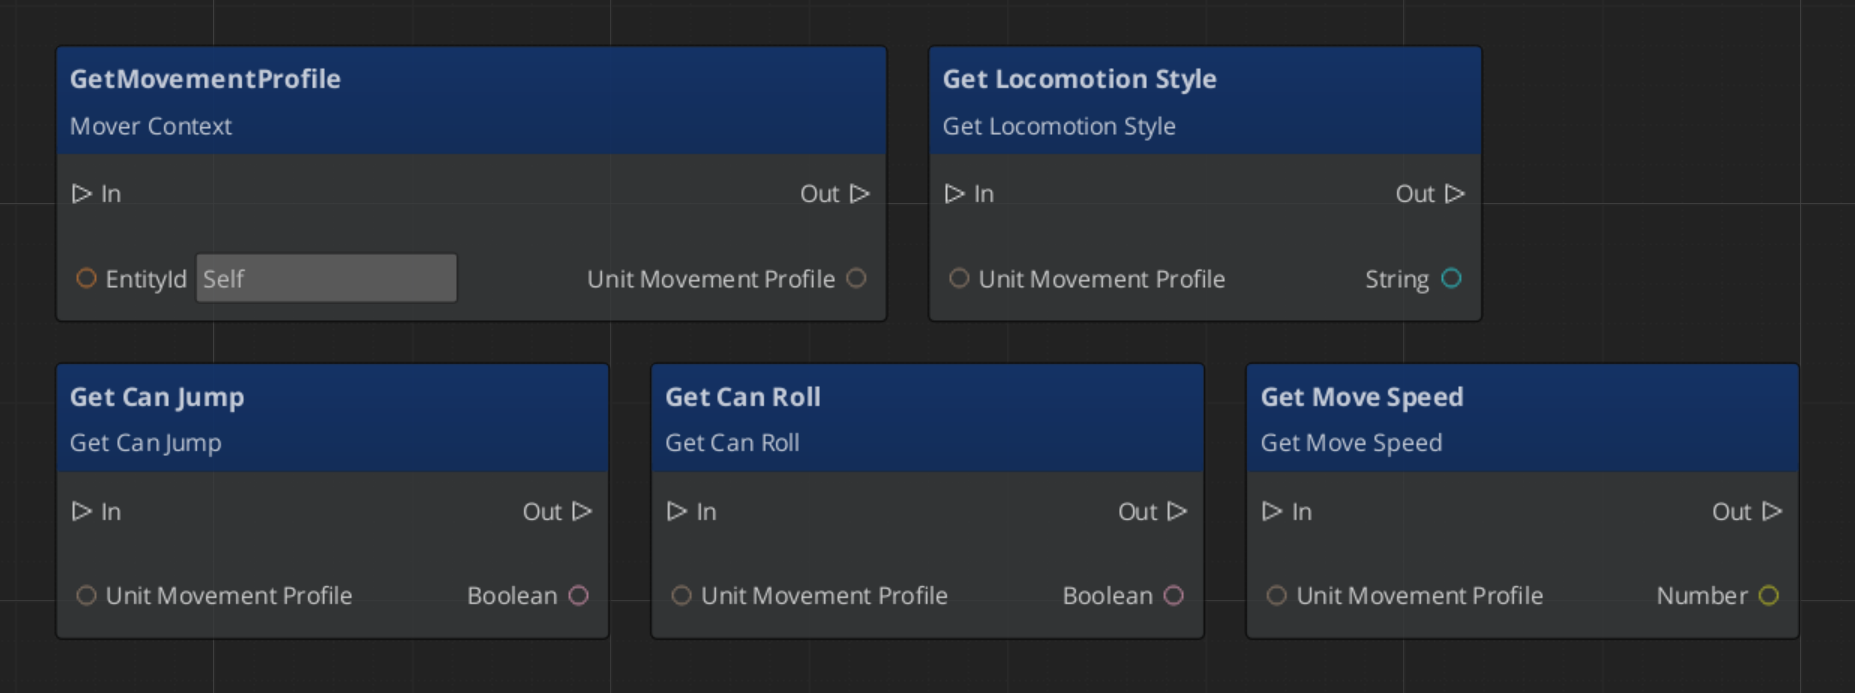
Movement Influence
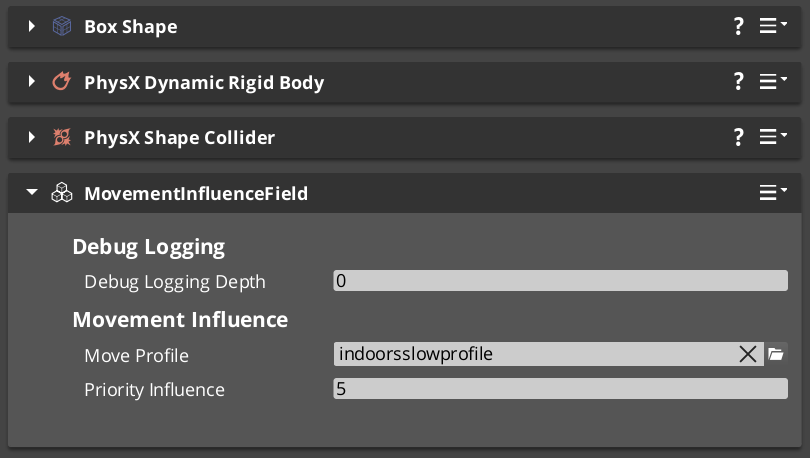
The MoverContext selects the active profile by priority:
- Influence list —
MovementInfluenceFieldComponent adds its profile when the unit enters its trigger volume. Multiple fields stack by priority. - Global fallback — if the influence list is empty and
allowGlobalInfluence is true, falls back to GlobalMovementRequestBus::GetGlobalMovementProfile. - Default profile — the
defaultMoveProfile assigned directly on the GS_MoverContextComponent.
MovementInfluenceFieldComponent
Inherits PhysicsTriggerComponent. On TriggerEnter, calls MoverContextRequestBus::AddMovementProfile(entityId, profile*) on the entering unit. On TriggerExit, calls RemoveMovementProfile(entityId).
Request Bus: MovementInfluenceRequestBus
ById bus — addressed by the influence field’s entity ID.
| Method | Parameters | Returns | Description |
|---|
GetPriority | — | int | Returns this field’s priority. Higher values take precedence when multiple fields overlap. |
GlobalMovementRequestBus
Broadcast bus — single global instance.
| Method | Parameters | Returns | Description |
|---|
GetGlobalMovementProfile | — | GS_UnitMovementProfile* | Returns the global fallback movement profile. Used by the MoverContext when no influence fields are active. |
Sub-Sections
- Mover Context — Input transformation, mode switching, context states, profile management
- Movers — Mover base class and concrete movers (
GS_3DFreeMoverComponent, GS_3DSlideMoverComponent) - Grounders — Grounder base class and concrete grounders (
GS_PhysicsRayGrounderComponent)
See Also
- Units — Unit entity setup and
GS_UnitComponent - Unit Controllers — Controllers that manage possession and drive input routing
- Input Data — The input pipeline that feeds movement reactors
- Stage Data — Handler for current stage functionality and global effects
- Springs Utility — Spring-damper functions used by movers and grounders
- Physics Trigger Volume — Physics overlap that triggers functionality.
Get GS_Unit
GS_Unit — Explore this gem on the product page and add it to your project.
15.4.1.1 - Mover Context
The central movement hub — transforms raw input into camera-relative and ground-projected vectors, manages mode switching, context states, and movement profiles.
GS_MoverContextComponent is the central state store for all movement on a unit. It sits between the input layer and the mover/grounder layer, holds all shared movement data, owns the mode-switching logic, and manages the active movement profile.
Movers and Grounders never communicate directly — they all read from and write to the MoverContext.
For usage guides and setup examples, see The Basics: GS_Unit.
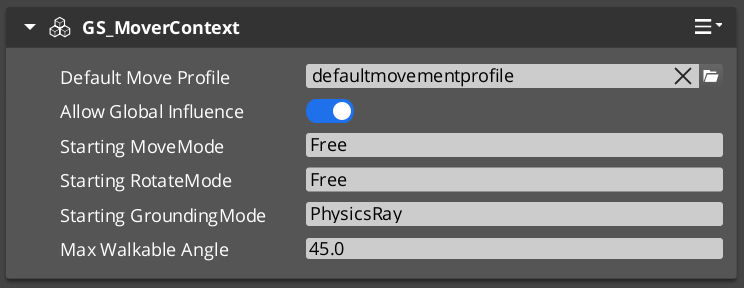
Contents
Raw input from reactor components arrives as a Vector2 (rawMoveInput). The MoverContext applies two sequential transformations each time input changes.
For a player unit (detected by “Player” tag): fetches the active camera’s world transform, flattens its forward and right vectors to the XY plane, then computes:
modifiedMoveInput = camForward * rawInput.Y + camRight * rawInput.X
For AI units (or when inputOverride = true): uses world cardinal axes (Y=forward, X=right).
Projects modifiedMoveInput onto the ground plane using the current groundNormal:
groundedMoveInput = modifiedMoveInput - groundNormal * dot(modifiedMoveInput, groundNormal)
Direction is then normalized and the original magnitude is restored. Movers use groundedMoveInput so movement always follows the surface contour, even on slopes.
Both steps run automatically whenever SetMoveInputAxis is called and again whenever SetGroundNormal is called (ground changed under a moving unit).
Mode Switching
The MoverContext maintains three independent mode strings, each with a current and last value:
| Mode Type | Current | Last |
|---|
| Movement mode | currentMoveMode | lastMoveMode |
| Rotation mode | currentRotateMode | lastRotateMode |
| Grounding mode | currentGroundingMode | lastGroundingMode |
ChangeMovementMode("Free") updates the string and broadcasts MoverContextNotificationBus::MovementModeChanged("Free"). Each Mover and Grounder component checks whether its own named mode matches the broadcast and activates or deactivates itself accordingly.
RevertToLastMovementMode() swaps current and last — enabling one-step undo (e.g., return from “Slide” to whatever was active before).
Context States
A generic key-value store for runtime state flags used by movers and grounders:
AZStd::unordered_map<AZStd::string, AZ::u32> contextStates
SetContextState(name, value) writes and broadcasts MoverContextNotificationBus::ContextStateChanged.
Known state keys:
| Key | Set by | Values | Meaning |
|---|
"grounding" | PhysicsRayGrounder | 0 = Falling, 1 = Grounded, 2 = Sliding | Ground contact state |
"StopMovement" | Various | 1 = stop | Signals the Free Mover to zero velocity |
Movement Profile Management
The MoverContext selects the active GS_UnitMovementProfile* by priority:
- Influence list —
AddMovementProfile(influencer, profile*) is called by MovementInfluenceFieldComponent when the unit enters a trigger volume. Multiple fields stack additively by priority via MovementInfluenceRequestBus::GetPriority. - Global fallback — if
influenceList is empty and allowGlobalInfluence is true, checks GlobalMovementRequestBus::GetGlobalMovementProfile. - Default profile — the asset-configured
defaultMoveProfile on the component.
When the profile changes, MoverContextNotificationBus::MovementProfileChanged(profile*) is broadcast. Movers update their cached activeProfile pointer.
Standby behavior:
UnitEnteringStandby → clears the influence list, broadcasts empty mode names (disables all movers/grounders)UnitExitingStandby → re-evaluates profile priority, re-broadcasts current mode names to re-enable the correct movers
Editor-Exposed Fields
| Field | Description |
|---|
defaultMoveProfile | Asset reference to the fallback GS_UnitMovementProfile |
allowGlobalInfluence | Whether to accept the global movement profile as a fallback |
startingMoveMode | Mode name to broadcast on activate (one-frame delayed to allow all components to start first) |
startingRotateMode | Rotation mode name to start with |
startingGroundingMode | Grounding mode name to start with |
maxWalkDegrees | Slope angle (degrees) above which movement is no longer considered grounded |
API Reference
Request Bus: MoverContextRequestBus
Commands sent to a specific unit’s MoverContext. ById bus — addressed by unit entity ID.
Input Axis:
| Method | Parameters | Returns | Description |
|---|
SetMoveInputAxis | AZStd::string axisName, float axisValue | void | Sets the raw input on “x” or “y”. Triggers ModifyInputAxis() and GroundInputAxis(). Clamps total magnitude to 1.0. |
GetMoveInputAxis | — | AZ::Vector2* | Returns pointer to rawMoveInput. |
GetModifiedMoveInputAxis | — | AZ::Vector3* | Returns pointer to camera-relative modifiedMoveInput. |
GetGroundMoveInputAxis | — | AZ::Vector3* | Returns pointer to ground-projected groundedMoveInput. |
Ground State:
| Method | Parameters | Returns | Description |
|---|
SetGroundNormal | AZ::Vector3 newNormal | void | Updates the ground normal and re-projects modifiedMoveInput. |
GetGroundNormal | — | AZ::Vector3* | Returns pointer to current ground normal. |
GetSlopeDirection | — | AZ::Vector3* | Returns pointer to the current slope direction vector. |
GetSlopeAngle | — | float* | Returns pointer to the current slope angle (dot product with up). |
GetMaxWalkAngle | — | float* | Returns pointer to the cosine of maxWalkDegrees. |
Context States:
| Method | Parameters | Returns | Description |
|---|
SetContextState | AZStd::string stateName, AZ::u32 stateValue | void | Writes a state value and broadcasts ContextStateChanged. |
GetContextState | AZStd::string stateName | AZ::u32 | Returns the current value for the named state. |
Mode Switching:
| Method | Parameters | Returns | Description |
|---|
ChangeMovementMode | AZStd::string targetMoveMode | void | Sets current move mode and broadcasts MovementModeChanged. |
RevertToLastMovementMode | — | void | Swaps current and last move mode. |
ChangeRotationMode | AZStd::string targetRotateMode | void | Sets current rotation mode and broadcasts RotationModeChanged. |
RevertToLastRotationMode | — | void | Swaps current and last rotation mode. |
ChangeGroundingMode | AZStd::string targetGroundingMode | void | Sets current grounding mode and broadcasts GroundingModeChanged. |
RevertToLastGroundingMode | — | void | Swaps current and last grounding mode. |
Profile Management:
| Method | Parameters | Returns | Description |
|---|
AddMovementProfile | AZ::EntityId influencer, GS_UnitMovementProfile* profile | void | Adds an influence-field profile to the priority list and re-evaluates. |
RemoveMovementProfile | AZ::EntityId influencer | void | Removes an influence-field profile and re-evaluates. |
Notification Bus: MoverContextNotificationBus
Events broadcast by the MoverContext. ById bus — addressed by unit entity ID. Movers and Grounders subscribe to this.
| Event | Parameters | Description |
|---|
MovementModeChanged | AZStd::string modeName | Fired when the movement mode changes. Movers activate or deactivate based on their m_moveModeName. |
RotationModeChanged | AZStd::string modeName | Fired when the rotation mode changes. |
GroundingModeChanged | AZStd::string modeName | Fired when the grounding mode changes. Grounders activate or deactivate based on their m_groundModeName. |
ContextStateChanged | AZStd::string stateName, AZ::u32 value | Fired when a context state value changes. |
MovementProfileChanged | GS_UnitMovementProfile* profile | Fired when the active movement profile is replaced. Movers update their activeProfile pointer. |
Virtual Methods
Override these when extending the MoverContext.
| Method | Description |
|---|
ModifyInputAxis() | Transforms rawMoveInput into modifiedMoveInput (camera-relative). Override for custom camera or axis mapping. |
GroundInputAxis() | Projects modifiedMoveInput onto the ground plane into groundedMoveInput. Override for custom surface projection. |
Script Canvas Examples
Changing movement mode:

Reverting to the previous movement mode:

Setting a context state flag:
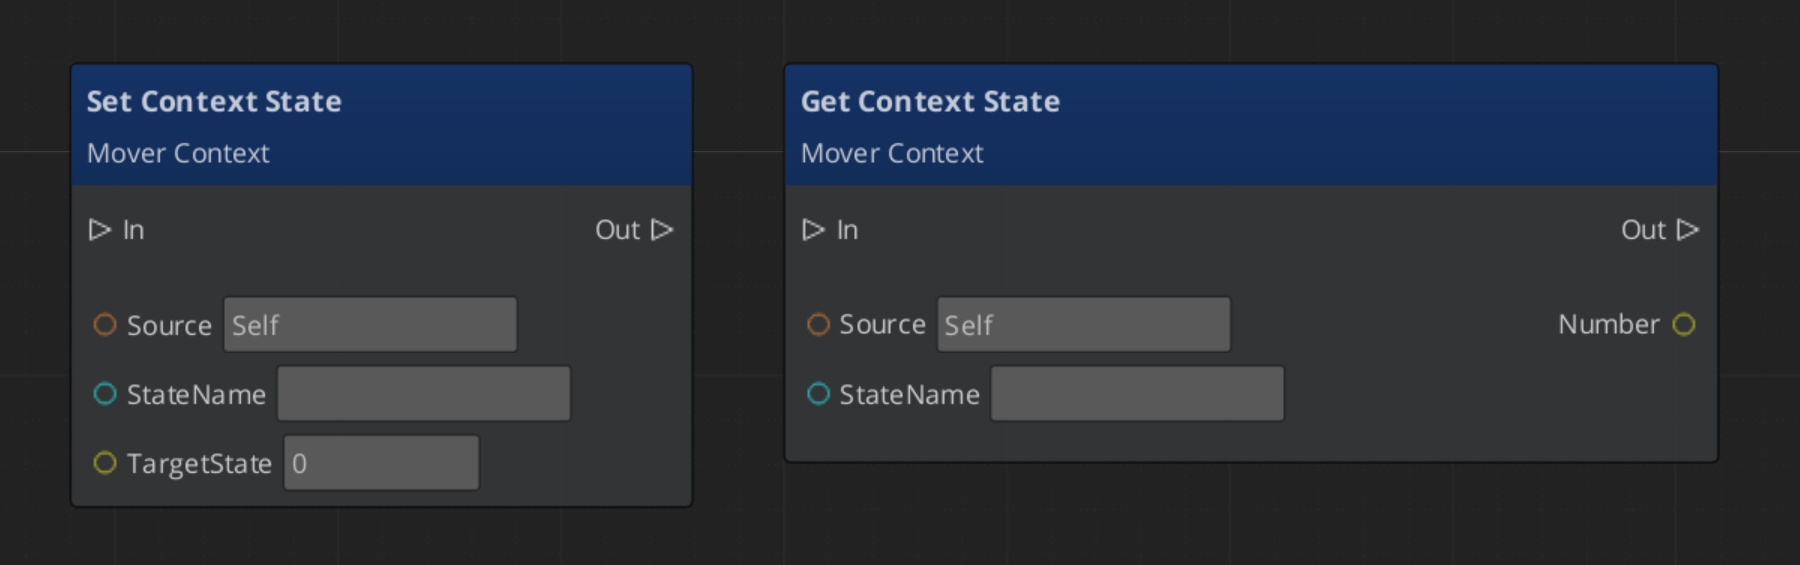
See Also
- Movers — Mover components that read from the MoverContext
- Grounders — Grounder components that write ground state to the MoverContext
- Movement — Movement system overview
- Input Data — The input pipeline that feeds
SetMoveInputAxis
Get GS_Unit
GS_Unit — Explore this gem on the product page and add it to your project.
15.4.1.2 - Movers
Mover base class and concrete mover components — translate MoverContext input into physics-based unit motion via named mode activation.
Movers translate the processed movement input from the MoverContext into physics forces on the unit’s rigid body. Each mover activates for a specific named mode — when the MoverContext broadcasts MovementModeChanged("Free"), only the mover whose m_moveModeName matches "Free" activates. All others deactivate. This makes the locomotion system fully mode-driven and composable.
For usage guides and setup examples, see The Basics: GS_Unit.

Contents
Class Hierarchy
GS_MoverComponent (base — mode-aware activation, tick management)
└── GS_PhysicsMoverComponent (adds RigidBody cache + validity check)
├── GS_3DFreeMoverComponent (mode: "Free")
└── GS_3DSlideMoverComponent (mode: "Slide")
GS_MoverComponent (Base)
Tick: AzPhysics::SystemEvents::OnPostSimulateEvent (after the physics step). Optional debugForceTick uses AZ::TickBus for debugging without physics.
Mode-Aware Activation
Listens to MoverContextNotificationBus::MovementModeChanged and RotationModeChanged. Compares the broadcast mode name against its own m_moveModeName and m_rotateModeName. Calls ToggleMovement(true/false) and ToggleRotation(true/false) accordingly. The physics post-simulate handler is only registered when the mover is active, saving ticks when inactive.
Per-Tick Processing
Each tick:
CheckCanOperate() — validates that the required pointers and state are validHandleMovement() — calculates and applies movement (no-op in base)HandleRotation() — calculates and applies rotation (no-op in base)
Key Fields
| Field | Description |
|---|
m_moveModeName | Mode string this mover activates for (set in Activate()) |
m_rotateModeName | Mode string this mover’s rotation activates for |
movementActive / rotationActive | Whether movement/rotation processing is currently running |
delta | Cached frame delta time |
activeProfile | Pointer to current GS_UnitMovementProfile (updated via MovementProfileChanged) |
debugForceTick | If true, uses game tick instead of post-simulate (for debugging without physics) |
GS_PhysicsMoverComponent
Extends GS_MoverComponent. On activate, fetches AzPhysics::RigidBody* from the entity. CheckCanOperate() verifies the rigid body pointer is valid before allowing tick processing.
Concrete Movers
| Component | Mode Name | Description |
|---|
| GS_3DFreeMoverComponent | "Free" | Standard 3D locomotion — camera-relative, spring-damped velocity and rotation |
| GS_3DSlideMoverComponent | "Slide" | Slope-sliding locomotion — activated by the grounder when slope exceeds maxWalkAngle |
API Reference
Movers consume two buses and produce one:
Consumed
| Bus | Event | Description |
|---|
MoverContextNotificationBus | MovementModeChanged(modeName) | Activates or deactivates movement processing based on mode name match. |
MoverContextNotificationBus | RotationModeChanged(modeName) | Activates or deactivates rotation processing based on mode name match. |
MoverContextNotificationBus | ContextStateChanged(stateName, value) | Allows movers to react to state flags (e.g. "StopMovement"). |
MoverContextNotificationBus | MovementProfileChanged(profile*) | Updates the cached activeProfile pointer. |
Virtual Methods
Override these when extending any mover:
| Method | Parameters | Returns | Description |
|---|
ToggleMovement | bool on | void | Called when the movement mode activates or deactivates. |
ToggleRotation | bool on | void | Called when the rotation mode activates or deactivates. |
HandleMovement | — | void | Called each tick when movement is active. Override to implement movement logic. |
HandleRotation | — | void | Called each tick when rotation is active. Override to implement rotation logic. |
CheckCanOperate | — | bool | Returns true if the mover has everything it needs to run this tick. |
Extension Guide
Use the Mover ClassWizard template to generate a new mover with boilerplate already in place — see GS_Unit Templates. The template offers two base class options: Physics Mover (default) for rigid-body locomotion, and Base Mover for transform-only movement.
Extend GS_PhysicsMoverComponent to create a custom physics-driven mover.
#pragma once
#include <Source/Unit/Mover/GS_PhysicsMoverComponent.h>
namespace MyProject
{
class MyCustomMover : public GS_Unit::GS_PhysicsMoverComponent
{
public:
AZ_COMPONENT_DECL(MyCustomMover);
static void Reflect(AZ::ReflectContext* context);
protected:
void Activate() override;
void HandleMovement() override;
void HandleRotation() override;
private:
// Mode name must be set in Activate():
// m_moveModeName = "MyMode";
// m_rotateModeName = "MyMode";
};
}
In HandleMovement(), read from the MoverContext and write to the rigid body:
void MyCustomMover::HandleMovement()
{
AZ::Vector3* groundedInput = nullptr;
GS_Unit::MoverContextRequestBus::EventResult(
groundedInput, GetEntityId(),
&GS_Unit::MoverContextRequestBus::Events::GetGroundMoveInputAxis
);
if (!groundedInput || groundedInput->IsZero()) return;
AZ::Vector3 targetVelocity = *groundedInput * activeProfile->moveSpeed;
m_rigidBody->SetLinearVelocity(targetVelocity);
}
See Also
Get GS_Unit
GS_Unit — Explore this gem on the product page and add it to your project.
15.4.1.2.1 - 3D Free Mover
Standard 3D locomotion — camera-relative movement and rotation driven by spring-damped physics, with optional slope slowdown.
GS_3DFreeMoverComponent is the standard mover for walking characters. It reads the ground-projected input vector from the MoverContext, applies optional slope attenuation, computes a destination velocity, and drives the rigid body via AccelerationSpringDamper. Rotation is handled separately using QuaternionSpringDamper to face the last non-zero movement direction.
Mode names: "Free" (both movement and rotation)
For usage guides and setup examples, see The Basics: GS_Unit.

Contents
How It Works
HandleMovement()
Called each post-physics tick while movement mode is "Free":
- Reads
groundedMoveInput pointer from MoverContextRequestBus::GetGroundMoveInputAxis. - If
EnableSlopeSlowdown is true, attenuates the input vector on steep slopes (see Slope Slowdown). - Multiplies the attenuated direction by
CalculateSpeed() to get destinationVelocity. - Fetches
rigidBody->GetLinearVelocity() as the current velocity. - Calls
GS_Core::Springs::AccelerationSpringDamper(position, velocity, cachedAcceleration, destinationVelocity, moveHalflife, delta). - Applies the result:
rigidBody->SetLinearVelocity(velocity).
The cachedAcceleration is a member field that persists between frames to produce smooth acceleration response even on sudden direction changes.
HandleRotation()
- Reads
groundedMoveInput from the MoverContext. - Updates
lastDirection only when groundedMoveInput is non-zero — so the unit keeps facing the last direction when stopped. - Computes target yaw from
lastDirection using atan2f. - Calls
GS_Core::Springs::QuaternionSpringDamper(currentRotation, cachedAngularVelocity, targetRotation, rotateHalflife, delta). - Applies
cachedAngularVelocity.Z to rigidBody->SetAngularVelocity().
StopMovement State
When ContextStateChanged("StopMovement", 1) fires, the mover zeros both velocity and cached acceleration, then clears the state back to 0. This allows other systems (e.g. landing from a jump, ability wind-up) to cleanly halt the unit.
Slope Slowdown
When EnableSlopeSlowdown is true, the mover reduces movement speed as the slope angle increases toward maxWalkAngle. The attenuation curve uses an exponent applied to the dot product of the movement direction against the uphill slope direction:
attenuation = 1.0 - uphillSlowStrength * pow(dot(moveDir, slopeDir), uphillSlowExponent)
× remap(slopeAngle, startSlowAngle, maxWalkAngle, 0, 1)
The slowdown begins at startSlowAngle degrees and reaches maximum reduction at maxWalkAngle. At or beyond maxWalkAngle, the grounder will switch the unit to "Slide" mode regardless.
Speed Calculation
CalculateSpeed() lerps curSpeed toward activeProfile->moveSpeed each frame:
curSpeed = AZ::Lerp(curSpeed, activeProfile->moveSpeed, expf(-speedChangeSmoothing * delta));
speedChangeSmoothing is read from activeProfile. This produces a smooth speed transition when the movement profile changes (e.g. entering a slow zone).
Editor-Exposed Settings
| Field | Default | Description |
|---|
moveHalflife | 0.1 | Spring halflife for movement velocity. Smaller = snappier acceleration. |
rotateHalflife | 0.2 | Spring halflife for rotation. Smaller = faster turn response. |
EnableSlopeSlowdown | true | Whether steep slopes reduce movement speed. |
uphillSlowStrength | 0.5 | Maximum speed reduction factor at the max walkable angle (0 = no reduction, 1 = full stop). |
uphillSlowExponent | 2.5 | Curve shape of the slowdown ramp. Higher = slower onset, steeper drop near max. |
startSlowAngle | 30° | Slope angle at which slowdown begins. |
Extension Guide
Extend GS_3DFreeMoverComponent to override movement or rotation behavior while keeping the base spring physics.
#pragma once
#include <Source/Unit/Mover/GS_3DFreeMoverComponent.h>
namespace MyProject
{
class MyFreeMove : public GS_Unit::GS_3DFreeMoverComponent
{
public:
AZ_COMPONENT_DECL(MyFreeMove);
static void Reflect(AZ::ReflectContext* context);
protected:
void HandleMovement() override;
};
}
void MyFreeMove::HandleMovement()
{
// Call base for standard spring movement
GS_3DFreeMoverComponent::HandleMovement();
// Add custom post-processing (e.g. strafe penalty, footstep IK correction)
}
See Also
Get GS_Unit
GS_Unit — Explore this gem on the product page and add it to your project.
15.4.1.2.2 - Slide Mover
Slope-sliding locomotion — automatically activated when slope exceeds maxWalkAngle, drives the unit down the slope via spring-damped physics with optional input resistance and automatic recovery.
GS_3DSlideMoverComponent handles slope-sliding locomotion. It activates automatically when the grounder detects a slope angle exceeding maxWalkAngle, and deactivates when the slope eases or the unit slows enough to recover.
Mode names: "Slide" (both movement and rotation)
For usage guides and setup examples, see The Basics: GS_Unit.
Contents
How It Works
HandleMovement()
Called each post-physics tick while movement mode is "Slide":
- Reads
slopeDir from MoverContextRequestBus::GetSlopeDirection. - Computes
destinationVelocity = slopeDir * baseSlideSpeed. - If
EnableInputSlideResistance is true, reads groundedMoveInput and applies an opposing influence:destinationVelocity += groundedMoveInput * InputResistanceInfluence
- Fetches
rigidBody->GetLinearVelocity() as the current velocity. - Calls
GS_Core::Springs::AccelerationSpringDamper(position, velocity, cachedAcceleration, destinationVelocity, moveHalflife, delta). - Applies the result:
rigidBody->SetLinearVelocity(velocity). - Calls
FinishSliding() to check whether the slide should end.
HandleRotation()
- Reads
slopeDir from the MoverContext. - Computes target yaw from slope direction using
atan2f — unit faces down the slope. - Calls
GS_Core::Springs::QuaternionSpringDamper(currentRotation, cachedAngularVelocity, targetRotation, rotateHalflife, delta). - Applies
cachedAngularVelocity.Z to rigidBody->SetAngularVelocity().
Finish Sliding
FinishSliding() is called every movement tick. It returns true and triggers recovery when both conditions are met:
- The current slope angle is below
minSlideAngle - The unit’s current speed is below
minSpeedToStop
On recovery:
MoverContextRequestBus::ChangeMovementMode(recoveryMoveMode);
MoverContextRequestBus::ChangeRotationMode(recoveryRotateMode);
Both modes default to "Free", returning the unit to standard locomotion.
Editor-Exposed Settings
| Field | Default | Description |
|---|
moveHalflife | 0.1 | Spring halflife for slide velocity. |
rotateHalflife | 0.15 | Spring halflife for rotation toward slope direction. |
baseSlideSpeed | 8.0 | Target speed along the slope direction (m/s). |
EnableInputSlideResistance | true | Whether player input can partially resist or redirect the slide. |
InputResistanceInfluence | 2.0 | Scalar applied to groundedMoveInput when computing resistance. Higher = more player control. |
minSlideAngle | 20° | Slope angle below which the unit may recover (if also slow enough). |
minSpeedToStop | 1.5 | Speed threshold below which the unit may recover (if also on shallow slope). |
recoveryMoveMode | "Free" | Movement mode to switch to on recovery. |
recoveryRotateMode | "Free" | Rotation mode to switch to on recovery. |
Extension Guide
Extend GS_3DSlideMoverComponent to override slide behavior while keeping the base spring physics and recovery logic.
#pragma once
#include <Source/Unit/Mover/GS_3DSlideMoverComponent.h>
namespace MyProject
{
class MySlide : public GS_Unit::GS_3DSlideMoverComponent
{
public:
AZ_COMPONENT_DECL(MySlide);
static void Reflect(AZ::ReflectContext* context);
protected:
void HandleMovement() override;
};
}
void MySlide::HandleMovement()
{
// Call base for standard slope physics
GS_3DSlideMoverComponent::HandleMovement();
// Add custom post-processing (e.g. audio trigger, particle effect on slide)
}
See Also
Get GS_Unit
GS_Unit — Explore this gem on the product page and add it to your project.
15.4.1.2.3 - 3D Strafe Mover
Aim-relative strafing movement for first-person and third-person units. Not yet implemented.
The 3D Strafe Mover provides aim-relative movement where the unit strafes relative to its facing direction. This is the standard movement model for first-person and third-person shooters where the camera or aim direction determines the movement frame.
This component is not yet implemented. This page will be updated with full API reference and usage documentation when the component is available.
For usage guides and setup examples, see The Basics: GS_Unit.
See Also
Get GS_Unit
GS_Unit — Explore this gem on the product page and add it to your project.
15.4.1.2.4 - Side Scroller Mover
2D side-scrolling movement constrained to a horizontal plane. Not yet implemented.
The Side Scroller Mover provides two-dimensional movement constrained to a horizontal plane with vertical jump support. This is the standard movement model for side-scrolling platformers, beat-em-ups, and other 2D gameplay projected in a 3D environment.
This component is not yet implemented. This page will be updated with full API reference and usage documentation when the component is available.
For usage guides and setup examples, see The Basics: GS_Unit.
See Also
- Movement – Movement subsystem overview
- Movers – All available mover components
Get GS_Unit
GS_Unit — Explore this gem on the product page and add it to your project.
15.4.1.2.5 - Grid Step Mover
Tile-based grid movement for turn-based or grid-locked unit locomotion. Not yet implemented.
The Grid Step Mover provides discrete, tile-based movement for units that move in fixed steps along a grid. This is the standard movement model for turn-based RPGs, tactics games, puzzle games, and any project that uses grid-locked locomotion.
This component is not yet implemented. This page will be updated with full API reference and usage documentation when the component is available.
For usage guides and setup examples, see The Basics: GS_Unit.
See Also
- Movement – Movement subsystem overview
- Movers – All available mover components
Get GS_Unit
GS_Unit — Explore this gem on the product page and add it to your project.
15.4.1.3 - Grounders
Grounder base class and concrete grounder components — detect ground contact, compute ground normals and slope data, and drive mode switching on the MoverContext.
Grounders run each physics tick to determine whether the unit is in contact with the ground, what the slope looks like, and whether the surface is walkable. They write their findings to the MoverContext and switch movement modes when the ground state changes.
For usage guides and setup examples, see The Basics: GS_Unit.

Contents
Class Hierarchy
GS_GrounderComponent (base — mode-aware activation, tick management)
└── GS_PhysicsRayGrounderComponent (grounding mode: "Free")
GS_GrounderComponent (Base)
Tick: AzPhysics::SystemEvents::OnPostSimulateEvent (after the physics step).
Mode-Aware Activation
Listens to MoverContextNotificationBus::GroundingModeChanged. Compares the broadcast mode name against its own m_groundModeName. Calls ToggleGrounder(true/false) accordingly. The physics post-simulate handler is only registered when the grounder is active.
Per-Tick Processing
Each tick:
CheckCanOperate() — validates required pointers and stateHandleGrounding() — performs ground detection and updates MoverContext (no-op in base)
Key Fields
| Field | Description |
|---|
m_groundModeName | Grounding mode string this grounder activates for |
delta | Cached frame delta time |
Concrete Grounders
API Reference
Virtual Methods
Override these when extending any grounder:
| Method | Parameters | Returns | Description |
|---|
ToggleGrounder | bool on | void | Called when the grounding mode activates or deactivates. |
HandleGrounding | — | void | Called each tick when the grounder is active. Override to implement ground detection logic. |
GroundingStateChange | AZ::u32 newState | void | Called when ground contact state changes. Override to react to grounding transitions. |
CheckCanOperate | — | bool | Returns true if the grounder has everything it needs to run this tick. |
Consumed Buses
| Bus | Event | Description |
|---|
MoverContextNotificationBus | GroundingModeChanged(modeName) | Activates or deactivates this grounder based on mode name match. |
Produced Calls
| Bus | Method | Description |
|---|
MoverContextRequestBus | SetGroundNormal(normal) | Updates the ground normal used by the MoverContext for input projection. |
MoverContextRequestBus | SetContextState("grounding", value) | Sets grounding state: 0 = Falling, 1 = Grounded, 2 = Sliding. |
MoverContextRequestBus | ChangeMovementMode(modeName) | Switches to "Slide" when slope exceeds maxWalkAngle, or back to "Free" on recovery. |
Extension Guide
Use the Grounder ClassWizard template to generate a new grounder with boilerplate already in place — see GS_Unit Templates. The template offers two base class options: Physics Ray Grounder (default, includes raycast, coyote time, and gravity) or Base Grounder for fully custom detection.
Extend GS_GrounderComponent to implement custom ground detection.
#pragma once
#include <Source/Unit/Grounder/GS_GrounderComponent.h>
namespace MyProject
{
class MyGrounder : public GS_Unit::GS_GrounderComponent
{
public:
AZ_COMPONENT_DECL(MyGrounder);
static void Reflect(AZ::ReflectContext* context);
protected:
void Activate() override;
void HandleGrounding() override;
void GroundingStateChange(AZ::u32 newState) override;
private:
// Set in Activate():
// m_groundModeName = "Free";
};
}
In HandleGrounding(), run your detection and write results to the MoverContext:
void MyGrounder::HandleGrounding()
{
AZ::Vector3 groundNormal = AZ::Vector3::CreateAxisZ();
bool isGrounded = false;
// ... custom detection logic ...
GS_Unit::MoverContextRequestBus::Event(
GetEntityId(),
&GS_Unit::MoverContextRequestBus::Events::SetGroundNormal,
groundNormal
);
AZ::u32 state = isGrounded ? 1 : 0;
GS_Unit::MoverContextRequestBus::Event(
GetEntityId(),
&GS_Unit::MoverContextRequestBus::Events::SetContextState,
"grounding", state
);
}
See Also
Get GS_Unit
GS_Unit — Explore this gem on the product page and add it to your project.
15.4.1.3.1 - 3D Free Grounder
Raycast-based grounder for standard 3D locomotion — detects ground contact with coyote time, applies manual gravity when airborne, switches to Slide mode on steep slopes.
GS_PhysicsRayGrounderComponent is the standard grounder for walking characters. Each physics tick it casts a ray downward from the unit’s capsule base, evaluates the slope, applies gravity when airborne, and updates the MoverContext with ground normal and grounding state.
Grounding mode name: "Free"
For usage guides and setup examples, see The Basics: GS_Unit.

Contents
How It Works
Each post-physics tick, the grounder runs two operations in order:
GroundCheck() — determines contact, slope, and normalGroundingMove() — applies gravity or snap force based on contact result
Ground Check
GroundCheck() casts a sphere (matching the capsule base radius) downward from the unit’s feet:
- If the ray hits geometry within
groundCheckDistance:- Computes slope angle from the hit normal vs. world up.
- Updates
MoverContextRequestBus::SetGroundNormal(hitNormal). - If slope angle ≤
maxWalkAngle (from the MoverContext): reports Grounded. - If slope angle >
maxWalkAngle: reports Sliding. - Resets coyote timer.
- If no hit:
- Increments
coyoteTimer. - If
coyoteTimer < coyoteTime: still reports Grounded (coyote grace period). - If
coyoteTimer ≥ coyoteTime: reports Falling.
Grounding Move
GroundingMove() applies vertical forces based on the current state:
Grounded: Applies a downward TimedSpringDamper to keep the unit snapped to the surface without bouncing.
Falling: Applies manual gravity — adds gravityScale * AZ::Physics::DefaultGravity to the rigid body’s linear velocity each frame:
AZ::Vector3 velocity = rigidBody->GetLinearVelocity();
velocity.SetZ(velocity.GetZ() + gravity * delta);
rigidBody->SetLinearVelocity(velocity);
Sliding: Does not override vertical velocity — the Free Mover’s AccelerationSpringDamper handles the slide direction entirely.
Grounding State Changes
GroundingStateChange(newState) is called whenever the ground state changes:
| State | Value | Trigger | Action |
|---|
| Falling | 0 | Lost ground contact beyond coyote time | SetContextState("grounding", 0) |
| Grounded | 1 | Ray hit within walkable angle | SetContextState("grounding", 1) |
| Sliding | 2 | Ray hit but slope > maxWalkAngle | SetContextState("grounding", 2), ChangeMovementMode("Slide") |
When returning to Grounded from Sliding, the grounder calls ChangeMovementMode("Free") to restore locomotion.
Editor-Exposed Settings
| Field | Default | Description |
|---|
groundCheckDistance | 0.15 | Raycast distance below the capsule base to detect ground. |
capsuleRadius | 0.3 | Radius of the sphere used for the downward cast (should match capsule). |
coyoteTime | 0.12 | Seconds of grace period before reporting Falling after losing ground contact. |
gravityScale | 1.0 | Multiplier on AZ::Physics::DefaultGravity applied when airborne. |
snapHalflife | 0.05 | Spring halflife for the ground-snap TimedSpringDamper. Smaller = tighter snap. |
Extension Guide
Extend GS_PhysicsRayGrounderComponent to add custom ground detection or state reactions.
#pragma once
#include <Source/Unit/Grounder/GS_PhysicsRayGrounderComponent.h>
namespace MyProject
{
class MyGrounder : public GS_Unit::GS_PhysicsRayGrounderComponent
{
public:
AZ_COMPONENT_DECL(MyGrounder);
static void Reflect(AZ::ReflectContext* context);
protected:
void GroundingStateChange(AZ::u32 newState) override;
};
}
void MyGrounder::GroundingStateChange(AZ::u32 newState)
{
// Call base to handle mode switching
GS_PhysicsRayGrounderComponent::GroundingStateChange(newState);
if (newState == 0)
{
// Unit became airborne — trigger jump animation, etc.
}
}
See Also
Get GS_Unit
GS_Unit — Explore this gem on the product page and add it to your project.
15.4.2 - Unit Action Graph
Hierarchical finite state machine editor for authoring character behavior with parallel layers, transitions, and conditions.
Under Construction
The Unit Action Graph is in early development. The editor infrastructure and runtime architecture are defined, but integration with the Unit system (GS_UnitContext, MoverContext, CharacterActionComponent) is not yet implemented. This page documents the design and what is currently functional.The Unit Action Graph is a Hierarchical Finite State Machine (HFSM) editor for authoring character behavior. It uses the gs_graphcanvas framework with a StateMachineGraph topology — multidirectional perimeter connections, tick-based state evaluation, and polymorphic transition conditions.
Contents
Opening the Editor
Open the Unit Action Graph editor from the O3DE Editor menu: GS Tools > Unit Action Graph Editor.
The editor manages a single .unitaction file containing all layers. Use File > New to create one, or File > Open to load an existing graph.
Multi-Layer Model
A .unitaction file is a container holding multiple layers, each an independent state machine graph. Layers are managed through the Layer Sidebar dock:
- Add — Create a new layer with an Entry node
- Remove — Delete a layer
- Rename — Double-click to rename
- Duplicate — Copy an existing layer
- Priority — Set in the Layer Details panel (higher priority overrides lower)
Click a layer name to open it as a graph tab. All layers save together as one file.
Perimeter Connections
Unlike flow and data-flow graphs that use slot-based bezier curves, state machine graphs use perimeter connections — straight arrows drawn from the edge of one state node to the edge of another. This gives the graph a traditional state machine diagram appearance.
When multiple connections exist between the same pair of nodes, they are offset for readability. Arrows include arrowheads at the target node.
Nodes
| Node | Purpose | Transitions In | Transitions Out |
|---|
| Entry | Marks the initial state | No | Yes (one connection to the starting state) |
| State | A behavior state with OnEnter/OnTick/OnExit lifecycle | Yes | Yes |
| Compound State | A state containing a nested sub-state-machine | Yes | Yes |
Entry Node
Auto-spawned in every new graph. Cannot be deleted or duplicated. Has a single outgoing connection to the initial state. Cannot be transitioned into.
State Node
The standard state. Represents a character behavior (Idle, Walk, Run, Attack). Each state carries its own list of outgoing TransitionDescriptor entries — one per outgoing connection.
Compound State Node
A state that contains an entire nested state machine. When entered, the compound state initializes and runs its sub-graph. When exited, the sub-graph stops. Used for complex behaviors with internal sub-states (e.g., a Jump state with Rising/Apex/Falling sub-states).
Transitions
Transitions are the connections between states. Each transition has:
- Priority — Integer value. When multiple transitions are valid on the same tick, the highest priority fires.
- Conditions — A polymorphic list of
TransitionCondition objects. All conditions must be satisfied for the transition to fire.
Inspecting Transitions
Click a transition arrow in the graph to select it. The Inspector Panel shows:
- “Transition: Source -> Destination” header
- Priority field
- Conditions list with a type picker to add new conditions
Transition Summary on Nodes
When a state node is selected, the inspector shows a summary of all outgoing transitions below the node’s properties. Each entry shows "P{priority}: -> {destination} [{N} conditions]" with a “Select” button to jump to that connection’s inspector.
Auto-Management
Transition descriptors are created and removed automatically when connections are added or removed in the graph. No manual descriptor management is needed.
Built-in Conditions
| Condition | Description |
|---|
| VariableCompareCondition | Compares a named variable to a value using a comparison operator (==, !=, <, >, <=, >=) |
| TimeElapsedCondition | Fires after a specified number of seconds in the current state. Reads the __stateTime auto-variable. |
| VariableTrueCondition | Fires when a named boolean variable is true |
Parallel Layers
The defining feature of the Unit Action Graph. Multiple layers evaluate simultaneously, each running its own independent state machine. All layers share the same variable context, enabling cross-layer communication.
Example layout:
UnitActionGraph
├── Layer: Movement (priority 0) — Idle, Walk, Run, Jump
├── Layer: Action (priority 1) — None, Attack, Interact
└── Layer: Rotation (priority 2) — FreeRotation, Locked, Modulated
Higher-priority layers can restrict or override lower-priority outputs. Each layer produces a state output that feeds into the character control system.
This solves the classic “jump while moving” problem — the Movement layer handles lateral motion while the Action layer handles the jump impulse, both evaluating simultaneously without conflicting.
Extending
Custom States
Subclass BaseNode and implement IStateMachineNode:
void OnEnter(GraphExecutionContext& context) override;
void OnTick(GraphExecutionContext& context, float deltaTime) override;
void OnExit(GraphExecutionContext& context) override;
Register with GS_AUTO_REGISTER_NODE_FOR(MyStateNode, "unitaction").
Custom Transition Conditions
Subclass TransitionCondition, add AZ_RTTI, and implement Reflect(). The inspector type picker auto-discovers new conditions via SerializeContext::EnumerateDerived().
Current Status
Implemented:
- Perimeter connection rendering (engine-level)
- Multi-layer container editor with sidebar
- HFSM runtime architecture (StateMachineEvaluator, ParallelLayerEvaluator)
- All node types (Entry, State, Compound State)
- Transition inspector with connection selection
- Built-in transition conditions
Not yet implemented:
- GS_UnitContext integration (connecting evaluator to unit components and Movers)
- Compound State sub-graph editing via double-click in the editor
- Tag-based transition groups and free-entry states
GS_CharacterActionComponent bridge to MoverContextRequestBus
See Also
15.5 - Templates
ClassWizard templates for GS_Unit — unit controllers, input reactors, mover components, and grounder components.
All GS_Unit extension types are generated through the ClassWizard CLI. The wizard handles UUID generation, cmake file-list registration, and module descriptor injection automatically.
For usage guides and setup examples, see The Basics: GS_Unit.
python ClassWizard.py \
--template <TemplateName> \
--gem <GemPath> \
--name <SymbolName> \
[--input-var key=value ...]
Contents
Unit Controller
Template: UnitController
Creates a Controller component that lives on the Controller Entity (the player or AI controller, not the Unit Entity itself). Manages which Unit is currently possessed, and coordinates possession/unpossession events to sibling controller-side components.
Generated files:
Source/${Name}ControllerComponent.h/.cpp
CLI:
python ClassWizard.py --template UnitController --gem <GemPath> --name <Name>
Post-generation: Implement OnPossess(unitEntityId) and OnUnpossess() to route activation to the correct input readers and other controller components. The controller entity is persistent; the unit entity is swappable.
See also: Unit Controllers — full extension guide with header and implementation examples.
Template: InputReactor
Sits on the Unit Entity. Subscribes to named input events from InputDataNotificationBus (broadcast by an InputReaderComponent on the Controller side) and translates them into MoverContextRequestBus calls.
Generated files:
Source/${Name}InputReactorComponent.h/.cpp
CLI:
python ClassWizard.py --template InputReactor --gem <GemPath> --name <Name>
Post-generation:
- Register event name strings in
inputReactEvents in Activate(). - Implement each
OnInputEvent(name, value) handler to call the appropriate MoverContextRequestBus method. - Multiple reactors can coexist on a Unit, each handling different input channels.
See also: Input Reactor — full extension guide with examples.
Mover Component
Template: Mover
Creates a Mover component that drives an entity’s movement each tick. Activates when GS_MoverContextComponent switches to the matching mode name, then calls HandleMovement() and HandleRotation() while active.
Two base classes available via --input-var:
| Option | Base Class | Movement Drive | Physics Required |
|---|
| Physics Mover (default) | GS_PhysicsMoverComponent | rigidBody linear/angular velocity, post-simulate tick | Yes — PhysicsRigidBodyService |
| Base Mover | GS_MoverComponent | TransformBus world translation, AZ::TickBus | No |
Generated files (Physics Mover):
Source/${Name}PhysicsMoverComponent.h/.cpp
Generated files (Base Mover):
Source/${Name}MoverComponent.h/.cpp
CLI:
# Physics Mover (default):
python ClassWizard.py --template Mover --gem <GemPath> --name <Name> \
--input-var mover_base="Physics Mover"
# Base Mover:
python ClassWizard.py --template Mover --gem <GemPath> --name <Name> \
--input-var mover_base="Base Mover"
Post-generation:
- Set
m_moveModeName and m_rotateModeName strings in Activate() to match the mode names configured in your MoverContext. - Implement
HandleMovement() and HandleRotation(). The Physics Mover template comes pre-filled with spring-damper stubs using AccelerationSpringDamper and QuaternionSpringDamper. - In
CheckCanOperate(), lazy-fetch any additional context pointers your mover needs. - One Mover per movement mode. All Mover components on a Unit Entity coexist — the MoverContext activates only the matching one at a time.
See also: Movers — full mover architecture and extension guide with code examples.
Grounder Component
Template: Grounder
Creates a Grounder component that determines ground state (Falling / Grounded / Sliding) each tick and reports it back to GS_MoverContextComponent. Active when the MoverContext switches to the matching grounding mode name.
Two base classes available via --input-var:
| Option | Base Class | Detection | Extras |
|---|
| Physics Ray Grounder (default) | GS_PhysicsRayGrounderComponent | Downward raycast from base class | Coyote time, spring position correction, gravity application |
| Base Grounder | GS_GrounderComponent | Bring your own detection | Tick only |
Generated files (Physics Ray Grounder):
Source/${Name}PhysicsRayGrounderComponent.h/.cpp
Generated files (Base Grounder):
Source/${Name}GrounderComponent.h/.cpp
CLI:
# Physics Ray Grounder (default):
python ClassWizard.py --template Grounder --gem <GemPath> --name <Name> \
--input-var grounder_base="Physics Ray Grounder"
# Base Grounder:
python ClassWizard.py --template Grounder --gem <GemPath> --name <Name> \
--input-var grounder_base="Base Grounder"
Post-generation:
- Set
m_groundModeName in Activate(). - For Physics Ray Grounder: The base class handles the raycast, spring correction, and gravity. Override
HandleGrounding() and GroundingStateChange() only to add custom reactions — call the base first. - For Base Grounder: Implement
HandleGrounding() with your detection method. Call GroundingStateChange(0/1/2) when state changes (0 = Falling, 1 = Grounded, 2 = Sliding), and SetGroundNormal() on the MoverContext when on a surface. - Typically one grounder per unit type. Swap the grounder via mode name for units that switch between ground-based and other locomotion.
See also: Grounders — full grounder architecture and extension guide with code examples.
See Also
For the full API, component properties, and C++ extension guide:
For all ClassWizard templates across GS_Play gems:
Get GS_Unit
GS_Unit — Explore this gem on the product page and add it to your project.
15.6 - 3rd Party Implementations
For usage guides and setup examples, see The Basics: GS_Unit.
Get GS_Unit
GS_Unit — Explore this gem on the product page and add it to your project.
16 - 3rd Party API
API for 3rd party support.
How to handle 3rd party support.